Moment SUBARU FORESTER 2017 SJ / 4.G Owners Manual
[x] Cancel search | Manufacturer: SUBARU, Model Year: 2017, Model line: FORESTER, Model: SUBARU FORESTER 2017 SJ / 4.GPages: 634, PDF Size: 11.77 MB
Page 149 of 634
Keys and doors/Moonroof
vehicle. Failure to follow this
procedure could result in injury
to a child operating the moon-
roof.
. Never try to check the anti-en-
trapment function by deliberately
placing part of your body in the
moonroof.
CAUTION
. Do not sit on the edge of the open
moonroof.
. Do not operate the moonroof if
falling snow or extremely cold
conditions have caused it to
freeze shut.
. Do not touch the moving parts of
the moonroof while the moonroof
is operating.
. If the moonroof does not close,
we recommend that you have the
system checked by a SUBARU
dealer.
The moonroof operates only when the
ignition switch is in the “ON ”position.
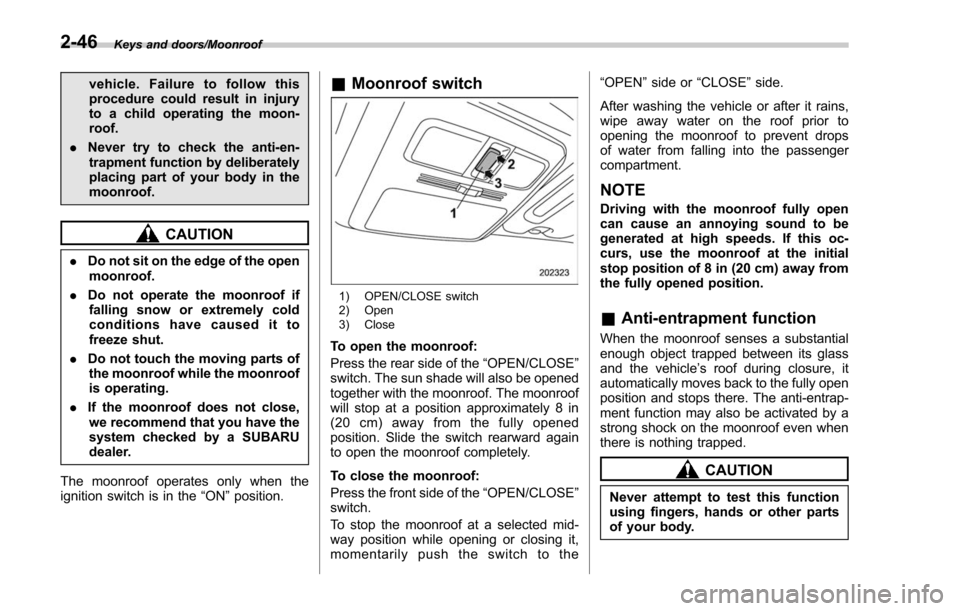
& Moonroof switch
1) OPEN/CLOSE switch
2) Open
3) Close
To open the moonroof:
Press the rear side of the “OPEN/CLOSE ”
switch. The sun shade will also be opened
together with the moonroof. The moonroof
will stop at a position approximately 8 in
(20 cm) away from the fully opened
position. Slide the switch rearward again
to open the moonroof completely.
To close the moonroof:
Press the front side of the “OPEN/CLOSE ”
switch.
To stop the moonroof at a selected mid-
way position while opening or closing it,
momentarily push the switch to the “OPEN
”side or “CLOSE ”side.
After washing the vehicle or after it rains,
wipe away water on the roof prior to
opening the moonroof to prevent drops
of water from falling into the passenger
compartment.
NOTE
Driving with the moonroof fully open
can cause an annoying sound to be
generated at high speeds. If this oc-
curs, use the moonroof at the initial
stop position of 8 in (20 cm) away from
the fully opened position.
& Anti-entrapment function
When the moonroof senses a substantial
enough object trapped between its glass
and the vehicle’ s roof during closure, it
automatically moves back to the fully open
position and stops there. The anti-entrap-
ment function may also be activated by a
strong shock on the moonroof even when
there is nothing trapped.
CAUTION
Never attempt to test this function
using fingers, hands or other parts
of your body.
2-46
Page 188 of 634
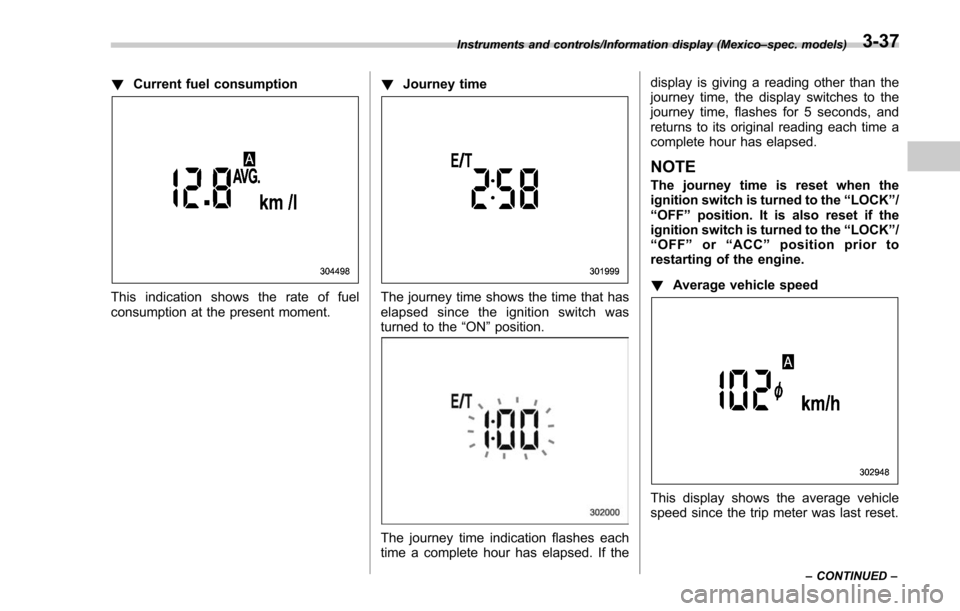
!Current fuel consumption
This indication shows the rate of fuel
consumption at the present moment. !
Journey timeThe journey time shows the time that has
elapsed since the ignition switch was
turned to the “ON”position.
The journey time indication flashes each
time a complete hour has elapsed. If the display is giving a reading other than the
journey time, the display switches to the
journey time, flashes for 5 seconds, and
returns to its original reading each time a
complete hour has elapsed.
NOTE
The journey time is reset when the
ignition switch is turned to the
“LOCK ”/
“ OFF ”position. It is also reset if the
ignition switch is turned to the “LOCK ”/
“ OFF ”or “ACC” position prior to
restarting of the engine.
! Average vehicle speed
This display shows the average vehicle
speed since the trip meter was last reset.
Instruments and controls/Information display (Mexico –spec. models)
–CONTINUED –3-37
Page 293 of 634
Audio/Audio set
&Tips for operating the audio/
visual system
CAUTION
To avoid damage to the audio/visual
system:
. Be careful not to spill beverages
over the audio/visual system.
. Do not put anything other than an
appropriate disc into the disc
slot.
NOTE
The use of a cell phone inside or near
the vehicle may cause a noise from the
speakers of the audio/visual system
which you are listening to. However,
this does not indicate a malfunction.
! Radio
Usually, a problem with radio reception
does not mean there is a problem with the
radio —it is just the normal result of
conditions outside the vehicle.
For example, nearby buildings and terrain
can interfere with FM reception. Power
lines or phone wires can interfere with AM
signals. And of course, radio signals have
a limited range. The farther the vehicle is from a station, the weaker its signal will
be. In addition, reception conditions
change constantly as the vehicle moves.
Here, some common reception problems
that probably do not indicate a problem
with the radio are described.
!FM
Fading and drifting stations: Generally, the
effective range of FM is about 25 miles (40
km). Once outside this range, you may
notice fading and drifting, which increase
with the distance from the radio transmit-
ter. They are often accompanied by
distortion.
Multi-path: FM signals are reflective,
making it possible for 2 signals to reach
the vehicle’ s antenna at the same time. If
this happens, the signals will cancel each
other out, causing a momentary flutter or
loss of reception.
Static and fluttering: These occur when
signals are blocked by buildings, trees or
other large objects. Increasing the bass
level may reduce static and fluttering.
Station swapping: If the FM signal being
listened to is interrupted or weakened, and
there is another strong station nearby on
the FM band, the radio may tune in the
second station until the original signal can
be picked up again. !
AM
Fading: AM broadcasts are reflected by
the upper atmosphere —especially at
night. These reflected signals can inter-
fere with those received directly from the
radio station, causing the radio station to
sound alternately strong and weak.
Station interference: When a reflected
signal and a signal received directly from
a radio station are very nearly the same
frequency, they can interfere with each
other, making it difficult to hear the broad-
cast.
Static: AM is easily affected by external
sources of electrical noise, such as high
tension power lines, lightening or electrical
motors. This results in static.
!SiriusXM (if equipped)
. Cargo loaded on the roof luggage
carrier, especially metal objects, may
adversely affect the reception of SiriusXM
Satellite Radio.
. Alternation or modifications carried out
without appropriate authorization may in-
validate the user ’s right to operate the
equipment.
5-6
Page 314 of 634
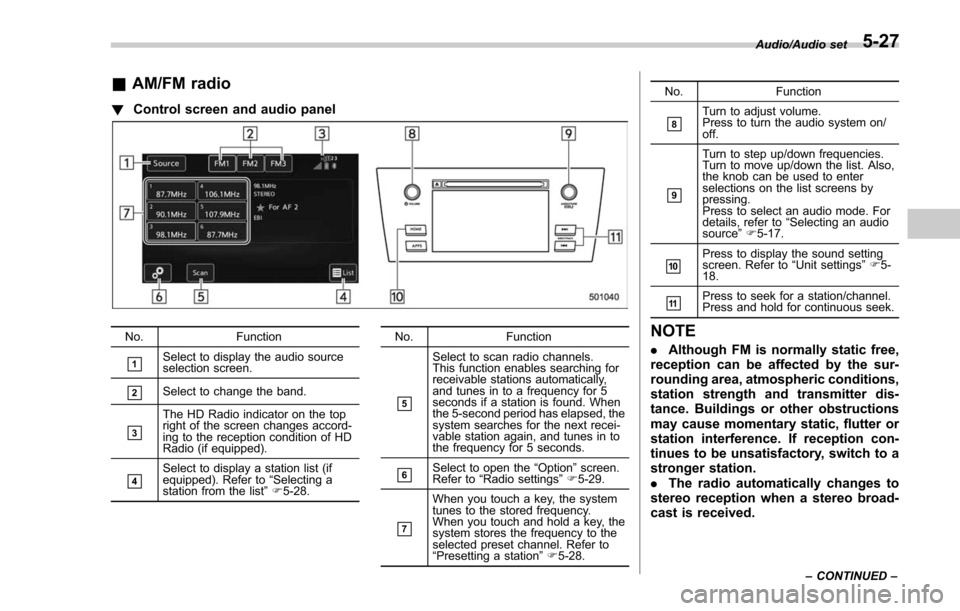
&AM/FM radio
! Control screen and audio panel
No. Function
&1Select to display the audio source
selection screen.
&2Select to change the band.
&3
The HD Radio indicator on the top
right of the screen changes accord-
ing to the reception condition of HD
Radio (if equipped).
&4Select to display a station list (if
equipped). Refer to“Selecting a
station from the list ”F 5-28. No. Function
&5
Select to scan radio channels.
This function enables searching for
receivable stations automatically,
and tunes in to a frequency for 5
seconds if a station is found. When
the 5-second period has elapsed, the
system searches for the next recei-
vable station again, and tunes in to
the frequency for 5 seconds.
&6Select to open the
“Option ”screen.
Refer to “Radio settings ”F 5-29.
&7
When you touch a key, the system
tunes to the stored frequency.
When you touch and hold a key, the
system stores the frequency to the
selected preset channel. Refer to
“Presetting a station ”F 5-28. No. Function
&8Turn to adjust volume.
Press to turn the audio system on/
off.
&9
Turn to step up/down frequencies.
Turn to move up/down the list. Also,
the knob can be used to enter
selections on the list screens by
pressing.
Press to select an audio mode. For
details, refer to
“Selecting an audio
source ”F 5-17.
&10Press to display the sound setting
screen. Refer to “Unit settings ”F 5-
18.
&11Press to seek for a station/channel.
Press and hold for continuous seek.
NOTE
. Although FM is normally static free,
reception can be affected by the sur-
rounding area, atmospheric conditions,
station strength and transmitter dis-
tance. Buildings or other obstructions
may cause momentary static, flutter or
station interference. If reception con-
tinues to be unsatisfactory, switch to a
stronger station.
. The radio automatically changes to
stereo reception when a stereo broad-
cast is received.
Audio/Audio set
–CONTINUED –5-27
Page 321 of 634
Audio/Audio set
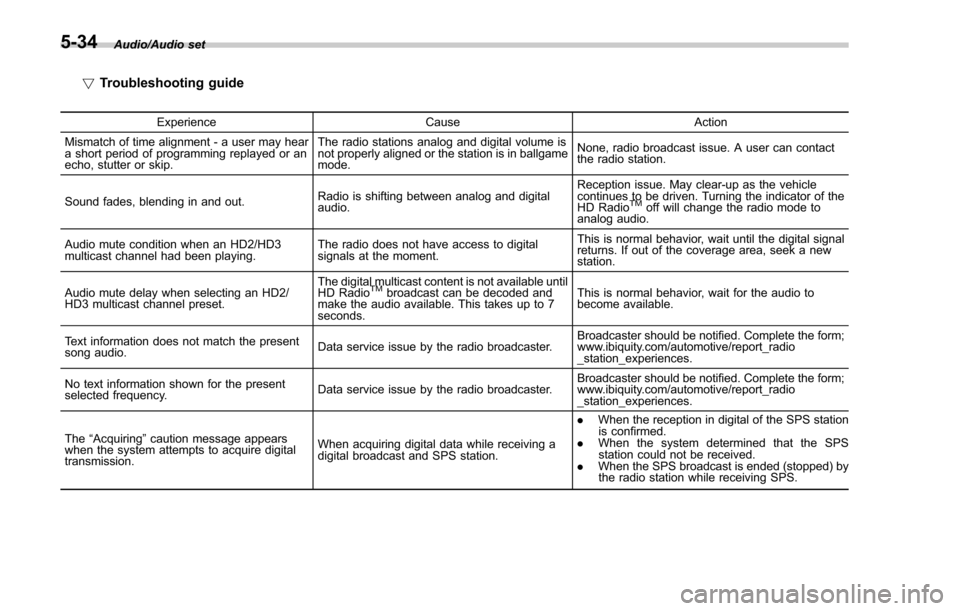
!Troubleshooting guide
Experience CauseAction
Mismatch of time alignment - a user may hear
a short period of programming replayed or an
echo, stutter or skip. The radio stations analog and digital volume is
not properly aligned or the station is in ballgame
mode.
None, radio broadcast issue. A user can contact
the radio station.
Sound fades, blending in and out. Radio is shifting between analog and digital
audio. Reception issue. May clear-up as the vehicle
continues to be driven. Turning the indicator of the
HD Radio
TMoff will change the radio mode to
analog audio.
Audio mute condition when an HD2/HD3
multicast channel had been playing. The radio does not have access to digital
signals at the moment. This is normal behavior, wait until the digital signal
returns. If out of the coverage area, seek a new
station.
Audio mute delay when selecting an HD2/
HD3 multicast channel preset. The digital multicast content is not available until
HD Radio
TMbroadcast can be decoded and
make the audio available. This takes up to 7
seconds. This is normal behavior, wait for the audio to
become available.
Text information does not match the present
song audio. Data service issue by the radio broadcaster. Broadcaster should be notified. Complete the form;
www.ibiquity.com/automotive/report_radio
_station_experiences.
No text information shown for the present
selected frequency. Data service issue by the radio broadcaster. Broadcaster should be notified. Complete the form;
www.ibiquity.com/automotive/report_radio
_station_experiences.
The “Acquiring ”caution message appears
when the system attempts to acquire digital
transmission. When acquiring digital data while receiving a
digital broadcast and SPS station. .
When the reception in digital of the SPS station
is confirmed.
. When the system determined that the SPS
station could not be received.
. When the SPS broadcast is ended (stopped) by
the radio station while receiving SPS.
5-34
Page 392 of 634
NOTE
When the lid of the center console is
closed, an opening remains between
the center console and the lid to allow
the power outlet in the center console
to be used. Pass the cord of the
electrical appliance through this open-
ing.
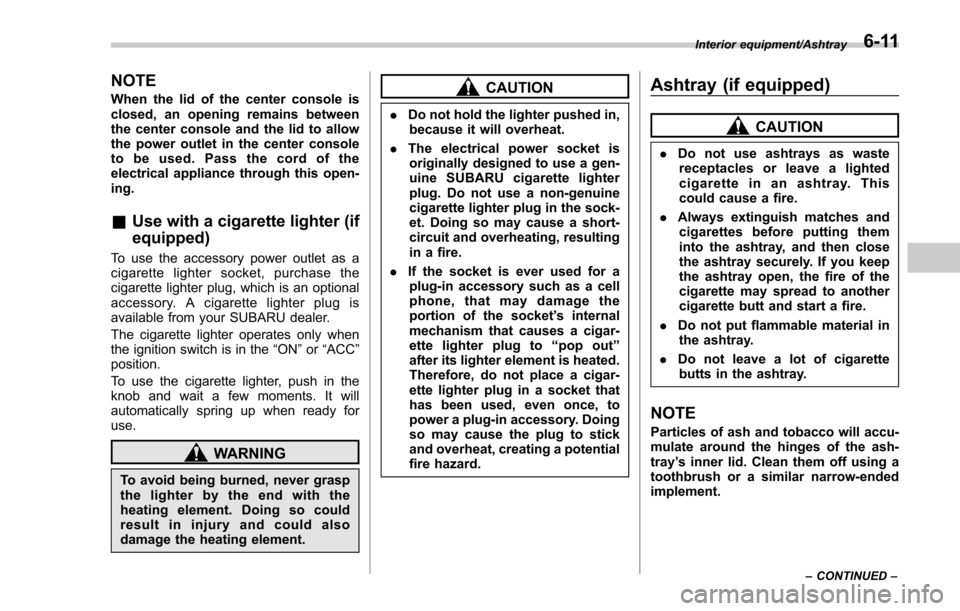
&Use with a cigarette lighter (if
equipped)
To use the accessory power outlet as a
cigarette lighter socket, purchase the
cigarette lighter plug, which is an optional
accessory. A cigarette lighter plug is
available from your SUBARU dealer.
The cigarette lighter operates only when
the ignition switch is in the “ON”or “ACC ”
position.
To use the cigarette lighter, push in the
knob and wait a few moments. It will
automatically spring up when ready for
use.
WARNING
To avoid being burned, never grasp
the lighter by the end with the
heating element. Doing so could
result in injury and could also
damage the heating element.
CAUTION
. Do not hold the lighter pushed in,
because it will overheat.
. The electrical power socket is
originally designed to use a gen-
uine SUBARU cigarette lighter
plug. Do not use a non-genuine
cigarette lighter plug in the sock-
et. Doing so may cause a short-
circuit and overheating, resulting
in a fire.
. If the socket is ever used for a
plug-in accessory such as a cell
phone, that may damage the
portion of the socket ’s internal
mechanism that causes a cigar-
ette lighter plug to “pop out ”
after its lighter element is heated.
Therefore, do not place a cigar-
ette lighter plug in a socket that
has been used, even once, to
power a plug-in accessory. Doing
so may cause the plug to stick
and overheat, creating a potential
fire hazard.
Ashtray (if equipped)
CAUTION
. Do not use ashtrays as waste
receptacles or leave a lighted
cigarette in an ashtray. This
could cause a fire.
. Always extinguish matches and
cigarettes before putting them
into the ashtray, and then close
the ashtray securely. If you keep
the ashtray open, the fire of the
cigarette may spread to another
cigarette butt and start a fire.
. Do not put flammable material in
the ashtray.
. Do not leave a lot of cigarette
butts in the ashtray.
NOTE
Particles of ash and tobacco will accu-
mulate around the hinges of the ash-
tray ’s inner lid. Clean them off using a
toothbrush or a similar narrow-ended
implement.
Interior equipment/Ashtray
–CONTINUED –6-11
Page 425 of 634
Starting and operating/Manual transmission
NOTE
.This device complies with Part 15 of
the FCC Rules and with RSS-210 of
Industry Canada. Operation is subject
to the following two conditions: (1) This
device may not cause harmful inter-
ference, and (2) this device must
accept any interference received, in-
cluding interference that may cause
undesired operation.
Changes or modifications not ex-
pressly approved by the party respon-
sible for compliance could void the
user ’s authority to operate the equip-
ment and void warranty.
. To comply with the FCC RF expo-
sure compliance requirements, no
change to the antenna or the device is
permitted. Any change to the antenna
or the device could result in the device
exceeding the RF exposure require-
ments and void user ’sauthorityto
operate the device.Manual transmission
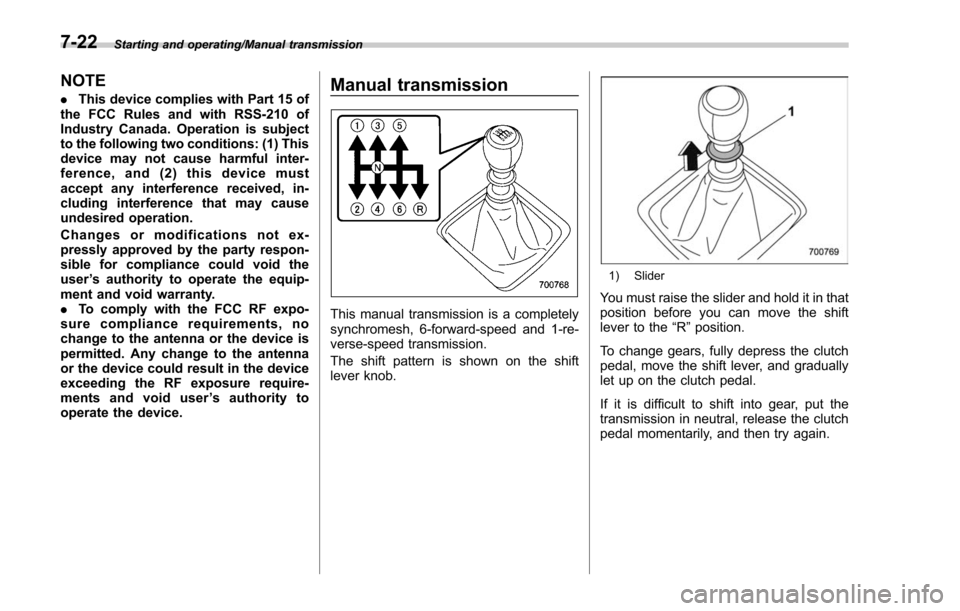
This manual transmission is a completely
synchromesh, 6-forward-speed and 1-re-
verse-speed transmission.
The shift pattern is shown on the shift
lever knob.
1) Slider
You must raise the slider and hold it in that
position before you can move the shift
lever to the “R”position.
To change gears, fully depress the clutch
pedal, move the shift lever, and gradually
let up on the clutch pedal.
If it is difficult to shift into gear, put the
transmission in neutral, release the clutch
pedal momentarily, and then try again.
7-22
Page 458 of 634
&To temporarily cancel the
cruise control
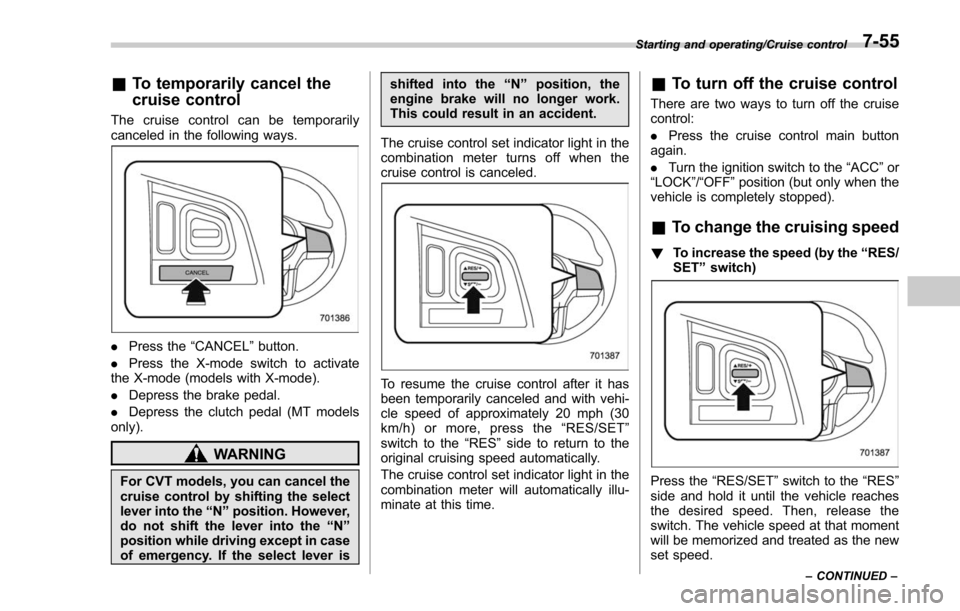
The cruise control can be temporarily
canceled in the following ways.
. Press the “CANCEL”button.
. Press the X-mode switch to activate
the X-mode (models with X-mode).
. Depress the brake pedal.
. Depress the clutch pedal (MT models
only).
WARNING
For CVT models, you can cancel the
cruise control by shifting the select
lever into the “N ” position. However,
do not shift the lever into the “N ”
position while driving except in case
of emergency. If the select lever is shifted into the
“N ” position, the
engine brake will no longer work.
This could result in an accident.
The cruise control set indicator light in the
combination meter turns off when the
cruise control is canceled.
To resume the cruise control after it has
been temporarily canceled and with vehi-
cle speed of approximately 20 mph (30
km/h) or more, press the “RES/SET ”
switch to the “RES ”side to return to the
original cruising speed automatically.
The cruise control set indicator light in the
combination meter will automatically illu-
minate at this time.
& To turn off the cruise control
There are two ways to turn off the cruise
control:
. Press the cruise control main button
again.
. Turn the ignition switch to the “ACC”or
“ LOCK ”/“OFF ”position (but only when the
vehicle is completely stopped).
& To change the cruising speed
! To increase the speed (by the “RES/
SET ”switch)
Press the “RES/SET ”switch to the “RES”
side and hold it until the vehicle reaches
the desired speed. Then, release the
switch. The vehicle speed at that moment
will be memorized and treated as the new
set speed.
Starting and operating/Cruise control
–CONTINUED –7-55
Page 460 of 634
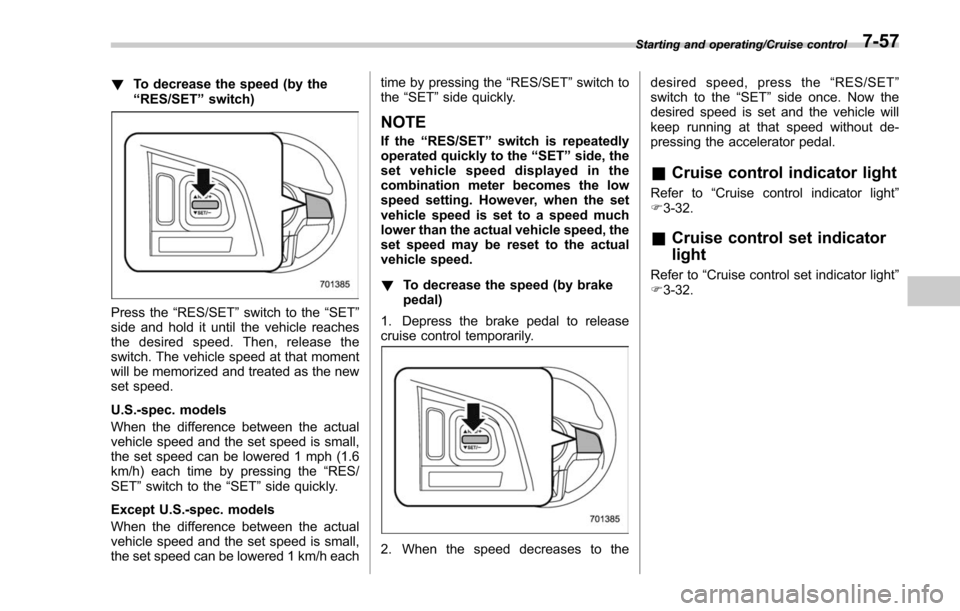
!To decrease the speed (by the
“RES/SET ”switch)
Press the “RES/SET”switch to the “SET”
side and hold it until the vehicle reaches
the desired speed. Then, release the
switch. The vehicle speed at that moment
will be memorized and treated as the new
set speed.
U.S.-spec. models
When the difference between the actual
vehicle speed and the set speed is small,
the set speed can be lowered 1 mph (1.6
km/h) each time by pressing the “RES/
SET ”switch to the “SET”side quickly.
Except U.S.-spec. models
When the difference between the actual
vehicle speed and the set speed is small,
the set speed can be lowered 1 km/h each time by pressing the
“RES/SET”switch to
the “SET ”side quickly.
NOTE
If the “RES/SET ”switch is repeatedly
operated quickly to the “SET ”side, the
set vehicle speed displayed in the
combination meter becomes the low
speed setting. However, when the set
vehicle speed is set to a speed much
lower than the actual vehicle speed, the
set speed may be reset to the actual
vehicle speed.
! To decrease the speed (by brake
pedal)
1. Depress the brake pedal to release
cruise control temporarily.
2. When the speed decreases to the desired speed, press the
“RES/SET ”
switch to the “SET”side once. Now the
desired speed is set and the vehicle will
keep running at that speed without de-
pressing the accelerator pedal.
& Cruise control indicator light
Refer to “Cruise control indicator light ”
F 3-32.
& Cruise control set indicator
light
Refer to “Cruise control set indicator light ”
F 3-32.
Starting and operating/Cruise control7-57