change wheel SUBARU FORESTER 2017 SJ / 4.G Owners Manual
[x] Cancel search | Manufacturer: SUBARU, Model Year: 2017, Model line: FORESTER, Model: SUBARU FORESTER 2017 SJ / 4.GPages: 634, PDF Size: 11.77 MB
Page 171 of 634
Instruments and controls/Warning and indicator lights
as the malfunction exists. When the
malfunction indicator is illuminated, the
system may not be able to detect or signal
low tire pressure as intended. TPMS
malfunctions may occur for a variety of
reasons, including the installation of re-
placement or alternate tires or wheels on
the vehicle that prevent the TPMS from
functioning properly. Always check the
TPMS malfunction telltale after replacing
one or more tires or wheels on your
vehicle to ensure that the replacement or
alternate tires and wheels allow the TPMS
to continue to function properly.
Should the warning light illuminate stea-
dily after blinking for approximately one
minute, have the system inspected by
your nearest SUBARU dealer as soon as
possible.
WARNING
If this light does not illuminate
briefly after the ignition switch is
turned ON or the light illuminates
steadily after blinking for approxi-
mately one minute, you should have
your Tire Pressure Monitoring Sys-
tem checked at a SUBARU dealer as
soon as possible.
If this light illuminates while driving,
never brake suddenly and keepdriving straight ahead while gradu-
ally reducing speed. Then slowly
pull off the road to a safe place.
Otherwise an accident involving
serious vehicle damage and serious
personal injury could occur.
If this light still illuminates while
driving after adjusting the tire pres-
sure, a tire may have significant
damage and a fast leak that causes
the tire to lose air rapidly. If you have
a flat tire, replace it with a spare tire
as soon as possible.
When a spare tire is mounted or a
wheel rim is replaced without the
original pressure sensor/transmitter
being transferred, the Low tire pres-
sure warning light will illuminate
steadily after blinking for approxi-
mately one minute. This indicates
the TPMS is unable to monitor all
four road wheels. Contact your
SUBARU dealer as soon as possible
for tire and sensor replacement and/
or system resetting.
If the light illuminates steadily after
blinking for approximately one min-
ute, promptly contact a SUBARU
dealer to have the system inspected.
CAUTION
The tire pressure monitoring system
is NOT a substitute for manually
checking tire pressure. The tire
pressure should be checked peri-
odically (at least monthly) using a
tire gauge. After any change to tire
pressure(s), the tire pressure mon-
itoring system will not re-check tire
inflation pressures until the vehicle
is first driven more than 25 mph (40
km/h). After adjusting the tire pres-
sures, increase the vehicle speed to
at least 25 mph (40 km/h) to start the
TPMS re-checking of the tire infla-
tion pressures. If the tire pressures
are now above the severe low
pressure threshold, the low tire
pressure warning light should turn
off a few minutes later. Therefore, be
sure to install the specified size for
the front and rear tires.
3-20
Page 192 of 634
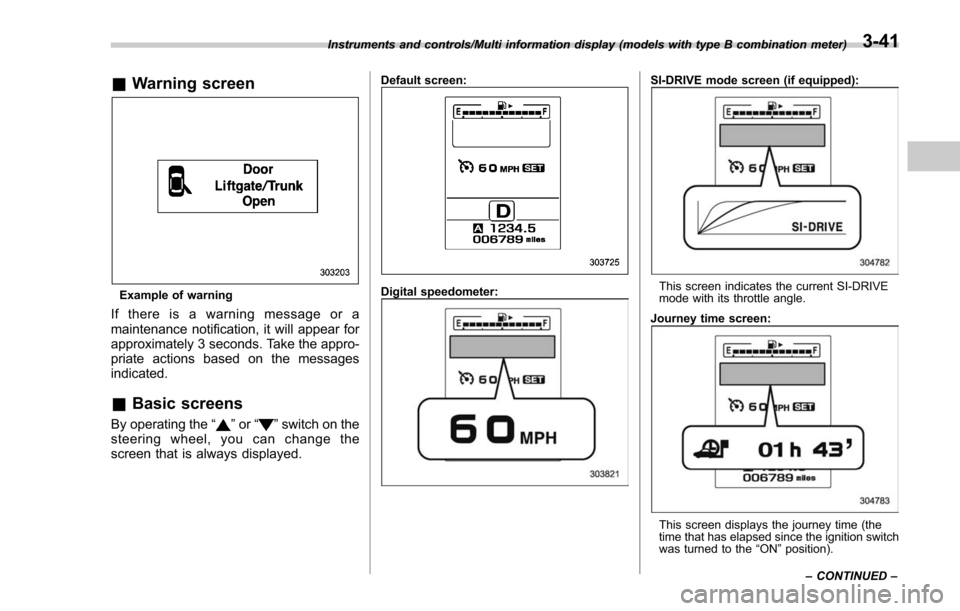
&Warning screen
Example of warning
If there is a warning message or a
maintenance notification, it will appear for
approximately 3 seconds. Take the appro-
priate actions based on the messages
indicated.
&Basic screens
By operating the “”or “”switch on the
steering wheel, you can change the
screen that is always displayed.
Default screen:
Digital speedometer:
SI-DRIVE mode screen (if equipped):
This screen indicates the current SI-DRIVE
mode with its throttle angle.
Journey time screen:
This screen displays the journey time (the
time that has elapsed since the ignition switch
was turned to the “ON ”position).
Instruments and controls/Multi information display (models with type B combination meter)
–CONTINUED –
3-41
Page 359 of 634
Audio/Hands–free phone system
& Registering/connecting a
Bluetooth phone
To use the hands-free system for cell
phones, it is necessary to register a cell
phone with the system. Refer to “Register-
ing/connecting Bluetooth
®device ”F 5-65.
! Bluetooth phone condition display
The condition of the Bluetooth phone
appears on the upper right side of the
screen.
& Using the phone switch/mi-
crophone
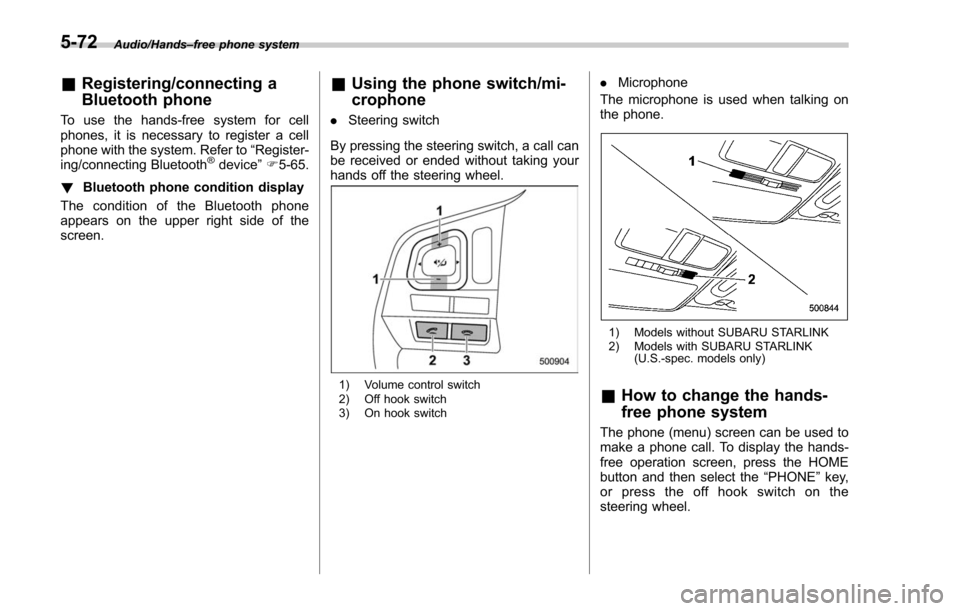
. Steering switch
By pressing the steering switch, a call can
be received or ended without taking your
hands off the steering wheel.
1) Volume control switch
2) Off hook switch
3) On hook switch
. Microphone
The microphone is used when talking on
the phone.
1) Models without SUBARU STARLINK
2) Models with SUBARU STARLINK (U.S.-spec. models only)
&How to change the hands-
free phone system
The phone (menu) screen can be used to
make a phone call. To display the hands-
free operation screen, press the HOME
button and then select the “PHONE”key,
or press the off hook switch on the
steering wheel.
5-72
Page 363 of 634
Audio/Hands–free phone system
No. Function
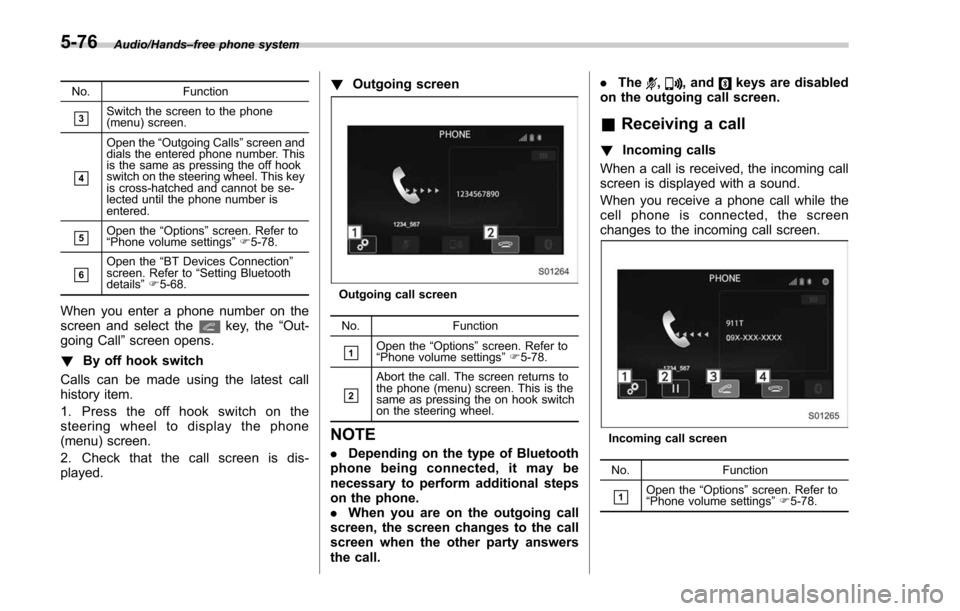
&3Switch the screen to the phone
(menu) screen.
&4
Open the“Outgoing Calls ”screen and
dials the entered phone number. This
is the same as pressing the off hook
switch on the steering wheel. This key
is cross-hatched and cannot be se-
lected until the phone number is
entered.
&5Open the “Options ”screen. Refer to
“ Phone volume settings ”F 5-78.
&6Open the “BT Devices Connection ”
screen. Refer to “Setting Bluetooth
details ”F 5-68.
When you enter a phone number on the
screen and select thekey, the “Out-
going Call ”screen opens.
! By off hook switch
Calls can be made using the latest call
history item.
1. Press the off hook switch on the
steering wheel to display the phone
(menu) screen.
2. Check that the call screen is dis-
played. !
Outgoing screen
Outgoing call screen
No. Function
&1Open the “Options ”screen. Refer to
“ Phone volume settings ”F 5-78.
&2
Abort the call. The screen returns to
the phone (menu) screen. This is the
same as pressing the on hook switch
on the steering wheel.
NOTE
. Depending on the type of Bluetooth
phone being connected, it may be
necessary to perform additional steps
on the phone.
. When you are on the outgoing call
screen, the screen changes to the call
screen when the other party answers
the call. .
The
,, andkeys are disabled
on the outgoing call screen.
& Receiving a call
! Incoming calls
When a call is received, the incoming call
screen is displayed with a sound.
When you receive a phone call while the
cell phone is connected, the screen
changes to the incoming call screen.
Incoming call screen
No. Function
&1Open the“Options ”screen. Refer to
“ Phone volume settings ”F 5-78.
5-76
Page 364 of 634
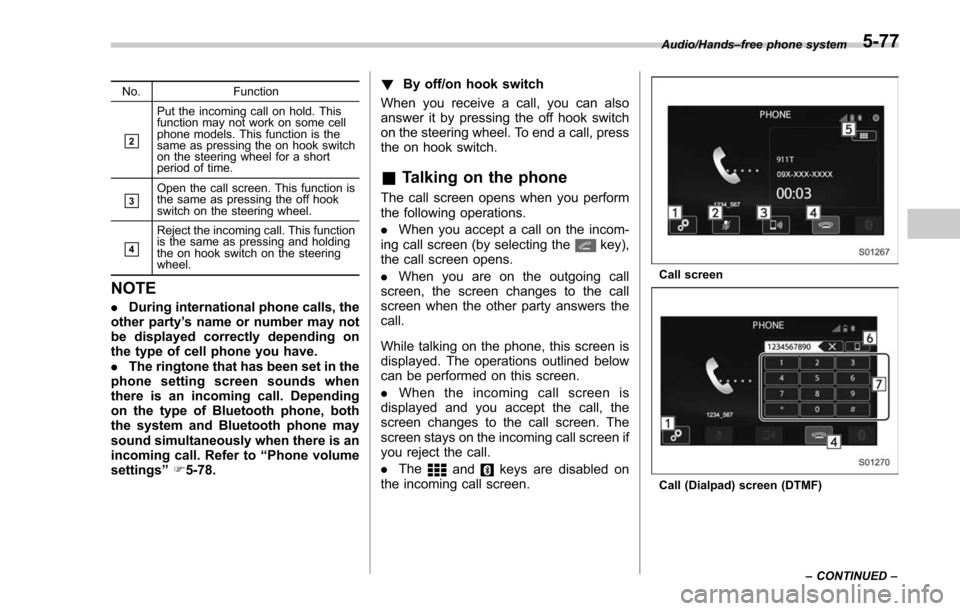
No.Function
&2
Put the incoming call on hold. This
function may not work on some cell
phone models. This function is the
same as pressing the on hook switch
on the steering wheel for a short
period of time.
&3Open the call screen. This function is
the same as pressing the off hook
switch on the steering wheel.
&4
Reject the incoming call. This function
is the same as pressing and holding
the on hook switch on the steering
wheel.
NOTE
.During international phone calls, the
other party’ s name or number may not
be displayed correctly depending on
the type of cell phone you have.
. The ringtone that has been set in the
phone setting screen sounds when
there is an incoming call. Depending
on the type of Bluetooth phone, both
the system and Bluetooth phone may
sound simultaneously when there is an
incoming call. Refer to “Phone volume
settings ”F 5-78. !
By off/on hook switch
When you receive a call, you can also
answer it by pressing the off hook switch
on the steering wheel. To end a call, press
the on hook switch.
& Talking on the phone
The call screen opens when you perform
the following operations.
. When you accept a call on the incom-
ing call screen (by selecting the
key),
the call screen opens.
. When you are on the outgoing call
screen, the screen changes to the call
screen when the other party answers the
call.
While talking on the phone, this screen is
displayed. The operations outlined below
can be performed on this screen.
. When the incoming call screen is
displayed and you accept the call, the
screen changes to the call screen. The
screen stays on the incoming call screen if
you reject the call.
. The
andkeys are disabled on
the incoming call screen.
Call screen
Call (Dialpad) screen (DTMF) Audio/Hands
–free phone system
–CONTINUED –
5-77
Page 365 of 634
Audio/Hands–free phone system
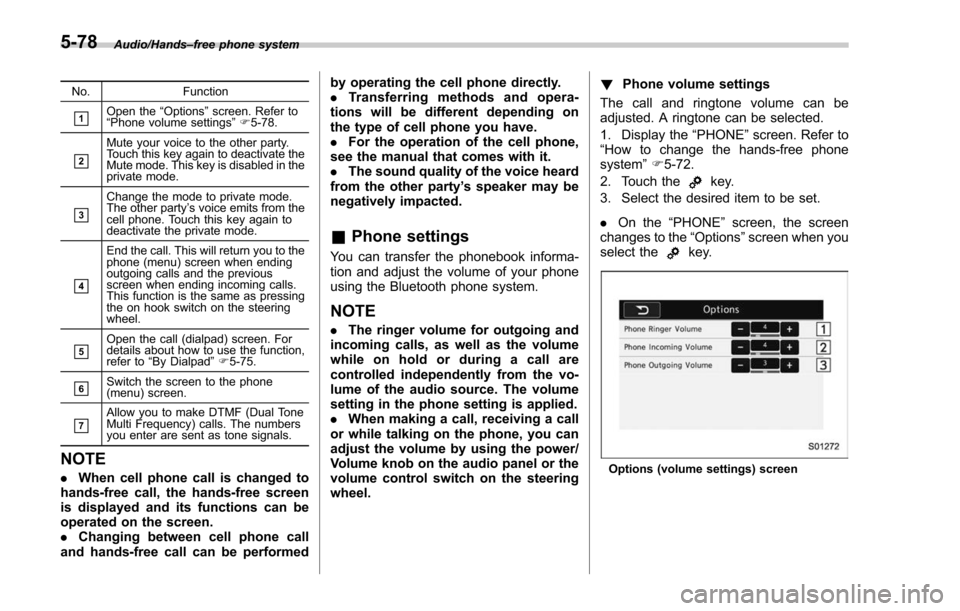
No. Function
&1Open the“Options ”screen. Refer to
“ Phone volume settings ”F 5-78.
&2
Mute your voice to the other party.
Touch this key again to deactivate the
Mute mode. This key is disabled in the
private mode.
&3
Change the mode to private mode.
The other party ’s voice emits from the
cell phone. Touch this key again to
deactivate the private mode.
&4
End the call. This will return you to the
phone (menu) screen when ending
outgoing calls and the previous
screen when ending incoming calls.
This function is the same as pressing
the on hook switch on the steering
wheel.
&5Open the call (dialpad) screen. For
details about how to use the function,
refer to “By Dialpad ”F 5-75.
&6Switch the screen to the phone
(menu) screen.
&7Allow you to make DTMF (Dual Tone
Multi Frequency) calls. The numbers
you enter are sent as tone signals.
NOTE
. When cell phone call is changed to
hands-free call, the hands-free screen
is displayed and its functions can be
operated on the screen.
. Changing between cell phone call
and hands-free call can be performed by operating the cell phone directly.
.
Transferring methods and opera-
tions will be different depending on
the type of cell phone you have.
. For the operation of the cell phone,
see the manual that comes with it.
. The sound quality of the voice heard
from the other party’ s speaker may be
negatively impacted.
& Phone settings
You can transfer the phonebook informa-
tion and adjust the volume of your phone
using the Bluetooth phone system.
NOTE
. The ringer volume for outgoing and
incoming calls, as well as the volume
while on hold or during a call are
controlled independently from the vo-
lume of the audio source. The volume
setting in the phone setting is applied.
. When making a call, receiving a call
or while talking on the phone, you can
adjust the volume by using the power/
Volume knob on the audio panel or the
volume control switch on the steering
wheel. !
Phone volume settings
The call and ringtone volume can be
adjusted. A ringtone can be selected.
1. Display the “PHONE ”screen. Refer to
“How to change the hands-free phone
system ”F 5-72.
2. Touch the
key.
3. Select the desired item to be set.
. On the “PHONE ”screen, the screen
changes to the “Options ”screen when you
select the
key.
Options (volume settings) screen
5-78
Page 369 of 634
Audio/Voice command system
&Voice command system op-
eration
1. Press the talk switch on the steering
wheel.
After the voice command top screen has
been displayed, speech guidance will
commence.
NOTE
When the voice command mode is
audio mode, voice guidance for the
voice command system can be skipped
by pressing the talk switch on the
steering wheel.
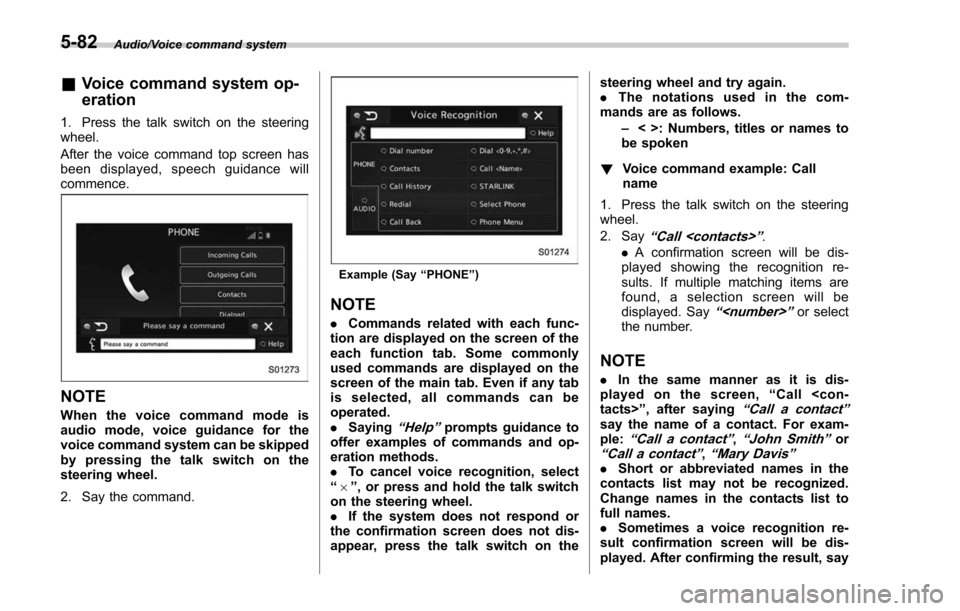
2. Say the command.
Example (Say “PHONE ”)
NOTE
. Commands related with each func-
tion are displayed on the screen of the
each function tab. Some commonly
used commands are displayed on the
screen of the main tab. Even if any tab
is selected, all commands can be
operated.
. Saying
“Help ”prompts guidance to
offer examples of commands and op-
eration methods.
. To cancel voice recognition, select
“ 6 ”, or press and hold the talk switch
on the steering wheel.
. If the system does not respond or
the confirmation screen does not dis-
appear, press the talk switch on the steering wheel and try again.
.
The notations used in the com-
mands are as follows.
–< >: Numbers, titles or names to
be spoken
! Voice command example: Call
name
1. Press the talk switch on the steering
wheel.
2. Say
“ Call
. A confirmation screen will be dis-
played showing the recognition re-
sults. If multiple matching items are
found, a selection screen will be
displayed. Say
“
the number.
NOTE
. In the same manner as it is dis-
played on the screen, “Call
“Call a contact ”say the name of a contact. For exam-
ple:“Call a contact ”,“John Smith ”or“Call a contact ”,“Mary Davis ”.Short or abbreviated names in the
contacts list may not be recognized.
Change names in the contacts list to
full names.
. Sometimes a voice recognition re-
sult confirmation screen will be dis-
played. After confirming the result, say
5-82
Page 450 of 634
mitter being transferred, the low
tire pressure warning light will
illuminate steadily after blinking
for approximately one minute.
This indicates the TPMS is un-
able to monitor all four road
wheels. Contact your SUBARU
dealer as soon as possible for
tire and sensor replacement and/
or system resetting.
. Do not inject any tire liquid or
aerosol tire sealant into the tires,
as this may cause a malfunction
of the tire pressure sensors. If
the light illuminates steadily after
blinking for approximately one
minute, promptly contact a
SUBARU dealer to have the sys-
tem inspected.
CAUTION
. Do not place metal film or any
metal parts in the cargo area.
This may cause poor reception of
the signals from the tire pressure
sensors, and the tire pressure
monitoring system will not func-
tion properly.
. FCC WARNING
Changes or modifications not expressly approved by the party
responsible for compliance
could void the user
’s authority
to operate the equipment.
NOTE
This device complies with Part 15 of
the FCC Rules. Operation is subject to
the following two conditions:
. U.S.-spec. models
FCC ID: CWTWD1U781
NOTE
This device complies with Part 15 of
the FCC Rules. Operation is subject to
the following two conditions: (1) This
device may not cause harmful inter-
ference, and (2) this device must
accept any interference received, in-
cluding interference that may cause
undesired operation.
Parking your vehicle
& Parking brake
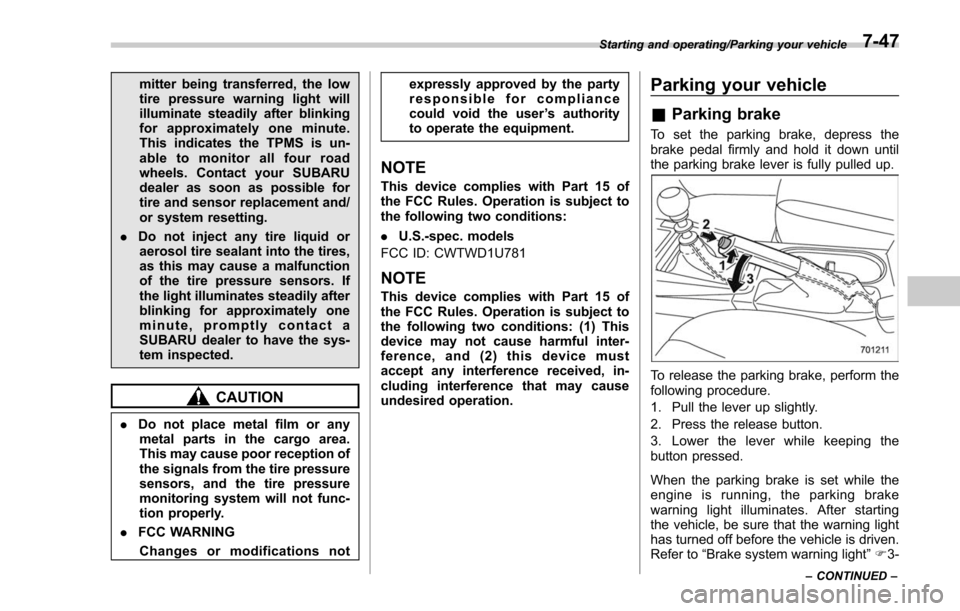
To set the parking brake, depress the
brake pedal firmly and hold it down until
the parking brake lever is fully pulled up.
To release the parking brake, perform the
following procedure.
1. Pull the lever up slightly.
2. Press the release button.
3. Lower the lever while keeping the
button pressed.
When the parking brake is set while the
engine is running, the parking brake
warning light illuminates. After starting
the vehicle, be sure that the warning light
has turned off before the vehicle is driven.
Refer to “Brake system warning light ”F 3-
Starting and operating/Parking your vehicle
–CONTINUED –7-47
Page 468 of 634
vehicle
–When using a chassis dynam-
ometer or free roller device, etc.
– When running the engine and
makingthewheelsrotatewhile
lifting up the vehicle
. If the ignition switch is turned to the
“ LOCK ”/“ OFF ”position, the last known
status of the system is maintained. For
example, if the ignition switch is turned
to the “LOCK ”/“ OFF ”position with the
BSD/RCTA deactivated, the BSD/RCTA
will remain deactivated the next time
the ignition switch is turned to the
“ ON ”position.
. If the vehicle battery is disconnected
due to situations such as battery
terminal or fuse replacement, after the
battery is reconnected, the BSD/RCTA
will be activated.
& Certification for the BSD/
RCTA
. U.S.-spec. models
FCC ID: OAYSRR2A
CAUTION
FCC WARNING
Changes or modifications not ex-
pressly approved by the party re- sponsible for compliance could void
the user
’s authority to operate the
equipment.
This device complies with part 15 of the
FCC Rules. Operation is subject to the
following two conditions: (1) This device
may not cause harmful interference, and
(2) this device must accept any interfer-
ence received, including interference that
may cause undesired operation.
. Canada-spec. models
This device complies with Industry
Canada licence-exempt RSS standard
(s). Operation is subject to the following
two conditions: (1) this device may not
cause interference, and (2) this device
must accept any interference, including
interference that may cause undesired
operation of the device.
Le présent appareil est conforme aux
CNR d ’Industrie Canada applicables aux
appareils radio exempts de licence. L ’ex-
ploitation est autorisée aux deux condi-
tions suivantes: (1) l ’appareil ne doit pas
produire de brouillage, et (2) l ’utilisateur
de l ’appareil doit accepter tout brouillage
radioélectrique subi, même si le brouillage
est susceptible d ’en compromettre le
fonctionnement.
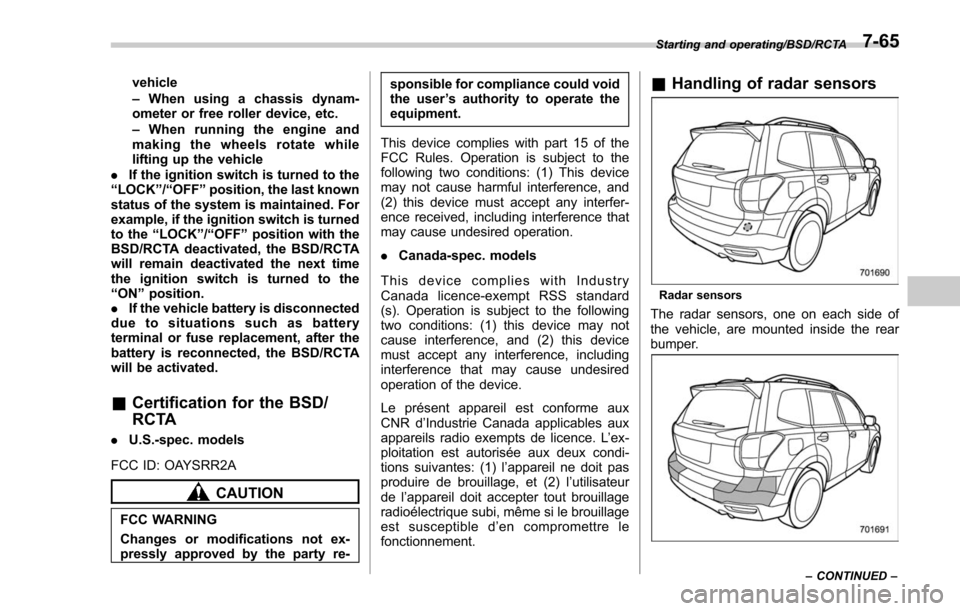
& Handling of radar sensors
Radar sensors
The radar sensors, one on each side of
the vehicle, are mounted inside the rear
bumper.
Starting and operating/BSD/RCTA
–CONTINUED –7-65
Page 501 of 634
Driving tips/Trailer towing
refer to“BSD/RCTA OFF switch ”
F 7-64.
. For models equipped with RAB
(Reverse Automatic Braking)
system, consult your SUBARU
dealer for additional information
about towing a trailer.
. Never exceed 45 mph (72 km/h)
when towing a trailer in hilly
country on hot days.
. When towing a trailer, steering,
stability, stopping distance and
braking performance will be dif-
ferent when compared to normal
operation. You should never
drive at excessive speeds but
always employ extra caution
when towing a trailer. You should
also keep the following tips in
mind.
! Before starting out on a trip
. Check that the vehicle and vehicle-to-
hitch mounting are in good condition. If
any problems are apparent, do not tow the
trailer.
. Check that the vehicle rests horizon-
tally with the trailer attached. If the vehicle
is tipped sharply up at the front and down
at the rear, check the total trailer weight,
GVW, GAWs and tongue load again, then confirm that the load and its distribution
are acceptable.
.
Check that the tire rating and pressures
are correct.
. Check that the vehicle and trailer are
connected properly. Confirm that:
–the trailer tongue is connected
properly to the hitch ball.
– the trailer lights connector is con-
nected properly and trailer ’sbrake
lights illuminate when the vehicle ’s
brake pedal is pressed, and that the
trailer ’s turn signal lights flash when
the vehicle’ s turn signal lever is oper-
ated.
– the safety chains are connected
properly.
– all cargo in the trailer is secured
safety in position.
– the side mirrors provide a good
rearward field of view without a sig-
nificant blind spot.
. Sufficient time should be taken to learn
the “feel ”of the vehicle/trailer combination
before starting out on a trip. In an area free
of traffic, practice turning, stopping and
backing up.
! Driving with a trailer
. You should allow for considerably more
stopping distance when towing a trailer.
Avoid sudden braking because it may result in skidding or jackknifing and loss of
control.
.
Avoid abrupt starts and sudden accel-
erations. If your vehicle has a manual
transmission, always start out in first gear
and release the clutch at moderate engine
revolution.
. Avoid uneven steering, sharp turns and
rapid lane changes.
. Slow down before turning. Make a
longer than normal turning radius because
the trailer wheels will be closer than the
vehicle wheels to the inside of the turn. In
a tight turn, the trailer could hit your
vehicle.
. Crosswinds will adversely affect the
handling of your vehicle and trailer, caus-
ing sway. Crosswinds can be due to
weather conditions or the passing of large
trucks or buses. If swaying occurs, firmly
grip the steering wheel and promptly begin
decelerating your vehicle at a gradual
pace.
. When passing other vehicles, consid-
erable distance is required because of the
added weight and length caused by
attaching the trailer to your vehicle.
8-24