interior lights SUBARU FORESTER 2017 SJ / 4.G Owners Manual
[x] Cancel search | Manufacturer: SUBARU, Model Year: 2017, Model line: FORESTER, Model: SUBARU FORESTER 2017 SJ / 4.GPages: 634, PDF Size: 11.77 MB
Page 110 of 634
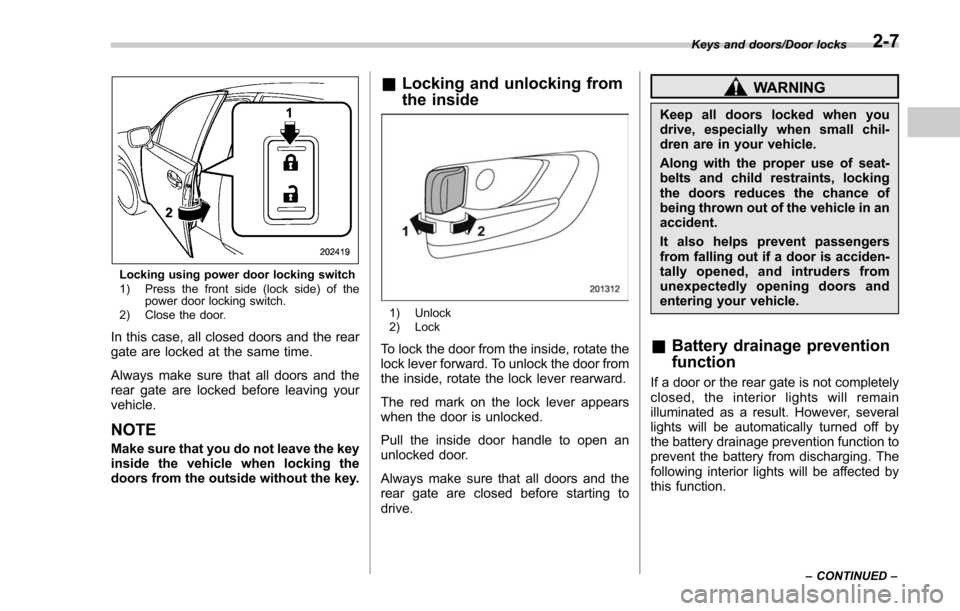
Locking using power door locking switch
1) Press the front side (lock side) of thepower door locking switch.
2) Close the door.
In this case, all closed doors and the rear
gate are locked at the same time.
Always make sure that all doors and the
rear gate are locked before leaving your
vehicle.
NOTE
Make sure that you do not leave the key
inside the vehicle when locking the
doors from the outside without the key.
& Locking and unlocking from
the inside
1) Unlock
2) Lock
To lock the door from the inside, rotate the
lock lever forward. To unlock the door from
the inside, rotate the lock lever rearward.
The red mark on the lock lever appears
when the door is unlocked.
Pull the inside door handle to open an
unlocked door.
Always make sure that all doors and the
rear gate are closed before starting to
drive.
WARNING
Keep all doors locked when you
drive, especially when small chil-
dren are in your vehicle.
Along with the proper use of seat-
belts and child restraints, locking
the doors reduces the chance of
being thrown out of the vehicle in an
accident.
It also helps prevent passengers
from falling out if a door is acciden-
tally opened, and intruders from
unexpectedly opening doors and
entering your vehicle.
&Battery drainage prevention
function
If a door or the rear gate is not completely
closed, the interior lights will remain
illuminated as a result. However, several
lights will be automatically turned off by
the battery drainage prevention function to
prevent the battery from discharging. The
following interior lights will be affected by
this function.
Keys and doors/Door locks
–CONTINUED –2-7
Page 128 of 634
Alarm system
The alarm system helps to protect your
vehicle and valuables from theft. The horn
sounds and the hazard warning flashers
flash if someone attempts to break into
your vehicle.
For models with“keyless access with
push-button start system ”:
The system can be armed and disarmed
with the keyless access function or access
key.
The system will not be activated when the
push-button ignition switch is in the “ACC ”
or “ON ”position.
For models without “keyless access
with push-button start system ”:
The system can be armed and disarmed
with the remote transmitter.
The system will not be activated when the
key is inserted into the ignition switch.
Your vehicle’ s alarm system has been set
for activation at the time of shipment from
the factory. You can set the system for
deactivation yourself or have it done by
your SUBARU dealer.
& System operation
The alarm system will sound the following
alarms when triggered.
. The vehicle ’s horn will sound for 30
seconds.
. The hazard warning flashers will flash
for 30 seconds.
If any of the doors or the rear gate remains
open after the 30-second period, the horn
will continue to sound for a maximum of 3
minutes. If the door or the rear gate is
closed while the horn is sounding, the
horn will stop sounding with a delay of up
to 30 seconds.
The alarm is triggered by:
. Opening any of the doors or the rear
gate
. Physical impact to the vehicle, such as
forced entry (only models with shock
sensors (dealer option))
NOTE
The alarm system can be set to trigger
the illumination of the following interior
lights.
. Map lights (illuminate only when the
door interlock switch is in the “DOOR ”
position)
. Dome light (illuminates only when
the dome light switch is in the “DOOR ”position)
.
Cargo area light (illuminates only
when the cargo area light switch is in
the “ON ”position)
The notifications regarding the map
lights, dome light and cargo area light
are deactivated as the factory setting. A
SUBARU dealer can activate the sys-
tem. Contact your SUBARU dealer for
details.
& Activating and deactivating
the alarm system
To change the setting of your vehicle’ s
alarm system for activation or deactiva-
tion, do the following.
1. Disarm the alarm system. Refer to
“Disarming the system ”F 2-29.
2. Sit in the driver ’s seat and shut all
doors and the rear gate.
3. Turn the ignition switch to the “ON”
position.
4. Hold down the REAR (UNLOCK) side
of the driver ’s power door locking switch,
open the driver ’s door within the following
1 second, and wait 10 seconds without
releasing the switch. The setting will then
be changed as follows.
If the system was previously activated:
The odometer/trip meter screen displays
Keys and doors/Alarm system
–CONTINUED –2-25
Page 382 of 634
Interior lights....................................................... 6-2Dome light.......................................................... 6-2
Cargo area light .................................................. 6-2
Map lights ........................................................... 6-3
OFF delay timer .................................................. 6-3
Sun visors........................................................... 6-4Sun visor extension plate .................................... 6-4
Vanity mirror ....................................................... 6-5
Vanity mirror with light (if equipped) .................... 6-5
Storage compartment......................................... 6-6Glove box........................................................... 6-6
Center console .................................................... 6-6
Overhead console (if equipped) ........................... 6-7
Cup holders......................................................... 6-7Front passenger ’s cup holder .............................. 6-7
Rear passenger ’s cup holder (if equipped) ........... 6-8
Bottle holders...................................................... 6-9
Accessory power outlets .................................... 6-9
Use with a cigarette lighter (if equipped) .. ........... 6-11
Ashtray (if equipped)......................................... 6-11
Floor mat (if equipped) ...................................... 6-12
Shopping bag hook ........................................... 6-13
Convenient hook ................................................ 6-13
Cargo area cover (if equipped) ......................... 6-14
Using the cover................................................. 6-14
To install the front cover .................................... 6-14
To remove the front cover .................................. 6-14
To remove the cover housing ... .......................... 6-15
Stowage of the cargo area cover ........................ 6-15
To install the cover housing ............................... 6-16
Cargo tie-down hooks....................................... 6-16
Under-floor storage compartment (if equipped) ........................................................ 6-17
Rear view camera (if equipped) ........................ 6-17
How to use the rear view camera ....................... 6-18
Viewing range on the screen .............................. 6-19
Help line ............................................................ 6-20
Interior equipment
6
Page 383 of 634
Interior equipment/Interior lights
Interior lights
CAUTION
When leaving your vehicle, make
sure the lights are turned off to
avoid battery discharge.
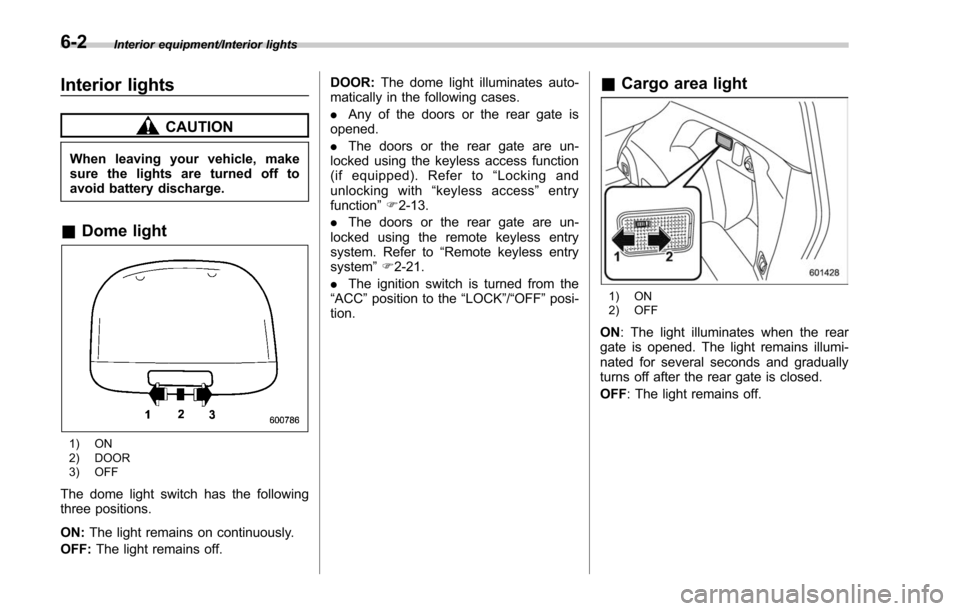
&Dome light
1) ON
2) DOOR
3) OFF
The dome light switch has the following
three positions.
ON: The light remains on continuously.
OFF: The light remains off. DOOR:
The dome light illuminates auto-
matically in the following cases.
. Any of the doors or the rear gate is
opened.
. The doors or the rear gate are un-
locked using the keyless access function
(if equipped). Refer to “Locking and
unlocking with “keyless access” entry
function ”F 2-13.
. The doors or the rear gate are un-
locked using the remote keyless entry
system. Refer to “Remote keyless entry
system ”F 2-21.
. The ignition switch is turned from the
“ACC ”position to the “LOCK”/ “OFF ”posi-
tion.
& Cargo area light
1) ON
2) OFF
ON : The light illuminates when the rear
gate is opened. The light remains illumi-
nated for several seconds and gradually
turns off after the rear gate is closed.
OFF : The light remains off.
6-2
Page 384 of 634
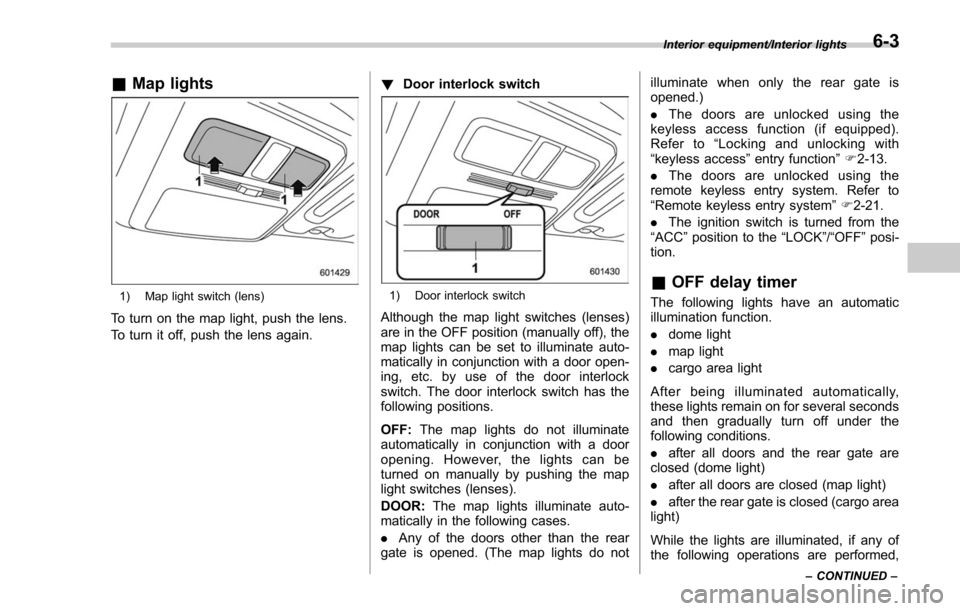
&Map lights
1) Map light switch (lens)
To turn on the map light, push the lens.
To turn it off, push the lens again. !
Door interlock switch
1) Door interlock switch
Although the map light switches (lenses)
are in the OFF position (manually off), the
map lights can be set to illuminate auto-
matically in conjunction with a door open-
ing, etc. by use of the door interlock
switch. The door interlock switch has the
following positions.
OFF: The map lights do not illuminate
automatically in conjunction with a door
opening. However, the lights can be
turned on manually by pushing the map
light switches (lenses).
DOOR: The map lights illuminate auto-
matically in the following cases.
. Any of the doors other than the rear
gate is opened. (The map lights do not illuminate when only the rear gate is
opened.)
.
The doors are unlocked using the
keyless access function (if equipped).
Refer to “Locking and unlocking with
“keyless access ”entry function ”F 2-13.
. The doors are unlocked using the
remote keyless entry system. Refer to
“Remote keyless entry system ”F 2-21.
. The ignition switch is turned from the
“ACC ”position to the “LOCK”/“OFF”posi-
tion.
& OFF delay timer
The following lights have an automatic
illumination function.
. dome light
. map light
. cargo area light
After being illuminated automatically,
these lights remain on for several seconds
and then gradually turn off under the
following conditions.
. after all doors and the rear gate are
closed (dome light)
. after all doors are closed (map light)
. after the rear gate is closed (cargo area
light)
While the lights are illuminated, if any of
the following operations are performed,
Interior equipment/Interior lights
–CONTINUED –6-3
Page 385 of 634
Interior equipment/Sun visors
the lights turn off immediately.
.The ignition switch is turned from the
“LOCK”/ “OFF ”position to the “ACC”or
“ON ”position.
. All doors and the rear gate are locked
using the keyless access function (if
equipped).
. All doors and the rear gate are locked
using the remote keyless entry system.
The setting for the period of time in which
the lights remain on (OFF delay timer) can
be changed by a SUBARU dealer. Con-
tact your SUBARU dealer for details. For
models with multi function display, the
setting can be changed by operating the
multi function display. For details, refer to
“Interior light off delay timer setting ”F 3-
84.Sun visors
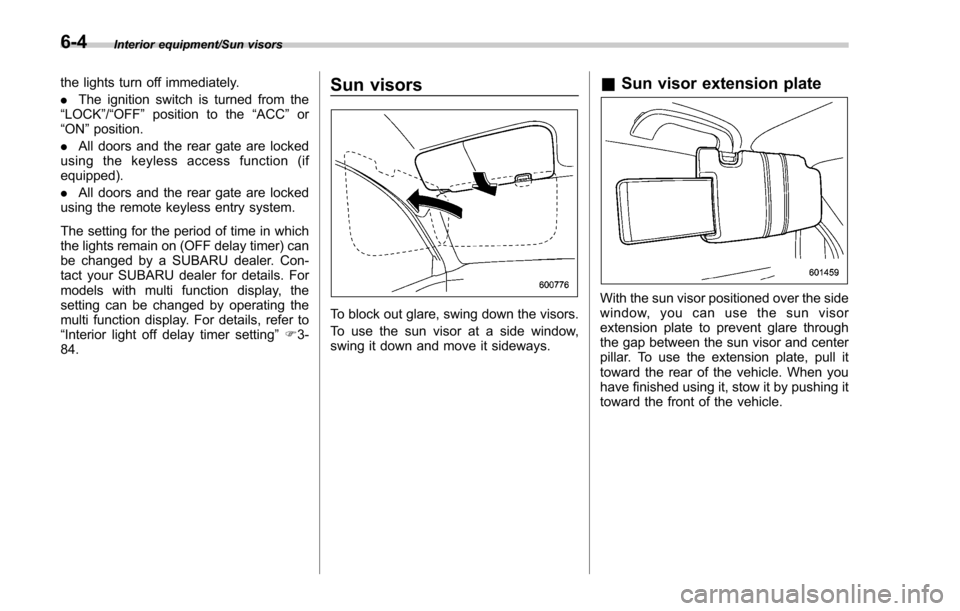
To block out glare, swing down the visors.
To use the sun visor at a side window,
swing it down and move it sideways.
& Sun visor extension plate
With the sun visor positioned over the side
window, you can use the sun visor
extension plate to prevent glare through
the gap between the sun visor and center
pillar. To use the extension plate, pull it
toward the rear of the vehicle. When you
have finished using it, stow it by pushing it
toward the front of the vehicle.
6-4
Page 621 of 634
14-6Index
Rear seat.............................................................. 1-12
Headlight Beam leveler ....................................................... 3-102
Bulb replacement .................................................. 11-39
Bulb wattage ....................................................... 12-16
Control switch ........................................................ 3-93
Flasher ................................................................. 3-98
Indicator light ......................................................... 3-33
OFF delay function ................................................. 3-94
Welcome lighting function ....................................... 3-94
HID headlights .......................................................... 11-39
High beam assist function ........................................... 3-95
Indicator light ......................................................... 3-32
High beam indicator light ............................................ 3-32
High/low beam change (dimmer) .................................. 3-95
Hill descent control ..................................................... 7-42
Indicator light ......................................................... 3-33
Hill start assist .................................................. 7-50, 11-21
OFF indicator light .................................................. 3-23
To activate/deactivate ............................................. 7-50
Warning light ......................................................... 3-23
HomeLink
®.............................................................. 3-109
Hook Cargo tie-down ...................................................... 6-16
Convenient ............................................................ 6-13
Shopping bag ........................................................ 6-13
Towing and tie-down ............................................... 9-13
Horn ........................................................................\
3-118
Hose and connections ............................................... 11-12 I
Ignition switch
............................................................. 3-4
Light ...................................................................... 3-6
Illumination brightness control .................................... 3-101
Immobilizer ................................................................. 2-3
Indicator light (security indicator light) ........................ 3-30
Indicator light BSD/RCTA OFF ............................................. 3-34, 7-64
BSD/RCTA warning ........................................ 3-33, 7-63
Coolant temperature low .......................................... 3-17
Cruise control ........................................................ 3-32
Cruise control set ................................................... 3-32
Front fog light ......................................................... 3-33
Headlight ............................................................... 3-33
High beam ............................................................. 3-32
High beam assist .................................................... 3-32
Hill descent control ................................................. 3-33
Hill start assist OFF ................................................ 3-23
Immobilizer ............................................................ 3-30
Security ................................................................. 3-30
Select lever/Gear position ........................................ 3-31
SI-DRIVE .............................................................. 3-31
Steering responsive fog lights OFF ... ........................ 3-33
Turn signal ............................................................ 3-32
Vehicle Dynamics Control OFF ................................. 3-25
Vehicle Dynamics Control operation .......................... 3-25
X-mode ................................................................. 3-33
Information display ...................................................... 3-34
Inside mirror ............................................................ 3-107
Interior lights ............................................................... 6-2