bluetooth SUBARU FORESTER 2021 Getting Started Guide
[x] Cancel search | Manufacturer: SUBARU, Model Year: 2021, Model line: FORESTER, Model: SUBARU FORESTER 2021Pages: 140, PDF Size: 38.84 MB
Page 81 of 140
SOUND
To change the sound settings, press the “Home” button, then select “Settings”, and then
select “Sound”. Choose the setting you want to change.
SETTING FUNCTION
EQ and Sound Position Select to set sound settings.
Entertainment Volume Select to set audio volume.
Aux Volume Gain Select to set AUX volume gain.
Microphone Volume Select to adjust the mic sensitivity. This adjusts the
speaker’s voice during hands-free communication.
Navigation Volume Select to set the navigation prompt volume.
(Navigation-equipped vehicles only).
Phone Volume Select to adjust the default volume of the other party’s
voice.
Ringtone Volume Select to adjust the ringtone volume.
Speech/VR Volume Select to set the voice recognition prompts volume.
Alert Sounds Select to turn the Alert Sound on/off for traffic,
weather, or SXM game information updates.
Beep Sounds Select to turn the sound beeps on/off.
Speed Volume Select to set the speed volume. The system adjusts to
the optimum volume and tone quality according to
vehicle speed to compensate for increased vehicle
noise.
PHONE
This system supports Bluetooth®, a wireless data system. The hands-free system lets you
make and receive calls without taking your hands off the steering wheel.
In the sound settings menu, you can adjust the microphone, ringtone, and phone volume.
On the Home Screen, select "Settings", then select the "Phone" menu to manage
connected devices and access other phone settings.
SETTINGS AND UPDATES
79
Page 84 of 140
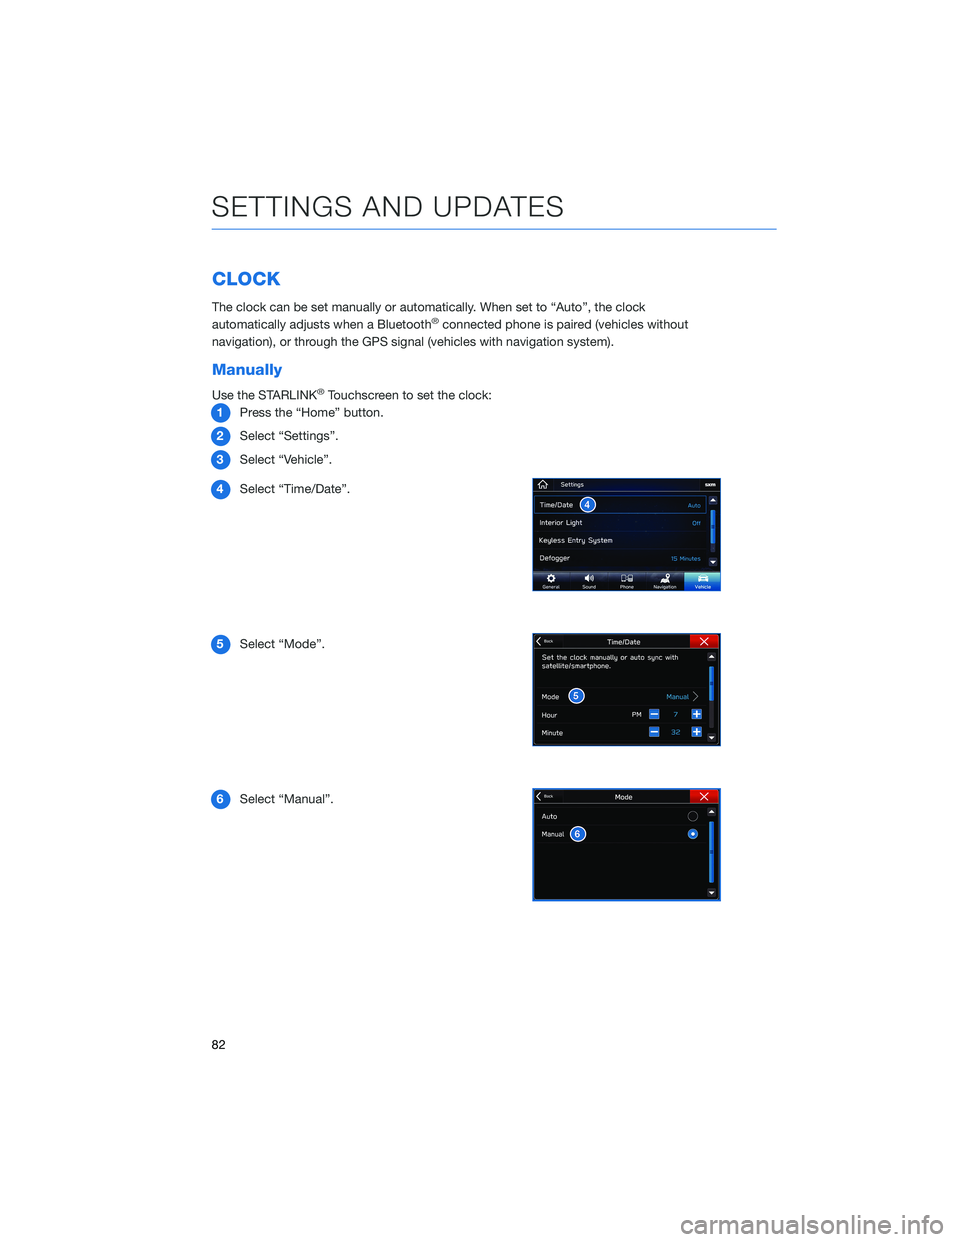
CLOCK
The clock can be set manually or automatically. When set to “Auto”, the clock
automatically adjusts when a Bluetooth®connected phone is paired (vehicles without
navigation), or through the GPS signal (vehicles with navigation system).
Manually
Use the STARLINK®Touchscreen to set the clock:
1Press the “Home” button.
2Select “Settings”.
3Select “Vehicle”.
4Select “Time/Date”.
5Select “Mode”.
6Select “Manual”.
SETTINGS AND UPDATES
82
Page 85 of 140
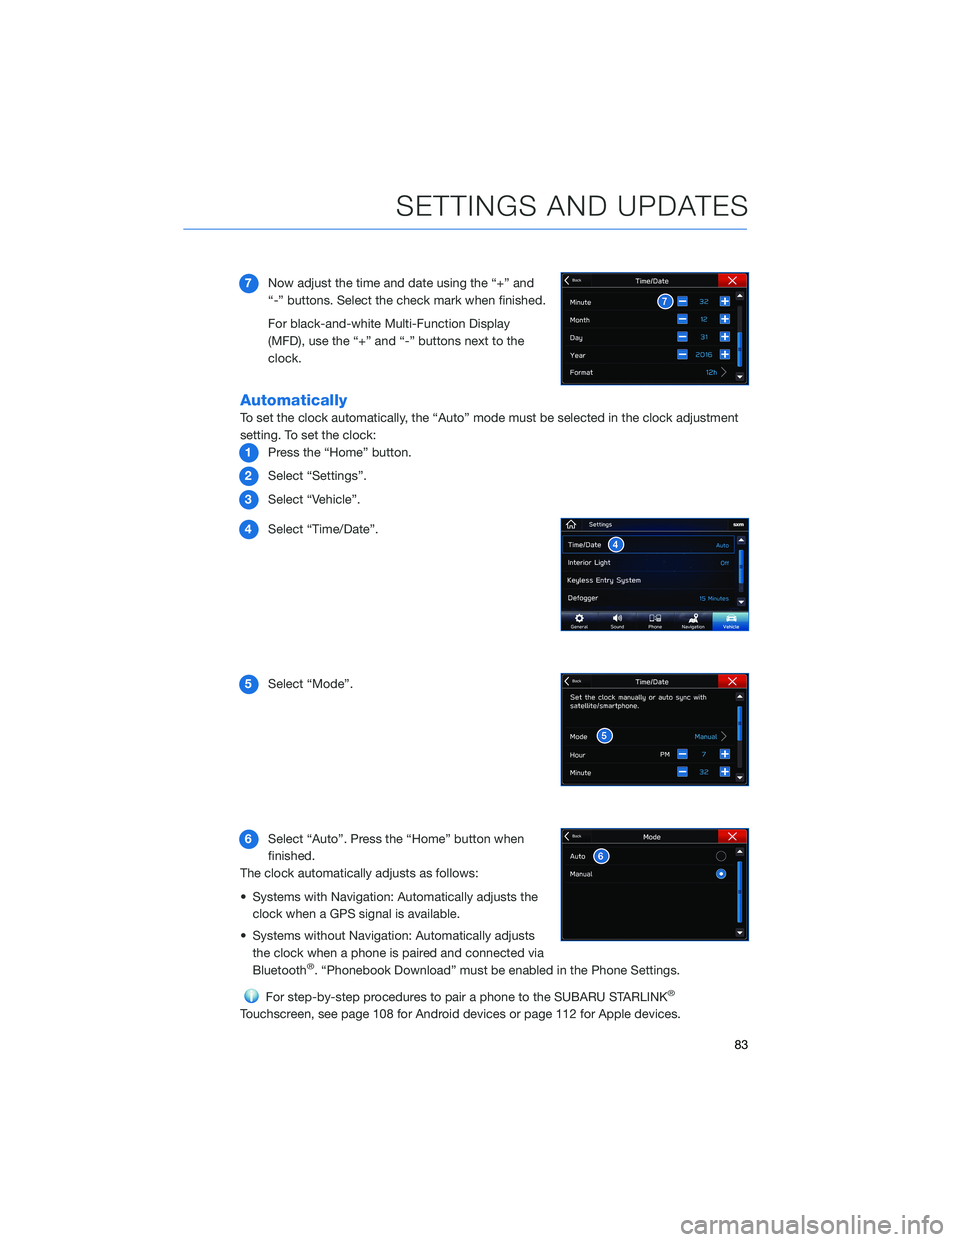
7Now adjust the time and date using the “+” and
“-” buttons. Select the check mark when finished.
For black-and-white Multi-Function Display
(MFD), use the “+” and “-” buttons next to the
clock.
Automatically
To set the clock automatically, the “Auto” mode must be selected in the clock adjustment
setting. To set the clock:
1Press the “Home” button.
2Select “Settings”.
3Select “Vehicle”.
4Select “Time/Date”.
5Select “Mode”.
6Select “Auto”. Press the “Home” button when
finished.
The clock automatically adjusts as follows:
• Systems with Navigation: Automatically adjusts the
clock when a GPS signal is available.
• Systems without Navigation: Automatically adjusts
the clock when a phone is paired and connected via
Bluetooth
®. “Phonebook Download” must be enabled in the Phone Settings.
For step-by-step procedures to pair a phone to the SUBARU STARLINK®
Touchscreen, see page 108 for Android devices or page 112 for Apple devices.
SETTINGS AND UPDATES
83
Page 110 of 140
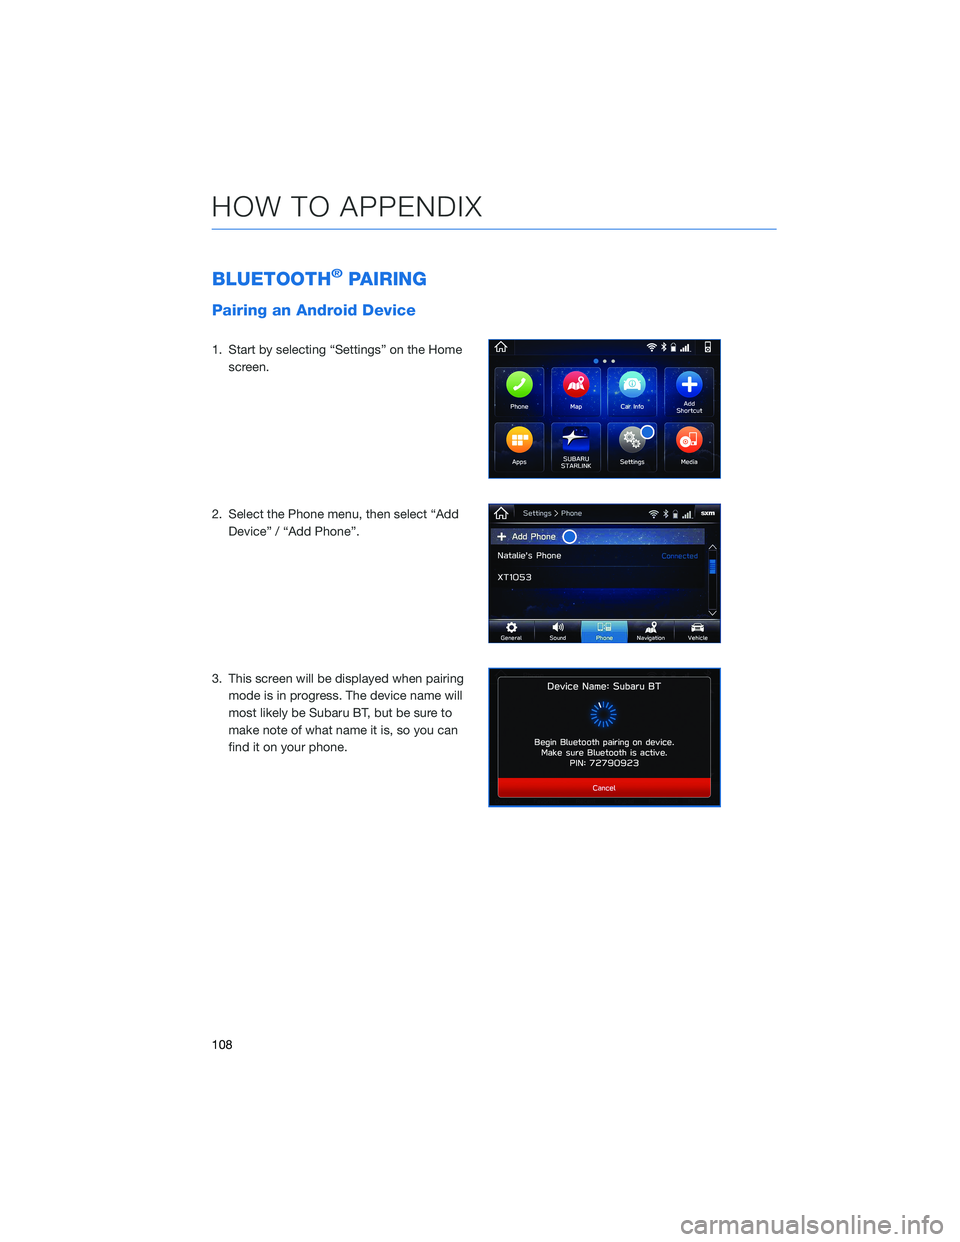
BLUETOOTH®PAIRING
Pairing an Android Device
1. Start by selecting “Settings” on the Home
screen.
2. Select the Phone menu, then select “Add
Device” / “Add Phone”.
3. This screen will be displayed when pairing
mode is in progress. The device name will
most likely be Subaru BT, but be sure to
make note of what name it is, so you can
find it on your phone.
HOW TO APPENDIX
108
Page 111 of 140
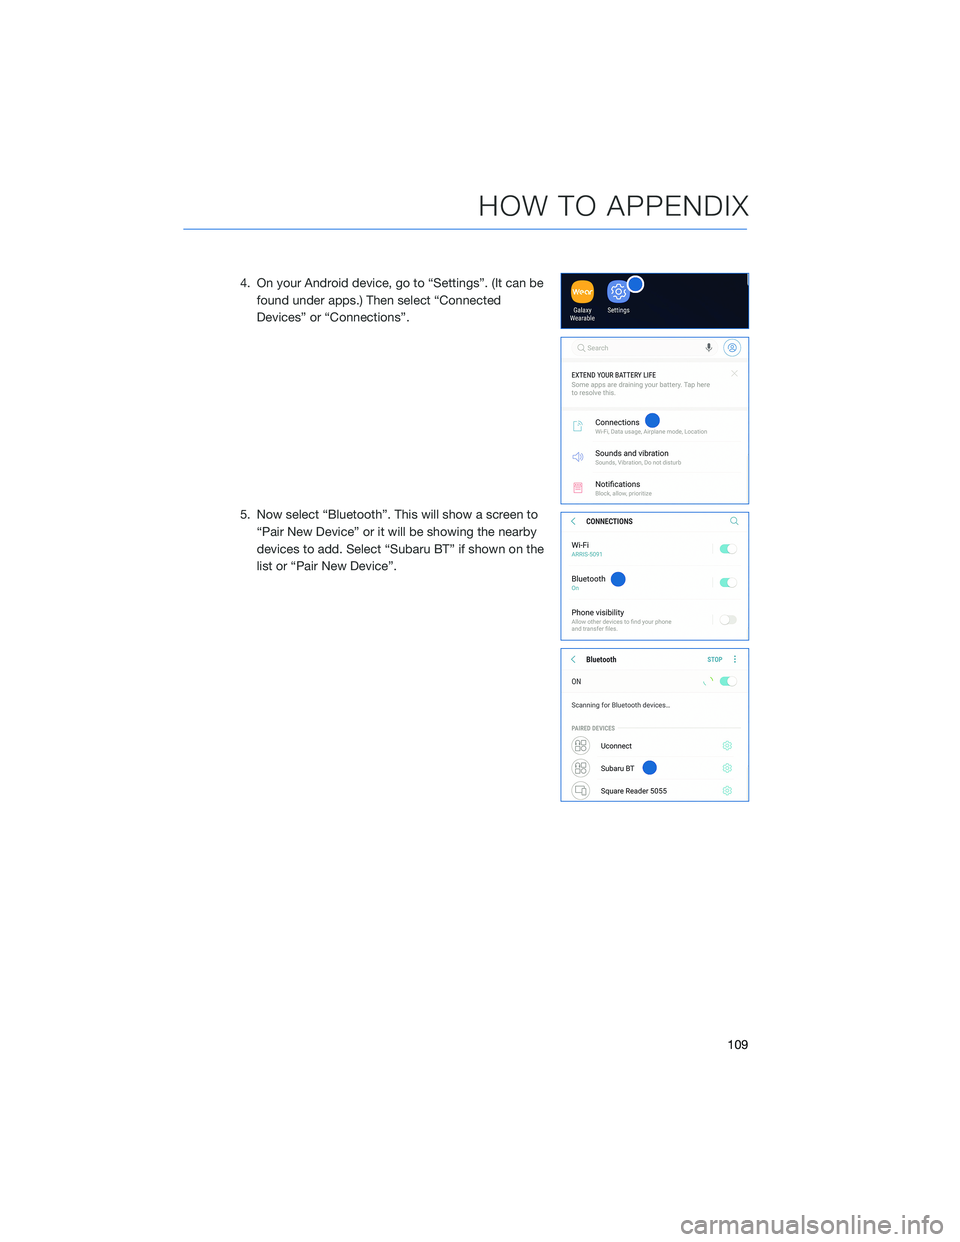
4. On your Android device, go to “Settings”. (It can be
found under apps.) Then select “Connected
Devices” or “Connections”.
5. Now select “Bluetooth”. This will show a screen to
“Pair New Device” or it will be showing the nearby
devices to add. Select “Subaru BT” if shown on the
list or “Pair New Device”.
HOW TO APPENDIX
109
Page 113 of 140
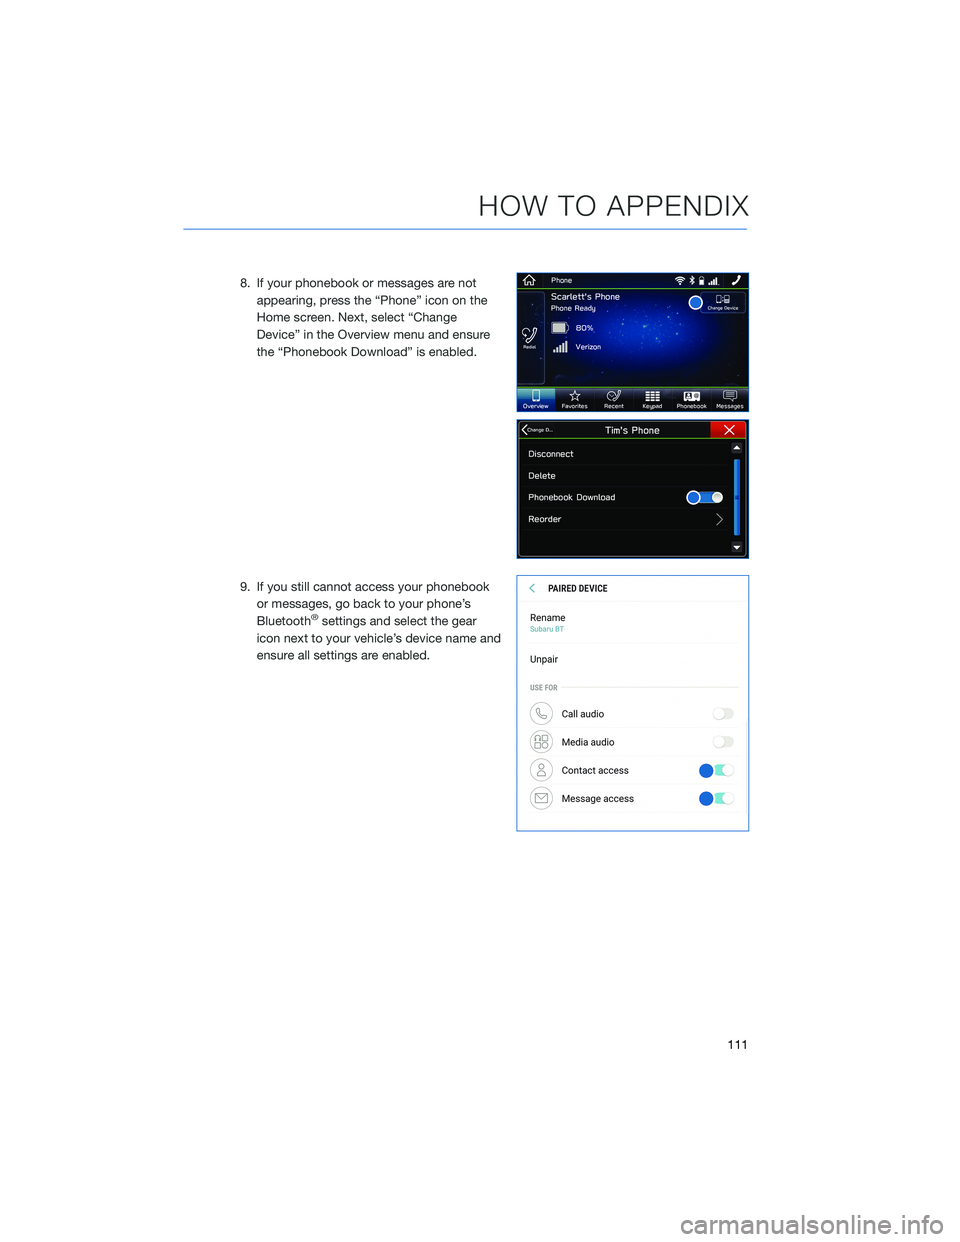
8. If your phonebook or messages are not
appearing, press the “Phone” icon on the
Home screen. Next, select “Change
Device” in the Overview menu and ensure
the “Phonebook Download” is enabled.
9. If you still cannot access your phonebook
or messages, go back to your phone’s
Bluetooth
®settings and select the gear
icon next to your vehicle’s device name and
ensure all settings are enabled.
HOW TO APPENDIX
111
Page 115 of 140
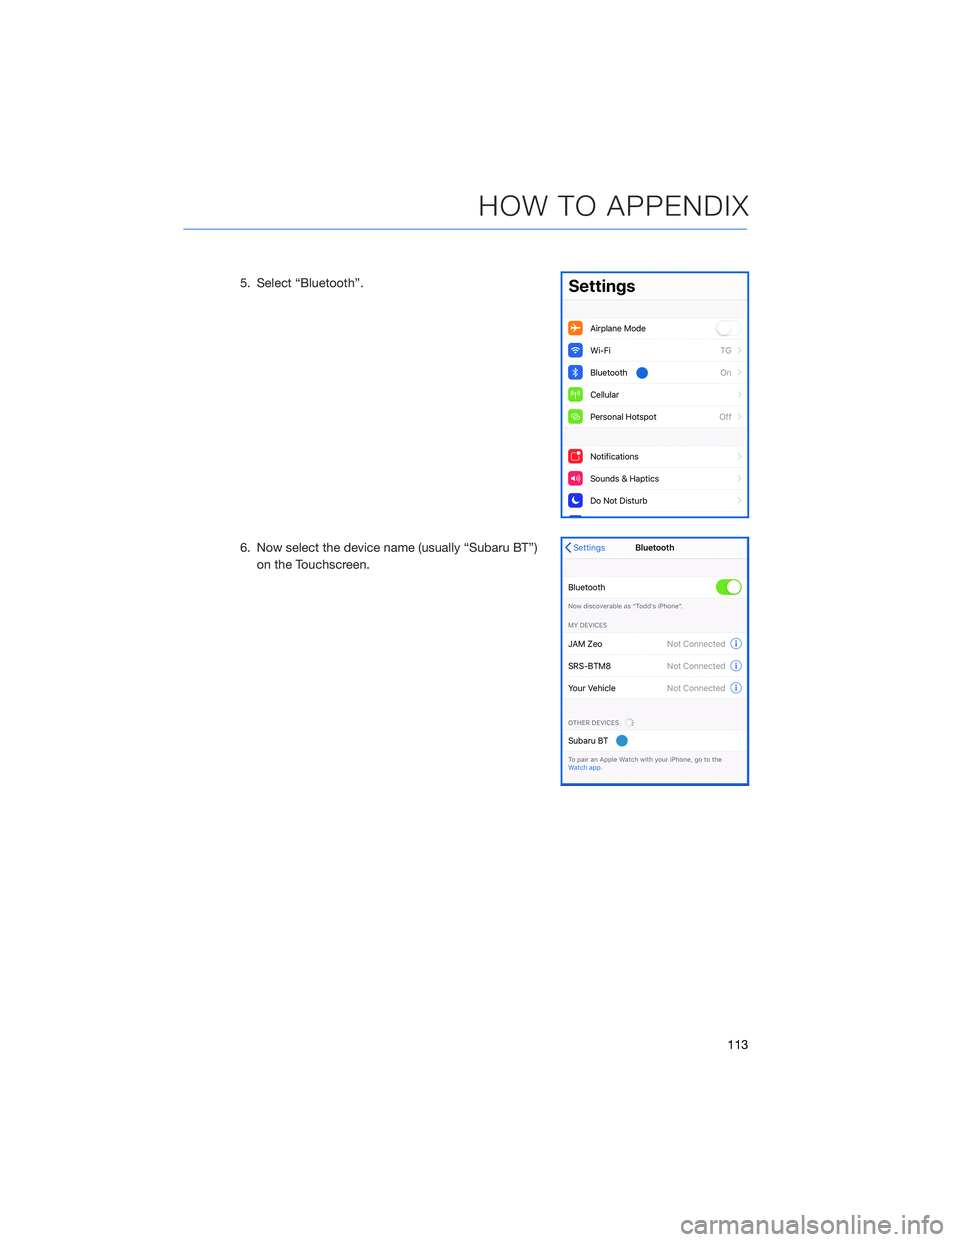
5. Select “Bluetooth”.
6. Now select the device name (usually “Subaru BT”)
on the Touchscreen.
HOW TO APPENDIX
113
Page 117 of 140
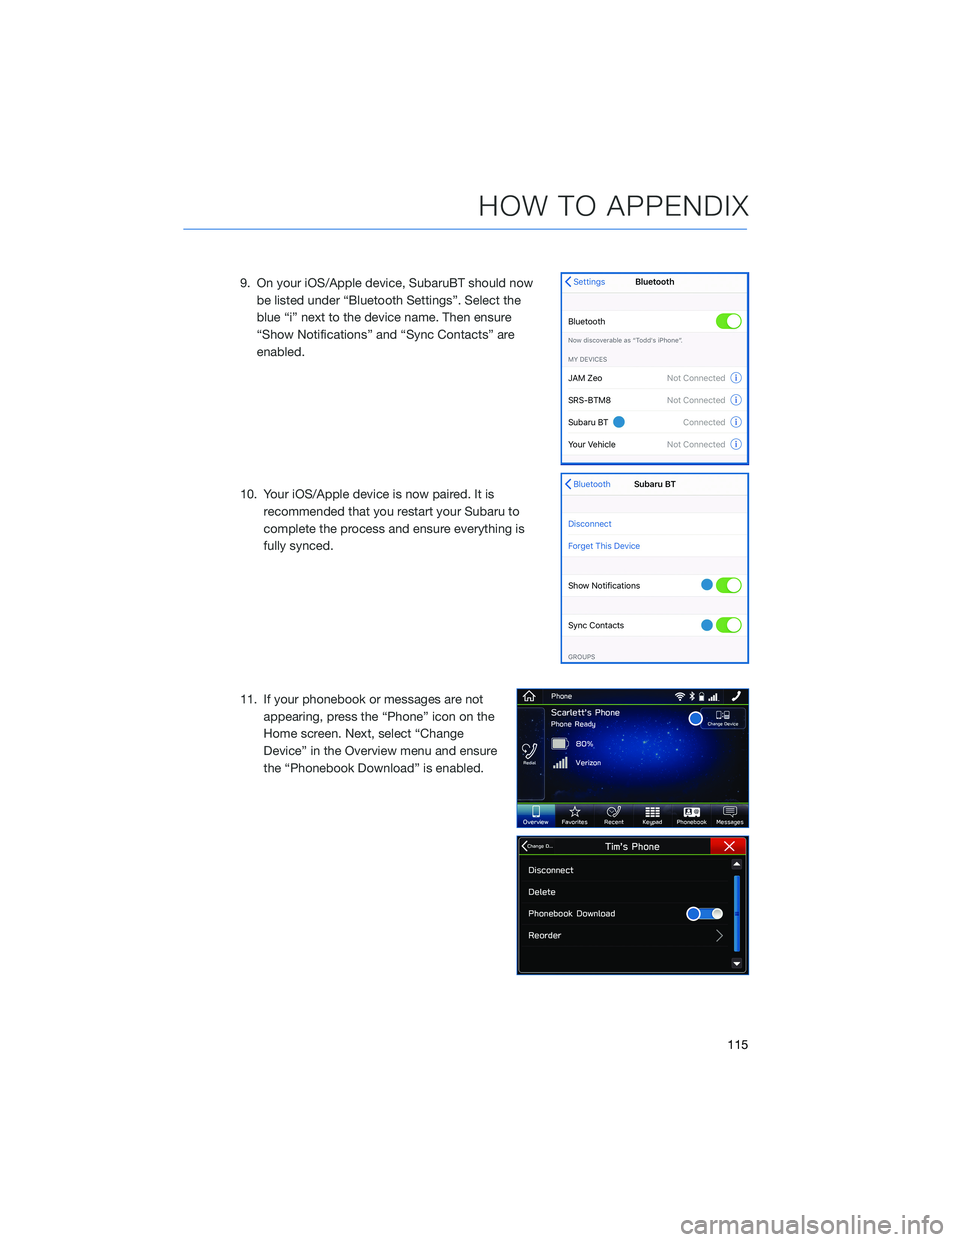
9. On your iOS/Apple device, SubaruBT should now
be listed under “Bluetooth Settings”. Select the
blue “i” next to the device name. Then ensure
“Show Notifications” and “Sync Contacts” are
enabled.
10. Your iOS/Apple device is now paired. It is
recommended that you restart your Subaru to
complete the process and ensure everything is
fully synced.
11. If your phonebook or messages are not
appearing, press the “Phone” icon on the
Home screen. Next, select “Change
Device” in the Overview menu and ensure
the “Phonebook Download” is enabled.
HOW TO APPENDIX
115
Page 132 of 140
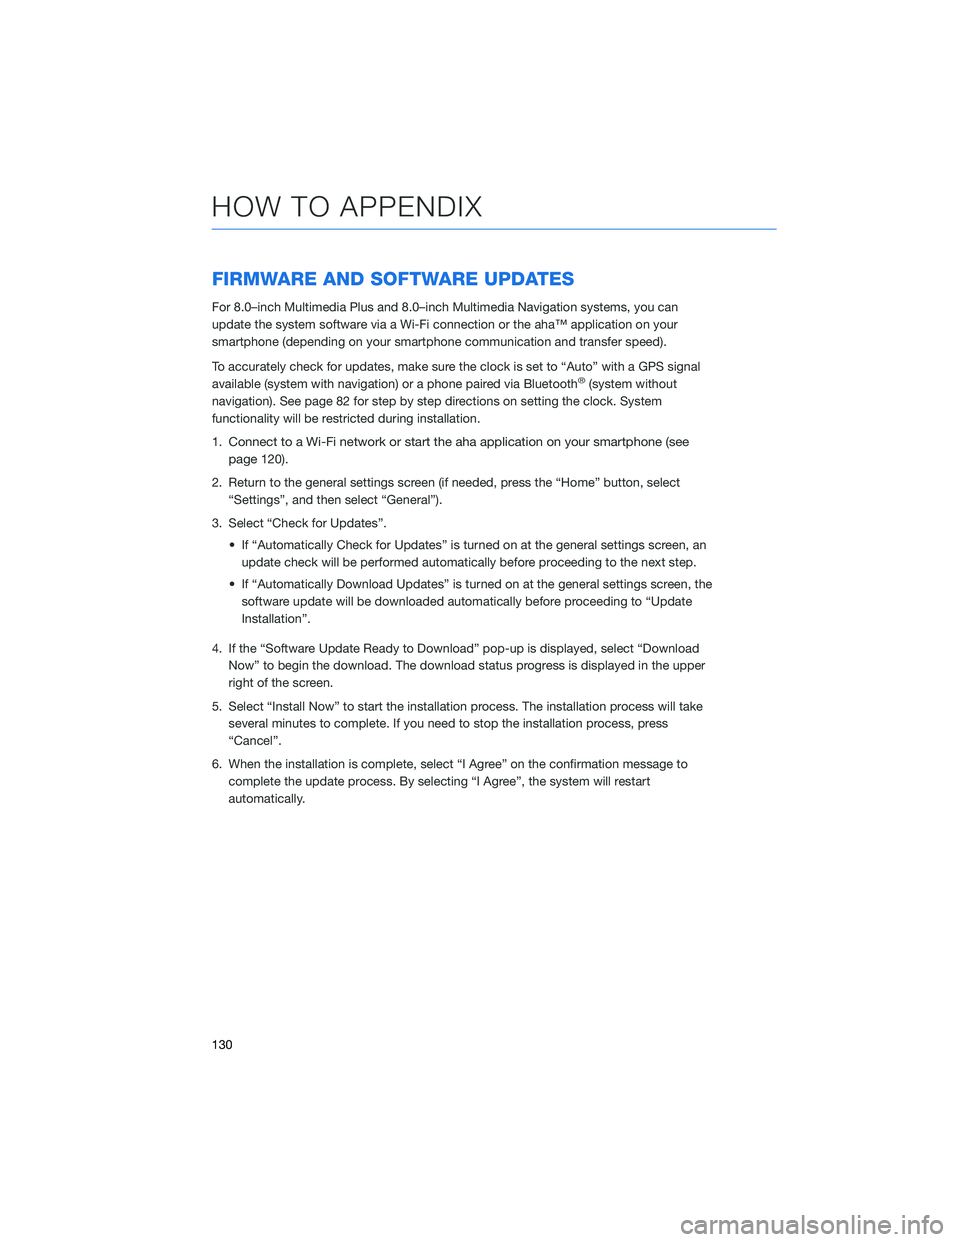
FIRMWARE AND SOFTWARE UPDATES
For 8.0–inch Multimedia Plus and 8.0–inch Multimedia Navigation systems, you can
update the system software via a Wi-Fi connection or the aha™ application on your
smartphone (depending on your smartphone communication and transfer speed).
To accurately check for updates, make sure the clock is set to “Auto” with a GPS signal
available (system with navigation) or a phone paired via Bluetooth
®(system without
navigation). See page 82 for step by step directions on setting the clock. System
functionality will be restricted during installation.
1.
Connect to a Wi-Fi network or start the aha application on your smartphone (see
page
120).
2. Return to the general settings screen (if needed, press the “Home” button, select
“Settings”, and then select “General”).
3. Select “Check for Updates”.
• If “Automatically Check for Updates” is turned on at the general settings screen, an
update check will be performed automatically before proceeding to the next step.
• If “Automatically Download Updates” is turned on at the general settings screen, the
software update will be downloaded automatically before proceeding to “Update
Installation”.
4. If the “Software Update Ready to Download” pop-up is displayed, select “Download
Now” to begin the download. The download status progress is displayed in the upper
right of the screen.
5. Select “Install Now” to start the installation process. The installation process will take
several minutes to complete. If you need to stop the installation process, press
“Cancel”.
6. When the installation is complete, select “I Agree” on the confirmation message to
complete the update process. By selecting “I Agree”, the system will restart
automatically.
HOW TO APPENDIX
130
Page 133 of 140
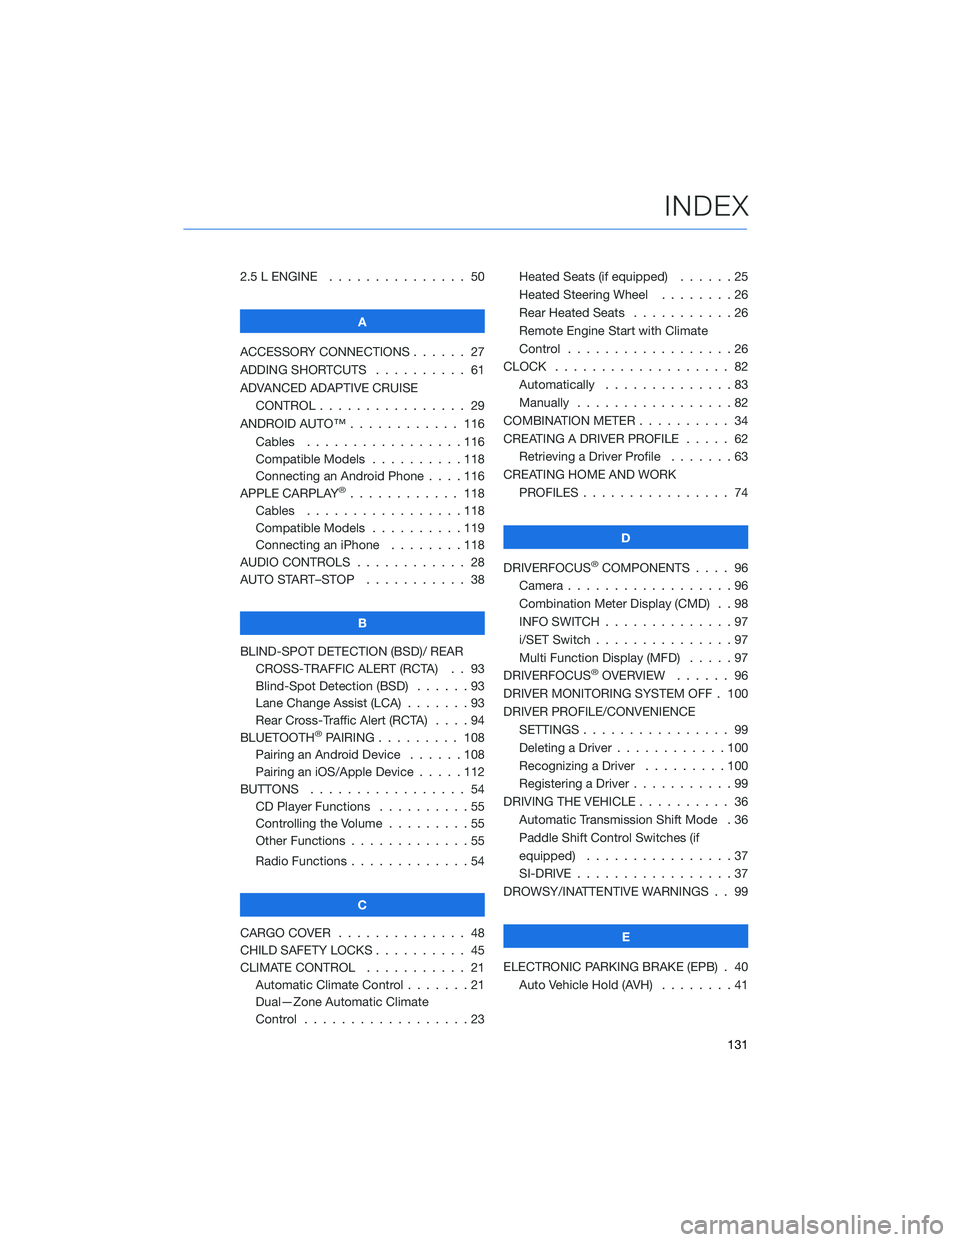
2.5 L ENGINE . . . . . . . ........ 50
A
ACCESSORY CONNECTIONS . . . . . . 27
ADDING SHORTCUTS . . . . ...... 61
ADVANCED ADAPTIVE CRUISE
CONTROL . . . . . ........... 29
ANDROID AUTO™ . . . . . ....... 116
Cables . . . . . . . ..........116
Compatible Models ..........118
Connecting an Android Phone....116
APPLE CARPLAY
®............ 118
Cables . . . . . . . ..........118
Compatible Models ..........119
Connecting an iPhone . . . .....118
AUDIO CONTROLS ............ 28
AUTO START–STOP . . . . . . . . . . . 38
B
BLIND-SPOT DETECTION (BSD)/ REAR
CROSS-TRAFFIC ALERT (RCTA) . . 93
Blind-Spot Detection (BSD) . . . . . . 93
Lane Change Assist (LCA) . ......93
Rear Cross-Traffic Alert (RCTA) . . . . 94
BLUETOOTH
®PAIRING . . ....... 108
Pairing an Android Device . . . . . . 108
Pairing an iOS/Apple Device . . . . . 112
BUTTONS . . . . ............. 54
CD Player Functions..........55
Controlling the Volume . . . . . . . . . 55
Other Functions . . . . . ........55
Radio Functions . . . . . ........54
C
CARGO COVER . . . . . . . . ...... 48
CHILD SAFETY LOCKS.......... 45
CLIMATE CONTROL........... 21
Automatic Climate Control . . . . . . . 21
Dual—Zone Automatic Climate
Control . . . . . . . . . . . . . . . . . . 23Heated Seats (if equipped) ......25
Heated Steering Wheel . .......26
Rear Heated Seats...........26
Remote Engine Start with Climate
Control . . . . . . . . . . . . . . . . . . 26
CLOCK . . ................. 82
Automatically ..............83
Manually.................82
COMBINATION METER .......... 34
CREATING A DRIVER PROFILE ..... 62
Retrieving a Driver Profile.......63
CREATING HOME AND WORK
PROFILES . . . . . . . . ........ 74
D
DRIVERFOCUS
®COMPONENTS . . . . 96
Camera . . . . . . . ...........96
Combination Meter Display (CMD) . . 98
INFO SWITCH . . . ...........97
i/SET Switch . ..............97
Multi Function Display (MFD).....97
DRIVERFOCUS
®OVERVIEW . . . . . . 96
DRIVER MONITORING SYSTEM OFF . 100
DRIVER PROFILE/CONVENIENCE
SETTINGS................ 99
Deleting a Driver . . ..........100
Recognizing a Driver.........100
Registering a Driver . . . ........99
DRIVING THE VEHICLE . . . ....... 36
Automatic Transmission Shift Mode . 36
Paddle Shift Control Switches (if
equipped) . . . .............37
SI-DRIVE . . . ..............37
DROWSY/INATTENTIVE WARNINGS . . 99
E
ELECTRONIC PARKING BRAKE (EPB) . 40
Auto Vehicle Hold (AVH) . . ......41
INDEX
131