light SUBARU FORESTER 2021 Getting Started Guide
[x] Cancel search | Manufacturer: SUBARU, Model Year: 2021, Model line: FORESTER, Model: SUBARU FORESTER 2021Pages: 140, PDF Size: 38.84 MB
Page 25 of 140
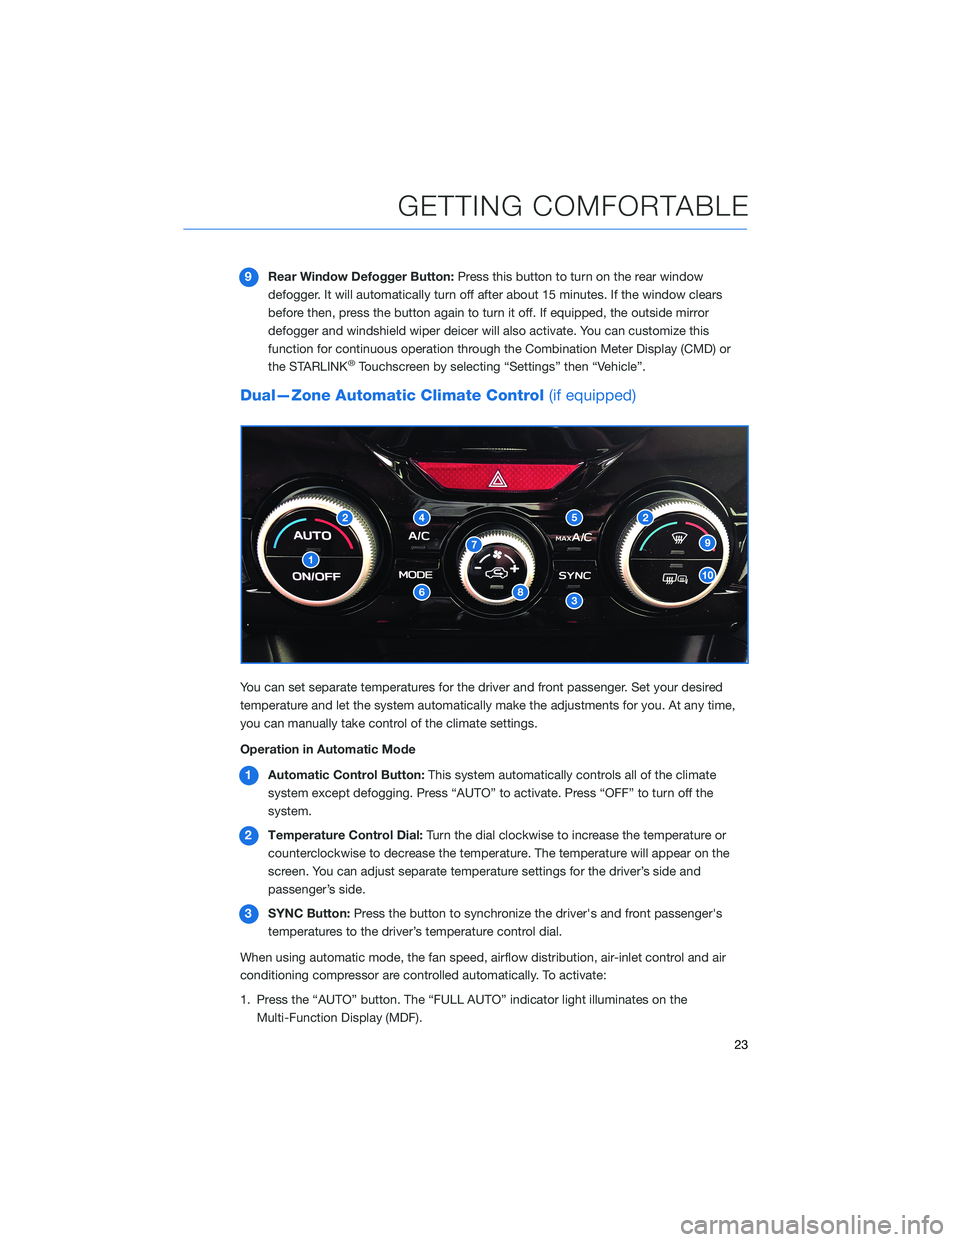
9Rear Window Defogger Button:Press this button to turn on the rear window
defogger. It will automatically turn off after about 15 minutes. If the window clears
before then, press the button again to turn it off. If equipped, the outside mirror
defogger and windshield wiper deicer will also activate. You can customize this
function for continuous operation through the Combination Meter Display (CMD) or
the STARLINK
®Touchscreen by selecting “Settings” then “Vehicle”.
Dual—Zone Automatic Climate Control(if equipped)
You can set separate temperatures for the driver and front passenger. Set your desired
temperature and let the system automatically make the adjustments for you. At any time,
you can manually take control of the climate settings.
Operation in Automatic Mode
1Automatic Control Button:This system automatically controls all of the climate
system except defogging. Press “AUTO” to activate. Press “OFF” to turn off the
system.
2Temperature Control Dial:Turn the dial clockwise to increase the temperature or
counterclockwise to decrease the temperature. The temperature will appear on the
screen. You can adjust separate temperature settings for the driver’s side and
passenger’s side.
3SYNC Button:Press the button to synchronize the driver's and front passenger's
temperatures to the driver’s temperature control dial.
When using automatic mode, the fan speed, airflow distribution, air-inlet control and air
conditioning compressor are controlled automatically. To activate:
1. Press the “AUTO” button. The “FULL AUTO” indicator light illuminates on the
Multi-Function Display (MDF).
GETTING COMFORTABLE
23
Page 26 of 140
2. Set the preferred temperature using the temperature control dial.
If you operate any of the buttons other than “ON/OFF”, rear window defogger, “SYNC”, or
the temperature control dial, the “FULL” indicator light will turn off. The “AUTO” light will
remain illuminated. You can then manually control the system as desired. Press the
“AUTO” button to change back to “FULL AUTO” mode.
4Air Conditioner Button:Press this button to activate or deactivate the air
conditioning.
5MAX A/C Button:Press this button for quickest cooling.
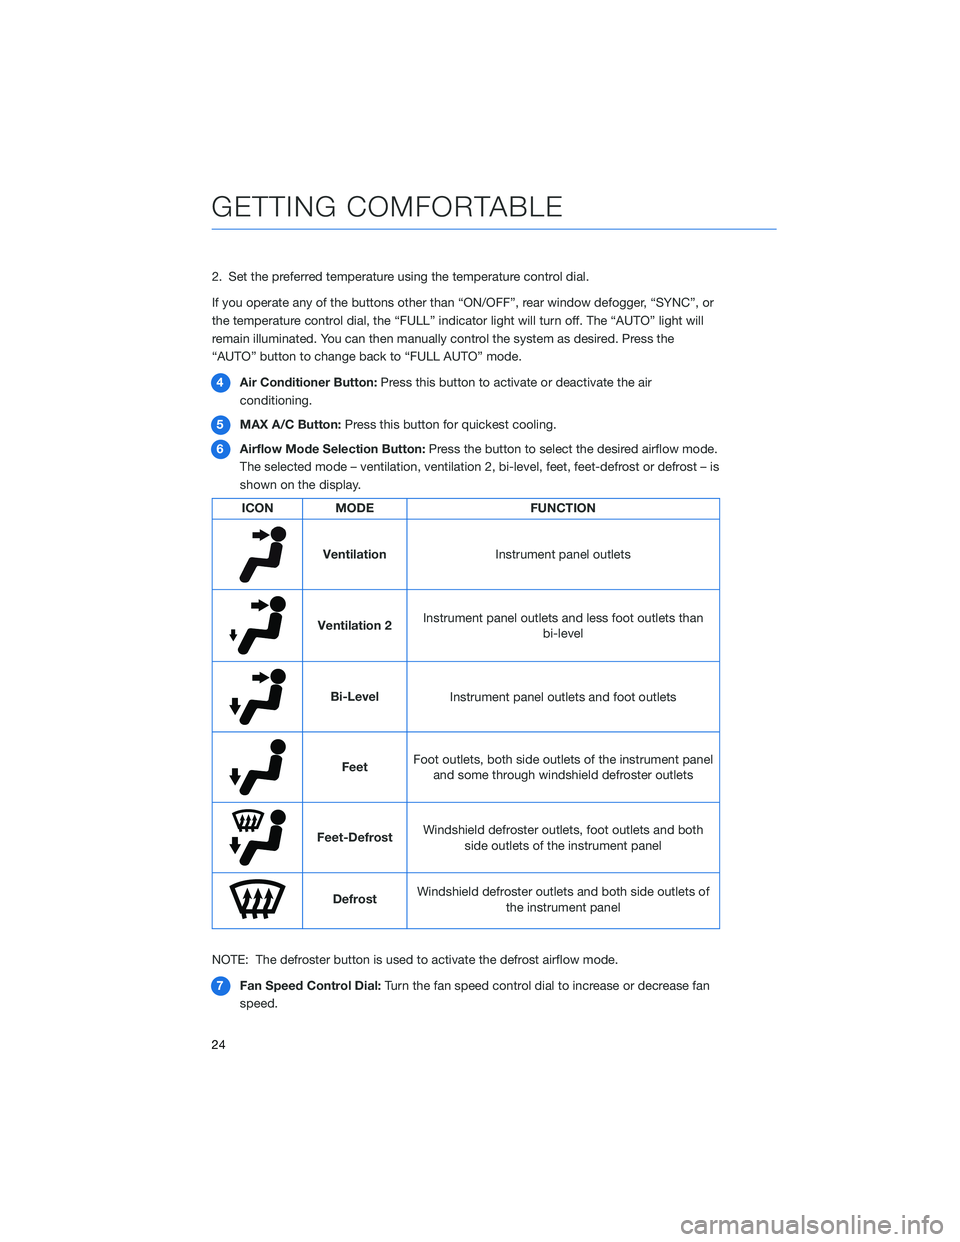
6Airflow Mode Selection Button:Press the button to select the desired airflow mode.
The selected mode – ventilation, ventilation 2, bi-level, feet, feet-defrost or defrost – is
shown on the display.
ICON MODE FUNCTION
Ventilation
Instrument panel outlets
Ventilation 2Instrument panel outlets and less foot outlets than
bi-level
Bi-Level
Instrument panel outlets and foot outlets
FeetFoot outlets, both side outlets of the instrument panel
and some through windshield defroster outlets
Feet-DefrostWindshield defroster outlets, foot outlets and both
side outlets of the instrument panel
DefrostWindshield defroster outlets and both side outlets of
the instrument panel
NOTE: The defroster button is used to activate the defrost airflow mode.
7Fan Speed Control Dial:Turn the fan speed control dial to increase or decrease fan
speed.
GETTING COMFORTABLE
24
Page 28 of 140
Rear Heated Seats(if equipped)
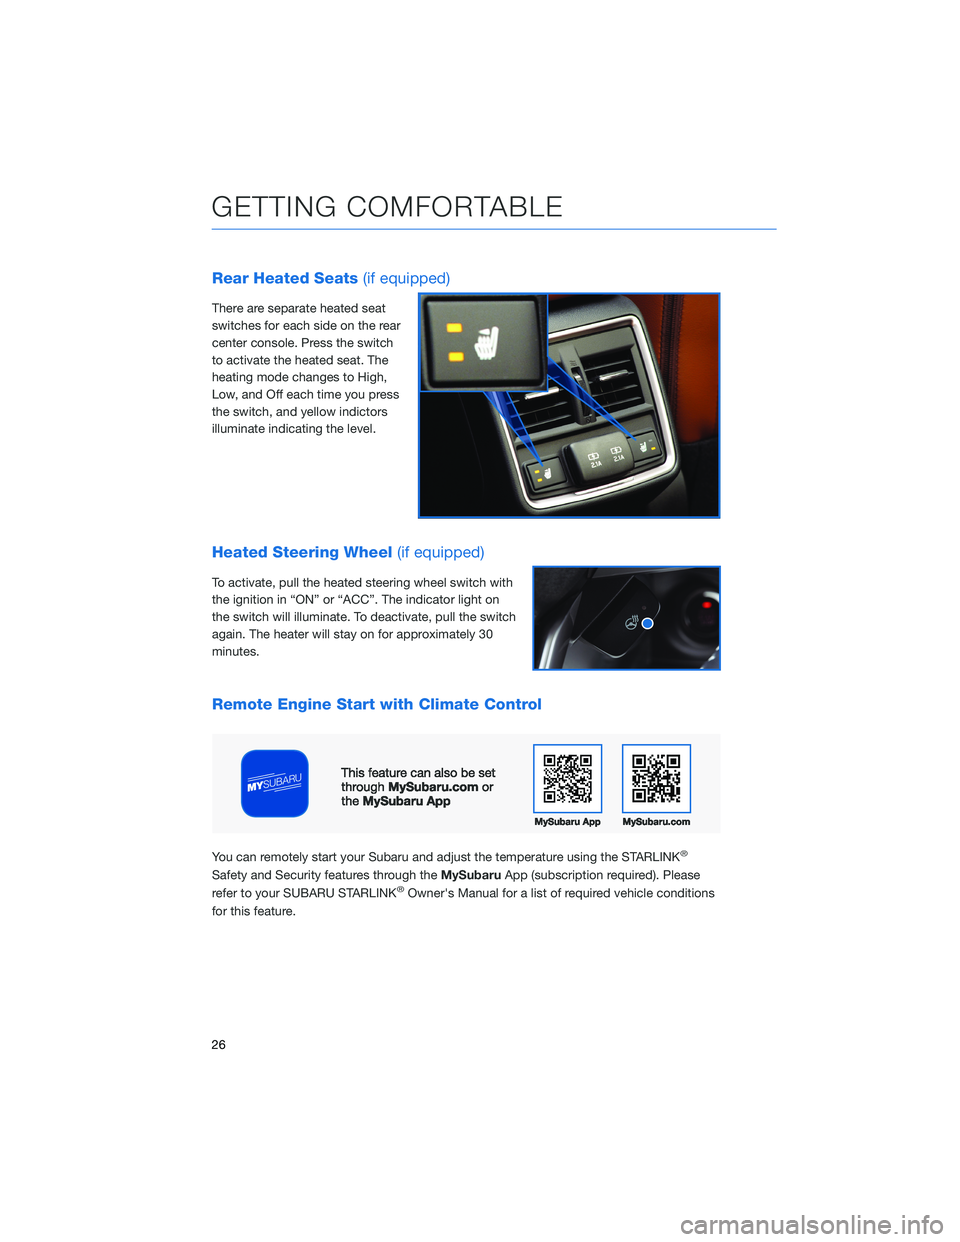
There are separate heated seat
switches for each side on the rear
center console. Press the switch
to activate the heated seat. The
heating mode changes to High,
Low, and Off each time you press
the switch, and yellow indictors
illuminate indicating the level.
Heated Steering Wheel(if equipped)
To activate, pull the heated steering wheel switch with
the ignition in “ON” or “ACC”. The indicator light on
the switch will illuminate. To deactivate, pull the switch
again. The heater will stay on for approximately 30
minutes.
Remote Engine Start with Climate Control
You can remotely start your Subaru and adjust the temperature using the STARLINK®
Safety and Security features through theMySubaruApp (subscription required). Please
refer to your SUBARU STARLINK®Owner's Manual for a list of required vehicle conditions
for this feature.
GETTING COMFORTABLE
26
Page 30 of 140
INSTRUMENT PANEL SWITCHES (LOWER LEFT)
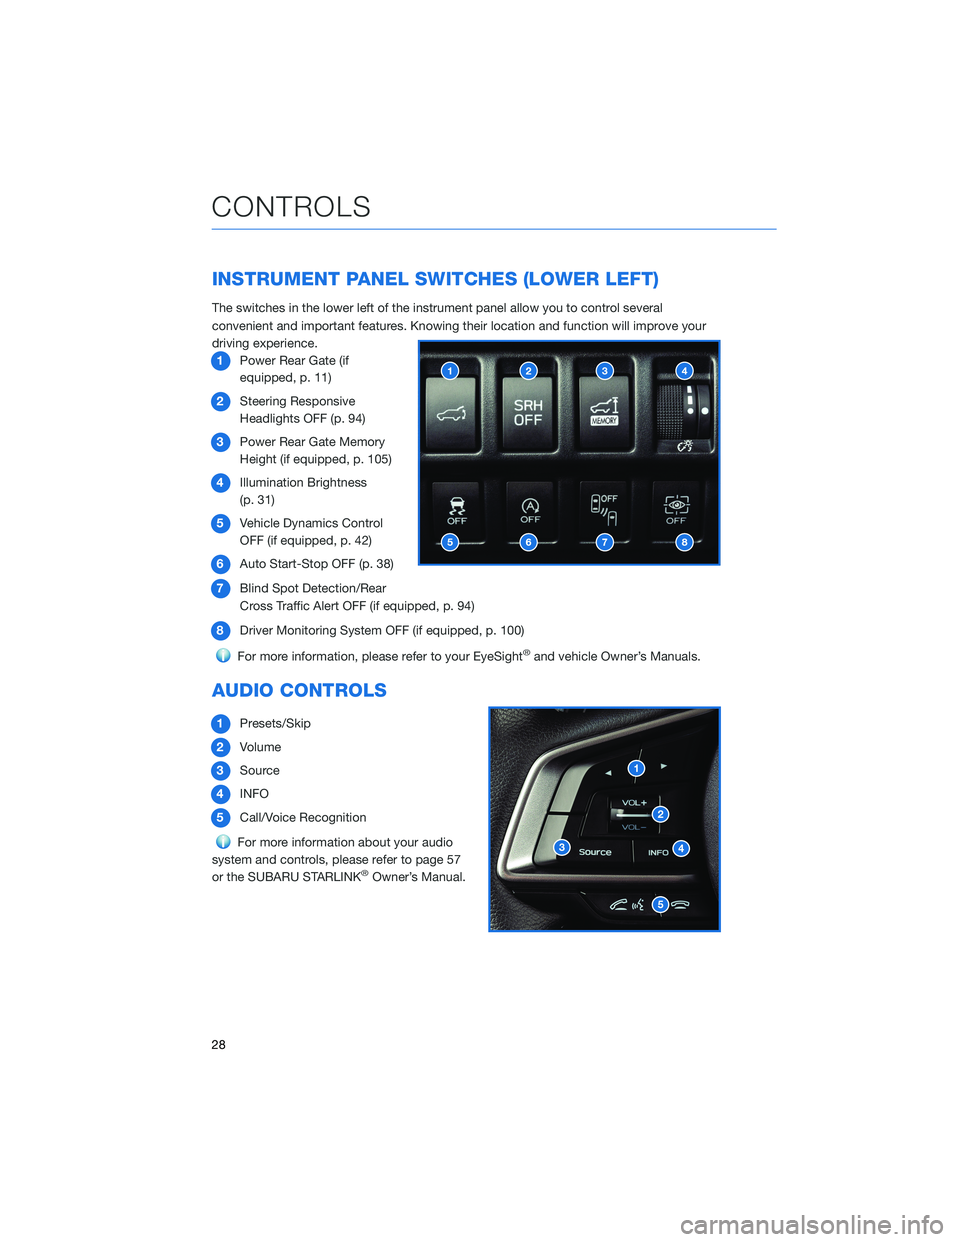
The switches in the lower left of the instrument panel allow you to control several
convenient and important features. Knowing their location and function will improve your
driving experience.
1Power Rear Gate (if
equipped, p. 11)
2Steering Responsive
Headlights OFF (p. 94)
3Power Rear Gate Memory
Height (if equipped, p. 105)
4Illumination Brightness
(p. 31)
5Vehicle Dynamics Control
OFF (if equipped, p. 42)
6Auto Start-Stop OFF (p. 38)
7Blind Spot Detection/Rear
Cross Traffic Alert OFF (if equipped, p. 94)
8Driver Monitoring System OFF (if equipped, p. 100)
For more information, please refer to your EyeSight®and vehicle Owner’s Manuals.
AUDIO CONTROLS
1Presets/Skip
2Volume
3Source
4INFO
5Call/Voice Recognition
For more information about your audio
system and controls, please refer to page 57
or the SUBARU STARLINK
®Owner’s Manual.
CONTROLS
28
Page 32 of 140
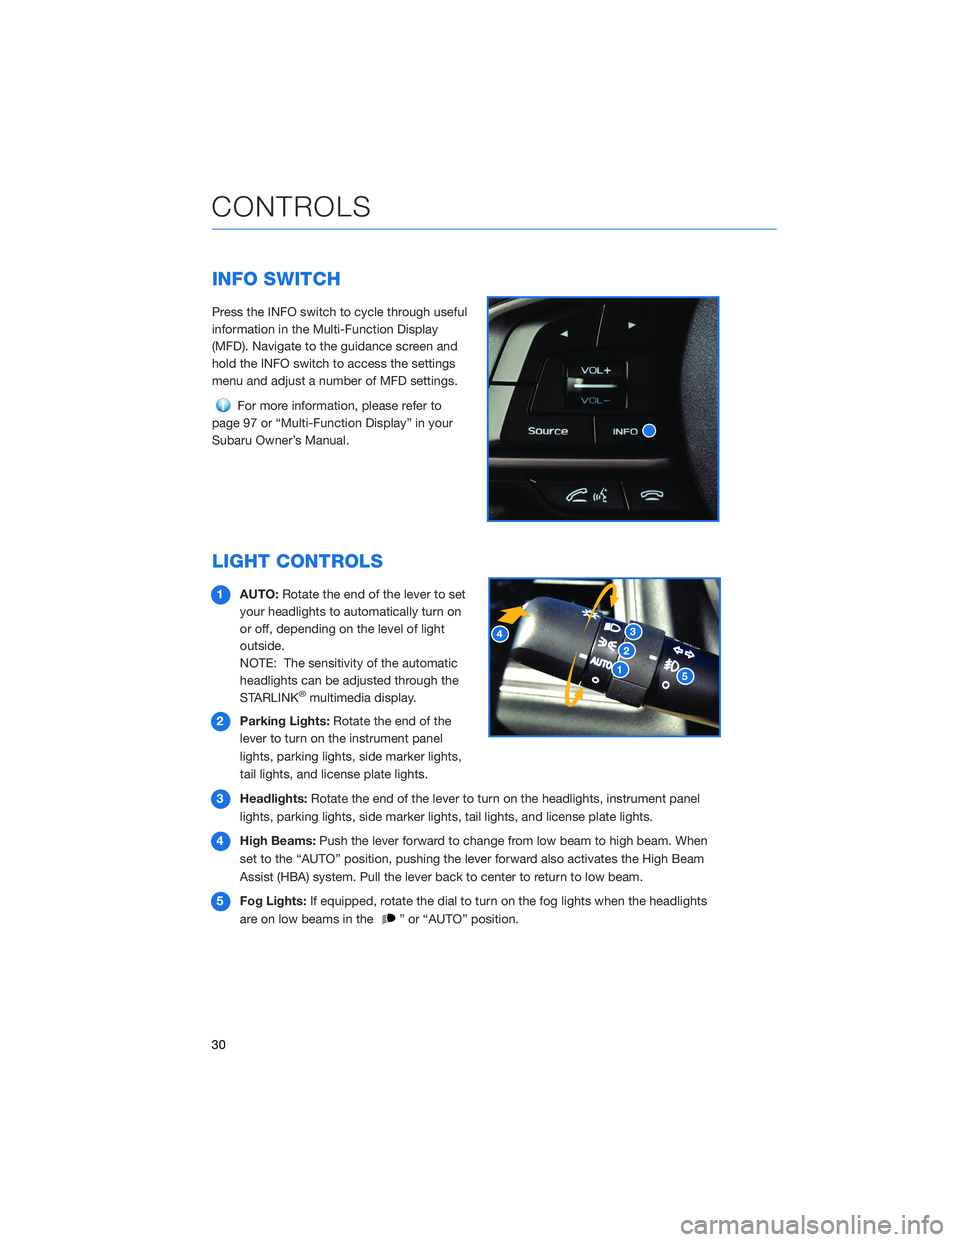
INFO SWITCH
Press the INFO switch to cycle through useful
information in the Multi-Function Display
(MFD). Navigate to the guidance screen and
hold the INFO switch to access the settings
menu and adjust a number of MFD settings.
For more information, please refer to
page 97 or “Multi-Function Display” in your
Subaru Owner’s Manual.
LIGHT CONTROLS
1AUTO:Rotate the end of the lever to set
your headlights to automatically turn on
or off, depending on the level of light
outside.
NOTE: The sensitivity of the automatic
headlights can be adjusted through the
STARLINK
®multimedia display.
2Parking Lights:Rotate the end of the
lever to turn on the instrument panel
lights, parking lights, side marker lights,
tail lights, and license plate lights.
3Headlights:Rotate the end of the lever to turn on the headlights, instrument panel
lights, parking lights, side marker lights, tail lights, and license plate lights.
4High Beams:Push the lever forward to change from low beam to high beam. When
set to the “AUTO” position, pushing the lever forward also activates the High Beam
Assist (HBA) system. Pull the lever back to center to return to low beam.
5Fog Lights:If equipped, rotate the dial to turn on the fog lights when the headlights
are on low beams in the
” or “AUTO” position.
CONTROLS
30
Page 33 of 140
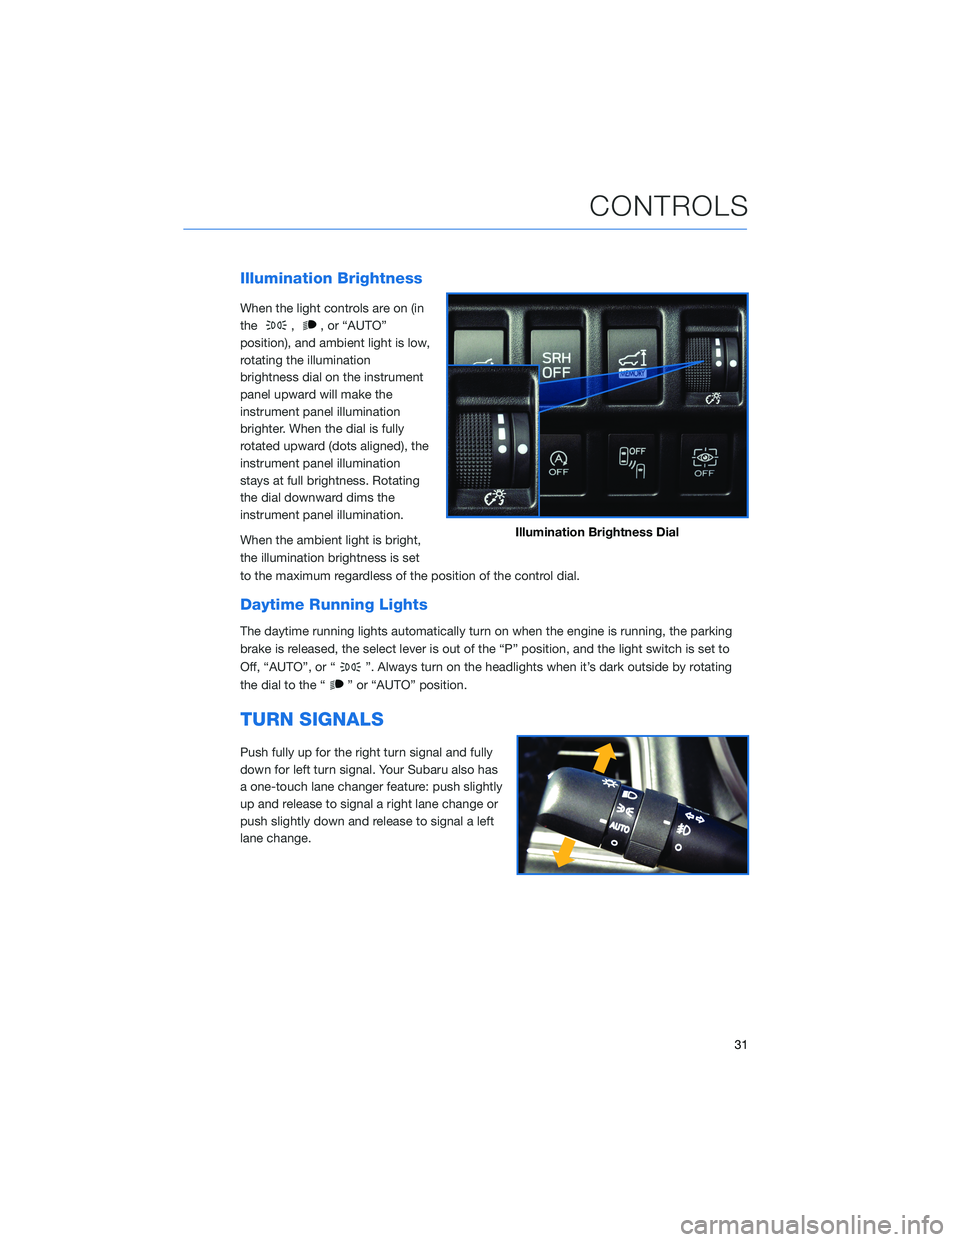
Illumination Brightness
When the light controls are on (in
the
,, or “AUTO”
position), and ambient light is low,
rotating the illumination
brightness dial on the instrument
panel upward will make the
instrument panel illumination
brighter. When the dial is fully
rotated upward (dots aligned), the
instrument panel illumination
stays at full brightness. Rotating
the dial downward dims the
instrument panel illumination.
When the ambient light is bright,
the illumination brightness is set
to the maximum regardless of the position of the control dial.
Daytime Running Lights
The daytime running lights automatically turn on when the engine is running, the parking
brake is released, the select lever is out of the “P” position, and the light switch is set to
Off, “AUTO”, or “
”. Always turn on the headlights when it’s dark outside by rotating
the dial to the “
” or “AUTO” position.
TURN SIGNALS
Push fully up for the right turn signal and fully
down for left turn signal. Your Subaru also has
a one-touch lane changer feature: push slightly
up and release to signal a right lane change or
push slightly down and release to signal a left
lane change.
Illumination Brightness Dial
CONTROLS
31
Page 35 of 140
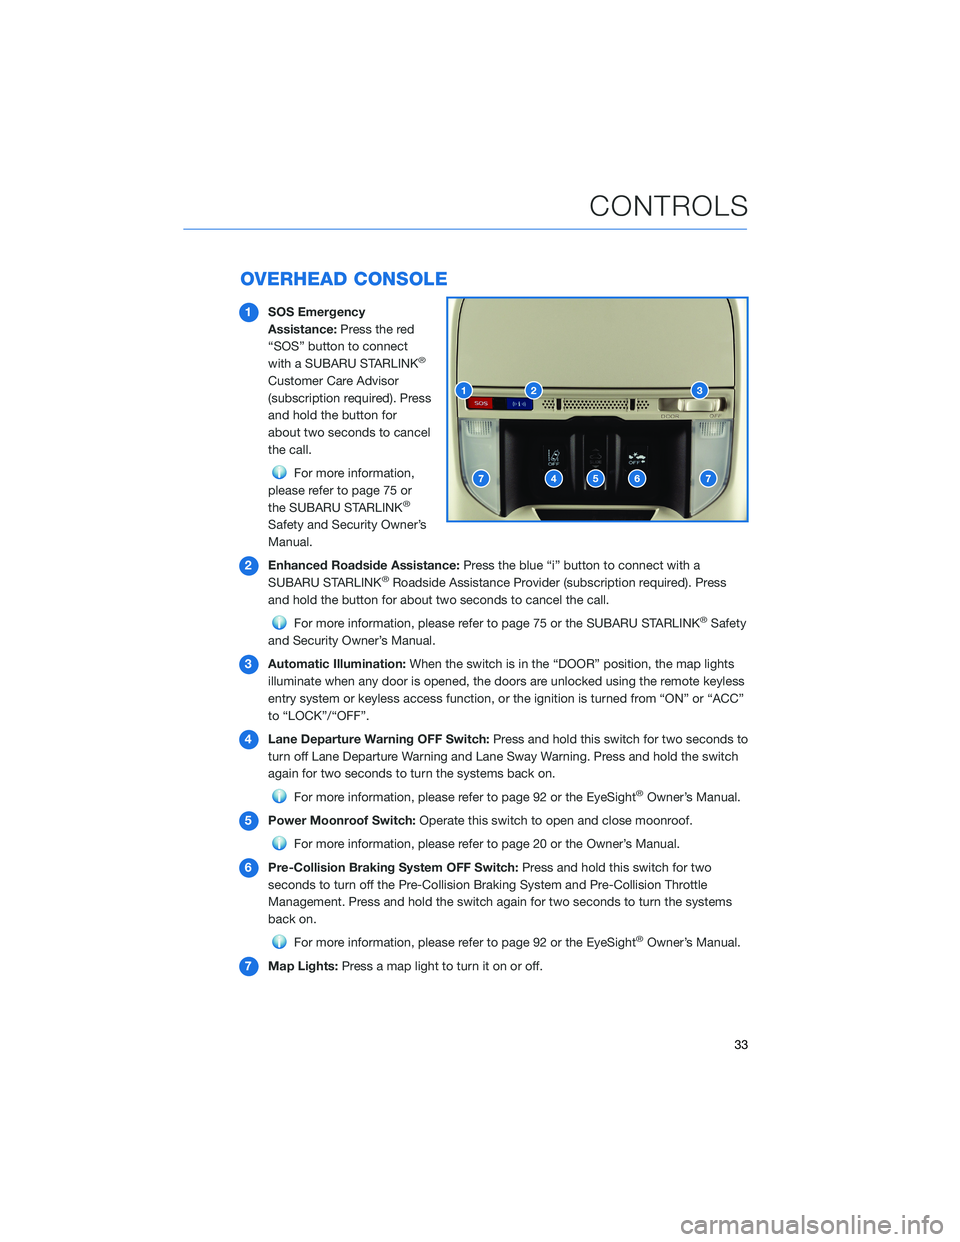
OVERHEAD CONSOLE
1SOS Emergency
Assistance:Press the red
“SOS” button to connect
with a SUBARU STARLINK
®
Customer Care Advisor
(subscription required). Press
and hold the button for
about two seconds to cancel
the call.
For more information,
please refer to page 75 or
the SUBARU STARLINK
®
Safety and Security Owner’s
Manual.
2Enhanced Roadside Assistance:Press the blue “i” button to connect with a
SUBARU STARLINK
®Roadside Assistance Provider (subscription required). Press
and hold the button for about two seconds to cancel the call.
For more information, please refer to page 75 or the SUBARU STARLINK®Safety
and Security Owner’s Manual.
3Automatic Illumination:When the switch is in the “DOOR” position, the map lights
illuminate when any door is opened, the doors are unlocked using the remote keyless
entry system or keyless access function, or the ignition is turned from “ON” or “ACC”
to “LOCK”/“OFF”.
4Lane Departure Warning OFF Switch:Press and hold this switch for two seconds to
turn off Lane Departure Warning and Lane Sway Warning. Press and hold the switch
again for two seconds to turn the systems back on.
For more information, please refer to page 92 or the EyeSight®Owner’s Manual.
5Power Moonroof Switch:Operate this switch to open and close moonroof.
For more information, please refer to page 20 or the Owner’s Manual.
6Pre-Collision Braking System OFF Switch:Press and hold this switch for two
seconds to turn off the Pre-Collision Braking System and Pre-Collision Throttle
Management. Press and hold the switch again for two seconds to turn the systems
back on.
For more information, please refer to page 92 or the EyeSight®Owner’s Manual.
7Map Lights:Press a map light to turn it on or off.
CONTROLS
33
Page 36 of 140
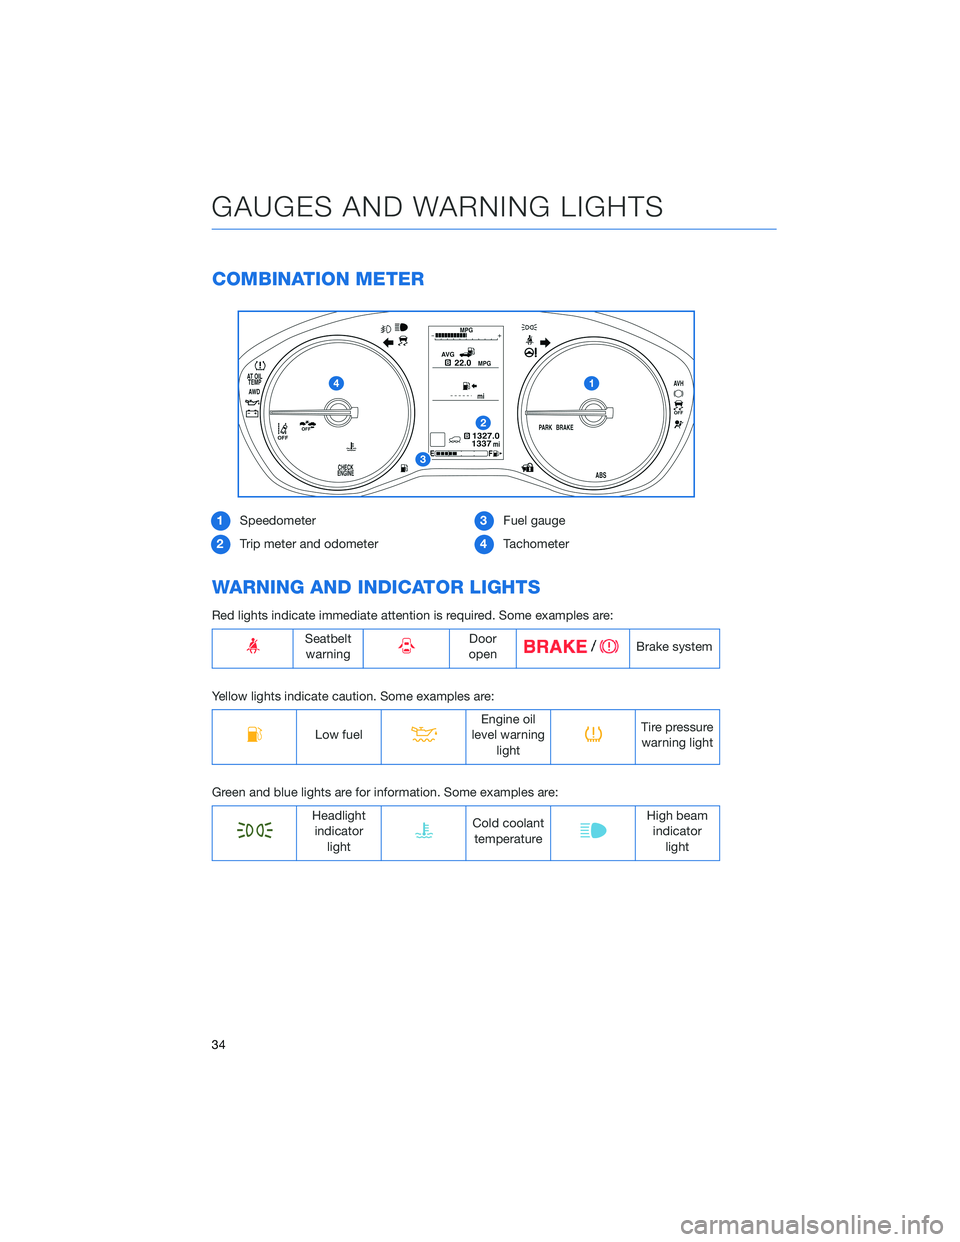
COMBINATION METER
1Speedometer
2Trip meter and odometer3Fuel gauge
4Tachometer
WARNING AND INDICATOR LIGHTS
Red lights indicate immediate attention is required. Some examples are:
Seatbelt
warningDoor
openBrake system
Yellow lights indicate caution. Some examples are:
Low fuelEngine oil
level warning
lightTire pressure
warning light
Green and blue lights are for information. Some examples are:
Headlight
indicator
lightCold coolant
temperatureHigh beam
indicator
light
GAUGES AND WARNING LIGHTS
34
Page 40 of 140
AUTO START–STOP
The Auto Start-Stop system is designed to automatically stop and restart the engine when
the vehicle is stationary for a short period of time after the engine has warmed up (while
waiting for a traffic light or in a traffic jam, for example). The system operates in order to
reduce fuel consumption, exhaust emissions, and undesired idling noise.
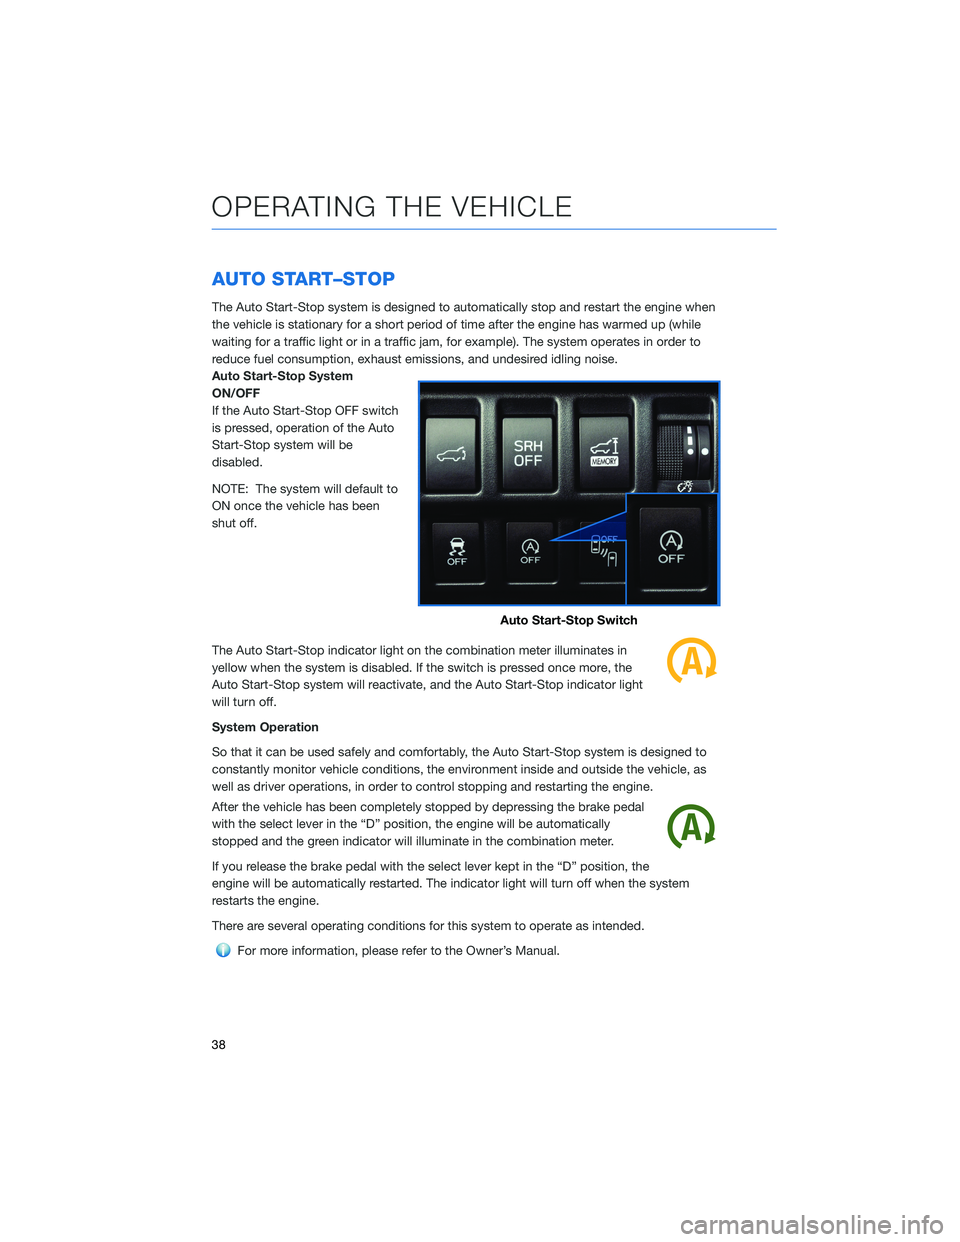
Auto Start-Stop System
ON/OFF
If the Auto Start-Stop OFF switch
is pressed, operation of the Auto
Start-Stop system will be
disabled.
NOTE: The system will default to
ON once the vehicle has been
shut off.
The Auto Start-Stop indicator light on the combination meter illuminates in
yellow when the system is disabled. If the switch is pressed once more, the
Auto Start-Stop system will reactivate, and the Auto Start-Stop indicator light
will turn off.
System Operation
So that it can be used safely and comfortably, the Auto Start-Stop system is designed to
constantly monitor vehicle conditions, the environment inside and outside the vehicle, as
well as driver operations, in order to control stopping and restarting the engine.
After the vehicle has been completely stopped by depressing the brake pedal
with the select lever in the “D” position, the engine will be automatically
stopped and the green indicator will illuminate in the combination meter.
If you release the brake pedal with the select lever kept in the “D” position, the
engine will be automatically restarted. The indicator light will turn off when the system
restarts the engine.
There are several operating conditions for this system to operate as intended.
For more information, please refer to the Owner’s Manual.
Auto Start-Stop Switch
OPERATING THE VEHICLE
38
Page 41 of 140
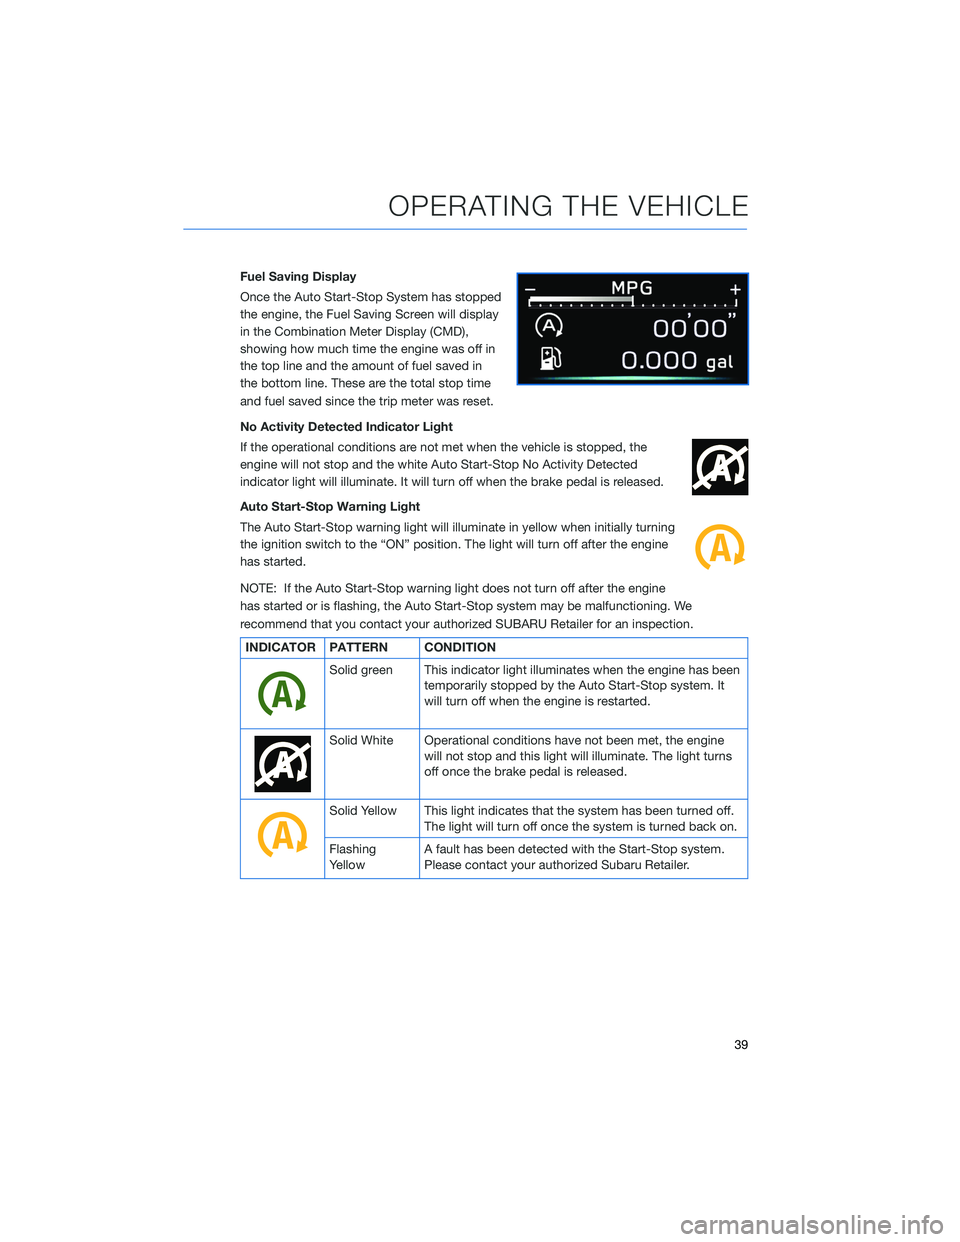
Fuel Saving Display
Once the Auto Start-Stop System has stopped
the engine, the Fuel Saving Screen will display
in the Combination Meter Display (CMD),
showing how much time the engine was off in
the top line and the amount of fuel saved in
the bottom line. These are the total stop time
and fuel saved since the trip meter was reset.
No Activity Detected Indicator Light
If the operational conditions are not met when the vehicle is stopped, the
engine will not stop and the white Auto Start-Stop No Activity Detected
indicator light will illuminate. It will turn off when the brake pedal is released.
Auto Start-Stop Warning Light
The Auto Start-Stop warning light will illuminate in yellow when initially turning
the ignition switch to the “ON” position. The light will turn off after the engine
has started.
NOTE: If the Auto Start-Stop warning light does not turn off after the engine
has started or is flashing, the Auto Start-Stop system may be malfunctioning. We
recommend that you contact your authorized SUBARU Retailer for an inspection.
INDICATOR PATTERN CONDITION
Solid green This indicator light illuminates when the engine has been
temporarily stopped by the Auto Start-Stop system. It
will turn off when the engine is restarted.
Solid White Operational conditions have not been met, the engine
will not stop and this light will illuminate. The light turns
off once the brake pedal is released.
Solid Yellow This light indicates that the system has been turned off.
The light will turn off once the system is turned back on.
Flashing
YellowA fault has been detected with the Start-Stop system.
Please contact your authorized Subaru Retailer.
OPERATING THE VEHICLE
39