Settings SUBARU FORESTER 2021 Getting Started Guide
[x] Cancel search | Manufacturer: SUBARU, Model Year: 2021, Model line: FORESTER, Model: SUBARU FORESTER 2021Pages: 140, PDF Size: 38.84 MB
Page 84 of 140
CLOCK
The clock can be set manually or automatically. When set to “Auto”, the clock
automatically adjusts when a Bluetooth®connected phone is paired (vehicles without
navigation), or through the GPS signal (vehicles with navigation system).
Manually
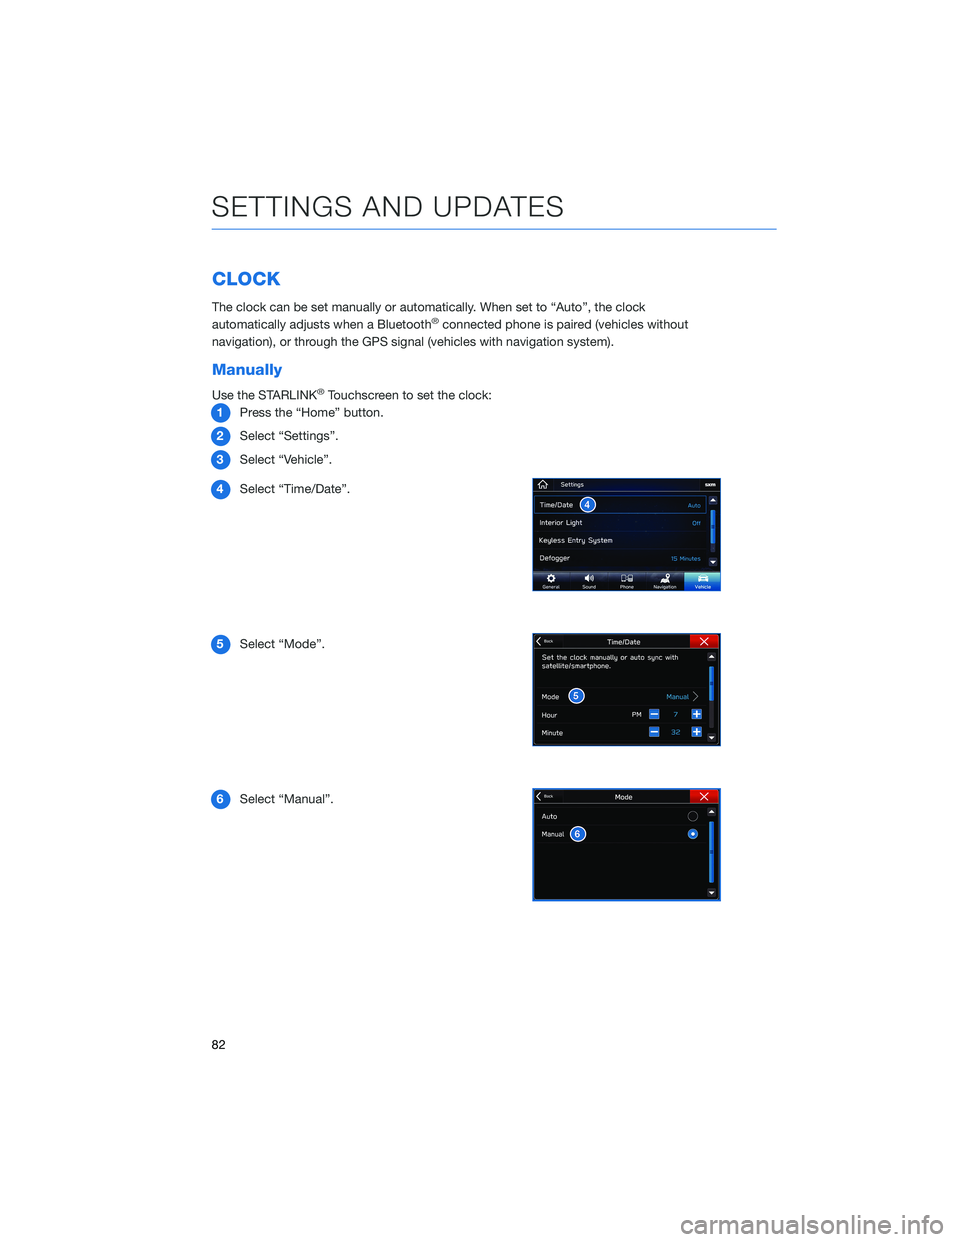
Use the STARLINK®Touchscreen to set the clock:
1Press the “Home” button.
2Select “Settings”.
3Select “Vehicle”.
4Select “Time/Date”.
5Select “Mode”.
6Select “Manual”.
SETTINGS AND UPDATES
82
Page 85 of 140
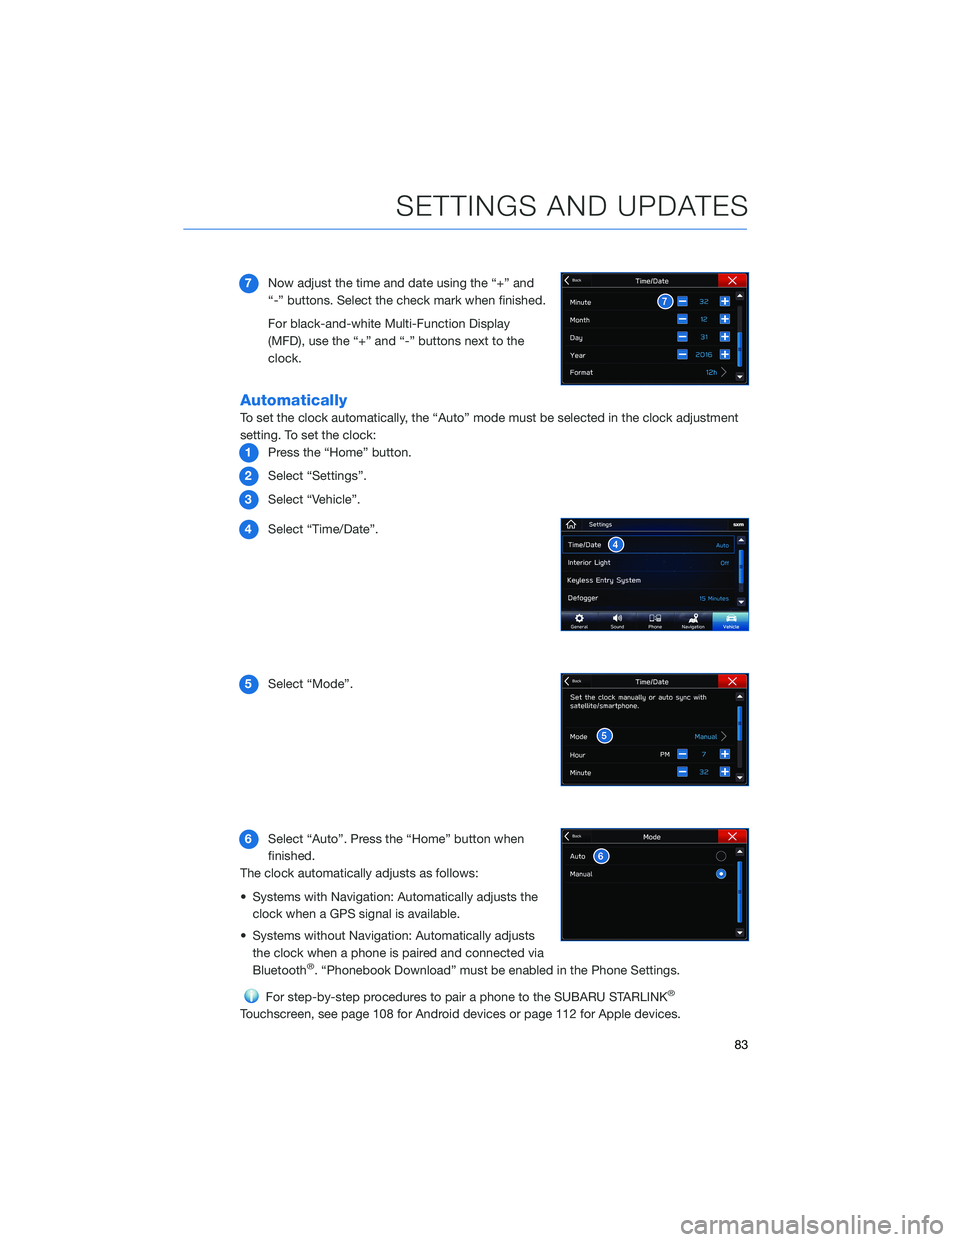
7Now adjust the time and date using the “+” and
“-” buttons. Select the check mark when finished.
For black-and-white Multi-Function Display
(MFD), use the “+” and “-” buttons next to the
clock.
Automatically
To set the clock automatically, the “Auto” mode must be selected in the clock adjustment
setting. To set the clock:
1Press the “Home” button.
2Select “Settings”.
3Select “Vehicle”.
4Select “Time/Date”.
5Select “Mode”.
6Select “Auto”. Press the “Home” button when
finished.
The clock automatically adjusts as follows:
• Systems with Navigation: Automatically adjusts the
clock when a GPS signal is available.
• Systems without Navigation: Automatically adjusts
the clock when a phone is paired and connected via
Bluetooth
®. “Phonebook Download” must be enabled in the Phone Settings.
For step-by-step procedures to pair a phone to the SUBARU STARLINK®
Touchscreen, see page 108 for Android devices or page 112 for Apple devices.
SETTINGS AND UPDATES
83
Page 92 of 140
Lead Vehicle Start Alert
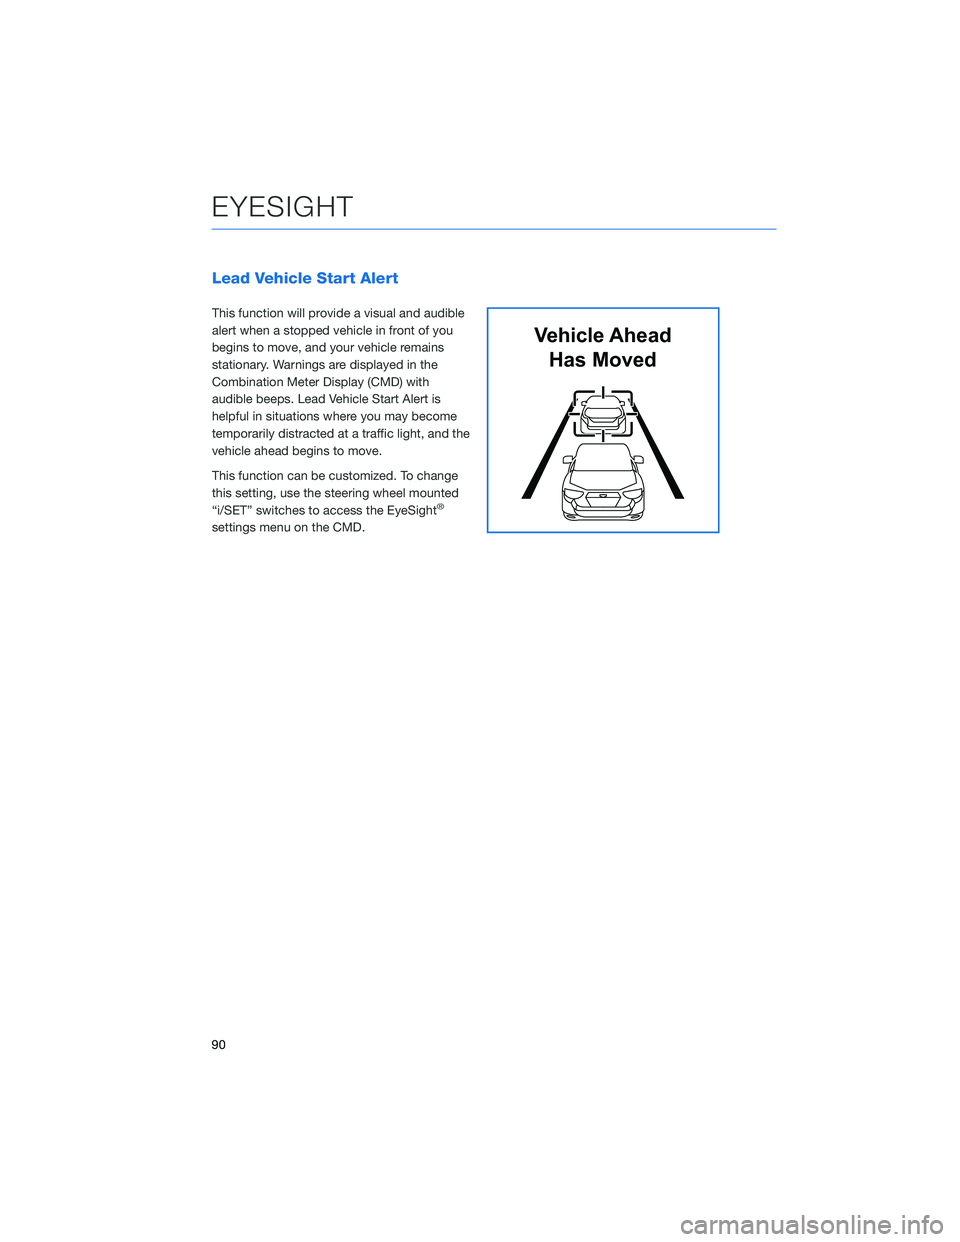
This function will provide a visual and audible
alert when a stopped vehicle in front of you
begins to move, and your vehicle remains
stationary. Warnings are displayed in the
Combination Meter Display (CMD) with
audible beeps. Lead Vehicle Start Alert is
helpful in situations where you may become
temporarily distracted at a traffic light, and the
vehicle ahead begins to move.
This function can be customized. To change
this setting, use the steering wheel mounted
“i/SET” switches to access the EyeSight
®
settings menu on the CMD.
Vehicle Ahead
Has Moved
EYESIGHT
90
Page 93 of 140
STEERING WHEEL CONTROLS
Advanced Adaptive Cruise Control
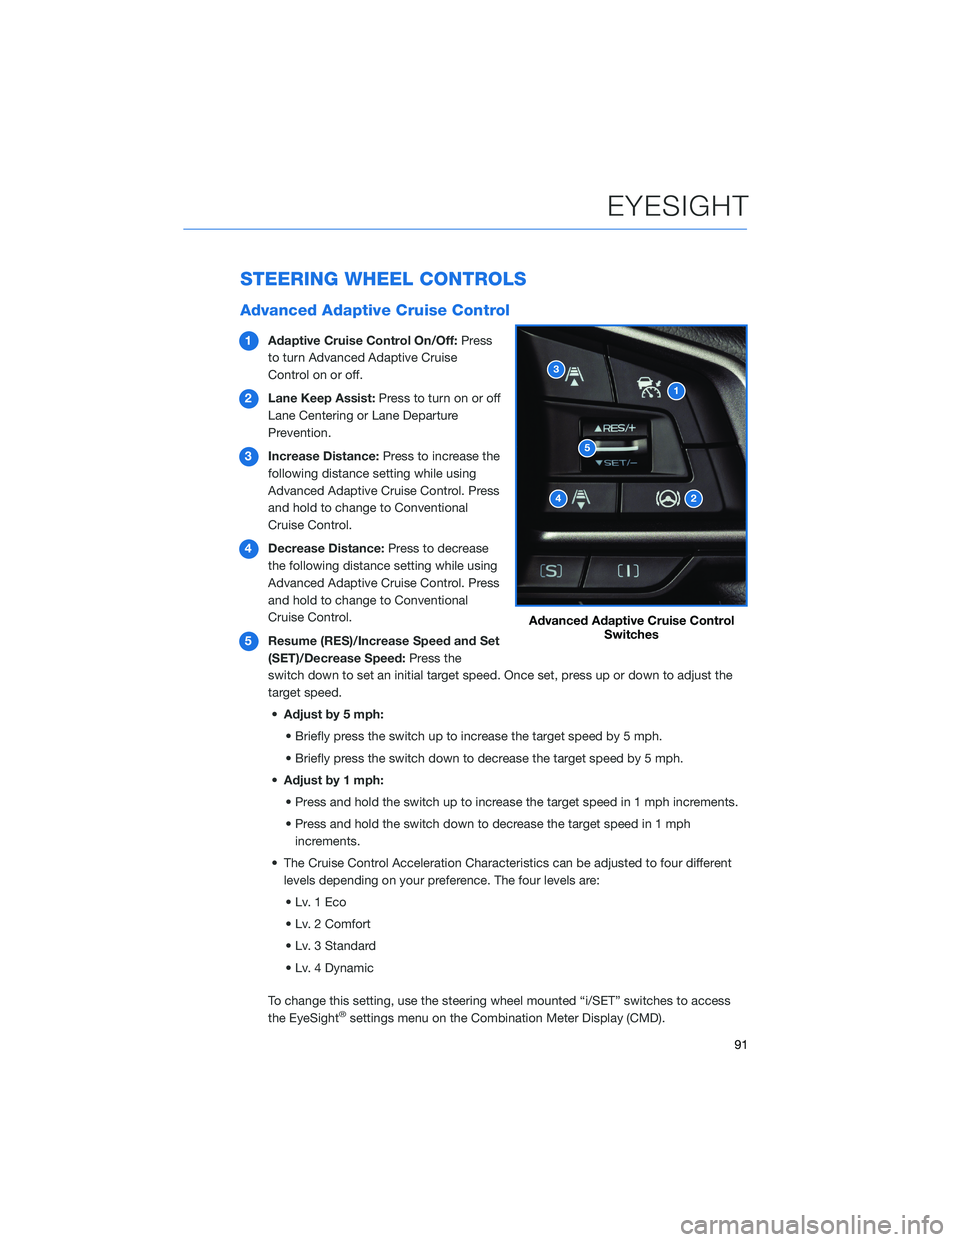
1Adaptive Cruise Control On/Off:Press
to turn Advanced Adaptive Cruise
Control on or off.
2Lane Keep Assist:Press to turn on or off
Lane Centering or Lane Departure
Prevention.
3Increase Distance:Press to increase the
following distance setting while using
Advanced Adaptive Cruise Control. Press
and hold to change to Conventional
Cruise Control.
4Decrease Distance:Press to decrease
the following distance setting while using
Advanced Adaptive Cruise Control. Press
and hold to change to Conventional
Cruise Control.
5Resume (RES)/Increase Speed and Set
(SET)/Decrease Speed:Press the
switch down to set an initial target speed. Once set, press up or down to adjust the
target speed.
•Adjust by 5 mph:
• Briefly press the switch up to increase the target speed by 5 mph.
• Briefly press the switch down to decrease the target speed by 5 mph.
•Adjust by 1 mph:
• Press and hold the switch up to increase the target speed in 1 mph increments.
• Press and hold the switch down to decrease the target speed in 1 mph
increments.
• The Cruise Control Acceleration Characteristics can be adjusted to four different
levels depending on your preference. The four levels are:
•Lv.1Eco
• Lv. 2 Comfort
• Lv. 3 Standard
• Lv. 4 Dynamic
To change this setting, use the steering wheel mounted “i/SET” switches to access
the EyeSight
®settings menu on the Combination Meter Display (CMD).
Advanced Adaptive Cruise Control
Switches
EYESIGHT
91
Page 94 of 140
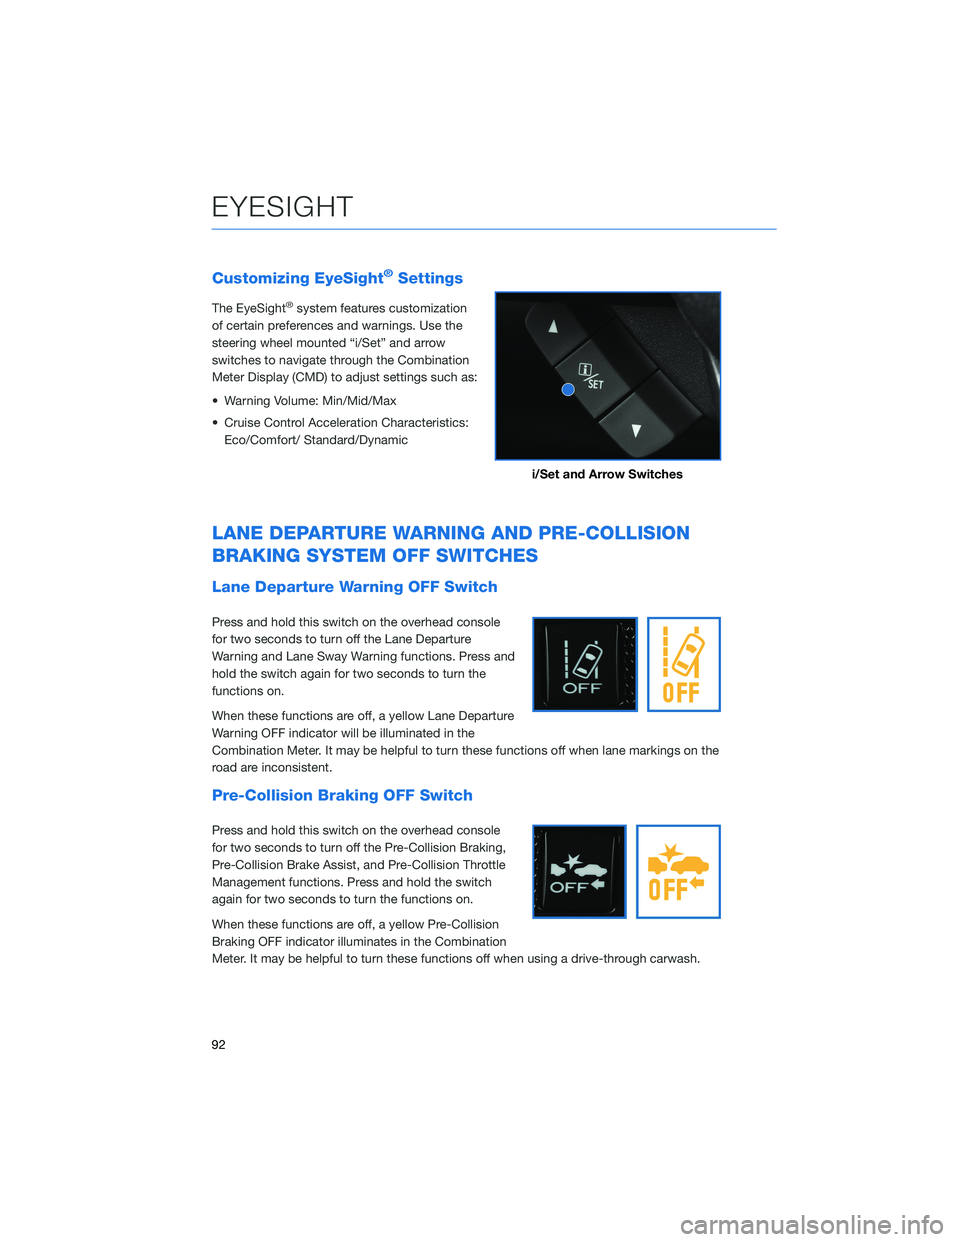
Customizing EyeSight®Settings
The EyeSight®system features customization
of certain preferences and warnings. Use the
steering wheel mounted “i/Set” and arrow
switches to navigate through the Combination
Meter Display (CMD) to adjust settings such as:
• Warning Volume: Min/Mid/Max
• Cruise Control Acceleration Characteristics:
Eco/Comfort/ Standard/Dynamic
LANE DEPARTURE WARNING AND PRE-COLLISION
BRAKING SYSTEM OFF SWITCHES
Lane Departure Warning OFF Switch
Press and hold this switch on the overhead console
for two seconds to turn off the Lane Departure
Warning and Lane Sway Warning functions. Press and
hold the switch again for two seconds to turn the
functions on.
When these functions are off, a yellow Lane Departure
Warning OFF indicator will be illuminated in the
Combination Meter. It may be helpful to turn these functions off when lane markings on the
road are inconsistent.
Pre-Collision Braking OFF Switch
Press and hold this switch on the overhead console
for two seconds to turn off the Pre-Collision Braking,
Pre-Collision Brake Assist, and Pre-Collision Throttle
Management functions. Press and hold the switch
again for two seconds to turn the functions on.
When these functions are off, a yellow Pre-Collision
Braking OFF indicator illuminates in the Combination
Meter. It may be helpful to turn these functions off when using a drive-through carwash.
i/Set and Arrow Switches
EYESIGHT
92
Page 96 of 140
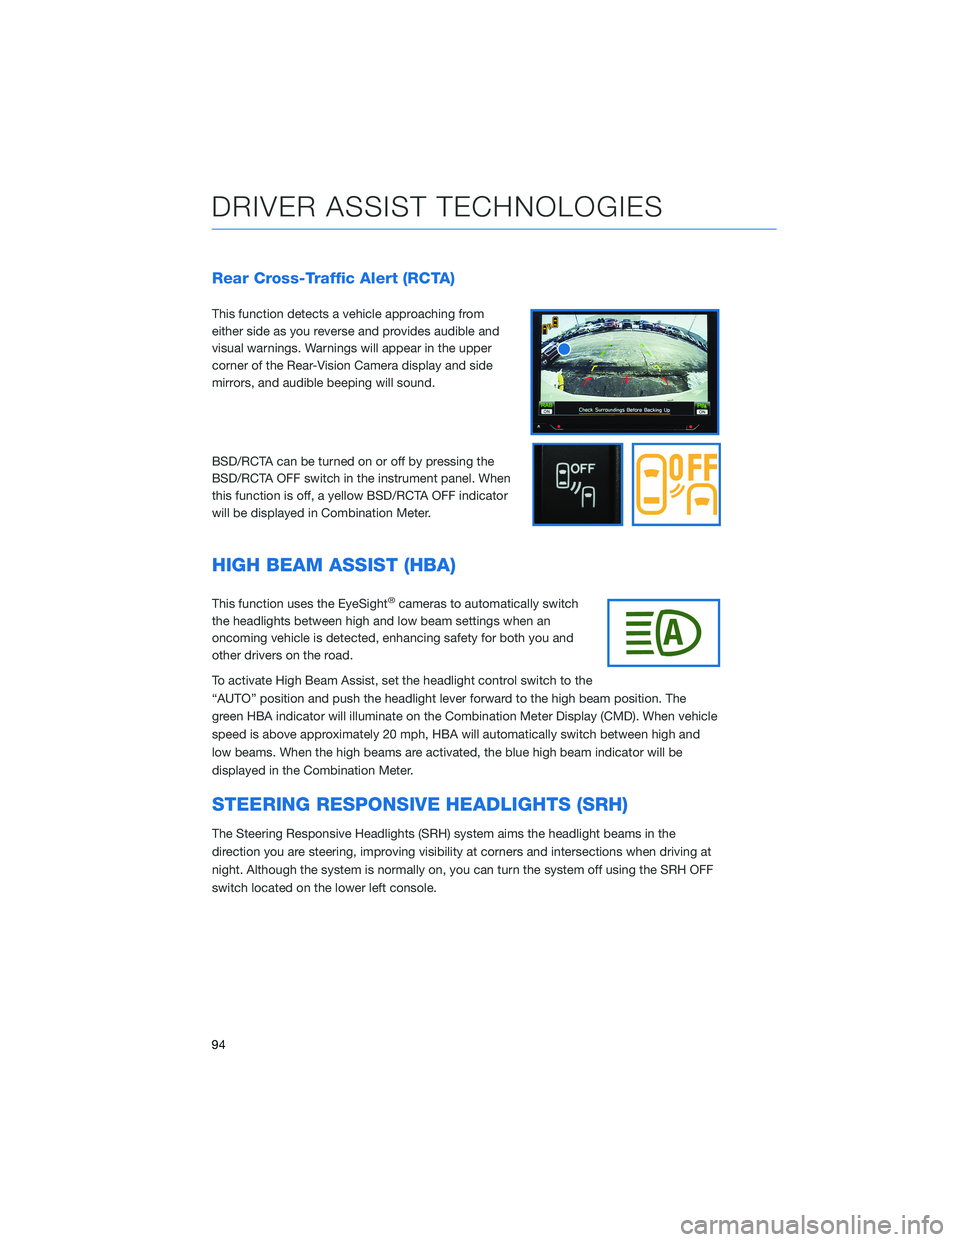
Rear Cross-Traffic Alert (RCTA)
This function detects a vehicle approaching from
either side as you reverse and provides audible and
visual warnings. Warnings will appear in the upper
corner of the Rear-Vision Camera display and side
mirrors, and audible beeping will sound.
BSD/RCTA can be turned on or off by pressing the
BSD/RCTA OFF switch in the instrument panel. When
this function is off, a yellow BSD/RCTA OFF indicator
will be displayed in Combination Meter.
HIGH BEAM ASSIST (HBA)
This function uses the EyeSight®cameras to automatically switch
the headlights between high and low beam settings when an
oncoming vehicle is detected, enhancing safety for both you and
other drivers on the road.
To activate High Beam Assist, set the headlight control switch to the
“AUTO” position and push the headlight lever forward to the high beam position. The
green HBA indicator will illuminate on the Combination Meter Display (CMD). When vehicle
speed is above approximately 20 mph, HBA will automatically switch between high and
low beams. When the high beams are activated, the blue high beam indicator will be
displayed in the Combination Meter.
STEERING RESPONSIVE HEADLIGHTS (SRH)
The Steering Responsive Headlights (SRH) system aims the headlight beams in the
direction you are steering, improving visibility at corners and intersections when driving at
night. Although the system is normally on, you can turn the system off using the SRH OFF
switch located on the lower left console.
DRIVER ASSIST TECHNOLOGIES
94
Page 98 of 140
DRIVERFOCUS®OVERVIEW(if equipped)
Your Subaru features DriverFocus®, a state-of-the-art system that helps reduce distracted
driving for both new and experienced drivers.
Working with our award-winning EyeSight
®Driver Assist Technology, DriverFocus®is like
having an attentive co-pilot along for the ride, available to give a helpful alert if a driver
becomes distracted or drowsy. For added convenience, DriverFocus
®can also recognize
up to five drivers and remember their preferences, such as seat position, climate settings,
and outside mirror positions.
For more information, please refer to “Driver Monitoring System” in your Owner’s
Manual.
DRIVERFOCUS®COMPONENTS
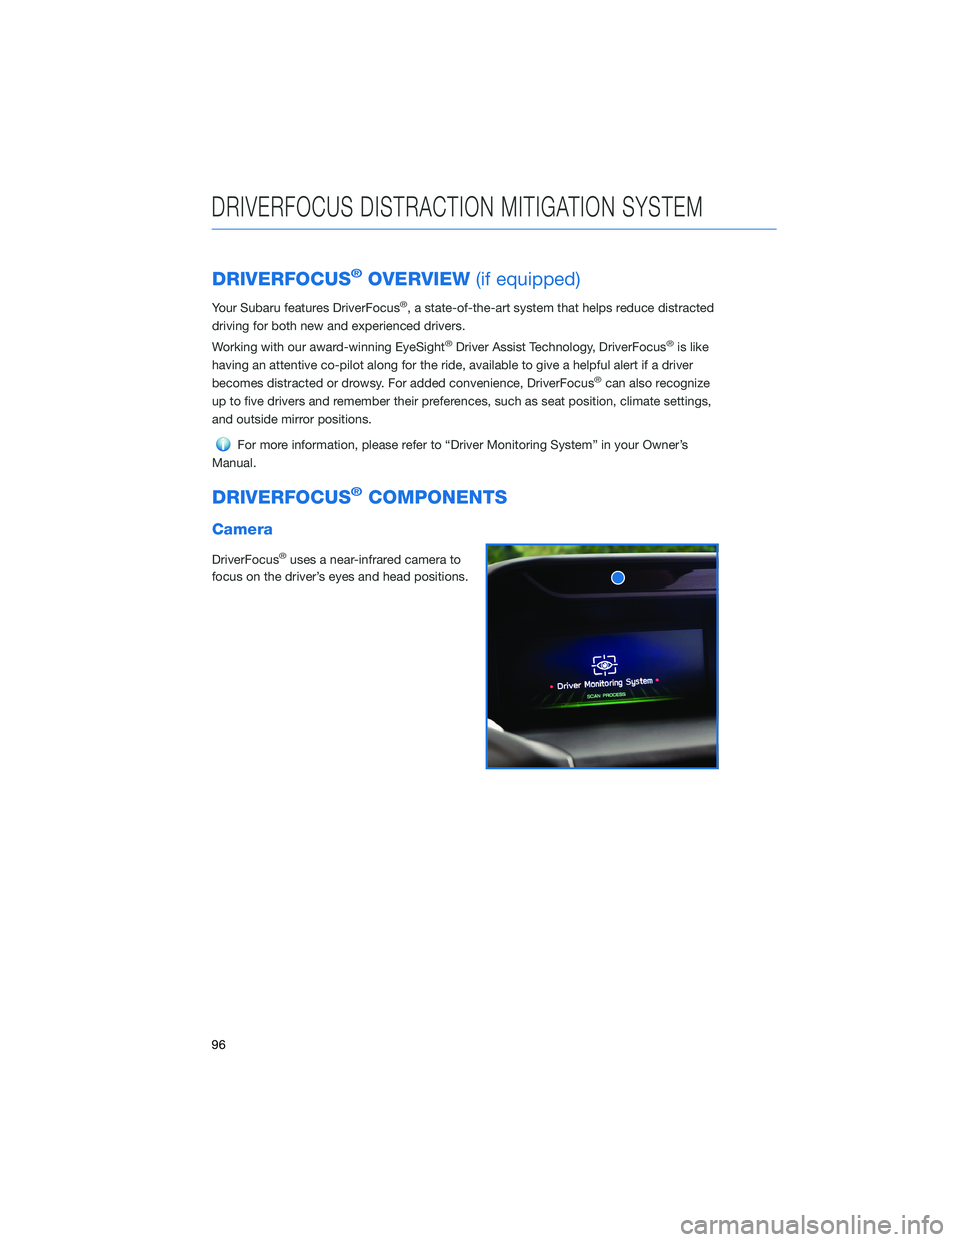
Camera
DriverFocus®uses a near-infrared camera to
focus on the driver’s eyes and head positions.
DRIVERFOCUS DISTRACTION MITIGATION SYSTEM
96
Page 99 of 140
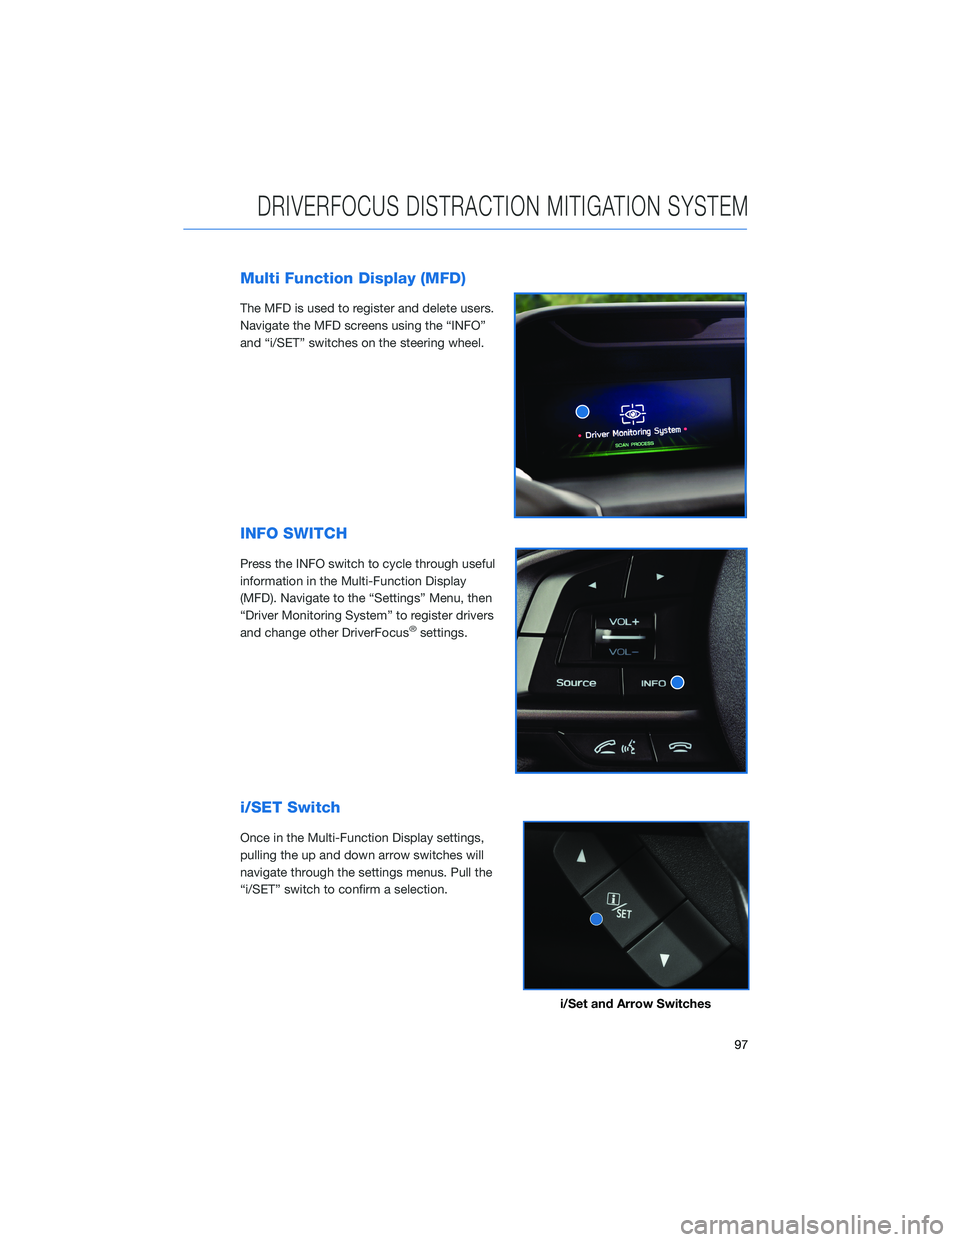
Multi Function Display (MFD)
The MFD is used to register and delete users.
Navigate the MFD screens using the “INFO”
and “i/SET” switches on the steering wheel.
INFO SWITCH
Press the INFO switch to cycle through useful
information in the Multi-Function Display
(MFD). Navigate to the “Settings” Menu, then
“Driver Monitoring System” to register drivers
and change other DriverFocus
®settings.
i/SET Switch
Once in the Multi-Function Display settings,
pulling the up and down arrow switches will
navigate through the settings menus. Pull the
“i/SET” switch to confirm a selection.
i/Set and Arrow Switches
DRIVERFOCUS DISTRACTION MITIGATION SYSTEM
97
Page 101 of 140
DROWSY/INATTENTIVE WARNINGS
DriverFocus®detects when the driver is possibly not paying
attention or is becoming drowsy while driving. It works whether you
are a registered user or not. The system does not provide alerts
when the turn signals are operating or when the select lever is in the
“R” position.
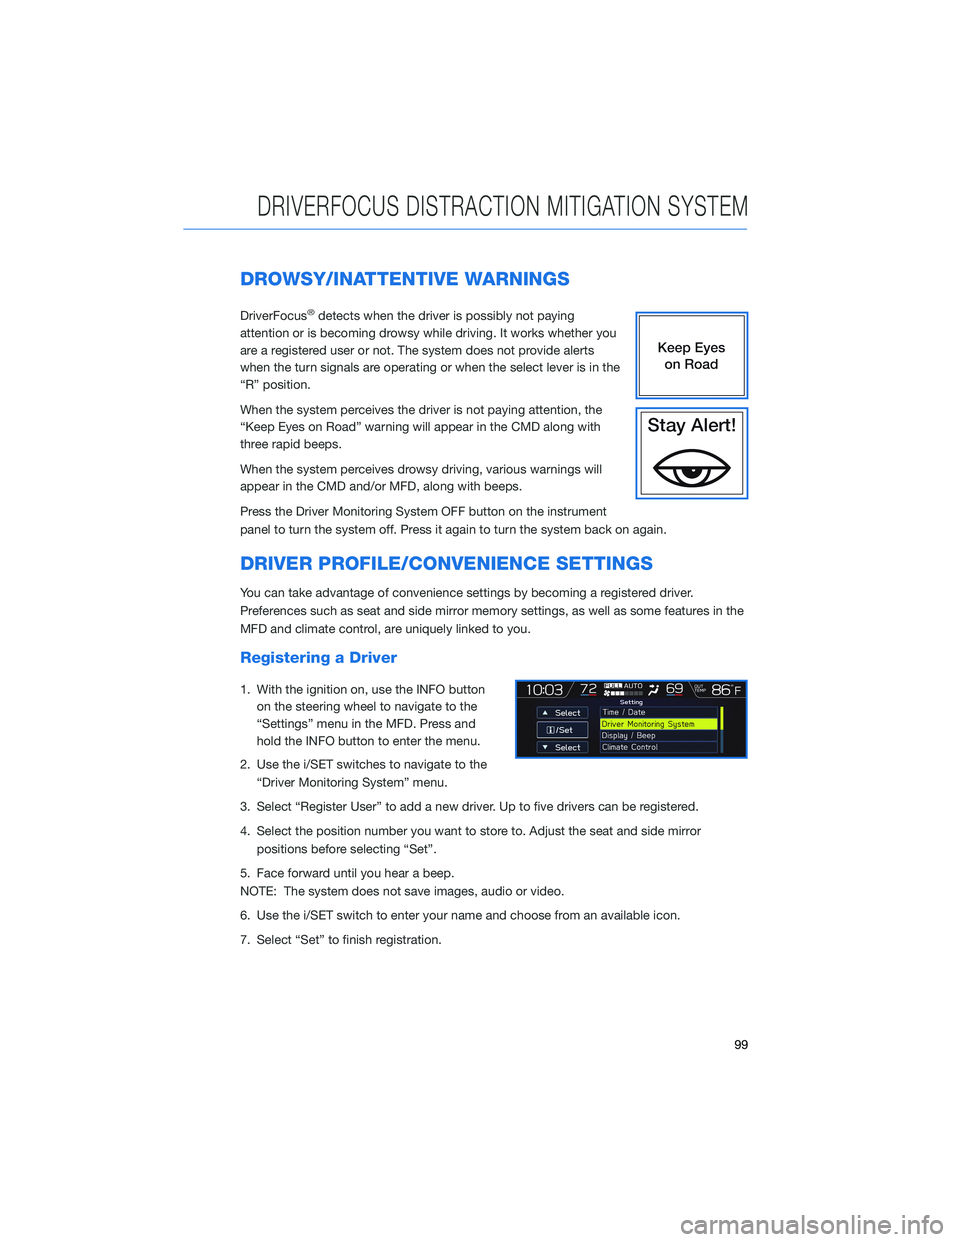
When the system perceives the driver is not paying attention, the
“Keep Eyes on Road” warning will appear in the CMD along with
three rapid beeps.
When the system perceives drowsy driving, various warnings will
appear in the CMD and/or MFD, along with beeps.
Press the Driver Monitoring System OFF button on the instrument
panel to turn the system off. Press it again to turn the system back on again.
DRIVER PROFILE/CONVENIENCE SETTINGS
You can take advantage of convenience settings by becoming a registered driver.
Preferences such as seat and side mirror memory settings, as well as some features in the
MFD and climate control, are uniquely linked to you.
Registering a Driver
1. With the ignition on, use the INFO button
on the steering wheel to navigate to the
“Settings” menu in the MFD. Press and
hold the INFO button to enter the menu.
2. Use the i/SET switches to navigate to the
“Driver Monitoring System” menu.
3. Select “Register User” to add a new driver. Up to five drivers can be registered.
4. Select the position number you want to store to. Adjust the seat and side mirror
positions before selecting “Set”.
5. Face forward until you hear a beep.
NOTE: The system does not save images, audio or video.
6. Use the i/SET switch to enter your name and choose from an available icon.
7. Select “Set” to finish registration.
DRIVERFOCUS DISTRACTION MITIGATION SYSTEM
99
Page 102 of 140
Recognizing a Driver
DriverFocus®will scan and recognize you as
soon as you enter the vehicle. The MFD will
display a welcome screen with your user
name and personal icon. The vehicle will also
recall your user settings, such as driver seat
and side mirror positions.
Deleting a Driver
1. With the ignition on, use the INFO button
on the steering wheel to navigate to the
“Settings” menu in the MFD.
2. Press and hold the INFO button to enter
the settings menu.
3. Use the i/SET switches to navigate to the “Driver Monitoring System” menu.
4. Select “Delete User”.
5. Select the driver you want to delete and select “Yes”.
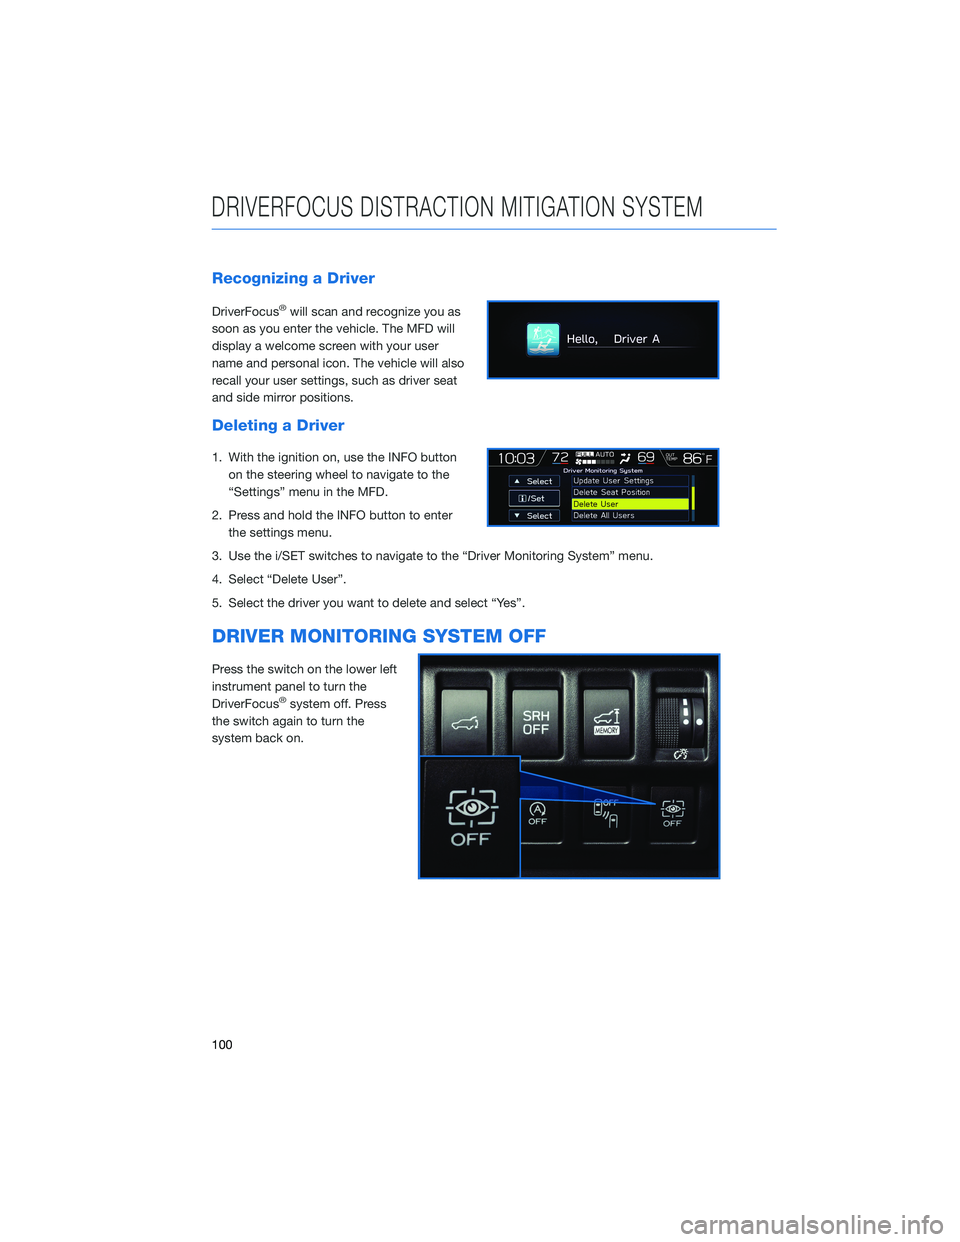
DRIVER MONITORING SYSTEM OFF
Press the switch on the lower left
instrument panel to turn the
DriverFocus
®system off. Press
the switch again to turn the
system back on.
DRIVERFOCUS DISTRACTION MITIGATION SYSTEM
100