clock SUBARU FORESTER 2021 Getting Started Guide
[x] Cancel search | Manufacturer: SUBARU, Model Year: 2021, Model line: FORESTER, Model: SUBARU FORESTER 2021Pages: 140, PDF Size: 38.84 MB
Page 4 of 140
AUTO START–STOP.........38
ELECTRONIC PARKING BRAKE
(EPB).....................40
X-MODE
®..................41
TURNING OFF THE VEHICLE...43
REFUELING
FUEL FILLER LID............44
FUEL......................44
FUEL CAPACITY.............44
PASSENGER/CARGO AREAS
FOLDING THE REAR SEATS...45
CHILD SAFETY LOCKS.......45
LATCH/ANCHOR............46
REAR SEAT REMINDER.......47
CARGO COVER.............48
SPARE TIRE AND JACK.......48
ENGINE COMPARTMENT
HOOD PROP................49
2.5 L ENGINE...............50
ADDITIONAL SPECIFICATIONS
NEW VEHICLE BREAK-IN......51
ENGINE OIL................51
ENGINE OIL CAPACITY.......51
ROOF RAIL CAPACITY.......52
TRAILER TOWING CAPACITY . . 52
TIRE PRESSURE MONITORING
SYSTEM (TPMS).............53
STARLINK OVERVIEW
OVERVIEW OF YOUR MULTIMEDIA
SYSTEM...................54
BUTTONS..................54
TOUCHSCREEN.............56
STEERING WHEEL CONTROLS . 57
VOICE RECOGNITION........57
STARLINK HOME
HOME SCREEN ICONS.......60
REARRANGING ICONS.......60
ADDING SHORTCUTS........61
DRIVER PROFILE
CREATING A DRIVER PROFILE . 62
MULTIMEDIA
RADIO.....................64
MEDIA.....................65
PHONE
PAIRING A PHONE...........66
MAKING A CALL.............66
RECEIVING A CALL..........67
TEXT MESSAGES............68
APPS
SUBARU STARLINK®IN-VEHICLE
APPS......................69
SUBARU STARLINK
®MOBILE
APP.......................71
MYSUBARU................73
MAPS (if equipped)
MAPS OVERVIEW............74
CREATING HOME AND WORK
PROFILES..................74
STARLINK SAFETY AND
SECURITY
SAFETY AND SECURITY
OVERVIEW.................75
ENROLLMENT..............76
MYSUBARU INTEGRATION....77
SUBARU STARLINK
®WI-FI
HOTSPOT..................77
SETTINGS AND UPDATES
SETTINGS AND UPDATES
OVERVIEW.................78
SOUND....................79
PHONE....................79
MAPS/NAVIGATION..........80
CLOCK....................82
EYESIGHT
EYESIGHT®OVERVIEW.......84
OPERATION................84
FUNCTIONS................85
STEERING WHEEL CONTROLS . 91
LANE DEPARTURE WARNING AND
PRE-COLLISION BRAKING
SYSTEM OFF SWITCHES......92
TABLE OF CONTENTS
2
Page 23 of 140
CLIMATE CONTROL
Automatic Climate Control
Set your desired temperature and let the system automatically make the adjustments for
you. At any time, you can manually take control of the climate settings.
Operation in Automatic Mode
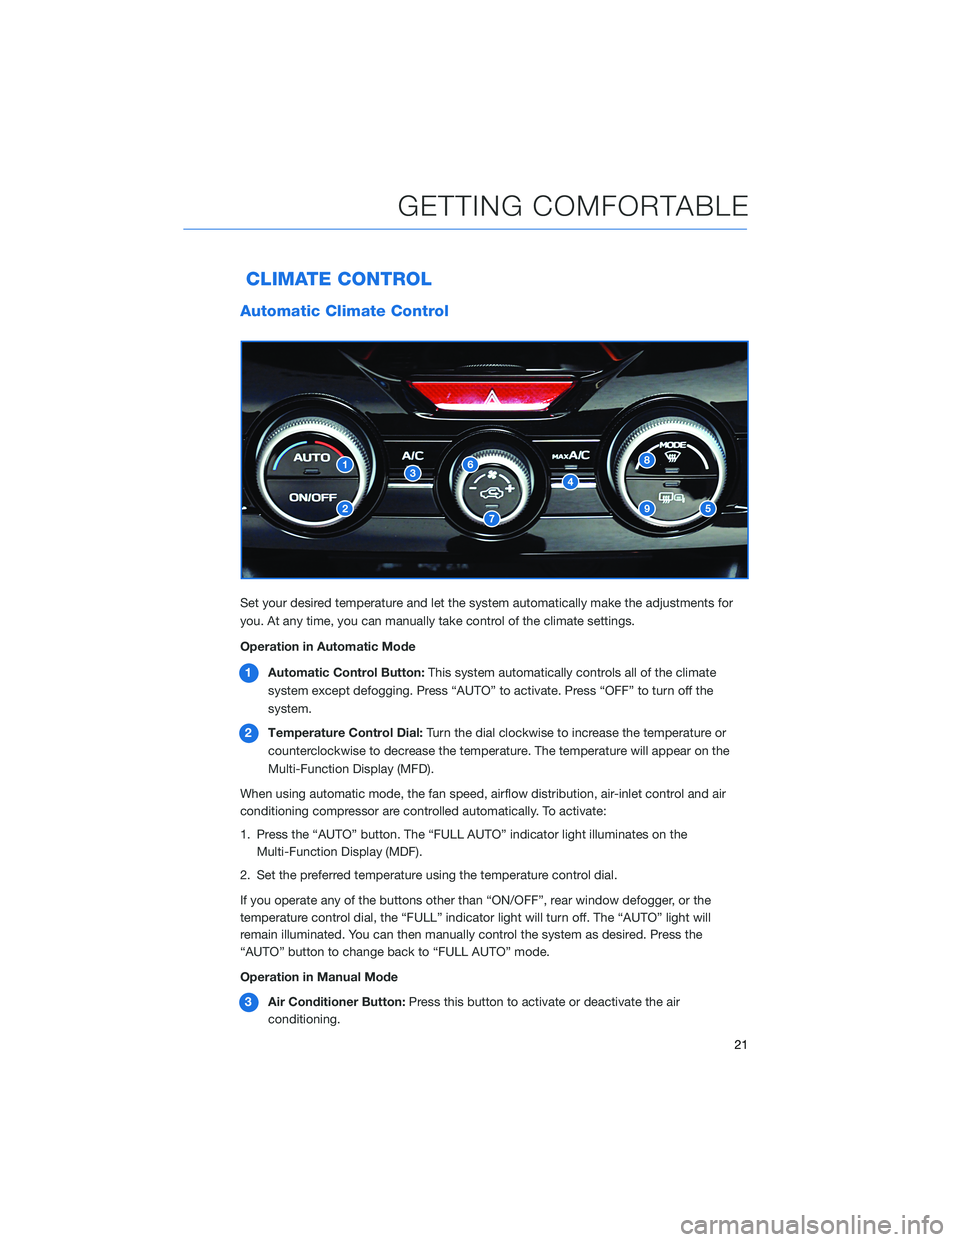
1Automatic Control Button:This system automatically controls all of the climate
system except defogging. Press “AUTO” to activate. Press “OFF” to turn off the
system.
2Temperature Control Dial:Turn the dial clockwise to increase the temperature or
counterclockwise to decrease the temperature. The temperature will appear on the
Multi-Function Display (MFD).
When using automatic mode, the fan speed, airflow distribution, air-inlet control and air
conditioning compressor are controlled automatically. To activate:
1. Press the “AUTO” button. The “FULL AUTO” indicator light illuminates on the
Multi-Function Display (MDF).
2. Set the preferred temperature using the temperature control dial.
If you operate any of the buttons other than “ON/OFF”, rear window defogger, or the
temperature control dial, the “FULL” indicator light will turn off. The “AUTO” light will
remain illuminated. You can then manually control the system as desired. Press the
“AUTO” button to change back to “FULL AUTO” mode.
Operation in Manual Mode
3Air Conditioner Button:Press this button to activate or deactivate the air
conditioning.
GETTING COMFORTABLE
21
Page 25 of 140
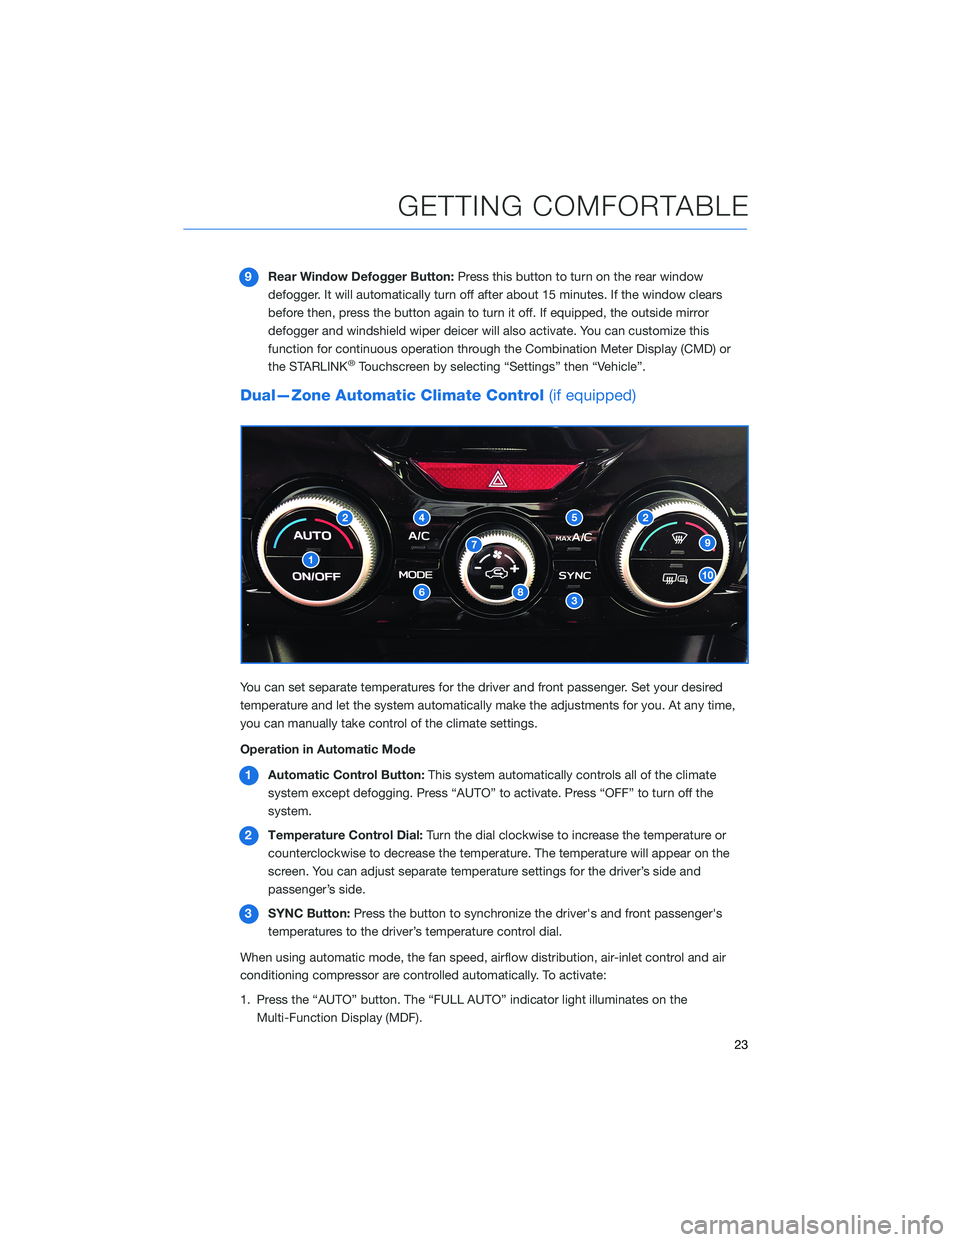
9Rear Window Defogger Button:Press this button to turn on the rear window
defogger. It will automatically turn off after about 15 minutes. If the window clears
before then, press the button again to turn it off. If equipped, the outside mirror
defogger and windshield wiper deicer will also activate. You can customize this
function for continuous operation through the Combination Meter Display (CMD) or
the STARLINK
®Touchscreen by selecting “Settings” then “Vehicle”.
Dual—Zone Automatic Climate Control(if equipped)
You can set separate temperatures for the driver and front passenger. Set your desired
temperature and let the system automatically make the adjustments for you. At any time,
you can manually take control of the climate settings.
Operation in Automatic Mode
1Automatic Control Button:This system automatically controls all of the climate
system except defogging. Press “AUTO” to activate. Press “OFF” to turn off the
system.
2Temperature Control Dial:Turn the dial clockwise to increase the temperature or
counterclockwise to decrease the temperature. The temperature will appear on the
screen. You can adjust separate temperature settings for the driver’s side and
passenger’s side.
3SYNC Button:Press the button to synchronize the driver's and front passenger's
temperatures to the driver’s temperature control dial.
When using automatic mode, the fan speed, airflow distribution, air-inlet control and air
conditioning compressor are controlled automatically. To activate:
1. Press the “AUTO” button. The “FULL AUTO” indicator light illuminates on the
Multi-Function Display (MDF).
GETTING COMFORTABLE
23
Page 46 of 140
FUEL FILLER LID
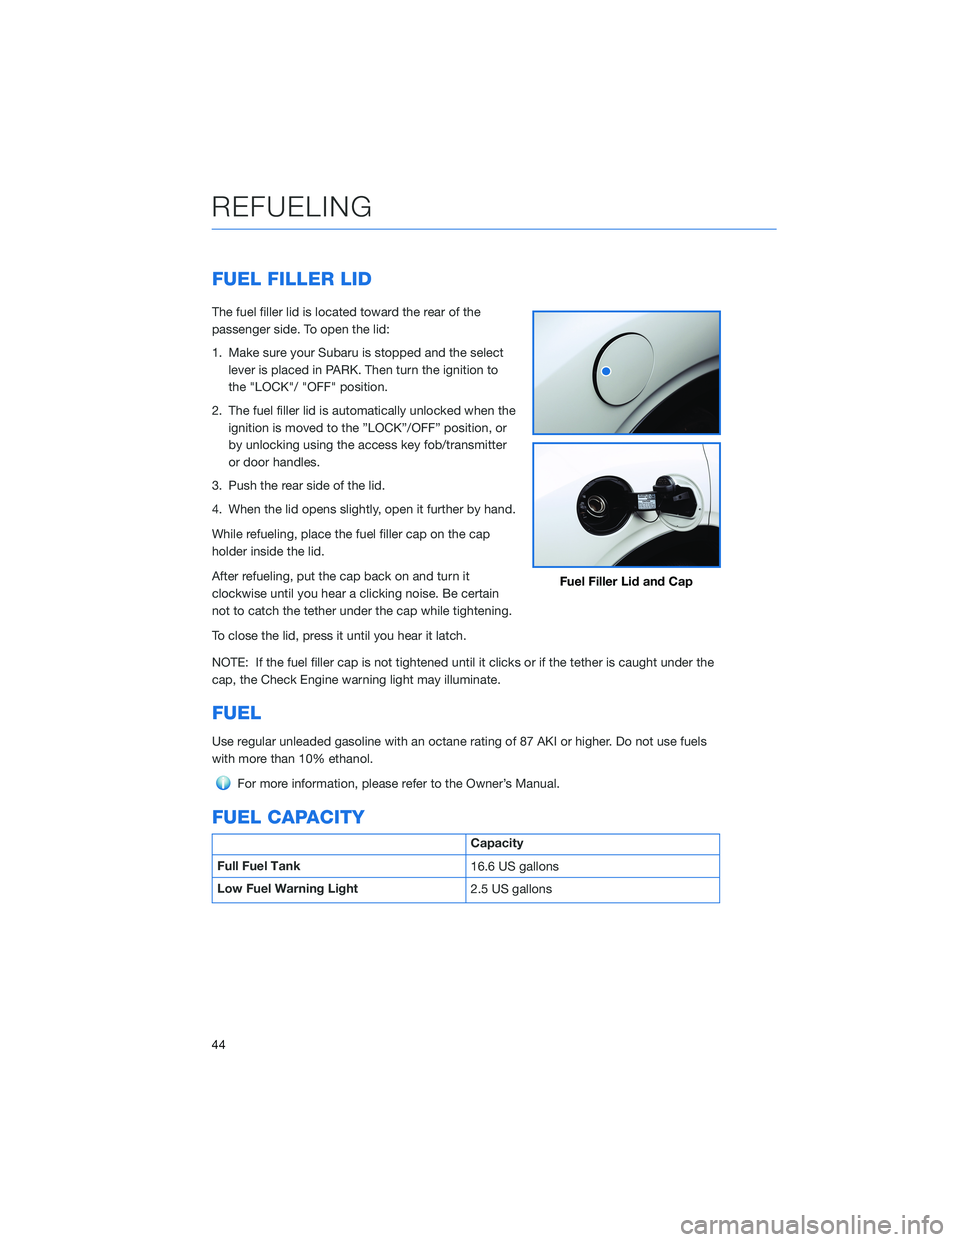
The fuel filler lid is located toward the rear of the
passenger side. To open the lid:
1. Make sure your Subaru is stopped and the select
lever is placed in PARK. Then turn the ignition to
the "LOCK"/ "OFF" position.
2. The fuel filler lid is automatically unlocked when the
ignition is moved to the ”LOCK”/OFF” position, or
by unlocking using the access key fob/transmitter
or door handles.
3. Push the rear side of the lid.
4. When the lid opens slightly, open it further by hand.
While refueling, place the fuel filler cap on the cap
holder inside the lid.
After refueling, put the cap back on and turn it
clockwise until you hear a clicking noise. Be certain
not to catch the tether under the cap while tightening.
To close the lid, press it until you hear it latch.
NOTE: If the fuel filler cap is not tightened until it clicks or if the tether is caught under the
cap, the Check Engine warning light may illuminate.
FUEL
Use regular unleaded gasoline with an octane rating of 87 AKI or higher. Do not use fuels
with more than 10% ethanol.
For more information, please refer to the Owner’s Manual.
FUEL CAPACITY
Capacity
Full Fuel Tank
16.6 US gallons
Low Fuel Warning Light
2.5 US gallons
Fuel Filler Lid and Cap
REFUELING
44
Page 84 of 140
CLOCK
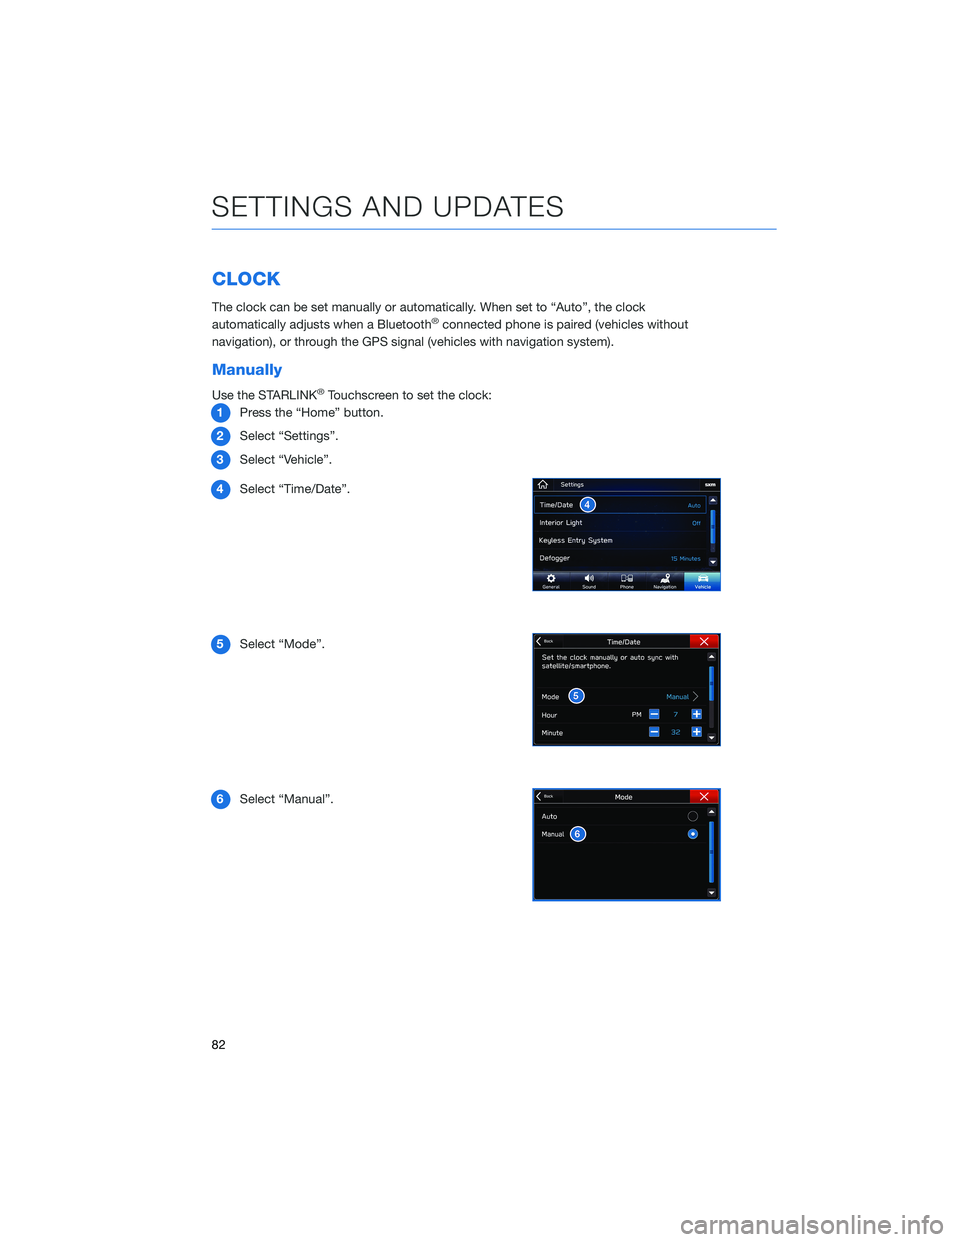
The clock can be set manually or automatically. When set to “Auto”, the clock
automatically adjusts when a Bluetooth®connected phone is paired (vehicles without
navigation), or through the GPS signal (vehicles with navigation system).
Manually
Use the STARLINK®Touchscreen to set the clock:
1Press the “Home” button.
2Select “Settings”.
3Select “Vehicle”.
4Select “Time/Date”.
5Select “Mode”.
6Select “Manual”.
SETTINGS AND UPDATES
82
Page 85 of 140
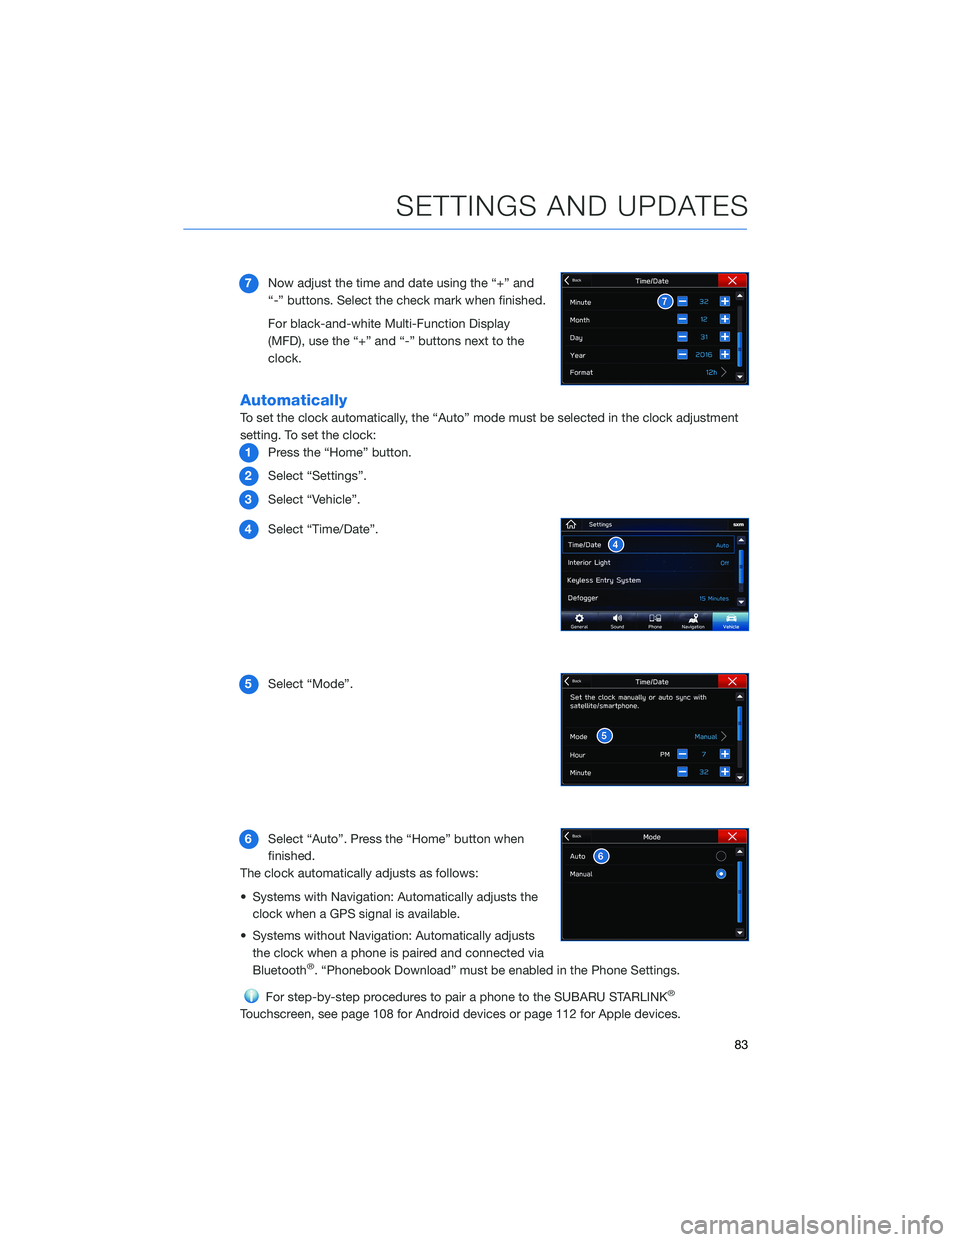
7Now adjust the time and date using the “+” and
“-” buttons. Select the check mark when finished.
For black-and-white Multi-Function Display
(MFD), use the “+” and “-” buttons next to the
clock.
Automatically
To set the clock automatically, the “Auto” mode must be selected in the clock adjustment
setting. To set the clock:
1Press the “Home” button.
2Select “Settings”.
3Select “Vehicle”.
4Select “Time/Date”.
5Select “Mode”.
6Select “Auto”. Press the “Home” button when
finished.
The clock automatically adjusts as follows:
• Systems with Navigation: Automatically adjusts the
clock when a GPS signal is available.
• Systems without Navigation: Automatically adjusts
the clock when a phone is paired and connected via
Bluetooth
®. “Phonebook Download” must be enabled in the Phone Settings.
For step-by-step procedures to pair a phone to the SUBARU STARLINK®
Touchscreen, see page 108 for Android devices or page 112 for Apple devices.
SETTINGS AND UPDATES
83
Page 132 of 140
FIRMWARE AND SOFTWARE UPDATES
For 8.0–inch Multimedia Plus and 8.0–inch Multimedia Navigation systems, you can
update the system software via a Wi-Fi connection or the aha™ application on your
smartphone (depending on your smartphone communication and transfer speed).
To accurately check for updates, make sure the clock is set to “Auto” with a GPS signal
available (system with navigation) or a phone paired via Bluetooth
®(system without
navigation). See page 82 for step by step directions on setting the clock. System
functionality will be restricted during installation.
1.
Connect to a Wi-Fi network or start the aha application on your smartphone (see
page
120).
2. Return to the general settings screen (if needed, press the “Home” button, select
“Settings”, and then select “General”).
3. Select “Check for Updates”.
• If “Automatically Check for Updates” is turned on at the general settings screen, an
update check will be performed automatically before proceeding to the next step.
• If “Automatically Download Updates” is turned on at the general settings screen, the
software update will be downloaded automatically before proceeding to “Update
Installation”.
4. If the “Software Update Ready to Download” pop-up is displayed, select “Download
Now” to begin the download. The download status progress is displayed in the upper
right of the screen.
5. Select “Install Now” to start the installation process. The installation process will take
several minutes to complete. If you need to stop the installation process, press
“Cancel”.
6. When the installation is complete, select “I Agree” on the confirmation message to
complete the update process. By selecting “I Agree”, the system will restart
automatically.
HOW TO APPENDIX
130
Page 133 of 140
2.5 L ENGINE . . . . . . . ........ 50
A
ACCESSORY CONNECTIONS . . . . . . 27
ADDING SHORTCUTS . . . . ...... 61
ADVANCED ADAPTIVE CRUISE
CONTROL . . . . . ........... 29
ANDROID AUTO™ . . . . . ....... 116
Cables . . . . . . . ..........116
Compatible Models ..........118
Connecting an Android Phone....116
APPLE CARPLAY
®............ 118
Cables . . . . . . . ..........118
Compatible Models ..........119
Connecting an iPhone . . . .....118
AUDIO CONTROLS ............ 28
AUTO START–STOP . . . . . . . . . . . 38
B
BLIND-SPOT DETECTION (BSD)/ REAR
CROSS-TRAFFIC ALERT (RCTA) . . 93
Blind-Spot Detection (BSD) . . . . . . 93
Lane Change Assist (LCA) . ......93
Rear Cross-Traffic Alert (RCTA) . . . . 94
BLUETOOTH
®PAIRING . . ....... 108
Pairing an Android Device . . . . . . 108
Pairing an iOS/Apple Device . . . . . 112
BUTTONS . . . . ............. 54
CD Player Functions..........55
Controlling the Volume . . . . . . . . . 55
Other Functions . . . . . ........55
Radio Functions . . . . . ........54
C
CARGO COVER . . . . . . . . ...... 48
CHILD SAFETY LOCKS.......... 45
CLIMATE CONTROL........... 21
Automatic Climate Control . . . . . . . 21
Dual—Zone Automatic Climate
Control . . . . . . . . . . . . . . . . . . 23Heated Seats (if equipped) ......25
Heated Steering Wheel . .......26
Rear Heated Seats...........26
Remote Engine Start with Climate
Control . . . . . . . . . . . . . . . . . . 26
CLOCK . . ................. 82
Automatically ..............83
Manually.................82
COMBINATION METER .......... 34
CREATING A DRIVER PROFILE ..... 62
Retrieving a Driver Profile.......63
CREATING HOME AND WORK
PROFILES . . . . . . . . ........ 74
D
DRIVERFOCUS
®COMPONENTS . . . . 96
Camera . . . . . . . ...........96
Combination Meter Display (CMD) . . 98
INFO SWITCH . . . ...........97
i/SET Switch . ..............97
Multi Function Display (MFD).....97
DRIVERFOCUS
®OVERVIEW . . . . . . 96
DRIVER MONITORING SYSTEM OFF . 100
DRIVER PROFILE/CONVENIENCE
SETTINGS................ 99
Deleting a Driver . . ..........100
Recognizing a Driver.........100
Registering a Driver . . . ........99
DRIVING THE VEHICLE . . . ....... 36
Automatic Transmission Shift Mode . 36
Paddle Shift Control Switches (if
equipped) . . . .............37
SI-DRIVE . . . ..............37
DROWSY/INATTENTIVE WARNINGS . . 99
E
ELECTRONIC PARKING BRAKE (EPB) . 40
Auto Vehicle Hold (AVH) . . ......41
INDEX
131