SUBARU FORESTER 2022 Getting Started Guide
FORESTER 2022
SUBARU
SUBARU
https://www.carmanualsonline.info/img/17/40407/w960_40407-0.png
SUBARU FORESTER 2022 Getting Started Guide
Trending: oil, sport mode, fold seats, AUX, audio, navigation, spare tire
Page 11 of 156
KEYLESS ACCESS WITH PUSH BUTTON START
(if equipped)
The Keyless Access with Push-Button Start system features the following touch-activated
door locking or unlocking functions without the key ever leaving your pocket or purse;
simply carry the access key fob with you. You can customize the touch-activated door
locking or unlocking settings using the Combination Meter Display or through the
STARLINK
®Touchscreen by selecting “Settings” then “Vehicle”.
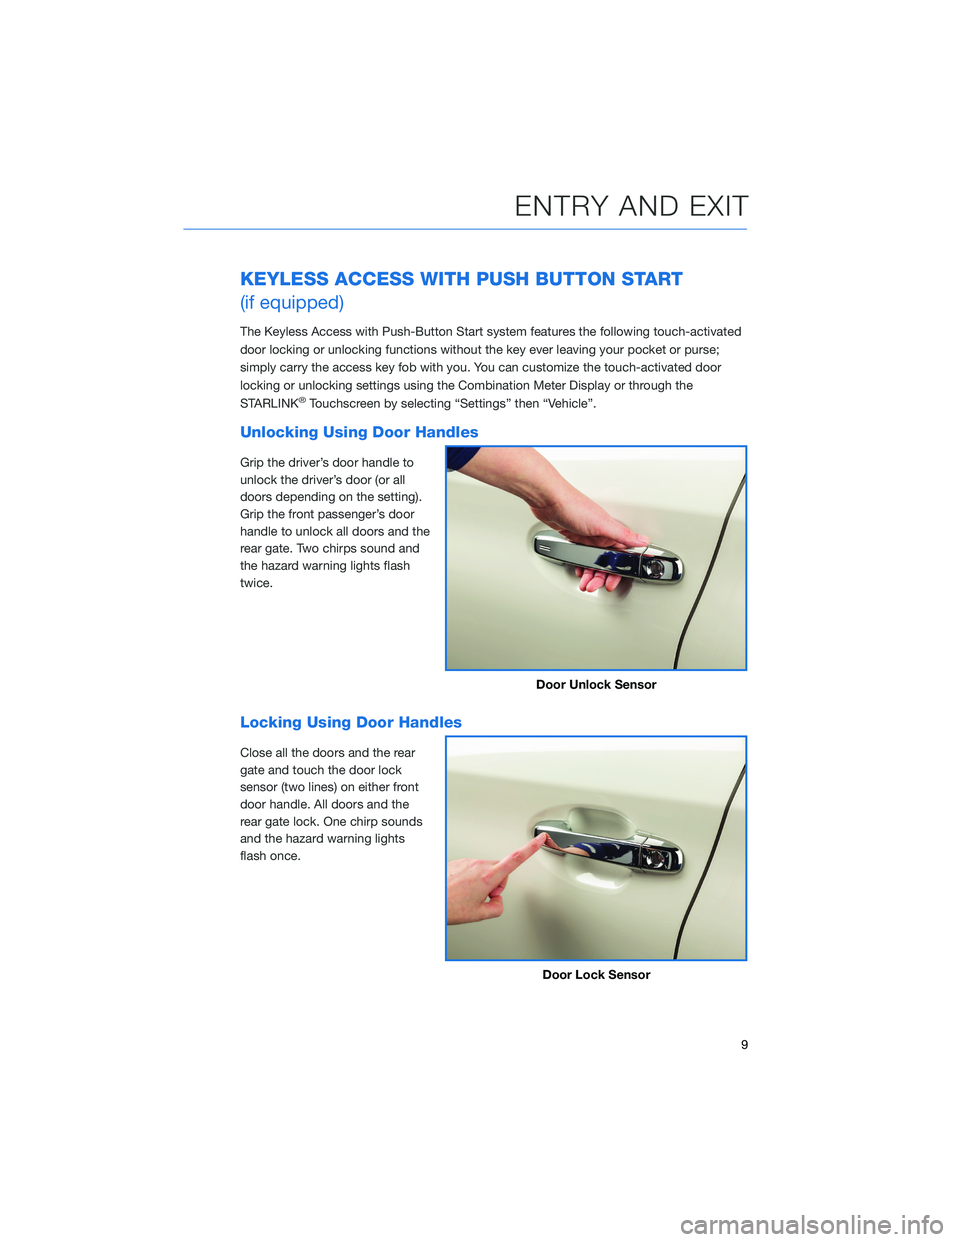
Unlocking Using Door Handles
Grip the driver’s door handle to
unlock the driver’s door (or all
doors depending on the setting).
Grip the front passenger’s door
handle to unlock all doors and the
rear gate. Two chirps sound and
the hazard warning lights flash
twice.
Locking Using Door Handles
Close all the doors and the rear
gate and touch the door lock
sensor (two lines) on either front
door handle. All doors and the
rear gate lock. One chirp sounds
and the hazard warning lights
flash once.
Door Unlock Sensor
Door Lock Sensor
ENTRY AND EXIT
9
Page 12 of 156
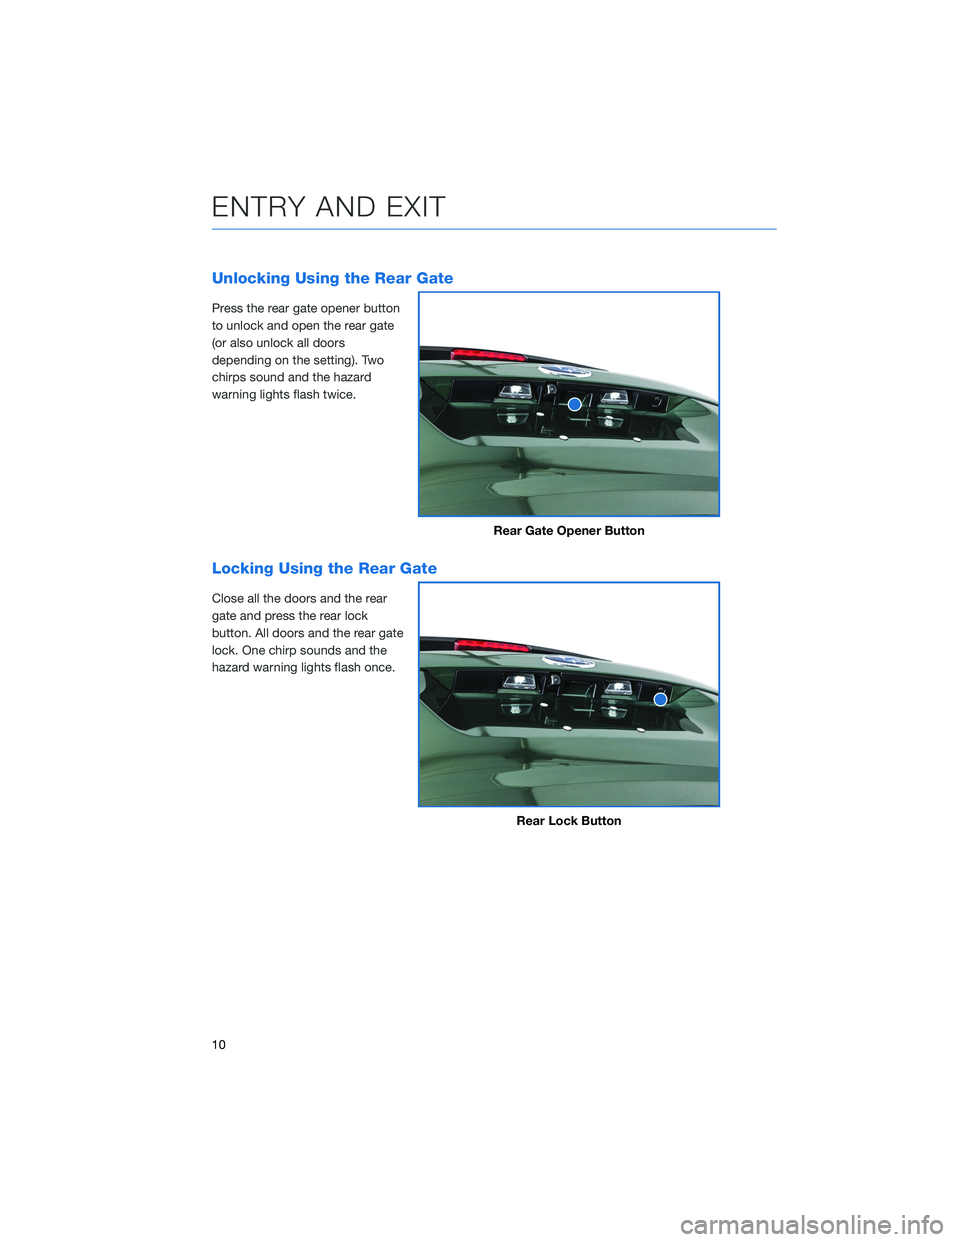
Unlocking Using the Rear Gate
Press the rear gate opener button
to unlock and open the rear gate
(or also unlock all doors
depending on the setting). Two
chirps sound and the hazard
warning lights flash twice.
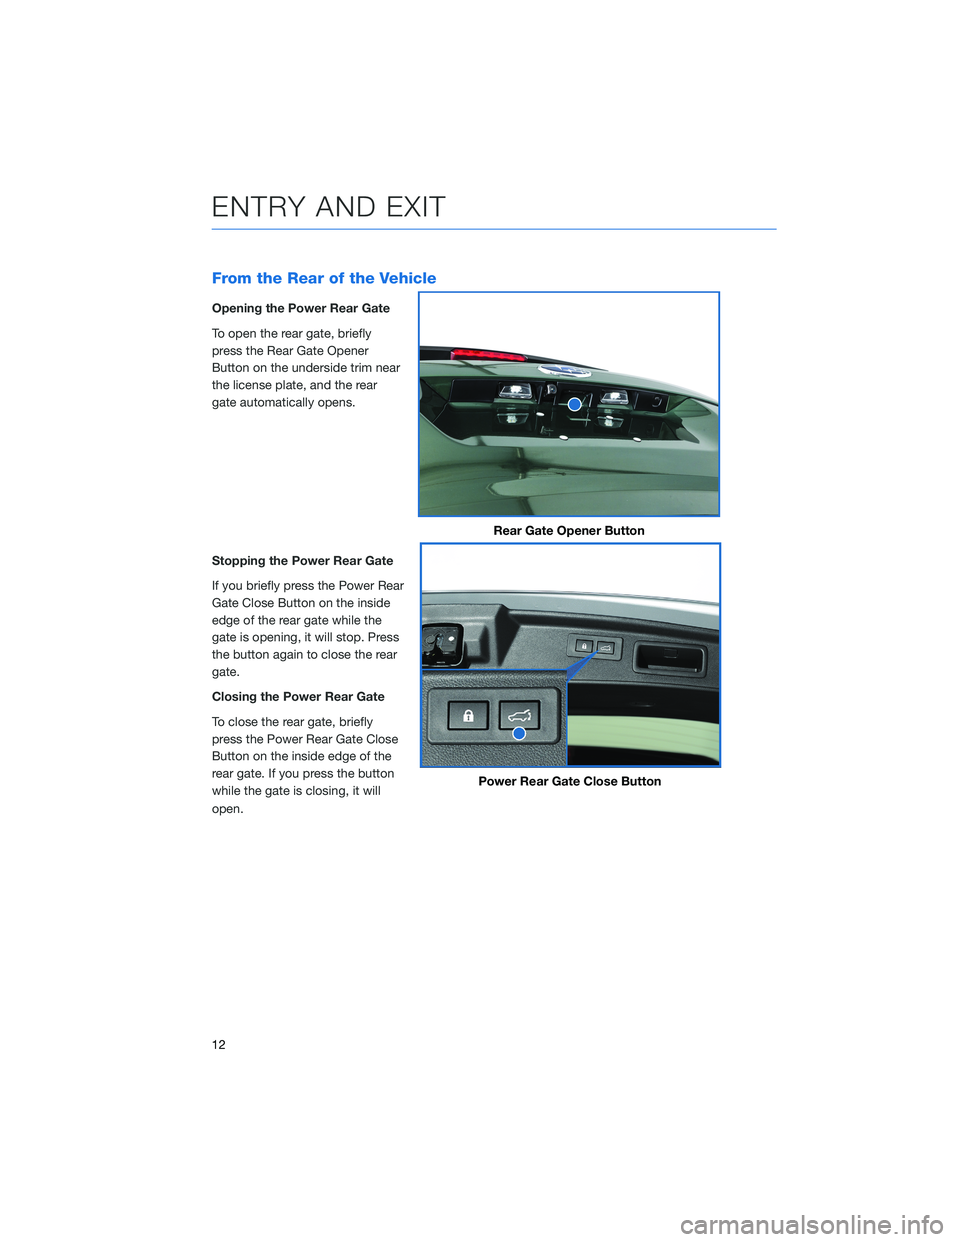
Locking Using the Rear Gate
Close all the doors and the rear
gate and press the rear lock
button. All doors and the rear gate
lock. One chirp sounds and the
hazard warning lights flash once.
Rear Gate Opener Button
Rear Lock Button
ENTRY AND EXIT
10
Page 13 of 156
POWER REAR GATE (PRG)(if equipped)
The Power Rear Gate allows automatic opening, and a single touch
of a button can close the gate and lock the entire vehicle. The
opening height can also be adjusted for spaces where clearance is
limited.
You can learn more about the Power Rear Gate from the video
linked in the QR code and “Keys and Doors” in your Owner’s
Manual.
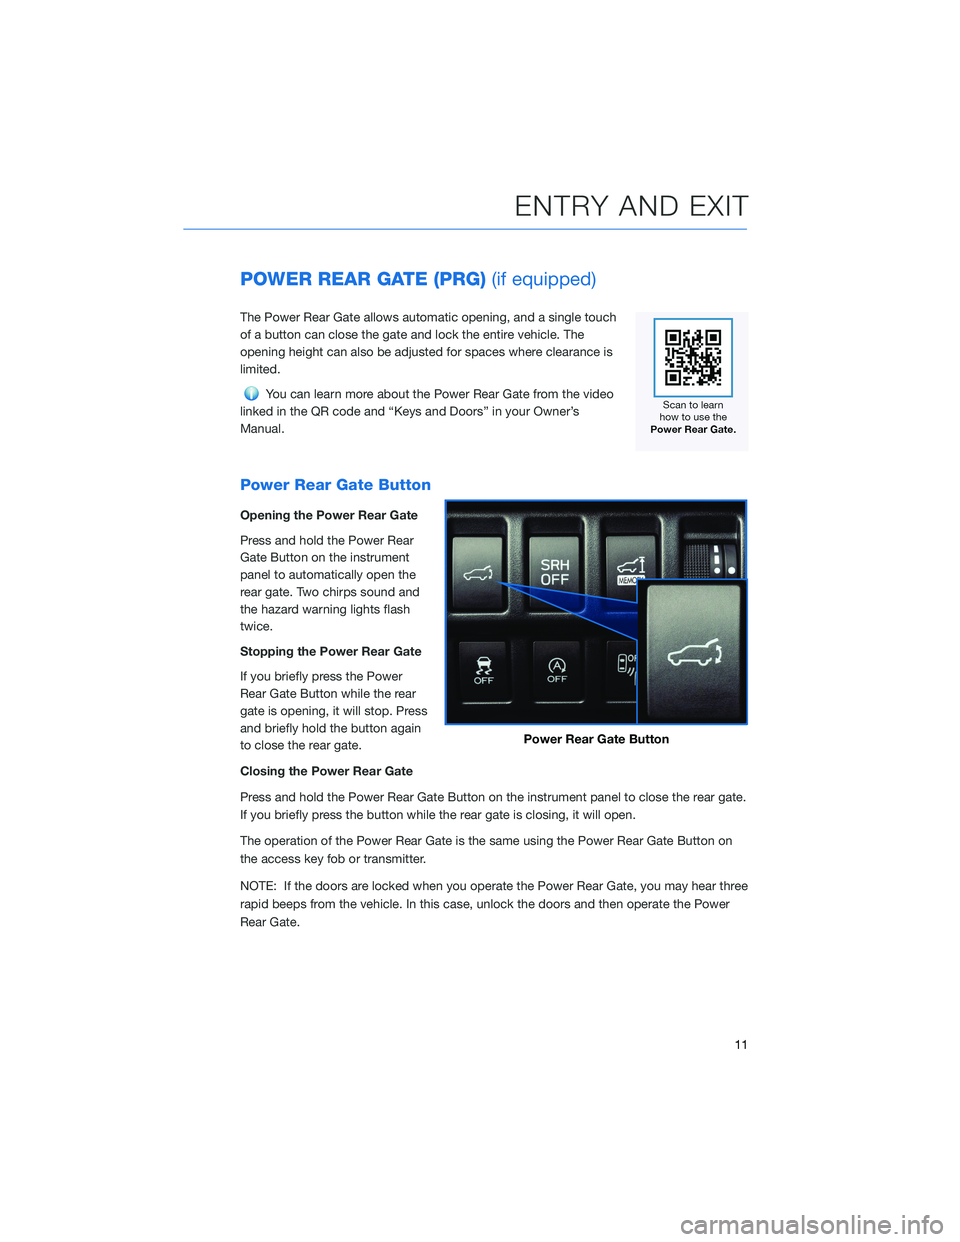
Power Rear Gate Button
Opening the Power Rear Gate
Press and hold the Power Rear
Gate Button on the instrument
panel to automatically open the
rear gate. Two chirps sound and
the hazard warning lights flash
twice.
Stopping the Power Rear Gate
If you briefly press the Power
Rear Gate Button while the rear
gate is opening, it will stop. Press
and briefly hold the button again
to close the rear gate.
Closing the Power Rear Gate
Press and hold the Power Rear Gate Button on the instrument panel to close the rear gate.
If you briefly press the button while the rear gate is closing, it will open.
The operation of the Power Rear Gate is the same using the Power Rear Gate Button on
the access key fob or transmitter.
NOTE: If the doors are locked when you operate the Power Rear Gate, you may hear three
rapid beeps from the vehicle. In this case, unlock the doors and then operate the Power
Rear Gate.
Power Rear Gate Button
ENTRY AND EXIT
11
Page 14 of 156
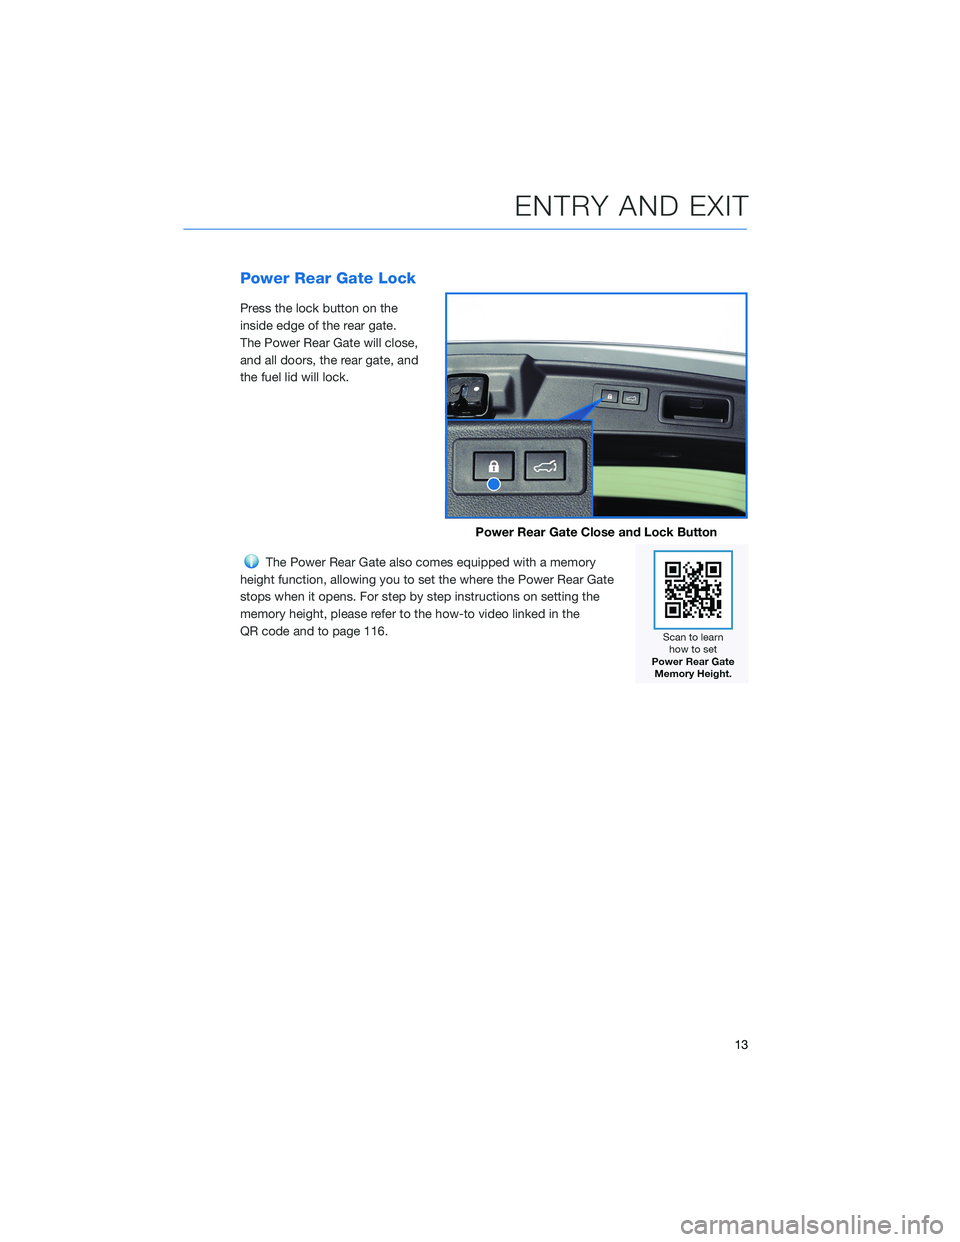
From the Rear of the Vehicle
Opening the Power Rear Gate
To open the rear gate, briefly
press the Rear Gate Opener
Button on the underside trim near
the license plate, and the rear
gate automatically opens.
Stopping the Power Rear Gate
If you briefly press the Power Rear
Gate Close Button on the inside
edge of the rear gate while the
gate is opening, it will stop. Press
the button again to close the rear
gate.
Closing the Power Rear Gate
To close the rear gate, briefly
press the Power Rear Gate Close
Button on the inside edge of the
rear gate. If you press the button
while the gate is closing, it will
open.
Rear Gate Opener Button
Power Rear Gate Close Button
ENTRY AND EXIT
12
Page 15 of 156
Power Rear Gate Lock
Press the lock button on the
inside edge of the rear gate.
The Power Rear Gate will close,
and all doors, the rear gate, and
the fuel lid will lock.
The Power Rear Gate also comes equipped with a memory
height function, allowing you to set the where the Power Rear Gate
stops when it opens. For step by step instructions on setting the
memory height, please refer to the how-to video linked in the
QR code and to page 116.
Power Rear Gate Close and Lock Button
ENTRY AND EXIT
13
Page 16 of 156
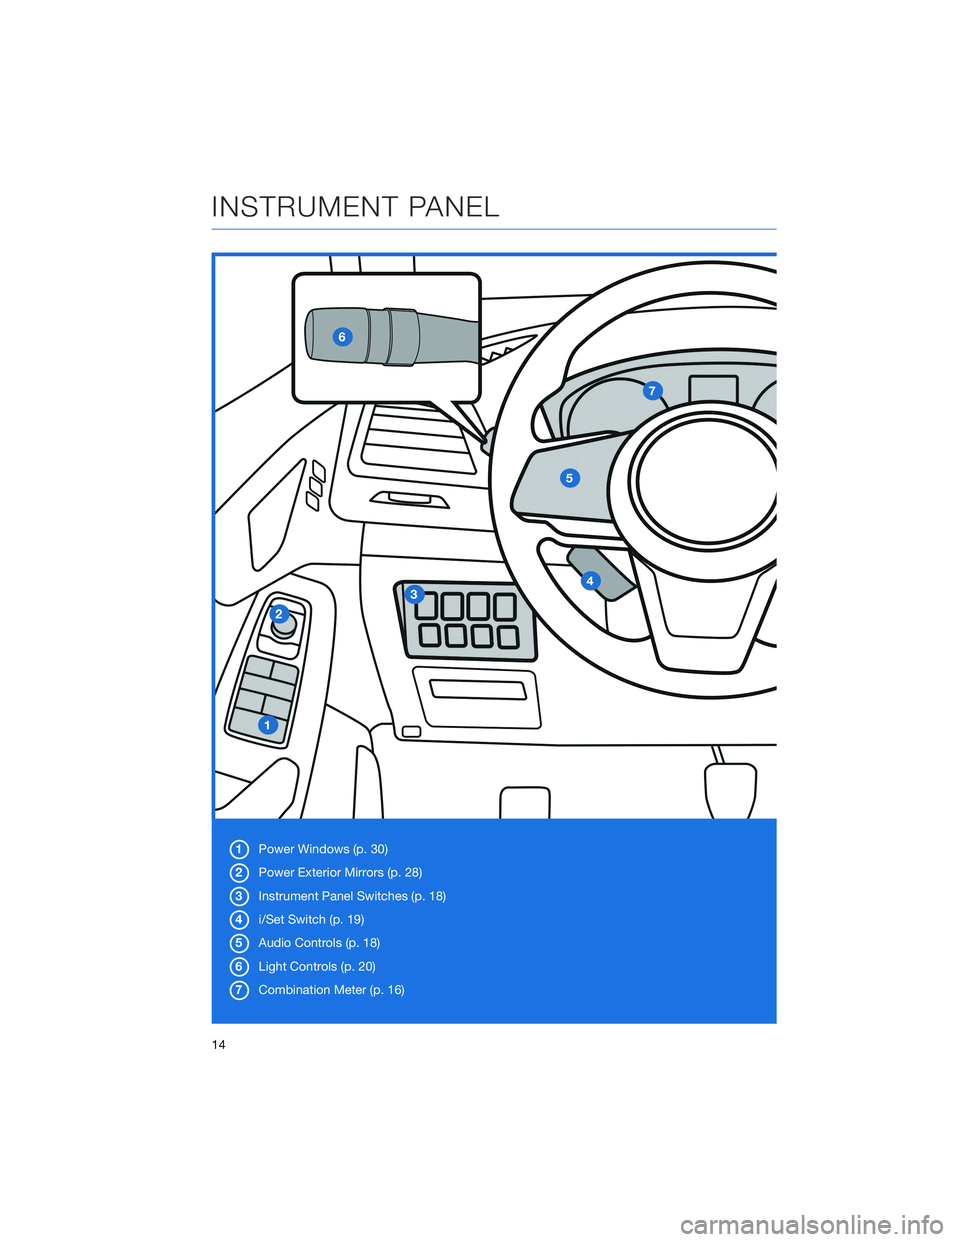
1Power Windows (p. 30)
2 Power Exterior Mirrors (p. 28)
3 Instrument Panel Switches (p. 18)
4 i/Set Switch (p. 19)
5 Audio Controls (p. 18)
6 Light Controls (p. 20)
7 Combination Meter (p. 16)
INSTRUMENT PANEL
14
Page 17 of 156
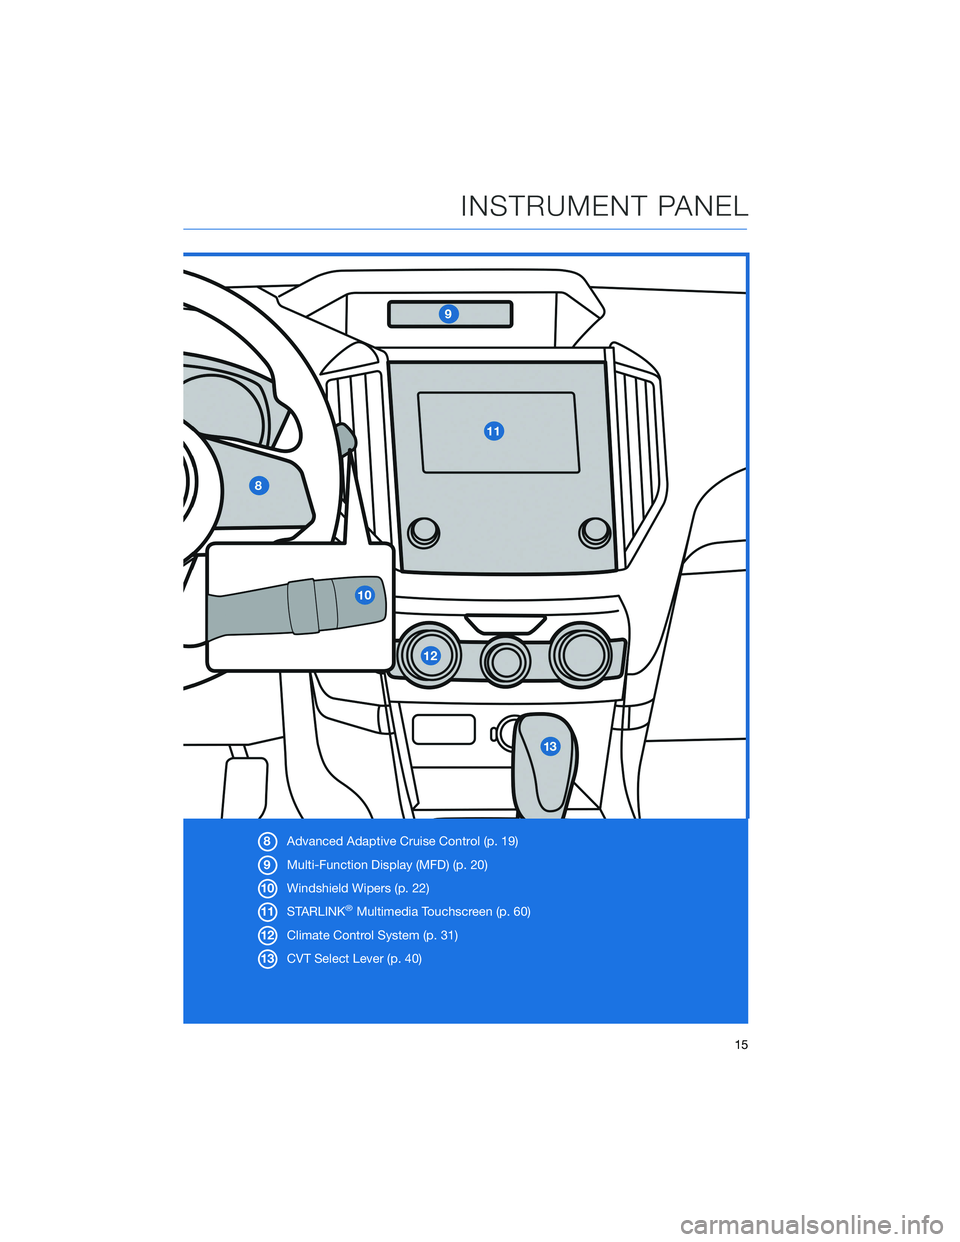
8Advanced Adaptive Cruise Control (p. 19)
9 Multi-Function Display (MFD) (p. 20)
10 Windshield Wipers (p. 22)
11 STARLINK
®Multimedia Touchscreen (p. 60)
12 Climate Control System (p. 31)
13 CVT Select Lever (p. 40)
INSTRUMENT PANEL
15
Page 18 of 156
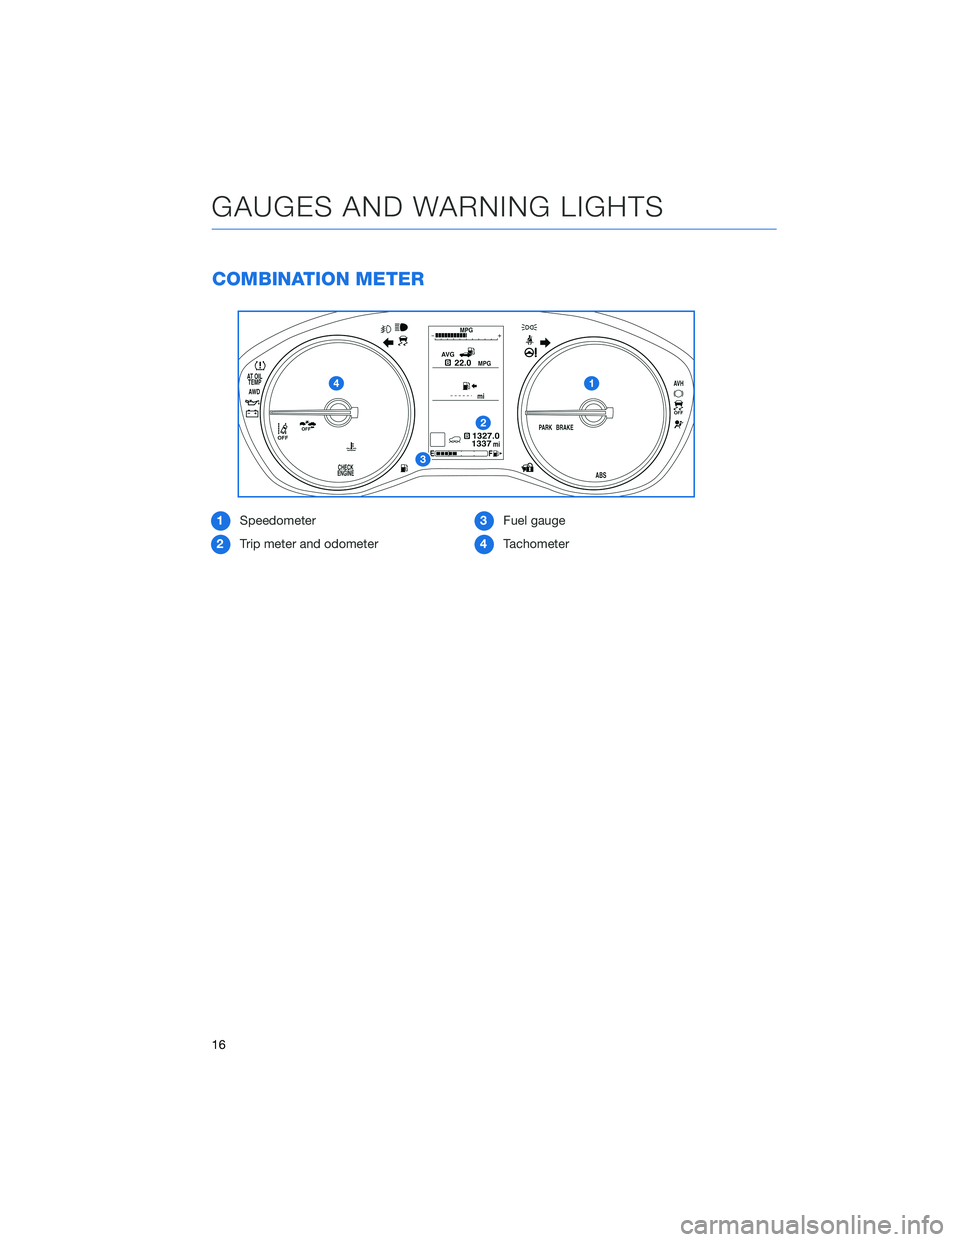
COMBINATION METER
1Speedometer
2 Trip meter and odometer 3
Fuel gauge
4 Tachometer
GAUGES AND WARNING LIGHTS
16
Page 19 of 156
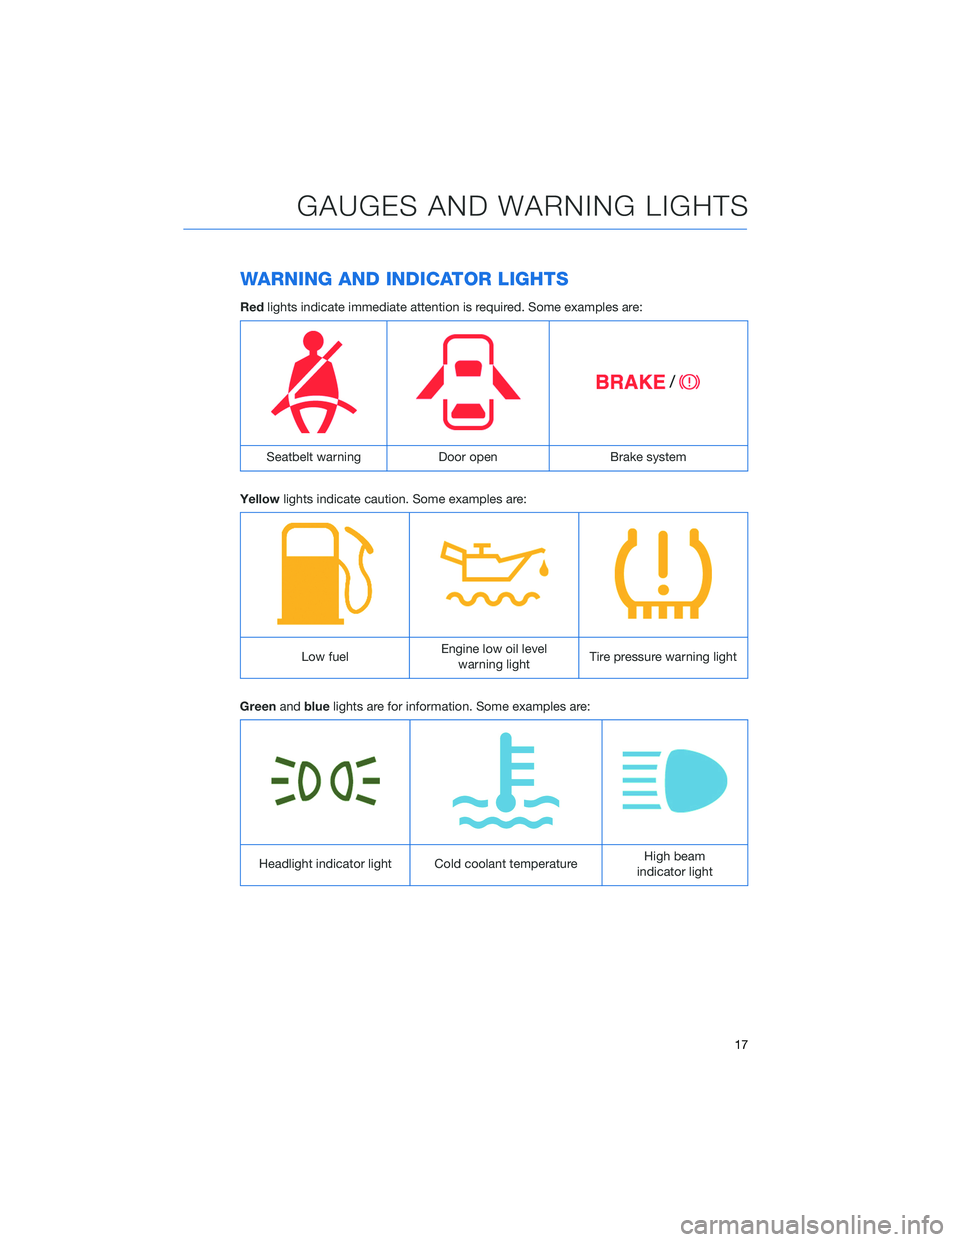
WARNING AND INDICATOR LIGHTS
Redlights indicate immediate attention is required. Some examples are:
Seatbelt warning Door openBrake system
Yellow lights indicate caution. Some examples are:
Low fuel Engine low oil level
warning light Tire pressure warning light
Green andblue lights are for information. Some examples are:
Headlight indicator light Cold coolant temperature High beam
indicator light
GAUGES AND WARNING LIGHTS
17
Page 20 of 156
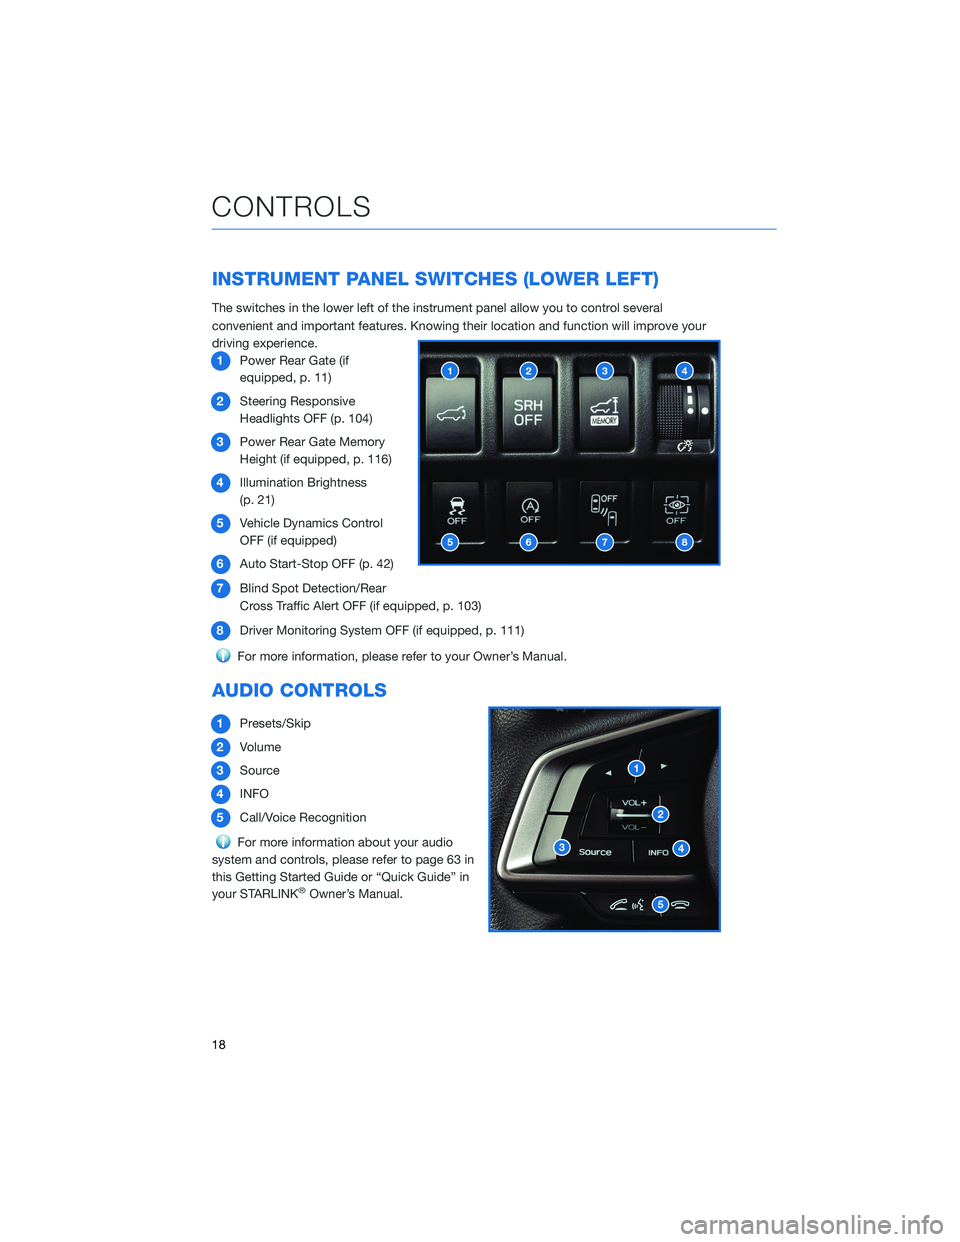
INSTRUMENT PANEL SWITCHES (LOWER LEFT)
The switches in the lower left of the instrument panel allow you to control several
convenient and important features. Knowing their location and function will improve your
driving experience.1 Power Rear Gate (if
equipped, p. 11)
2 Steering Responsive
Headlights OFF (p. 104)
3 Power Rear Gate Memory
Height (if equipped, p. 116)
4 Illumination Brightness
(p. 21)
5 Vehicle Dynamics Control
OFF (if equipped)
6 Auto Start-Stop OFF (p. 42)
7 Blind Spot Detection/Rear
Cross Traffic Alert OFF (if equipped, p. 103)
8 Driver Monitoring System OFF (if equipped, p. 111)
For more information, please refer to your Owner’s Manual.
AUDIO CONTROLS
1Presets/Skip
2 Volume
3 Source
4 INFO
5 Call/Voice Recognition
For more information about your audio
system and controls, please refer to page 63 in
this Getting Started Guide or “Quick Guide” in
your STARLINK
®Owner’s Manual.
CONTROLS
18
Trending: wiper fluid, check engine, navigation update, oil pressure, low beam, lane departure off, spare wheel

