Seat SUBARU FORESTER 2022 Getting Started Guide
[x] Cancel search | Manufacturer: SUBARU, Model Year: 2022, Model line: FORESTER, Model: SUBARU FORESTER 2022Pages: 156, PDF Size: 45.35 MB
Page 46 of 156
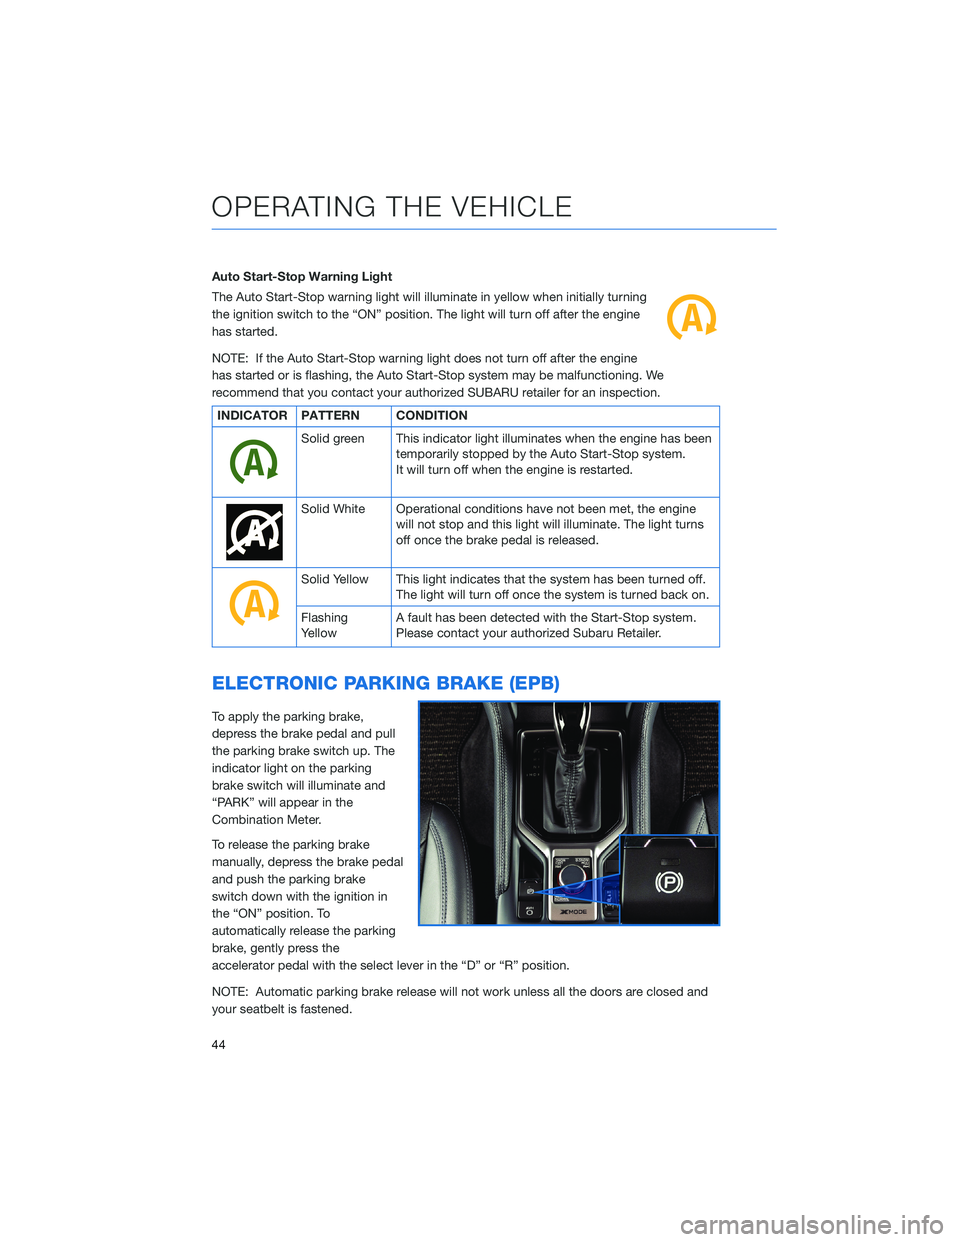
Auto Start-Stop Warning Light
The Auto Start-Stop warning light will illuminate in yellow when initially turning
the ignition switch to the “ON” position. The light will turn off after the engine
has started.
NOTE: If the Auto Start-Stop warning light does not turn off after the engine
has started or is flashing, the Auto Start-Stop system may be malfunctioning. We
recommend that you contact your authorized SUBARU retailer for an inspection.
INDICATOR PATTERN CONDITION
Solid green This indicator light illuminates when the engine has beentemporarily stopped by the Auto Start-Stop system.
It will turn off when the engine is restarted.
Solid White Operational conditions have not been met, the enginewill not stop and this light will illuminate. The light turns
off once the brake pedal is released.
Solid Yellow This light indicates that the system has been turned off.The light will turn off once the system is turned back on.
Flashing
Yellow A fault has been detected with the Start-Stop system.
Please contact your authorized Subaru Retailer.
ELECTRONIC PARKING BRAKE (EPB)
To apply the parking brake,
depress the brake pedal and pull
the parking brake switch up. The
indicator light on the parking
brake switch will illuminate and
“PARK” will appear in the
Combination Meter.
To release the parking brake
manually, depress the brake pedal
and push the parking brake
switch down with the ignition in
the “ON” position. To
automatically release the parking
brake, gently press the
accelerator pedal with the select lever in the “D” or “R” position.
NOTE: Automatic parking brake release will not work unless all the doors are closed and
your seatbelt is fastened.
OPERATING THE VEHICLE
44
Page 47 of 156
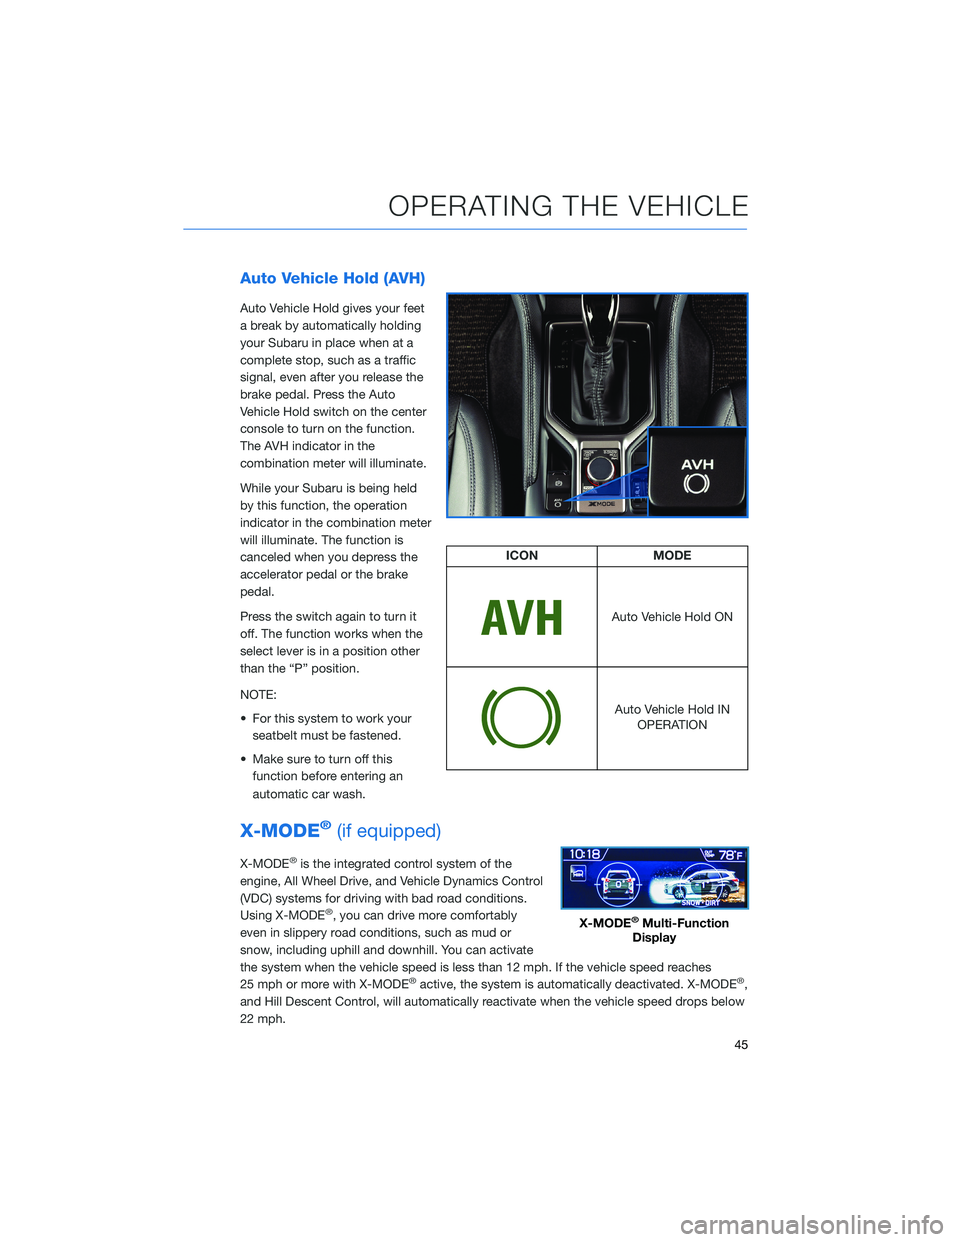
Auto Vehicle Hold (AVH)
Auto Vehicle Hold gives your feet
a break by automatically holding
your Subaru in place when at a
complete stop, such as a traffic
signal, even after you release the
brake pedal. Press the Auto
Vehicle Hold switch on the center
console to turn on the function.
The AVH indicator in the
combination meter will illuminate.
While your Subaru is being held
by this function, the operation
indicator in the combination meter
will illuminate. The function is
canceled when you depress the
accelerator pedal or the brake
pedal.
Press the switch again to turn it
off. The function works when the
select lever is in a position other
than the “P” position.
NOTE:
• For this system to work yourseatbelt must be fastened.
• Make sure to turn off this function before entering an
automatic car wash.
X-MODE®(if equipped)
X-MODE®is the integrated control system of the
engine, All Wheel Drive, and Vehicle Dynamics Control
(VDC) systems for driving with bad road conditions.
Using X-MODE
®, you can drive more comfortably
even in slippery road conditions, such as mud or
snow, including uphill and downhill. You can activate
the system when the vehicle speed is less than 12 mph. If the vehicle speed reaches
25 mph or more with X-MODE
®active, the system is automatically deactivated. X-MODE®,
and Hill Descent Control, will automatically reactivate when the vehicle speed drops below
22 mph.
ICON MODE
Auto Vehicle Hold ON
Auto Vehicle Hold IN
OPERATION
X-MODE®Multi-Function
Display
OPERATING THE VEHICLE
45
Page 52 of 156
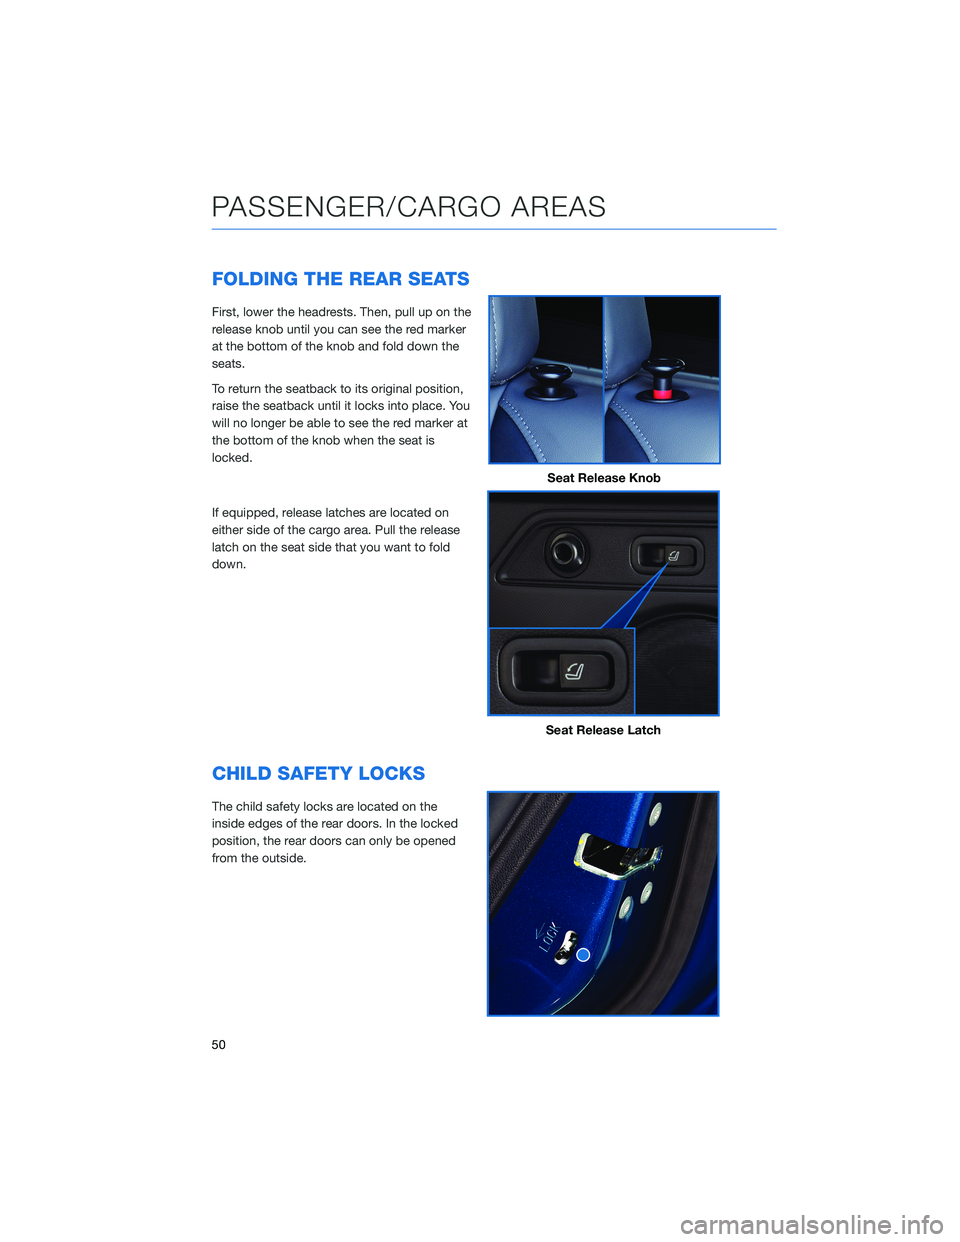
FOLDING THE REAR SEATS
First, lower the headrests. Then, pull up on the
release knob until you can see the red marker
at the bottom of the knob and fold down the
seats.
To return the seatback to its original position,
raise the seatback until it locks into place. You
will no longer be able to see the red marker at
the bottom of the knob when the seat is
locked.
If equipped, release latches are located on
either side of the cargo area. Pull the release
latch on the seat side that you want to fold
down.
CHILD SAFETY LOCKS
The child safety locks are located on the
inside edges of the rear doors. In the locked
position, the rear doors can only be opened
from the outside.
Seat Release Knob
Seat Release Latch
PASSENGER/CARGO AREAS
50
Page 53 of 156
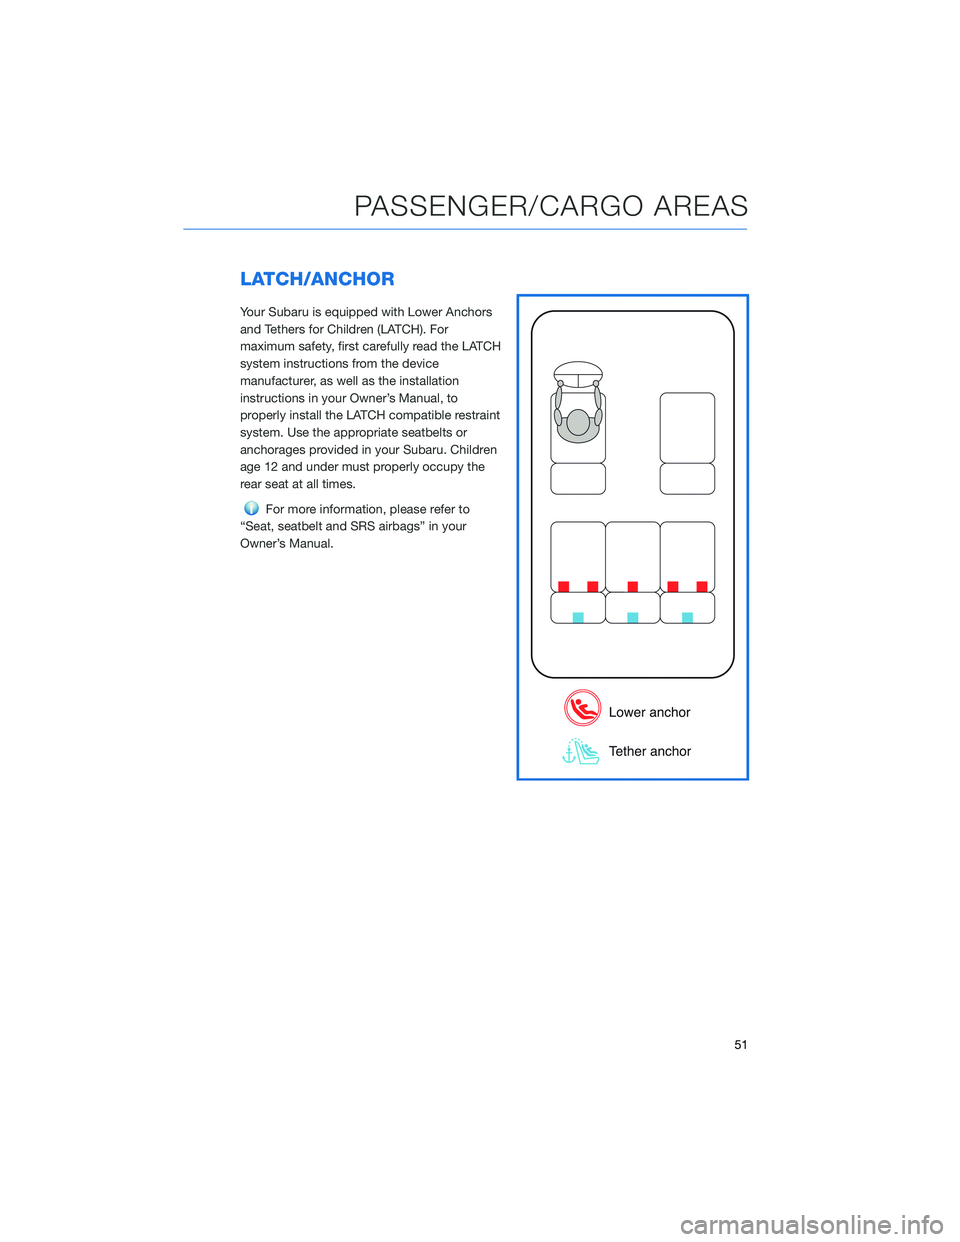
LATCH/ANCHOR
Your Subaru is equipped with Lower Anchors
and Tethers for Children (LATCH). For
maximum safety, first carefully read the LATCH
system instructions from the device
manufacturer, as well as the installation
instructions in your Owner’s Manual, to
properly install the LATCH compatible restraint
system. Use the appropriate seatbelts or
anchorages provided in your Subaru. Children
age 12 and under must properly occupy the
rear seat at all times.
For more information, please refer to
“Seat, seatbelt and SRS airbags” in your
Owner’s Manual.
PASSENGER/CARGO AREAS
51
Page 54 of 156
REAR SEAT REMINDER
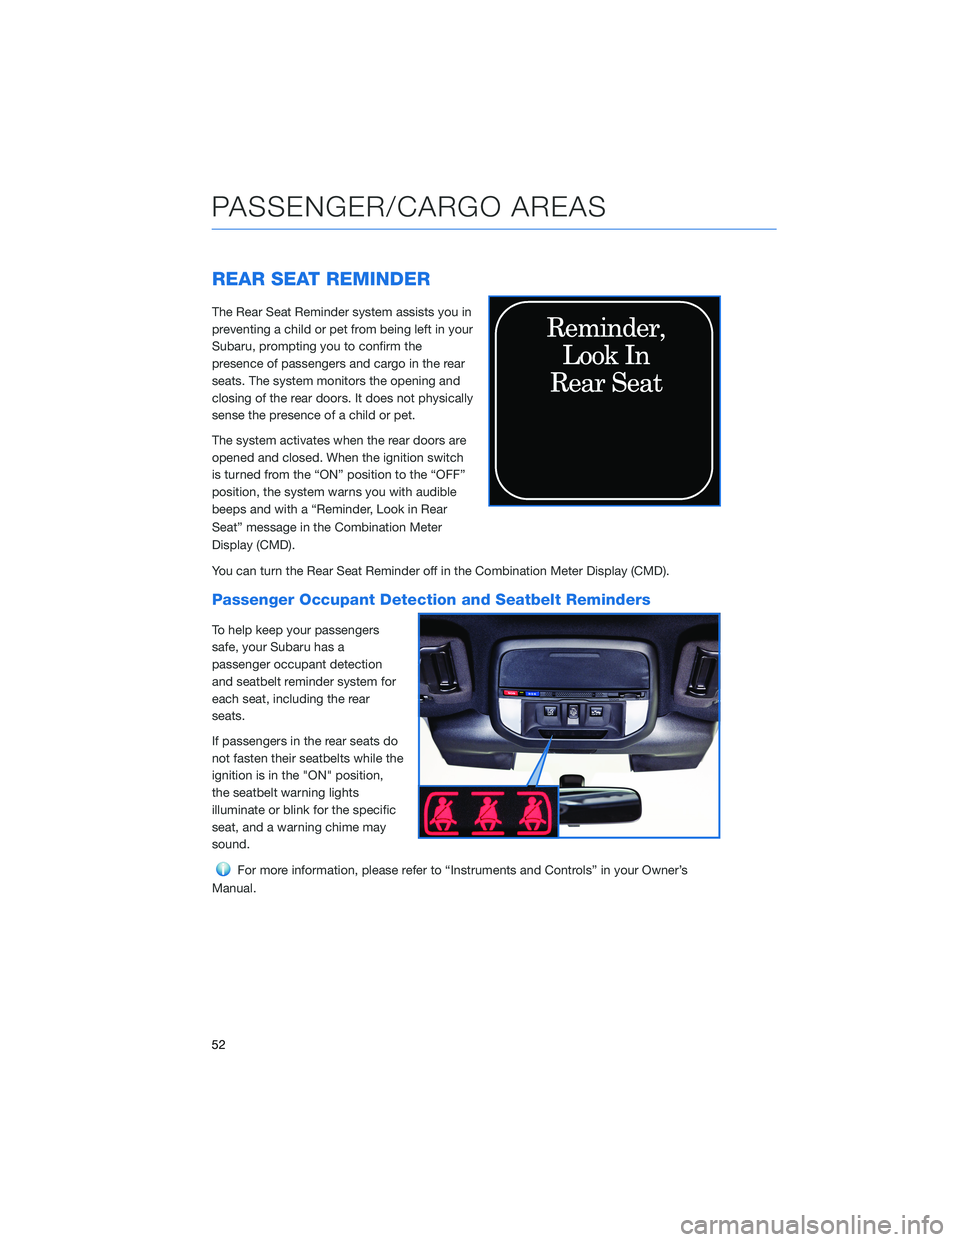
The Rear Seat Reminder system assists you in
preventing a child or pet from being left in your
Subaru, prompting you to confirm the
presence of passengers and cargo in the rear
seats. The system monitors the opening and
closing of the rear doors. It does not physically
sense the presence of a child or pet.
The system activates when the rear doors are
opened and closed. When the ignition switch
is turned from the “ON” position to the “OFF”
position, the system warns you with audible
beeps and with a “Reminder, Look in Rear
Seat” message in the Combination Meter
Display (CMD).
You can turn the Rear Seat Reminder off in the Combination Meter Display (CMD).
Passenger Occupant Detection and Seatbelt Reminders
To help keep your passengers
safe, your Subaru has a
passenger occupant detection
and seatbelt reminder system for
each seat, including the rear
seats.
If passengers in the rear seats do
not fasten their seatbelts while the
ignition is in the "ON" position,
the seatbelt warning lights
illuminate or blink for the specific
seat, and a warning chime may
sound.
For more information, please refer to “Instruments and Controls” in your Owner’s
Manual.
PASSENGER/CARGO AREAS
52
Page 108 of 156
DRIVERFOCUS®OVERVIEW(if equipped)
Your Subaru features DriverFocus®, a state-of-the-art system that
helps reduce distracted driving for both new and experienced
drivers.
Working with our award-winning EyeSight
®Driver Assist
Technology, DriverFocus®is like having an attentive co-pilot along
for the ride, available to give a helpful alert if a driver becomes
distracted or drowsy. For added convenience, DriverFocus
®can
also recognize up to five drivers and remember their preferences,
such as seat position, climate settings, and outside mirror positions.
For more information, please refer to the video linked in the QR code and to “Starting
and Operating” in your Owner’s Manual.
DRIVERFOCUS®COMPONENTS
Camera
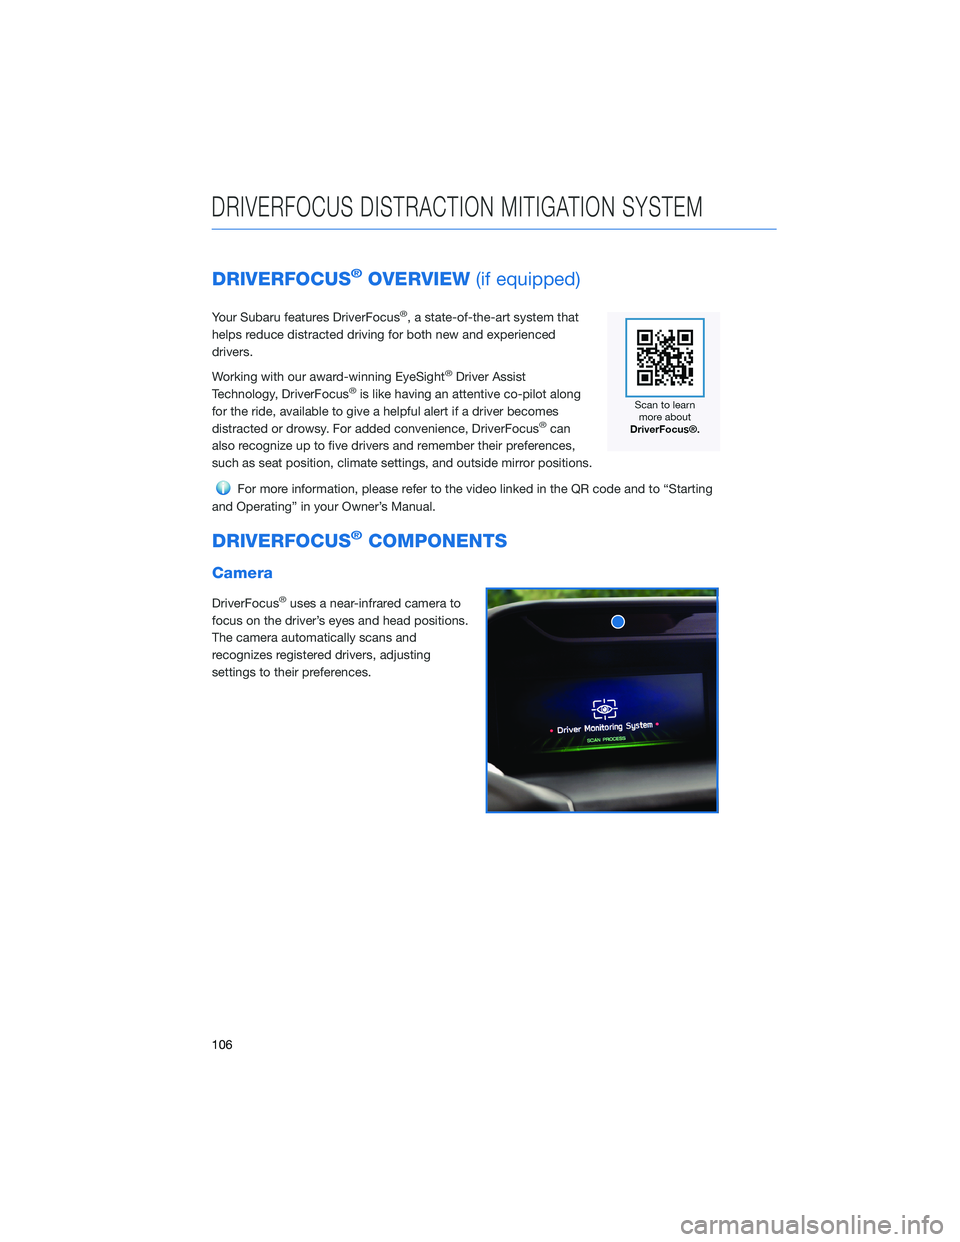
DriverFocus®uses a near-infrared camera to
focus on the driver’s eyes and head positions.
The camera automatically scans and
recognizes registered drivers, adjusting
settings to their preferences.
DRIVERFOCUS DISTRACTION MITIGATION SYSTEM
106
Page 111 of 156
DROWSY/INATTENTIVE WARNINGS
DriverFocus®detects when the driver is possibly not paying
attention or is becoming drowsy while driving. It works whether you
are a registered user or not. The system does not provide alerts
when the turn signals are operating or when the select lever is in the
“R” position.
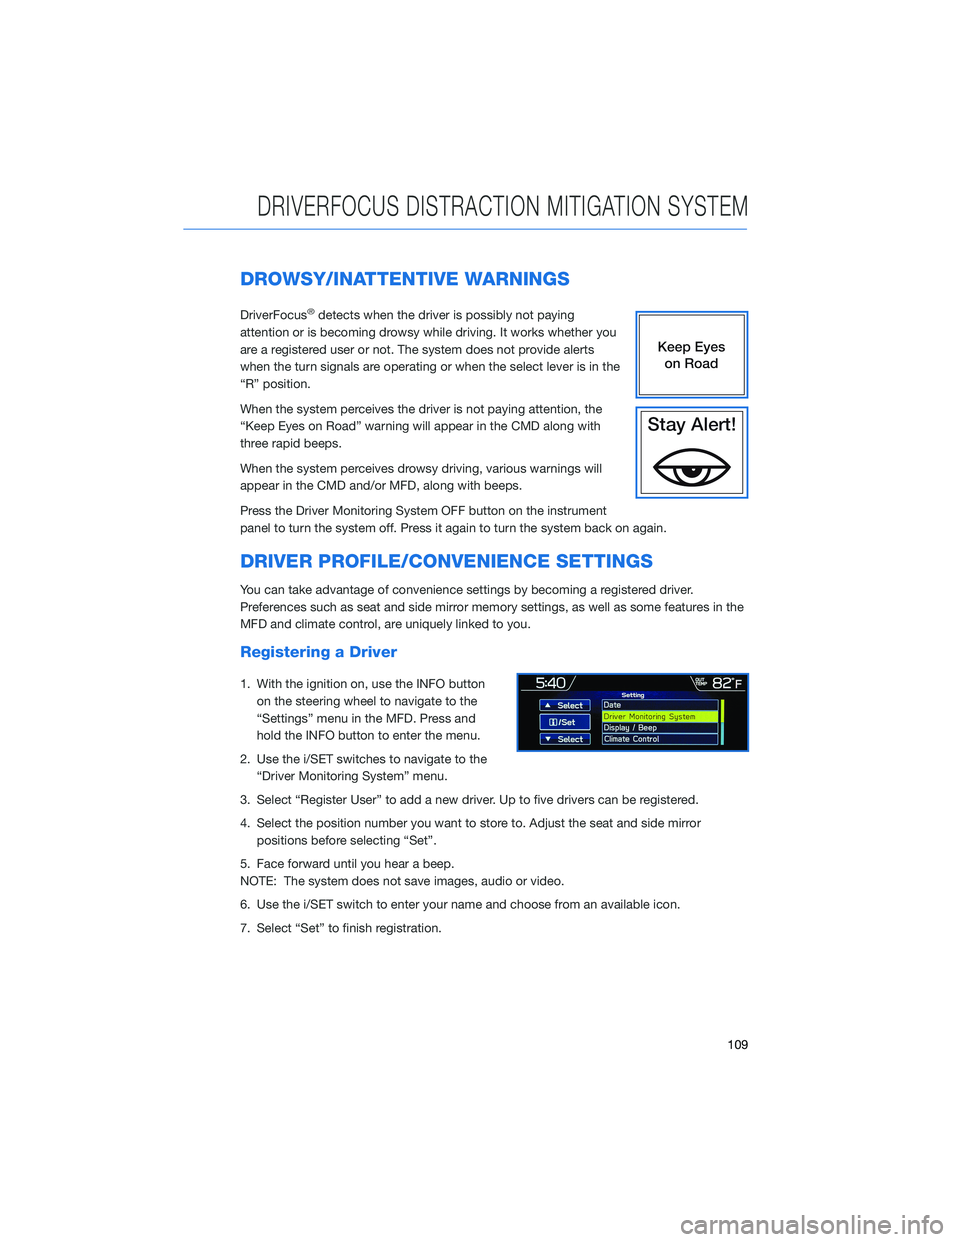
When the system perceives the driver is not paying attention, the
“Keep Eyes on Road” warning will appear in the CMD along with
three rapid beeps.
When the system perceives drowsy driving, various warnings will
appear in the CMD and/or MFD, along with beeps.
Press the Driver Monitoring System OFF button on the instrument
panel to turn the system off. Press it again to turn the system back on again.
DRIVER PROFILE/CONVENIENCE SETTINGS
You can take advantage of convenience settings by becoming a registered driver.
Preferences such as seat and side mirror memory settings, as well as some features in the
MFD and climate control, are uniquely linked to you.
Registering a Driver
1. With the ignition on, use the INFO button on the steering wheel to navigate to the
“Settings” menu in the MFD. Press and
hold the INFO button to enter the menu.
2. Use the i/SET switches to navigate to the “Driver Monitoring System” menu.
3. Select “Register User” to add a new driver. Up to five drivers can be registered.
4. Select the position number you want to store to. Adjust the seat and side mirror positions before selecting “Set”.
5. Face forward until you hear a beep.
NOTE: The system does not save images, audio or video.
6. Use the i/SET switch to enter your name and choose from an available icon.
7. Select “Set” to finish registration.
DRIVERFOCUS DISTRACTION MITIGATION SYSTEM
109
Page 113 of 156
Recognizing a Driver
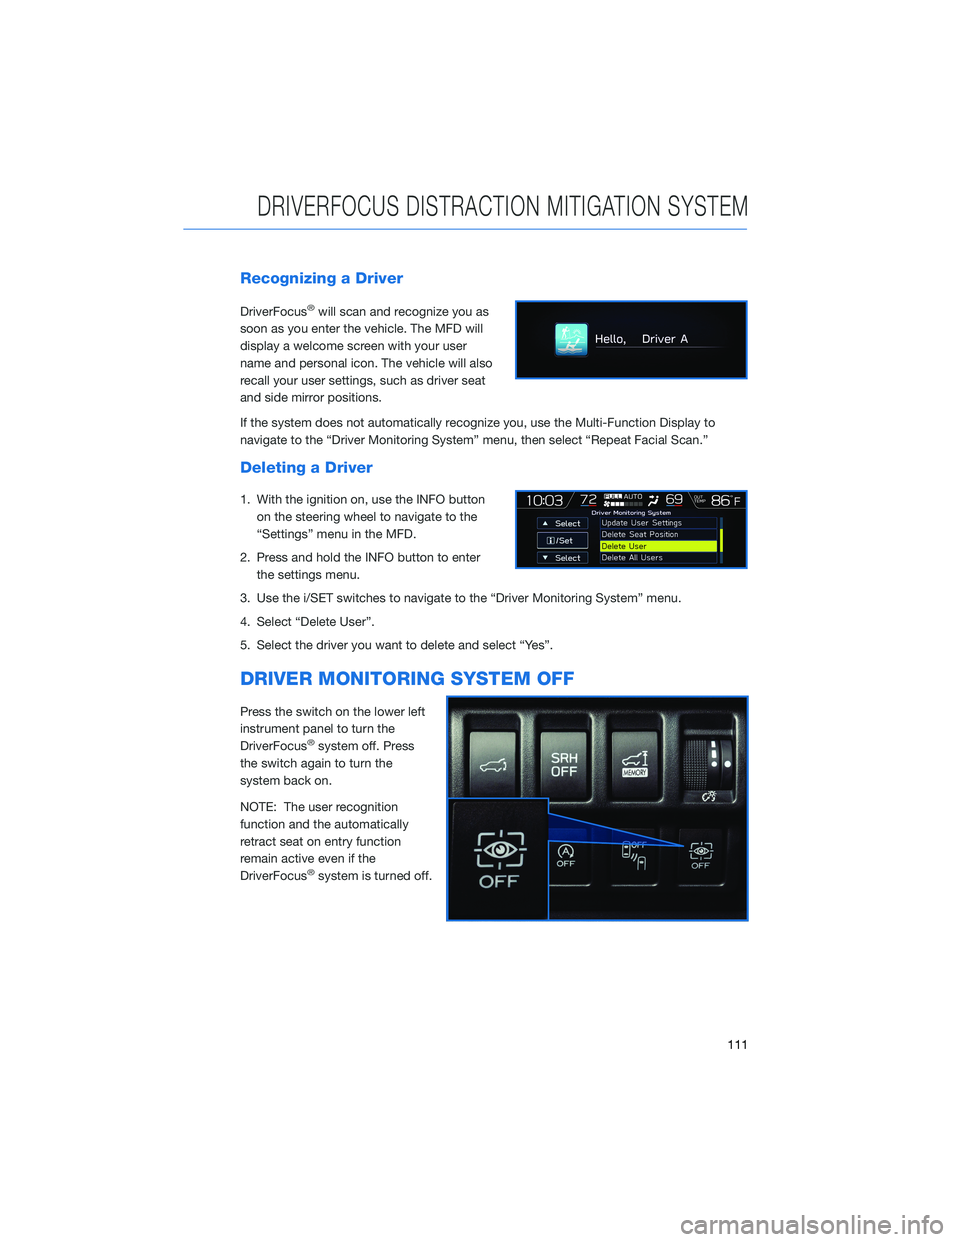
DriverFocus®will scan and recognize you as
soon as you enter the vehicle. The MFD will
display a welcome screen with your user
name and personal icon. The vehicle will also
recall your user settings, such as driver seat
and side mirror positions.
If the system does not automatically recognize you, use the Multi-Function Display to
navigate to the “Driver Monitoring System” menu, then select “Repeat Facial Scan.”
Deleting a Driver
1. With the ignition on, use the INFO button on the steering wheel to navigate to the
“Settings” menu in the MFD.
2. Press and hold the INFO button to enter the settings menu.
3. Use the i/SET switches to navigate to the “Driver Monitoring System” menu.
4. Select “Delete User”.
5. Select the driver you want to delete and select “Yes”.
DRIVER MONITORING SYSTEM OFF
Press the switch on the lower left
instrument panel to turn the
DriverFocus
®system off. Press
the switch again to turn the
system back on.
NOTE: The user recognition
function and the automatically
retract seat on entry function
remain active even if the
DriverFocus
®system is turned off.
DRIVERFOCUS DISTRACTION MITIGATION SYSTEM
111
Page 120 of 156
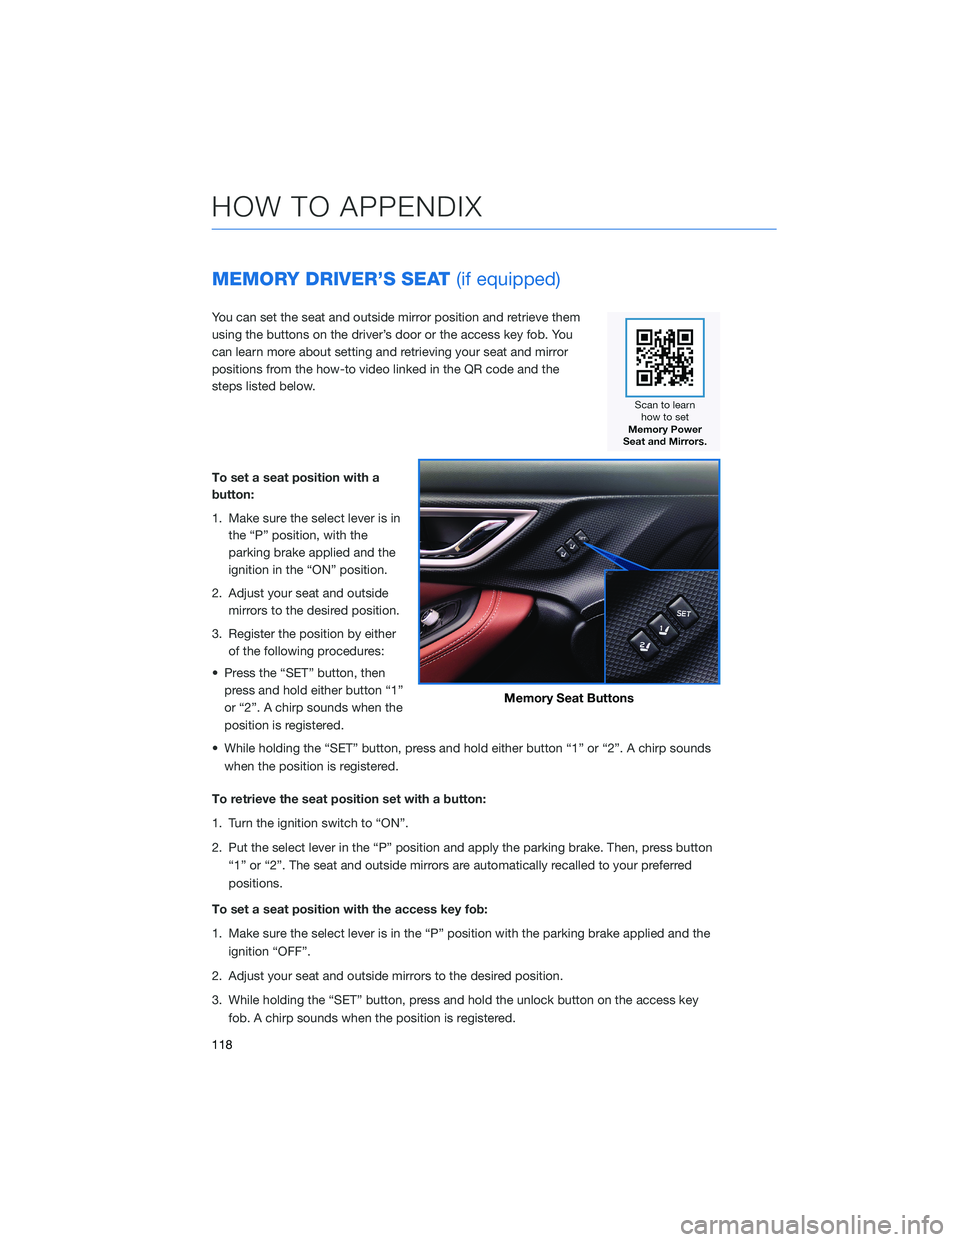
MEMORY DRIVER’S SEAT(if equipped)
You can set the seat and outside mirror position and retrieve them
using the buttons on the driver’s door or the access key fob. You
can learn more about setting and retrieving your seat and mirror
positions from the how-to video linked in the QR code and the
steps listed below.
To set a seat position with a
button:
1. Make sure the select lever is in
the “P” position, with the
parking brake applied and the
ignition in the “ON” position.
2. Adjust your seat and outside mirrors to the desired position.
3. Register the position by either of the following procedures:
• Press the “SET” button, then press and hold either button “1”
or “2”. A chirp sounds when the
position is registered.
• While holding the “SET” button, press and hold either button “1” or “2”. A chirp sounds when the position is registered.
To retrieve the seat position set with a button:
1. Turn the ignition switch to “ON”.
2. Put the select lever in the “P” position and apply the parking brake. Then, press button “1” or “2”. The seat and outside mirrors are automatically recalled to your preferred
positions.
To set a seat position with the access key fob:
1. Make sure the select lever is in the “P” position with the parking brake applied and the ignition “OFF”.
2. Adjust your seat and outside mirrors to the desired position.
3. While holding the “SET” button, press and hold the unlock button on the access key fob. A chirp sounds when the position is registered.
Memory Seat Buttons
HOW TO APPENDIX
118
Page 121 of 156
To retrieve the seat position set with the access key fob:
1. Hold the access key fob.
2. Unlock and open the driver’s door. The seat and outside mirrors are automaticallyrecalled to your preferred positions.
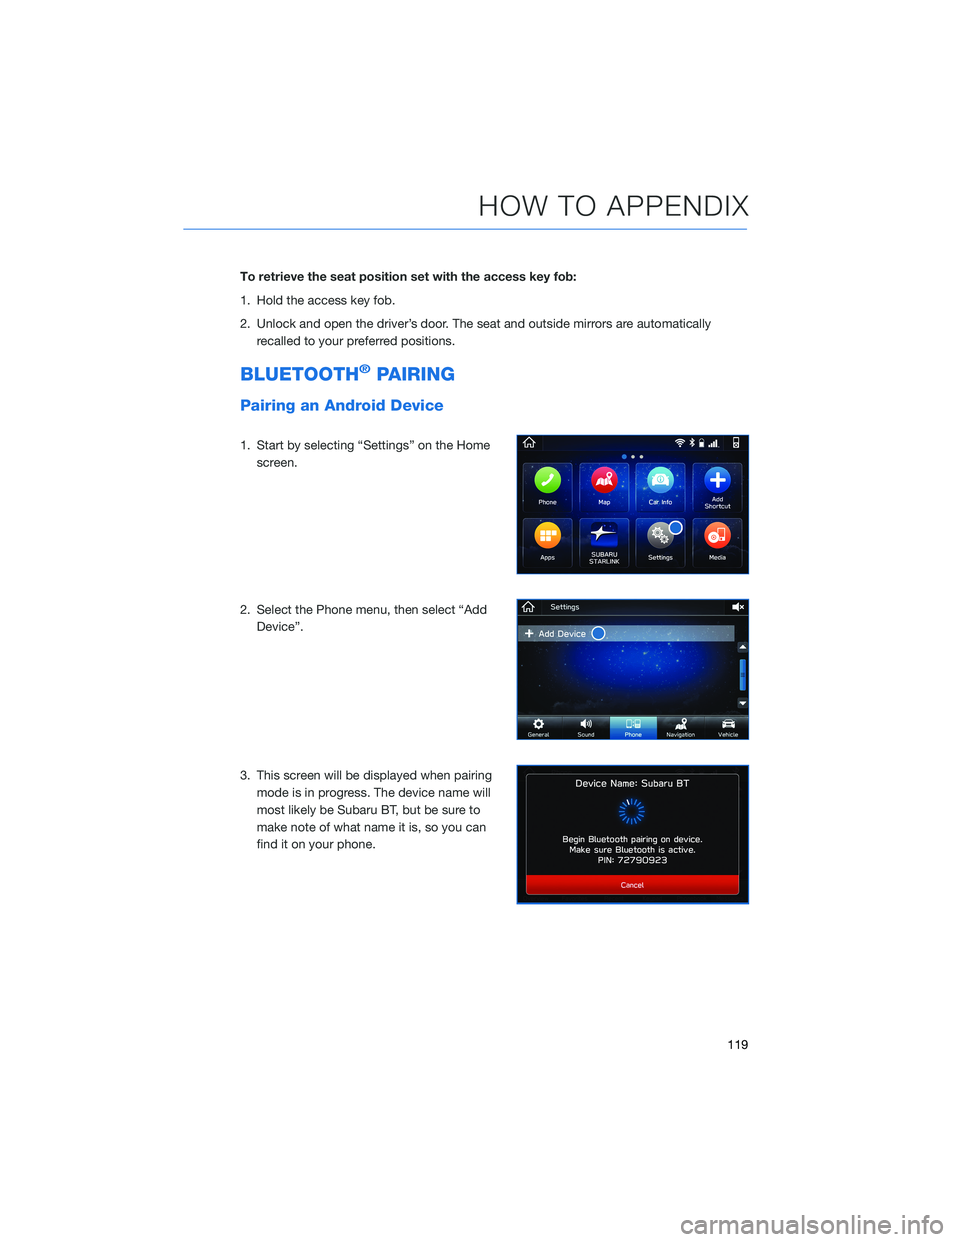
BLUETOOTH®PAIRING
Pairing an Android Device
1. Start by selecting “Settings” on the Homescreen.
2. Select the Phone menu, then select “Add Device”.
3. This screen will be displayed when pairing mode is in progress. The device name will
most likely be Subaru BT, but be sure to
make note of what name it is, so you can
find it on your phone.
HOW TO APPENDIX
119