wheel SUBARU FORESTER 2022 Getting Started Guide
[x] Cancel search | Manufacturer: SUBARU, Model Year: 2022, Model line: FORESTER, Model: SUBARU FORESTER 2022Pages: 156, PDF Size: 45.35 MB
Page 49 of 156
X-MODE®Dual Mode System
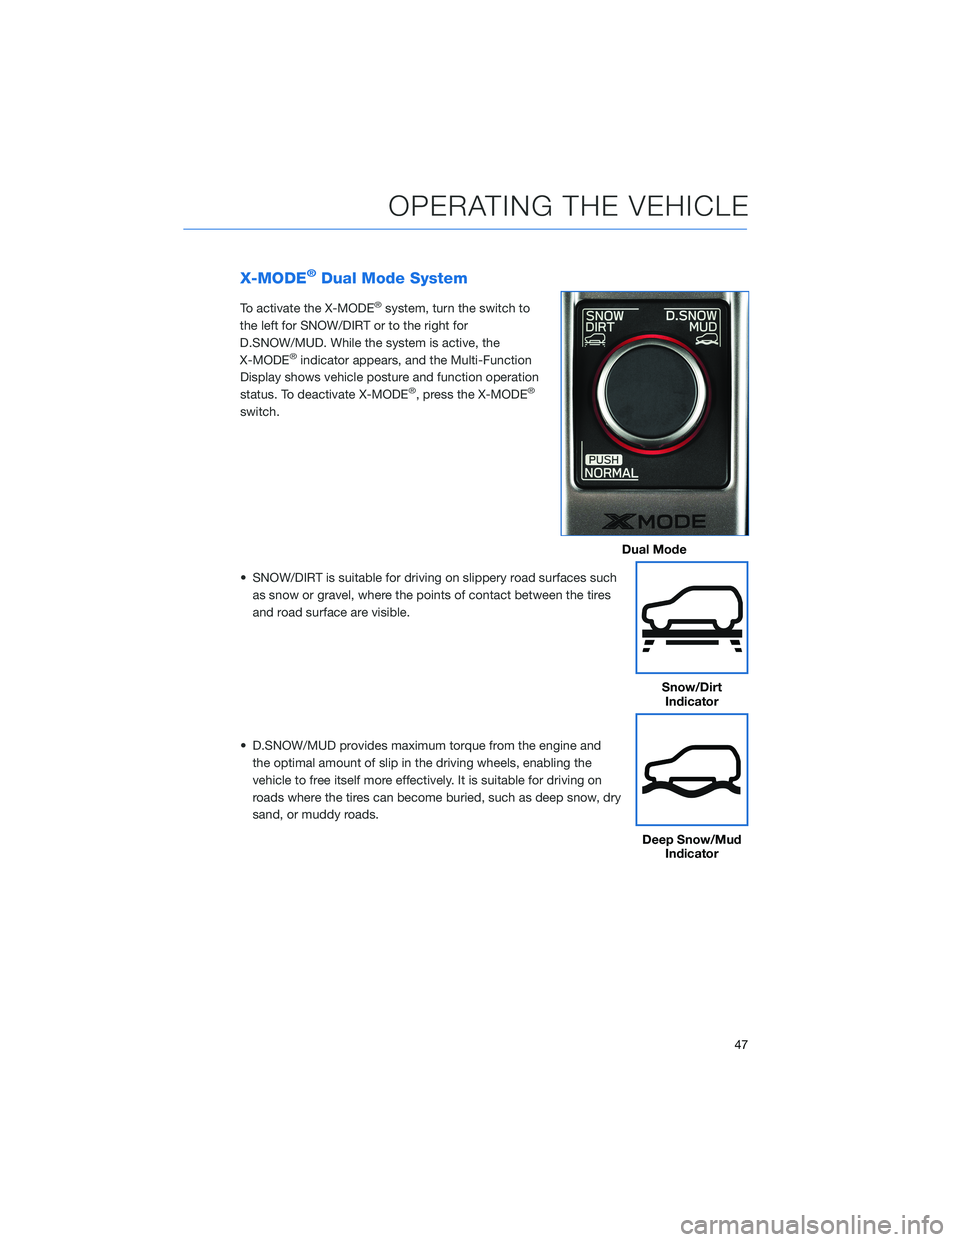
To activate the X-MODE®system, turn the switch to
the left for SNOW/DIRT or to the right for
D.SNOW/MUD. While the system is active, the
X-MODE
®indicator appears, and the Multi-Function
Display shows vehicle posture and function operation
status. To deactivate X-MODE
®, press the X-MODE®
switch.
• SNOW/DIRT is suitable for driving on slippery road surfaces such as snow or gravel, where the points of contact between the tires
and road surface are visible.
• D.SNOW/MUD provides maximum torque from the engine and the optimal amount of slip in the driving wheels, enabling the
vehicle to free itself more effectively. It is suitable for driving on
roads where the tires can become buried, such as deep snow, dry
sand, or muddy roads.
Dual Mode
Snow/DirtIndicator
Deep Snow/Mud Indicator
OPERATING THE VEHICLE
47
Page 55 of 156
CARGO AREA AND COVER(if equipped)
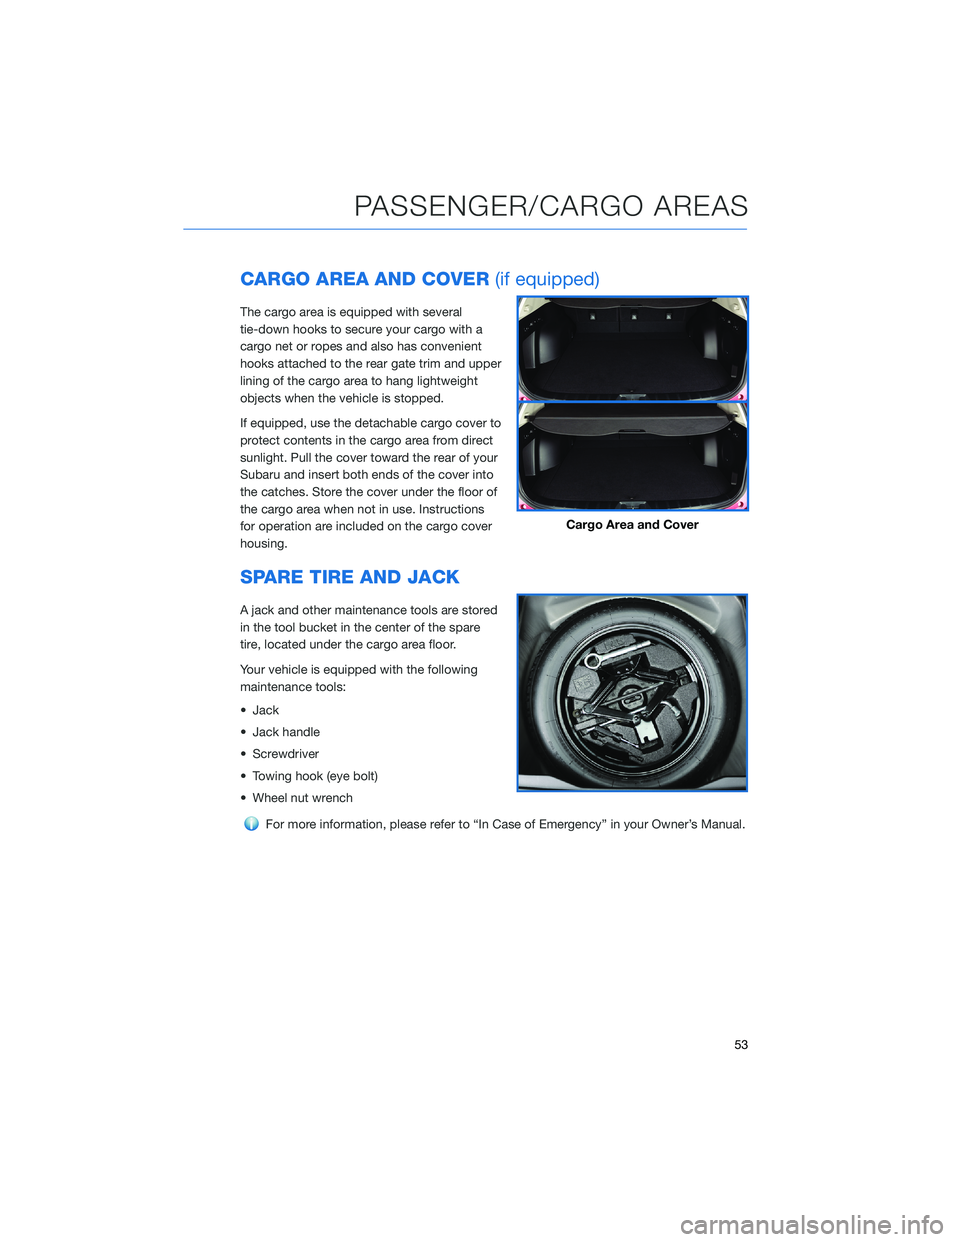
The cargo area is equipped with several
tie-down hooks to secure your cargo with a
cargo net or ropes and also has convenient
hooks attached to the rear gate trim and upper
lining of the cargo area to hang lightweight
objects when the vehicle is stopped.
If equipped, use the detachable cargo cover to
protect contents in the cargo area from direct
sunlight. Pull the cover toward the rear of your
Subaru and insert both ends of the cover into
the catches. Store the cover under the floor of
the cargo area when not in use. Instructions
for operation are included on the cargo cover
housing.
SPARE TIRE AND JACK
A jack and other maintenance tools are stored
in the tool bucket in the center of the spare
tire, located under the cargo area floor.
Your vehicle is equipped with the following
maintenance tools:
• Jack
• Jack handle
• Screwdriver
• Towing hook (eye bolt)
• Wheel nut wrench
For more information, please refer to “In Case of Emergency” in your Owner’s Manual.
Cargo Area and Cover
PASSENGER/CARGO AREAS
53
Page 61 of 156
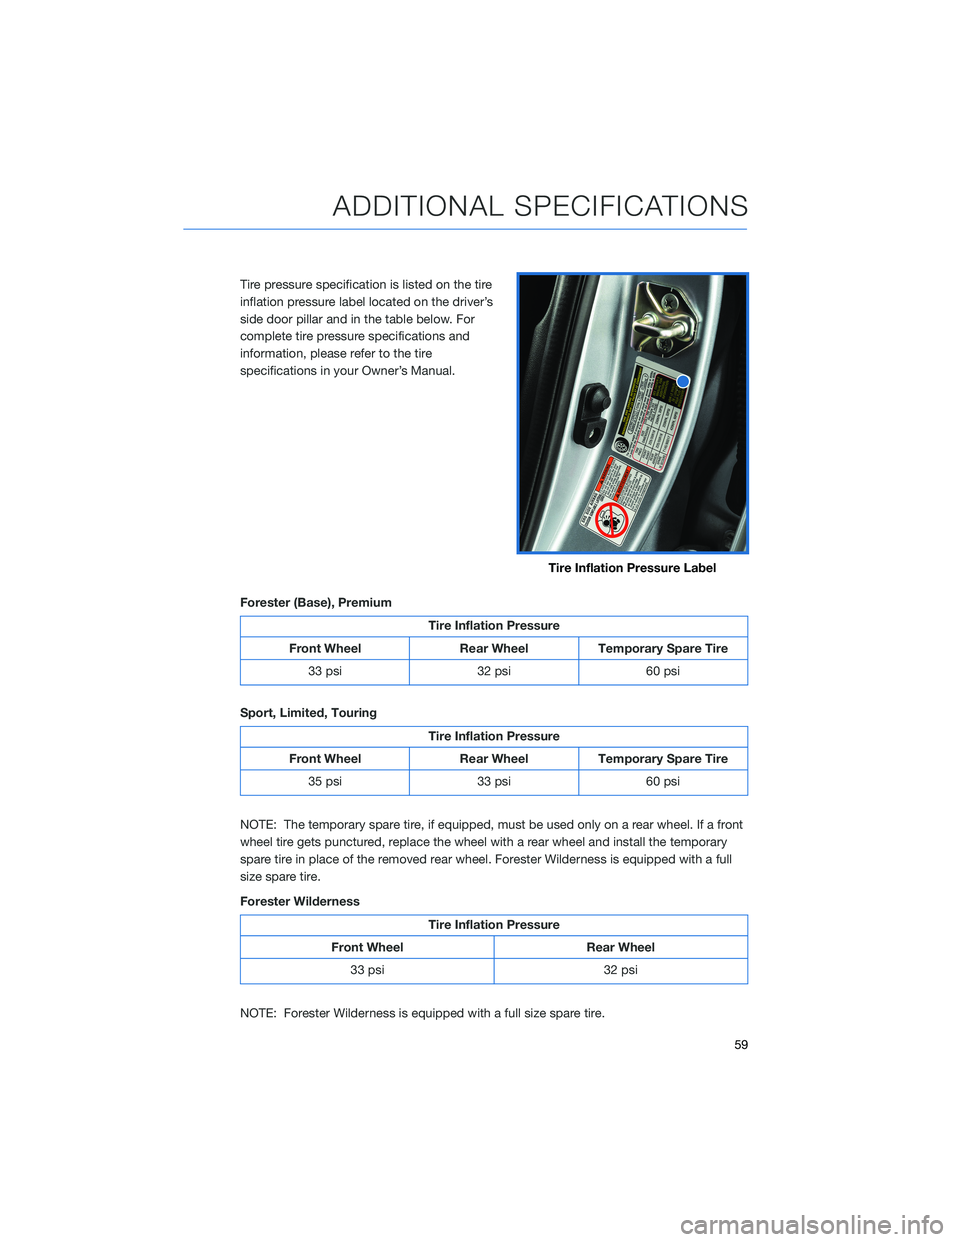
Tire pressure specification is listed on the tire
inflation pressure label located on the driver’s
side door pillar and in the table below. For
complete tire pressure specifications and
information, please refer to the tire
specifications in your Owner’s Manual.
Forester (Base), Premium
Tire Inflation Pressure
Front Wheel Rear Wheel Temporary Spare Tire 33 psi 32 psi 60 psi
Sport, Limited, Touring
Tire Inflation Pressure
Front Wheel Rear Wheel Temporary Spare Tire 35 psi 33 psi 60 psi
NOTE: The temporary spare tire, if equipped, must be used only on a rear wheel. If a front
wheel tire gets punctured, replace the wheel with a rear wheel and install the temporary
spare tire in place of the removed rear wheel. Forester Wilderness is equipped with a full
size spare tire.
Forester Wilderness
Tire Inflation Pressure
Front Wheel Rear Wheel 33 psi 32 psi
NOTE: Forester Wilderness is equipped with a full size spare tire.
Tire Inflation Pressure Label
ADDITIONAL SPECIFICATIONS
59
Page 65 of 156
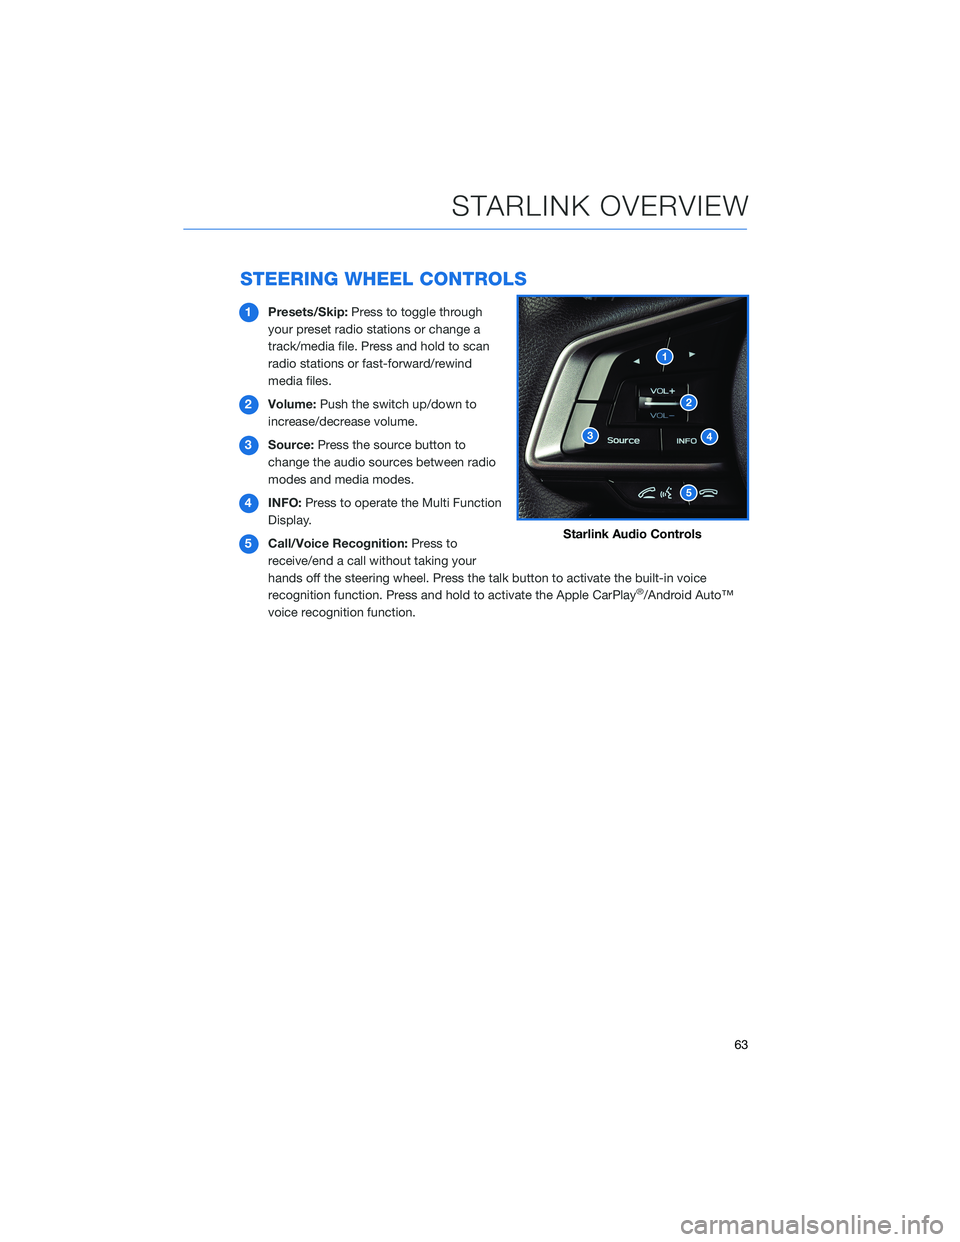
STEERING WHEEL CONTROLS
1Presets/Skip: Press to toggle through
your preset radio stations or change a
track/media file. Press and hold to scan
radio stations or fast-forward/rewind
media files.
2 Volume: Push the switch up/down to
increase/decrease volume.
3 Source: Press the source button to
change the audio sources between radio
modes and media modes.
4 INFO: Press to operate the Multi Function
Display.
5 Call/Voice Recognition: Press to
receive/end a call without taking your
hands off the steering wheel. Press the talk button to activate the built-in voice
recognition function. Press and hold to activate the Apple CarPlay
®/Android Auto™
voice recognition function.
Starlink Audio Controls
STARLINK OVERVIEW
63
Page 66 of 156
VOICE RECOGNITION
With SUBARU STARLINK®, simple voice commands can control
features like navigation, entertainment, phone calls, and, on select
models, climate control. A microphone is located in the overhead
console; however, you do not need to speak directly into it to
activate the voice command features. Press the Voice Recognition
button on the steering wheel to start the voice recognition system.
Press and hold the button to cancel the system.
For help with what features are available with voice recognition,
press the "Help" button on the screen or press the voice recognition
button and say "Help".
Tips
The system may not recognize the voice command due to various
types of interference. Some causes for voice command interference
are:
• The command is spoken too quickly or at a low or high volume.
• The command is incorrect or unclear.
• The window is open, the climate control system is set on high, or the ventilation is directed toward the microphone.
• Passengers are talking while the command is spoken.
NOTE: The system is designed to recognize a variety of commands, but certain words,
accents or speech patterns may be difficult for the system to recognize.
STARLINK OVERVIEW
64
Page 74 of 156
PAIRING A PHONE
To begin using your Bluetooth®hands-free device you must first
pair your phone with the system. Phone pairing provides access to
the contact list on your phone and allows you to use the voice
recognition system to make and receive calls. The system can also
read incoming text messages, as well as allowing you to reply to
texts or send short messages. The system automatically reconnects
to your Bluetooth
®device and will remember your driver profile.
Visit www.subaru.com/engineering/starlink/multimedia.html for
more information on what is available by connecting a phone to the
Touchscreen.
For instructions on how to pair your phone to the Touchscreen, see page 119 for
Android devices or page 123 for Apple devices.
MAKING A CALL
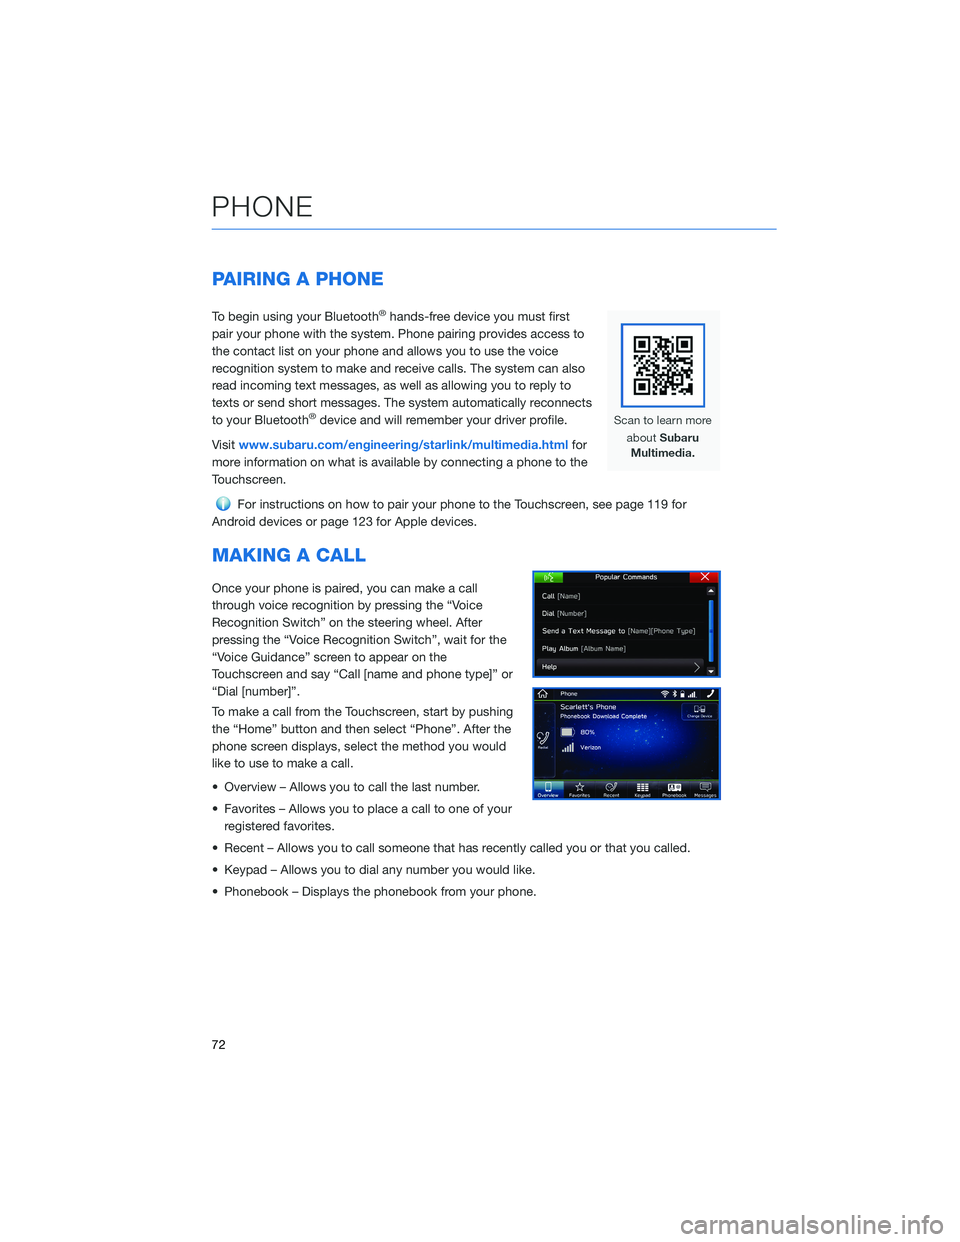
Once your phone is paired, you can make a call
through voice recognition by pressing the “Voice
Recognition Switch” on the steering wheel. After
pressing the “Voice Recognition Switch”, wait for the
“Voice Guidance” screen to appear on the
Touchscreen and say “Call [name and phone type]” or
“Dial [number]”.
To make a call from the Touchscreen, start by pushing
the “Home” button and then select “Phone”. After the
phone screen displays, select the method you would
like to use to make a call.
• Overview – Allows you to call the last number.
• Favorites – Allows you to place a call to one of your registered favorites.
• Recent – Allows you to call someone that has recently called you or that you called.
• Keypad – Allows you to dial any number you would like.
• Phonebook – Displays the phonebook from your phone.
PHONE
72
Page 75 of 156
RECEIVING A CALL
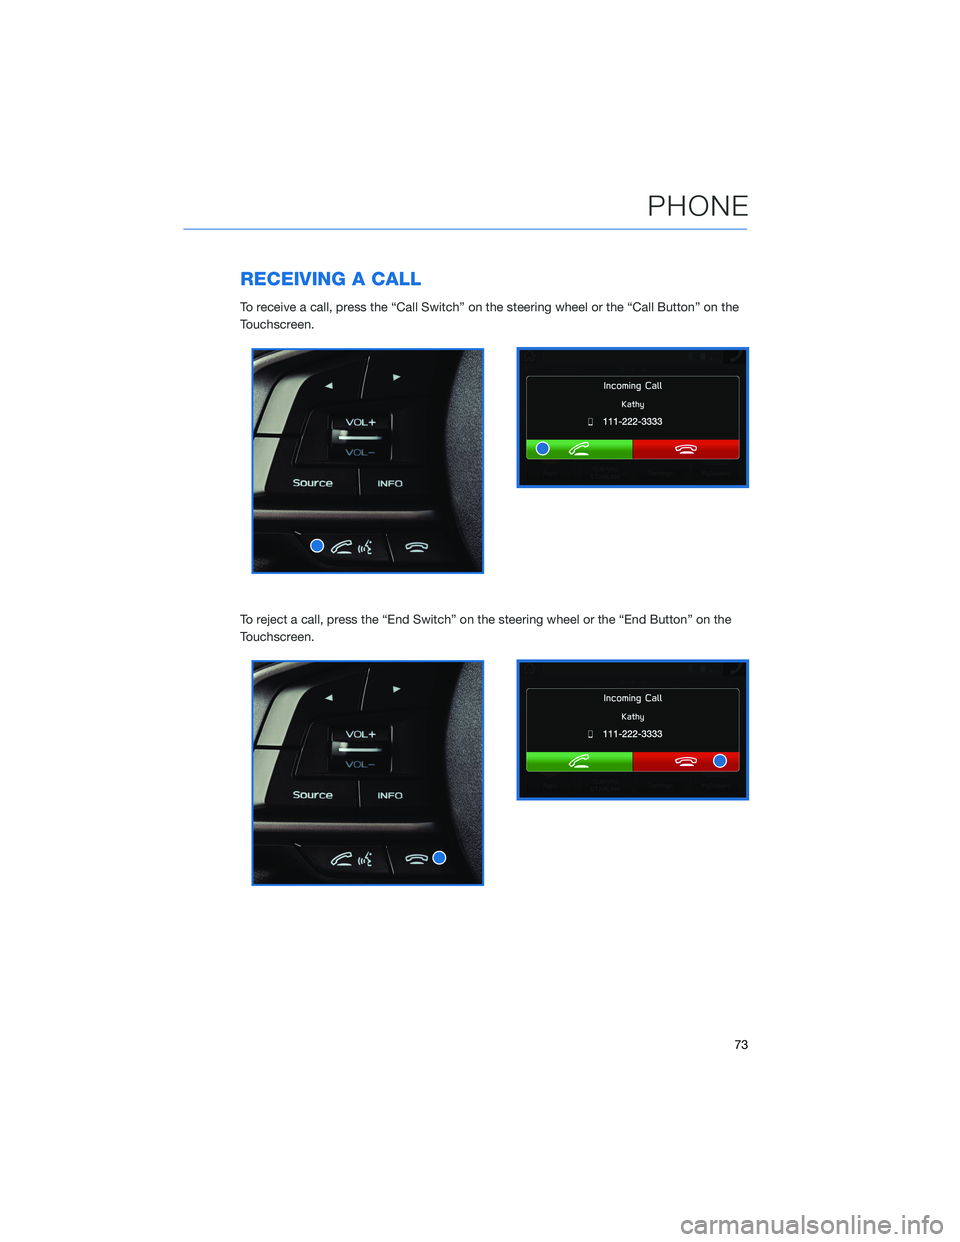
To receive a call, press the “Call Switch” on the steering wheel or the “Call Button” on the
Touchscreen.
To reject a call, press the “End Switch” on the steering wheel or the “End Button” on the
Touchscreen.
PHONE
73
Page 86 of 156
SOUND
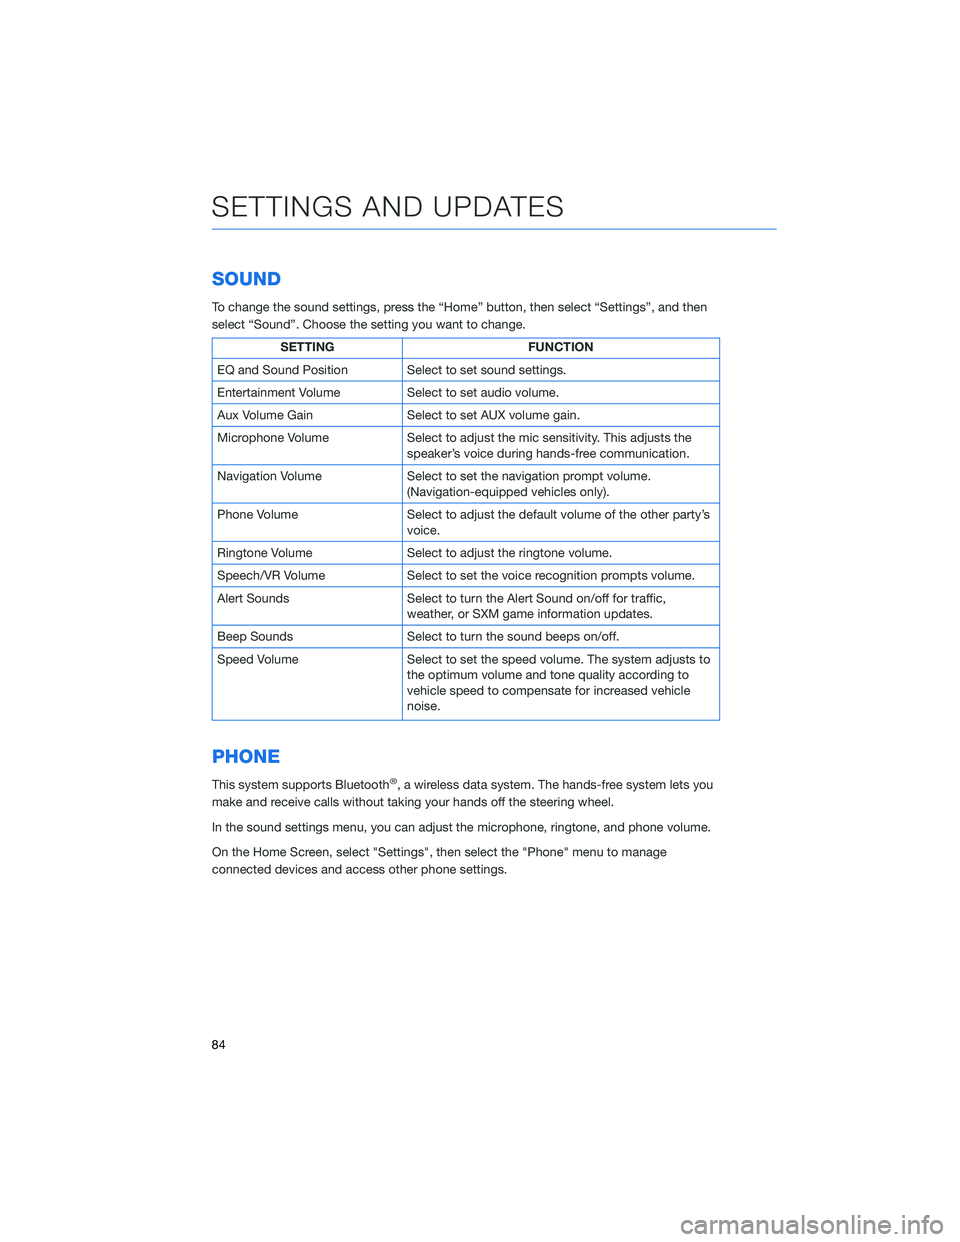
To change the sound settings, press the “Home” button, then select “Settings”, and then
select “Sound”. Choose the setting you want to change.
SETTINGFUNCTION
EQ and Sound Position Select to set sound settings.
Entertainment Volume Select to set audio volume.
Aux Volume Gain Select to set AUX volume gain.
Microphone Volume Select to adjust the mic sensitivity. This adjusts the
speaker’s voice during hands-free communication.
Navigation Volume Select to set the navigation prompt volume.
(Navigation-equipped vehicles only).
Phone Volume Select to adjust the default volume of the other party’s
voice.
Ringtone Volume Select to adjust the ringtone volume.
Speech/VR Volume Select to set the voice recognition prompts volume.
Alert Sounds Select to turn the Alert Sound on/off for traffic,
weather, or SXM game information updates.
Beep Sounds Select to turn the sound beeps on/off.
Speed Volume Select to set the speed volume. The system adjusts to
the optimum volume and tone quality according to
vehicle speed to compensate for increased vehicle
noise.
PHONE
This system supports Bluetooth®, a wireless data system. The hands-free system lets you
make and receive calls without taking your hands off the steering wheel.
In the sound settings menu, you can adjust the microphone, ringtone, and phone volume.
On the Home Screen, select "Settings", then select the "Phone" menu to manage
connected devices and access other phone settings.
SETTINGS AND UPDATES
84
Page 96 of 156
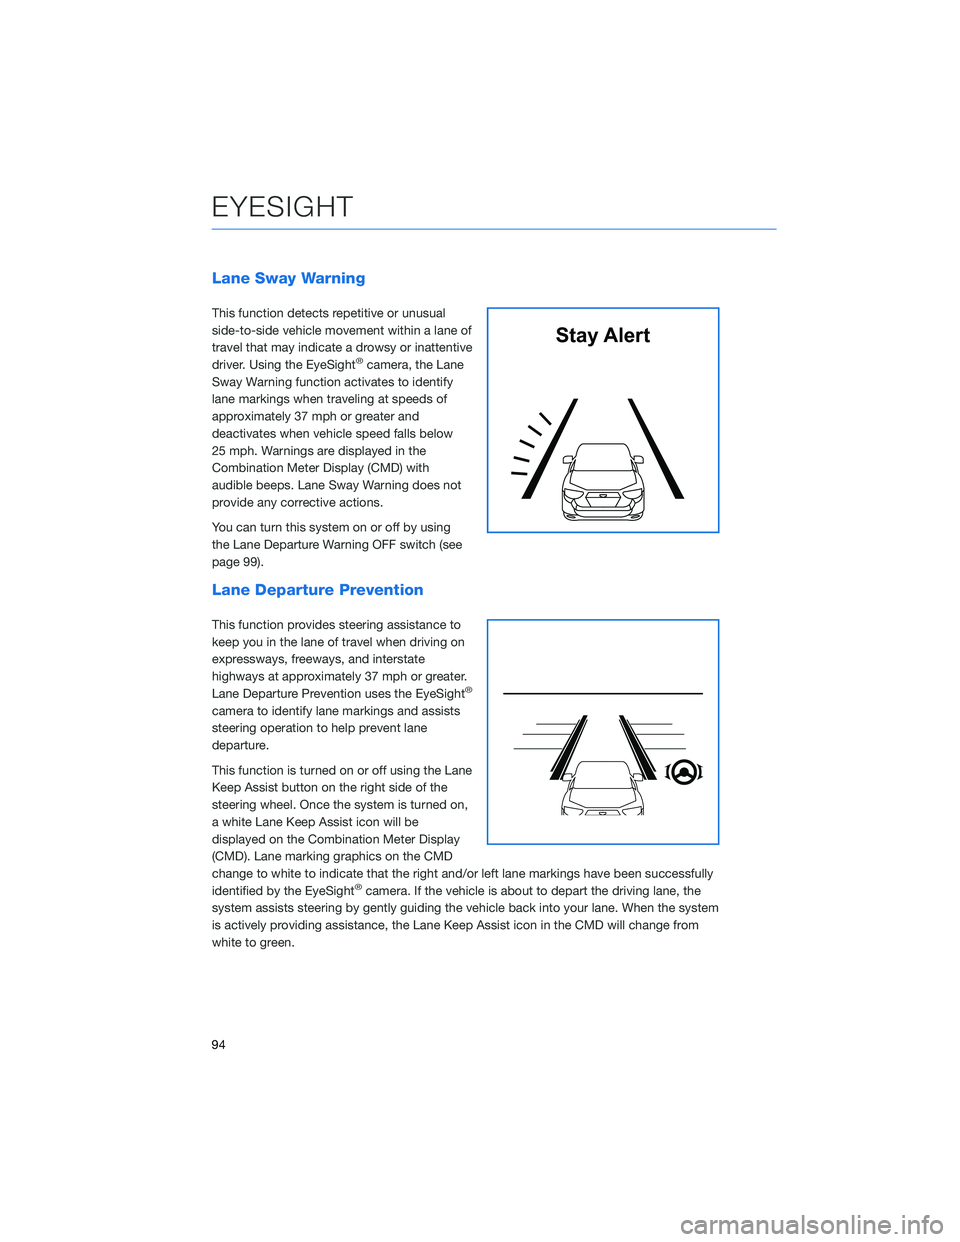
Lane Sway Warning
This function detects repetitive or unusual
side-to-side vehicle movement within a lane of
travel that may indicate a drowsy or inattentive
driver. Using the EyeSight
®camera, the Lane
Sway Warning function activates to identify
lane markings when traveling at speeds of
approximately 37 mph or greater and
deactivates when vehicle speed falls below
25 mph. Warnings are displayed in the
Combination Meter Display (CMD) with
audible beeps. Lane Sway Warning does not
provide any corrective actions.
You can turn this system on or off by using
the Lane Departure Warning OFF switch (see
page 99).
Lane Departure Prevention
This function provides steering assistance to
keep you in the lane of travel when driving on
expressways, freeways, and interstate
highways at approximately 37 mph or greater.
Lane Departure Prevention uses the EyeSight
®
camera to identify lane markings and assists
steering operation to help prevent lane
departure.
This function is turned on or off using the Lane
Keep Assist button on the right side of the
steering wheel. Once the system is turned on,
a white Lane Keep Assist icon will be
displayed on the Combination Meter Display
(CMD). Lane marking graphics on the CMD
change to white to indicate that the right and/or left lane markings have been successfully
identified by the EyeSight
®camera. If the vehicle is about to depart the driving lane, the
system assists steering by gently guiding the vehicle back into your lane. When the system
is actively providing assistance, the Lane Keep Assist icon in the CMD will change from
white to green.
Stay Alert
EYESIGHT
94
Page 97 of 156
Advanced Adaptive Cruise Control with Lane Centering
Advanced Adaptive Cruise Control is a driving support system intended to reduce the
burden on you when driving on an expressway (including during congestion and when
driving at high speed). Advanced Adaptive Cruise Control and Lane Centering work
together to assist you by automatically controlling the accelerator, brake, and steering.
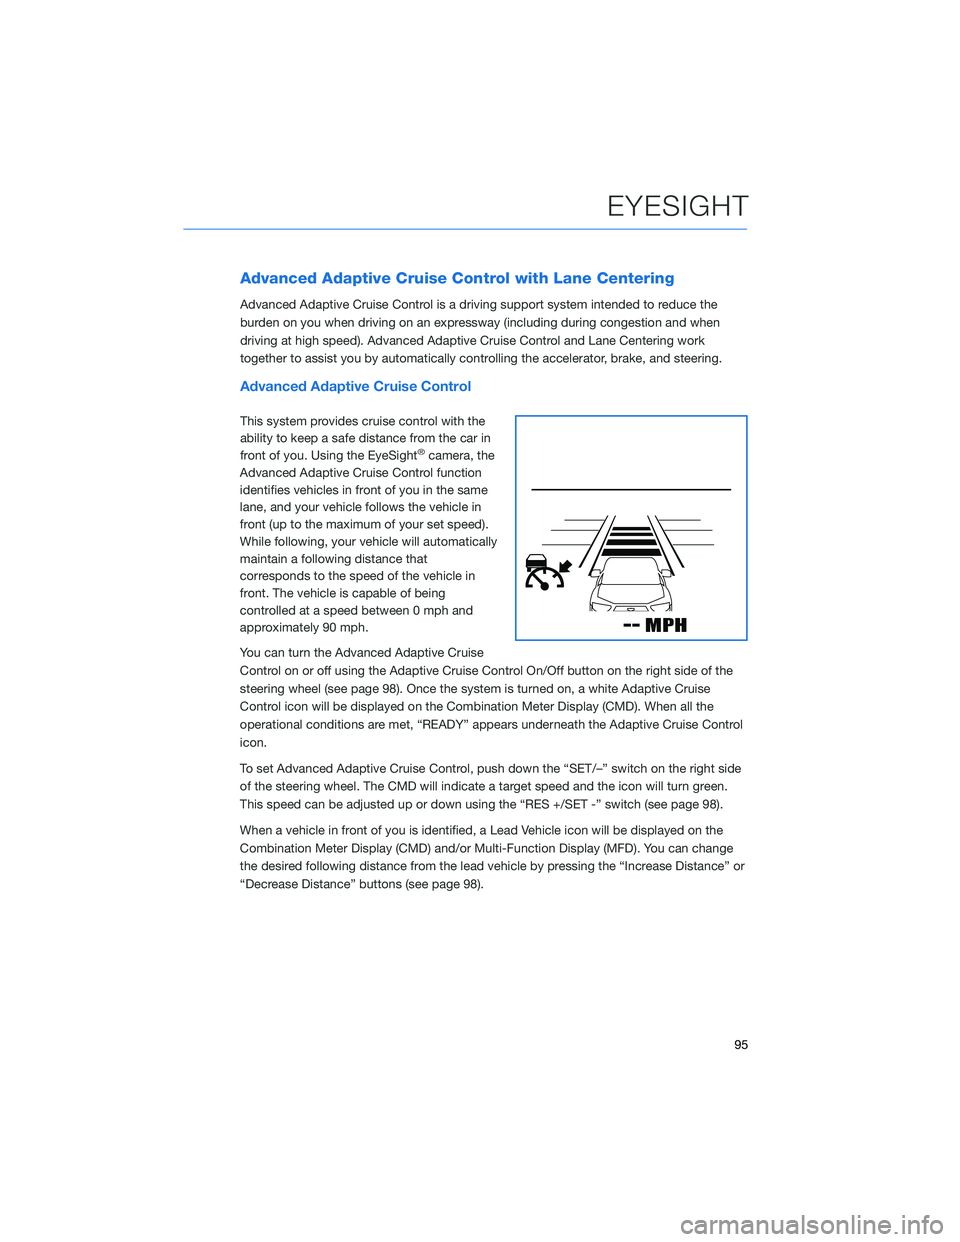
Advanced Adaptive Cruise Control
This system provides cruise control with the
ability to keep a safe distance from the car in
front of you. Using the EyeSight
®camera, the
Advanced Adaptive Cruise Control function
identifies vehicles in front of you in the same
lane, and your vehicle follows the vehicle in
front (up to the maximum of your set speed).
While following, your vehicle will automatically
maintain a following distance that
corresponds to the speed of the vehicle in
front. The vehicle is capable of being
controlled at a speed between 0 mph and
approximately 90 mph.
You can turn the Advanced Adaptive Cruise
Control on or off using the Adaptive Cruise Control On/Off button on the right side of the
steering wheel (see page 98). Once the system is turned on, a white Adaptive Cruise
Control icon will be displayed on the Combination Meter Display (CMD). When all the
operational conditions are met, “READY” appears underneath the Adaptive Cruise Control
icon.
To set Advanced Adaptive Cruise Control, push down the “SET/–” switch on the right side
of the steering wheel. The CMD will indicate a target speed and the icon will turn green.
This speed can be adjusted up or down using the “RES +/SET -” switch (see page 98).
When a vehicle in front of you is identified, a Lead Vehicle icon will be displayed on the
Combination Meter Display (CMD) and/or Multi-Function Display (MFD). You can change
the desired following distance from the lead vehicle by pressing the “Increase Distance” or
“Decrease Distance” buttons (see page 98).
EYESIGHT
95