lock SUBARU FORESTER 2022 Getting Started Guide
[x] Cancel search | Manufacturer: SUBARU, Model Year: 2022, Model line: FORESTER, Model: SUBARU FORESTER 2022Pages: 156, PDF Size: 45.35 MB
Page 90 of 156
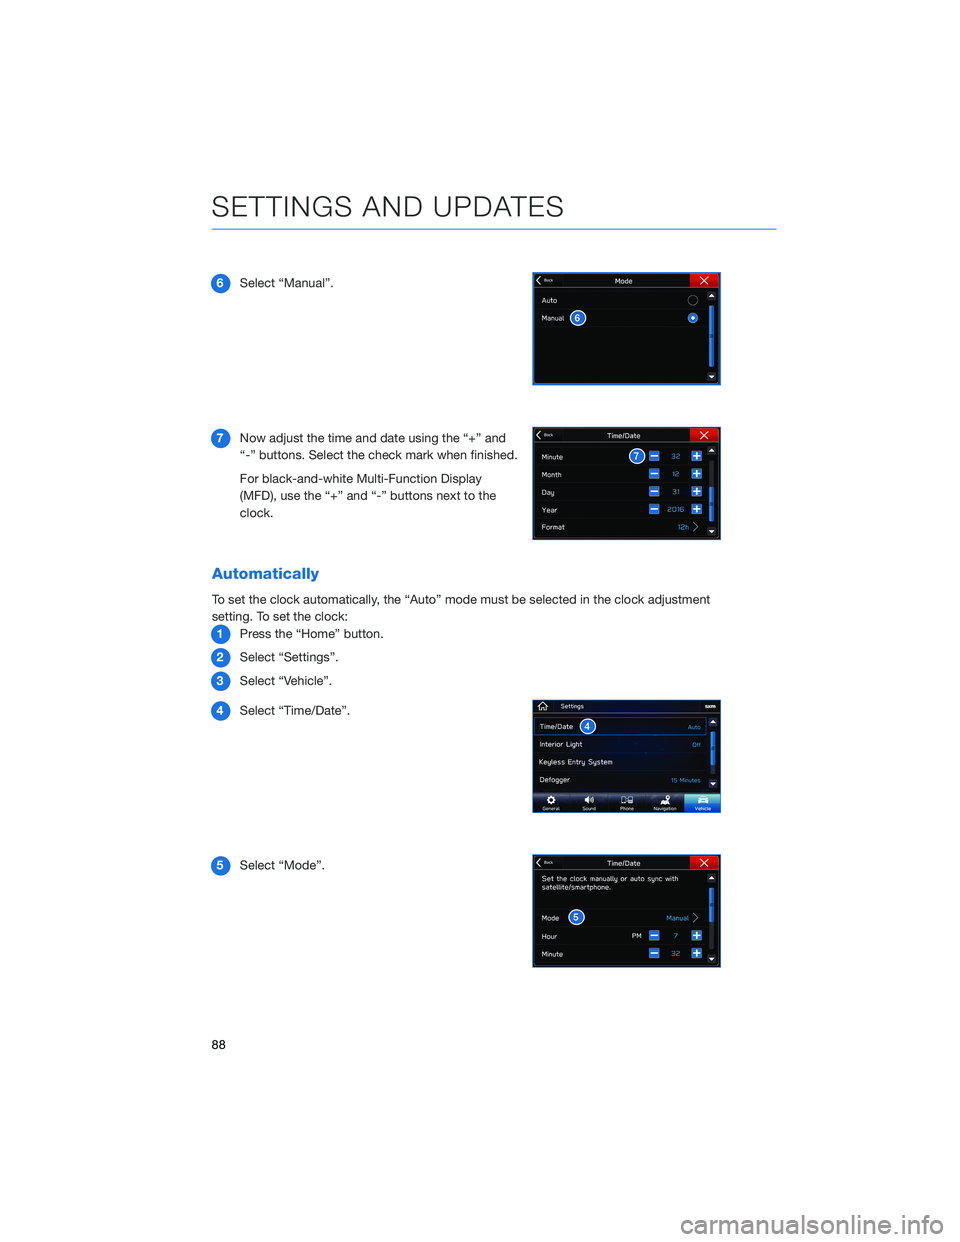
6Select “Manual”.
7 Now adjust the time and date using the “+” and
“-” buttons. Select the check mark when finished.
For black-and-white Multi-Function Display
(MFD), use the “+” and “-” buttons next to the
clock.
Automatically
To set the clock automatically, the “Auto” mode must be selected in the clock adjustment
setting. To set the clock:
1 Press the “Home” button.
2 Select “Settings”.
3 Select “Vehicle”.
4 Select “Time/Date”.
5 Select “Mode”.
SETTINGS AND UPDATES
88
Page 91 of 156
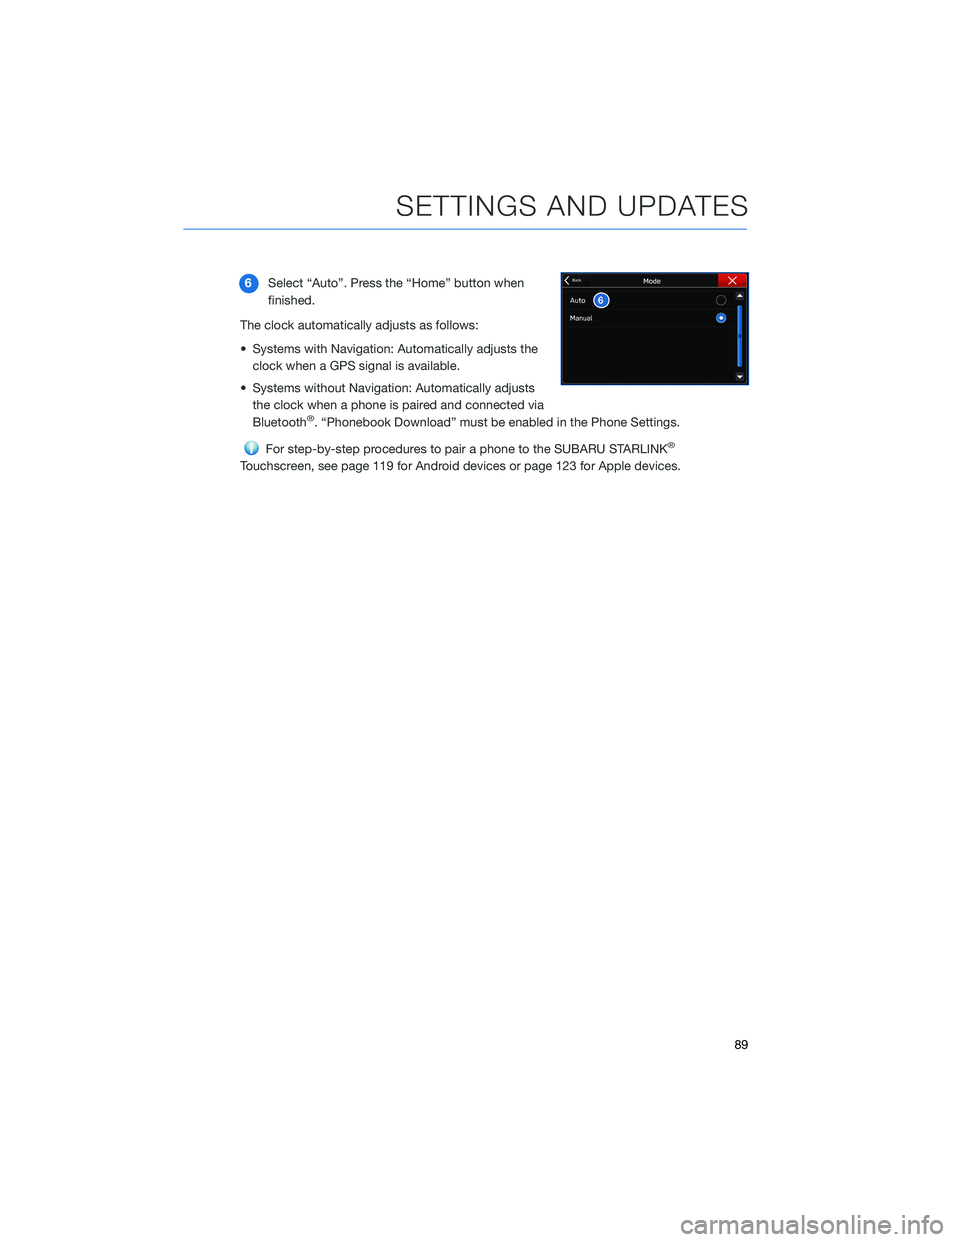
6Select “Auto”. Press the “Home” button when
finished.
The clock automatically adjusts as follows:
• Systems with Navigation: Automatically adjusts the clock when a GPS signal is available.
• Systems without Navigation: Automatically adjusts the clock when a phone is paired and connected via
Bluetooth
®. “Phonebook Download” must be enabled in the Phone Settings.
For step-by-step procedures to pair a phone to the SUBARU STARLINK®
Touchscreen, see page 119 for Android devices or page 123 for Apple devices.
SETTINGS AND UPDATES
89
Page 114 of 156
STEREO CAMERA PRECAUTIONS
Your EyeSight®stereo cameras are precision components that must be kept free from
obstruction and contamination, such as fingerprints or cleaning solutions. When the
system detects that the stereo camera lenses are impaired, a malfunction indicator will be
displayed and EyeSight
®functions will not be available.
When you are in the vicinity of the EyeSight
®stereo cameras, always observe the following
precautions:
• Do not touch or attempt to clean the EyeSight
®camera lenses inside the vehicle. Extra
caution should be used when cleaning the inside of the windshield. Over-spray from
cleaning solutions may impair or even damage the camera lenses. When cleaning the
inside of the windshield around the camera cover, do not spray cleaner directly onto the
windshield. Instead, spray cleaner onto a cloth and then wipe the windshield. Please
inform others who may attempt to clean the windshield, such as car wash staff, of these
precautions.
• If the inside of the windshield in front of the stereo camera is dirty, do not try to clean the windshield yourself. Contact your Subaru retailer to have the vehicle inspected.
• If the camera system becomes hot, the cooling fans may operate. Do not block or insert anything into the ventilation holes. Do not touch the camera cover, because it may be
hot due to head generated by the camera system.
• Electronic Toll Collection devices, such as EZPass
TM, must be installed in an area that
does not obstruct the stereo cameras' field of vision. See prohibited area on page 113.
• Adjust the rearview mirror so it does not obstruct the stereo cameras' field of vision.
• Do not install any interior rearview mirror accessories, such as a wide-type mirror or hanging objects. Only approved Genuine SUBARU accessories may be installed.
For more detailed information, please refer to your EyeSight
®Owner’s Manual.
WINDSHIELD GLASS AND DASHBOARD
Since the characteristics and limitations of the EyeSight®stereo cameras are similar to
human eyes, it is important that the area in front of the cameras be kept free from dirt,
scratches, cracks, fogging, or accessories mounted to the windshield, hood or dashboard.
Visual impairments or reflections can affect EyeSight
®system performance. Extra caution
should be taken when cleaning the windshield to prevent over-spray from cleaning
solutions.
The image in the following section outlines those areas that must be kept clean and free
from obstruction. Please refer to the Owner’s Manual for a complete listing of limitations.
CARE AND LIMITATIONS
112
Page 120 of 156
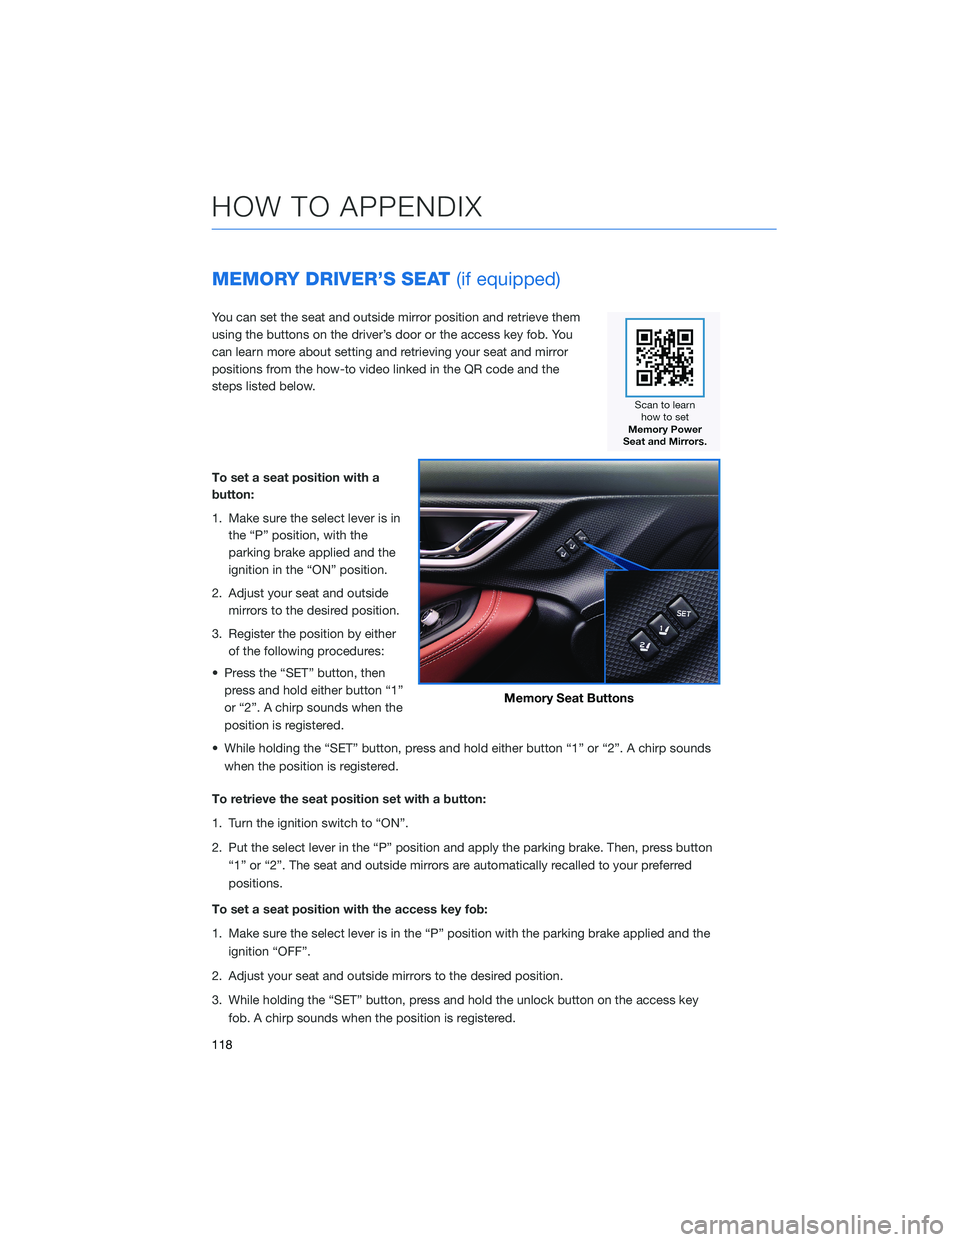
MEMORY DRIVER’S SEAT(if equipped)
You can set the seat and outside mirror position and retrieve them
using the buttons on the driver’s door or the access key fob. You
can learn more about setting and retrieving your seat and mirror
positions from the how-to video linked in the QR code and the
steps listed below.
To set a seat position with a
button:
1. Make sure the select lever is in
the “P” position, with the
parking brake applied and the
ignition in the “ON” position.
2. Adjust your seat and outside mirrors to the desired position.
3. Register the position by either of the following procedures:
• Press the “SET” button, then press and hold either button “1”
or “2”. A chirp sounds when the
position is registered.
• While holding the “SET” button, press and hold either button “1” or “2”. A chirp sounds when the position is registered.
To retrieve the seat position set with a button:
1. Turn the ignition switch to “ON”.
2. Put the select lever in the “P” position and apply the parking brake. Then, press button “1” or “2”. The seat and outside mirrors are automatically recalled to your preferred
positions.
To set a seat position with the access key fob:
1. Make sure the select lever is in the “P” position with the parking brake applied and the ignition “OFF”.
2. Adjust your seat and outside mirrors to the desired position.
3. While holding the “SET” button, press and hold the unlock button on the access key fob. A chirp sounds when the position is registered.
Memory Seat Buttons
HOW TO APPENDIX
118
Page 121 of 156
To retrieve the seat position set with the access key fob:
1. Hold the access key fob.
2. Unlock and open the driver’s door. The seat and outside mirrors are automaticallyrecalled to your preferred positions.
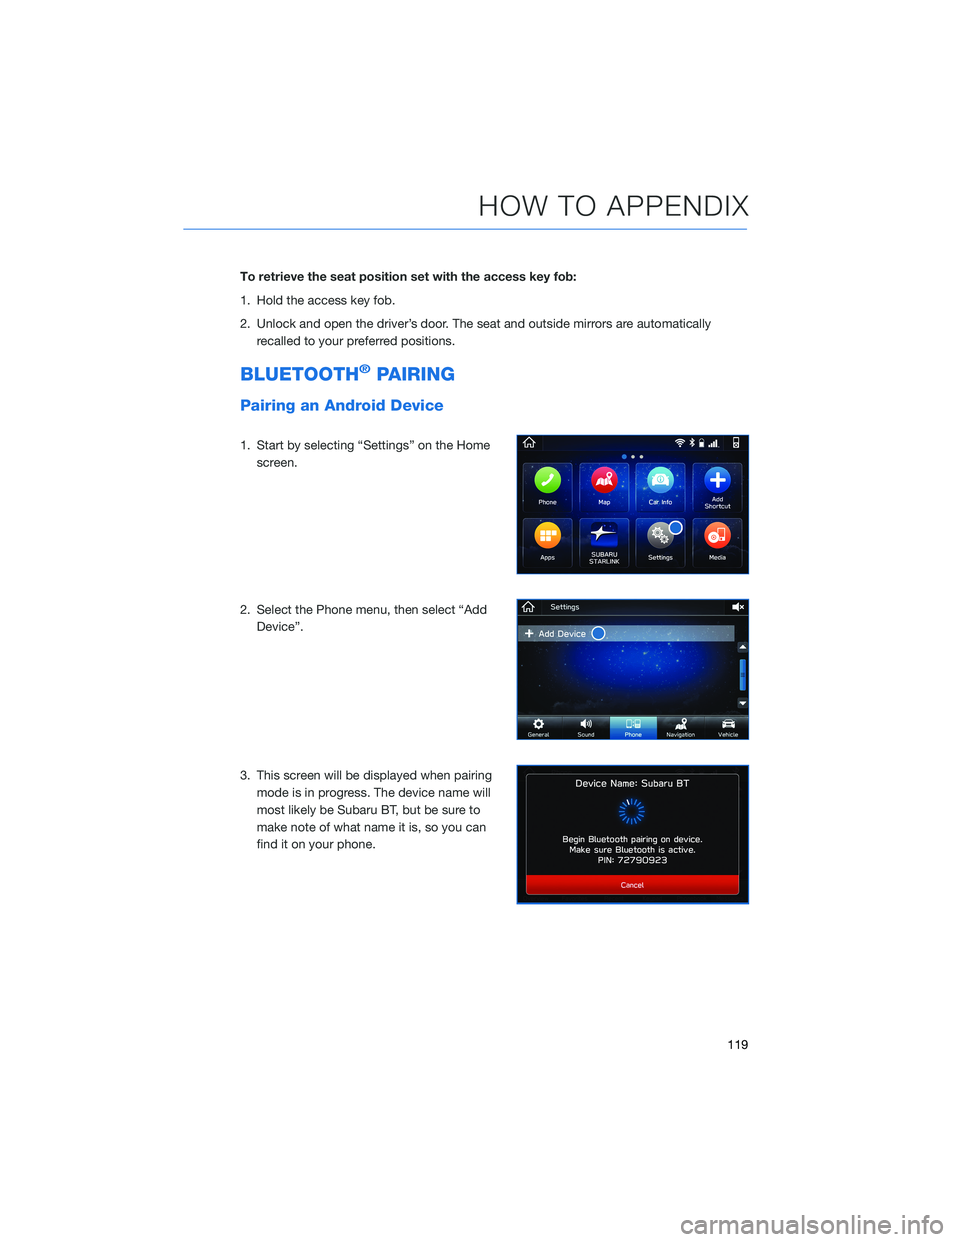
BLUETOOTH®PAIRING
Pairing an Android Device
1. Start by selecting “Settings” on the Homescreen.
2. Select the Phone menu, then select “Add Device”.
3. This screen will be displayed when pairing mode is in progress. The device name will
most likely be Subaru BT, but be sure to
make note of what name it is, so you can
find it on your phone.
HOW TO APPENDIX
119
Page 134 of 156
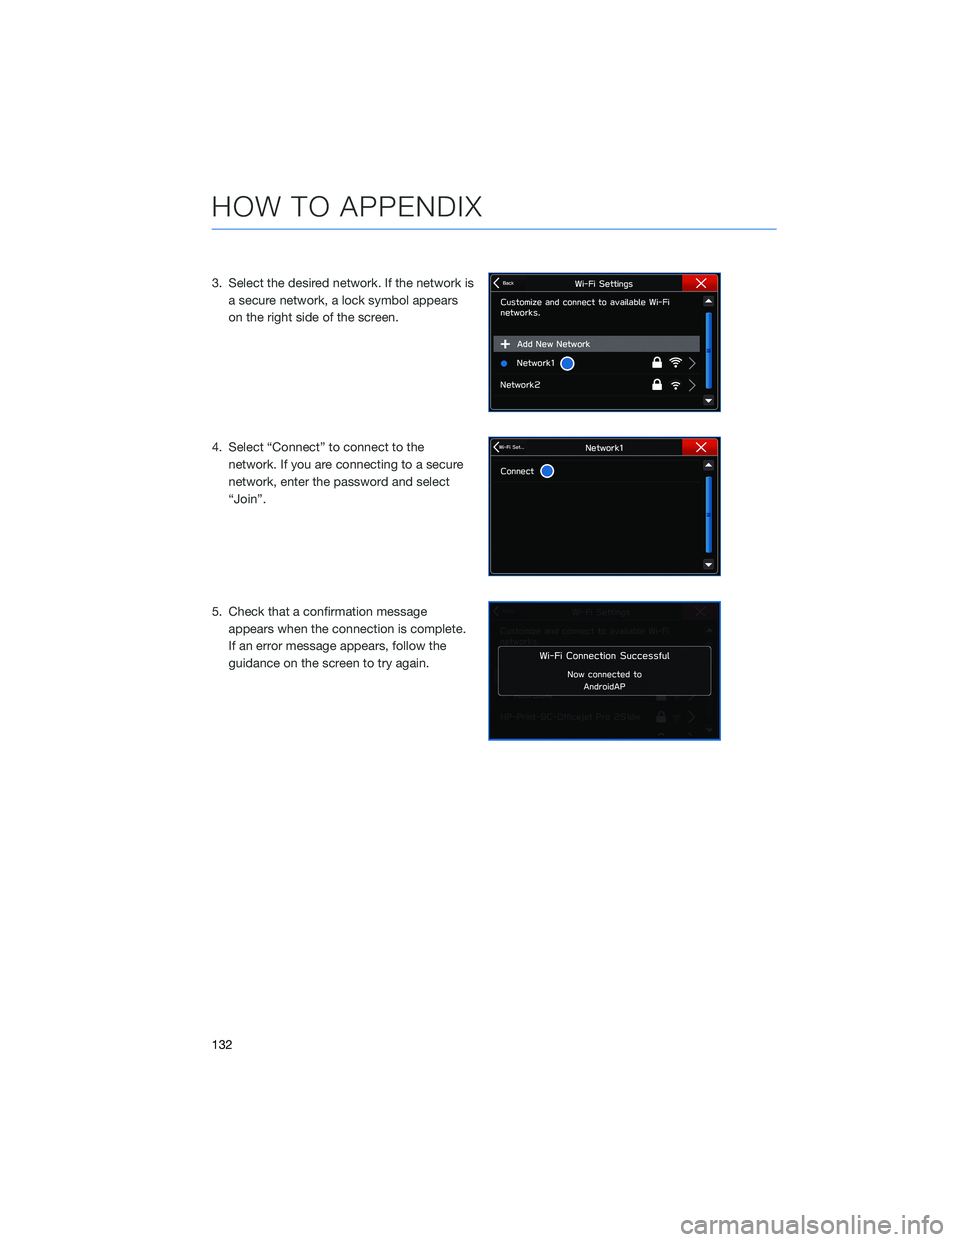
3. Select the desired network. If the network isa secure network, a lock symbol appears
on the right side of the screen.
4. Select “Connect” to connect to the network. If you are connecting to a secure
network, enter the password and select
“Join”.
5. Check that a confirmation message appears when the connection is complete.
If an error message appears, follow the
guidance on the screen to try again.
HOW TO APPENDIX
132
Page 144 of 156
FIRMWARE AND SOFTWARE UPDATES
For 8.0–inch Multimedia Plus and 8.0–inch Multimedia Navigation systems, you can
update the system software via a Wi-Fi connection or the aha™ application on your
smartphone (depending on your smartphone communication and transfer speed).
To accurately check for updates, make sure the clock is set to “Auto” with a GPS signal
available (system with navigation) or a phone paired via Bluetooth
®(system without
navigation). See page 87 for step by step directions on setting the clock. System
functionality will be restricted during installation.
1. Connect to a Wi-Fi network or start the aha application on your smartphone (see page 131).
2. Return to the general settings screen (if needed, press the “Home” button, select “Settings”, and then select “General”).
3. Select “Check for Updates”. • If “Automatically Check for Updates” is turned on at the general settings screen, anupdate check will be performed automatically before proceeding to the next step.
• If “Automatically Download Updates” is turned on at the general settings screen, the software update will be downloaded automatically before proceeding to “Update
Installation”.
4. If the “Software Update Ready to Download” pop-up is displayed, select “Download Now” to begin the download. The download status progress is displayed in the upper
right of the screen.
5. Select “Install Now” to start the installation process. The installation process will take several minutes to complete. If you need to stop the installation process, press
“Cancel”.
6. When the installation is complete, select “I Agree” on the confirmation message to complete the update process. By selecting “I Agree”, the system will restart
automatically.
HOW TO APPENDIX
142
Page 145 of 156
2.5 L ENGINE . . . . . . . ........ 55
A
ACCESSORY CONNECTIONS . . . . . . 38
ADDING SHORTCUTS . . . . . ..... 67
ADVANCED ADAPTIVE CRUISE CONTROL . . . . . . .......... 19
ANDROID AUTO™ . . . . . . ...... 127
Cables . . . . . . . . .........127
Compatible Models . .........129
Connecting an Android Phone ....127
APPLE CARPLAY
®............ 130
Cables . . . . . . . . .........130
Compatible Models . .........131
Connecting an iPhone . . . . ....130
AUDIO CONTROLS . ........... 18
AUTO START–STOP . . . . . . . . . . . 42
B
BLIND SPOT DETECTION (BSD) / REAR CROSS TRAFFIC ALERT (RCTA) . . 102
Blind Spot Detection (BSD) . . . . . 102
Blind Spot Detection / Rear Cross
Traffic Alert OFF . . . . . .......103
Lane Change Assist (LCA) ......103
Rear Cross-Traffic Alert (RCTA) . . . 103
BLUETOOTH
®PAIRING . . . ...... 119
Pairing an Android Device . . . . . . 119
Pairing an iOS/Apple Device . . . . . 123
BUTTONS . . . . . ............ 60
CD Player Functions ..........61
Controlling the Volume . . . . . . . . . 61
Other Functions . . . . . . .......61
Radio Functions . . . . . . .......60 C
CARGO AREA AND COVER ....... 53
CHILD SAFETY LOCKS . . . . . . .... 50
CLIMATE CONTROL . . . . . . ..... 31
Automatic Climate Control . . . ....31
Dual—Zone Automatic
Climate Control . . . . . . .......34
Heated Seats (if equipped) . .....37
Heated Steering Wheel . . ......37
Rear Heated Seats ...........37
Remote Engine Start with
Climate Control . . . . . . .......36
CLOCK . . . ................ 87
Automatically . .............88
Manually .................87
COMBINATION METER . ......... 16
CREATING A DRIVER PROFILE . .... 68
Retrieving a Driver Profile .......69
CREATING HOME AND WORK PROFILES . . . . . . . . . ....... 79
D
DRIVERFOCUS
®COMPONENTS . . . 106
Camera . . ...............106
Combination Meter Display (CMD) . 108
INFO SWITCH . . . . . . .......107
i/SET Switch . . . . . . ........108
Multi Function Display (MFD) . . . . 107
DRIVERFOCUS
®OVERVIEW ..... 106
DRIVER MONITORING SYSTEM OFF . . 111
DRIVER PROFILE/CONVENIENCE
SETTINGS . .............. 109
Deleting a Driver . . . .........111
Recognizing a Driver .........111
Registering a Driver . . . . . . . . . . 109
Temperature Gesture Control ....110
DRIVING THE VEHICLE . . . . ...... 40
Automatic Transmission Shift Mode . 40
Paddle Shift Control Switches
(if equipped) ...............41
SI-DRIVE . . . . .............41
DROWSY/INATTENTIVE WARNINGS . 109
INDEX
143
Page 146 of 156
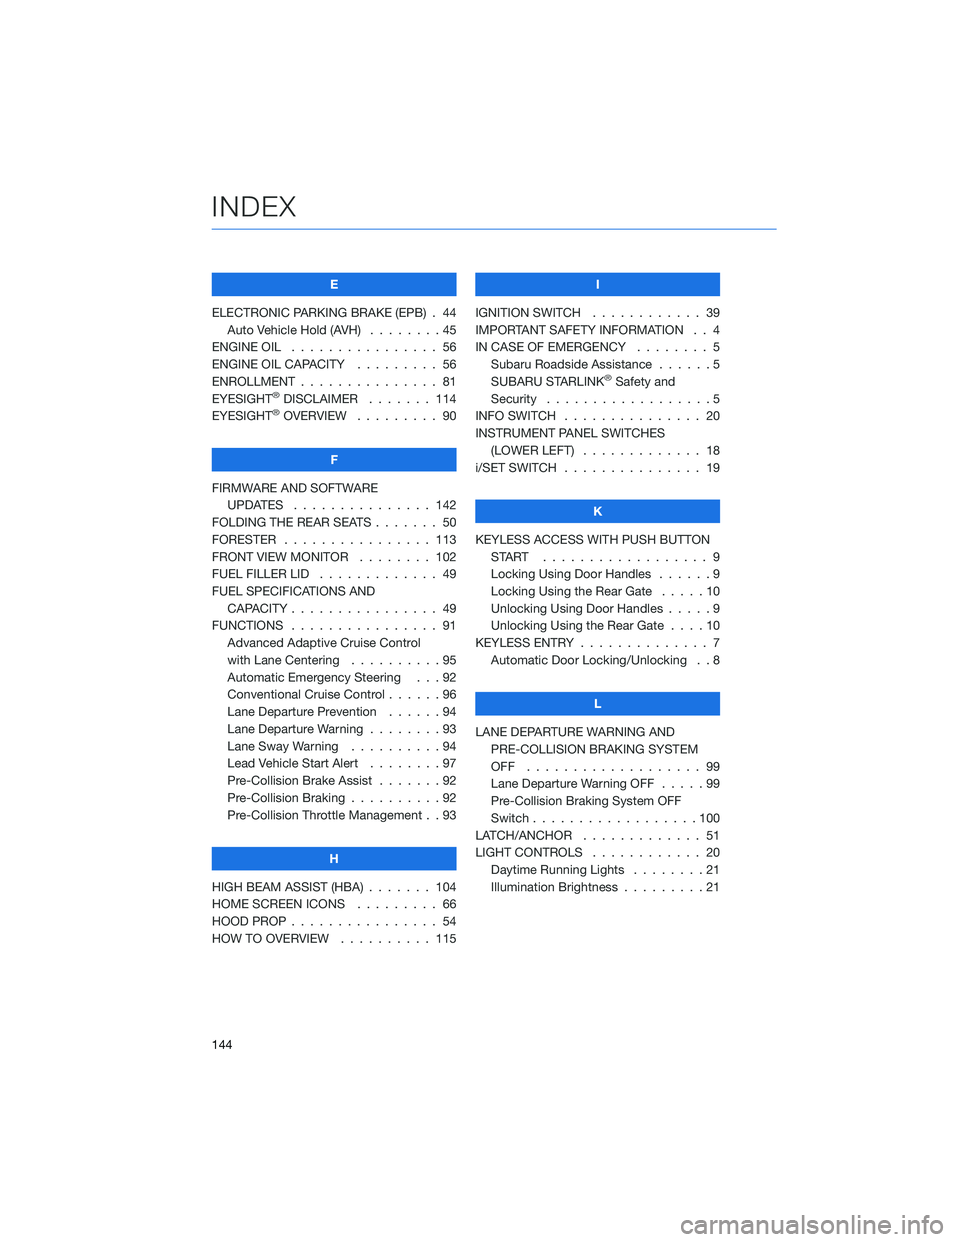
E
ELECTRONIC PARKING BRAKE (EPB) . 44 Auto Vehicle Hold (AVH) ........45
ENGINE OIL . . . . . . . . . ....... 56
ENGINE OIL CAPACITY . . . . . .... 56
ENROLLMENT . . . . . . . . . . . . . . . 81
EYESIGHT
®DISCLAIMER . ...... 114
EYESIGHT®OVERVIEW . . . . . . . . . 90
F
FIRMWARE AND SOFTWARE UPDATES . . . . . . . . . ...... 142
FOLDING THE REAR SEATS . . . . . . . 50
FORESTER . . . . . . . . . . ...... 113
FRONT VIEW MONITOR . . ...... 102
FUEL FILLER LID . . . . . . . . . .... 49
FUEL SPECIFICATIONS AND CAPACITY . . . . . . . . . ....... 49
FUNCTIONS . . . . . . . . . . . . . . . . 91 Advanced Adaptive Cruise Control
with Lane Centering . . . . . . ....95
Automatic Emergency Steering . . . 92
Conventional Cruise Control . .....96
Lane Departure Prevention . . . . . . 94
Lane Departure Warning . . . . . . . . 93
Lane Sway Warning . . . . . . . . . . 94
Lead Vehicle Start Alert ........97
Pre-Collision Brake Assist . . . ....92
Pre-Collision Braking . .........92
Pre-Collision Throttle Management . . 93
H
HIGH BEAM ASSIST (HBA) . . . . . . . 104
HOME SCREEN ICONS . ........ 66
HOOD PROP . . . . . . . . . ....... 54
HOW TO OVERVIEW . . . ....... 115 I
IGNITION SWITCH . ........... 39
IMPORTANT SAFETY INFORMATION . . 4
IN CASE OF EMERGENCY . . . . . . . . 5 Subaru Roadside Assistance . . . . . . 5
SUBARU STARLINK
®Safety and
Security . . . . . . . . . . . . . . . . . . 5
INFO SWITCH ............... 20
INSTRUMENT PANEL SWITCHES (LOWER LEFT) . . . . ......... 18
i/SET SWITCH . . . . . . . ........ 19
K
KEYLESS ACCESS WITH PUSH BUTTON START .................. 9
Locking Using Door Handles . . ....9
Locking Using the Rear Gate . . . . . 10
Unlocking Using Door Handles .....9
Unlocking Using the Rear Gate . . . . 10
KEYLESS ENTRY . . . . . . ........ 7
Automatic Door Locking/Unlocking . . 8
L
LANE DEPARTURE WARNING AND PRE-COLLISION BRAKING SYSTEM
OFF ................... 99
Lane Departure Warning OFF .....99
Pre-Collision Braking System OFF
Switch . . . . . . . . . . . .......100
LATCH/ANCHOR . . . . ......... 51
LIGHT CONTROLS . . .......... 20
Daytime Running Lights . . . . . . . . 21
Illumination Brightness . . . . . . . . . 21
INDEX
144
Page 147 of 156
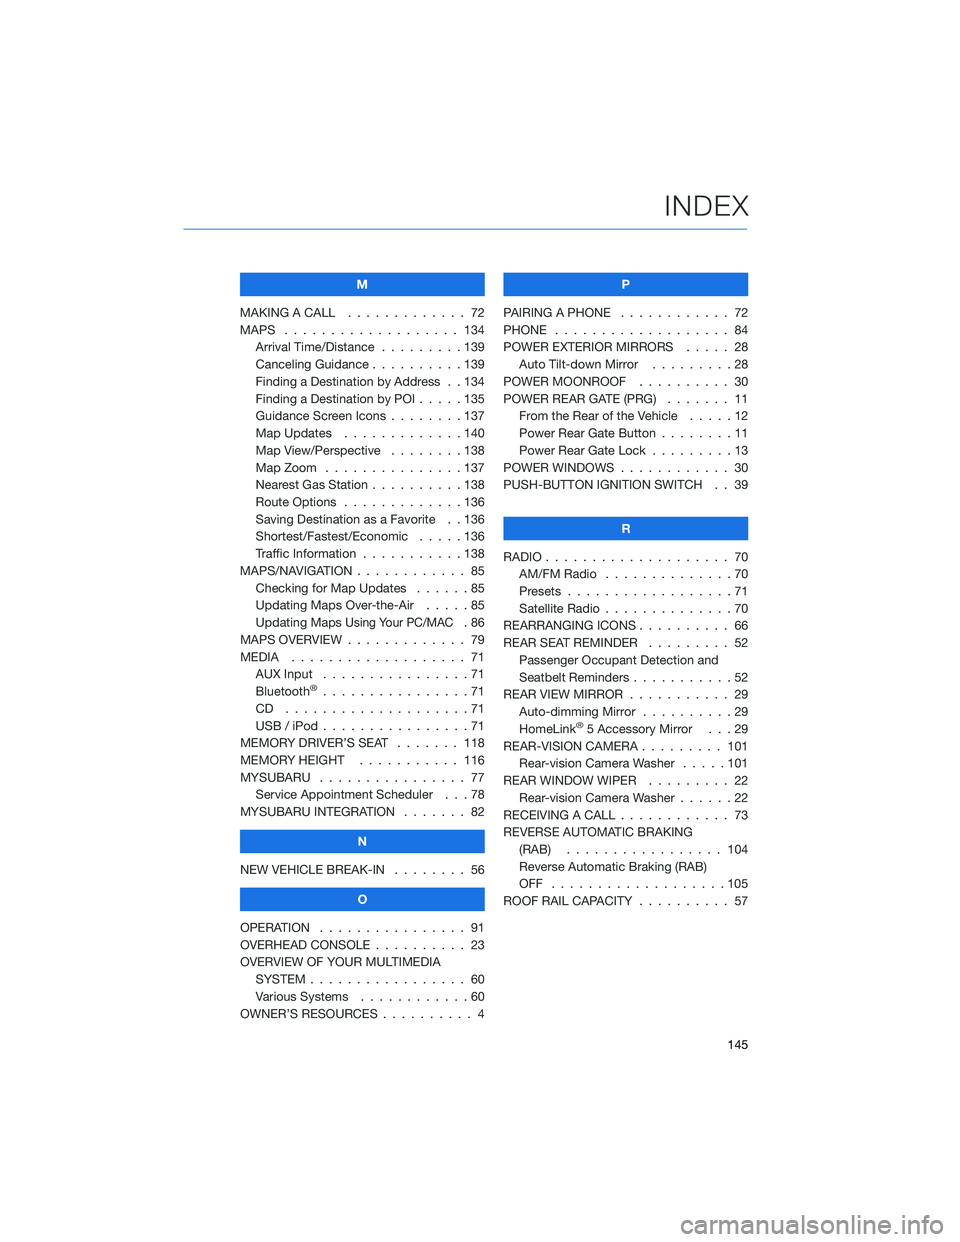
M
MAKING A CALL . . . .......... 72
MAPS . . . . . . . . . . . . . . . . . . . 134 Arrival Time/Distance . . . ......139
Canceling Guidance . . ........139
Finding a Destination by Address . . 134
Finding a Destination by POI .....135
Guidance Screen Icons ........137
Map Updates . . . ..........140
Map View/Perspective . . . . . . . . 138
Map Zoom . . . . . ..........137
Nearest Gas Station ..........138
Route Options . . ...........136
Saving Destination as a Favorite . . 136
Shortest/Fastest/Economic . . . . . 136
Traffic Information . . . . . . . . . . . 138
MAPS/NAVIGATION . . .......... 85
Checking for Map Updates . . . . . . 85
Updating Maps Over-the-Air . ....85
Updating Maps
Using Your PC/MAC.86
MAPS OVERVIEW . . . . . . . . . . . . . 79
MEDIA . . . . . . . . . .......... 71
AUX Input . . . . . . . . . . . . . . . . 71
Bluetooth
®................71
CD ....................71
USB / iPod . . . . . . ..........71
MEMORY DRIVER’S SEAT . ...... 118
MEMORY HEIGHT . . . ........ 116
MYSUBARU . . . . . . .......... 77
Service Appointment Scheduler . . . 78
MYSUBARU INTEGRATION ....... 82
N
NEW VEHICLE BREAK-IN . . . . . . . . 56
O
OPERATION . . . . . ........... 91
OVERHEAD CONSOLE . ......... 23
OVERVIEW OF YOUR MULTIMEDIA SYSTEM . . . . . . . . . . . . . . . . . 60
Various Systems . . ..........60
OWNER’S RESOURCES . . ........ 4 P
PAIRING A PHONE ............ 72
PHONE ................... 84
POWER EXTERIOR MIRRORS . . . . . 28 Auto Tilt-down Mirror . . . . .....28
POWER MOONROOF .......... 30
POWER REAR GATE (PRG) ....... 11
From the Rear of the Vehicle . ....12
Power Rear Gate Button . . . .....11
Power Rear Gate Lock .........13
POWER WINDOWS . . . . . ....... 30
PUSH-BUTTON IGNITION SWITCH . . 39
R
RADIO .................... 70
AM/FM Radio . . . . . . . . . . ....70
Presets . . . . . . . . ..........71
Satellite Radio . . . . . .........70
REARRANGING ICONS .......... 66
REAR SEAT REMINDER . . . . . . . . . 52 Passenger Occupant Detection and
Seatbelt Reminders . . . . .......52
REAR VIEW MIRROR . . . ........ 29
Auto-dimming Mirror . . ........29
HomeLink
®5 Accessory Mirror . . . 29
REAR-VISION CAMERA . . . . ..... 101
Rear-vision Camera Washer .....101
REAR WINDOW WIPER . . . . ..... 22
Rear-vision Camera Washer . . . . . . 22
RECEIVING A CALL . . . . . . . . . . . . 73
REVERSE AUTOMATIC BRAKING (RAB) . . . . . . . .......... 104
Reverse Automatic Braking (RAB)
OFF ...................105
ROOF RAIL CAPACITY .......... 57
INDEX
145