Passenger SUBARU FORESTER 2022 Getting Started Guide
[x] Cancel search | Manufacturer: SUBARU, Model Year: 2022, Model line: FORESTER, Model: SUBARU FORESTER 2022Pages: 156, PDF Size: 45.35 MB
Page 4 of 156
OPERATING THE VEHICLE
IGNITION SWITCH...........39
PUSH-BUTTON IGNITION
SWITCH ...................39
STARTING THE VEHICLE ......39
DRIVING THE VEHICLE .......40
AUTO START–STOP .........42
ELECTRONIC PARKING BRAKE
(EPB) .....................44
X-MODE
®..................45
TURNING OFF THE VEHICLE ...48
REFUELING
FUEL FILLER LID............49
FUEL SPECIFICATIONS AND
CAPACITY ..................49
PASSENGER/CARGO AREAS
FOLDING THE REAR SEATS ...50
CHILD SAFETY LOCKS .......50
LATCH/ANCHOR ............51
REAR SEAT REMINDER .......52
CARGO AREA AND COVER ...53
SPARE TIRE AND JACK .......53
ENGINE COMPARTMENT
HOOD PROP................54
2.5 L ENGINE ...............55
ADDITIONAL SPECIFICATIONS
NEW VEHICLE BREAK-IN ......56
ENGINE OIL ................56
ENGINE OIL CAPACITY .......56
ROOF RAIL CAPACITY .......57
TRAILER TOWING CAPACITY . . 57
TIRE PRESSURE MONITORING
SYSTEM (TPMS) .............58
STARLINK OVERVIEW
OVERVIEW OF YOUR
MULTIMEDIA SYSTEM ........60
BUTTONS ..................60
TOUCHSCREEN .............62
STEERING WHEEL CONTROLS . 63
VOICE RECOGNITION ........64
STARLINK HOME
HOME SCREEN ICONS .......66
REARRANGING ICONS .......66
ADDING SHORTCUTS ........67
DRIVER PROFILE
CREATING A DRIVER PROFILE . . 68
MULTIMEDIA
RADIO.....................70
MEDIA .....................71
PHONE
PAIRING A PHONE ...........72
MAKING A CALL .............72
RECEIVING A CALL ..........73
TEXT MESSAGES ............74
APPS
SUBARU STARLINK®
IN-VEHICLE APPS ...........75
SUBARU STARLINK®
MOBILE APP ................77
MYSUBARU ................77
MAPS (if equipped)
MAPS OVERVIEW ............79
CREATING HOME AND
WORK PROFILES ............79
STARLINK SAFETY AND
SECURITY
SAFETY AND SECURITY
OVERVIEW.................80
ENROLLMENT ..............81
MYSUBARU INTEGRATION ....82
SUBARU STARLINK
®
WI-FI HOTSPOT .............82
SETTINGS AND UPDATES
SETTINGS AND UPDATES
OVERVIEW.................83
SOUND ....................84
PHONE ....................84
MAPS/NAVIGATION ..........85
CLOCK ....................87
TABLE OF CONTENTS
2
Page 11 of 156
KEYLESS ACCESS WITH PUSH BUTTON START
(if equipped)
The Keyless Access with Push-Button Start system features the following touch-activated
door locking or unlocking functions without the key ever leaving your pocket or purse;
simply carry the access key fob with you. You can customize the touch-activated door
locking or unlocking settings using the Combination Meter Display or through the
STARLINK
®Touchscreen by selecting “Settings” then “Vehicle”.
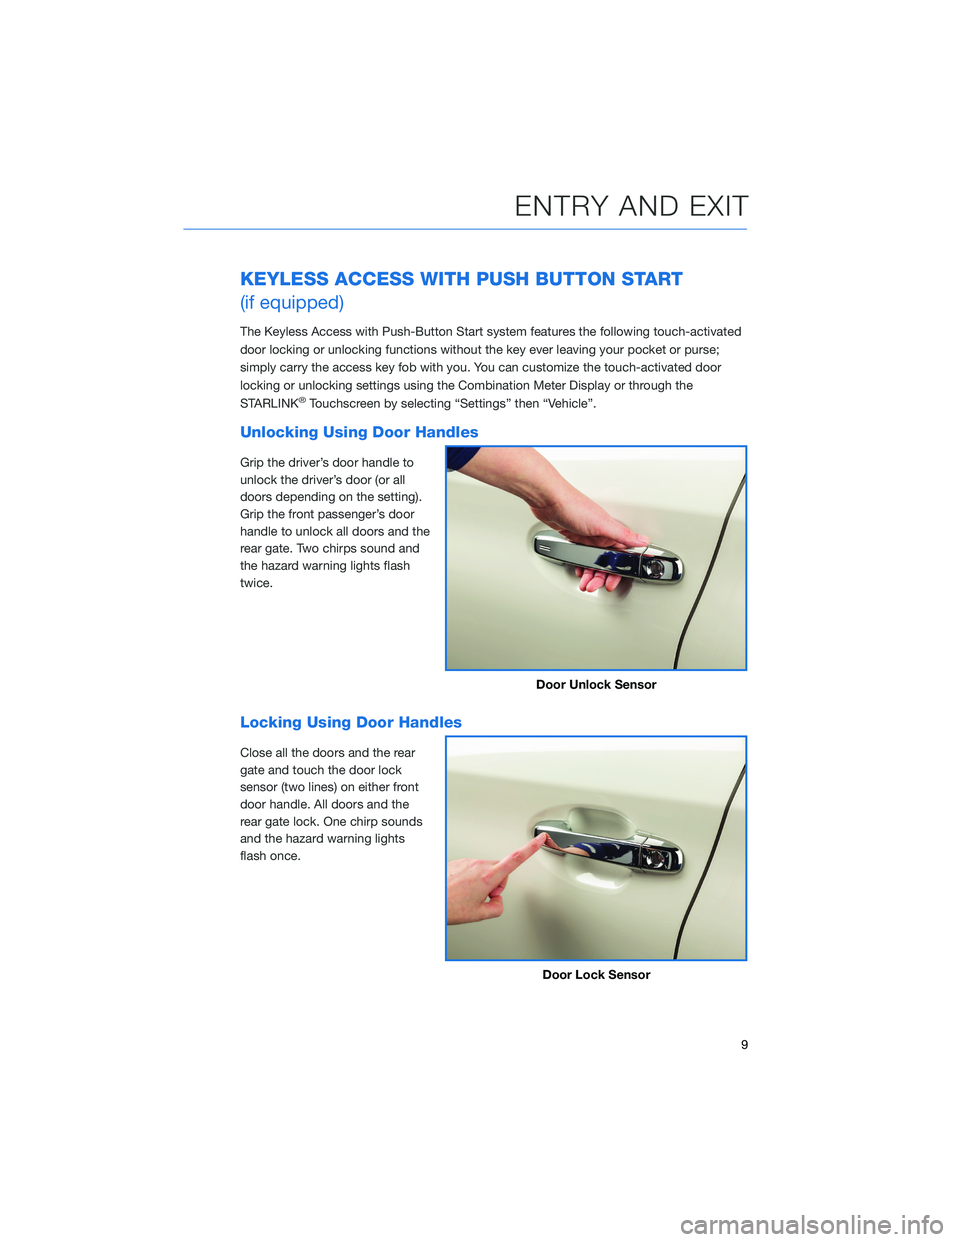
Unlocking Using Door Handles
Grip the driver’s door handle to
unlock the driver’s door (or all
doors depending on the setting).
Grip the front passenger’s door
handle to unlock all doors and the
rear gate. Two chirps sound and
the hazard warning lights flash
twice.
Locking Using Door Handles
Close all the doors and the rear
gate and touch the door lock
sensor (two lines) on either front
door handle. All doors and the
rear gate lock. One chirp sounds
and the hazard warning lights
flash once.
Door Unlock Sensor
Door Lock Sensor
ENTRY AND EXIT
9
Page 30 of 156
POWER EXTERIOR MIRRORS
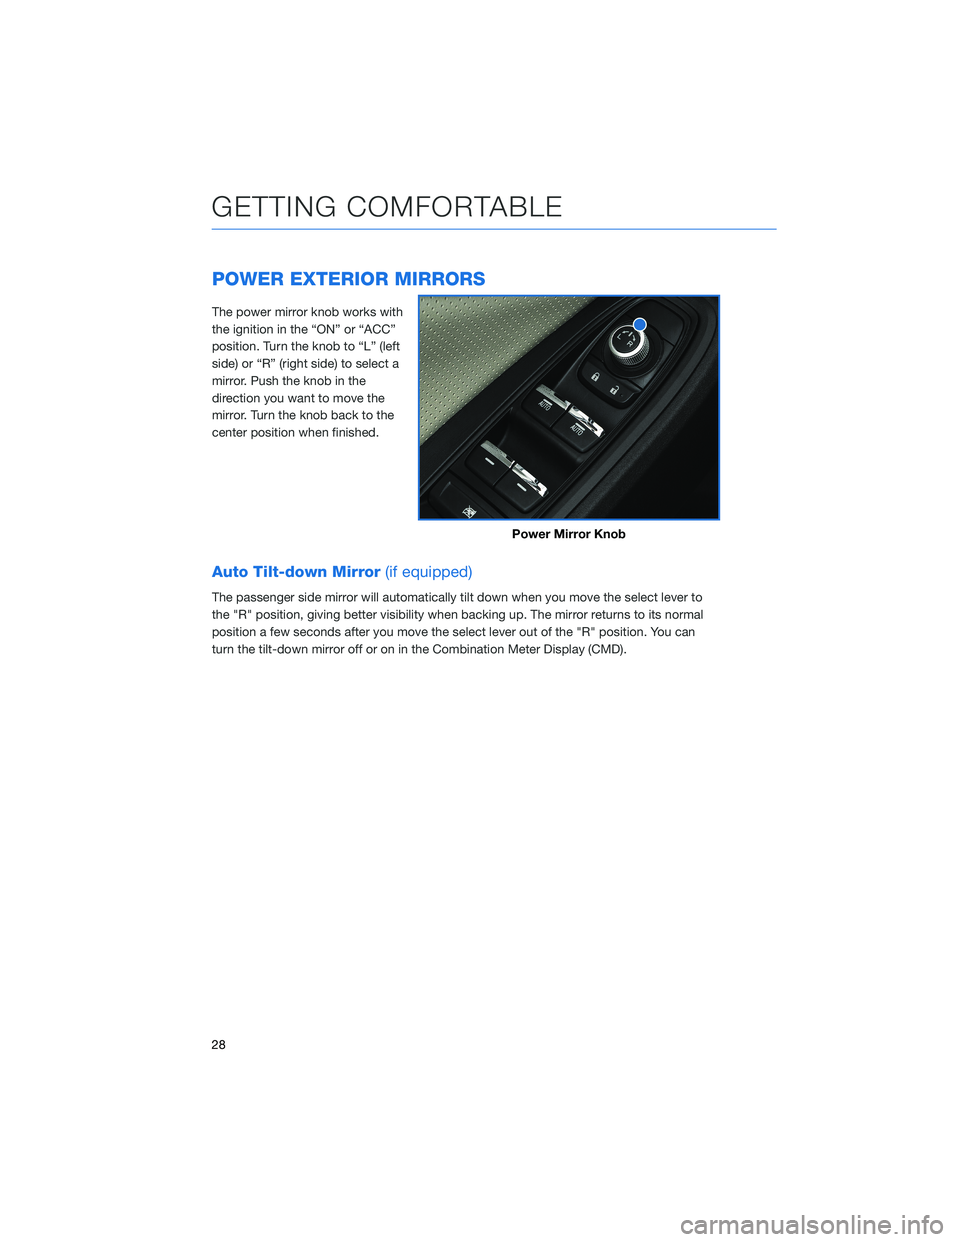
The power mirror knob works with
the ignition in the “ON” or “ACC”
position. Turn the knob to “L” (left
side) or “R” (right side) to select a
mirror. Push the knob in the
direction you want to move the
mirror. Turn the knob back to the
center position when finished.
Auto Tilt-down Mirror(if equipped)
The passenger side mirror will automatically tilt down when you move the select lever to
the "R" position, giving better visibility when backing up. The mirror returns to its normal
position a few seconds after you move the select lever out of the "R" position. You can
turn the tilt-down mirror off or on in the Combination Meter Display (CMD).
Power Mirror Knob
GETTING COMFORTABLE
28
Page 32 of 156
POWER WINDOWS
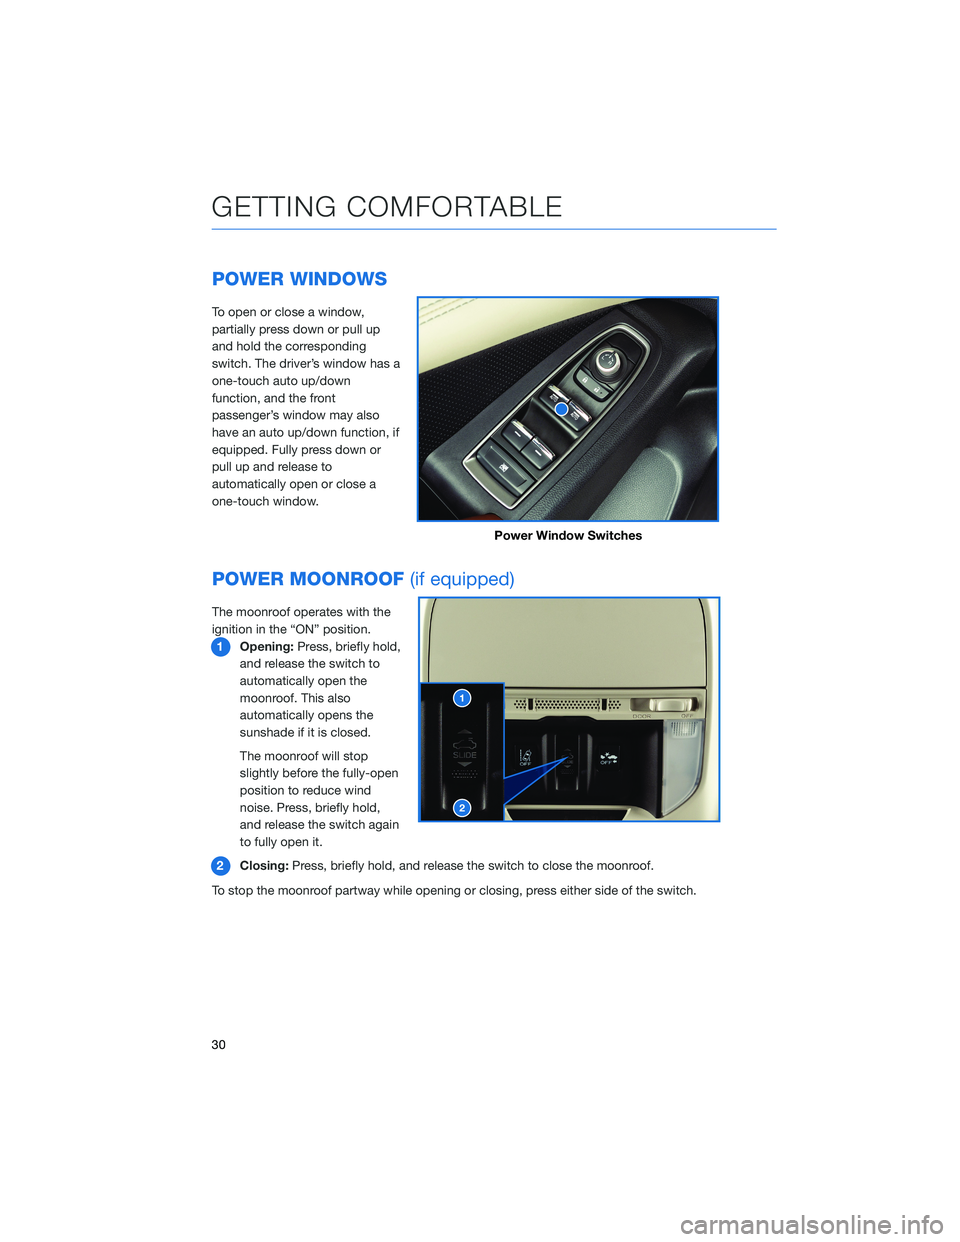
To open or close a window,
partially press down or pull up
and hold the corresponding
switch. The driver’s window has a
one-touch auto up/down
function, and the front
passenger’s window may also
have an auto up/down function, if
equipped. Fully press down or
pull up and release to
automatically open or close a
one-touch window.
POWER MOONROOF(if equipped)
The moonroof operates with the
ignition in the “ON” position.
1 Opening: Press, briefly hold,
and release the switch to
automatically open the
moonroof. This also
automatically opens the
sunshade if it is closed.
The moonroof will stop
slightly before the fully-open
position to reduce wind
noise. Press, briefly hold,
and release the switch again
to fully open it.
2 Closing: Press, briefly hold, and release the switch to close the moonroof.
To stop the moonroof partway while opening or closing, press either side of the switch.
Power Window Switches
GETTING COMFORTABLE
30
Page 36 of 156
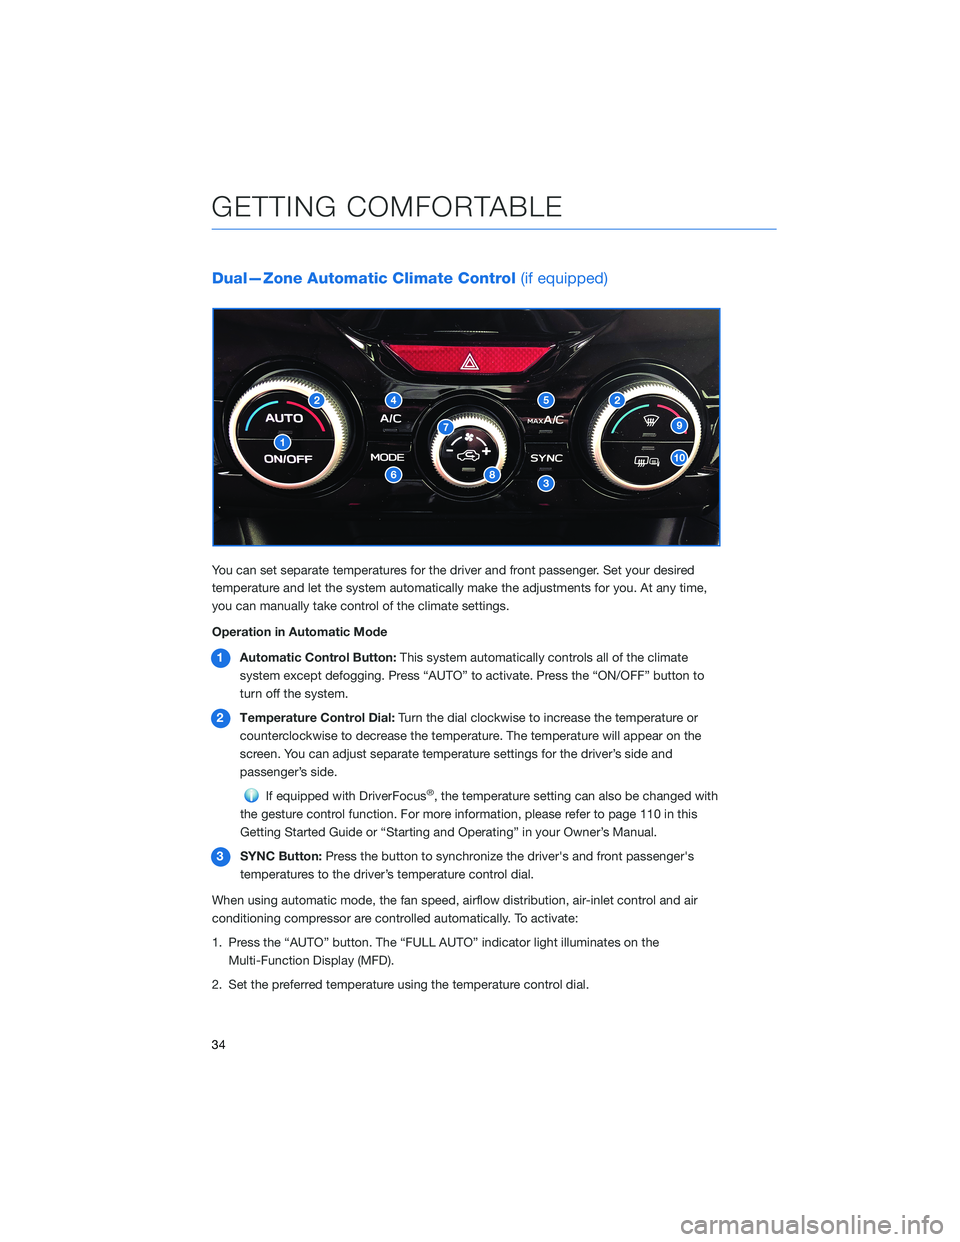
Dual—Zone Automatic Climate Control(if equipped)
You can set separate temperatures for the driver and front passenger. Set your desired
temperature and let the system automatically make the adjustments for you. At any time,
you can manually take control of the climate settings.
Operation in Automatic Mode
1 Automatic Control Button: This system automatically controls all of the climate
system except defogging. Press “AUTO” to activate. Press the “ON/OFF” button to
turn off the system.
2 Temperature Control Dial: Turn the dial clockwise to increase the temperature or
counterclockwise to decrease the temperature. The temperature will appear on the
screen. You can adjust separate temperature settings for the driver’s side and
passenger’s side.
If equipped with DriverFocus®, the temperature setting can also be changed with
the gesture control function. For more information, please refer to page 110 in this
Getting Started Guide or “Starting and Operating” in your Owner’s Manual.
3 SYNC Button: Press the button to synchronize the driver's and front passenger's
temperatures to the driver’s temperature control dial.
When using automatic mode, the fan speed, airflow distribution, air-inlet control and air
conditioning compressor are controlled automatically. To activate:
1. Press the “AUTO” button. The “FULL AUTO” indicator light illuminates on the Multi-Function Display (MFD).
2. Set the preferred temperature using the temperature control dial.
GETTING COMFORTABLE
34
Page 39 of 156
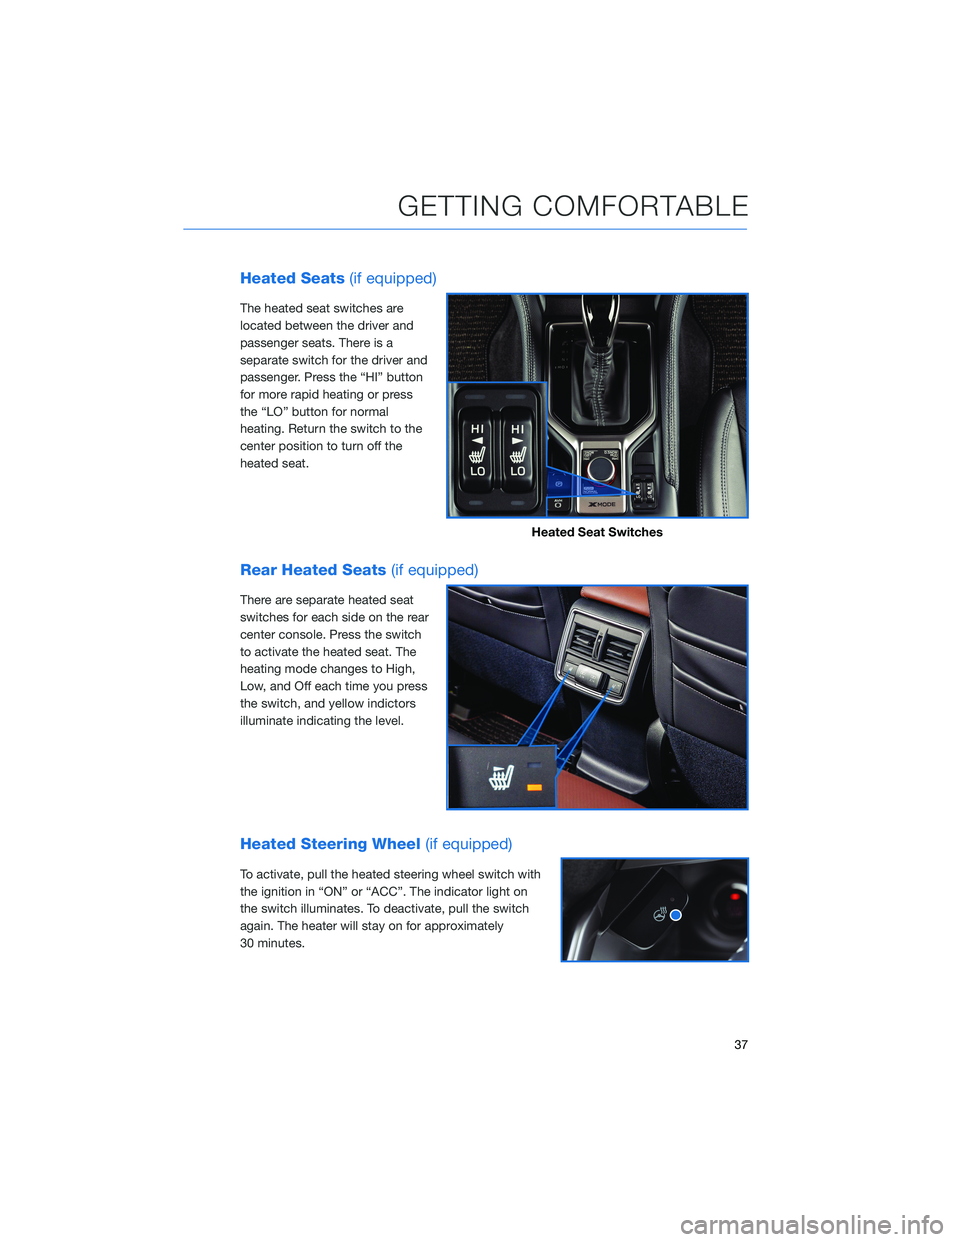
Heated Seats(if equipped)
The heated seat switches are
located between the driver and
passenger seats. There is a
separate switch for the driver and
passenger. Press the “HI” button
for more rapid heating or press
the “LO” button for normal
heating. Return the switch to the
center position to turn off the
heated seat.
Rear Heated Seats (if equipped)
There are separate heated seat
switches for each side on the rear
center console. Press the switch
to activate the heated seat. The
heating mode changes to High,
Low, and Off each time you press
the switch, and yellow indictors
illuminate indicating the level.
Heated Steering Wheel (if equipped)
To activate, pull the heated steering wheel switch with
the ignition in “ON” or “ACC”. The indicator light on
the switch illuminates. To deactivate, pull the switch
again. The heater will stay on for approximately
30 minutes.
Heated Seat Switches
GETTING COMFORTABLE
37
Page 50 of 156
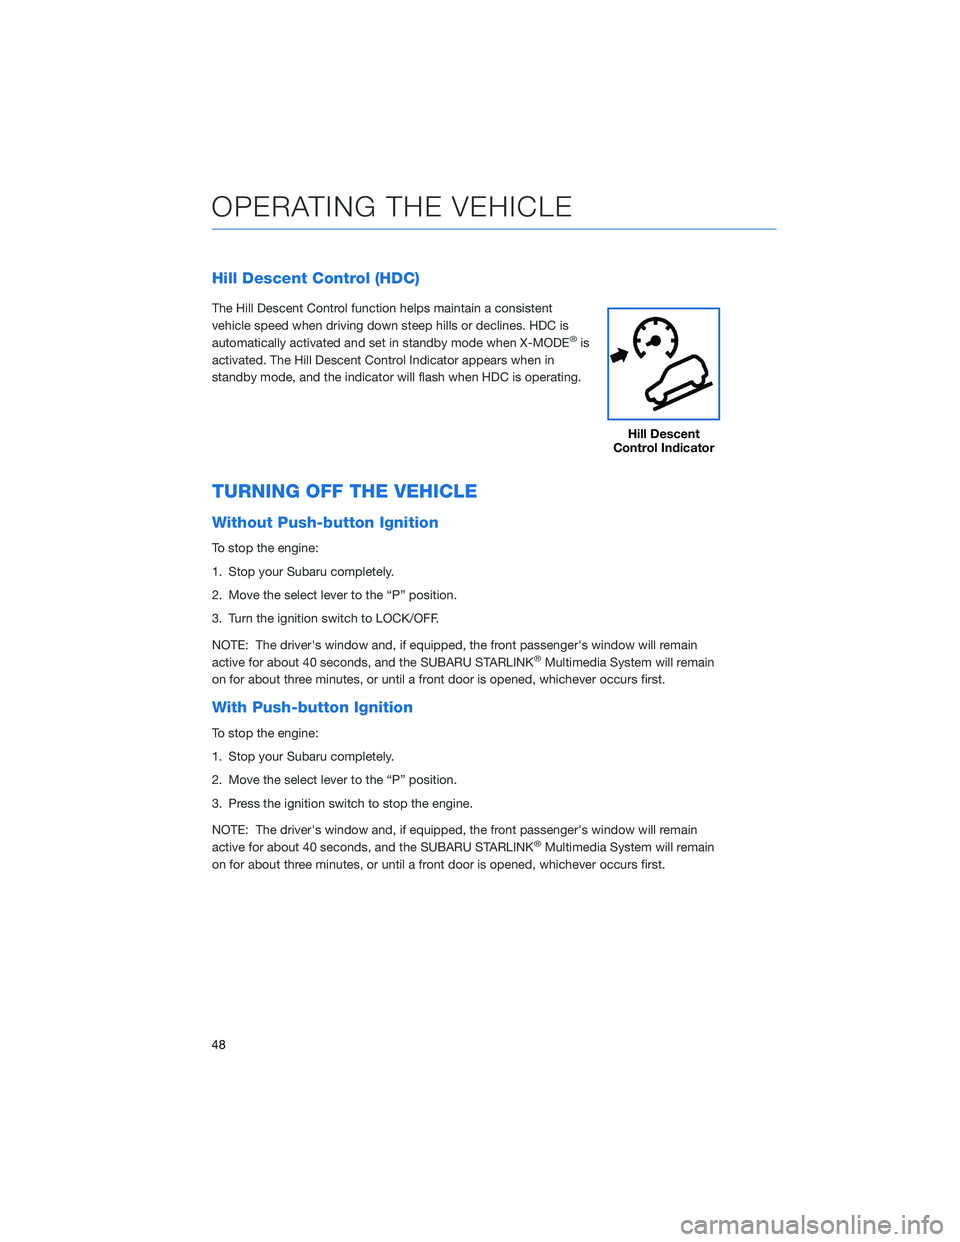
Hill Descent Control (HDC)
The Hill Descent Control function helps maintain a consistent
vehicle speed when driving down steep hills or declines. HDC is
automatically activated and set in standby mode when X-MODE
®is
activated. The Hill Descent Control Indicator appears when in
standby mode, and the indicator will flash when HDC is operating.
TURNING OFF THE VEHICLE
Without Push-button Ignition
To stop the engine:
1. Stop your Subaru completely.
2. Move the select lever to the “P” position.
3. Turn the ignition switch to LOCK/OFF.
NOTE: The driver's window and, if equipped, the front passenger's window will remain
active for about 40 seconds, and the SUBARU STARLINK
®Multimedia System will remain
on for about three minutes, or until a front door is opened, whichever occurs first.
With Push-button Ignition
To stop the engine:
1. Stop your Subaru completely.
2. Move the select lever to the “P” position.
3. Press the ignition switch to stop the engine.
NOTE: The driver's window and, if equipped, the front passenger's window will remain
active for about 40 seconds, and the SUBARU STARLINK
®Multimedia System will remain
on for about three minutes, or until a front door is opened, whichever occurs first.
Hill Descent
Control Indicator
OPERATING THE VEHICLE
48
Page 51 of 156
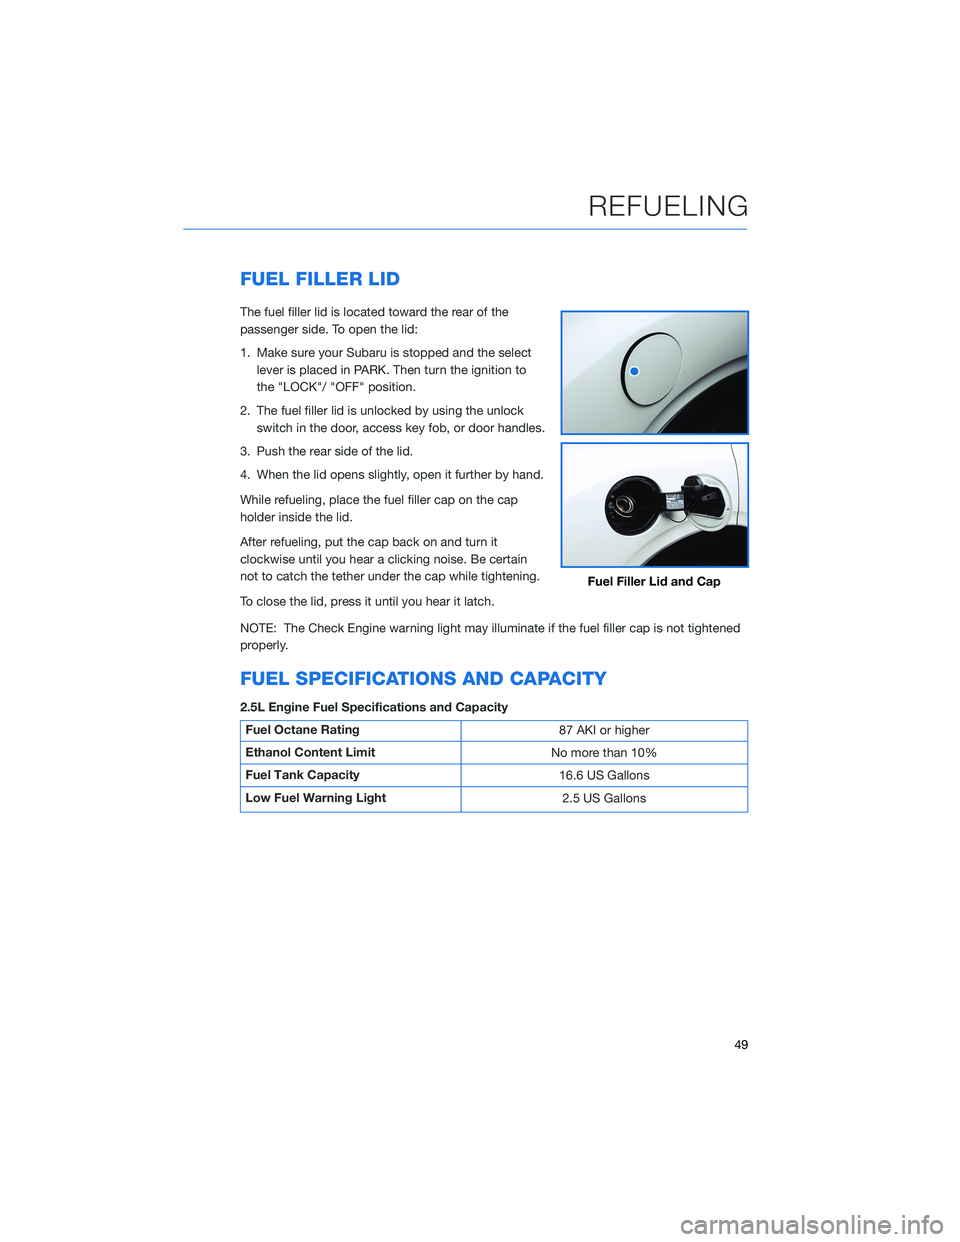
FUEL FILLER LID
The fuel filler lid is located toward the rear of the
passenger side. To open the lid:
1. Make sure your Subaru is stopped and the selectlever is placed in PARK. Then turn the ignition to
the "LOCK"/ "OFF" position.
2. The fuel filler lid is unlocked by using the unlock switch in the door, access key fob, or door handles.
3. Push the rear side of the lid.
4. When the lid opens slightly, open it further by hand.
While refueling, place the fuel filler cap on the cap
holder inside the lid.
After refueling, put the cap back on and turn it
clockwise until you hear a clicking noise. Be certain
not to catch the tether under the cap while tightening.
To close the lid, press it until you hear it latch.
NOTE: The Check Engine warning light may illuminate if the fuel filler cap is not tightened
properly.
FUEL SPECIFICATIONS AND CAPACITY
2.5L Engine Fuel Specifications and Capacity
Fuel Octane Rating 87 AKI or higher
Ethanol Content Limit No more than 10%
Fuel Tank Capacity 16.6 US Gallons
Low Fuel Warning Light 2.5 US Gallons
Fuel Filler Lid and Cap
REFUELING
49
Page 52 of 156
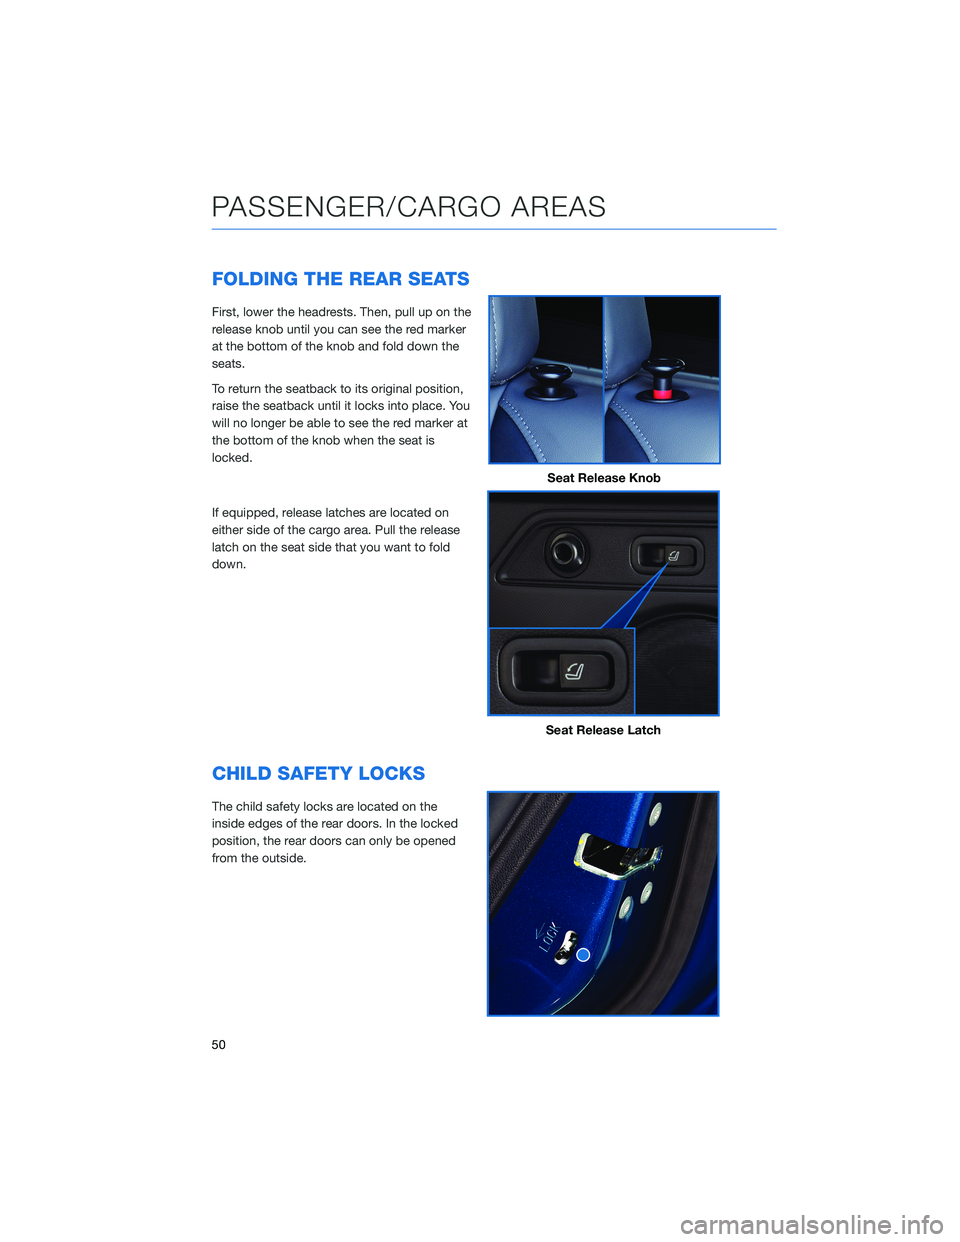
FOLDING THE REAR SEATS
First, lower the headrests. Then, pull up on the
release knob until you can see the red marker
at the bottom of the knob and fold down the
seats.
To return the seatback to its original position,
raise the seatback until it locks into place. You
will no longer be able to see the red marker at
the bottom of the knob when the seat is
locked.
If equipped, release latches are located on
either side of the cargo area. Pull the release
latch on the seat side that you want to fold
down.
CHILD SAFETY LOCKS
The child safety locks are located on the
inside edges of the rear doors. In the locked
position, the rear doors can only be opened
from the outside.
Seat Release Knob
Seat Release Latch
PASSENGER/CARGO AREAS
50
Page 53 of 156
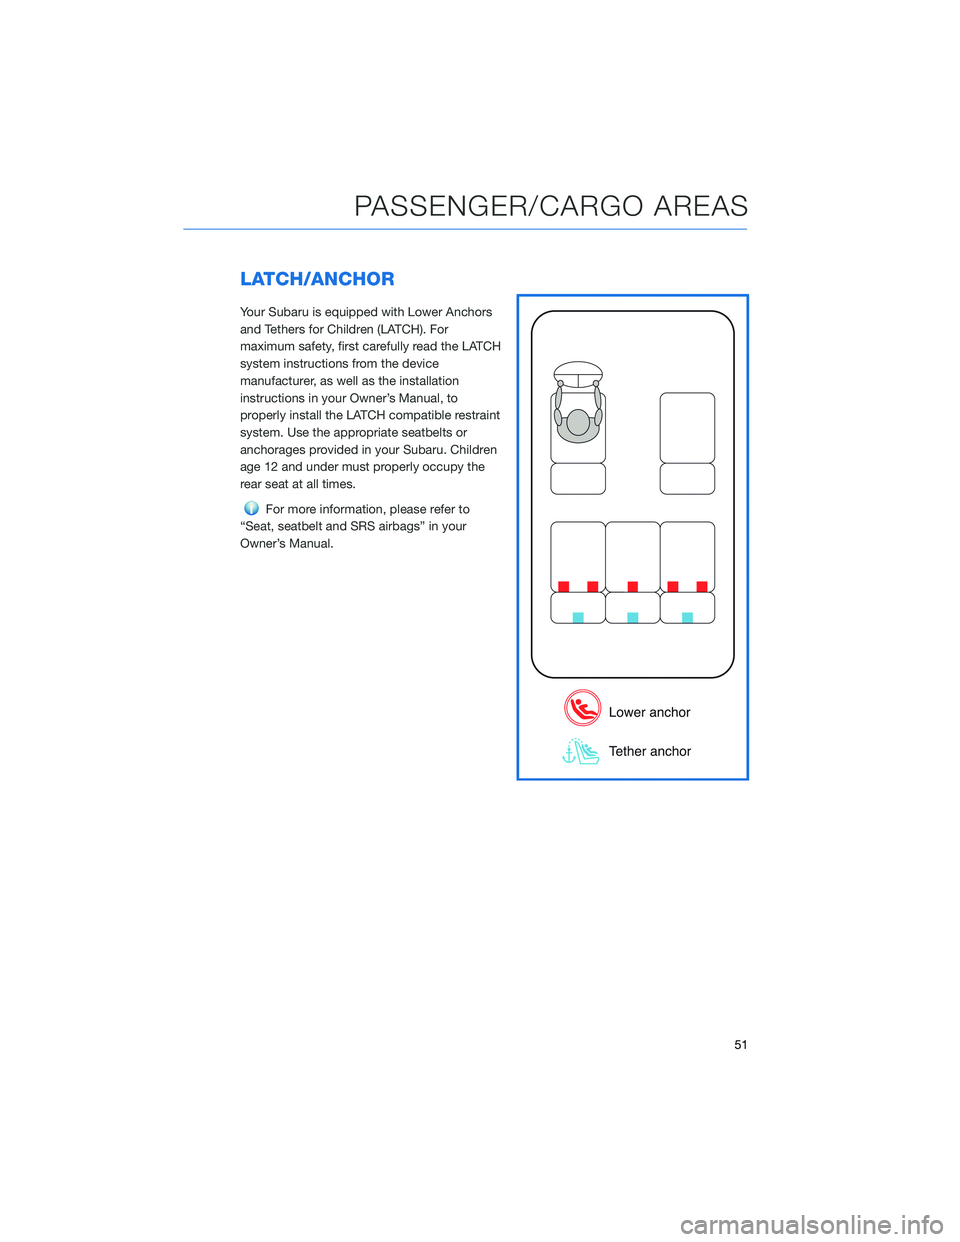
LATCH/ANCHOR
Your Subaru is equipped with Lower Anchors
and Tethers for Children (LATCH). For
maximum safety, first carefully read the LATCH
system instructions from the device
manufacturer, as well as the installation
instructions in your Owner’s Manual, to
properly install the LATCH compatible restraint
system. Use the appropriate seatbelts or
anchorages provided in your Subaru. Children
age 12 and under must properly occupy the
rear seat at all times.
For more information, please refer to
“Seat, seatbelt and SRS airbags” in your
Owner’s Manual.
PASSENGER/CARGO AREAS
51