fuel SUBARU FORESTER 2022 Getting Started Guide
[x] Cancel search | Manufacturer: SUBARU, Model Year: 2022, Model line: FORESTER, Model: SUBARU FORESTER 2022Pages: 156, PDF Size: 45.35 MB
Page 4 of 156
OPERATING THE VEHICLE
IGNITION SWITCH...........39
PUSH-BUTTON IGNITION
SWITCH ...................39
STARTING THE VEHICLE ......39
DRIVING THE VEHICLE .......40
AUTO START–STOP .........42
ELECTRONIC PARKING BRAKE
(EPB) .....................44
X-MODE
®..................45
TURNING OFF THE VEHICLE ...48
REFUELING
FUEL FILLER LID............49
FUEL SPECIFICATIONS AND
CAPACITY ..................49
PASSENGER/CARGO AREAS
FOLDING THE REAR SEATS ...50
CHILD SAFETY LOCKS .......50
LATCH/ANCHOR ............51
REAR SEAT REMINDER .......52
CARGO AREA AND COVER ...53
SPARE TIRE AND JACK .......53
ENGINE COMPARTMENT
HOOD PROP................54
2.5 L ENGINE ...............55
ADDITIONAL SPECIFICATIONS
NEW VEHICLE BREAK-IN ......56
ENGINE OIL ................56
ENGINE OIL CAPACITY .......56
ROOF RAIL CAPACITY .......57
TRAILER TOWING CAPACITY . . 57
TIRE PRESSURE MONITORING
SYSTEM (TPMS) .............58
STARLINK OVERVIEW
OVERVIEW OF YOUR
MULTIMEDIA SYSTEM ........60
BUTTONS ..................60
TOUCHSCREEN .............62
STEERING WHEEL CONTROLS . 63
VOICE RECOGNITION ........64
STARLINK HOME
HOME SCREEN ICONS .......66
REARRANGING ICONS .......66
ADDING SHORTCUTS ........67
DRIVER PROFILE
CREATING A DRIVER PROFILE . . 68
MULTIMEDIA
RADIO.....................70
MEDIA .....................71
PHONE
PAIRING A PHONE ...........72
MAKING A CALL .............72
RECEIVING A CALL ..........73
TEXT MESSAGES ............74
APPS
SUBARU STARLINK®
IN-VEHICLE APPS ...........75
SUBARU STARLINK®
MOBILE APP ................77
MYSUBARU ................77
MAPS (if equipped)
MAPS OVERVIEW ............79
CREATING HOME AND
WORK PROFILES ............79
STARLINK SAFETY AND
SECURITY
SAFETY AND SECURITY
OVERVIEW.................80
ENROLLMENT ..............81
MYSUBARU INTEGRATION ....82
SUBARU STARLINK
®
WI-FI HOTSPOT .............82
SETTINGS AND UPDATES
SETTINGS AND UPDATES
OVERVIEW.................83
SOUND ....................84
PHONE ....................84
MAPS/NAVIGATION ..........85
CLOCK ....................87
TABLE OF CONTENTS
2
Page 9 of 156
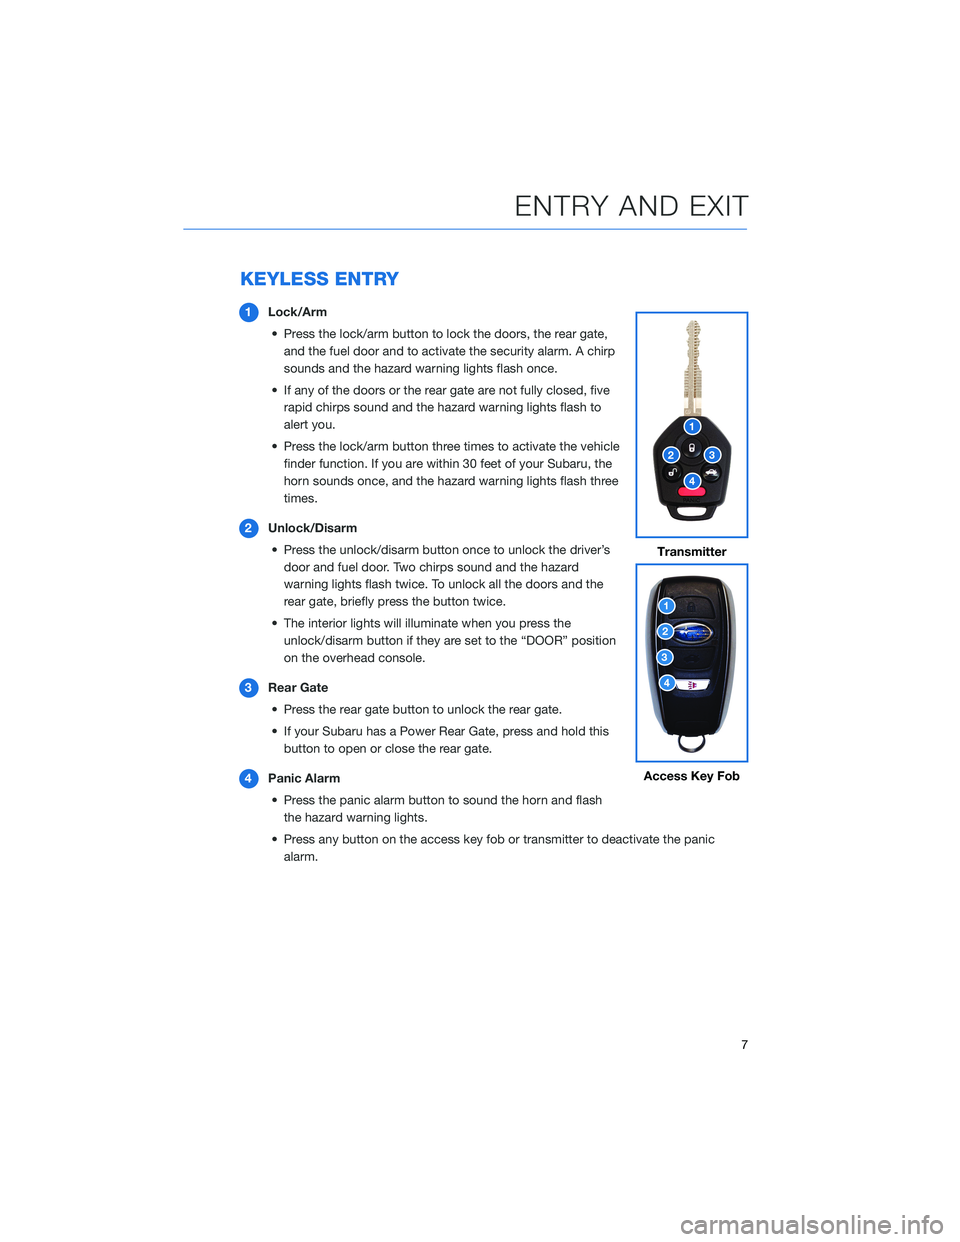
KEYLESS ENTRY
1Lock/Arm
• Press the lock/arm button to lock the doors, the rear gate, and the fuel door and to activate the security alarm. A chirp
sounds and the hazard warning lights flash once.
• If any of the doors or the rear gate are not fully closed, five rapid chirps sound and the hazard warning lights flash to
alert you.
• Press the lock/arm button three times to activate the vehicle finder function. If you are within 30 feet of your Subaru, the
horn sounds once, and the hazard warning lights flash three
times.
2 Unlock/Disarm
• Press the unlock/disarm button once to unlock the driver’s door and fuel door. Two chirps sound and the hazard
warning lights flash twice. To unlock all the doors and the
rear gate, briefly press the button twice.
• The interior lights will illuminate when you press the unlock/disarm button if they are set to the “DOOR” position
on the overhead console.
3 Rear Gate
• Press the rear gate button to unlock the rear gate.
• If your Subaru has a Power Rear Gate, press and hold this button to open or close the rear gate.
4 Panic Alarm
• Press the panic alarm button to sound the horn and flash the hazard warning lights.
• Press any button on the access key fob or transmitter to deactivate the panic alarm.
Transmitter
Access Key Fob
ENTRY AND EXIT
7
Page 15 of 156
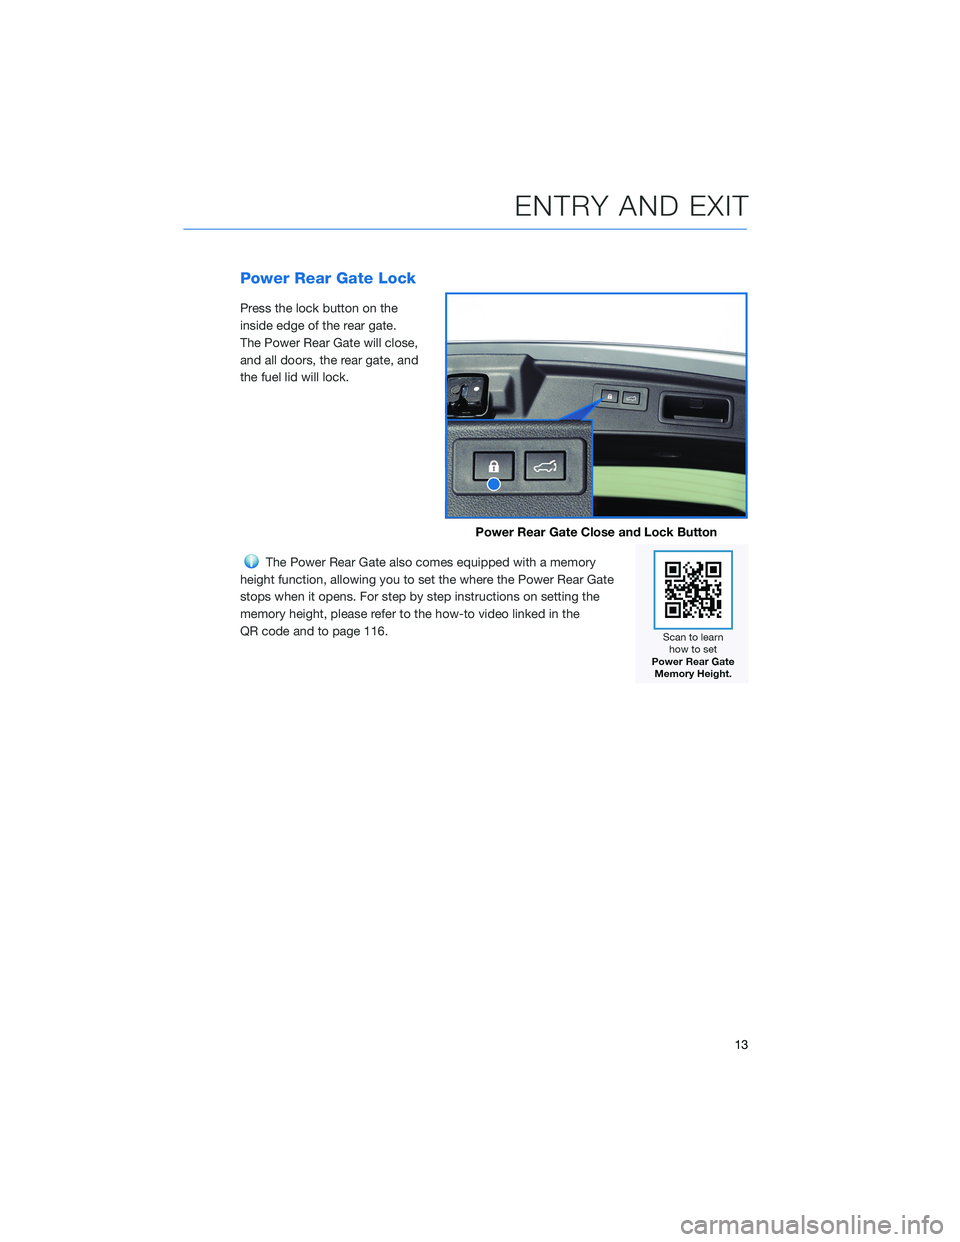
Power Rear Gate Lock
Press the lock button on the
inside edge of the rear gate.
The Power Rear Gate will close,
and all doors, the rear gate, and
the fuel lid will lock.
The Power Rear Gate also comes equipped with a memory
height function, allowing you to set the where the Power Rear Gate
stops when it opens. For step by step instructions on setting the
memory height, please refer to the how-to video linked in the
QR code and to page 116.
Power Rear Gate Close and Lock Button
ENTRY AND EXIT
13
Page 18 of 156
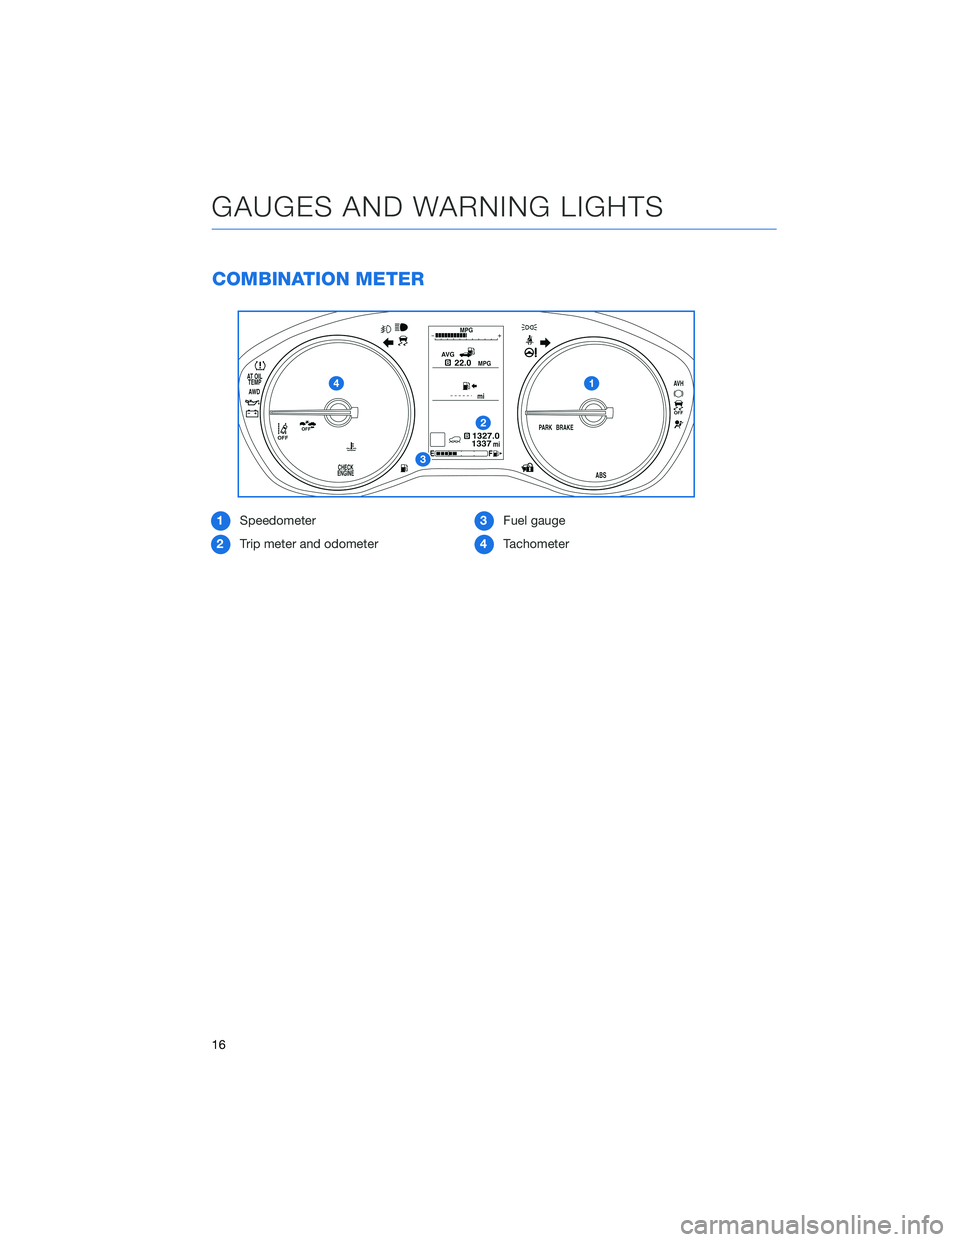
COMBINATION METER
1Speedometer
2 Trip meter and odometer 3
Fuel gauge
4 Tachometer
GAUGES AND WARNING LIGHTS
16
Page 19 of 156
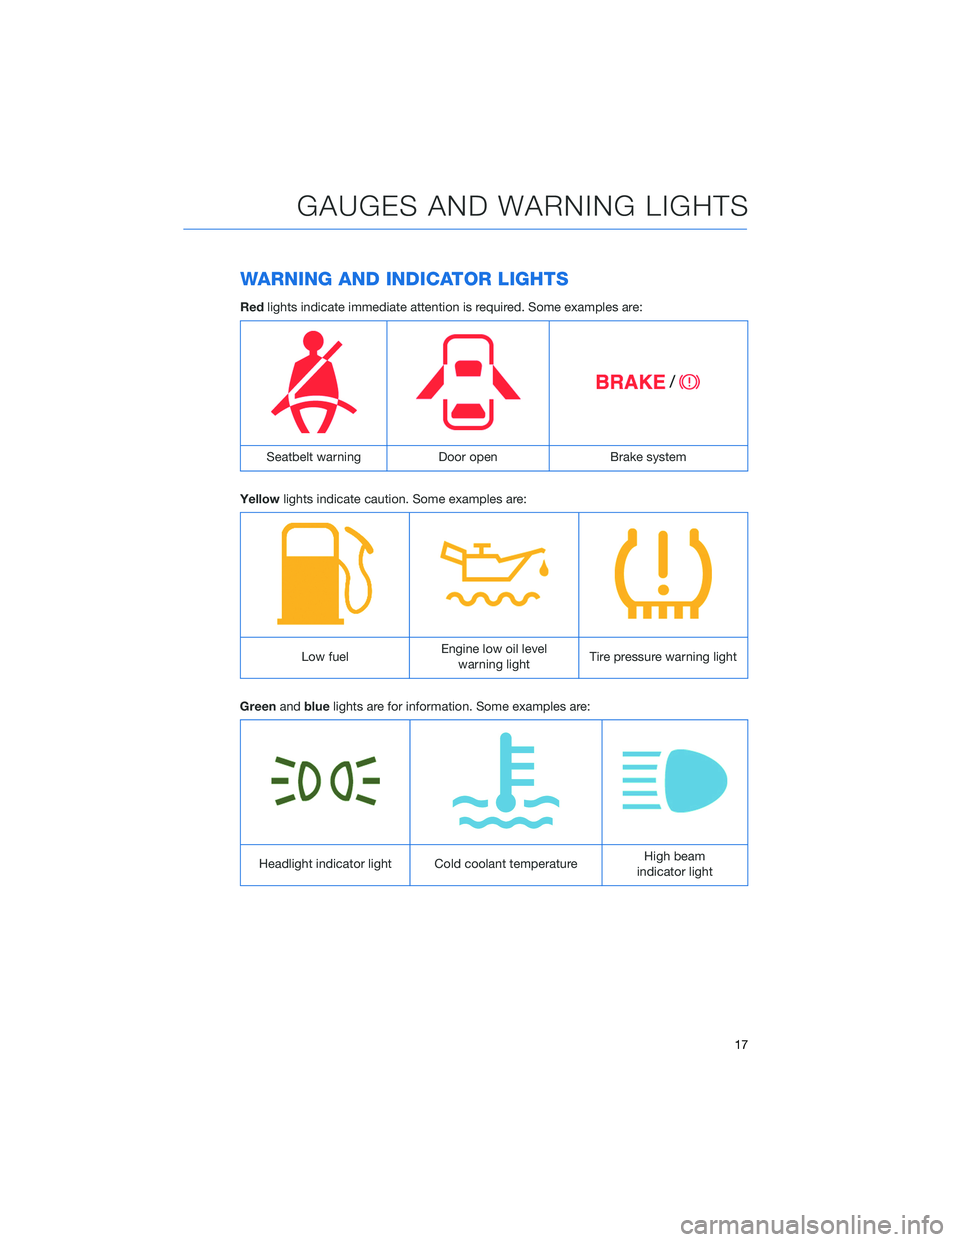
WARNING AND INDICATOR LIGHTS
Redlights indicate immediate attention is required. Some examples are:
Seatbelt warning Door openBrake system
Yellow lights indicate caution. Some examples are:
Low fuel Engine low oil level
warning light Tire pressure warning light
Green andblue lights are for information. Some examples are:
Headlight indicator light Cold coolant temperature High beam
indicator light
GAUGES AND WARNING LIGHTS
17
Page 21 of 156
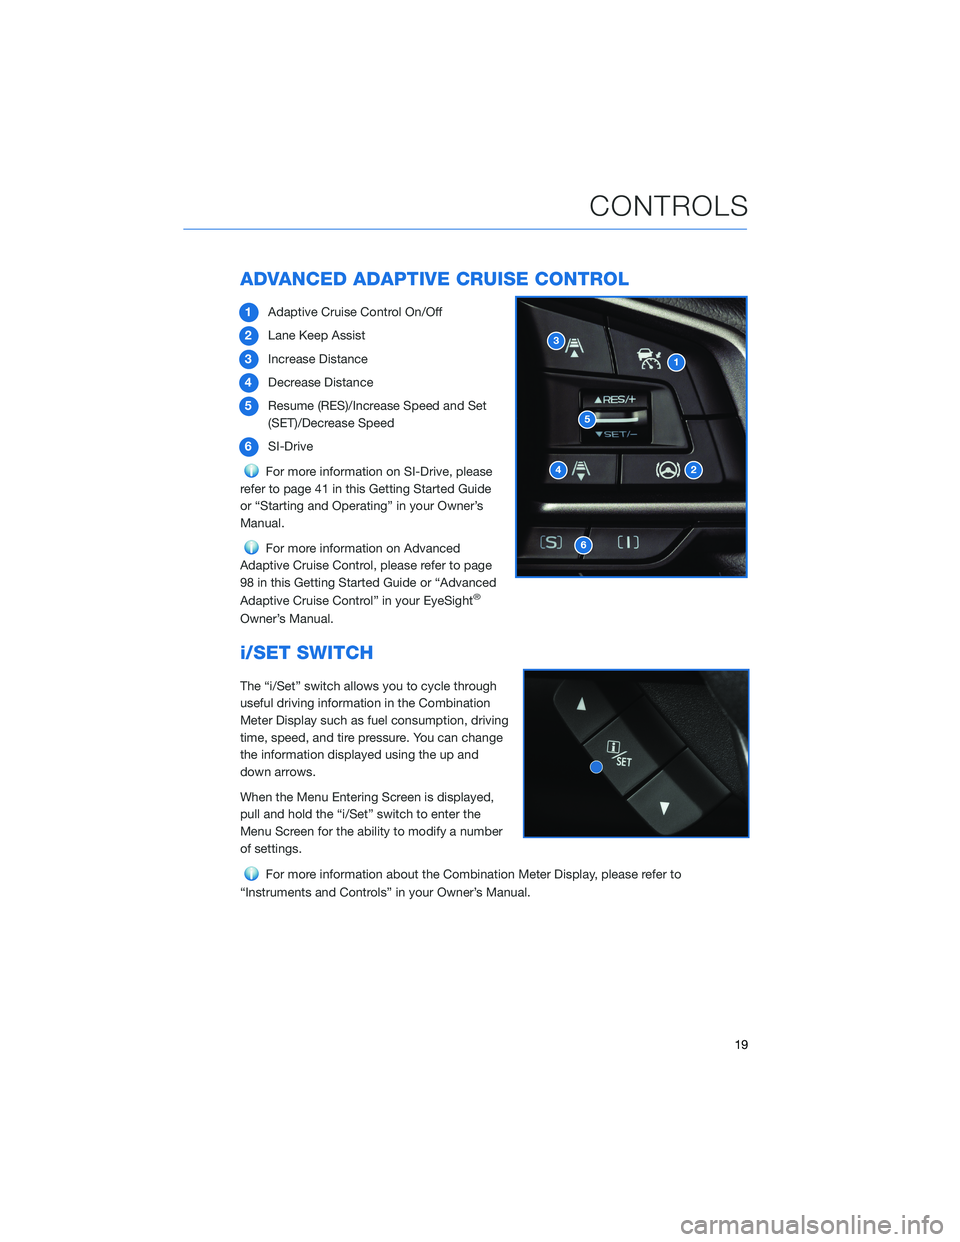
ADVANCED ADAPTIVE CRUISE CONTROL
1Adaptive Cruise Control On/Off
2 Lane Keep Assist
3 Increase Distance
4 Decrease Distance
5 Resume (RES)/Increase Speed and Set
(SET)/Decrease Speed
6 SI-Drive
For more information on SI-Drive, please
refer to page 41 in this Getting Started Guide
or “Starting and Operating” in your Owner’s
Manual.
For more information on Advanced
Adaptive Cruise Control, please refer to page
98 in this Getting Started Guide or “Advanced
Adaptive Cruise Control” in your EyeSight
®
Owner’s Manual.
i/SET SWITCH
The “i/Set” switch allows you to cycle through
useful driving information in the Combination
Meter Display such as fuel consumption, driving
time, speed, and tire pressure. You can change
the information displayed using the up and
down arrows.
When the Menu Entering Screen is displayed,
pull and hold the “i/Set” switch to enter the
Menu Screen for the ability to modify a number
of settings.
For more information about the Combination Meter Display, please refer to
“Instruments and Controls” in your Owner’s Manual.
CONTROLS
19
Page 43 of 156
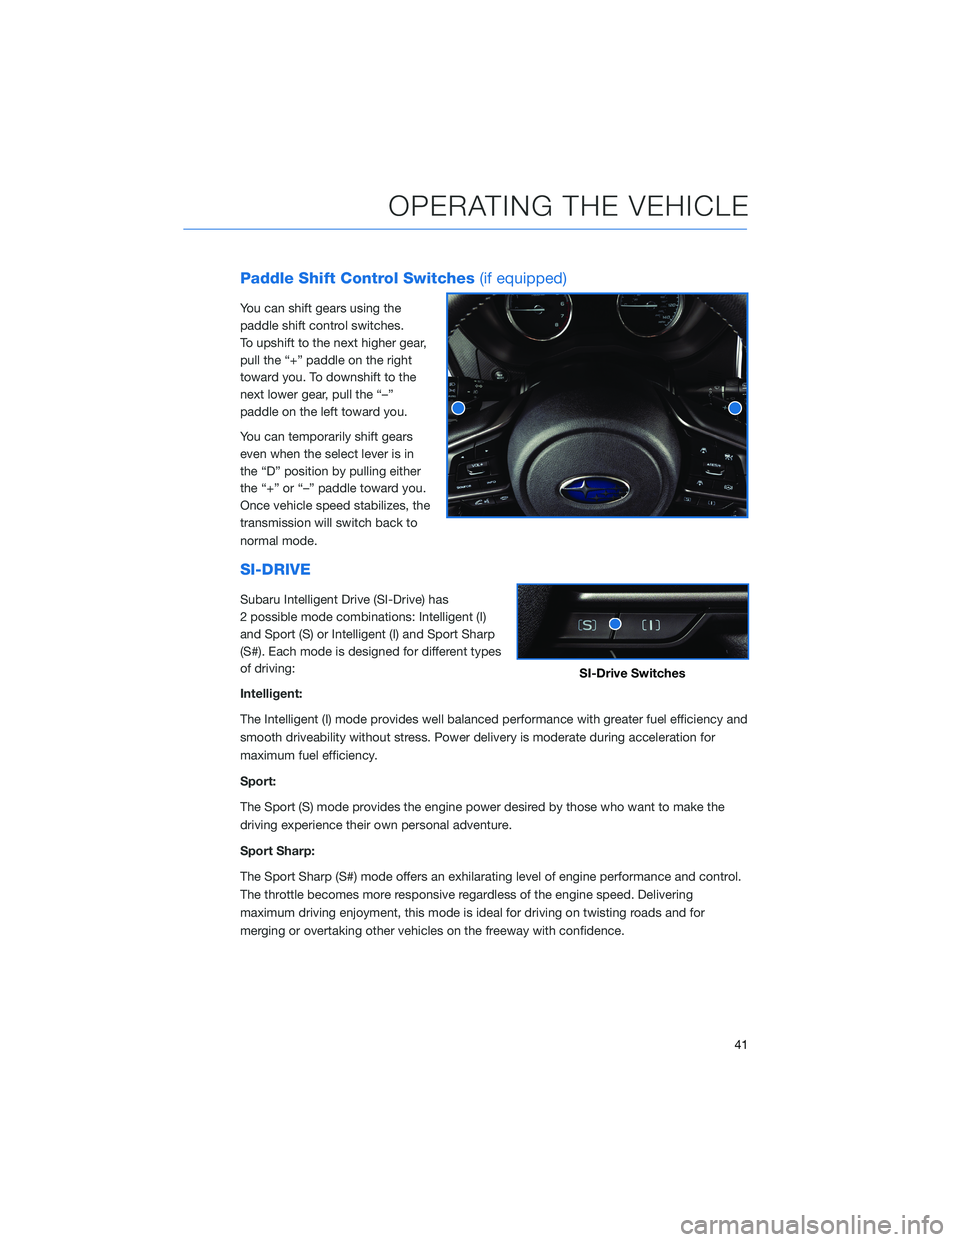
Paddle Shift Control Switches(if equipped)
You can shift gears using the
paddle shift control switches.
To upshift to the next higher gear,
pull the “+” paddle on the right
toward you. To downshift to the
next lower gear, pull the “–”
paddle on the left toward you.
You can temporarily shift gears
even when the select lever is in
the “D” position by pulling either
the “+” or “–” paddle toward you.
Once vehicle speed stabilizes, the
transmission will switch back to
normal mode.
SI-DRIVE
Subaru Intelligent Drive (SI-Drive) has
2 possible mode combinations: Intelligent (I)
and Sport (S) or Intelligent (I) and Sport Sharp
(S#). Each mode is designed for different types
of driving:
Intelligent:
The Intelligent (I) mode provides well balanced performance with greater fuel efficiency and
smooth driveability without stress. Power delivery is moderate during acceleration for
maximum fuel efficiency.
Sport:
The Sport (S) mode provides the engine power desired by those who want to make the
driving experience their own personal adventure.
Sport Sharp:
The Sport Sharp (S#) mode offers an exhilarating level of engine performance and control.
The throttle becomes more responsive regardless of the engine speed. Delivering
maximum driving enjoyment, this mode is ideal for driving on twisting roads and for
merging or overtaking other vehicles on the freeway with confidence.
SI-Drive Switches
OPERATING THE VEHICLE
41
Page 44 of 156
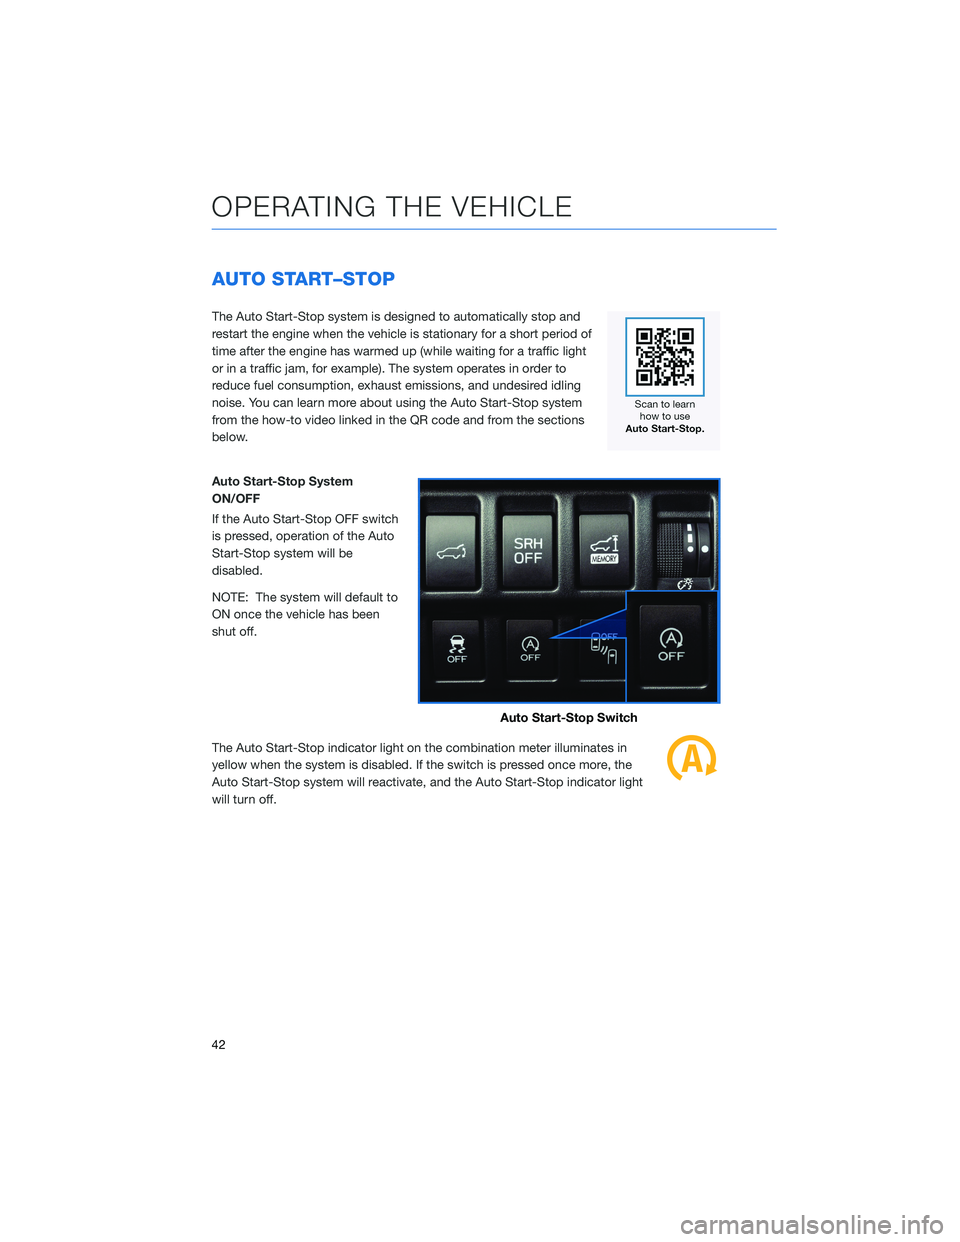
AUTO START–STOP
The Auto Start-Stop system is designed to automatically stop and
restart the engine when the vehicle is stationary for a short period of
time after the engine has warmed up (while waiting for a traffic light
or in a traffic jam, for example). The system operates in order to
reduce fuel consumption, exhaust emissions, and undesired idling
noise. You can learn more about using the Auto Start-Stop system
from the how-to video linked in the QR code and from the sections
below.
Auto Start-Stop System
ON/OFF
If the Auto Start-Stop OFF switch
is pressed, operation of the Auto
Start-Stop system will be
disabled.
NOTE: The system will default to
ON once the vehicle has been
shut off.
The Auto Start-Stop indicator light on the combination meter illuminates in
yellow when the system is disabled. If the switch is pressed once more, the
Auto Start-Stop system will reactivate, and the Auto Start-Stop indicator light
will turn off.
Auto Start-Stop Switch
OPERATING THE VEHICLE
42
Page 45 of 156
System Operation
So that it can be used safely and comfortably, the Auto Start-Stop system is designed to
constantly monitor vehicle conditions, the environment inside and outside the vehicle, as
well as driver operations, in order to control stopping and restarting the engine.
After the vehicle has been completely stopped by depressing the brake pedal
with the select lever in the “D” position, the engine will be automatically
stopped and the green indicator will illuminate in the combination meter.
If you release the brake pedal with the select lever kept in the “D” position, the
engine will be automatically restarted. The indicator light will turn off when the system
restarts the engine.
There are several operating conditions for this system to operate as intended.
For more information, please refer to “Starting and Operating” in your Owner’s
Manual.
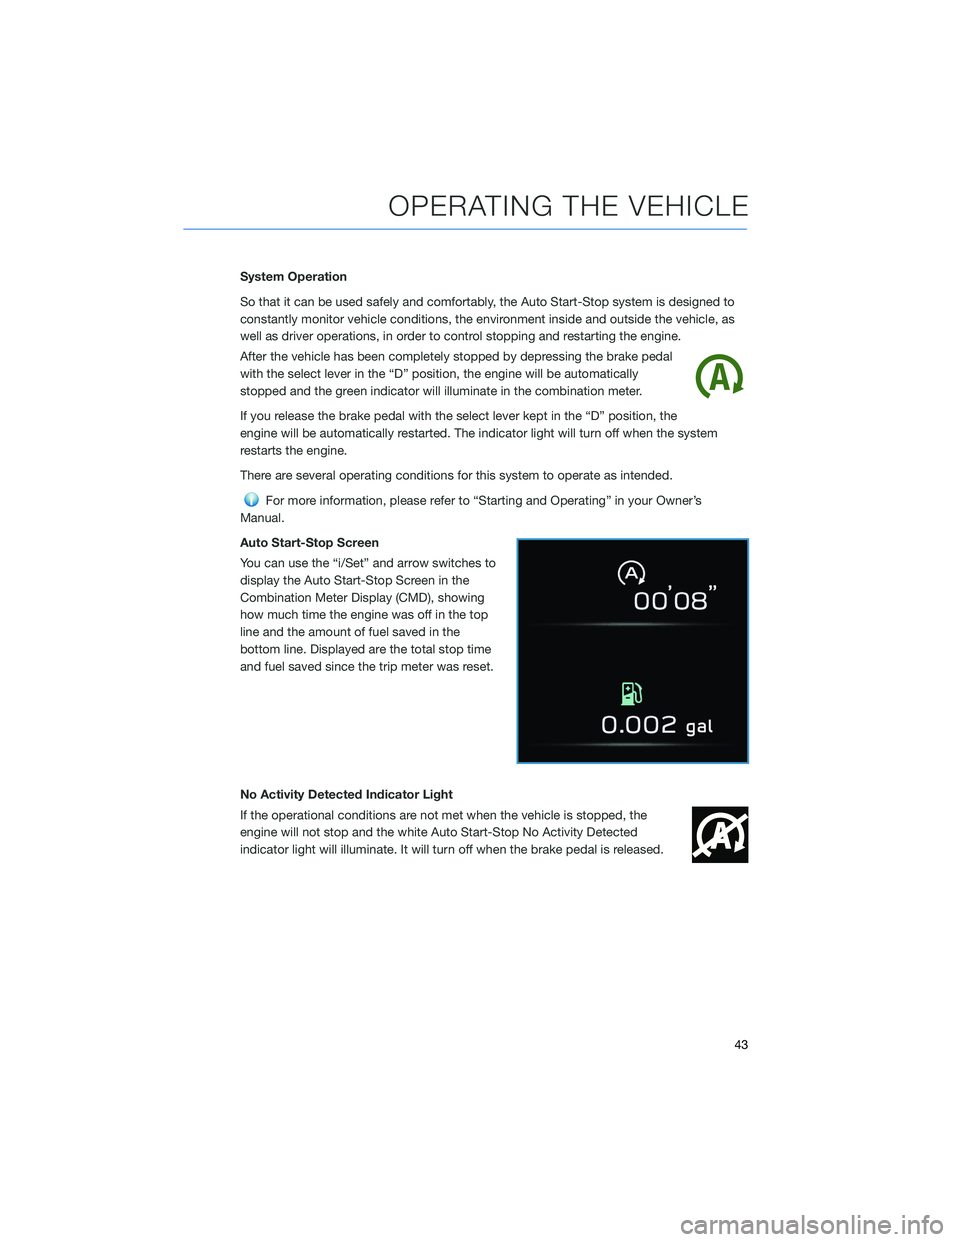
Auto Start-Stop Screen
You can use the “i/Set” and arrow switches to
display the Auto Start-Stop Screen in the
Combination Meter Display (CMD), showing
how much time the engine was off in the top
line and the amount of fuel saved in the
bottom line. Displayed are the total stop time
and fuel saved since the trip meter was reset.
No Activity Detected Indicator Light
If the operational conditions are not met when the vehicle is stopped, the
engine will not stop and the white Auto Start-Stop No Activity Detected
indicator light will illuminate. It will turn off when the brake pedal is released.
OPERATING THE VEHICLE
43
Page 51 of 156
FUEL FILLER LID
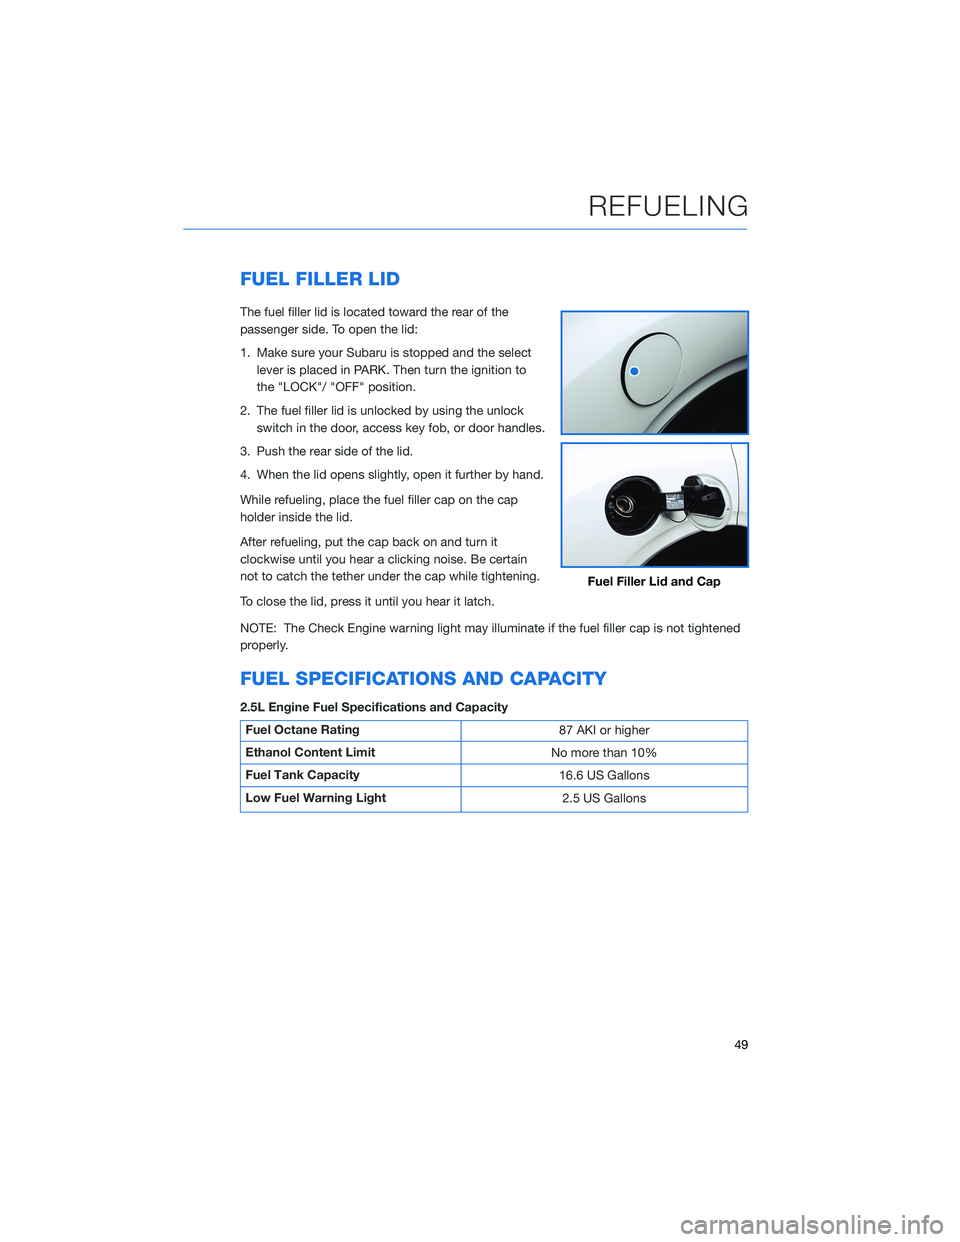
The fuel filler lid is located toward the rear of the
passenger side. To open the lid:
1. Make sure your Subaru is stopped and the selectlever is placed in PARK. Then turn the ignition to
the "LOCK"/ "OFF" position.
2. The fuel filler lid is unlocked by using the unlock switch in the door, access key fob, or door handles.
3. Push the rear side of the lid.
4. When the lid opens slightly, open it further by hand.
While refueling, place the fuel filler cap on the cap
holder inside the lid.
After refueling, put the cap back on and turn it
clockwise until you hear a clicking noise. Be certain
not to catch the tether under the cap while tightening.
To close the lid, press it until you hear it latch.
NOTE: The Check Engine warning light may illuminate if the fuel filler cap is not tightened
properly.
FUEL SPECIFICATIONS AND CAPACITY
2.5L Engine Fuel Specifications and Capacity
Fuel Octane Rating 87 AKI or higher
Ethanol Content Limit No more than 10%
Fuel Tank Capacity 16.6 US Gallons
Low Fuel Warning Light 2.5 US Gallons
Fuel Filler Lid and Cap
REFUELING
49