manual transmission SUBARU IMPREZA 2004 2.G Owners Manual
[x] Cancel search | Manufacturer: SUBARU, Model Year: 2004, Model line: IMPREZA, Model: SUBARU IMPREZA 2004 2.GPages: 491, PDF Size: 5.93 MB
Page 141 of 491
3-4
Instruments and controls
The key can be turned from “ACC” to “LOCK” only
when the selector lever is in the “P” position. !
Manual transmission vehicles
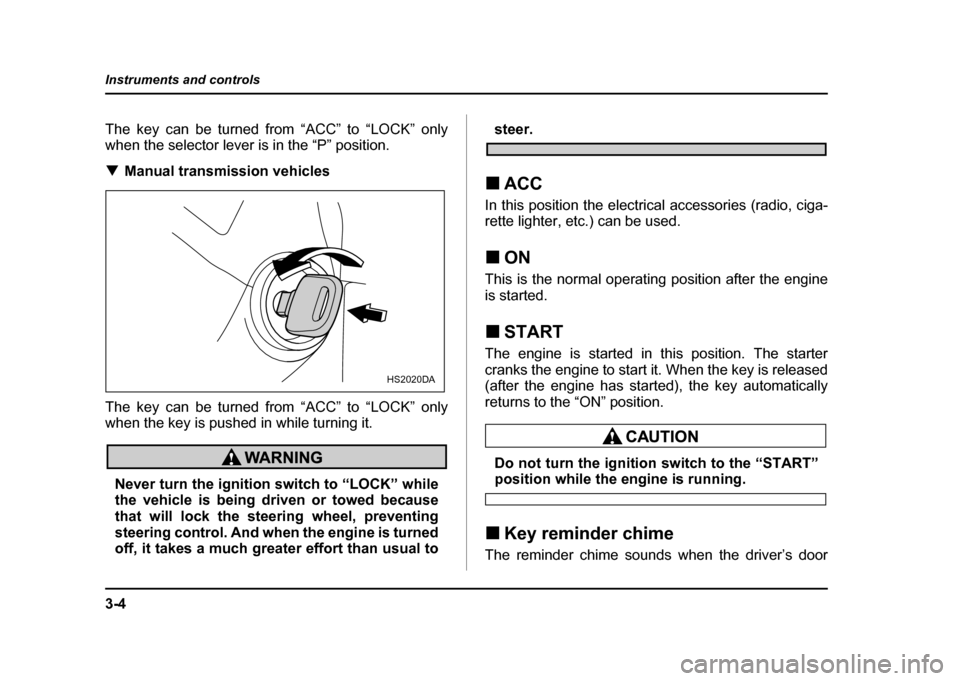
The key can be turned from “ACC” to “LOCK” only
when the key is pushed in while turning it.
Never turn the ignition switch to “LOCK” while
the vehicle is being driven or towed because
that will lock the steering wheel, preventing
steering control. And when the engine is turned
off, it takes a much greater effort than usual to
steer.
! ACC
In this position the electrical accessories (radio, ciga-
rette lighter, etc.) can be used. ! ON
This is the normal operating position after the engine
is started. ! START
The engine is started in this position. The starter
cranks the engine to start it. When the key is released
(after the engine has started), the key automatically
returns to the “ON” position.
Do not turn the ignition switch to the “START”position while the engine is running.
! Key reminder chime
The reminder chime sounds when the driver’s door
HS2020DA
Page 270 of 491

7-1
7
Starting and operating
F uel .. ... ... ... .. ... ... ... ... .. ... ... ... ... ... .. ... ... ... ... .. ... ... 7-2
F uel re quire ments ..................... ..................... ... 7-2
Fuel filler lid and cap ........................................ 7-4
State emission testing (U.S. only) ............... 7-7
Preparing to drive ......................................... 7-9
Starting the engine ....................................... 7-9 Manual transmission vehicle ........................... 7-9
Automatic transmission vehicle ...................... 7-10
Starting the engine during cold weather below −4 °F ( −20 °C) ......................................... 7-10
Starting a flooded engine ................................. 7-11
Stopping the engine ..................................... 7-11
Manual transmission – 6 speed (WRX-STi) 7-12 Selecting reverse gear ...................................... 7-12
Shifting speeds ................................................. 7-13
Driving tips ........................................................ 7-14
Manual transmission – 5 speed (except WRX-STi) ...................................... 7-15Shifting speeds ................................................. 7-15
Driving tips ........................................................ 7-17
Driver’s Control Center Differential (DCCD) (WRX-STi) ..................................... 7-18Auto mode ......................................................... 7-18
Manual mode ..................................................... 7-19
Temporary release ............................................ 7-21
Automatic transmission ............................... 7-21 Selector lever for automatic transmission ..... 7-22
Shift lock release .............................................. 7-26
Limited slip differential (LSD) (if equipped) 7-27 Power steering .............................................. 7-28
Braking ........................................................... 7-28
Braking tips ....................................................... 7-28
Brake system .................................................... 7-29
Disc brake pad wear warning indicators ........ 7-29
ABS (Anti-lock Brake System) ..................... 7-30 ABS system self-check .................................... 7-30
ABS warning light ............................................. 7-31
Electronic Brake Force Distribution (EBD) system ........................................................ 7-32Steps to take if EBD system fails .................... 7-33
Parking your vehicle ..................................... 7-34 Parking brake .................................................... 7-34
Parking tips ....................................................... 7-35
Cruise control ................................................ 7-37 To set cruise control ........................................ 7-37
To temporarily cancel the cruise control ....... 7-39
To turn off the cruise control ........................... 7-40
To change the cruising speed ......................... 7-40
Page 278 of 491
7-9
Starting and operating
– CONTINUED –
Preparing to drive
You should perform the following checks and adjust-
ments every day before you start driving.
1. Check that all windows, mirrors, and lights are
clean and unobstructed.
2. Check the appearance and condition of the tires.
Also check tires for proper inflation.
3. Look under the vehicle for any sign of leaks.
4. Check that the hood, trunk and rear gate are fully
closed.
5. Check the adjustment of the seat.
6. Check the adjustment of the inside and outside mir-
rors.
7. Fasten your seatbelt. Check that your passengers
have fastened their seatbelts.
8. Check the operation of the warning and indicator
lights when the ignition switch is turned to the “ON” po-sition.
9. Check the gauges, indicator and warning lights af-
ter starting the engine.
NOTE
Engine oil, engine coolant, brake fluid, washer flu-
id and other fluid levels should be checked daily,
weekly or at fuel stops.
Starting the engine
Do not operate the starter motor continuously
for more than ten seconds. If the engine fails to
start after operating the starter for five to ten
seconds, wait for ten seconds or more before
trying again.
! Manual transmission vehicle
1. Apply the parking brake.
2. Turn off unnecessary lights and accessories.
3. Press the clutch pedal to the floor and shift the shift
lever into neutral. Hold the clutch pedal to the floor
while starting the engine.
The starter motor will only operate when the clutch
pedal is pressed fully to the floor.
4. Turn the ignition switch to the “ON” position and
check the operation of the warning and indicator lights.
Refer to the “Warning and indicator lights” section (chapter 3).
5. Turn the ignition switch to the “START” position
without depressing the accelerator pedal. Release
the key immediately after the engine has started.
Page 281 of 491
7-12
Starting and operating
Manual transmission – 6 speed (WRX-
STi)
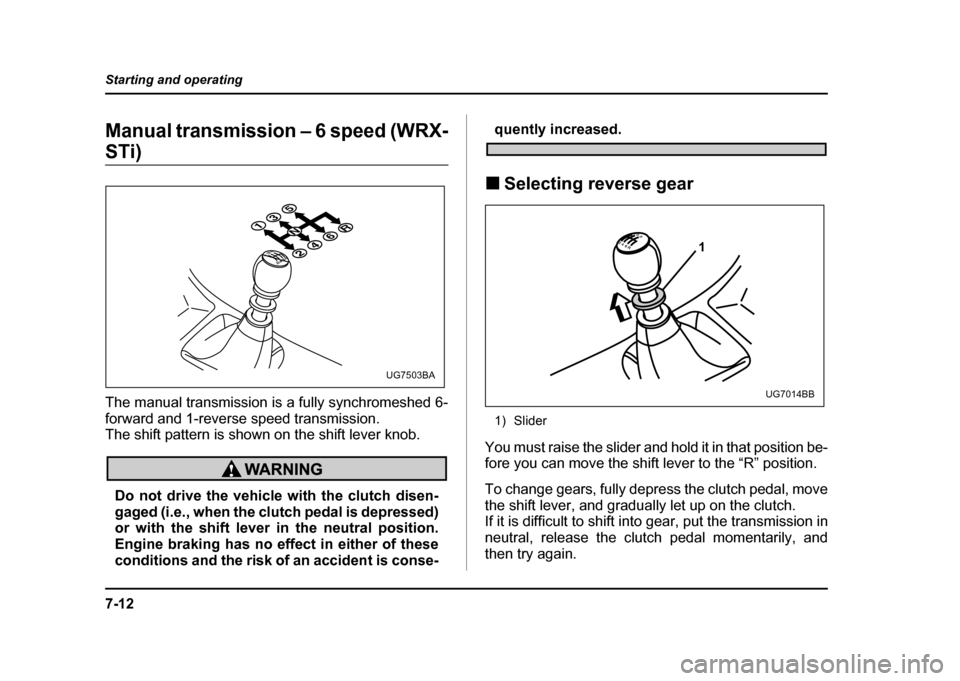
The manual transmission is a fully synchromeshed 6-
forward and 1-reverse speed transmission.
The shift pattern is shown on the shift lever knob.
Do not drive the vehicle with the clutch disen-
gaged (i.e., when the clutch pedal is depressed)
or with the shift lever in the neutral position.
Engine braking has no effect in either of these
conditions and the risk of an accident is conse-
quently increased.
! Selecting reverse gear
1) Slider
You must raise the slider and hold it in that position be-
fore you can move the shift lever to the “R” position.
To change gears, fully depress the clutch pedal, move
the shift lever, and gradually let up on the clutch.
If it is difficult to shift into gear, put the transmission in
neutral, release the clutch pedal momentarily, and
then try again.
N3
4
1
2
5
6R
UG7503BA
1
UG7014BB
Page 284 of 491
7-15
Starting and operating
– CONTINUED –
Manual transmission – 5 speed (ex-
cept WRX-STi)
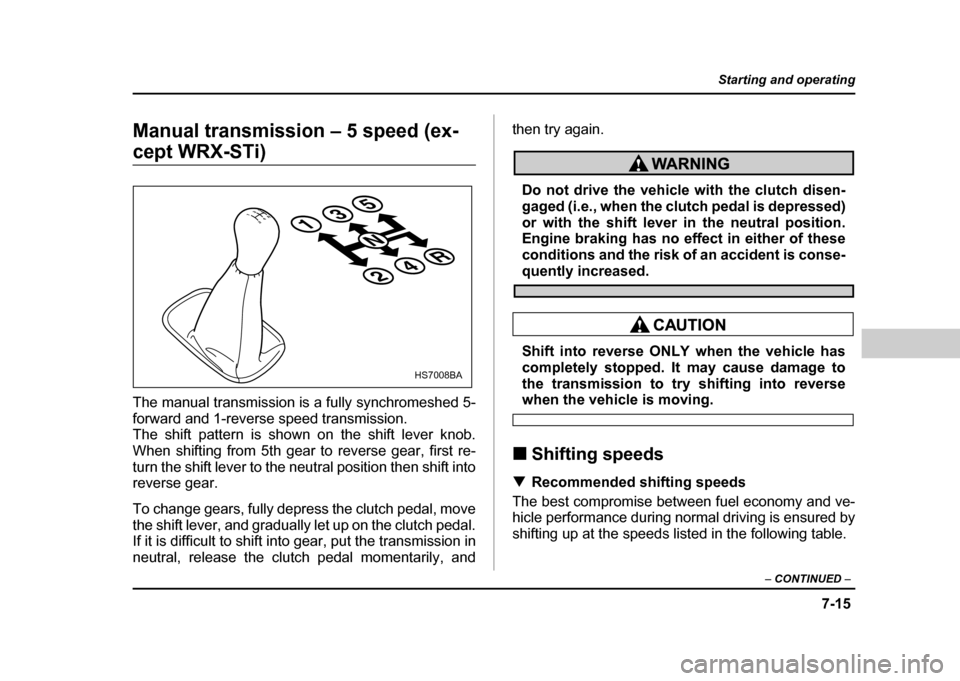
The manual transmission is a fully synchromeshed 5-
forward and 1-reverse speed transmission.
The shift pattern is shown on the shift lever knob.
When shifting from 5th gear to reverse gear, first re-
turn the shift lever to the neutral position then shift into
reverse gear.
To change gears, fully depress the clutch pedal, move
the shift lever, and gradually let up on the clutch pedal.
If it is difficult to shift into gear, put the transmission in
neutral, release the clutch pedal momentarily, and then try again.
Do not drive the vehicle with the clutch disen-
gaged (i.e., when the clutch pedal is depressed)
or with the shift lever in the neutral position.
Engine braking has no effect in either of these
conditions and the risk of an accident is conse-
quently increased.
Shift into reverse ONLY when the vehicle has
completely stopped. It may cause damage to
the transmission to try shifting into reverse
when the vehicle is moving.
! Shifting speeds
! Recommended shifting speeds
The best compromise between fuel economy and ve-
hicle performance during normal driving is ensured by
shifting up at the speeds listed in the following table.
135
24R
N
13524R
HS7008BA
Page 290 of 491
7-21
Starting and operating
– CONTINUED –
mode.
NOTE "If the differential-limiting factor is large during
cornering maneuvers, a small speed difference
between the front and rear wheels may cause tight
corner braking (a phenomenon accompanied by
vibration and noise). This phenomenon does not
indicate a problem. It will disappear if the differen-
tial-action limiting factor is reduced. " Use the center-differential indicator light only as
a rough indication of the differential-action limit-
ing factor. ! Temporary release
When the driver stop the vehicle and pulls the parking-
brake lever after manually setting the differential-ac-
tion limiting factor, the factor is temporarily minimized.
The indicator in the combination meter continues to
show the driver’s selected differential-action limiting
factor. When the driver releases the parking-brake le-
ver, the factor set by the driver is restored.
Automatic transmission
The automatic transmission is electronically controlled
with 4-forward speeds and 1-reverse speed.
NOTE
Immediately after a disconnected battery is recon-
nected or ATF (automatic transmission fluid) is re-
placed, you may feel that the automatic transmis-
sion operation is somewhat unusual.
This results from erasure or invalidation of data
the on-board computer has collected and stored in
memory to allow the transmission to shift at the
most appropriate times for the current condition
of your vehicle. Optimized shifting will be restored
as the vehicle continues to be driven for a while.
Do not shift from the “P” or “N” position into
the “D”, “3”, “2”, “1” or “R” position while de-
pressing the accelerator pedal. This may cause
the vehicle to jump forward or backward.
" Shift into the “P” or “R” position only after
Page 293 of 491
7-24
Starting and operating
has no effect in this condition and the risk of anaccident is consequently increased.
! D (Drive)
This position is for normal driving.
The transmission automatically shifts into a suitable
gear from 1st to 4th according to the vehicle speed
and the acceleration you require.
When more acceleration is required in this position,
press the accelerator pedal fully to the floor and hold
that position. The transmission will automatically
downshift to 3rd, 2nd or 1st gear. When you release
the pedal, the transmission will return to the original
gear position. " While climbing a grade
When driving up hill, undesired upshift to 4th gear is
prevented from taking place when the accelerator
pedal is released. This minimizes the chances of sub-
sequent downshifting to a lower gear when accelerat-
ing again. This prevents repeated upshifting and
downshifting resulting in a smoother operation of the
vehicle.
NOTE
The transmission may downshift to 2nd or 1st gear, depending on the way the accelerator pedal
is pressed to accelerate the vehicle again. "
While going down a hill
When descending a steep hill, depressing the brake
pedal will cause the transmission to downshift to 3rd
gear, thus applying engine braking. Reacceleration for
a short time will cause the transmission to upshift nor-mally.
NOTE
In some cases, depressing the brake pedal on a
downhill grade does not result in an automatic
downshift to 3rd gear. This can happen when the
automatic transmission fluid temperature is very
low, for example, during driving shortly after the
vehicle has been parked for an extended period of
time. When the ATF temperature has risen to a cer-
tain level, automatic downshift normally takes
place. In the meantime, downshift manually for en-
gine braking as required.
Also, downshifting when braking downhill will not
occur at speeds above approximately 48 mph (78
km/h). ! 3 (Third)
This position is for using engine braking when going
down a hill or for climbing a grade.
Page 304 of 491
7-35
Starting and operating
– CONTINUED –
“Warning and indicator lights” section (chapter 3).
Never drive while the parking brake is set be-
cause this will cause unnecessary wear on the
brake linings. Before starting to drive, always
make sure that the parking brake has been fully
released.
! Parking tips
When parking your vehicle, always set the parking
brake firmly and put the shift lever in the “1” (1st) for an
upgrade or “R” (Reverse) for a downgrade for manual
transmission vehicles, or in the “P” (Park) position for
automatic transmission vehicles. Always set the park-
ing brake firmly when parking your vehicle. Never rely
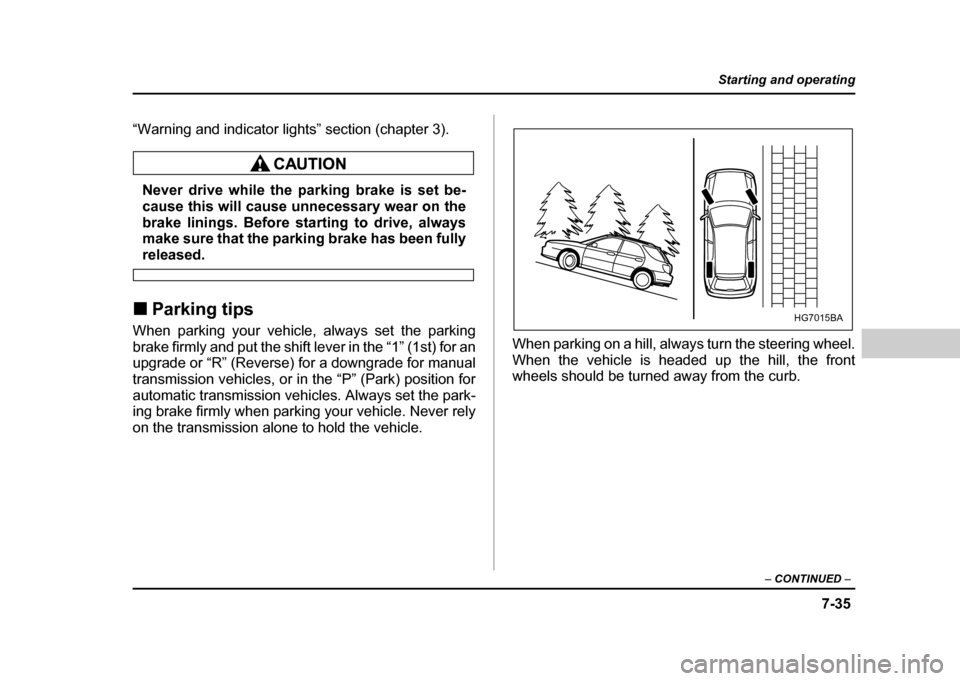
on the transmission alone to hold the vehicle. When parking on a hill, always turn the steering wheel.
When the vehicle is headed up the hill, the front
wheels should be turned away from the curb.
HG7015BA
Page 309 of 491
7-40
Starting and operating
"
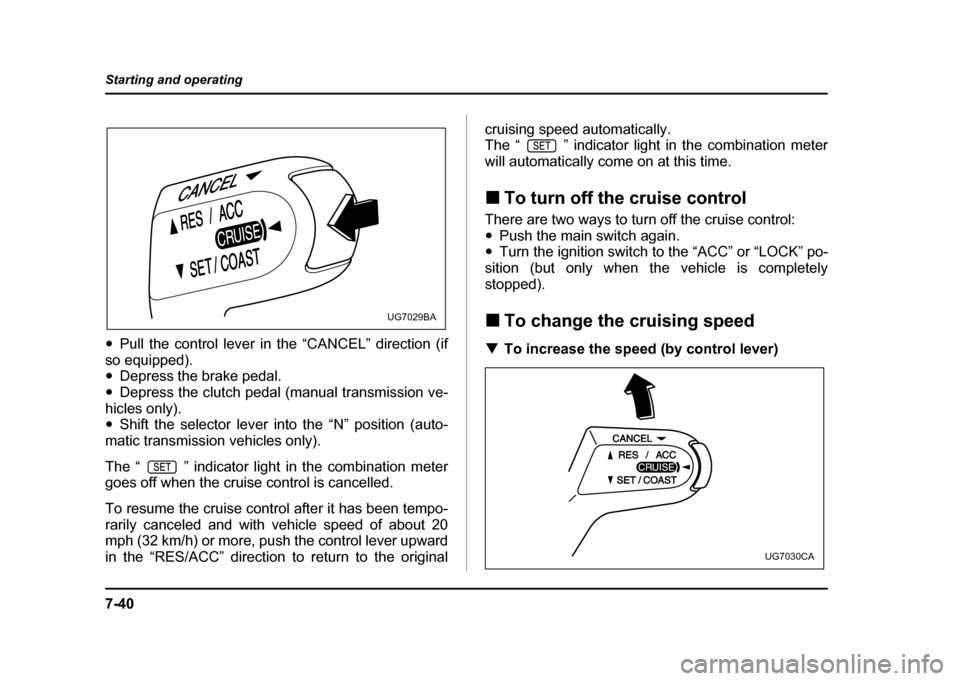
Pull the control lever in the “CANCEL” direction (if
so equipped). " Depress the brake pedal.
" Depress the clutch pedal (manual transmission ve-
hicles only)." Shift the selector lever into the “N” position (auto-
matic transmission vehicles only).
The “ ” indicator light in the combination meter
goes off when the cruise control is cancelled.
To resume the cruise control after it has been tempo-
rarily canceled and with vehicle speed of about 20
mph (32 km/h) or more, push the control lever upward
in the “RES/ACC” direction to return to the original cruising speed automatically.
The “ ” indicator light in the combination meter
will automatically come on at this time. !
To turn off the cruise control
There are two ways to turn off the cruise control: " Push the main switch again.
" Turn the ignition switch to the “ACC” or “LOCK” po-
sition (but only when the vehicle is completely
stopped). ! To change the cruising speed
! To increase the speed (by control lever)
UG7029BA
UG7030CA
Page 321 of 491

8-10
Driving tips
shallow streams, first check the depth of the water and
the bottom of the stream bed for firmness and ensure
that the bed of the stream is flat. Drive slowly and com-
pletely through the stream. The water should be shal-
low enough that it does not reach the vehicle’s under-
carriage. Water entering the engine air intake or the
exhaust pipe or water splashing onto electrical parts
may damage your vehicle and may cause it to stall.
Never attempt to drive through rushing water; regard-
less of its depth, it can wash away the ground from un-
der your tires, resulting in possible loss of traction and
even vehicle rollover. "
Always check your brakes for effectiveness immedi-
ately after driving in sand, mud or water. Do this by
driving slowly and stepping on the brake pedal. Re-
peat that process several times to dry out the brake
discs and brake pads. " Do not drive or park over or near flammable materi-
als such as dry grass or fallen leaves, as they may
burn easily. The exhaust system is very hot while the
engine is running and right after the engine stops. This
could create a fire hazard." After driving through tall grass, mud, rocks, sand,
rivers, etc., check that there is no grass, bush, paper,
rags, stones, sand, etc. adhering to or trapped on the
underbody. Clear off any such matter from the under-
body. If the vehicle is used with these materials trapped or adhering to the underbody, a mechanical
breakdown or fire could occur. "
Secure all cargo carried inside the vehicle and make
certain that it is not piled higher than the seatbacks.
During sudden stops or jolts, unsecured cargo could
be thrown around in the vehicle and cause injury. Do
not pile heavy loads on the roof. Those loads raise the
vehicle’s center of gravity and make it more prone to
tip over." If you must rock the vehicle to free it from sand or
mud, depress the accelerator pedal slightly and move
the selector lever back and forth between “D” and “R”
repeatedly. Do not race the engine. For the best pos-
sible traction, avoid spinning the wheels when trying to
free the vehicle.
When the road surface is extremely slippery, you can
obtain better traction by starting the vehicle with the
transmission in 2nd than 1st (both for MT and AT). " Never equip your vehicle with tires larger than those
specified in this manual. " Frequent driving of an AWD vehicle under hard-driv-
ing conditions such as rough roads or off roads will ne-
cessitate more frequent replacement of engine oil,
brake fluid and transmission oil than that specified in
the maintenance schedule described in the “Warranty
and Maintenance Booklet”.
Remember that damage done to your Subaru while