oil level SUBARU IMPREZA 2004 2.G Owners Manual
[x] Cancel search | Manufacturer: SUBARU, Model Year: 2004, Model line: IMPREZA, Model: SUBARU IMPREZA 2004 2.GPages: 491, PDF Size: 5.93 MB
Page 138 of 491

3-1
3
Instruments and controls
Ignition switch .............................................. 3-3 LOCK .................................................................. 3-3
ACC .................................................................... 3-4
ON ....................................................................... 3-4
START ................................................................ 3-4
Key reminder chime .......................................... 3-4
Ignition switch light (if equipped) .................... 3-5
Key interlock release (AT vehicles only) ........ 3-5
Hazard warning flasher ................................ 3-6
Meters and gauges (WRX-STi) .................... 3-7 Combination meter illumination ...................... 3-7
Cancelling sequential illumination of the combination meter ......................................... 3-7
Speedometer ..................................................... 3-7
Odometer/Trip meter ........................................ 3-8
Tachometer ........................................................ 3-9
Fuel gauge ......................................................... 3-9
Temperature gauge ........................................... 3-10
Ambient temperature gauge ............................ 3-11
REV indicator light and buzzer (WRX-STi) . 3-12 Setting the alarm-level engine speed .............. 3-13
Deactivating the REV alarm system ................ 3-14
Meters and gauges (Except WRX-STi) ........ 3-15 Speedometer ..................................................... 3-15
Odometer/Trip meter ........................................ 3-15
Tachometer ........................................................ 3-16
Fuel gauge ......................................................... 3-16
Temperature gauge ........................................... 3-17
Ambient temperature gauge (if equipped) ...... 3-18
Warning and indicator lights ....................... 3-19 Seatbelt warning light and chime .................... 3-19 SRS airbag system warning light .................... 3-20
CHECK ENGINE warning light/Malfunction
indicator lamp ................................................. 3-20
Charge warning light ........................................ 3-21
Oil pressure warning light ............................... 3-21
AT OIL TEMPerature warning light (for AT vehicles) ............................................. 3-22
Rear differential oil temperature warning light
(WRX-STi) ........................................................ 3-22
ABS warning light ............................................. 3-23
Brake system warning light ............................. 3-24
Door open warning lights ................................ 3-25
Front-wheel drive warning light (for AT vehicles – if equipped) ...................... 3-25
Intercooler water spray warning light
(WRX-STi) ........................................................ 3-25
Selector lever position indicator (AT vehicles) 3-26
Turn signal indicator lights .............................. 3-26
High beam indicator light ................................. 3-26
Cruise control indicator light ........................... 3-26
Cruise control set indicator light .................... 3-26
Driver’s control center differential auto indicator light (WRX-STi) ............................... 3-26
Driver’s control center differential indicator
lights (WRX-STi) ............................................. 3-27
Headlight indicator light (WRX-STi) ................ 3-27
REV indicator light (WRX-STi) ......................... 3-27
Clock .............................................................. 3-28
Light control switch ...................................... 3-29 Headlights ......................................................... 3-29
High/low beam change (dimmer) .................... 3-30
Headlight flasher ............................................... 3-30
Page 158 of 491
3-21
Instruments and controls
– CONTINUED –
NOTE
This light also comes on when the fuel filler cap is
not tightened until it clicks.
If you have recently refueled your vehicle, the cause of
the CHECK ENGINE warning light/malfunction indica-
tor lamp coming on could be a loose or missing fuel fill-
er cap. Remove the cap and retighten it until it clicks.
Make sure nothing is interfering with the sealing of the
cap. Tightening the cap will not make the CHECK EN-
GINE warning light turn off immediately. It may take
several driving trips. If the light does not go out, take
your vehicle to your authorized SUBARU dealer im-
mediately. !If the light is blinking:
If the light is blinking while driving, an engine misfire
condition has been detected which may damage the
emission control system.
To prevent serious damage to the emission control
system, you should do the following: "Reduce vehicle speed.
" Avoid hard acceleration.
" Avoid steep uphill grades.
" Reduce the amount of cargo, if possible.
" Stop towing a trailer as soon as possible.
The CHECK ENGINE warning light may stop blinking and come on steadily after several driving trips. You
should have your vehicle checked by an authorized
SUBARU dealer immediately. !
Charge warning light
If this light comes on when the engine is running, it
may indicate that the charging system is not working
properly.
If the light comes on while driving or does not go out
after the engine starts, stop the engine at the first safe
opportunity and check the alternator belt. If the belt is
loose, broken or if the belt is in good condition but the
light remains on, contact your nearest SUBARU deal-
er immediately. ! Oil pressure warning light
If this light comes on when the engine is running, it
may indicate that the engine oil pressure is low and the
lubricating system is not working properly.
If the light comes on while driving or does not go out
after the engine starts, stop the engine at the first safe
opportunity and check the engine oil level. If the oil lev-
el is low, add oil immediately. If the engine oil is at the
proper level but the light remains on, contact your
nearest SUBARU dealer immediately.
Page 278 of 491
7-9
Starting and operating
– CONTINUED –
Preparing to drive
You should perform the following checks and adjust-
ments every day before you start driving.
1. Check that all windows, mirrors, and lights are
clean and unobstructed.
2. Check the appearance and condition of the tires.
Also check tires for proper inflation.
3. Look under the vehicle for any sign of leaks.
4. Check that the hood, trunk and rear gate are fully
closed.
5. Check the adjustment of the seat.
6. Check the adjustment of the inside and outside mir-
rors.
7. Fasten your seatbelt. Check that your passengers
have fastened their seatbelts.
8. Check the operation of the warning and indicator
lights when the ignition switch is turned to the “ON” po-sition.
9. Check the gauges, indicator and warning lights af-
ter starting the engine.
NOTE
Engine oil, engine coolant, brake fluid, washer flu-
id and other fluid levels should be checked daily,
weekly or at fuel stops.
Starting the engine
Do not operate the starter motor continuously
for more than ten seconds. If the engine fails to
start after operating the starter for five to ten
seconds, wait for ten seconds or more before
trying again.
! Manual transmission vehicle
1. Apply the parking brake.
2. Turn off unnecessary lights and accessories.
3. Press the clutch pedal to the floor and shift the shift
lever into neutral. Hold the clutch pedal to the floor
while starting the engine.
The starter motor will only operate when the clutch
pedal is pressed fully to the floor.
4. Turn the ignition switch to the “ON” position and
check the operation of the warning and indicator lights.
Refer to the “Warning and indicator lights” section (chapter 3).
5. Turn the ignition switch to the “START” position
without depressing the accelerator pedal. Release
the key immediately after the engine has started.
Page 372 of 491
9-21
In case of emergency
– CONTINUED –
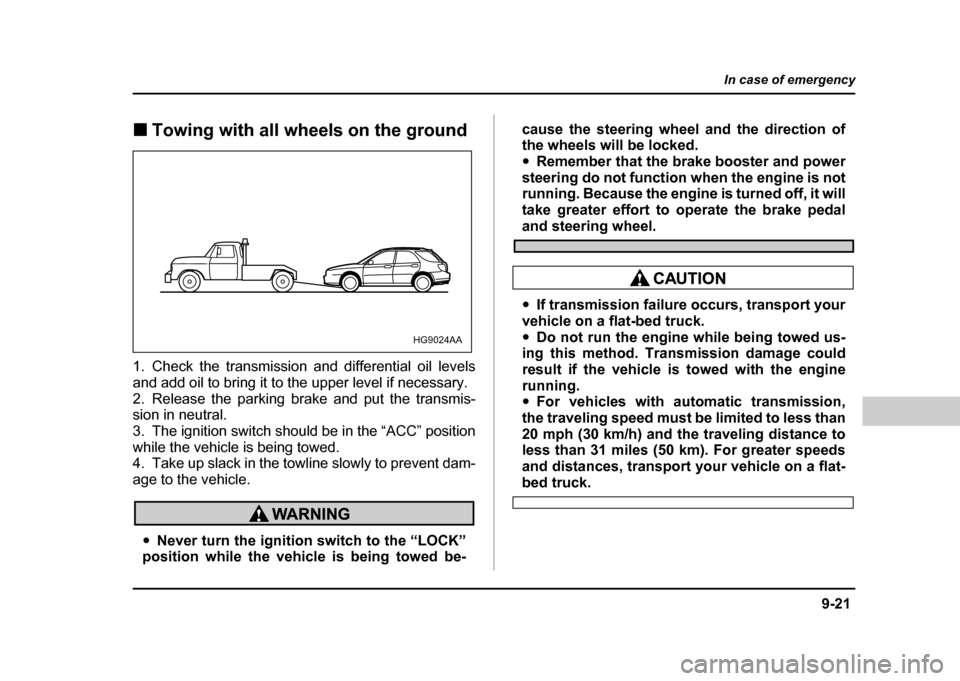
!Towing with all wheels on the ground
1. Check the transmission and differential oil levels
and add oil to bring it to the upper level if necessary.
2. Release the parking brake and put the transmis-
sion in neutral.
3. The ignition switch should be in the “ACC” position
while the vehicle is being towed.
4. Take up slack in the towline slowly to prevent dam-
age to the vehicle.
" Never turn the ignition switch to the “LOCK”
position while the vehicle is being towed be- cause the steering wheel and the direction of
the wheels will be locked. "
Remember that the brake booster and power
steering do not function when the engine is not
running. Because the engine is turned off, it will
take greater effort to operate the brake pedal
and steering wheel.
" If transmission failure occurs, transport your
vehicle on a flat-bed truck. " Do not run the engine while being towed us-
ing this method. Transmission damage could
result if the vehicle is towed with the engine
running. " For vehicles with automatic transmission,
the traveling speed must be limited to less than
20 mph (30 km/h) and the traveling distance to
less than 31 miles (50 km). For greater speeds
and distances, transport your vehicle on a flat-
bed truck.
HG9024AA
Page 386 of 491

11 - 1
11
Maintenance and service
Maintenance schedule ................................. 11-3
Maintenance precautions ............................ 11-3 Before checking or servicing in the engine compartment .................................................. 11-4
When you do checking or servicing in the engine compartment while the engine is
running ............................................................ 11-5
Engine hood .................................................. 11-5
Engine compartment overview ................... 11-8 2.5 liter model .................................................... 11-8
2.0 liter (Turbo) model ...................................... 11-9
2.5 liter (Turbo) model ...................................... 11-10
Engine oil ...................................................... 11-11 Checking the oil level ....................................... 11-11
Changing the oil and oil filter .......................... 11-12
Recommended grade and viscosity ................ 11-16
Recommended grade and viscosity under severe driving conditions .............................. 11-18
Synthetic oil ....................................................... 11-18
Cooling system ............................................. 11-18 Cooling fan, hose and connections ................ 11-19
Engine coolant .................................................. 11-19
Air cleaner element ...................................... 11-23 Replacing the air cleaner element ................... 11-23
Spark plugs ................................................... 11-26 Recommended spark plugs ............................. 11-27
Drive belts ..................................................... 11-27
Manual transmission oil ............................... 11-28 Checking the oil level ....................................... 11-28
Recommended grade and viscosity ................ 11-30 Automatic transmission fluid ...................... 11-31
Checking the fluid level .................................... 11-31
Recommended fluid ......................................... 11-32
Front differential gear oil (AT vehicles) ...... 11-33 Checking the oil level ....................................... 11-33
Recommended grade and viscosity ............... 11-33
Rear differential gear oil ............................... 11-34 Checking the gear oil level .............................. 11-34
Recommended grade and viscosity ............... 11-35
Power steering fluid ...................................... 11-36 Checking the fluid level .................................... 11-36
Recommended fluid ......................................... 11-37
Brake fluid ..................................................... 11-37 Checking the fluid level .................................... 11-37
Recommended brake fluid ............................... 11-38
Clutch fluid (MT vehicles) ............................ 11-38 Checking the fluid level .................................... 11-38
Recommended clutch fluid .............................. 11-39
Brake booster ................................................ 11-40
Brake pedal .................................................... 11-40 Checking the brake pedal free play ................ 11-40
Checking the brake pedal reserve distance ... 11-41
Clutch pedal (MT vehicles) ........................... 11-41 Checking the clutch function .......................... 11-41
Checking the clutch pedal free play ............... 11-42
Replacement of brake pad and lining ......... 11-42 Breaking-in of new brake pads and linings .... 11-43
Parking brake stroke .................................... 11-44
Tires and wheels ........................................... 11-44
Page 393 of 491
11 - 8
Maintenance and service
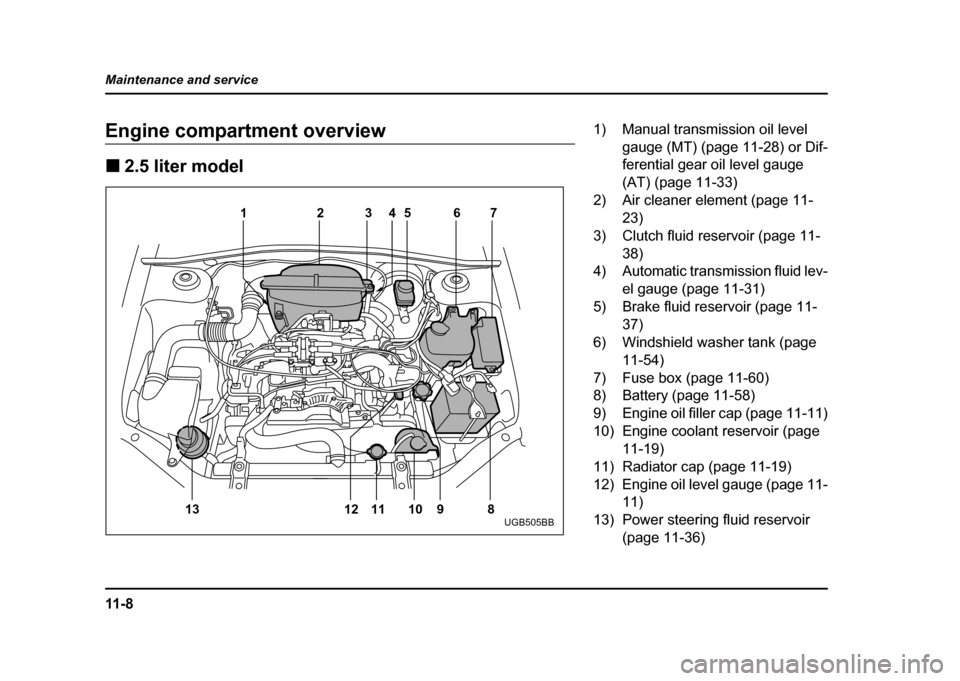
Engine compartment overview !
2.5 liter model
12 345 67
8
9
10
11
12
13
UGB505BB
1) Manual transmission oil level
gauge (MT) (page 11-28) or Dif-
ferential gear oil level gauge
(AT) (page 11-33)
2) Air cleaner element (page 11- 23)
3) Clutch fluid reservoir (page 11- 38)
4) Automatic transmission fluid lev-
el gauge (page 11-31)
5) Brake fluid reservoir (page 11-
37)
6) Windshield washer tank (page 11-54)
7) Fuse box (page 11-60)
8) Battery (page 11-58)
9) Engine oil filler cap (page 11-11)
10) Engine coolant reservoir (page 11-19)
11) Radiator cap (page 11-19)
12) Engine oil level gauge (page 11- 11)
13) Power steering fluid reservoir
(page 11-36)
Page 394 of 491
11 - 9
Maintenance and service
– CONTINUED –
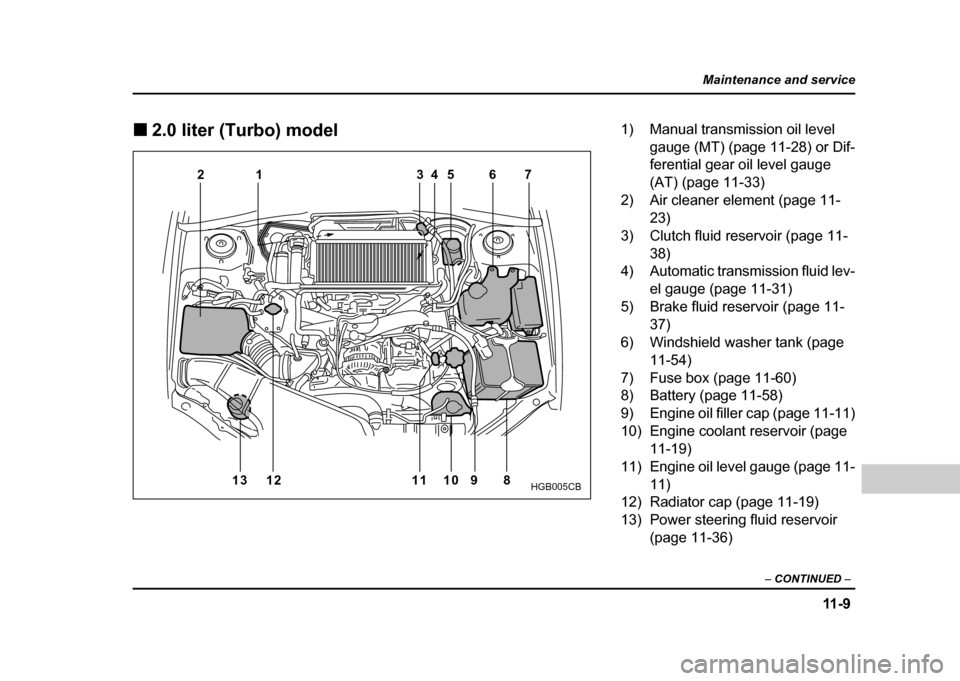
!2.0 liter (Turbo) model
34 5 6 7
1
2
13 12 11 10 9 8
HGB005CB
1) Manual transmission oil level gauge (MT) (page 11-28) or Dif-
ferential gear oil level gauge
(AT) (page 11-33)
2) Air cleaner element (page 11- 23)
3) Clutch fluid reservoir (page 11- 38)
4) Automatic transmission fluid lev-
el gauge (page 11-31)
5) Brake fluid reservoir (page 11-
37)
6) Windshield washer tank (page 11-54)
7) Fuse box (page 11-60)
8) Battery (page 11-58)
9) Engine oil filler cap (page 11-11)
10) Engine coolant reservoir (page 11-19)
11) Engine oil level gauge (page 11-
11)
12) Radiator cap (page 11-19)
13) Power steering fluid reservoir
(page 11-36)
Page 395 of 491
11 - 1 0
Maintenance and service !
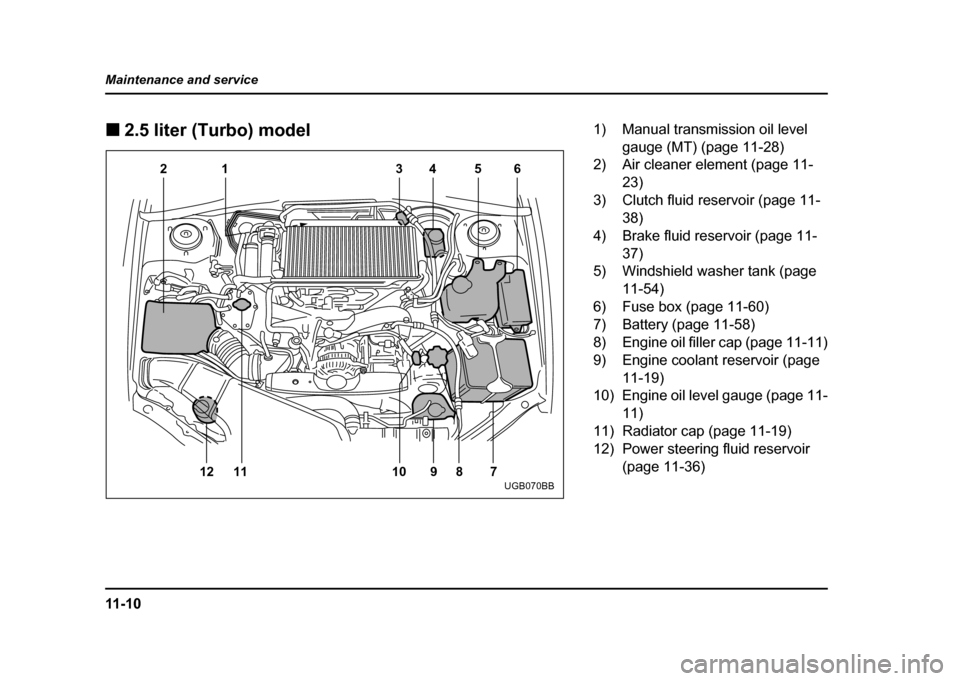
2.5 liter (Turbo) model
34 5 6
7
1
2
12 11 10 9 8
UGB070BB
1) Manual transmission oil level gauge (MT) (page 11-28)
2) Air cleaner element (page 11-
23)
3) Clutch fluid reservoir (page 11- 38)
4) Brake fluid reservoir (page 11- 37)
5) Windshield washer tank (page
11-54)
6) Fuse box (page 11-60)
7) Battery (page 11-58)
8) Engine oil filler cap (page 11-11)
9) Engine coolant reservoir (page
11-19)
10) Engine oil level gauge (page 11- 11)
11) Radiator cap (page 11-19)
12) Power steering fluid reservoir (page 11-36)
Page 396 of 491
11-11
Maintenance and service
– CONTINUED –
Engine oil !Checking the oil level
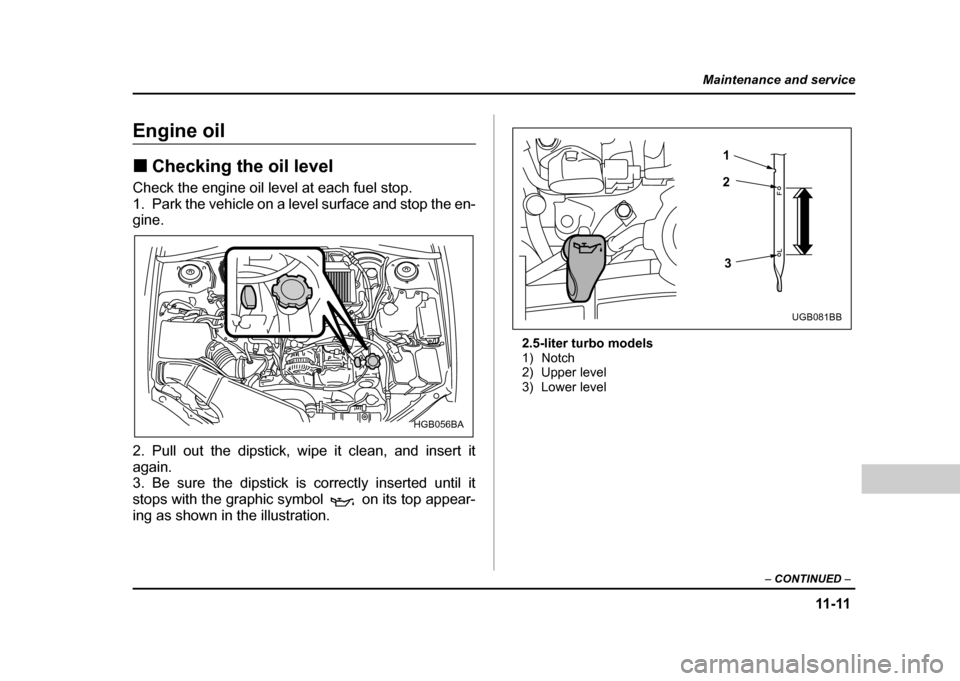
Check the engine oil level at each fuel stop.
1. Park the vehicle on a level surface and stop the en-
gine.
2. Pull out the dipstick, wipe it clean, and insert it
again.
3. Be sure the dipstick is correctly inserted until it
stops with the graphic symbol on its top appear-
ing as shown in the illustration. 2.5-liter turbo models
1) Notch
2) Upper level
3) Lower level
HGB056BA
1 2
3
UGB081BB
Page 397 of 491
11 - 1 2
Maintenance and service
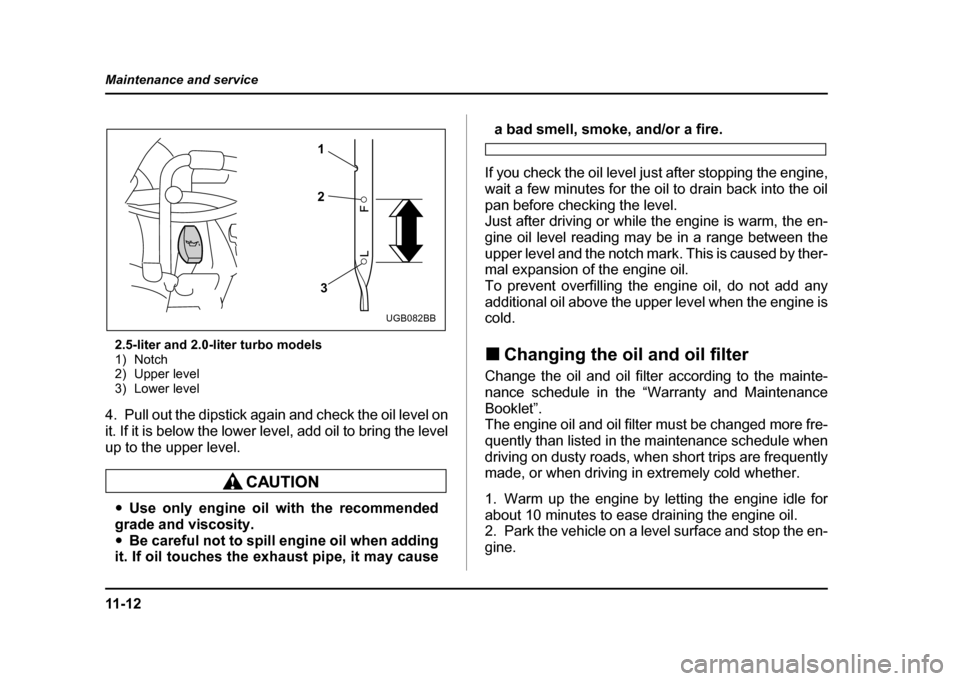
2.5-liter and 2.0-liter turbo models
1) Notch
2) Upper level
3) Lower level
4. Pull out the dipstick again and check the oil level on
it. If it is below the lower level, add oil to bring the level
up to the upper level.
" Use only engine oil with the recommended
grade and viscosity. " Be careful not to spill engine oil when adding
it. If oil touches the exhaust pipe, it may cause
a bad smell, smoke, and/or a fire.
If you check the oil level just after stopping the engine,
wait a few minutes for the oil to drain back into the oil
pan before checking the level.
Just after driving or while the engine is warm, the en-
gine oil level reading may be in a range between the
upper level and the notch mark. This is caused by ther-
mal expansion of the engine oil.
To prevent overfilling the engine oil, do not add any
additional oil above the upper level when the engine iscold. ! Changing the oil and oil filter
Change the oil and oil filter according to the mainte-
nance schedule in the “Warranty and Maintenance Booklet”.
The engine oil and oil filter must be changed more fre-
quently than listed in the maintenance schedule when
driving on dusty roads, when short trips are frequently
made, or when driving in extremely cold whether.
1. Warm up the engine by letting the engine idle for
about 10 minutes to ease draining the engine oil.
2. Park the vehicle on a level surface and stop the en-
gine.
1 2
3
UGB082BB