window SUBARU IMPREZA 2006 2.G User Guide
[x] Cancel search | Manufacturer: SUBARU, Model Year: 2006, Model line: IMPREZA, Model: SUBARU IMPREZA 2006 2.GPages: 365, PDF Size: 7.09 MB
Page 61 of 365
1-34 Seat, seatbelt and SRS airbags
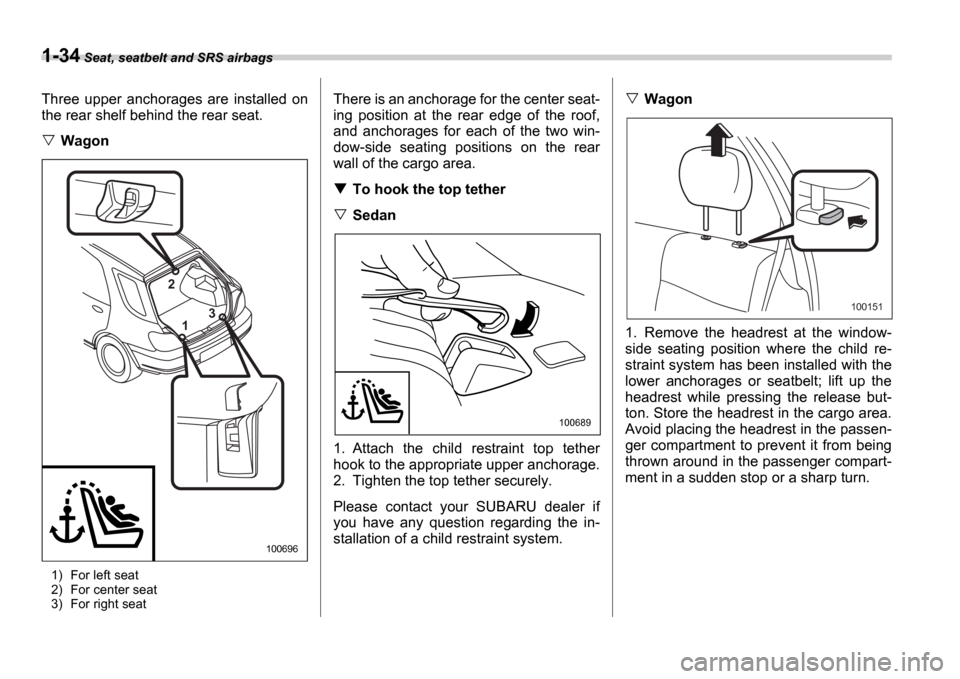
Three upper anchorages are installed on
the rear shelf behind the rear seat.
Wagon
1) For left seat
2) For center seat
3) For right seat
There is an anchorage for the center seat-
ing position at the rear edge of the roof,
and anchorages for each of the two win-
dow-side seating positions on the rear
wall of the cargo area.
To hook the top tether
Sedan
1. Attach the child restraint top tether
hook to the appropriate upper anchorage.
2. Tighten the top tether securely.
Please contact your SUBARU dealer if
you have any question regarding the in-
stallation of a child restraint system.
Wagon
1. Remove the headrest at the window-
side seating position where the child re-
straint system has been installed with the
lower anchorages or seatbelt; lift up the
headrest while pressing the release but-
ton. Store the headrest in the cargo area.
Avoid placing the headrest in the passen-
ger compartment to prevent it from being
thrown around in the passenger compart-
ment in a sudden stop or a sharp turn.
2 1 3
100696
100689
100151
Page 62 of 365
Seat, seatbelt and SRS airbags 1-35
CONTINUED
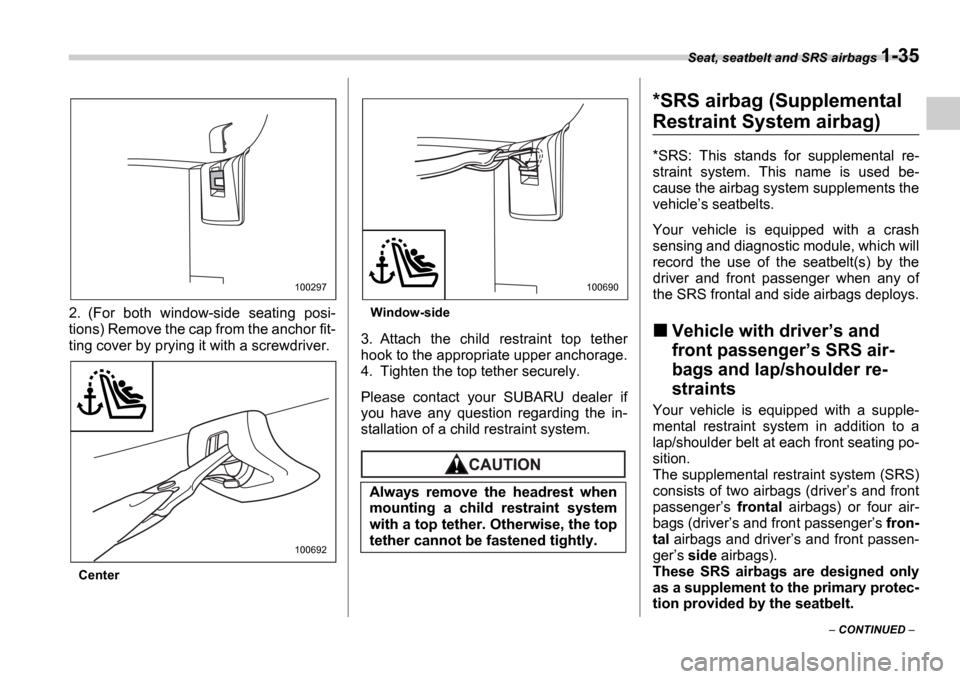
2. (For both window-side seating posi-
tions) Remove the cap from the anchor fit-
ting cover by prying it with a screwdriver.
Center
Window-side
3. Attach the child restraint top tether
hook to the appropriate upper anchorage.
4. Tighten the top tether securely.
Please contact your SUBARU dealer if
you have any question regarding the in-
stallation of a child restraint system.
*SRS airbag (Supplemental
Restraint System airbag)
*SRS: This stands for supplemental re-
straint system. This name is used be-
cause the airbag system supplements the
vehicle
s seatbelts.
Your vehicle is equipped with a crash
sensing and diagnostic module, which will
record the use of the seatbelt(s) by the
driver and front passenger when any of
the SRS frontal and side airbags deploys.
Vehicle with driver s and
front passenger s SRS air-
bags and lap/shoulder re-
straints
Your vehicle is equipped with a supple-
mental restraint system in addition to a
lap/shoulder belt at each front seating po-
sition.
The supplemental restraint system (SRS)
consists of two airbags (driver s and front
passenger s frontal airbags) or four air-
bags (driver s and front passenger s fron-
tal airbags and driver s and front passen-
ger s side airbags).
These SRS airbags are designed only
as a supplement to the primary protec-
tion provided by the seatbelt.
100297
100692
Always remove the headrest when
mounting a child restraint system
with a top tether. Otherwise, the top
tether cannot be fastened tightly.
100690
Page 79 of 365
1-52 Seat, seatbelt and SRS airbags
100166
100167
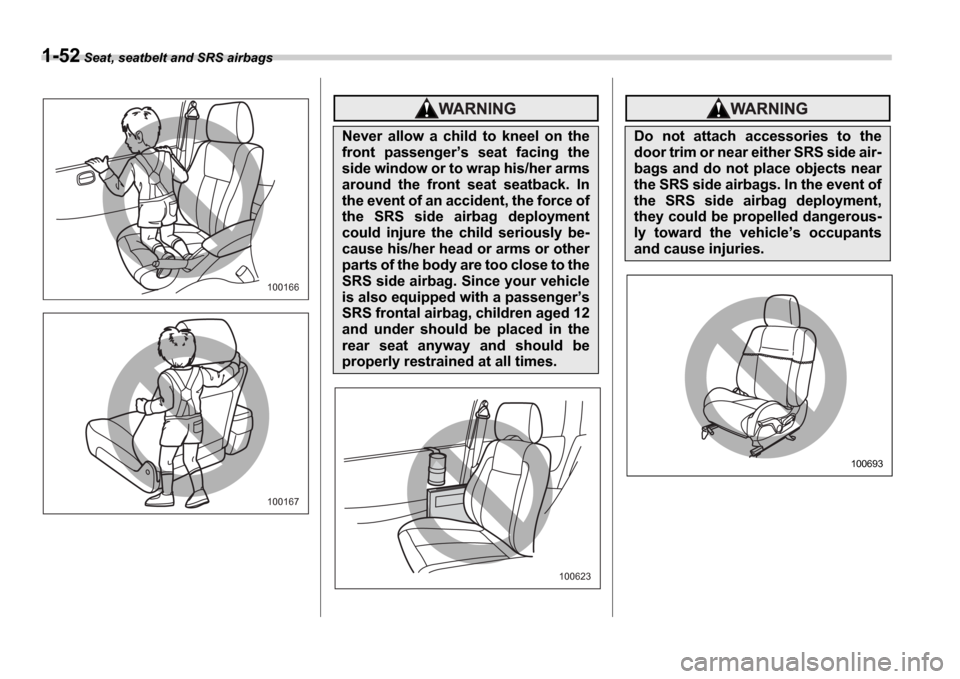
Never allow a child to kneel on the
front passenger s seat facing the
side window or to wrap his/her arms
around the front seat seatback. In
the event of an accident, the force of
the SRS side airbag deployment
could injure the child seriously be-
cause his/her head or arms or other
parts of the body are too close to the
SRS side airbag. Since your vehicle
is also equipped with a passenger s
SRS frontal airbag, children aged 12
and under should be placed in the
rear seat anyway and should be
properly restrained at all times.
100623
Do not attach accessories to the
door trim or near either SRS side air-
bags and do not place objects near
the SRS side airbags. In the event of
the SRS side airbag deployment,
they could be propelled dangerous-
ly toward the vehicle s occupants
and cause injuries.
100693
Page 88 of 365

2
Keys and doors
Keys ..................................................................... 2-2
Key number ........................................ ..................... 2-2
Immobilizer (Turbo models) ......................... ..... 2-3
Security ID plate ................................. .................... 2-3
Security indicator light .......................... ................. 2-3
Key replacement ................................... .................. 2-4
Door locks ........................................ ................... 2-4
Locking and unlocking from the outside ............ . 2-4
Locking and unlocking from the inside ............. ... 2-5
Key lock-in prevention function ................... ......... 2-5
Power door locking switches ....................... ..... 2-6
Remote keyless entry system ....................... .... 2-7
Locking the doors ................................. ................. 2-7
Unlocking the doors ............................... ................ 2-8
Illuminated entry ................................. .................... 2-8
Vehicle finder function ........................... ................ 2-8
Sounding a panic alarm ............................ ............. 2-8
Selecting audible signal operation ................ ....... 2-8
Replacing the battery ............................. ................ 2-9
Replacing lost transmitters ....................... ............ 2-10
Alarm system ...................................... ................ 2-13
System alarm operation ............................ ............. 2-13
Activating and deactivating the alarm system ..... 2 -13
If you have accidentally triggered the alarm
system ............................................ ....................... 2-14
Arming the system ................................. ................ 2-14
Disarming the system .............................. .............. 2-15
Valet mode ........................................ ...................... 2-16
Passive arming .................................... ................... 2-16Tripped sensor identification .....................
........... 2-17
Shock sensors (dealer option) ..................... ......... 2-17
Child safety locks ................................ ............... 2-18
Windows ........................................... ................... 2-18
Power windows ..................................... .................. 2-18
Trunk lid (Sedan) ................................. ............... 2-20
To open and close the trunk lid from outside ...... 2-20
To open the trunk lid from inside ................. ......... 2-21
To cancel the trunk lid release ................... ........... 2-21
Internal trunk lid release handle ................. ........... 2-21
Rear gate (Wagon) ................................. ............. 2-23
Moonroof (if equipped) ............................ .......... 2-24
Tilt function ..................................... ........................ 2-24
Sliding function .................................. ..................... 2-24
Sun shades ........................................ ...................... 2-25
Page 90 of 365
Keys and doors 2-3
CONTINUED
Immobilizer (Turbo models)
The immobilizer system is designed to
prevent an unauthorized person from
starting the engine. Only keys registered
with your vehicle s immobilizer system
can be used to operate your vehicle. Even
if an unregistered key fits into the ignition
switch and can be turned to the START
position, the engine will automatically stop
after several seconds.
Each immobilizer key contains a tran-
sponder in which the key s ID code is
stored. When a key is inserted into the ig-
nition switch and turned to the ON posi-
tion, the transponder transmits the key s
ID code to the immobilizer system s re-
ceiver. If the transmitted ID code matches
the ID code registered in the immobilizer
system, the system allows the engine to
be started. Since the ID code is transmit-
ted and acted upon almost instantly, the
immobilizer system does not impede nor-
mal starting of the engine.
If the engine fails to start, pull out the key
once before trying again. (Refer to the Ig-
nition switch section [chapter 3].)
This device complies with Part 15 of
the FCC Rules and with RSS-210 of In-
dustry Canada. Operation is subject to
the following two conditions: (1) This device may not cause harmful interfer-
ence, and (2) this device must accept
any interference received, including in-
terference that may cause undesired
operation.
Changes or modifications not express-
ly approved by the party responsible
for compliance could void the user
s
authority to operate the equipment.
NOTE
To protect your vehicle from theft,
please pay close attention to the fol-
lowing security precautions:
Never leave your vehicle unattended
with its keys inside.
Before leaving your vehicle, close all
windows and lock the doors and rear
gate.
Do not leave spare keys or any
record of your key number in the vehi-
cle.
Security ID plate
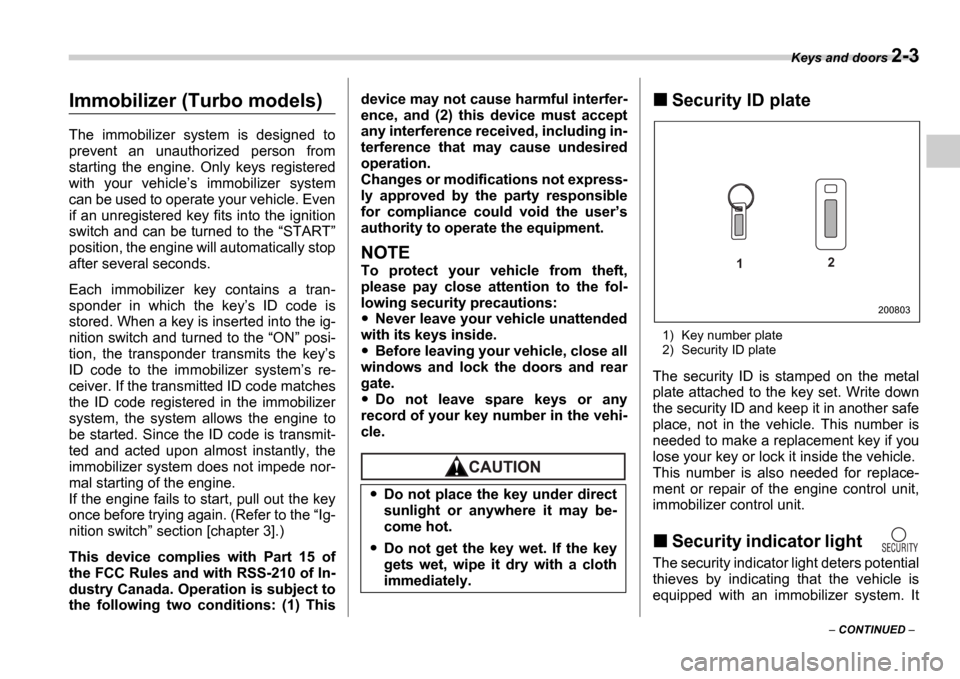
1) Key number plate
2) Security ID plate
The security ID is stamped on the metal
plate attached to the key set. Write down
the security ID and keep it in another safe
place, not in the vehicle. This number is
needed to make a replacement key if you
lose your key or lock it inside the vehicle.
This number is also needed for replace-
ment or repair of the engine control unit,
immobilizer control unit.
Security indicator light
The security indicator light deters potential
thieves by indicating that the vehicle is
equipped with an immobilizer system. It
Do not place the key under direct
sunlight or anywhere it may be-
come hot.
Do not get the key wet. If the key
gets wet, wipe it dry with a cloth
immediately.
1 2
200803
Page 101 of 365
2-14 Keys and doors
cating that the system is now deactivated.
If the system was previously deactivated:
The odometer/trip meter screen displays AL on and the horn sounds once, indi-
cating that the system is now activated.
NOTE
You may have the above setting
change done by your SUBARU dealer.
If you have accidentally trig-
gered the alarm system
To stop the alarm
Do any of the following operations:
Press any button on the remote trans-
mitter.
Cycle the ignition switch from the
LOCK to ON position three times within
5 seconds.
Arming the system
To arm the system using remote
transmitter
1. Close all windows and the moonroof (if
so equipped).
2. Remove the key from the ignition
switch.
3. Open the doors and get out of the vehi-
cle. 4. Make sure that the engine hood (and
the trunk lid) are locked.
5. Close all doors (and the rear gate on
the Wagon).
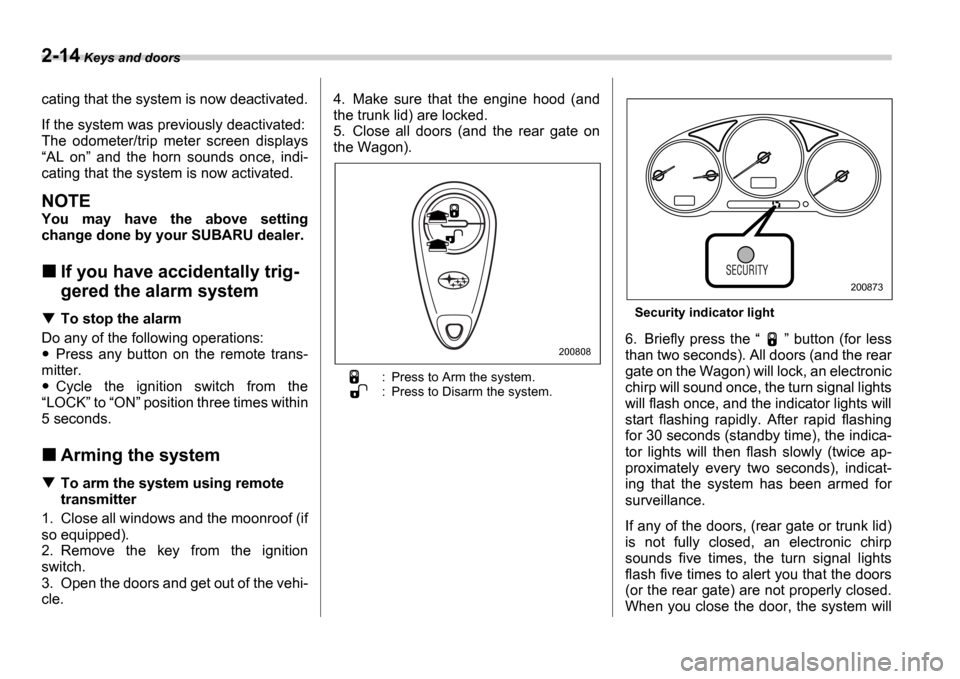
: Press to Arm the system.
: Press to Disarm the system.
Security indicator light
6. Briefly press the
button (for less
than two seconds). All doors (and the rear
gate on the Wagon) will lock, an electronic
chirp will sound once, the turn signal lights
will flash once, and the indicator lights will
start flashing rapidly. After rapid flashing
for 30 seconds (standby time), the indica-
tor lights will then flash slowly (twice ap-
proximately every two seconds), indicat-
ing that the system has been armed for
surveillance.
If any of the doors, (rear gate or trunk lid)
is not fully closed, an electronic chirp
sounds five times, the turn signal lights
flash five times to alert you that the doors
(or the rear gate) are not properly closed.
When you close the door, the system will200808
200873
Page 102 of 365
Keys and doors 2-15
CONTINUED
automatically arm and doors will automat-
ically lock.
To arm the system using power
door locking switches
1. Close all windows.
2. Remove the key from the ignition
switch.
3. Open the doors and get out of the vehi-
cle.
4. Make sure that the engine hood is
locked.
5. Close the doors (and the rear gate on
the Wagon) but leave only the driver s
door or the front passenger s door open.
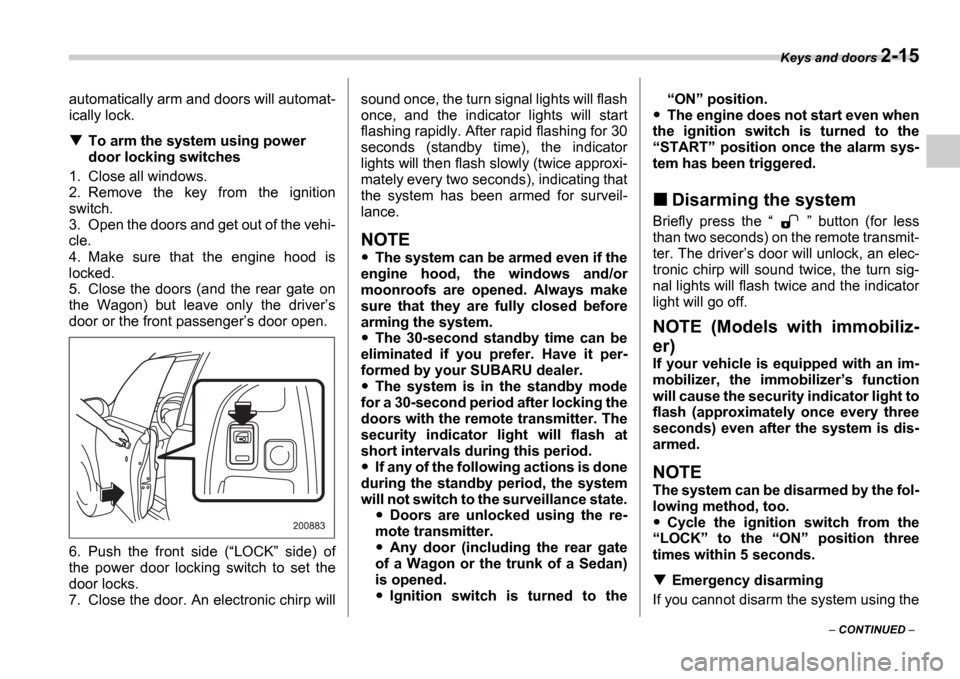
6. Push the front side ( LOCK side) of
the power door locking switch to set the
door locks.
7. Close the door. An electronic chirp will sound once, the turn signal lights will flash
once, and the indicator lights will start
flashing rapidly. After rapid flashing for 30
seconds (standby time), the indicator
lights will then flash slowly (twice approxi-
mately every two seconds), indicating that
the system has been armed for surveil-
lance.
NOTE
The system can be armed even if the
engine hood, the windows and/or
moonroofs are opened. Always make
sure that they are fully closed before
arming the system.
The 30-second standby time can be
eliminated if you prefer. Have it per-
formed by your SUBARU dealer.
The system is in the standby mode
for a 30-second period after locking the
doors with the remote transmitter. The
security indicator light will flash at
short intervals during this period.
If any of the following actions is done
during the standby period, the system
will not switch to the surveillance state.
Doors are unlocked using the re-
mote transmitter.
Any door (including the rear gate
of a Wagon or the trunk of a Sedan)
is opened.
Ignition switch is turned to the
ON position.
The engine does not start even when
the ignition switch is turned to the START position once the alarm sys-
tem has been triggered.
Disarming the system
Briefly press the button (for less
than two seconds) on the remote transmit-
ter. The driver s door will unlock, an elec-
tronic chirp will sound twice, the turn sig-
nal lights will flash twice and the indicator
light will go off.
NOTE (Models with immobiliz-
er)
If your vehicle is equipped with an im-
mobilizer, the immobilizer s function
will cause the security indicator light to
flash (approximately once every three
seconds) even after the system is dis-
armed.
NOTE
The system can be disarmed by the fol-
lowing method, too.
Cycle the ignition switch from the
LOCK to the ON position three
times within 5 seconds.
Emergency disarming
If you cannot disarm the system using the
Page 105 of 365

2-18 Keys and doors
Child safety locks
Each rear door has a child safety lock that
prevents the doors from being opened
even if the inside door handle is pulled.
When the child safety lock lever is in the
lock position, the door cannot be opened
from inside regardless of the position of
the inner door handle lock lever. The door
can only be opened from the outside.
Windows
Power windows
The power windows operate only when
the ignition switch is in the ON position.
Driver s side switches
1) Lock switch
2) For driver s window (with one-touch auto
down feature)
3) For front passenger s window
4) For rear left window
5) For rear right window
All door windows can be controlled by the
power window switch cluster at the driver
side door.
Always use the child safety lock
whenever a child rides in the rear
seat. Serious injury could result if a
child accidentally opened the door
and fell out.
L O CK
200876
To avoid serious personal injury
caused by entrapment, you must do
the following.
When operating the power win-
dows, be extremely careful to pre-
vent anyone
s fingers, arms, neck
or head from being caught in the
window.
Always lock the passengers win-
dows using the lock switch when
children are riding in the vehicle.
Before leaving the vehicle, always
remove the key from the ignition
switch for safety and never allow
an unattended child to remain in
the vehicle. Failure to follow this
procedure could result in injury to
a child operating the power win-
dow.
1
2
4 5 3
200819
Page 106 of 365

Keys and doors 2-19
CONTINUED
Operating the driver s window
1) Open
2) Automatically open
3) Close
To open:
Push the switch down lightly and hold it.
The window will open as long as the
switch is held.
This switch also has a one-touch auto
down feature that allows the window to be
opened fully without holding the switch.
Push the switch down until it clicks and re-
lease it, and the window will fully open. To
stop the window halfway, pull the switch
up lightly.
To close:
Pull the switch up lightly and hold it. The
window will close as long as the switch is held.
Operating the passengers
windows
To open the passengers windows, push
the appropriate switch down and hold it
until the window reaches the desired posi-
tion.
To close the window, pull the switch up
and hold it until it reaches the desired po-
sition.
Locking the passengers windows
1) Lock
2) Unlock
To lock the passengers windows, push
the lock switch. When the lock switch is in
the LOCK position, the passengers win-
dows cannot be opened or closed.
Press the switch again to cancel the pas-
sengers window locking.
Passengers side switches
To open the window, push the switch
down and hold it until the window reaches
the desired position.
To close the window, pull the switch up
and hold it until the window reaches the
desired position.
When the lock switch on the power win-
3
1
2
200820
200191
1
2
200821
Page 107 of 365
2-20 Keys and doors
dow switch cluster, located on the driver s
side door, is in the LOCK position, the
passengers windows cannot be operated
with the passengers switches.Trunk lid (Sedan)To open and close the trunk
lid from outside
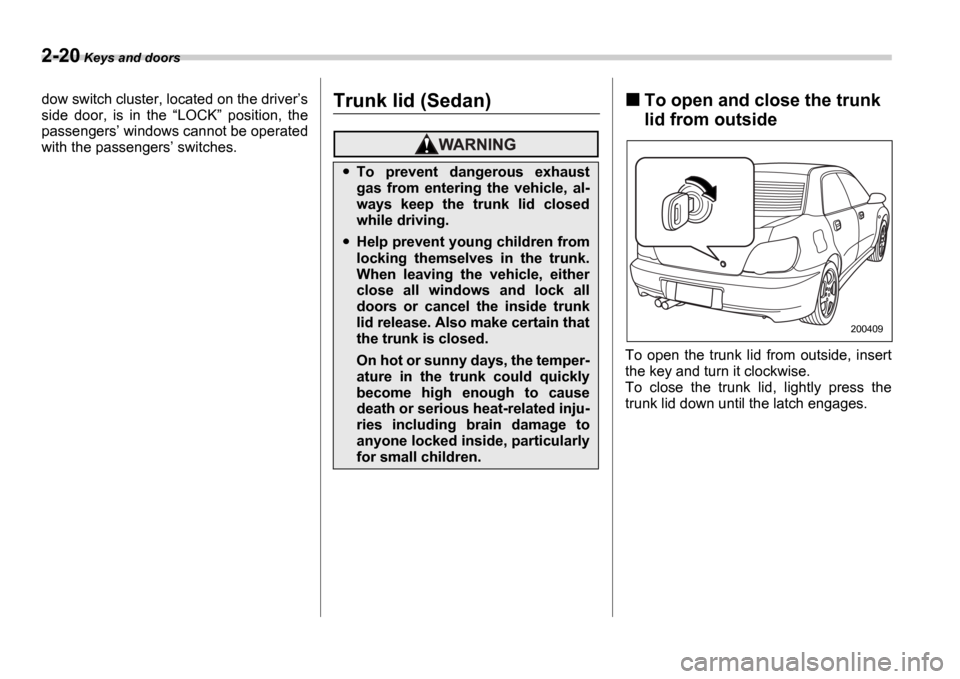
To open the trunk lid from outside, insert
the key and turn it clockwise.
To close the trunk lid, lightly press the
trunk lid down until the latch engages.
To prevent dangerous exhaust
gas from entering the vehicle, al-
ways keep the trunk lid closed
while driving.
Help prevent young children from
locking themselves in the trunk.
When leaving the vehicle, either
close all windows and lock all
doors or cancel the inside trunk
lid release. Also make certain that
the trunk is closed.
On hot or sunny days, the temper-
ature in the trunk could quickly
become high enough to cause
death or serious heat-related inju-
ries including brain damage to
anyone locked inside, particularly
for small children.
200409