fuel SUBARU IMPREZA 2006 2.G Owner's Manual
[x] Cancel search | Manufacturer: SUBARU, Model Year: 2006, Model line: IMPREZA, Model: SUBARU IMPREZA 2006 2.GPages: 365, PDF Size: 7.09 MB
Page 202 of 365
Starting and operating 7-5
CONTINUED
light comes on. Engine misfires as a re-
sult of an empty tank could cause dam-
age to the engine.
State emission testing (U.S.
only)
At state inspection time, remember to
tell your inspection or service station
in advance not to place your Subaru
AWD vehicle on a two-wheel dyna-
mometer. Otherwise, serious transmis-
sion damage will result.
Some states have started using dyna-
mometers in their state inspection pro-
grams in order to meet their obligation un-
der federal law to implement stricter vehi-
cle emission standards to reduce air pollu-
tion from vehicles. A dynamometer is a
treadmill or roller-like testing device that
allows your vehicle
s wheels to turn while
the vehicle remains in one place. Depend-
ing on the severity of a state s air pollution
problems, the states must adopt either a basic or enhanced vehicle emission in-
spection test. Normally, a portion of the
basic emission test consists of an emis-
sion inspector inserting an analyzer probe
into the exhaust pipe of an idling vehicle
for a short period of time. States with more
severe air pollution problems are required
to adopt an enhanced vehicle emission
test. This test simulates actual driving
conditions on a dynamometer and permits
more accurate measurement of tailpipe emitted pollution than the basic emission
test.
The U.S. Environmental Protection Agen-
cy (EPA) and states using two-wheel dy-
namometers in their emission testing pro-
grams have
EXEMPTED Subaru AWD
vehicles from the portion of the testing
program that involves a two-wheel dyna-
mometer.
There are some states that use four-wheel
dynamometers in their testing programs.
When properly used, that equipment will
not damage an AWD Subaru vehicle.
Under no circumstances should the rear
wheels be jacked off the ground, nor
should the driveshaft be disconnected for
state emission testing.
Never add any cleaning agents to
the fuel tank. The addition of a
cleaning agent may cause dam-
age to the fuel system.
Make sure that the cap is tight-
ened until it clicks to prevent fuel
spillage in the event of an acci-
dent.
Do not let fuel spill on the exterior
surfaces of the vehicle.
Fuels may cause paint damage,
which is not covered under the
SUBARU Limited Warranty.
Always use a genuine SUBARU
fuel filler cap. If you use the wrong
cap, it may not fit or have proper
venting, and your fuel tank and
emission control system might be
damaged.
Testing of an All-Wheel Drive vehi-
cle must NEVER be performed on a
single two-wheel dynamometer. At-
tempting to do so will result in un-
controlled vehicle movement and
may cause an accident or injuries to
persons nearby.
Page 203 of 365
7-6 Starting and operating
The EPA has issued regulations for in-
specting the On-Board Diagnostic (OBD)
system as part of the state emissions in-
spection. The OBD system is designed to
detect engine and transmission problems
that might cause vehicle emissions to ex-
ceed allowable limits. These inspections
apply to all 1996 model year and newer
passenger cars and light trucks. Over 30
states plus the District of Columbia have
implemented the OBD system inspection.
The inspection of the OBD system con-
sists of a visual operational check of the CHECK ENGINE warning light/malfunc-
tion indicator lamp (MIL) and an examina-
tion of the OBD system with an electronic
scan tool while the engine is running.
A vehicle passes the OBD system in-
spection if proper the CHECK ENGINE
warning light/MIL illumination is observed,
there is no stored diagnostic trouble
codes, and the OBD system readiness
monitors are complete.
A vehicle fails the OBD inspection if the
CHECK ENGINE warning light/MIL is
not properly operating or there is one or
more diagnostic trouble codes stored in
vehicle s computer with the CHECK EN-
GINE warning light/MIL illuminated.
A state emission inspection may reject
(not pass or fail) a vehicle if the number of
OBD system readiness monitors Not
Ready is greater than one. Under this
condition, the vehicle operator should be
instructed to drive his/her vehicle for a few
days to set the monitors and return for an
emission re-inspection.
Owners of rejected or failing vehicles
should contact their Subaru Dealer for
service.
Preparing to drive
You should perform the following checks
and adjustments every day before you
start driving.
1. Check that all windows, mirrors, and
lights are clean and unobstructed.
2. Check the appearance and condition of
the tires. Also check tires for proper infla-
tion.
3. Look under the vehicle for any sign of
leaks.
4. Check that the hood, trunk (Sedan)
and rear gate (Wagon) are fully closed.
5. Check the adjustment of the seat.
6. Check the adjustment of the inside and
outside mirrors.
7. Fasten your seatbelt. Check that your
passengers have fastened their seatbelts.
8. Check the operation of the warning and
indicator lights when the ignition switch is
turned to the ON position.
9. Check the gauges, indicator and warn-
ing lights after starting the engine.
NOTE
Engine oil, engine coolant, brake fluid,
washer fluid and other fluid levels
should be checked daily, weekly or at
fuel stops.
Resultant vehicle damage due to im-
proper testing is not covered under
the SUBARU Limited Warranty and
is the responsibility of the state in-
spection program or its contractors
or licensees.
Page 204 of 365
Starting and operating 7-7
CONTINUED
Starting the engine
Manual transmission vehicle
1. Apply the parking brake.
2. Turn off unnecessary lights and acces-
sories.
3. Press the clutch pedal to the floor and
shift the shift lever into neutral. Hold the
clutch pedal to the floor while starting the
engine.
The starter motor will only operate when
the clutch pedal is pressed fully to the
floor.
4. Turn the ignition switch to the ON po-
sition and check the operation of the warn-
ing and indicator lights. Refer to the Warning and indicator lights section
(chapter 3).
5. Turn the ignition switch to the START
position without depressing the accelera-
tor pedal. Release the key immediately af-
ter the engine has started. If the engine does not start, try the follow-
ing.
1) Turn the ignition switch to the OFF
position and wait for at least 10 sec-
onds. After checking that the parking
brake is firmly set, turn the ignition
switch to the START position while de-
pressing the accelerator pedal slightly
(approximately a quarter of the full
stroke). Release the accelerator pedal
as soon as the engine starts.
2) If this fails to start the engine, turn the
ignition switch back to the OFF posi-
tion and wait for at least 10 seconds.
Then fully depress the accelerator ped-
al and turn the ignition switch to the START position. If the engine starts,
quickly release the accelerator pedal.
3) If this fails to start the engine, turn the
ignition switch again to the OFF posi-
tion. After waiting for 10 seconds or
longer, turn the ignition switch to the START position without depressing
the accelerator pedal.
4) If the engine still refuses to start, con-
tact your nearest SUBARU dealer for
assistance.
6. Confirm that all warning and indicator
lights have gone off after the engine has
started. The fuel injection system auto-
matically lowers the idle speed as the en-
gine warms up.
NOTE
The engine may be difficult to start
when the battery has been disconnect-
ed and reconnected (for maintenance
or other purposes). This difficulty is
caused by the electronically controlled
throttle s self-diagnosis function. To
overcome it, keep the ignition switch in
the ON position for approximately 10
seconds before starting the engine.
Automatic transmission vehi-
cle
1. Apply the parking brake.
2. Turn off unnecessary lights and acces-
sories.
3. Shift the selector lever to the P or N
position (preferably P position).
The starter motor will only operate when
the select lever is at the P or N position.
4. Turn the ignition switch to the ON po-
sition and check the operation of the warn-
ing and indicator lights. Refer to the Warning and indicator lights section
(chapter 3).
5. Turn the ignition switch to the START
position without depressing the accelera-
tor pedal. Release the key immediately af-
ter the engine has started.
If the engine does not start, try the follow-
Do not operate the starter motor
continuously for more than ten sec-
onds. If the engine fails to start after
operating the starter for five to ten
seconds, wait for ten seconds or
more before trying again.
Page 205 of 365
7-8 Starting and operating
ing.
1) Turn the ignition switch to the OFF
position and wait for at least 10 sec-
onds. After checking that the parking
brake is firmly set, turn the ignition
switch to the START position while de-
pressing the accelerator pedal slightly
(approximately a quarter of the full
stroke). Release the accelerator pedal
as soon as the engine starts.
2) If this fails to start the engine, turn the
ignition switch back to the OFF posi-
tion and wait for at least 10 seconds.
Then fully depress the accelerator ped-
al and turn the ignition switch to the START position. If the engine starts,
quickly release the accelerator pedal.
3) If this fails to start the engine, turn the
ignition switch again to the OFF posi-
tion. After waiting for 10 seconds or
longer, turn the ignition switch to the START position without depressing
the accelerator pedal.
4) If the engine still refuses to start, con-
tact your nearest SUBARU dealer for
assistance.
6. Confirm that all warning and indicator
lights have gone out after the engine has
started. The fuel injection system auto-
matically lowers the idle speed as the en-
gine warms up.
While the engine is warming up, make sure that the selector lever is at the
P or
N position and that the parking brake is
applied.
NOTE
The engine may be difficult to start
when the battery has been disconnect-
ed and reconnected (for maintenance
or other purposes). This difficulty is
caused by the electronically controlled
throttle s self-diagnosis function. To
overcome it, keep the ignition switch in
the ON position for approximately 10
seconds before starting the engine.
Stopping the engine
The ignition switch should be turned off
only when the vehicle is stopped and the
engine is idling.
If you restart the engine while the
vehicle is moving, shift the selector
lever into the N position. Do not
attempt to place the selector lever of
a moving vehicle into the P posi-
tion.
Do not stop the engine when the ve-
hicle is moving. This will cause loss
of power to the power steering and
the brake booster, making steering
and braking more difficult. It could
also result in accidental activation
of the LOCK position on the igni-
tion switch, causing the steering
wheel to lock.
Page 206 of 365
Starting and operating 7-9
CONTINUED
Manual transmission 6
speeds (WRX-STI)
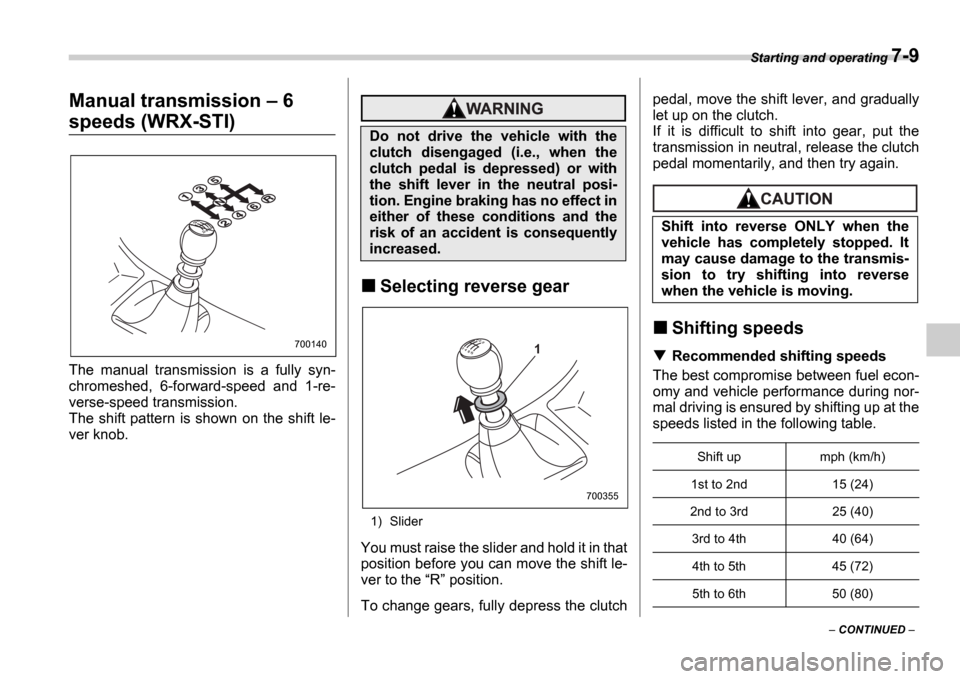
The manual transmission is a fully syn-
chromeshed, 6-forward-speed and 1-re-
verse-speed transmission.
The shift pattern is shown on the shift le-
ver knob.
Selecting reverse gear
1) Slider
You must raise the slider and hold it in that
position before you can move the shift le-
ver to the R position.
To change gears, fully depress the clutch pedal, move the shift lever, and gradually
let up on the clutch.
If it is difficult to shift into gear, put the
transmission in neutral, release the clutch
pedal momentarily, and then try again.
Shifting speeds
Recommended shifting speeds
The best compromise between fuel econ-
omy and vehicle performance during nor-
mal driving is ensured by shifting up at the
speeds listed in the following table.
700140
Do not drive the vehicle with the
clutch disengaged (i.e., when the
clutch pedal is depressed) or with
the shift lever in the neutral posi-
tion. Engine braking has no effect in
either of these conditions and the
risk of an accident is consequently
increased.
1
700355
Shift into reverse ONLY when the
vehicle has completely stopped. It
may cause damage to the transmis-
sion to try shifting into reverse
when the vehicle is moving.
Shift up mph (km/h)
1st to 2nd 15 (24)
2nd to 3rd 25 (40) 3rd to 4th 40 (64)
4th to 5th 45 (72)
5th to 6th 50 (80)
Page 207 of 365
7-10 Starting and operating
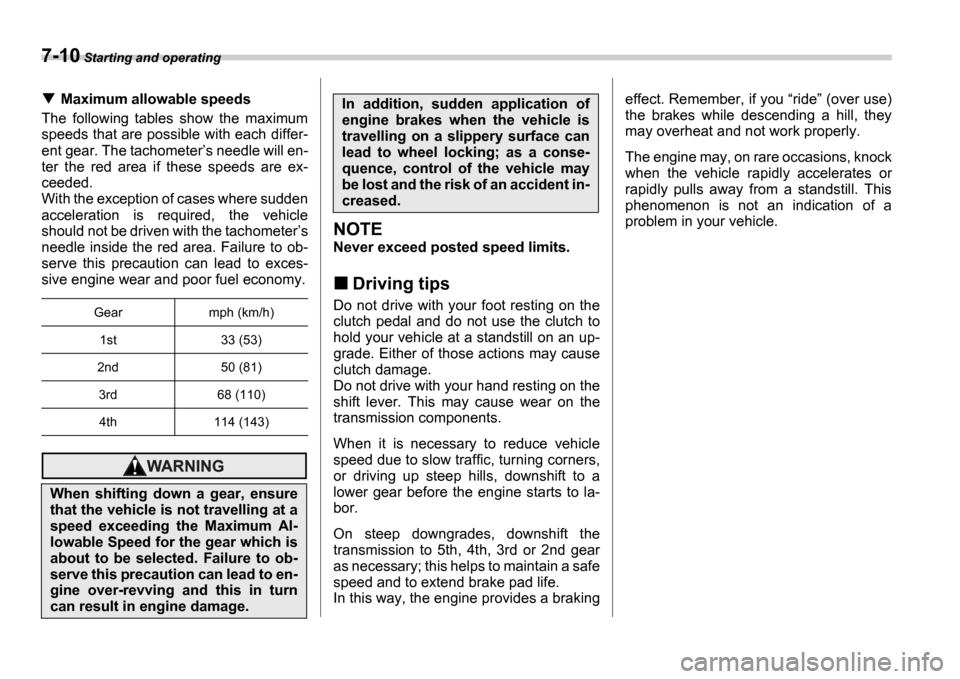
Maximum allowable speeds
The following tables show the maximum
speeds that are possible with each differ-
ent gear. The tachometer s needle will en-
ter the red area if these speeds are ex-
ceeded.
With the exception of cases where sudden
acceleration is required, the vehicle
should not be driven with the tachometer s
needle inside the red area. Failure to ob-
serve this precaution can lead to exces-
sive engine wear and poor fuel economy.
NOTE
Never exceed posted speed limits.
Driving tips
Do not drive with your foot resting on the
clutch pedal and do not use the clutch to
hold your vehicle at a standstill on an up-
grade. Either of those actions may cause
clutch damage.
Do not drive with your hand resting on the
shift lever. This may cause wear on the
transmission components.
When it is necessary to reduce vehicle
speed due to slow traffic, turning corners,
or driving up steep hills, downshift to a
lower gear before the engine starts to la-
bor.
On steep downgrades, downshift the
transmission to 5th, 4th, 3rd or 2nd gear
as necessary; this helps to maintain a safe
speed and to extend brake pad life.
In this way, the engine provides a braking effect. Remember, if you
ride (over use)
the brakes while descending a hill, they
may overheat and not work properly.
The engine may, on rare occasions, knock
when the vehicle rapidly accelerates or
rapidly pulls away from a standstill. This
phenomenon is not an indication of a
problem in your vehicle.Gear mph (km/h)
1st 33 (53)
2nd 50 (81)
3rd 68 (110)4th 114 (143)
When shifting down a gear, ensure
that the vehicle is not travelling at a
speed exceeding the Maximum Al-
lowable Speed for the gear which is
about to be selected. Failure to ob-
serve this precaution can lead to en-
gine over-revving and this in turn
can result in engine damage.
In addition, sudden application of
engine brakes when the vehicle is
travelling on a slippery surface can
lead to wheel locking; as a conse-
quence, control of the vehicle may
be lost and the risk of an accident in-
creased.
Page 208 of 365
Starting and operating 7-11
CONTINUED
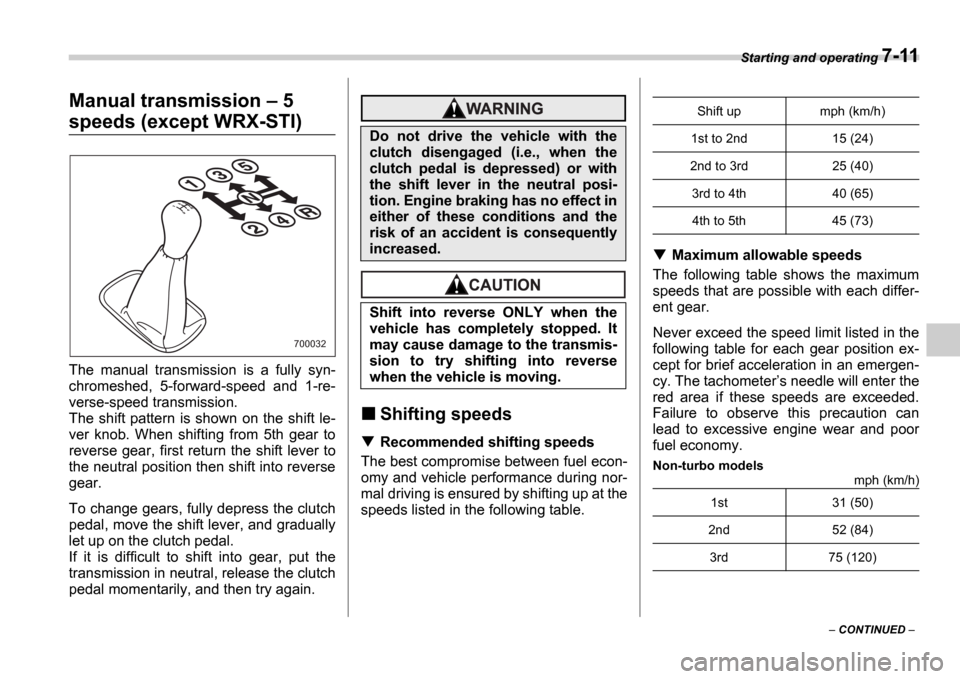
Manual transmission 5
speeds (except WRX-STI)
The manual transmission is a fully syn-
chromeshed, 5-forward-speed and 1-re-
verse-speed transmission.
The shift pattern is shown on the shift le-
ver knob. When shifting from 5th gear to
reverse gear, first return the shift lever to
the neutral position then shift into reverse
gear.
To change gears, fully depress the clutch
pedal, move the shift lever, and gradually
let up on the clutch pedal.
If it is difficult to shift into gear, put the
transmission in neutral, release the clutch
pedal momentarily, and then try again.
Shifting speeds
Recommended shifting speeds
The best compromise between fuel econ-
omy and vehicle performance during nor-
mal driving is ensured by shifting up at the
speeds listed in the following table.
Maximum allowable speeds
The following table shows the maximum
speeds that are possible with each differ-
ent gear.
Never exceed the speed limit listed in the
following table for each gear position ex-
cept for brief acceleration in an emergen-
cy. The tachometer s needle will enter the
red area if these speeds are exceeded.
Failure to observe this precaution can
lead to excessive engine wear and poor
fuel economy.
Non-turbo models mph (km/h)
700032
Do not drive the vehicle with the
clutch disengaged (i.e., when the
clutch pedal is depressed) or with
the shift lever in the neutral posi-
tion. Engine braking has no effect in
either of these conditions and the
risk of an accident is consequently
increased.
Shift into reverse ONLY when the
vehicle has completely stopped. It
may cause damage to the transmis-
sion to try shifting into reverse
when the vehicle is moving.
Shift up mph (km/h)
1st to 2nd 15 (24)
2nd to 3rd 25 (40) 3rd to 4th 40 (65)4th to 5th 45 (73)
1st 31 (50)
2nd 52 (84)
3rd 75 (120)
Page 228 of 365

8
Driving tips
New vehicle break-in driving the first 1,000
miles (1,600 km) .................................. ............ 8-2
Fuel economy hints ................................ ........... 8-2
Engine exhaust gas (Carbon monoxide) ......... 8-2
Catalytic converter ............................... .............. 8-3
Periodic inspections .............................. ............ 8-4
Driving in foreign countries ...................... ........ 8-4
Driving tips for AWD vehicles ..................... ...... 8-5
Off road driving .................................. ................ 8-6
All AWD models except OUTBACK SPORT and vehicles with 17 inch tires ....................... ............ 8-6
OUTBACK SPORT ..................................... ............. 8-6
Winter driving .................................... ................. 8-8
Operation during cold weather ..................... ......... 8-8
Driving on snowy and icy roads .................... ........ 8-9
Corrosion protection .............................. ................ 8-10
Snow tires ........................................ ....................... 8-10
Tire chains ....................................... ........................ 8-11
Rocking the vehicle ............................... ................. 8-12
Loading your vehicle .............................. ........... 8-12
Vehicle capacity weight ........................... .............. 8-13
GVWR and GAWR (Gross Vehicle Weight Rating and Gross Axle Weight Rating) ..................... ...... 8-14
Roof rail and crossbar (if equipped) .............. ....... 8-14
Trailer hitch (if equipped) ....................... ........... 8-17
Connecting a trailer .............................. .................. 8-17
When you do not tow a trailer ..................... .......... 8-19Trailer towing ....................................
.................. 8-19
Warranties and maintenance ........................ ......... 8-19
Maximum load limits ............................... ............... 8-20
Trailer hitches ................................... ...................... 8-23
Connecting a trailer .............................. .................. 8-24
Trailer towing tips ............................... .................... 8-25
Page 229 of 365
8-2 Driving tips
Driving tipsNew vehicle break-in driving the first 1,000 miles (1,600
km)
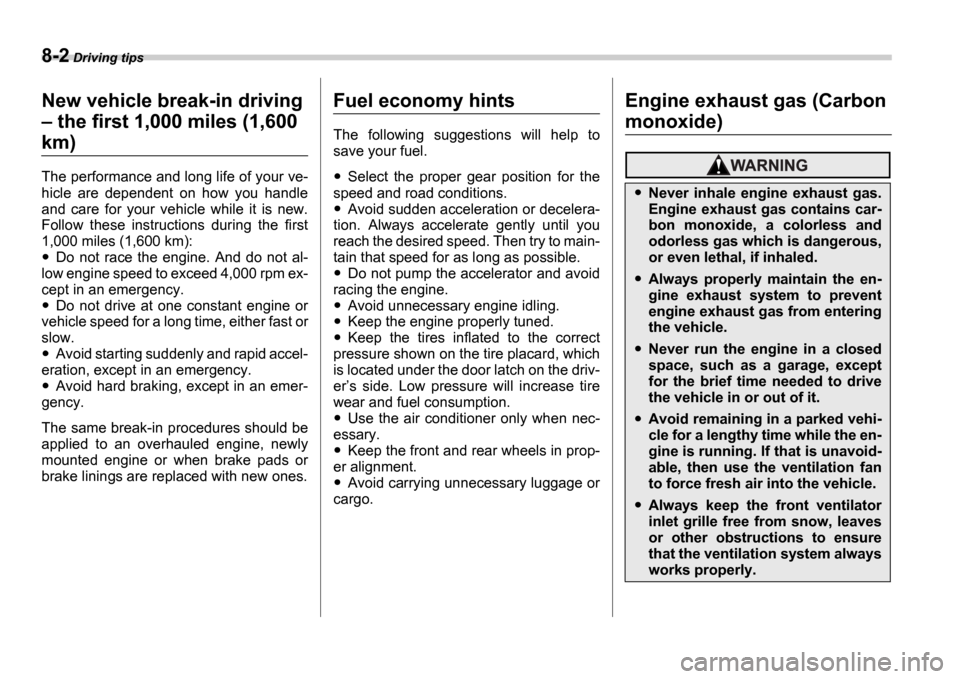
The performance and long life of your ve-
hicle are dependent on how you handle
and care for your vehicle while it is new.
Follow these instructions during the first
1,000 miles (1,600 km):
Do not race the engine. And do not al-
low engine speed to exceed 4,000 rpm ex-
cept in an emergency.
Do not drive at one constant engine or
vehicle speed for a long time, either fast or
slow.
Avoid starting suddenly and rapid accel-
eration, except in an emergency.
Avoid hard braking, except in an emer-
gency.
The same break-in procedures should be
applied to an overhauled engine, newly
mounted engine or when brake pads or
brake linings are replaced with new ones.
Fuel economy hints
The following suggestions will help to
save your fuel.
Select the proper gear position for the
speed and road conditions.
Avoid sudden acceleration or decelera-
tion. Always accelerate gently until you
reach the desired speed. Then try to main-
tain that speed for as long as possible.
Do not pump the accelerator and avoid
racing the engine.
Avoid unnecessary engine idling.
Keep the engine properly tuned.
Keep the tires inflated to the correct
pressure shown on the tire placard, which
is located under the door latch on the driv-
er s side. Low pressure will increase tire
wear and fuel consumption.
Use the air conditioner only when nec-
essary.
Keep the front and rear wheels in prop-
er alignment.
Avoid carrying unnecessary luggage or
cargo.
Engine exhaust gas (Carbon
monoxide)
Never inhale engine exhaust gas.
Engine exhaust gas contains car-
bon monoxide, a colorless and
odorless gas which is dangerous,
or even lethal, if inhaled.
Always properly maintain the en-
gine exhaust system to prevent
engine exhaust gas from entering
the vehicle.
Never run the engine in a closed
space, such as a garage, except
for the brief time needed to drive
the vehicle in or out of it.
Avoid remaining in a parked vehi-
cle for a lengthy time while the en-
gine is running. If that is unavoid-
able, then use the ventilation fan
to force fresh air into the vehicle.
Always keep the front ventilator
inlet grille free from snow, leaves
or other obstructions to ensure
that the ventilation system always
works properly.
Page 230 of 365
Driving tips 8-3
CONTINUED
NOTE
Due to the expansion and contraction
of the metals used in the manufacture
of the exhaust system, you may hear a
crackling sound coming from the ex-
haust system for a short time after the
engine has been shut off. This sound is
normal.
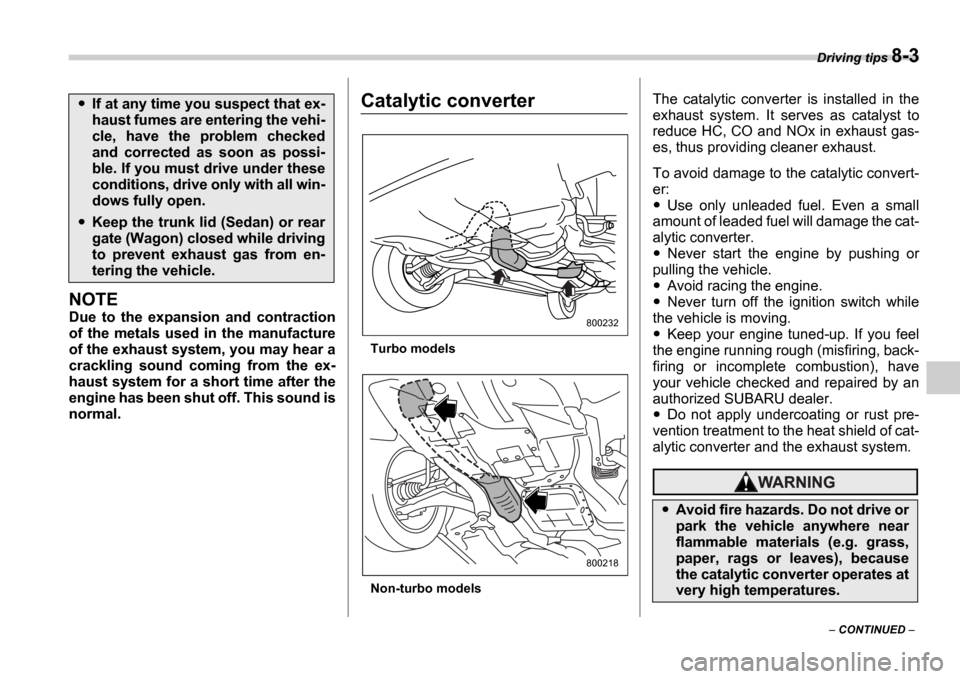
Catalytic converter
Turbo models
Non-turbo modelsThe catalytic converter is installed in the
exhaust system. It serves as catalyst to
reduce HC, CO and NOx in exhaust gas-
es, thus providing cleaner exhaust.
To avoid damage to the catalytic convert-
er:
Use only unleaded fuel. Even a small
amount of leaded fuel will damage the cat-
alytic converter.
Never start the engine by pushing or
pulling the vehicle.
Avoid racing the engine.
Never turn off the ignition switch while
the vehicle is moving.
Keep your engine tuned-up. If you feel
the engine running rough (misfiring, back-
firing or incomplete combustion), have
your vehicle checked and repaired by an
authorized SUBARU dealer.
Do not apply undercoating or rust pre-
vention treatment to the heat shield of cat-
alytic converter and the exhaust system.
If at any time you suspect that ex-
haust fumes are entering the vehi-
cle, have the problem checked
and corrected as soon as possi-
ble. If you must drive under these
conditions, drive only with all win-
dows fully open.
Keep the trunk lid (Sedan) or rear
gate (Wagon) closed while driving
to prevent exhaust gas from en-
tering the vehicle.
800232
800218
Avoid fire hazards. Do not drive or
park the vehicle anywhere near
flammable materials (e.g. grass,
paper, rags or leaves), because
the catalytic converter operates at
very high temperatures.