roof SUBARU IMPREZA 2016 5.G User Guide
[x] Cancel search | Manufacturer: SUBARU, Model Year: 2016, Model line: IMPREZA, Model: SUBARU IMPREZA 2016 5.GPages: 594, PDF Size: 5.36 MB
Page 95 of 594

Seat, seatbelt and SRS airbags/*SRS airbag (Supplemental Restraint System airbag)
!Examples of the types of accidents in which the SRS side airbag is unlikely
to deploy.1) The vehicle is involved in an oblique
side-on impact.
2) The vehicle is involved in a side-on impact in an area outside the vicinity of
the passenger compartment.
3) The vehicle strikes a telephone pole or similar object.
4) The vehicle is involved in a side-on impact from a motorcycle.
5) The vehicle rolls onto its side or the roof.
There are many types of collisions which
might not necessarily require SRS side
airbag deployment. In the event of acci-
dents like those illustrated, the SRS side
airbag may not deploy depending on the
level of accident forces involved.
1-64
Page 96 of 594

!Examples of the types of accidents in which the SRS curtain airbag is
unlikely to deploy.
Except Crosstrek models1) The vehicle is involved in an oblique side-on impact.
2) The vehicle is involved in a side-on impact in an area outside the vicinity of
the passenger compartment.
3) The vehicle strikes a telephone pole or similar object.
4) The vehicle is involved in a side-on impact from a motorcycle.
5) The vehicle rolls onto its side or the roof.
There are many types of collisions which
might not necessarily require SRS curtain
airbag deployment. In the event of acci-
dents like those illustrated, the SRS
curtain airbag may not deploy depending
on the level of accident forces involved.
Seat, seatbelt and SRS airbags/*SRS airbag (Supplemental Restraint System airbag)
–CONTINUED –1-65
Page 100 of 594

&SRS airbag system servicing
WARNING
. When discarding an airbag mod-
ule or scrapping the entire vehi-
cle damaged by a collision, con-
sult your SUBARU dealer.
. The SRS airbag has no user-
serviceable parts. Do not use
electrical test equipment on any
circuit related to the SRS airbag
system. For required servicing of
the SRS airbag, consult your
nearest SUBARU dealer. Tamper-
ing with or disconnecting the
system ’s wiring could result in
accidental inflation of the SRS
airbag or could make the system
inoperative, which may result in
serious injury.
CAUTION
If you need service or repair in areas
indicated in the following list, have
the work performed by an author-
ized SUBARU dealer. The SRS air-
bag control module, impact sensors
and airbag modules are stored in
these areas. .
Under the center of the instru-
ment panel
. On both the right and left sides at
the front of the vehicle
. Steering wheel and column and
nearby areas
. Bottom of the steering column
and nearby areas
. Top of the dashboard on front
passenger ’s side and nearby
areas
. Each front seat and nearby area
. Inside each center pillar
. Inside each front door
. In each roof side (from the front
pillar to a point over the rear seat)
. Between the rear seat cushion
and rear wheel house on each
side
. Under the rear center seat
In the event that the SRS airbag is
deployed, replacement of the system
should be performed only by an author-
ized SUBARU dealer. When the compo-
nents of the SRS airbag system are
replaced, use only genuine SUBARU
parts.
NOTE
In the following cases, contact your
SUBARU dealer as soon as possible.
. The front part of the vehicle was
involved in an accident in which only
the driver ’s SRS frontal airbag or both
driver ’s and front passenger ’sSRS
frontal airbags did not deploy.
. The pad of the steering wheel, the
cover over the front passenger ’s SRS
frontal airbag, or either roof side (from
the front pillar to a point over the rear
seat) is scratched, cracked, or other-
wise damaged.
. The center pillar, front door, rear
wheel house or rear sub frame, or an
area near these parts, was involved in
an accident in which the SRS side
airbag and SRS curtain airbag did not
deploy.
. The fabric or leather of either front
seatback is cut, frayed, or otherwise
damaged.
. The rear part of the vehicle was
involved in an accident in which no
SRS airbag was deployed.
Seat, seatbelt and SRS airbags/*SRS airbag (Supplemental Restraint System airbag)
–CONTINUED –1-69
Page 103 of 594

Keys and doors
Internal trunk lid release handle.......................... 2-39
Rear gate (5-door).............................................. 2-41Lock/unlock....................................................... 2-41
Open/close ......................................................... 2-41
Moonroof (if equipped) ...................................... 2-42Moonroof switches............................................ 2-43
Sun shade ......................................................... 2-44
Page 105 of 594

Keys and doors/Immobilizer
CAUTION
.Do not place the key under direct
sunlight or anywhere it may
become hot.
. Do not get the key wet. If the key
gets wet, wipe it dry with a cloth
immediately.
NOTE
. To protect your vehicle from theft,
please pay close attention to the fol-
lowing security precautions:
–Never leave your vehicle unat-
tended with its keys inside.
– Before leaving your vehicle,
close all windows and the moon-
roof, and lock the doors and rear
gate.
– Do not leave spare keys or any
record of your key number in the
vehicle.
. The vehicle has a maintenance-free
type immobilizer system.
& Security indicator light
Refer to “Security indicator light ”F 3-30.
& Key replacement
Your key number plate will be required if
you ever need a replacement key made.
Any new key must be registered for use
with your vehicle ’s immobilizer system
before it can be used. The maximum
number of keys that can be registered
for use with one vehicle is as follows.
. Four (models without “keyless access
with push-button start system ”)
. Seven (models with “keyless access
with push-button start system ”)
One key that has already been registered
is required in order to register a new key.
If you lose a key, the lost key ’s ID code still
remains in the memory of the vehicle’ s
immobilizer system. For security reasons,
the lost key ’s ID code should be erased
from the memory. To erase the lost key ’s
ID code, all keys that will be used are
required.
For details about new key registration and
erasing the lost key ’s ID code, contact
your SUBARU dealer.
& Certification for immobilizer
system
. For models with “keyless access
with push-button start system”:
Refer to “Certification for keyless access
with push-button start system ”F 2-20.
. For models without “keyless access
with push-button start system”:
–U.S.-spec. models
FCC ID: MOZRI-38BFH
CAUTION
FCC WARNING
Changes or modifications not ex-
pressly approved by the party re-
sponsible for compliance could void
the user ’s authority to operate the
equipment.
This device complies with part 15 of the
FCC Rules. Operation is subject to the
following two conditions: (1) This de-
vice may not cause harmful interfer-
ence, and (2) this device must accept
any interference received, including
interference that may cause undesired
operation.
2-4
Page 109 of 594

Keys and doors/Power door locking switches
ItemSwitch
position Automatically turning
off
Map
lights
*1OFF*1Approximately 20 minutes later
Dome light DOOR Approximately 20
minutes later
Ignition
switch light —Approximately 20
minutes later
Cargo area
light DOORApproximately 20
minutes later
*1: The battery drainage prevention function
affects only the map lights on models with the
moonroof, and only when the map light
switches are in the OFF position. The map
lights on models without the moonroof do not
turn off automatically, so push the light switches
manually to turn them off.
The operational/non-operational setting of
this function can be changed by a
SUBARU dealer. Contact your SUBARU
dealer to change the setting.
NOTE
. The factory setting (default setting)
for this function is set as “operational”.
. When leaving the vehicle, please
make sure that all doors and the rear
gate (5-door) are completely closed.
. The battery drainage prevention
function does not operate while the key is in the ignition switch.
Power door locking switches
1) Lock
2) Unlock
All doors and the rear gate (for 5-door) can
be locked and unlocked by the power door
locking switches located at the driver
’s
side and the front passenger ’s side doors.
To lock the doors, push the front side of
the switch.
To unlock the doors, push the rear side of
the switch.
When you close the doors after you set
the door locks, the doors remain locked.
2-8
Page 129 of 594

Keys and doors/Alarm system
&System operation
The alarm system will sound the following
alarms when triggered.
. The vehicle’ s horn will sound for 30
seconds.
. The hazard warning flashers will flash
for 30 seconds.
If any of the doors or the rear gate/trunk lid
remains open after the 30-second period,
the horn will continue to sound for a
maximum of 3 minutes. If the door or the
rear gate/trunk lid is closed while the horn
is sounding, the horn will stop sounding
with a delay of up to 30 seconds.
The alarm is triggered by:
. Opening any of the doors, the rear gate
or trunk lid
. Physical impact to the vehicle, such as
forced entry (only models with shock
sensors (dealer option))
NOTE
The alarm system can be set to trigger
the illumination of the following interior
lights.
. Map lights (models with moonroof)
. Dome light (illuminates only when
the dome light switch is in the “DOOR ”
position)
. Cargo area light (illuminates only when the cargo area light switch is in
the
“DOOR ”position)
The notifications regarding the map
lights, dome light and cargo area light
are deactivated as the factory setting. A
SUBARU dealer can activate the sys-
tem. Contact your SUBARU dealer for
details.
& Activating and deactivating
the alarm system
To change the setting of your vehicle’ s
alarm system for activation or deactiva-
tion, do the following.
1. Disarm the alarm system. Refer to
“Disarming the system” F2-32.
2. Sit in the driver ’s seat and shut all
doors (and the rear gate if your vehicle is a
5-door).
3. Turn the ignition switch to the “ON ”
position.
4. Hold down the REAR (UNLOCK) side
of the driver ’s power door locking switch,
open the driver ’s door within the following
1 second, and wait 10 seconds without
releasing the switch. The setting will then
be changed as follows.
If the system was previously activated:
The odometer/trip meter screen displays
as follows and the horn sounds twice, indicating that the system is now deacti-
vated.
.
“AL oF ”(models with type A combina-
tion meter)
. “ALOF” (models with type B combina-
tion meter)
If the system was previously deacti-
vated:
The odometer/trip meter screen displays
as follows and the horn sounds once,
indicating that the system is now acti-
vated.
. “AL on ”(models with type A combina-
tion meter)
. “ALON” (models with type B combina-
tion meter)
NOTE
You may have the above setting
change done by your SUBARU dealer.
& If you have accidentally trig-
gered the alarm system
! To stop the alarm
Do any of the following operations:
. Press any button on the access key/
remote transmitter.
. Turn the ignition switch to the “ON”
position (models without “keyless access
with push-button start system ”).
2-28
Page 130 of 594

.Turn the push-button ignition to the
“ ACC ”position (models with “keyless
access with push-button start system ”).
NOTE
Only registered keys will stop the
alarm. If the immobilizer transponder
is not registered, the alarm will not
stop.
& Arming the system
! Tips
. The system can be armed even if the
engine hood, windows and/or moonroof
are open. Always make sure that they are
fully closed before arming the system.
. The 30-second standby time can be
eliminated if you prefer. Have it performed
by your SUBARU dealer.
. If your vehicle is a 4-door and you open
the trunk using the access key/remote
transmitter ’s “
”button with the alarm
system armed, the system will be tem-
porarily placed in a standby state. The
system will go back to the surveillance
state upon locking the trunk.
. The system is in the standby mode for
a 30-second period after locking the doors
with the remote transmitter. The security
indicator light will flash at short intervals
during this period. .
If any of the following actions are done
during the standby period, the system will
not switch to the surveillance state.
–Doors (including the rear gate/trunk
lid) are unlocked using the access key/
remote transmitter.
– Doors (including the rear gate/trunk
lid) are unlocked using the keyless
access function (models with “keyless
access with push-button start sys-
tem”).
– Any door (including the rear gate/
trunk lid) is opened.
– The ignition switch is turned to the
“ON ”position (models without “keyless
access with push-button start sys-
tem”).
– Push-button ignition switch is
turned to the “ACC”position (models
with “keyless access with push-button
start system ”).
! To arm the system using access
key/remote transmitter
1. Close all windows and the moonroof (if
equipped).
2. Remove the key from the ignition
switch (models without “keyless access
with push-button start system ”)/turn the
push-button ignition switch to the “OFF”
position (models with “keyless access with
push-button start system ”). 3. Open the doors and get out of the
vehicle.
4. Make sure that the engine hood (and
the trunk lid on the 4-door) are locked.
5. Close all doors (and the rear gate on
the 5-door).
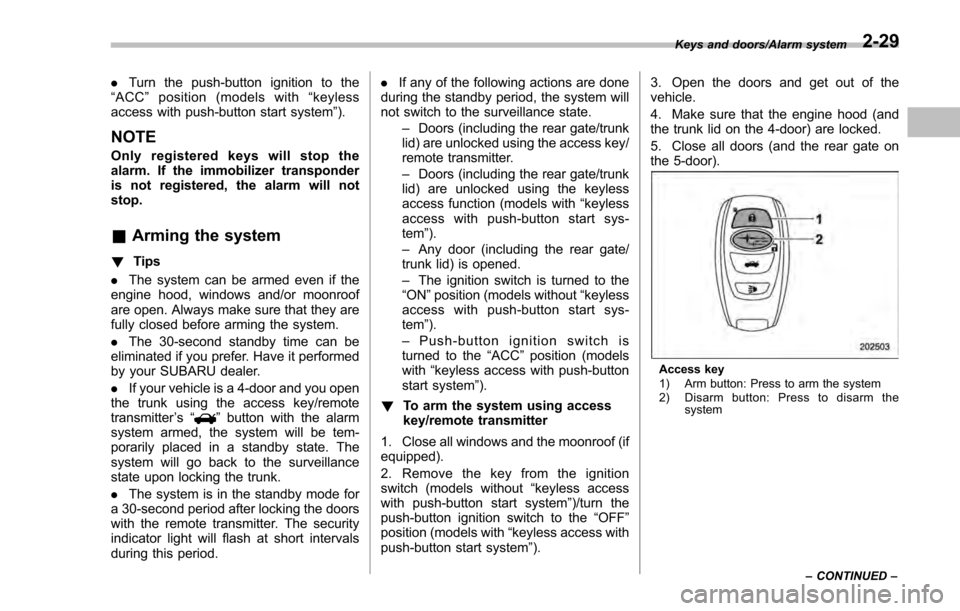
Access key
1) Arm button: Press to arm the system
2) Disarm button: Press to disarm the
system
Keys and doors/Alarm system
–CONTINUED –
2-29
Page 132 of 594

the power door locking switch to set the
door locks.
7. Close the door. An electronic chirp will
sound once, the hazard warning flashers
will flash once and the security indicator
light will start flashing rapidly. After rapid
flashing for 30 seconds (standby time), the
indicator lights will then flash slowly (twice
approximately every 2 seconds), indicat-
ing that the system has been armed for
surveillance.
!To arm the system using the key-
less access function (if equipped)
1. Close all windows and the moonroof (if
equipped)
2. Turn the push-button ignition switch to
the “OFF ”position.
3. Open the doors and get out of the
vehicle.
4. Make sure that the engine hood is
locked.
5. Close all doors and the rear gate/trunk
lid.
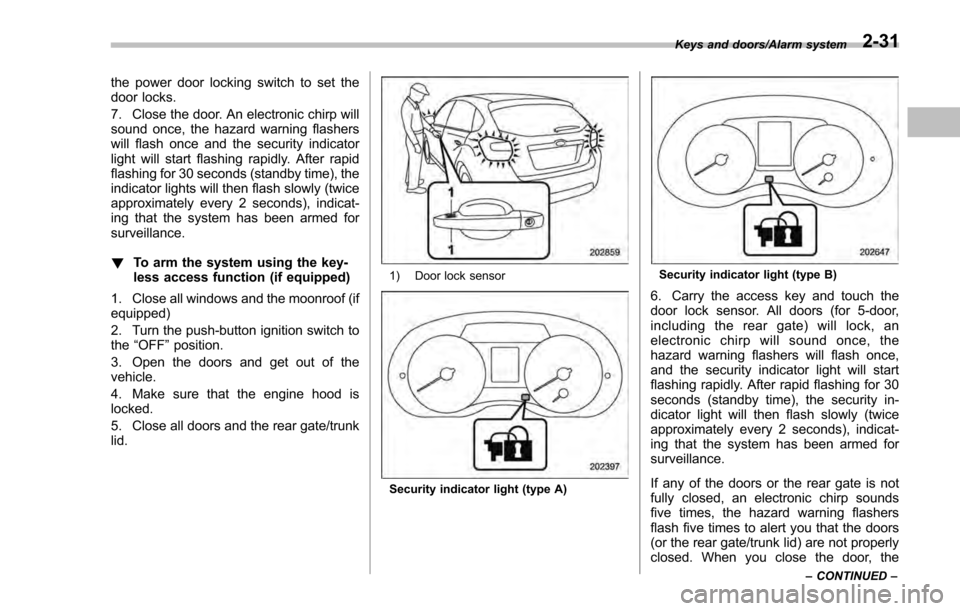
1) Door lock sensor
Security indicator light (type A)
Security indicator light (type B)
6. Carry the access key and touch the
door lock sensor. All doors (for 5-door,
including the rear gate) will lock, an
electronic chirp will sound once, the
hazard warning flashers will flash once,
and the security indicator light will start
flashing rapidly. After rapid flashing for 30
seconds (standby time), the security in-
dicator light will then flash slowly (twice
approximately every 2 seconds), indicat-
ing that the system has been armed for
surveillance.
If any of the doors or the rear gate is not
fully closed, an electronic chirp sounds
five times, the hazard warning flashers
flash five times to alert you that the doors
(or the rear gate/trunk lid) are not properly
closed. When you close the door, the
Keys and doors/Alarm system
–CONTINUED –2-31
Page 143 of 594

Keys and doors/Moonroof
firmly until the latch engages.
The rear gate can be lowered easily if you
pull it down holding the recessed grip.
WARNING
.To prevent dangerous exhaust
gas from entering the vehicle,
always keep the rear gate closed
while driving.
. Do not attempt to shut the rear
gate while holding the recessed
grip. Also avoid closing the rear
gate by pulling on the recessed
grip from inside the cargo space.
There is a danger of your hand
being caught and injured.
CAUTION
. Do not jam a plastic bag in or
place cellophane tape on the rear
gate stays or scratch the stays
while loading or unloading cargo.
That could cause leakage of gas
from the stays, which may result
in their inability to hold the rear
gate open.
. Be careful not to hit your head or
face on the rear gate when open-
ing or closing the rear gate and when loading or unloading car-
go.
NOTE
If the rear gate cannot be unlocked due
to a discharged vehicle battery, a
malfunction in the door locking/unlock-
ing system or other causes, you can
unlock it by manually operating the
rear gate lock release lever. For the
procedure, refer to
“Rear gate–if the
rear gate cannot be opened ”F 9-19.
Moonroof (if equipped)
WARNING
Never let anyone ’shands,arms,
head or any objects protrude from
the moonroof. A person could be
seriously injured if any of the follow-
ing conditions occur.
. The vehicle stops suddenly.
. The vehicle turns sharply.
. The vehicle is involved in an
accident.
. Body parts protruding from the
vehicle are struck by outside
objects.
To avoid serious personal injury
caused by entrapment, always con-
form to the following instructions
without exception.
. Before closing the moonroof,
make sure that no one ’s hands,
arms, head or other objects will
be accidentally caught in the
moonroof.
. Always carry the key when you
leave the vehicle for safety rea-
sons and never allow an unat-
tended child to remain in the
2-42