battery SUBARU IMPREZA 2016 5.G Service Manual
[x] Cancel search | Manufacturer: SUBARU, Model Year: 2016, Model line: IMPREZA, Model: SUBARU IMPREZA 2016 5.GPages: 594, PDF Size: 5.36 MB
Page 363 of 594

Audio/What to do if...
In other situations
SymptomLikely cause SolutionPage
Cell
phone This
system
Even though all conceivable mea-
sures have been taken, the symptom
status does not change. The cell phone is not close enough to
this system.
Bring the cell phone closer to this system.
——
The cell phone is the most likely cause
of the symptom. Turn the cell phone off, remove and reinstall
the battery pack, and then restart the cell
phone.
*
—
Enable the cell phone ’s Bluetooth connection. * —
Stop the cell phone ’s security software and
close all applications. *
—
Before using an application installed on the
cell phone, carefully check its source and how
its operation might affect this system. *
—
*: For details, refer to the owner ’s manual that came with the cell phone.
5-92
Page 367 of 594
Interior equipment/Interior lights
Interior lights
CAUTION
When leaving your vehicle, make
sure the lights are turned off to
avoid battery discharge.
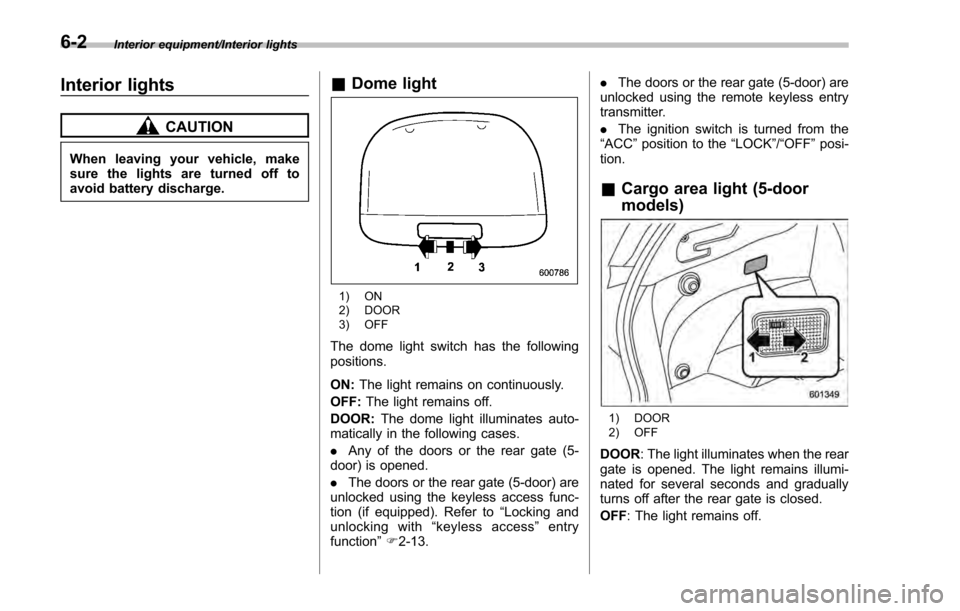
&Dome light
1) ON
2) DOOR
3) OFF
The dome light switch has the following
positions.
ON: The light remains on continuously.
OFF: The light remains off.
DOOR: The dome light illuminates auto-
matically in the following cases.
. Any of the doors or the rear gate (5-
door) is opened.
. The doors or the rear gate (5-door) are
unlocked using the keyless access func-
tion (if equipped). Refer to “Locking and
unlocking with “keyless access” entry
function ”F 2-13. .
The doors or the rear gate (5-door) are
unlocked using the remote keyless entry
transmitter.
. The ignition switch is turned from the
“ ACC ”position to the “LOCK”/ “OFF”posi-
tion.
& Cargo area light (5-door
models)
1) DOOR
2) OFF
DOOR : The light illuminates when the rear
gate is opened. The light remains illumi-
nated for several seconds and gradually
turns off after the rear gate is closed.
OFF : The light remains off.
6-2
Page 368 of 594
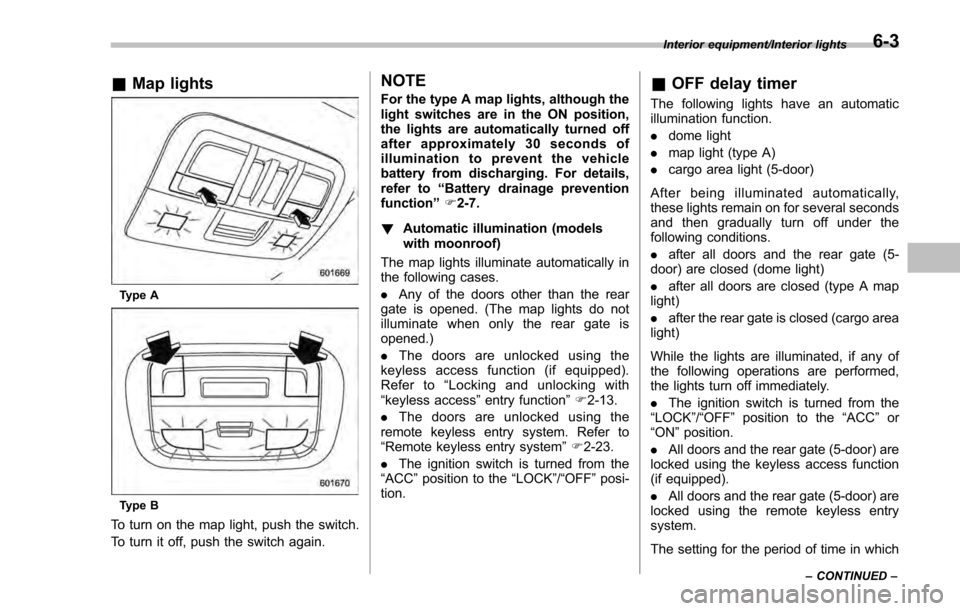
&Map lights
Type A
Type B
To turn on the map light, push the switch.
To turn it off, push the switch again.
NOTE
For the type A map lights, although the
light switches are in the ON position,
the lights are automatically turned off
after approximately 30 seconds of
illumination to prevent the vehicle
battery from discharging. For details,
refer to “Battery drainage prevention
function” F2-7.
! Automatic illumination (models
with moonroof)
The map lights illuminate automatically in
the following cases.
. Any of the doors other than the rear
gate is opened. (The map lights do not
illuminate when only the rear gate is
opened.)
. The doors are unlocked using the
keyless access function (if equipped).
Refer to “Locking and unlocking with
“keyless access” entry function”F 2-13.
. The doors are unlocked using the
remote keyless entry system. Refer to
“Remote keyless entry system ”F 2-23.
. The ignition switch is turned from the
“ACC ”position to the “LOCK”/ “OFF”posi-
tion.& OFF delay timer
The following lights have an automatic
illumination function.
. dome light
. map light (type A)
. cargo area light (5-door)
After being illuminated automatically,
these lights remain on for several seconds
and then gradually turn off under the
following conditions.
. after all doors and the rear gate (5-
door) are closed (dome light)
. after all doors are closed (type A map
light)
. after the rear gate is closed (cargo area
light)
While the lights are illuminated, if any of
the following operations are performed,
the lights turn off immediately.
. The ignition switch is turned from the
“ LOCK ”/“OFF ”position to the “ACC”or
“ON ”position.
. All doors and the rear gate (5-door) are
locked using the keyless access function
(if equipped).
. All doors and the rear gate (5-door) are
locked using the remote keyless entry
system.
The setting for the period of time in which
Interior equipment/Interior lights
–CONTINUED –6-3
Page 373 of 594
Interior equipment/Accessory power outlets
trim can be used to hold beverage bottles
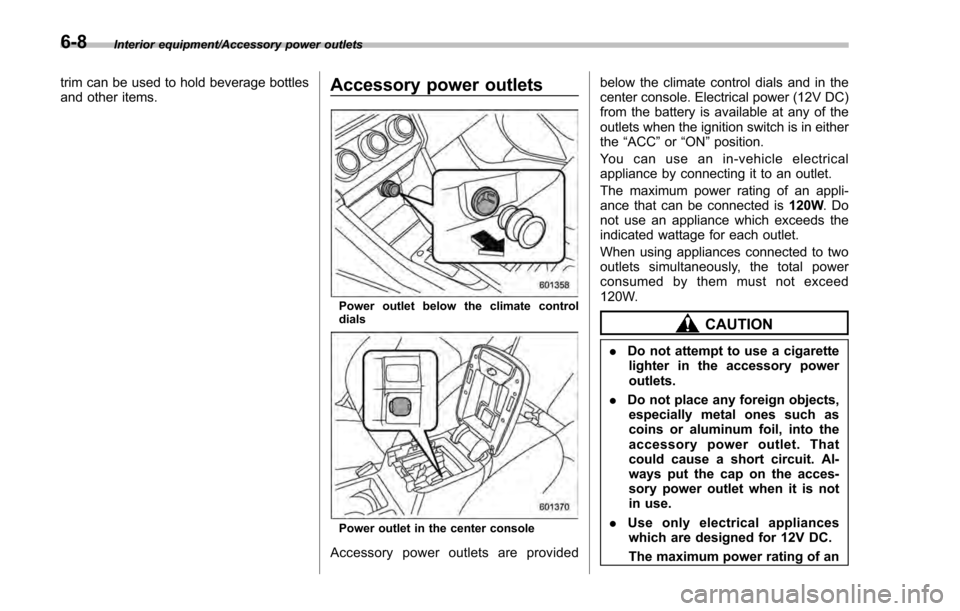
and other items.Accessory power outlets
Power outlet below the climate control
dials
Power outlet in the center console
Accessory power outlets are providedbelow the climate control dials and in the
center console. Electrical power (12V DC)
from the battery is available at any of the
outlets when the ignition switch is in either
the
“ACC ”or “ON ”position.
You can use an in-vehicle electrical
appliance by connecting it to an outlet.
The maximum power rating of an appli-
ance that can be connected is 120W.Do
not use an appliance which exceeds the
indicated wattage for each outlet.
When using appliances connected to two
outlets simultaneously, the total power
consumed by them must not exceed
120W.
CAUTION
. Do not attempt to use a cigarette
lighter in the accessory power
outlets.
. Do not place any foreign objects,
especially metal ones such as
coins or aluminum foil, into the
accessory power outlet. That
could cause a short circuit. Al-
ways put the cap on the acces-
sory power outlet when it is not
in use.
. Use only electrical appliances
which are designed for 12V DC.
The maximum power rating of an
6-8
Page 374 of 594
appliance that can be connected
is 120W. Do not use an appliance
which exceeds the indicated wat-
tage for each outlet.
When using appliances con-
nected to two outlets simulta-
neously, the total power con-
sumed by them must not exceed
120W. Overloading the accessory
power outlet can cause a short
circuit. Do not use double adap-
ters or more than one electrical
appliance.
. If the plug on your electric appli-
ance is either too loose or too
tight for the accessory power
outlet, this can result in a poor
contact or cause the plug to get
stuck. Only use plugs that fit
properly.
. Use of an electric appliance in the
accessory power outlet for a long
period of time while the engine is
not running can cause battery
discharge.
. Before driving your vehicle, make
sure that the plug and the cord
on your electrical appliance will
not interfere with your shifting
gears and operating the accel-
erator and brake pedals. If they do, do not use the electrical
appliance while driving.
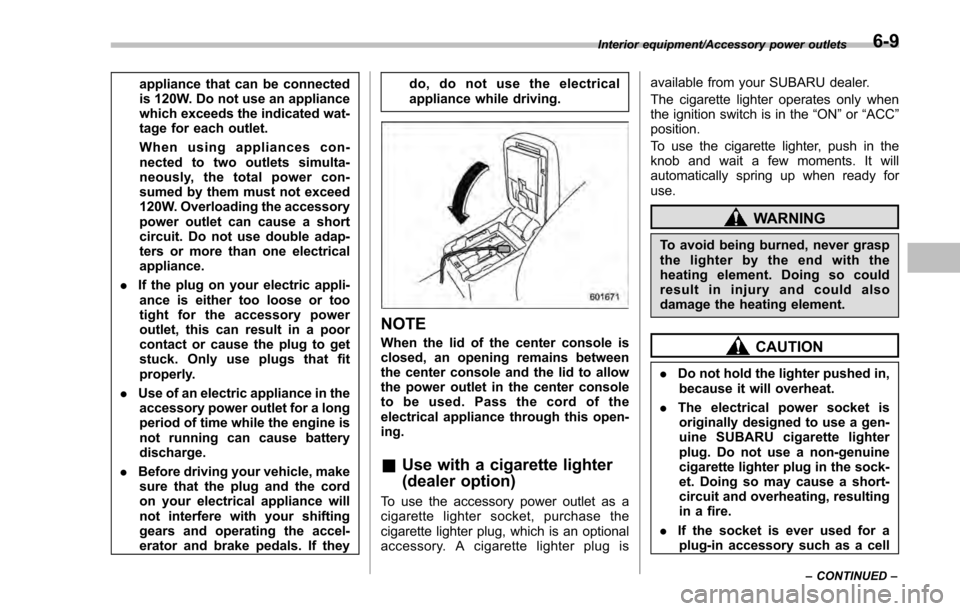
NOTE
When the lid of the center console is
closed, an opening remains between
the center console and the lid to allow
the power outlet in the center console
to be used. Pass the cord of the
electrical appliance through this open-
ing.
&
Use with a cigarette lighter
(dealer option)
To use the accessory power outlet as a
cigarette lighter socket, purchase the
cigarette lighter plug, which is an optional
accessory. A cigarette lighter plug is available from your SUBARU dealer.
The cigarette lighter operates only when
the ignition switch is in the
“ON”or “ACC ”
position.
To use the cigarette lighter, push in the
knob and wait a few moments. It will
automatically spring up when ready for
use.
WARNING
To avoid being burned, never grasp
the lighter by the end with the
heating element. Doing so could
result in injury and could also
damage the heating element.
CAUTION
. Do not hold the lighter pushed in,
because it will overheat.
. The electrical power socket is
originally designed to use a gen-
uine SUBARU cigarette lighter
plug. Do not use a non-genuine
cigarette lighter plug in the sock-
et. Doing so may cause a short-
circuit and overheating, resulting
in a fire.
. If the socket is ever used for a
plug-in accessory such as a cell
Interior equipment/Accessory power outlets
–CONTINUED –6-9
Page 381 of 594
Interior equipment/Rear view camera
.Since the range of the image on
the monitor is limited, you should
always check the rear view and
the surrounding area with your
eyes and mirrors, and move
backward at a slow speed. Mov-
ing backward only by checking
the rear view image from the
camera could cause an accident.
. Do not disassemble or modify the
camera, switch or wiring. If
smoke comes out or you smell
a strange odor, stop using the
rear view camera immediately.
Contact your SUBARU dealer
for an inspection. Continued use
may result in accident, fire or
electric shock.
CAUTION
. If your vehicle is washed with a
high-pressure washer, do not
allow water to contact the camera
directly. Entry of water in the
camera lens may result in con-
densation, malfunction, fire or
electric shock.
. Since the camera is a precision
device, do not subject it to strong
impacts. Otherwise, malfunction, fire or electric shock may occur.
. If mud or snow sticks to or is
frozen on the camera, you must
be very careful when removing it.
Otherwise, damage to the camera
may cause a fire or electric
shock. Pour water or lukewarm
water over the camera to remove
mud and ice, and wipe it with a
soft, dry cloth.
. Do not put a flame close to the
camera or wiring. Otherwise, da-
mage or fire may occur.
. When replacing the fuse, be sure
to use a fuse with the specified
rating. Use of a fuse with a
different rating may result in a
malfunction.
. If the rear view camera is used for
a long time while the engine is
not operated, the battery may
become completely discharged.
NOTE
. Do not wipe the camera with alcohol,
benzine or paint thinner. Otherwise,
discoloration may occur. To remove
contamination, wipe the camera with a
cloth moistened with a diluted neutral
detergent and then wipe it with a soft, dry cloth.
.
When waxing the vehicle, be careful
not to apply the wax to the camera. If it
comes in contact with the camera,
moisten a clean cloth with a diluted
neutral detergent to remove the wax.
. The camera lens has a hard coating
to help prevent scratches. However,
when washing the vehicle or cleaning
the camera lens, be careful not to
scratch the camera lens. Do not use a
washing brush directly on the camera
lens. The image quality of the rear view
camera may deteriorate.
. Strong light shined on the camera
lens may develop vertical lines around
the light source. This is not a malfunc-
tion.
. Under fluorescent light, the display
may flicker. However, this is not a
malfunction.
. The image of the rear view camera
may be slightly different from the
actual color of the objects.
6-16
Page 393 of 594

Starting and operating/Preparing to drive
.A vehiclefails the OBDII inspection if
the “CHECK ENGINE ”warning light is not
properly operating (light is illuminated or is
not working due to a burned out bulb) or
there is one or more diagnostic trouble
codes stored in the vehicle’ s computer.
. A state emission inspection may reject
(not pass or fail) a vehicle if the number of
OBDII system readiness monitors “NOT
READY ”is greater than one. If the
vehicle’ s battery has been recently re-
placed or disconnected, the OBDII system
inspection may indicate that the vehicle is
not ready for the emission test. Under this
condition, the vehicle driver should be
instructed to drive his/her vehicle for a few
days to reset the readiness monitors and
return for an emission re-inspection.
. Owners of rejected or failing vehicles
should contact their SUBARU Dealer for
service.
Some states still use dynamometers in
their emission inspection program. A
dynamometer is a treadmill or roller-like
testing device that allows your vehicle ’s
wheels to turn while the vehicle remains in
one place. Prior to your vehicle being put
on a dynamometer, tell your emission
inspector
not to place your SUBARU
AWD vehicle on a two-wheel dynam-
ometer. Otherwise, serious transmis-
sion damage will result. The U.S. Environmental Protection
Agency (EPA) and states using two-wheel
dynamometers in their emission testing
program have EXEMPTED SUBARU
AWD vehicles from the portion of the
testing program that involves a two-wheel
dynamometer. There are some states that
use four-wheel dynamometers in their
testing program. When properly used, this
equipment should not damage a SUBARU
AWD vehicle.
Under no circumstances should the rear
wheels be jacked off the ground, nor
should the driveshaft be disconnected for
state emission testing.
Preparing to drive
You should perform the following checks
and adjustments every day before you
start driving.
1. Check that all windows, mirrors, and
lights are clean and unobstructed.
2. Check the appearance and condition
of the tires. Also check tires for proper
inflation.
3. Look under the vehicle for any sign of
leaks.
4. Check that the hood, trunk (4-door)
and rear gate (5-door) are fully closed.
5. Check the adjustment of the seat.
6. Check the adjustment of the inside
and outside mirrors.
7. Fasten your seatbelt. Check that your
passengers have fastened their seatbelts.
8. Check the operation of the warning
and indicator lights when the ignition
switch is turned to the
“ON ”position.
9. Check the gauges, indicator and warn-
ing lights after starting the engine.
10. Check that no small animals enter the
engine compartment.
7-8
Page 394 of 594
CAUTION
Trapping small animals in the cool-
ing fan and belts of the engine may
result in a malfunction. Check that
no small animal enters the engine
compartment and under the vehicle
before starting the engine.
NOTE
Engine oil, engine coolant, brake fluid,
washer fluid and other fluid levels
should be checked daily, weekly or at
fuel stops.
Starting and stopping the
engine (models without
push-button start system)
CAUTION
Do not operate the starter motor
continuously for more than 10 sec-
onds. If the engine fails to start after
operating the starter for 5 to 10
seconds, wait for 10 seconds or
more before trying again.
NOTE
It may be difficult to start the engine
when the battery has been discon-
nected and reconnected (for mainte-
nance or other purposes). This diffi-
culty is caused by the electronically
controlled throttle’s self-diagnosis
function. To overcome it, keep the
ignition switch in the “ON”position
for approximately 10 seconds before
starting the engine.
& Starting engine
! General precautions when starting
engine
WARNING
.Never start the engine from out-
side the vehicle (except when
using the remote engine start
system). It may result in an
accident.
. Do not leave the engine running
in locations with poor ventilation,
such as a garage and indoors.
The exhaust gas may enter the
vehicle or indoors, and it may
result in carbon monoxide poi-
soning.
. Do not start the engine near dry
foliage, paper, or other flam-
mable substances. The exhaust
pipe and exhaust emissions can
create a fire hazard at high
temperatures.
CAUTION
. If the engine is stopped during
driving, the catalyst may over-
heat and burn.
Starting and operating/Starting and stopping the engine (models without push –button start system)
–CONTINUED –7-9
Page 397 of 594
Starting and operating/Starting and stopping engine (models with push–button start system)
Starting and stopping engine
(models with push-button
start system)
& Safety precautions
Refer to “Safety precautions ”F 2-10.
& Operating range for push-
button start system
Refer to “Operating range for push-button
start system ”F 3-6.
& Starting engine
WARNING
. There are some general precau-
tions when starting the engine.
Carefully read the precautions
described in “Starting engine ”
F 7-9.
. If the indicator on the push-
button ignition switch flashes in
green after the engine has
started, never drive the vehicle.
The steering is still locked, and it
may result in an accident.
CAUTION
. When the operation indicator on
the push-button ignition switch is
flashing in orange, there may be
a malfunction with the vehicle.
Contact a SUBARU dealer imme-
diately.
. If the indicator on the push-
button ignition switch is flashing
in green after the engine has
started, it means that the steering
is still locked. Depress the brake
pedal while moving the steering
wheel to the right and left, and
press the push-button ignition
switch.
. Do not continue pushing the
push-button ignition switch for
more than 10 seconds. Doing so
could cause a malfunction. If the
engine does not start, stop push-
ing the push-button ignition
switch and turn off the engine.
Wait 10 seconds, and then push
the push-button ignition switch
to start the engine.
NOTE
. When the push-button ignition
switch is pressed while depressing the brake pedal, the engine starter
operates for a maximum of 10 seconds
and after starting the engine, the starter
stops automatically.
.
When the push-button ignition
switch is pressed while depressing
the brake pedal, the engine can be
started regardless of the status of the
push-button ignition switch.
. If the security indicator light illumi-
nates when you attempt to start the
engine but the engine does not start,
press the push-button ignition switch
to switch the power to “OFF”and then
try to start the engine again.
. If the engine does not start, press
the push-button ignition switch without
depressing the brake pedal to switch
the power to “OFF”. Then, while de-
pressing the brake pedal more force-
fully, press the push-button ignition
switch.
. The engine start procedures may
not function depending on the radio
wave conditions around the vehicle. In
such a case, refer to “Starting engine”
F 9-19.
. If the vehicle battery is discharged,
the steering cannot be unlocked.
Charge the battery.
7-12
Page 399 of 594
Starting and operating/Remote engine start system (dealer option)
doors until the vehicle is stopped
in a safe location. It is dangerous
because the steering lock may be
activated. Stop the vehicle in a
safe place, and contact a
SUBARU dealer immediately.
CAUTION
.Do not stop the engine while the
select lever is in a position other
than the “P”position.
. If the engine is stopped while the
select lever is in a position other
than the “P”position, the power
will be in “ACC”. If the vehicle is
left in this condition, the battery
may be discharged.
NOTE
Although you can stop the engine by
operating the push-button ignition
switch, do not stop the engine during
driving except in an emergency.
& When access key does not
operate properly
Refer to “Access key –if access key does
not operate properly ”F 9-18.
Remote engine start system
(dealer option)
WARNING
. There are some general precau-
tions when starting the engine.
Carefully read the precautions
described in “General precau-
tions when starting engine ”F 7-
9.
. Do not remote start a vehicle in
an enclosed environment (e.g.
closed garage). Prolonged opera-
tion of a motor vehicle in an
enclosed environment can cause
a harmful build-up of Carbon
Monoxide. Carbon Monoxide is
harmful to your health. Exposure
to high levels of Carbon Monox-
ide can cause headaches, dizzi-
ness or in extreme cases uncon-
sciousness and/or death.
. Before performing any servicing
of the vehicle, temporarily place
the remote engine start system in
service mode to prevent the
system from unexpectedly start-
ing the engine.
The remote engine start system allows you to start the engine from outside the
vehicle. In addition, the remote engine
start system can activate the heater or air
conditioner, providing you with a comfor-
table cabin upon entry.NOTE
The length of time for which it is
acceptable to allow the engine to
remain idling may be bound by local
laws and regulations. Check the local
rules when using the remote engine
start system.
7-14