alarm SUBARU IMPREZA 2016 5.G Owners Manual
[x] Cancel search | Manufacturer: SUBARU, Model Year: 2016, Model line: IMPREZA, Model: SUBARU IMPREZA 2016 5.GPages: 594, PDF Size: 5.36 MB
Page 29 of 594

Function settings
A SUBARU dealer can change the settings of the functions shown in the following table to meet your personal requirements. Contact
the nearest SUBARU dealer for details. If your vehicle is equipped with a multi function display, the settings for some of these functions
can be changed using the display. For details, refer to“Multi function display”F 3-42.
Item Function Possible settingsDefault setting
Alarm system Alarm system Operation/Non-operationOperation
Monitoring start delay time (after
closure of doors) 0 seconds/30 seconds
30 seconds
Impact sensor operation (only
models with shock sensors (dealer
option)) Operation/Non-operation
Non-operation
Passive arming (models without
“ Keyless Access with Push-button
Start system ”) Operation/Non-operation
Non-operation
Dome light and map lights illumina-
tion (models with moonroof) ON/OFF
OFF
Dome light illumination (models
without moonroof)
Keyless Access (if equipped) Hazard warning flasher Operation/Non-operationOperation
Audible signal Operation/Non-operationOperation
Audible signal volume Level 1 to 7Level 5
Door unlock selection function (dri-
ver ’s door unlock) Driver
’s door only/All doors Driver ’s door only
Door unlock selection function (rear
gate unlock) Rear gate only/All doors
Rear gate only
Remote keyless entry system Hazard warning flasher Operation/Non-operationOperation
Audible signal Operation/Non-operationOperation
Audible signal volume Level 1 to 7Level 5
24
Page 102 of 594

Keys..................................................................... 2-3Key number plate ................................................ 2-3
Immobilizer.......................................................... 2-3Security indicator light ........................................ 2-4
Key replacement ................................................. 2-4
Certification for immobilizer system ..................... 2-4
Door locks........................................................... 2-5Locking and unlocking from the outside .. ............ 2-5
Locking and unlocking from the inside ................ 2-7
Battery drainage prevention function ................... 2-7
Power door locking switches............................. 2-8Key lock-in prevention function ........................... 2-9
Keyless access with push-button start
system (if equipped) ........................................ 2-9
Safety precautions............................................. 2-10
Locking and unlocking with “keyless access”
entry function. .................................................. 2-13
Selecting audible signal operation ...................... 2-18
Warning chimes and warning indicator ............... 2-18
Disabling keyless access function ...................... 2-18
When access key does not operate properly ....... 2-20
Replacing battery of access key ......................... 2-20
Replacing access key ......................................... 2-20
Certification for keyless access with push-button start system ..................................................... 2-20
PIN Code Access (models with “keyless
access with push-button start system ”)........ 2-21
Registering a PIN code ....................................... 2-22
Unlocking .......................................................... 2-23
Remote keyless entry system ........................... 2-23Locking the doors.............................................. 2-25 Unlocking the doors
.......................................... 2-25
Opening the trunk lid (4-door) .. .......................... 2-25
Unlocking the rear gate (5-door) ......................... 2-25
Vehicle finder function ....................................... 2-25
Sounding a panic alarm ..................................... 2-25
Selecting audible signal operation (models without “keyless access with push-button start
system ”).......................................................... 2-26
Replacing the battery ......................................... 2-26
Replacing lost transmitters ................................ 2-26
Certification for remote keyless entry system ..... 2-26
Alarm system..................................................... 2-27System operation ............................................... 2-28
Activating and deactivating the alarm system ..... 2-28
If you have accidentally triggered the alarm system ............................................................ 2-28
Arming the system ............................................ 2-29
Disarming the system ........................................ 2-32
Valet mode ........................................................ 2-32
Passive arming (models without “keyless access
with push-button start system ”) ....................... 2-32
Tripped sensor identification .............................. 2-34
Shock sensors (dealer option).. .......................... 2-34
Child safety locks.............................................. 2-35
Windows ............................................................. 2-35
Power window operation by driver ..................... 2-35
Power window operation by passengers ............. 2-37
Initialization of power window .. .......................... 2-38
Trunk lid (4-door)............................................... 2-38To open and close the trunk lid from outside . ..... 2-39
To open the trunk lid from inside. ....................... 2-39
Keys and doors
2
Page 106 of 594

–Canada-spec. models–Mexico-spec. modelsDoor locks
& Locking and unlocking from
the outside
NOTE
If you unlock the driver ’s door with a
key (including a mechanical key) and
open the door while the alarm system
is armed, the alarm system is triggered
and the vehicle ’s horn sounds. In this
case, perform any of the following
operations:
Models with “keyless access with
push-button start system ”:
. Press any button on the access key
(except when the access key battery is
discharged).
. Press the push-button ignition
switch to “ACC”.
. Carry the access key and perform
either of the following procedures.
–Grip the front door handle
– Press the rear gate opener button
Models without “keyless access with
push-button start system ”:
. Press any button on the remote
transmitter (except when the transmit-
ter battery is discharged).
. Insert the key into the ignition
switch and turn the ignition switch to
Keys and doors/Door locks
–CONTINUED –2-5
Page 107 of 594

Keys and doors/Door locks
“ON”.
For details about the alarm system,
refer to “Alarm system” F2-27.
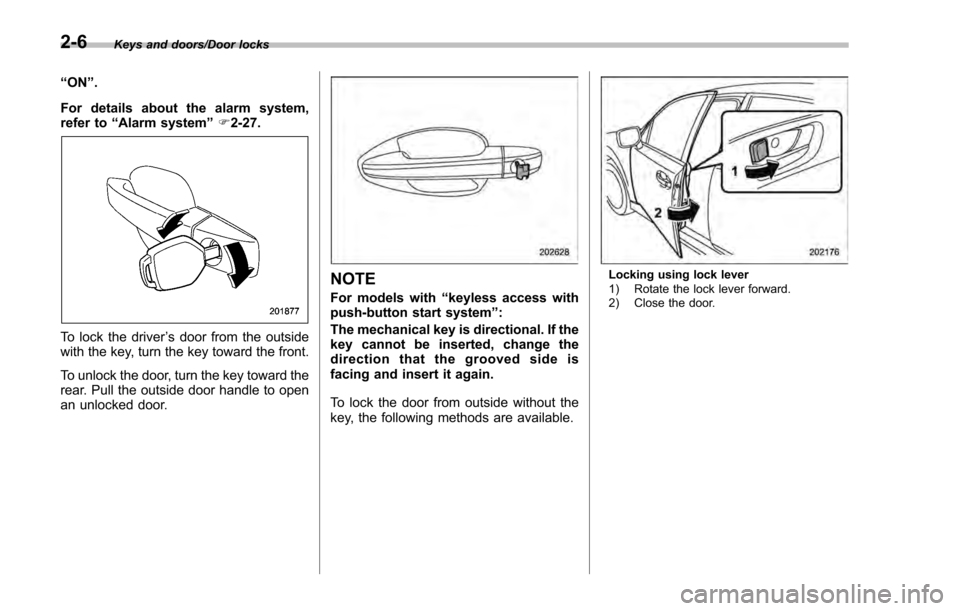
To lock the driver ’s door from the outside
with the key, turn the key toward the front.
To unlock the door, turn the key toward the
rear. Pull the outside door handle to open
an unlocked door.
NOTE
For models with “keyless access with
push-button start system ”:
The mechanical key is directional. If the
key cannot be inserted, change the
direction that the grooved side is
facing and insert it again.
To lock the door from outside without the
key, the following methods are available.
Locking using lock lever
1) Rotate the lock lever forward.
2) Close the door.
2-6
Page 111 of 594

Keys and doors/Keyless access with push–button start system
. Opening the trunk (4-door)
. Starting and stopping the engine. For
detailed information, refer to “Starting and
stopping engine (models with push-button
start system) ”F 7-12.
. Arming and disarming the alarm sys-
tem. For detailed information, refer to
“ Alarm system ”F 2-27.
Locking and unlocking by the remote
keyless entry system can also be con-
trolled with the buttons on the access key.
For detailed information, refer to “Remote
keyless entry system ”F 2-23.
A mechanical key is attached to each
access key. The mechanical key is used
for the following operations.
. Locking and unlocking the driver ’s door
. Locking and unlocking the glove box
You cannot unlock the glove box without
using the mechanical key. You can keep
the glove box locked when you leave your
vehicle and the access key (with the
mechanical key removed) at a parking
facility.
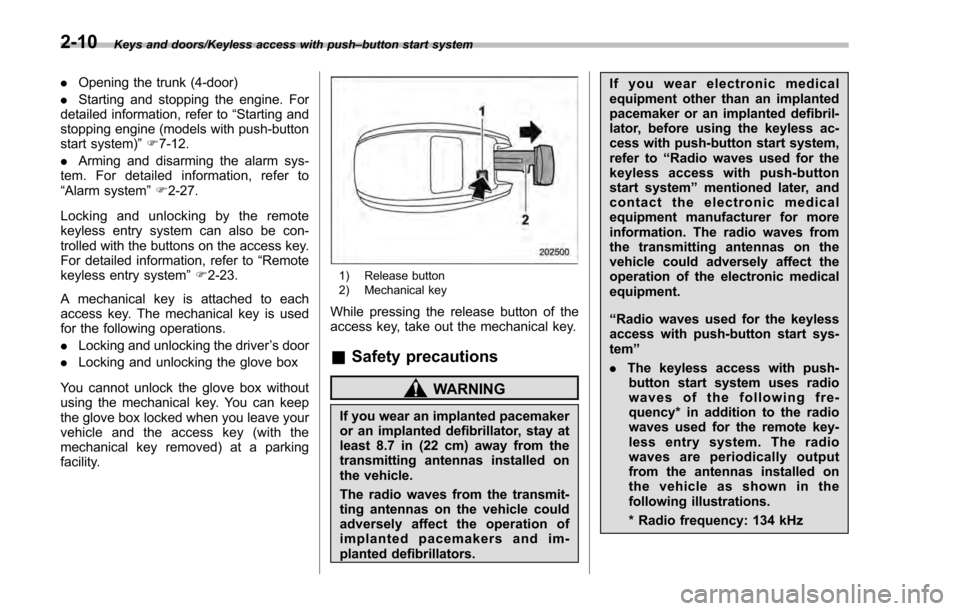
1) Release button
2) Mechanical key
While pressing the release button of the
access key, take out the mechanical key.
& Safety precautions
WARNING
If you wear an implanted pacemaker
or an implanted defibrillator, stay at
least 8.7 in (22 cm) away from the
transmitting antennas installed on
the vehicle.
The radio waves from the transmit-
ting antennas on the vehicle could
adversely affect the operation of
implanted pacemakers and im-
planted defibrillators. If you wear electronic medical
equipment other than an implanted
pacemaker or an implanted defibril-
lator, before using the keyless ac-
cess with push-button start system,
refer to
“Radio waves used for the
keyless access with push-button
start system ”mentioned later, and
contact the electronic medical
equipment manufacturer for more
information. The radio waves from
the transmitting antennas on the
vehicle could adversely affect the
operation of the electronic medical
equipment.
“Radio waves used for the keyless
access with push-button start sys-
tem ”
. The keyless access with push-
button start system uses radio
waves of the following fre-
quency* in addition to the radio
waves used for the remote key-
less entry system. The radio
waves are periodically output
from the antennas installed on
the vehicle as shown in the
following illustrations.
* Radio frequency: 134 kHz
2-10
Page 125 of 594

Keys and doors/Remote keyless entry system
key is used as the transmitter for the
remote keyless entry system. For models
without“keyless access with push-button
start system” , the transmitter for the
remote keyless entry system is located
inside the key head.
The remote keyless entry system has the
following functions.
. Locking and unlocking the doors (and
rear gate for 5-door) without a key
. Opening the trunk lid for 4-door without
key
. Sounding a panic alarm
. Arming and disarming the alarm sys-
tem. For detailed information, refer to
“Alarm system ”F 2-27.
The operable distance of the remote
keyless entry system is approximately 30
feet (10 meters). However, this distance
will vary depending on environmental
conditions. The system ’s operable dis-
tance will be shorter in areas near a
facility or electronic equipment emitting
strong radio waves such as a power plant,
broadcast station, TV tower, or remote
controller of home electronic appliances.
NOTE
. For models with “keyless access
with push-button start system ”,the
remote keyless entry system will not be activated when the push-button
ignition switch is in any position other
than the
“OFF”position.
. For models without “keyless access
with push-button start system ”,the
remote keyless entry system will not
be activated when the key is inserted in
the ignition switch.
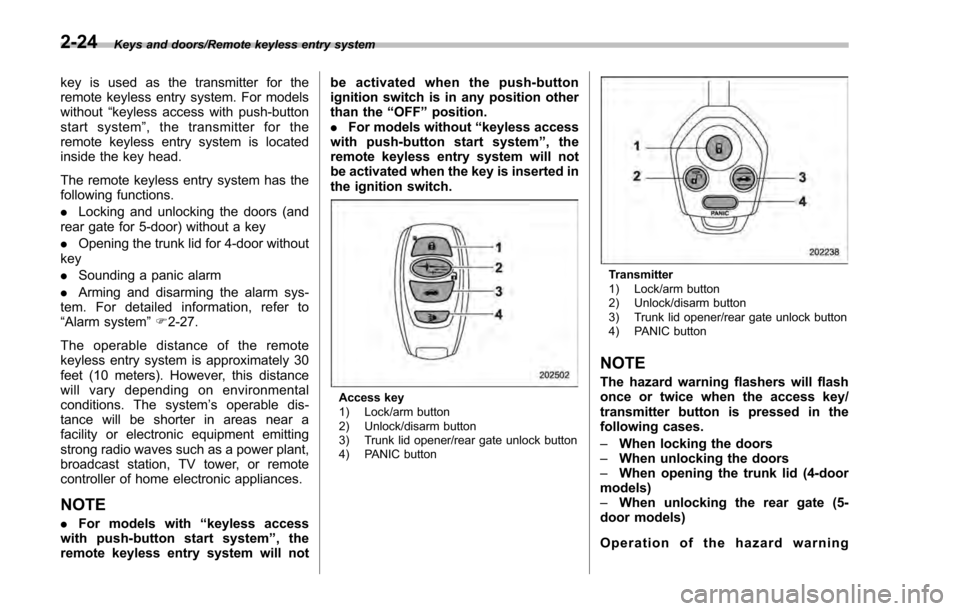
Access key
1) Lock/arm button
2) Unlock/disarm button
3) Trunk lid opener/rear gate unlock button
4) PANIC button
Transmitter
1) Lock/arm button
2) Unlock/disarm button
3) Trunk lid opener/rear gate unlock button
4) PANIC button
NOTE
The hazard warning flashers will flash
once or twice when the access key/
transmitter button is pressed in the
following cases.
– When locking the doors
– When unlocking the doors
– When opening the trunk lid (4-door
models)
– When unlocking the rear gate (5-
door models)
Operation of the hazard warning
2-24
Page 126 of 594

flashers in the above cases can be set
to“On ”or “Off ”by a SUBARU dealer.
Consult your SUBARU dealer for de-
tails. Also, for models with a multi
function display, the setting can be
changed using the display. For details,
refer to “Hazard warning flasher
setting ”F 3-79.
& Locking the doors
Press the lock/arm button to lock all doors
and rear gate (5-door). An electronic chirp
will sound once and the hazard warning
flashers will flash once.
If any of the doors (or the rear gate/trunk
lid) is not fully closed, the following will
occur to alert you that the doors (or the
rear gate/trunk lid) are not properly closed.
. an electronic chirp sounds five times.
. the hazard warning flashers flash five
times.
When you close the door, it will automa-
tically lock and then the following will
occur.
. an electronic chirp sounds once.
. the hazard warning flashers flash once.
&Unlocking the doors
Press the unlock/disarm button to unlock
the driver ’s door. An electronic chirp will
sound twice and the hazard warning
flashers will flash twice. To unlock all
doors and the rear gate (5-door), briefly
press the unlock/disarm button a second
time within 5 seconds.
NOTE
If the interval between the first and
second presses of the unlock/disarm
button (for unlocking of all of the doors
and the rear gate) is extremely short,
the system may not respond.
& Opening the trunk lid
(4-door)
Press and hold the trunk lid opener button
to open the trunk lid. An electronic chirp
will sound twice and the hazard warning
flashers will flash twice.
&Unlocking the rear gate
(5-door)
Press the rear gate unlock button to
unlock the rear gate.
An electronic chirp will sound twice and
the hazard warning flashers will flash
twice.
&Vehicle finder function
Use this function to find your vehicle
parked among many vehicles in a large
parking lot. Provided you are within 30 feet
(10 meters) of the vehicle, pressing the
lock/arm button three times in a 5-second
period will cause your vehicle’ s horn to
sound once and its hazard warning
flashers to flash three times.
NOTE
If the interval between presses is too
short when you press the lock/arm
button three times, the system may
not respond to the signals from the
remote transmitter.
& Sounding a panic alarm
To activate the alarm, press the “PANIC ”
button once.
The horn will sound and the hazard
warning flashers will flash.
To deactivate the panic alarm, press any
button on the remote transmitter. Unless a
button on the remote transmitter is
pressed, the alarm will be deactivated
after approximately 30 seconds.
Keys and doors/Remote keyless entry system
–CONTINUED –2-25
Page 128 of 594

!Canada-spec. models!Mexico-spec. models
COFETEL RCPSUTW13-2221
COFETEL RLVSU8813-2140
Alarm system
The alarm system helps to protect your
vehicle and valuables from theft. The horn
sounds and the hazard warning flashers
flash if someone attempts to break into
your vehicle.
For models with “keyless access with
push-button start system ”:
The system can be armed or disarmed
with the keyless access function or access
key.
The system will not be activated when the
push-button ignition switch is in the “ACC”
or “ON ”position.
For models without “keyless access
with push-button start system”:
The system can be armed or disarmed
with the remote transmitter.
The system will not be activated when the
key is inserted into the ignition switch.
Your vehicle’ s alarm system has been set
for activation at the time of shipment from
the factory. You can set the system for
deactivation yourself or have it done by
your SUBARU dealer.
Keys and doors/Alarm system
–CONTINUED –2-27
Page 129 of 594

Keys and doors/Alarm system
&System operation
The alarm system will sound the following
alarms when triggered.
. The vehicle’ s horn will sound for 30
seconds.
. The hazard warning flashers will flash
for 30 seconds.
If any of the doors or the rear gate/trunk lid
remains open after the 30-second period,
the horn will continue to sound for a
maximum of 3 minutes. If the door or the
rear gate/trunk lid is closed while the horn
is sounding, the horn will stop sounding
with a delay of up to 30 seconds.
The alarm is triggered by:
. Opening any of the doors, the rear gate
or trunk lid
. Physical impact to the vehicle, such as
forced entry (only models with shock
sensors (dealer option))
NOTE
The alarm system can be set to trigger
the illumination of the following interior
lights.
. Map lights (models with moonroof)
. Dome light (illuminates only when
the dome light switch is in the “DOOR ”
position)
. Cargo area light (illuminates only when the cargo area light switch is in
the
“DOOR ”position)
The notifications regarding the map
lights, dome light and cargo area light
are deactivated as the factory setting. A
SUBARU dealer can activate the sys-
tem. Contact your SUBARU dealer for
details.
& Activating and deactivating
the alarm system
To change the setting of your vehicle’ s
alarm system for activation or deactiva-
tion, do the following.
1. Disarm the alarm system. Refer to
“Disarming the system” F2-32.
2. Sit in the driver ’s seat and shut all
doors (and the rear gate if your vehicle is a
5-door).
3. Turn the ignition switch to the “ON ”
position.
4. Hold down the REAR (UNLOCK) side
of the driver ’s power door locking switch,
open the driver ’s door within the following
1 second, and wait 10 seconds without
releasing the switch. The setting will then
be changed as follows.
If the system was previously activated:
The odometer/trip meter screen displays
as follows and the horn sounds twice, indicating that the system is now deacti-
vated.
.
“AL oF ”(models with type A combina-
tion meter)
. “ALOF” (models with type B combina-
tion meter)
If the system was previously deacti-
vated:
The odometer/trip meter screen displays
as follows and the horn sounds once,
indicating that the system is now acti-
vated.
. “AL on ”(models with type A combina-
tion meter)
. “ALON” (models with type B combina-
tion meter)
NOTE
You may have the above setting
change done by your SUBARU dealer.
& If you have accidentally trig-
gered the alarm system
! To stop the alarm
Do any of the following operations:
. Press any button on the access key/
remote transmitter.
. Turn the ignition switch to the “ON”
position (models without “keyless access
with push-button start system ”).
2-28
Page 130 of 594

.Turn the push-button ignition to the
“ ACC ”position (models with “keyless
access with push-button start system ”).
NOTE
Only registered keys will stop the
alarm. If the immobilizer transponder
is not registered, the alarm will not
stop.
& Arming the system
! Tips
. The system can be armed even if the
engine hood, windows and/or moonroof
are open. Always make sure that they are
fully closed before arming the system.
. The 30-second standby time can be
eliminated if you prefer. Have it performed
by your SUBARU dealer.
. If your vehicle is a 4-door and you open
the trunk using the access key/remote
transmitter ’s “
”button with the alarm
system armed, the system will be tem-
porarily placed in a standby state. The
system will go back to the surveillance
state upon locking the trunk.
. The system is in the standby mode for
a 30-second period after locking the doors
with the remote transmitter. The security
indicator light will flash at short intervals
during this period. .
If any of the following actions are done
during the standby period, the system will
not switch to the surveillance state.
–Doors (including the rear gate/trunk
lid) are unlocked using the access key/
remote transmitter.
– Doors (including the rear gate/trunk
lid) are unlocked using the keyless
access function (models with “keyless
access with push-button start sys-
tem”).
– Any door (including the rear gate/
trunk lid) is opened.
– The ignition switch is turned to the
“ON ”position (models without “keyless
access with push-button start sys-
tem”).
– Push-button ignition switch is
turned to the “ACC”position (models
with “keyless access with push-button
start system ”).
! To arm the system using access
key/remote transmitter
1. Close all windows and the moonroof (if
equipped).
2. Remove the key from the ignition
switch (models without “keyless access
with push-button start system ”)/turn the
push-button ignition switch to the “OFF”
position (models with “keyless access with
push-button start system ”). 3. Open the doors and get out of the
vehicle.
4. Make sure that the engine hood (and
the trunk lid on the 4-door) are locked.
5. Close all doors (and the rear gate on
the 5-door).
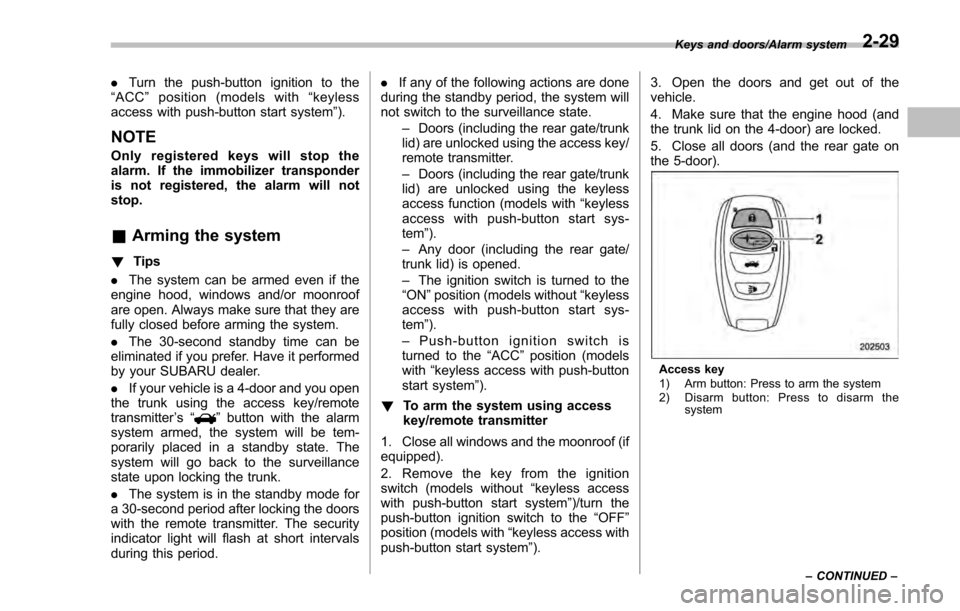
Access key
1) Arm button: Press to arm the system
2) Disarm button: Press to disarm the
system
Keys and doors/Alarm system
–CONTINUED –
2-29