speed display SUBARU IMPREZA 2022 Getting Started Guide
[x] Cancel search | Manufacturer: SUBARU, Model Year: 2022, Model line: IMPREZA, Model: SUBARU IMPREZA 2022Pages: 124, PDF Size: 33.04 MB
Page 10 of 124
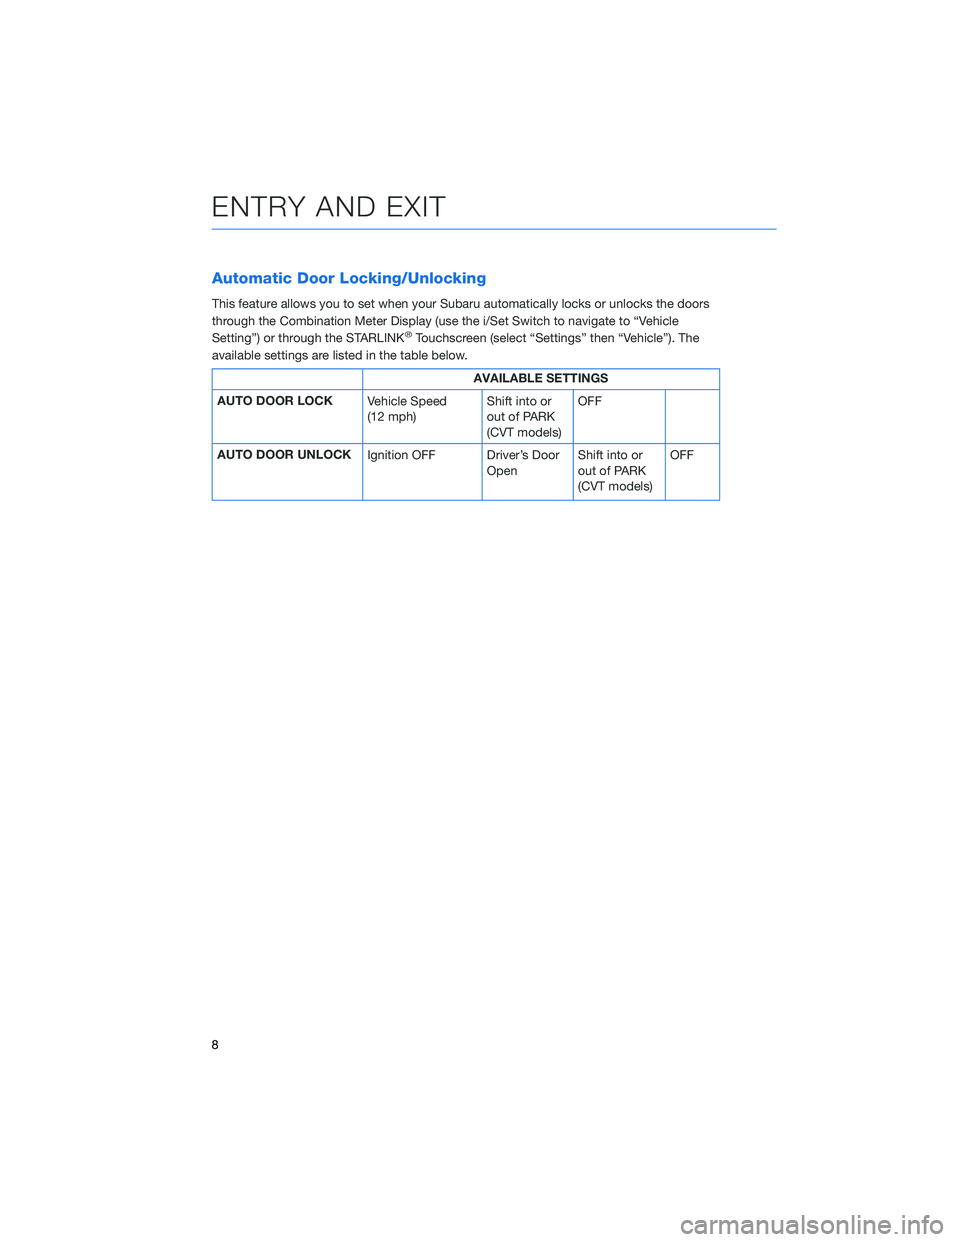
Automatic Door Locking/Unlocking
This feature allows you to set when your Subaru automatically locks or unlocks the doors
through the Combination Meter Display (use the i/Set Switch to navigate to “Vehicle
Setting”) or through the STARLINK
®Touchscreen (select “Settings” then “Vehicle”). The
available settings are listed in the table below.
AVAILABLE SETTINGS
AUTO DOOR LOCK Vehicle Speed
(12 mph)Shift into or
out of PARK
(CVT models)OFF
AUTO DOOR UNLOCK Ignition OFF Driver’s Door
OpenShift into or
out of PARK
(CVT models) OFF
ENTRY AND EXIT
8
Page 16 of 124
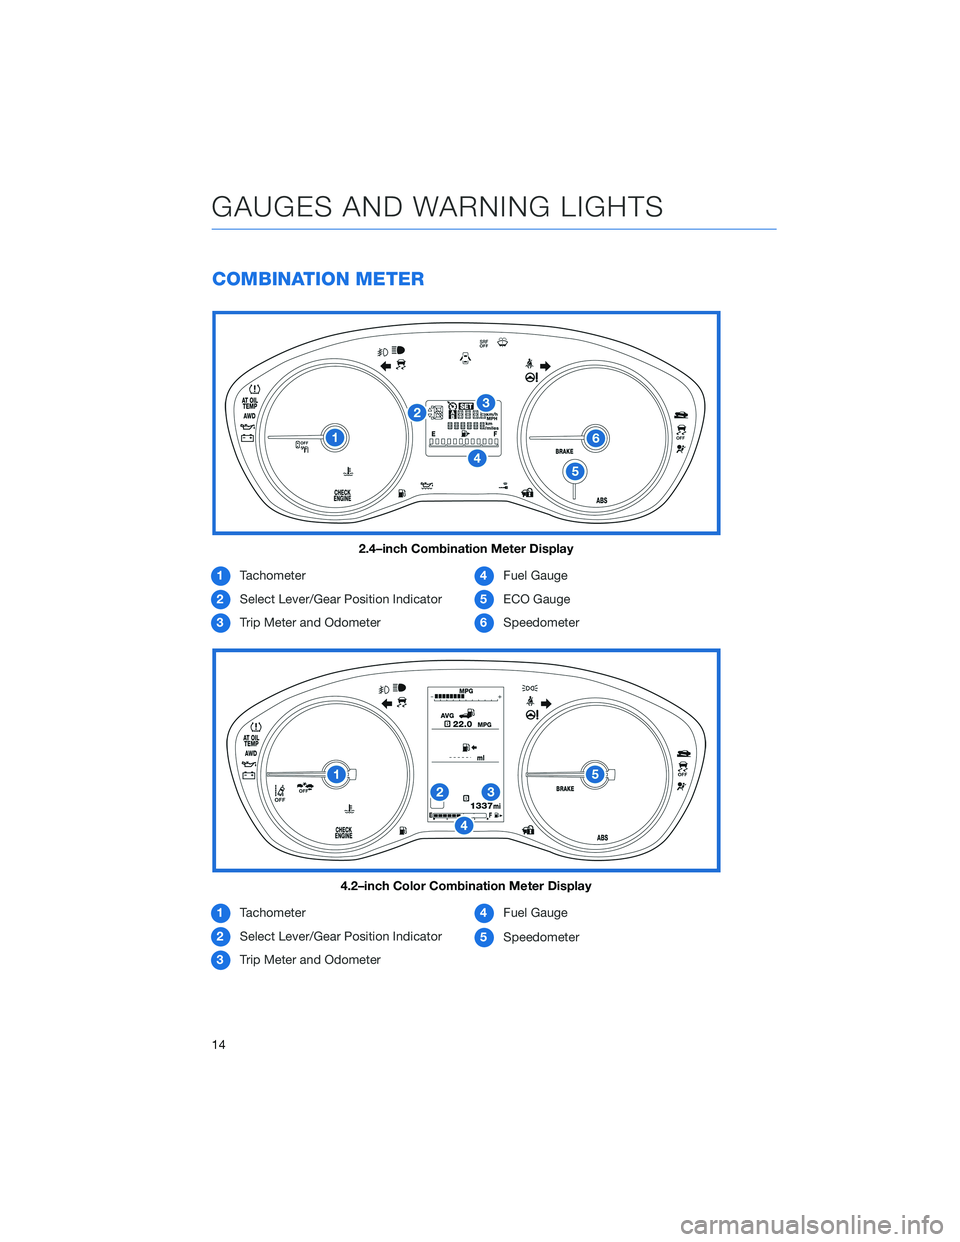
COMBINATION METER
1Tachometer
2 Select Lever/Gear Position Indicator
3 Trip Meter and Odometer 4
Fuel Gauge
5 ECO Gauge
6 Speedometer
1 Tachometer
2 Select Lever/Gear Position Indicator
3 Trip Meter and Odometer 4
Fuel Gauge
5 Speedometer
2.4–inch Combination Meter Display
4.2–inch Color Combination Meter Display
GAUGES AND WARNING LIGHTS
14
Page 20 of 124
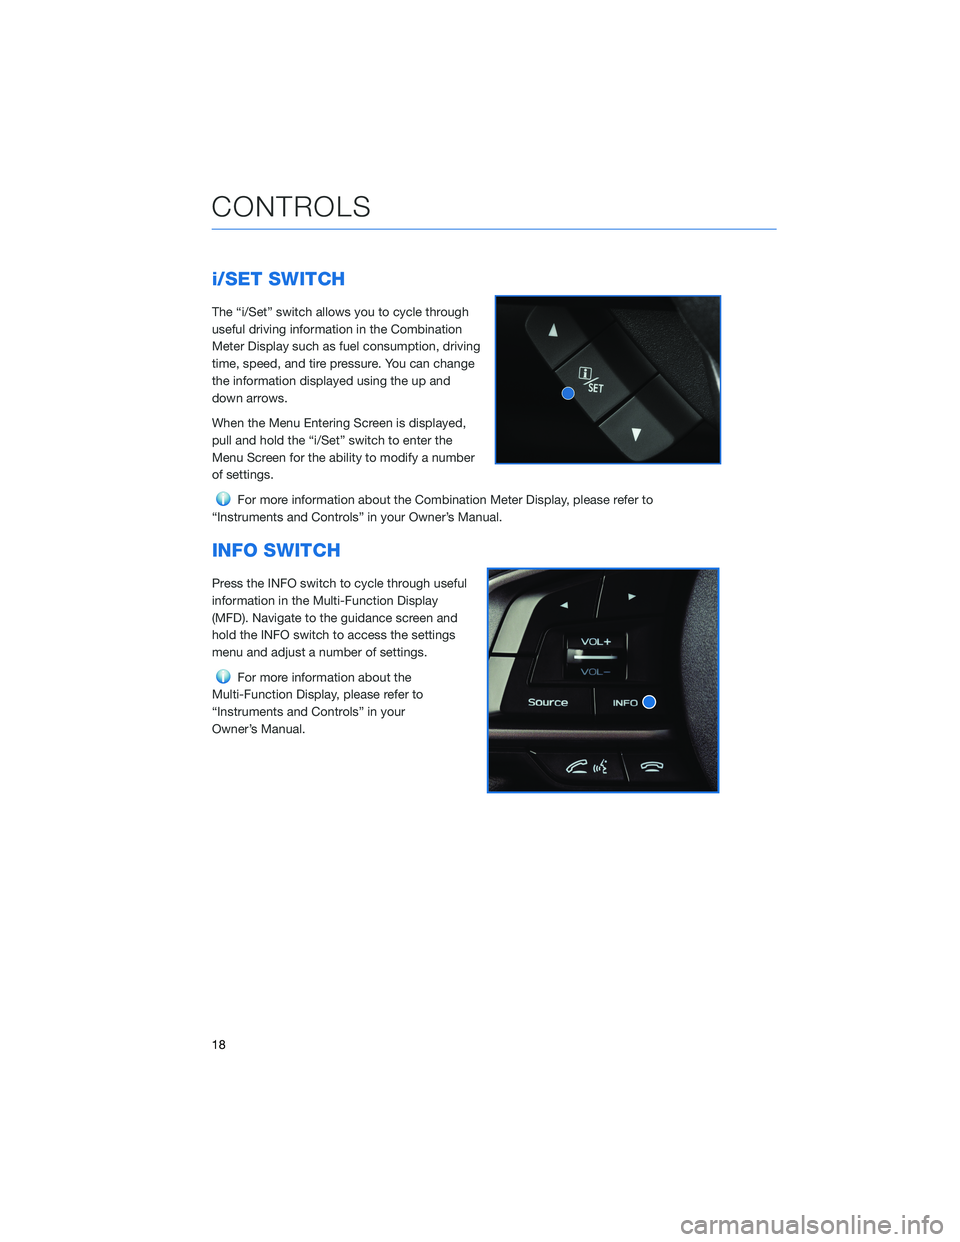
i/SET SWITCH
The “i/Set” switch allows you to cycle through
useful driving information in the Combination
Meter Display such as fuel consumption, driving
time, speed, and tire pressure. You can change
the information displayed using the up and
down arrows.
When the Menu Entering Screen is displayed,
pull and hold the “i/Set” switch to enter the
Menu Screen for the ability to modify a number
of settings.
For more information about the Combination Meter Display, please refer to
“Instruments and Controls” in your Owner’s Manual.
INFO SWITCH
Press the INFO switch to cycle through useful
information in the Multi-Function Display
(MFD). Navigate to the guidance screen and
hold the INFO switch to access the settings
menu and adjust a number of settings.
For more information about the
Multi-Function Display, please refer to
“Instruments and Controls” in your
Owner’s Manual.
CONTROLS
18
Page 33 of 124
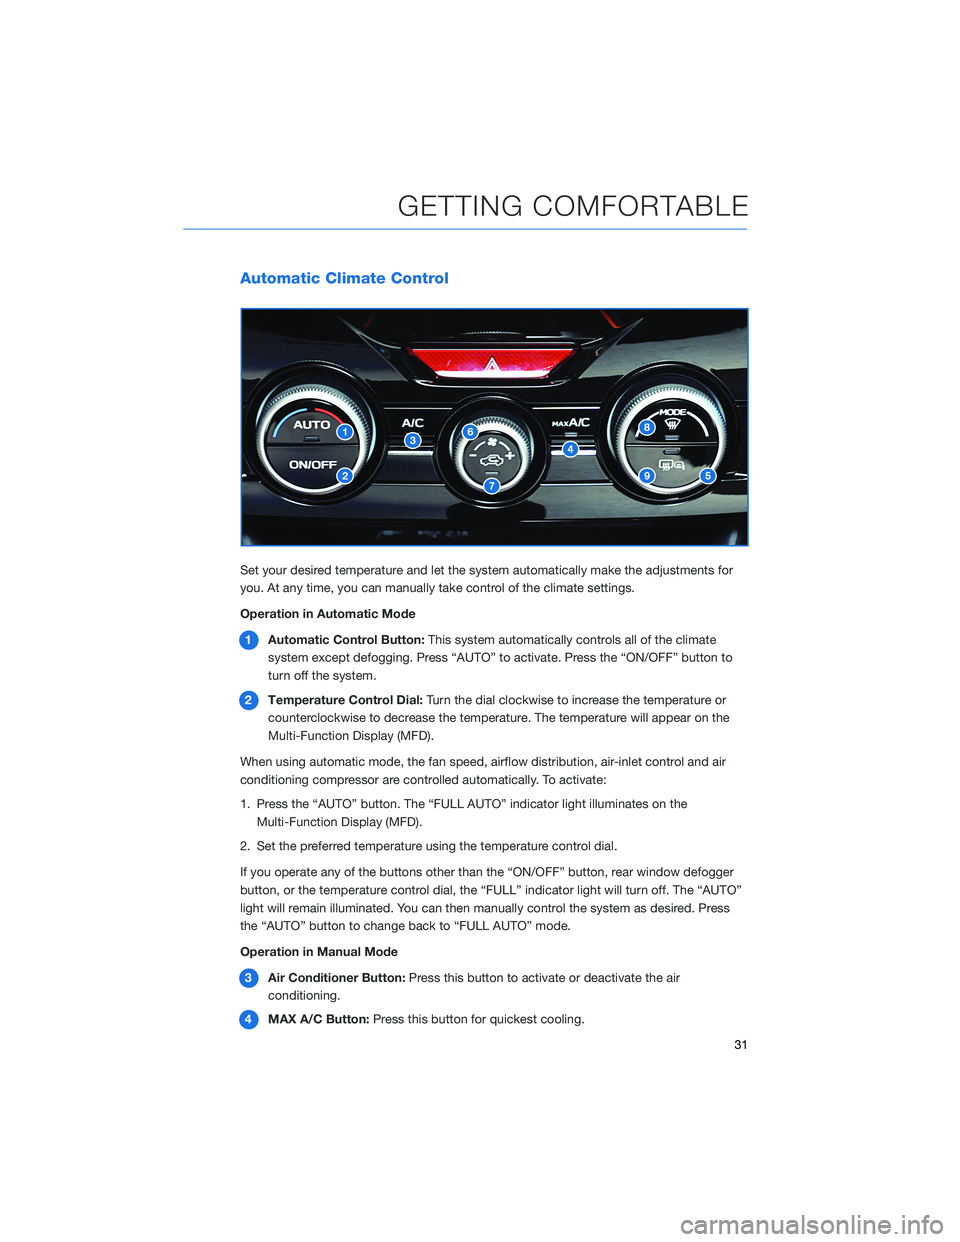
Automatic Climate Control
Set your desired temperature and let the system automatically make the adjustments for
you. At any time, you can manually take control of the climate settings.
Operation in Automatic Mode1 Automatic Control Button: This system automatically controls all of the climate
system except defogging. Press “AUTO” to activate. Press the “ON/OFF” button to
turn off the system.
2 Temperature Control Dial: Turn the dial clockwise to increase the temperature or
counterclockwise to decrease the temperature. The temperature will appear on the
Multi-Function Display (MFD).
When using automatic mode, the fan speed, airflow distribution, air-inlet control and air
conditioning compressor are controlled automatically. To activate:
1. Press the “AUTO” button. The “FULL AUTO” indicator light illuminates on the Multi-Function Display (MFD).
2. Set the preferred temperature using the temperature control dial.
If you operate any of the buttons other than the “ON/OFF” button, rear window defogger
button, or the temperature control dial, the “FULL” indicator light will turn off. The “AUTO”
light will remain illuminated. You can then manually control the system as desired. Press
the “AUTO” button to change back to “FULL AUTO” mode.
Operation in Manual Mode
3 Air Conditioner Button: Press this button to activate or deactivate the air
conditioning.
4 MAX A/C Button: Press this button for quickest cooling.
GETTING COMFORTABLE
31
Page 34 of 124
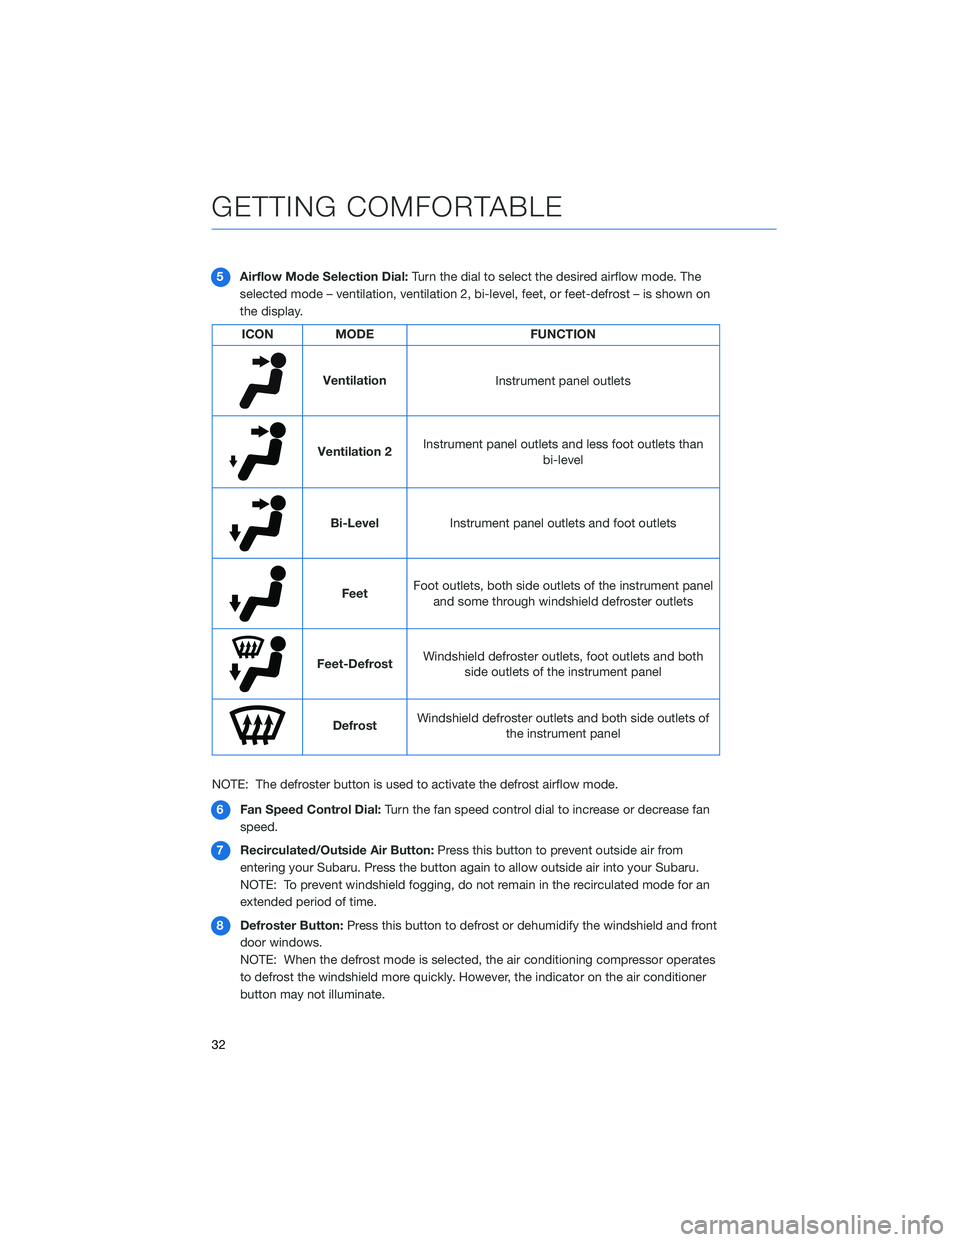
5Airflow Mode Selection Dial: Turn the dial to select the desired airflow mode. The
selected mode – ventilation, ventilation 2, bi-level, feet, or feet-defrost – is shown on
the display.
ICON MODE FUNCTION
Ventilation
Instrument panel outlets
Ventilation 2Instrument panel outlets and less foot outlets than
bi-level
Bi-LevelInstrument panel outlets and foot outlets
FeetFoot outlets, both side outlets of the instrument panel
and some through windshield defroster outlets
Feet-Defrost Windshield defroster outlets, foot outlets and both
side outlets of the instrument panel
Defrost Windshield defroster outlets and both side outlets of
the instrument panel
NOTE: The defroster button is used to activate the defrost airflow mode. 6 Fan Speed Control Dial: Turn the fan speed control dial to increase or decrease fan
speed.
7 Recirculated/Outside Air Button: Press this button to prevent outside air from
entering your Subaru. Press the button again to allow outside air into your Subaru.
NOTE: To prevent windshield fogging, do not remain in the recirculated mode for an
extended period of time.
8 Defroster Button: Press this button to defrost or dehumidify the windshield and front
door windows.
NOTE: When the defrost mode is selected, the air conditioning compressor operates
to defrost the windshield more quickly. However, the indicator on the air conditioner
button may not illuminate.
GETTING COMFORTABLE
32
Page 38 of 124
DRIVING THE VEHICLE
5-Speed Manual Transmission
The manual transmission is a fully synchronised 5-forward and 1-reverse speed
transmission. To shift into reverse gear from 5th gear, you must first return the shift lever
into the neutral position, then shift into reverse gear.
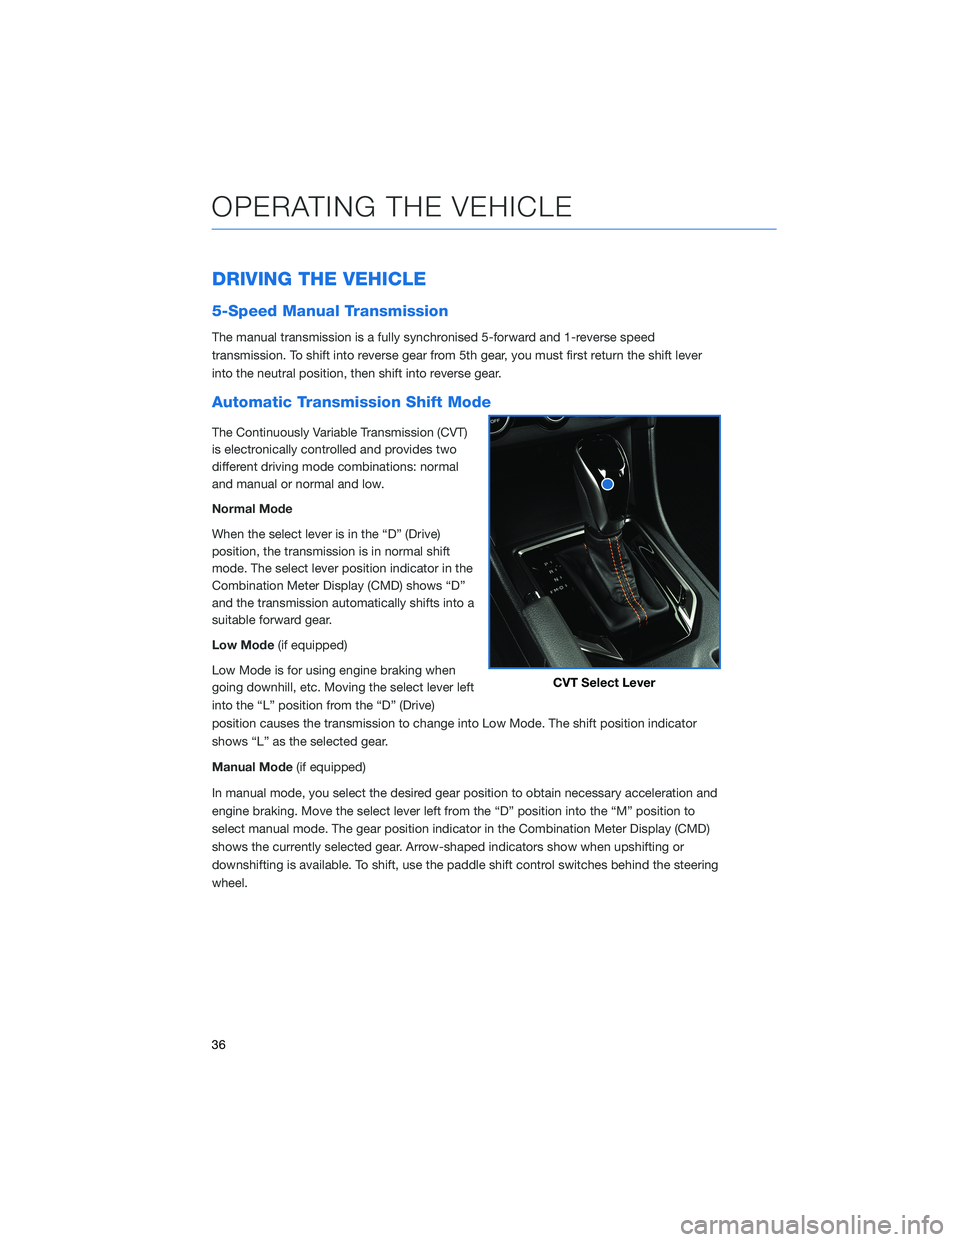
Automatic Transmission Shift Mode
The Continuously Variable Transmission (CVT)
is electronically controlled and provides two
different driving mode combinations: normal
and manual or normal and low.
Normal Mode
When the select lever is in the “D” (Drive)
position, the transmission is in normal shift
mode. The select lever position indicator in the
Combination Meter Display (CMD) shows “D”
and the transmission automatically shifts into a
suitable forward gear.
Low Mode(if equipped)
Low Mode is for using engine braking when
going downhill, etc. Moving the select lever left
into the “L” position from the “D” (Drive)
position causes the transmission to change into Low Mode. The shift position indicator
shows “L” as the selected gear.
Manual Mode (if equipped)
In manual mode, you select the desired gear position to obtain necessary acceleration and
engine braking. Move the select lever left from the “D” position into the “M” position to
select manual mode. The gear position indicator in the Combination Meter Display (CMD)
shows the currently selected gear. Arrow-shaped indicators show when upshifting or
downshifting is available. To shift, use the paddle shift control switches behind the steering
wheel.
CVT Select Lever
OPERATING THE VEHICLE
36
Page 57 of 124
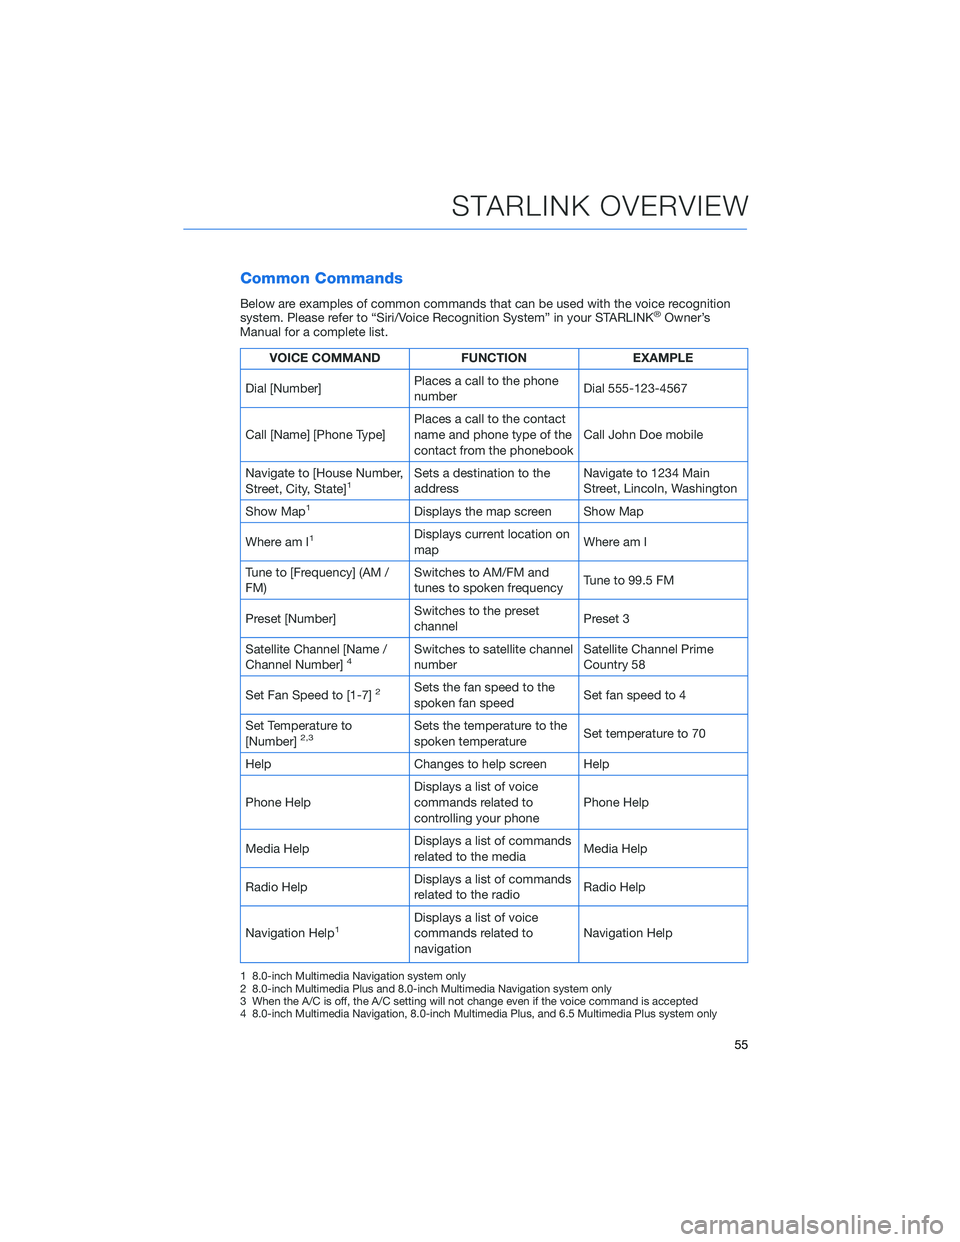
Common Commands
Below are examples of common commands that can be used with the voice recognition
system. Please refer to “Siri/Voice Recognition System” in your STARLINK®Owner’s
Manual for a complete list.
VOICE COMMAND FUNCTIONEXAMPLE
Dial [Number] Places a call to the phone
number Dial 555-123-4567
Call [Name] [Phone Type] Places a call to the contact
name and phone type of the
contact from the phonebook Call John Doe mobile
Navigate to [House Number,
Street, City, State]
1Sets a destination to the
address Navigate to 1234 Main
Street, Lincoln, Washington
Show Map
1Displays the map screen Show Map
Where am I
1Displays current location on
map Where am I
Tune to [Frequency] (AM /
FM) Switches to AM/FM and
tunes to spoken frequency
Tune to 99.5 FM
Preset [Number] Switches to the preset
channel Preset 3
Satellite Channel [Name /
Channel Number]
4Switches to satellite channel
number Satellite Channel Prime
Country 58
Set Fan Speed to [1-7]
2Sets the fan speed to the
spoken fan speed Set fan speed to 4
Set Temperature to
[Number]
2,3Sets the temperature to the
spoken temperature Set temperature to 70
Help Changes to help screen Help
Phone Help Displays a list of voice
commands related to
controlling your phone Phone Help
Media Help Displays a list of commands
related to the media Media Help
Radio Help Displays a list of commands
related to the radio Radio Help
Navigation Help
1Displays a list of voice
commands related to
navigation Navigation Help
1 8.0-inch Multimedia Navigation system only
2 8.0-inch Multimedia Plus and 8.0-inch Multimedia Navigation system only
3 When the A/C is off, the A/C setting will not change even if the voice command is accepted
4 8.0-inch Multimedia Navigation, 8.0-inch Multimedia Plus, and 6.5 Multimedia Plus system only
STARLINK OVERVIEW
55
Page 83 of 124
Pre-Collision Throttle Management
This function is designed to help prevent you from unintentionally accelerating into a
stopped vehicle or other obstacle by reducing engine power. Warnings are displayed in the
Combination Meter Display (CMD) with audible beeps.
Pre-Collision Throttle Management is helpful when:
• You unintentionally place the select lever in the “D” position instead of the “R” positionand start to accelerate toward a parked car, wall or parking structure.
• While you are at a stop, the vehicle ahead of you accelerates, but then suddenly slows down or stops as you begin to accelerate.
This system can be turned on or off by using the Pre-Collision Braking System OFF switch
(see page 86).
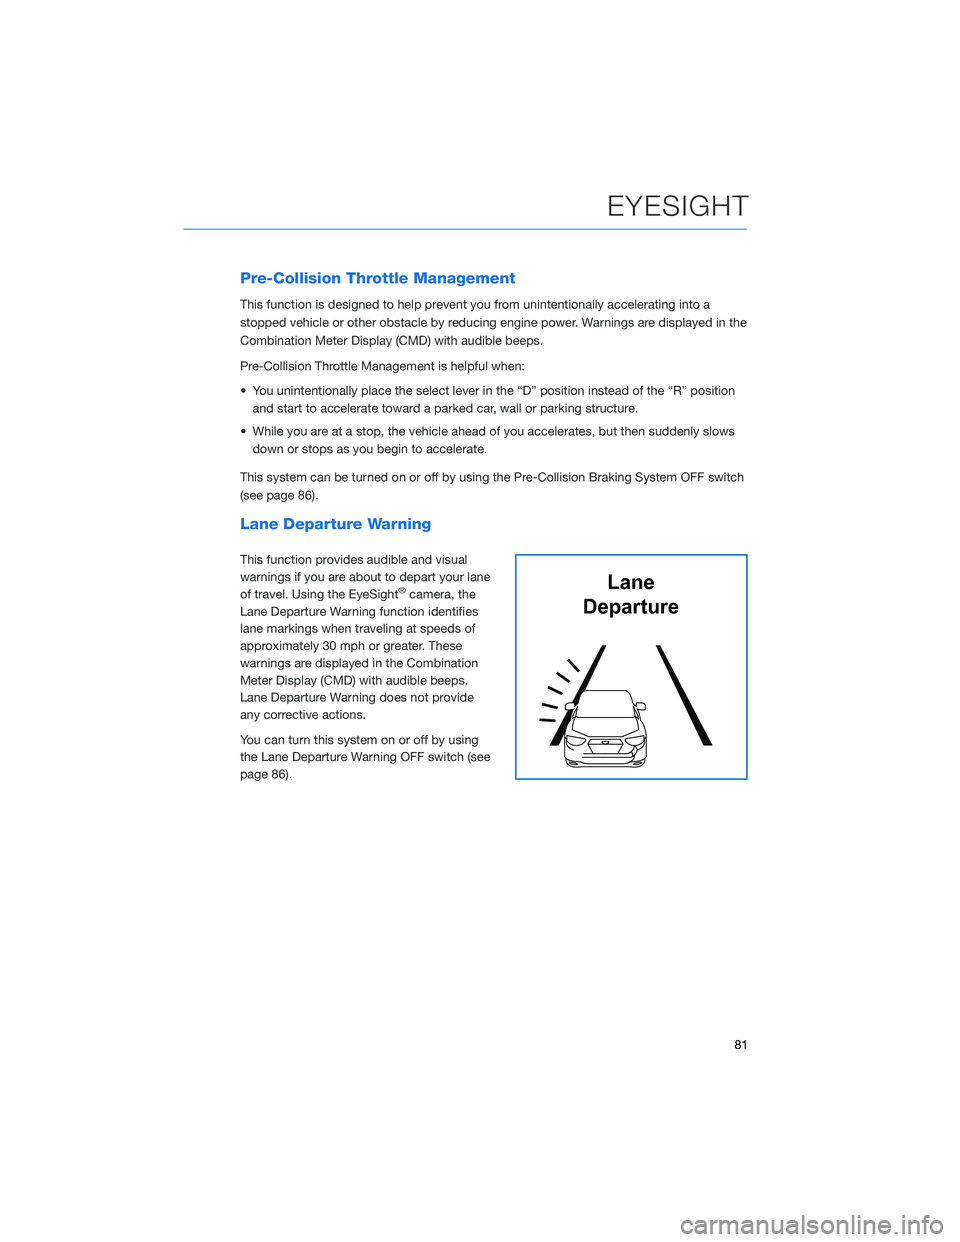
Lane Departure Warning
This function provides audible and visual
warnings if you are about to depart your lane
of travel. Using the EyeSight
®camera, the
Lane Departure Warning function identifies
lane markings when traveling at speeds of
approximately 30 mph or greater. These
warnings are displayed in the Combination
Meter Display (CMD) with audible beeps.
Lane Departure Warning does not provide
any corrective actions.
You can turn this system on or off by using
the Lane Departure Warning OFF switch (see
page 86).Lane
Departure
EYESIGHT
81
Page 84 of 124
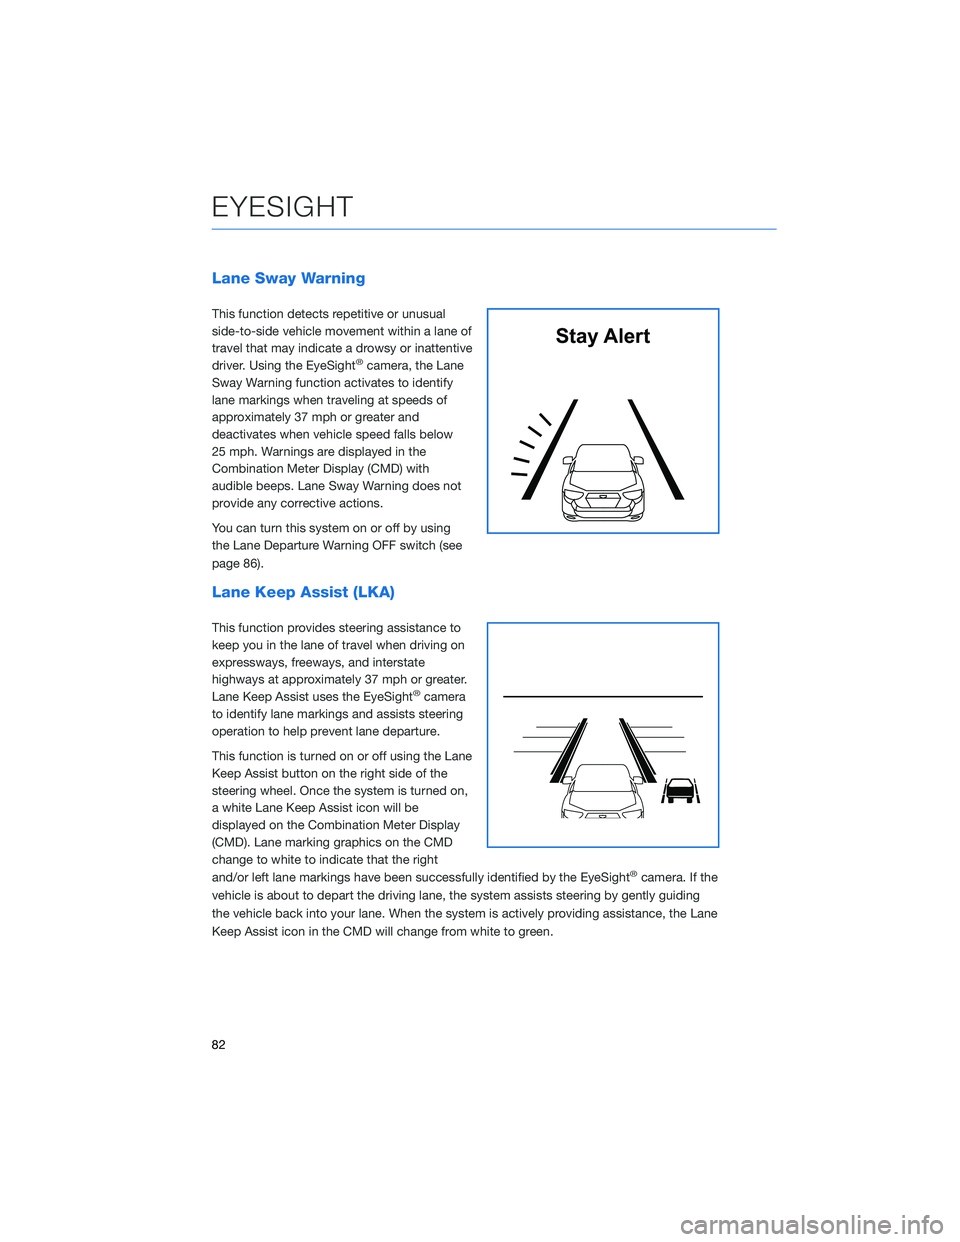
Lane Sway Warning
This function detects repetitive or unusual
side-to-side vehicle movement within a lane of
travel that may indicate a drowsy or inattentive
driver. Using the EyeSight
®camera, the Lane
Sway Warning function activates to identify
lane markings when traveling at speeds of
approximately 37 mph or greater and
deactivates when vehicle speed falls below
25 mph. Warnings are displayed in the
Combination Meter Display (CMD) with
audible beeps. Lane Sway Warning does not
provide any corrective actions.
You can turn this system on or off by using
the Lane Departure Warning OFF switch (see
page 86).
Lane Keep Assist (LKA)
This function provides steering assistance to
keep you in the lane of travel when driving on
expressways, freeways, and interstate
highways at approximately 37 mph or greater.
Lane Keep Assist uses the EyeSight
®camera
to identify lane markings and assists steering
operation to help prevent lane departure.
This function is turned on or off using the Lane
Keep Assist button on the right side of the
steering wheel. Once the system is turned on,
a white Lane Keep Assist icon will be
displayed on the Combination Meter Display
(CMD). Lane marking graphics on the CMD
change to white to indicate that the right
and/or left lane markings have been successfully identified by the EyeSight
®camera. If the
vehicle is about to depart the driving lane, the system assists steering by gently guiding
the vehicle back into your lane. When the system is actively providing assistance, the Lane
Keep Assist icon in the CMD will change from white to green.
Stay Alert
EYESIGHT
82
Page 85 of 124
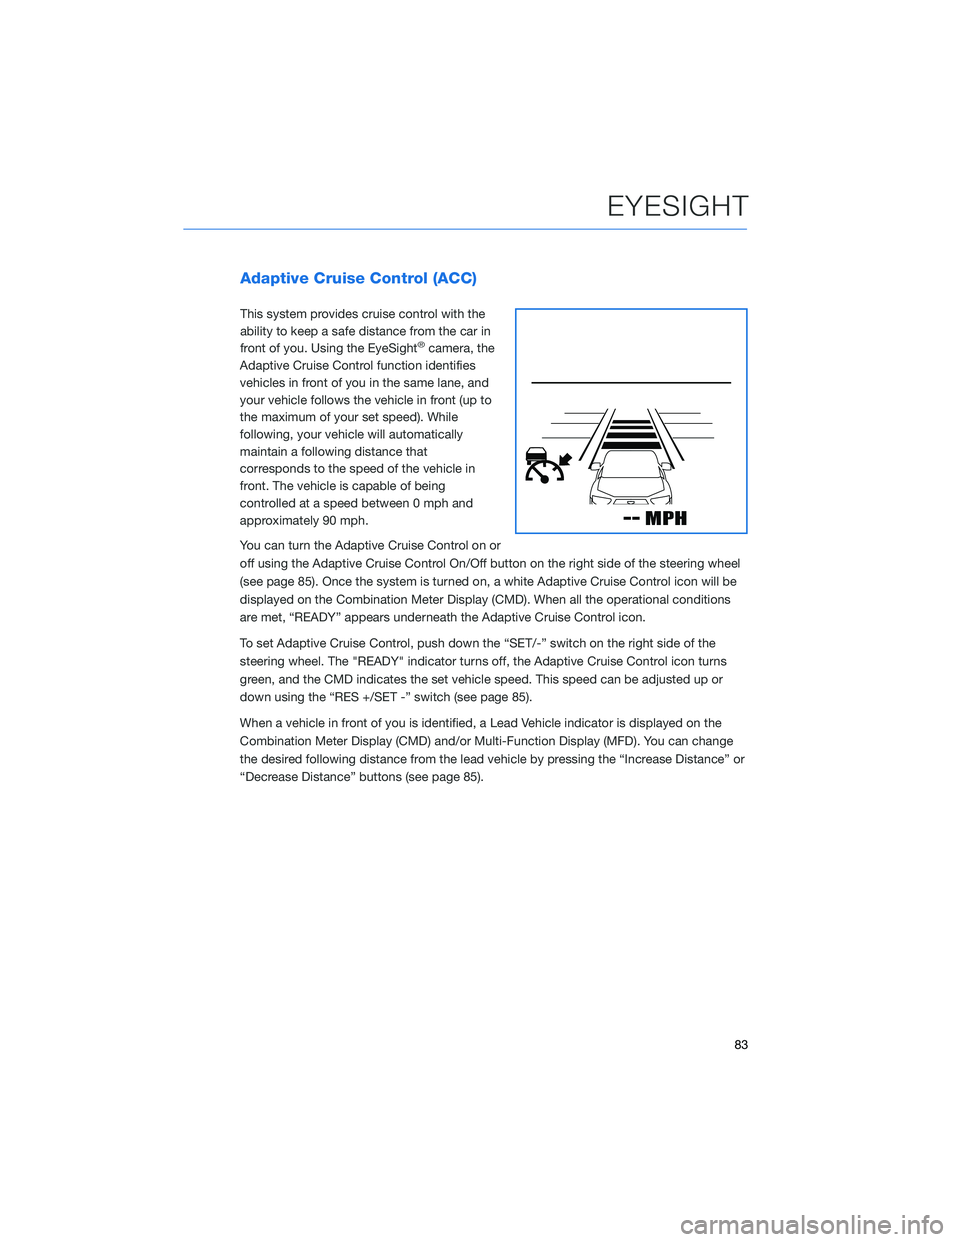
Adaptive Cruise Control (ACC)
This system provides cruise control with the
ability to keep a safe distance from the car in
front of you. Using the EyeSight
®camera, the
Adaptive Cruise Control function identifies
vehicles in front of you in the same lane, and
your vehicle follows the vehicle in front (up to
the maximum of your set speed). While
following, your vehicle will automatically
maintain a following distance that
corresponds to the speed of the vehicle in
front. The vehicle is capable of being
controlled at a speed between 0 mph and
approximately 90 mph.
You can turn the Adaptive Cruise Control on or
off using the Adaptive Cruise Control On/Off button on the right side of the steering wheel
(see page 85). Once the system is turned on, a white Adaptive Cruise Control icon will be
displayed on the Combination Meter Display (CMD). When all the operational conditions
are met, “READY” appears underneath the Adaptive Cruise Control icon.
To set Adaptive Cruise Control, push down the “SET/-” switch on the right side of the
steering wheel. The "READY" indicator turns off, the Adaptive Cruise Control icon turns
green, and the CMD indicates the set vehicle speed. This speed can be adjusted up or
down using the “RES +/SET -” switch (see page 85).
When a vehicle in front of you is identified, a Lead Vehicle indicator is displayed on the
Combination Meter Display (CMD) and/or Multi-Function Display (MFD). You can change
the desired following distance from the lead vehicle by pressing the “Increase Distance” or
“Decrease Distance” buttons (see page 85).
EYESIGHT
83