key SUBARU IMPREZA 2022 Getting Started Guide
[x] Cancel search | Manufacturer: SUBARU, Model Year: 2022, Model line: IMPREZA, Model: SUBARU IMPREZA 2022Pages: 124, PDF Size: 33.04 MB
Page 3 of 124
PURPOSE OF THIS GUIDE
WELCOME................. 4
IMPORTANT SAFETY
INFORMATION .............. 4
OWNER’S RESOURCES ....... 4
IN CASE OF EMERGENCY ..... 5
TOWING YOUR ALL-WHEEL
DRIVE SUBARU ............. 6
ENTRY AND EXIT
KEYLESS ENTRY ............ 7
KEYLESS ACCESS WITH PUSH
BUTTON START ............. 9
INSTRUMENT PANEL ........12
GAUGES AND WARNING
LIGHTS
COMBINATION METER .......14
WARNING AND INDICATOR
LIGHTS ....................15
CONTROLS
INSTRUMENT PANEL SWITCHES
(LOWER LEFT) ..............16
AUDIO CONTROLS ...........16
CRUISE CONTROL ...........17
ADAPTIVE CRUISE CONTROL . 17
i/SET SWITCH ...............18
INFO SWITCH ...............18
LIGHT CONTROLS ...........19 TURN SIGNALS
.............20
WINDSHIELD WIPERS ........20
REAR WINDOW WIPER
(Hatchback Models) ..........21
OVERHEAD CONSOLE ........21
GETTING COMFORTABLE
SEATING...................23
TILT AND TELESCOPIC
STEERING COLUMN .........25
POWER EXTERIOR MIRRORS . . 25
REAR VIEW MIRROR .........26
POWER WINDOWS ..........27
POWER MOONROOF ........28
CLIMATE CONTROL ..........29
ACCESSORY CONNECTIONS . . 34
OPERATING THE VEHICLE
IGNITION SWITCH ...........35
PUSH-BUTTON IGNITION
SWITCH ...................35
STARTING THE VEHICLE ......35
DRIVING THE VEHICLE .......36
TURNING OFF THE VEHICLE ...38
REFUELING
FUEL FILLER LID............39
FUEL SPECIFICATIONS AND
CAPACITY ..................39
TABLE OF CONTENTS
Page 6 of 124
WELCOME
Congratulations on choosing a Subaru Impreza and welcome to the Subaru family!
Subaru is more than a car company™. We are committed to making the world a better
place, and the Subaru Love Promise is our vision to show love and respect to all people at
every interaction with Subaru. We believe in building lifelong relationships with our
customers, earning your trust and exceeding your expectations by providing customer
service with integrity and compassion.
This Getting Started Guide will introduce you to your new Subaru Impreza by providing
information on the basic operation and key features of your Subaru as well as the
STARLINK
®and EyeSight®systems in your vehicle.
IMPORTANT SAFETY INFORMATION
The Getting Started Guide is not intended as a substitute for your Owner’s Manuals. We
strongly encourage you to review your Vehicle, STARLINK®, and EyeSight®Owner’s
Manuals to ensure complete understanding.
OWNER’S RESOURCES
If you’re having difficulty using any of the functions outlined in this guide, or want to learn
more, you can get additional information from the
following sources:
Your Subaru Owner’s Manuals:
Located in the glovebox
Online Subaru Owner’s Resources:
www.subaru.com/owners
Subaru Customer Support:
www.subaru.com/customer-support
1-800-782-2783 (1-800-SUBARU3 )
PURPOSE OF THIS GUIDE
4
Page 9 of 124
KEYLESS ENTRY
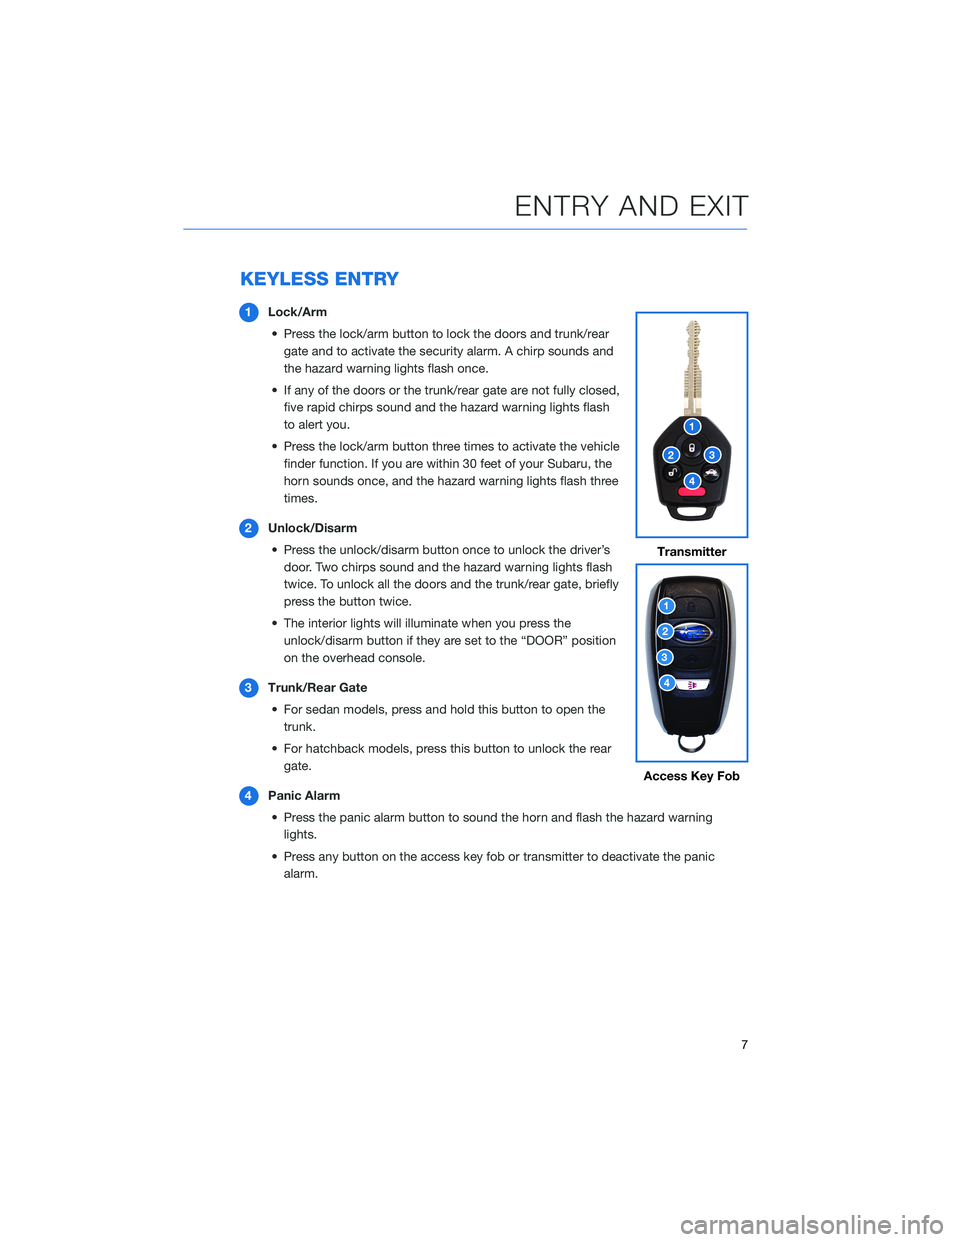
1Lock/Arm
• Press the lock/arm button to lock the doors and trunk/rear gate and to activate the security alarm. A chirp sounds and
the hazard warning lights flash once.
• If any of the doors or the trunk/rear gate are not fully closed, five rapid chirps sound and the hazard warning lights flash
to alert you.
• Press the lock/arm button three times to activate the vehicle finder function. If you are within 30 feet of your Subaru, the
horn sounds once, and the hazard warning lights flash three
times.
2 Unlock/Disarm
• Press the unlock/disarm button once to unlock the driver’s door. Two chirps sound and the hazard warning lights flash
twice. To unlock all the doors and the trunk/rear gate, briefly
press the button twice.
• The interior lights will illuminate when you press the unlock/disarm button if they are set to the “DOOR” position
on the overhead console.
3 Trunk/Rear Gate
• For sedan models, press and hold this button to open the trunk.
• For hatchback models, press this button to unlock the rear gate.
4 Panic Alarm
• Press the panic alarm button to sound the horn and flash the hazard warning lights.
• Press any button on the access key fob or transmitter to deactivate the panic alarm.
Transmitter
Access Key Fob
ENTRY AND EXIT
7
Page 11 of 124
KEYLESS ACCESS WITH PUSH BUTTON START
(if equipped)
The Keyless Access with Push-Button Start system features the following touch-activated
door locking or unlocking functions without the key ever leaving your pocket or purse;
simply carry the access key fob with you. You can customize the touch-activated door
locking or unlocking settings using the Combination Meter Display or through the
STARLINK
®Touchscreen by selecting “Settings” then “Vehicle”.
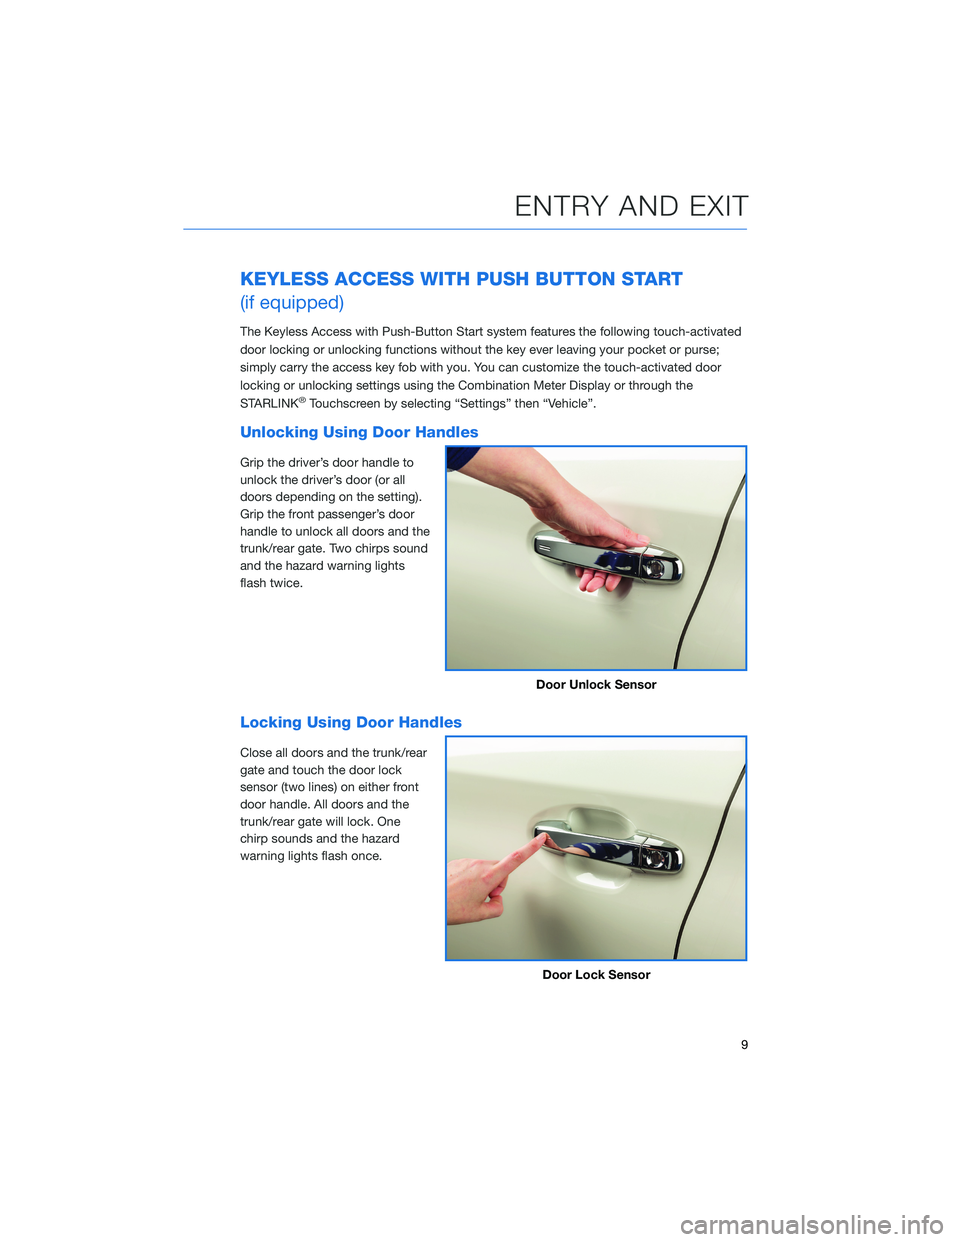
Unlocking Using Door Handles
Grip the driver’s door handle to
unlock the driver’s door (or all
doors depending on the setting).
Grip the front passenger’s door
handle to unlock all doors and the
trunk/rear gate. Two chirps sound
and the hazard warning lights
flash twice.
Locking Using Door Handles
Close all doors and the trunk/rear
gate and touch the door lock
sensor (two lines) on either front
door handle. All doors and the
trunk/rear gate will lock. One
chirp sounds and the hazard
warning lights flash once.
Door Unlock Sensor
Door Lock Sensor
ENTRY AND EXIT
9
Page 24 of 124
3Automatic Illumination: When the switch is in the “DOOR” position, the map lights
illuminate when any door is opened, the doors are unlocked using the remote keyless
entry system or keyless access function, or the ignition is turned from “ON” or “ACC”
to “LOCK”/“OFF”.
4 Lane Departure Warning OFF Switch: Press and hold this switch for two seconds to
turn off Lane Departure Warning and Lane Sway Warning. Press and hold the switch
again for two seconds to turn the systems back on.
For more information, please refer to page 86 in this Getting Started Guide or
“Lane Departure Warning” in your EyeSight®Owner’s Manual.
5 Pre-Collision Braking System OFF Switch: Press and hold this switch for two
seconds to turn off the Pre-Collision Braking System (including Pre-Collision Brake
Assist) and Pre-Collision Throttle Management. Press and hold the switch again for
two seconds to turn the systems back on.
For more information, please refer to page 86 in this Getting Started Guide or
“Pre-Collision Braking System” in your EyeSight®Owner’s Manual.
6 Map Lights: Press a map light to turn it on or off.
7 Power Moonroof Switch: Operate these switches to tilt and slide the moonroof.
For more information, please refer to page 28 in this Getting Started Guide or
“Keys and Doors” in your Owner’s Manual.
CONTROLS
22
Page 37 of 124
IGNITION SWITCH
The ignition switch has four positions:
LOCK:You can only insert or remove the key in this position.
ACC (Accessory): Provides power to the audio system and accessory power outlets.
ON: All electrical systems are available. The key returns to this position after starting the
engine.
START: Turn the key to this position to start the engine.
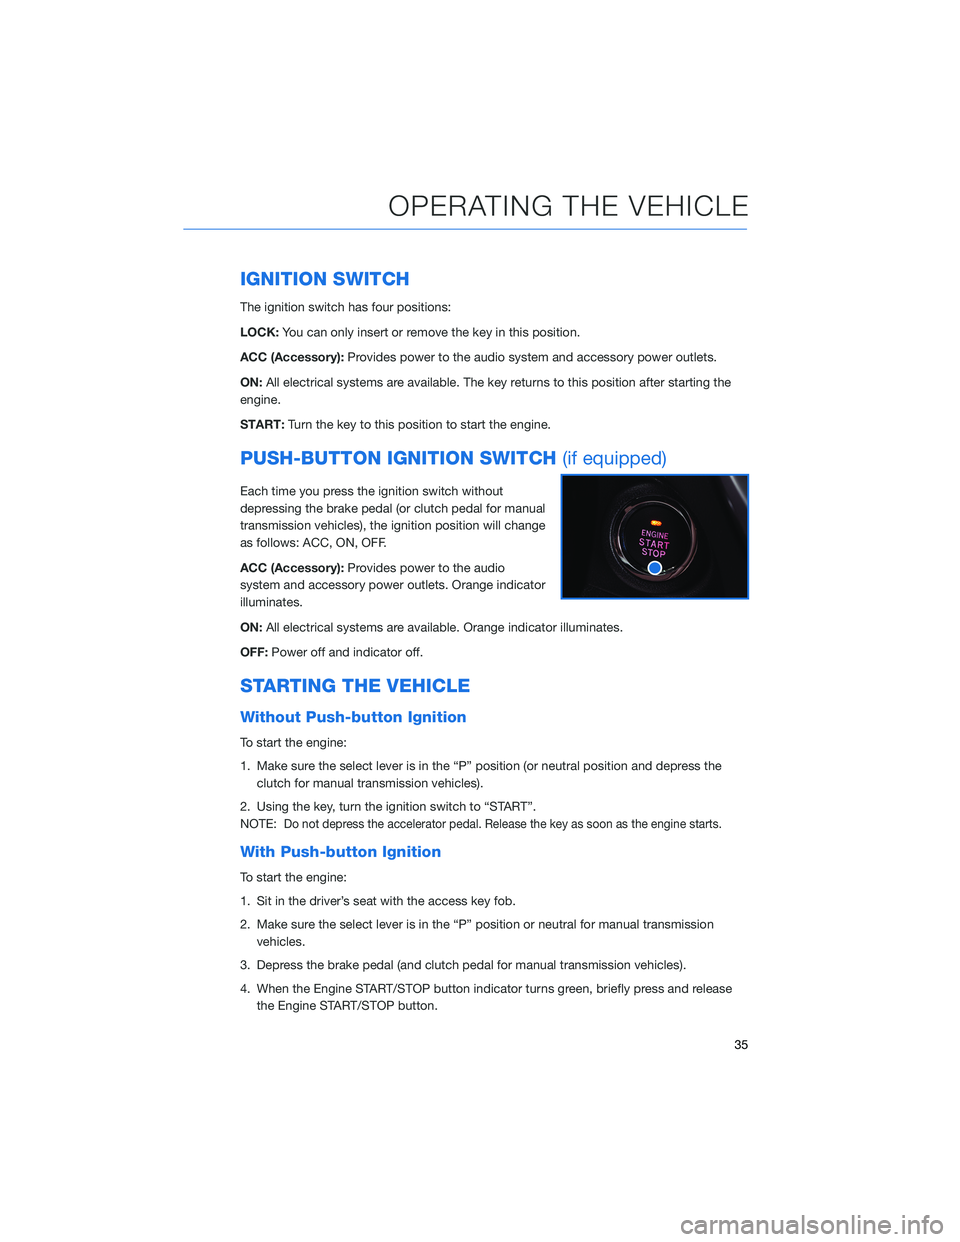
PUSH-BUTTON IGNITION SWITCH (if equipped)
Each time you press the ignition switch without
depressing the brake pedal (or clutch pedal for manual
transmission vehicles), the ignition position will change
as follows: ACC, ON, OFF.
ACC (Accessory):Provides power to the audio
system and accessory power outlets. Orange indicator
illuminates.
ON: All electrical systems are available. Orange indicator illuminates.
OFF: Power off and indicator off.
STARTING THE VEHICLE
Without Push-button Ignition
To start the engine:
1. Make sure the select lever is in the “P” position (or neutral position and depress the
clutch for manual transmission vehicles).
2. Using the key, turn the ignition switch to “START”.
NOTE:
Do not depress the accelerator pedal. Release the key as soon as the engine starts.
With Push-button Ignition
To start the engine:
1. Sit in the driver’s seat with the access key fob.
2. Make sure the select lever is in the “P” position or neutral for manual transmission vehicles.
3. Depress the brake pedal (and clutch pedal for manual transmission vehicles).
4. When the Engine START/STOP button indicator turns green, briefly press and release the Engine START/STOP button.
OPERATING THE VEHICLE
35
Page 60 of 124
CREATING A DRIVER PROFILE
Creating a Driver Profile provides many benefits beyond just pairing a phone. The profile
records and remembers station presets, sound preferences, home and work address (if
equipped with navigation), phone favorites, screen icons and placement, and the
background wallpaper.
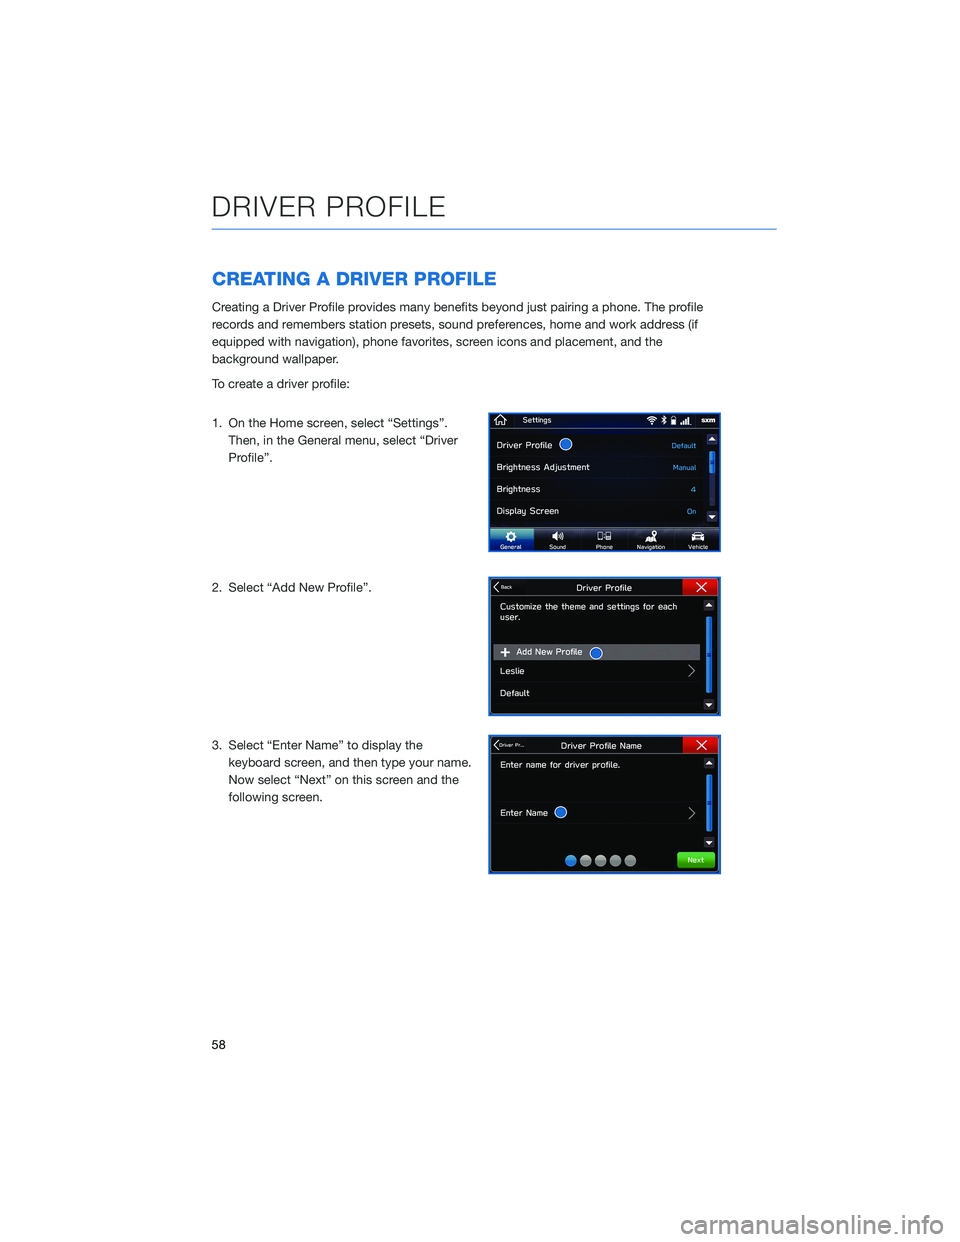
To create a driver profile:
1. On the Home screen, select “Settings”.Then, in the General menu, select “Driver
Profile”.
2. Select “Add New Profile”.
3. Select “Enter Name” to display the keyboard screen, and then type your name.
Now select “Next” on this screen and the
following screen.
DRIVER PROFILE
58
Page 64 of 124
PAIRING A PHONE
To begin using your Bluetooth®hands-free device you must first
pair your phone with the system. Phone pairing provides access to
the contact list on your phone and allows you to use the voice
recognition system to make and receive calls. The system can also
read incoming text messages, as well as allowing you to reply to
texts or send short messages. The system automatically reconnects
to your Bluetooth
®device and will remember your driver profile.
Visit www.subaru.com/engineering/starlink/multimedia.html for
more information on what is available by connecting a phone to the
Touchscreen.
For instructions on how to pair your phone to the Touchscreen, see page 94 for
Android devices or page 98 for Apple devices.
MAKING A CALL
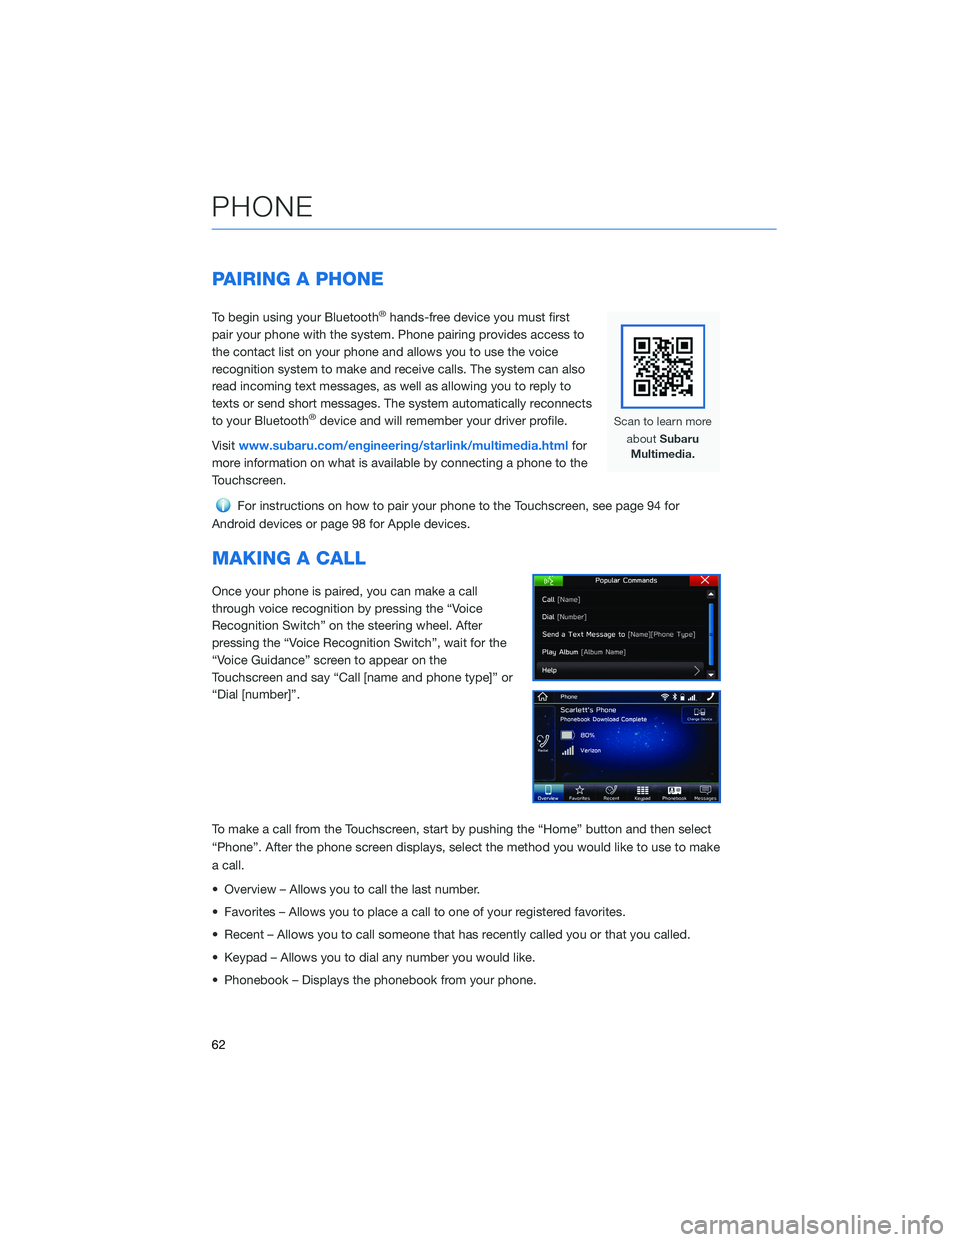
Once your phone is paired, you can make a call
through voice recognition by pressing the “Voice
Recognition Switch” on the steering wheel. After
pressing the “Voice Recognition Switch”, wait for the
“Voice Guidance” screen to appear on the
Touchscreen and say “Call [name and phone type]” or
“Dial [number]”.
To make a call from the Touchscreen, start by pushing the “Home” button and then select
“Phone”. After the phone screen displays, select the method you would like to use to make
a call.
• Overview – Allows you to call the last number.
• Favorites – Allows you to place a call to one of your registered favorites.
• Recent – Allows you to call someone that has recently called you or that you called.
• Keypad – Allows you to dial any number you would like.
• Phonebook – Displays the phonebook from your phone.
PHONE
62
Page 73 of 124
Head towww.Subaru.com/STARLINK to see all the SUBARU
STARLINK®subscription services and packages.
* Access to STARLINK®Safety and Security services requires an active
STARLINK®subscription. Not available in all States. See retailer for details.
Remote Engine Start available on keyless access with push-button start
vehicles. Remote Engine Start with Climate Control is available on select
models only. Not available on vehicles with manual transmission. See
Retailer for details or visit the STARLINK
®page on Subaru.com to learn
more.
ENROLLMENT
To enroll in SUBARU STARLINK®and access remote services, a MySubaru account is
required. MySubaru is the Subaru owner website that allows you to access vehicle remote
services, user preferences, diagnostic alerts and other useful features enabled by your
STARLINK
®Safety Plus, STARLINK®Security Plus and STARLINK®Concierge
subscription.
Your retailer may have created an account for you during the delivery process. However,
you can also create a MySubaru account at www.mysubaru.com.
Enrollment in SUBARU STARLINK
®can be done online at MySubaru.com, through the
MySubaru Mobile App, at your Subaru retailer or by calling a STARLINK®Customer Care
Representative at: 1-855-753-2495
NOTE: Please have your Vehicle Identification Number (VIN) available, as you will need it
to complete this step. After the enrollment process, you will learn more about the features
in detail at MySubaru.com.
STARLINK SAFETY AND SECURITY
71
Page 110 of 124
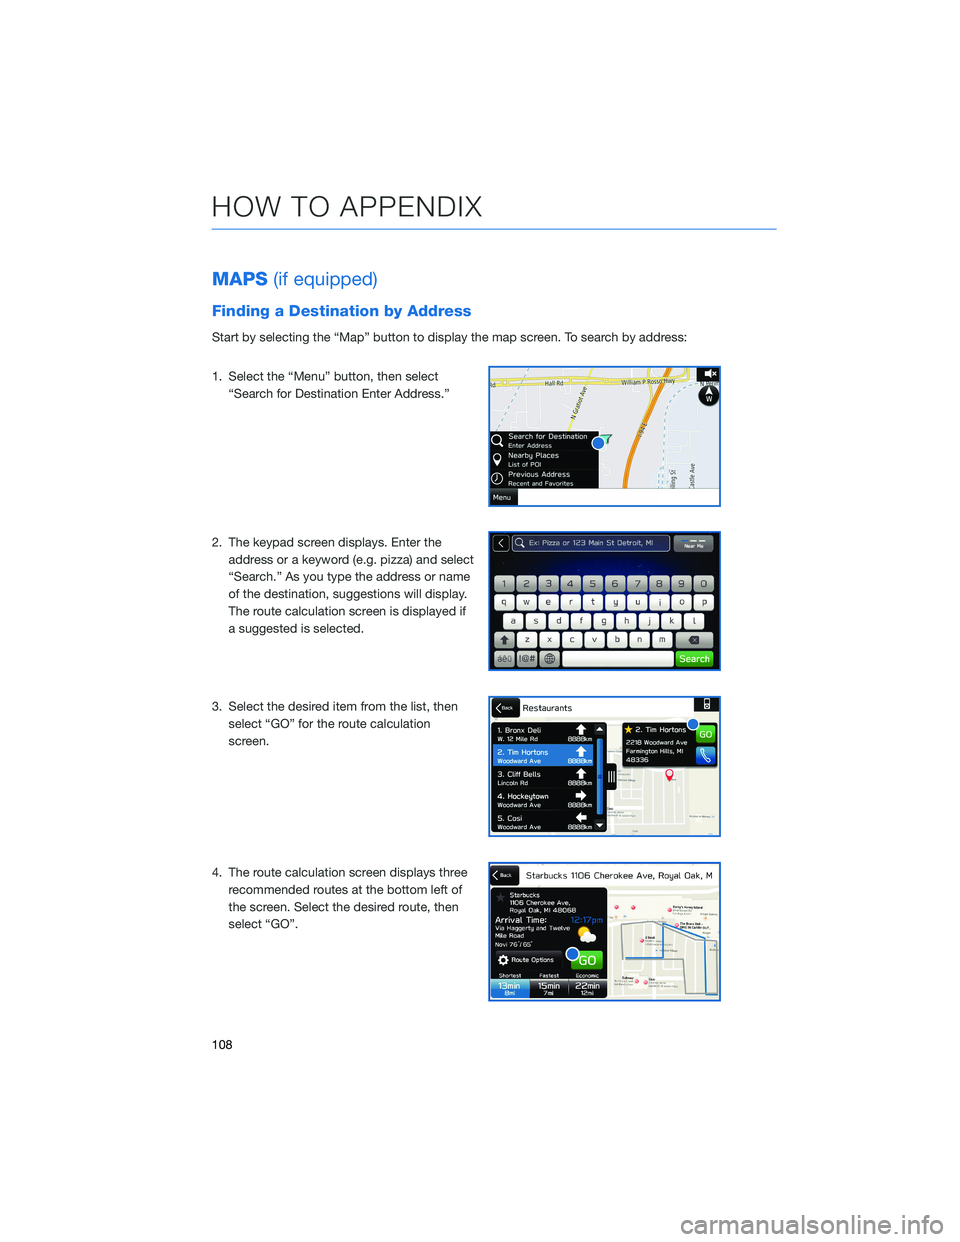
MAPS(if equipped)
Finding a Destination by Address
Start by selecting the “Map” button to display the map screen. To search by address:
1. Select the “Menu” button, then select
“Search for Destination Enter Address.”
2. The keypad screen displays. Enter the address or a keyword (e.g. pizza) and select
“Search.” As you type the address or name
of the destination, suggestions will display.
The route calculation screen is displayed if
a suggested is selected.
3. Select the desired item from the list, then select “GO” for the route calculation
screen.
4. The route calculation screen displays three recommended routes at the bottom left of
the screen. Select the desired route, then
select “GO”.
HOW TO APPENDIX
108