manual SUBARU IMPREZA 2022 Getting Started Guide
[x] Cancel search | Manufacturer: SUBARU, Model Year: 2022, Model line: IMPREZA, Model: SUBARU IMPREZA 2022Pages: 124, PDF Size: 33.04 MB
Page 6 of 124
WELCOME
Congratulations on choosing a Subaru Impreza and welcome to the Subaru family!
Subaru is more than a car company™. We are committed to making the world a better
place, and the Subaru Love Promise is our vision to show love and respect to all people at
every interaction with Subaru. We believe in building lifelong relationships with our
customers, earning your trust and exceeding your expectations by providing customer
service with integrity and compassion.
This Getting Started Guide will introduce you to your new Subaru Impreza by providing
information on the basic operation and key features of your Subaru as well as the
STARLINK
®and EyeSight®systems in your vehicle.
IMPORTANT SAFETY INFORMATION
The Getting Started Guide is not intended as a substitute for your Owner’s Manuals. We
strongly encourage you to review your Vehicle, STARLINK®, and EyeSight®Owner’s
Manuals to ensure complete understanding.
OWNER’S RESOURCES
If you’re having difficulty using any of the functions outlined in this guide, or want to learn
more, you can get additional information from the
following sources:
Your Subaru Owner’s Manuals:
Located in the glovebox
Online Subaru Owner’s Resources:
www.subaru.com/owners
Subaru Customer Support:
www.subaru.com/customer-support
1-800-782-2783 (1-800-SUBARU3 )
PURPOSE OF THIS GUIDE
4
Page 7 of 124
IN CASE OF EMERGENCY
SUBARU STARLINK®Safety and Security(subscription required)
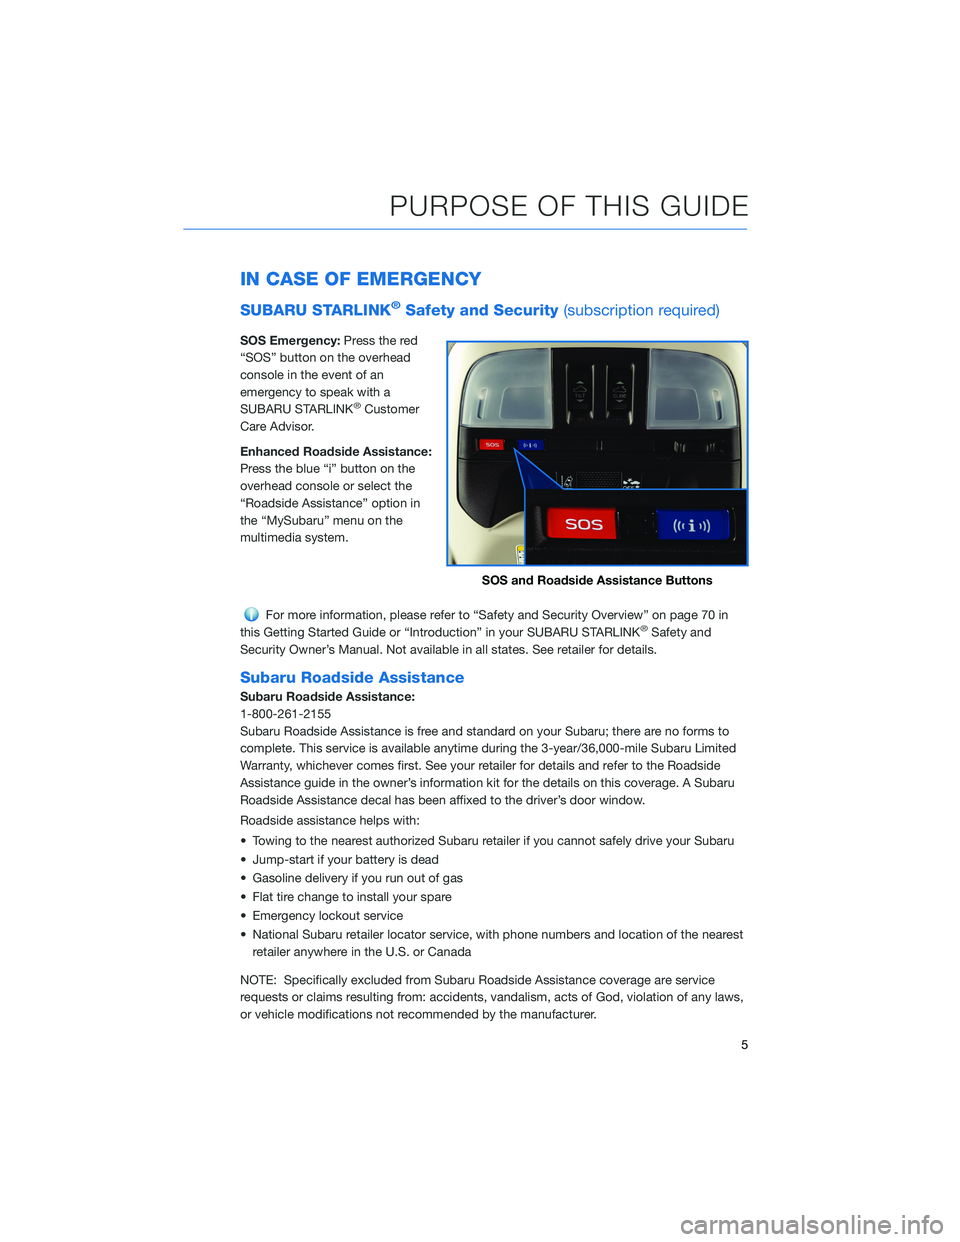
SOS Emergency:Press the red
“SOS” button on the overhead
console in the event of an
emergency to speak with a
SUBARU STARLINK
®Customer
Care Advisor.
Enhanced Roadside Assistance:
Press the blue “i” button on the
overhead console or select the
“Roadside Assistance” option in
the “MySubaru” menu on the
multimedia system.
For more information, please refer to “Safety and Security Overview” on page 70 in
this Getting Started Guide or “Introduction” in your SUBARU STARLINK®Safety and
Security Owner’s Manual. Not available in all states. See retailer for details.
Subaru Roadside Assistance
Subaru Roadside Assistance:
1-800-261-2155
Subaru Roadside Assistance is free and standard on your Subaru; there are no forms to
complete. This service is available anytime during the 3-year/36,000-mile Subaru Limited
Warranty, whichever comes first. See your retailer for details and refer to the Roadside
Assistance guide in the owner’s information kit for the details on this coverage. A Subaru
Roadside Assistance decal has been affixed to the driver’s door window.
Roadside assistance helps with:
• Towing to the nearest authorized Subaru retailer if you cannot safely drive your Subaru
• Jump-start if your battery is dead
• Gasoline delivery if you run out of gas
• Flat tire change to install your spare
• Emergency lockout service
• National Subaru retailer locator service, with phone numbers and location of the nearest retailer anywhere in the U.S. or Canada
NOTE: Specifically excluded from Subaru Roadside Assistance coverage are service
requests or claims resulting from: accidents, vandalism, acts of God, violation of any laws,
or vehicle modifications not recommended by the manufacturer.
SOS and Roadside Assistance Buttons
PURPOSE OF THIS GUIDE
5
Page 8 of 124
TOWING YOUR ALL-WHEEL DRIVE SUBARU
Since Subaru Symmetrical All-Wheel Drive distributes power to all four wheels, improper
towing may damage your AWD system. The best way to tow your Impreza is with a flatbed
truck by your Subaru retailer or a commercial towing service.
For more information, please refer to “In Case of Emergency” in your Owner’s Manual.
PURPOSE OF THIS GUIDE
6
Page 18 of 124
INSTRUMENT PANEL SWITCHES (LOWER LEFT)
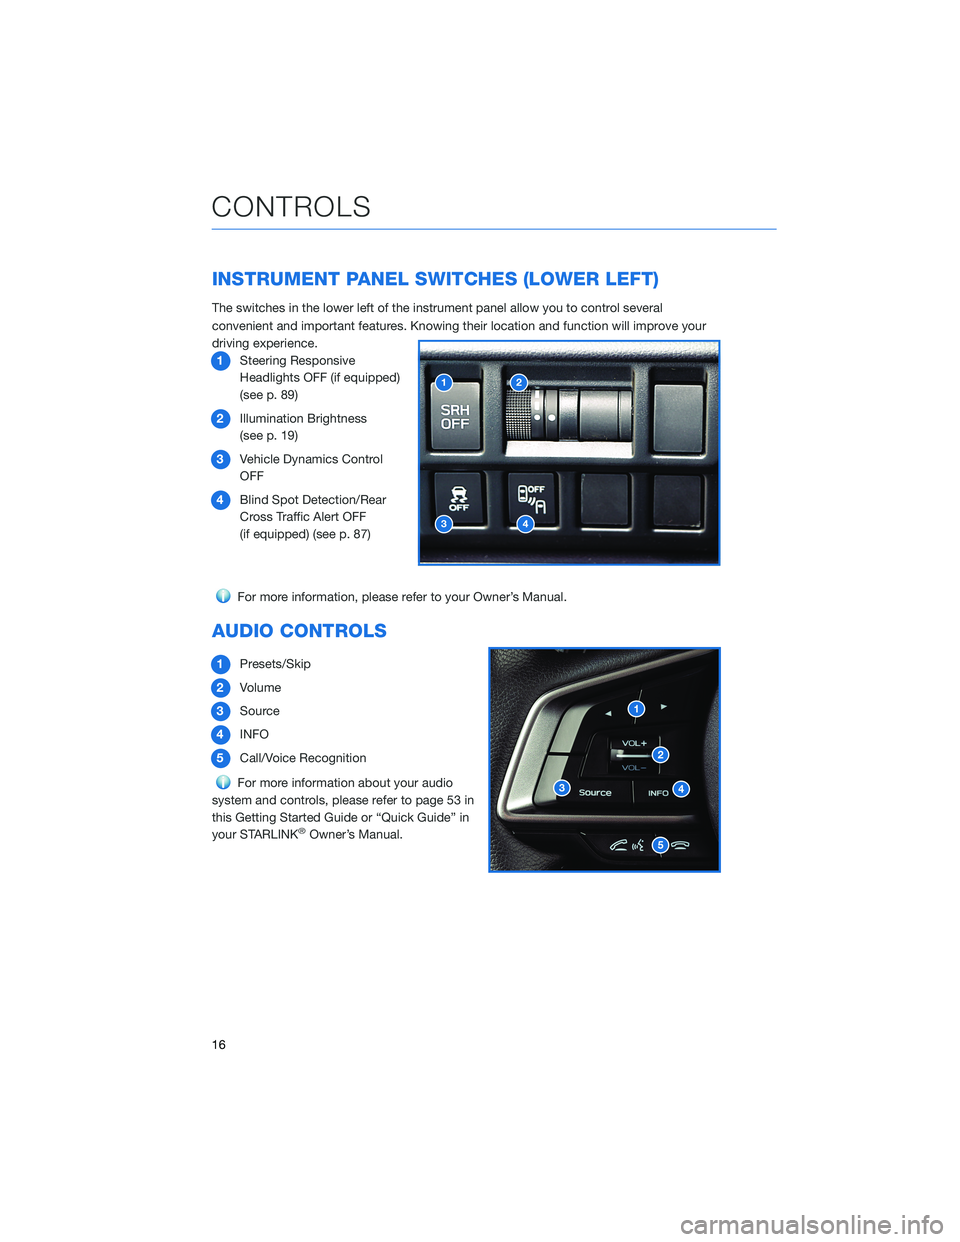
The switches in the lower left of the instrument panel allow you to control several
convenient and important features. Knowing their location and function will improve your
driving experience.1 Steering Responsive
Headlights OFF (if equipped)
(see p. 89)
2 Illumination Brightness
(see p. 19)
3 Vehicle Dynamics Control
OFF
4 Blind Spot Detection/Rear
Cross Traffic Alert OFF
(if equipped) (see p. 87)
For more information, please refer to your Owner’s Manual.
AUDIO CONTROLS
1Presets/Skip
2 Volume
3 Source
4 INFO
5 Call/Voice Recognition
For more information about your audio
system and controls, please refer to page 53 in
this Getting Started Guide or “Quick Guide” in
your STARLINK
®Owner’s Manual.
CONTROLS
16
Page 19 of 124
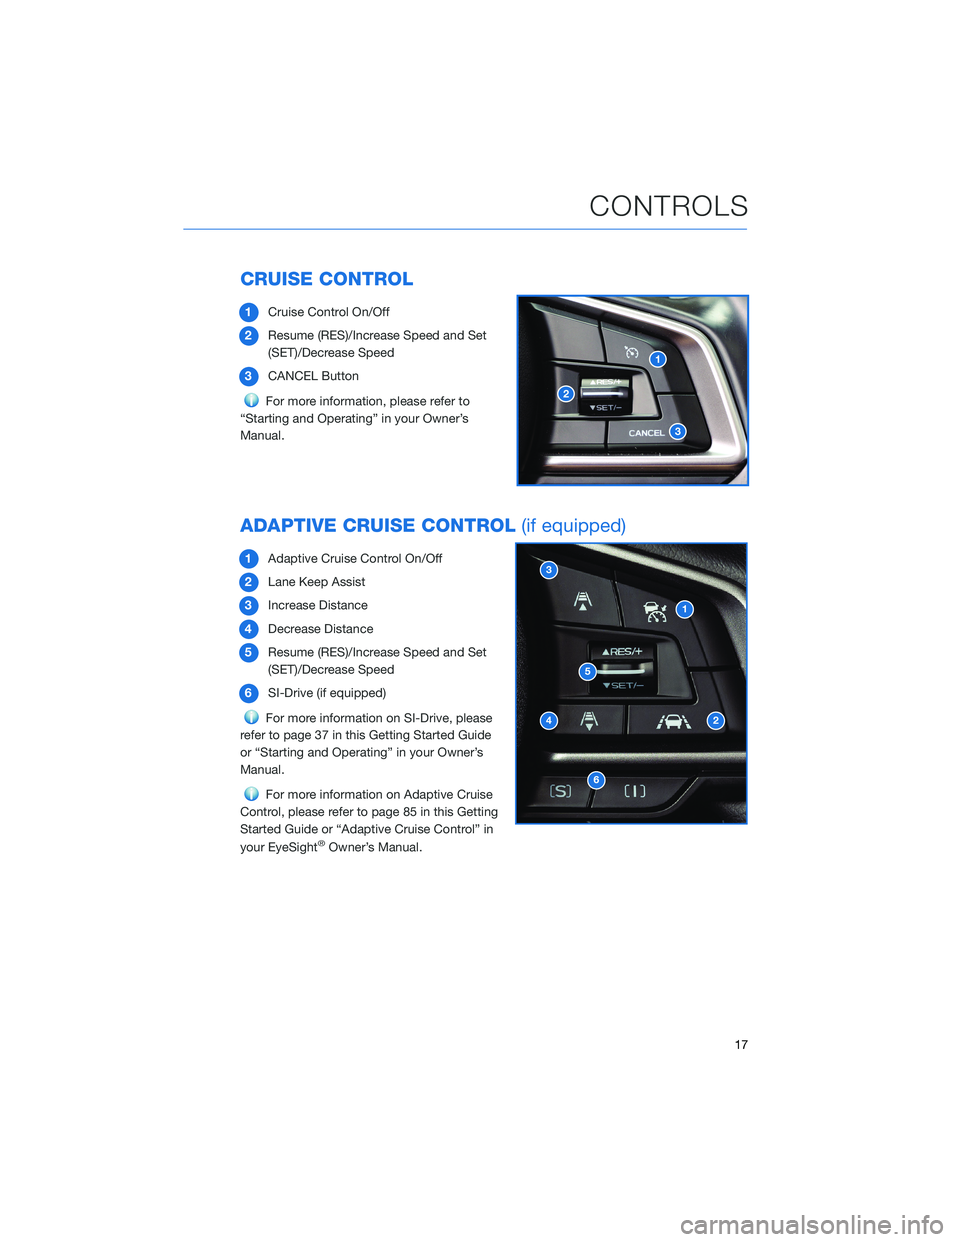
CRUISE CONTROL
1Cruise Control On/Off
2 Resume (RES)/Increase Speed and Set
(SET)/Decrease Speed
3 CANCEL Button
For more information, please refer to
“Starting and Operating” in your Owner’s
Manual.
ADAPTIVE CRUISE CONTROL (if equipped)
1Adaptive Cruise Control On/Off
2 Lane Keep Assist
3 Increase Distance
4 Decrease Distance
5 Resume (RES)/Increase Speed and Set
(SET)/Decrease Speed
6 SI-Drive (if equipped)
For more information on SI-Drive, please
refer to page 37 in this Getting Started Guide
or “Starting and Operating” in your Owner’s
Manual.
For more information on Adaptive Cruise
Control, please refer to page 85 in this Getting
Started Guide or “Adaptive Cruise Control” in
your EyeSight
®Owner’s Manual.
CONTROLS
17
Page 20 of 124
i/SET SWITCH
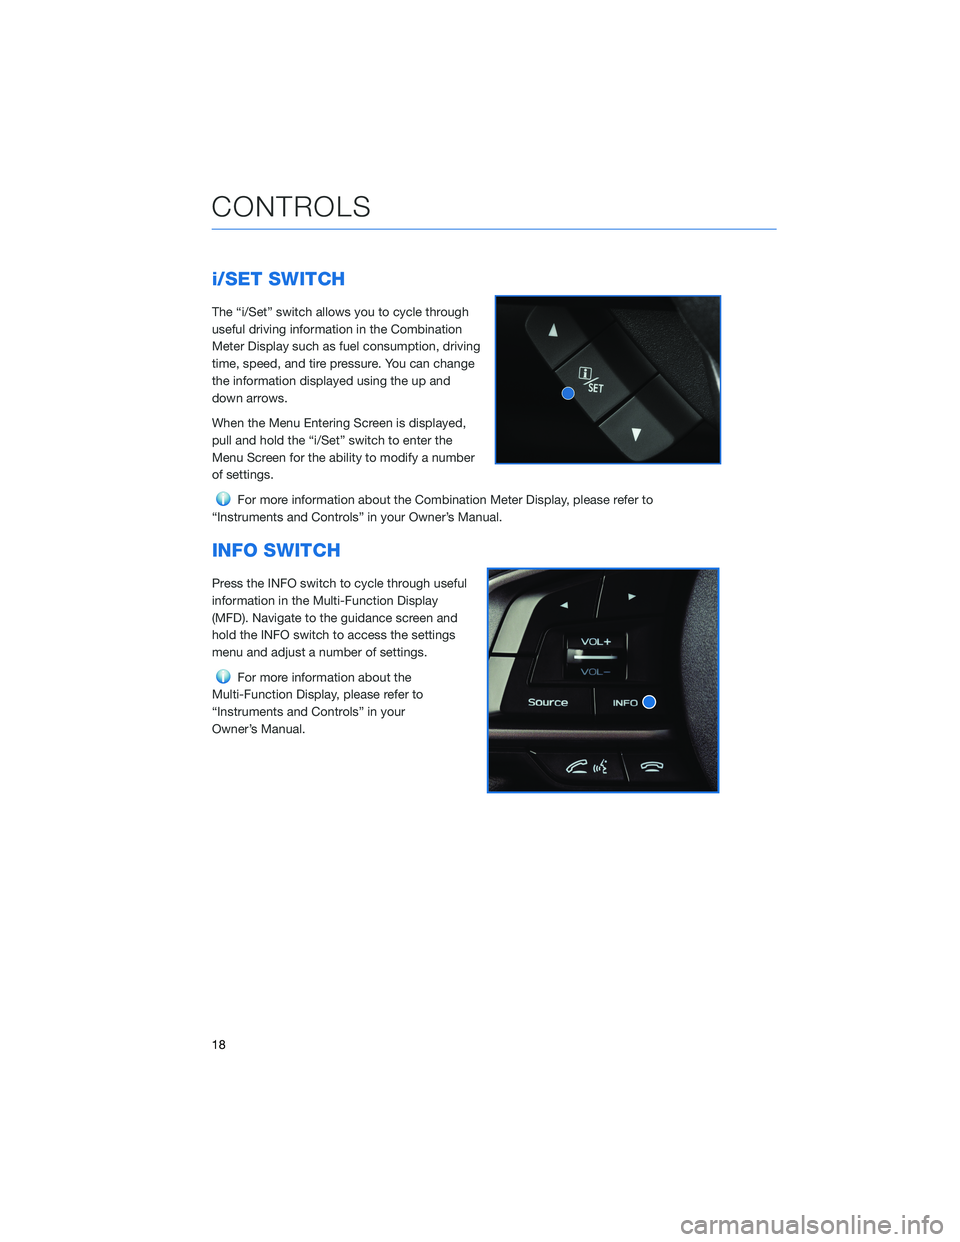
The “i/Set” switch allows you to cycle through
useful driving information in the Combination
Meter Display such as fuel consumption, driving
time, speed, and tire pressure. You can change
the information displayed using the up and
down arrows.
When the Menu Entering Screen is displayed,
pull and hold the “i/Set” switch to enter the
Menu Screen for the ability to modify a number
of settings.
For more information about the Combination Meter Display, please refer to
“Instruments and Controls” in your Owner’s Manual.
INFO SWITCH
Press the INFO switch to cycle through useful
information in the Multi-Function Display
(MFD). Navigate to the guidance screen and
hold the INFO switch to access the settings
menu and adjust a number of settings.
For more information about the
Multi-Function Display, please refer to
“Instruments and Controls” in your
Owner’s Manual.
CONTROLS
18
Page 21 of 124
LIGHT CONTROLS
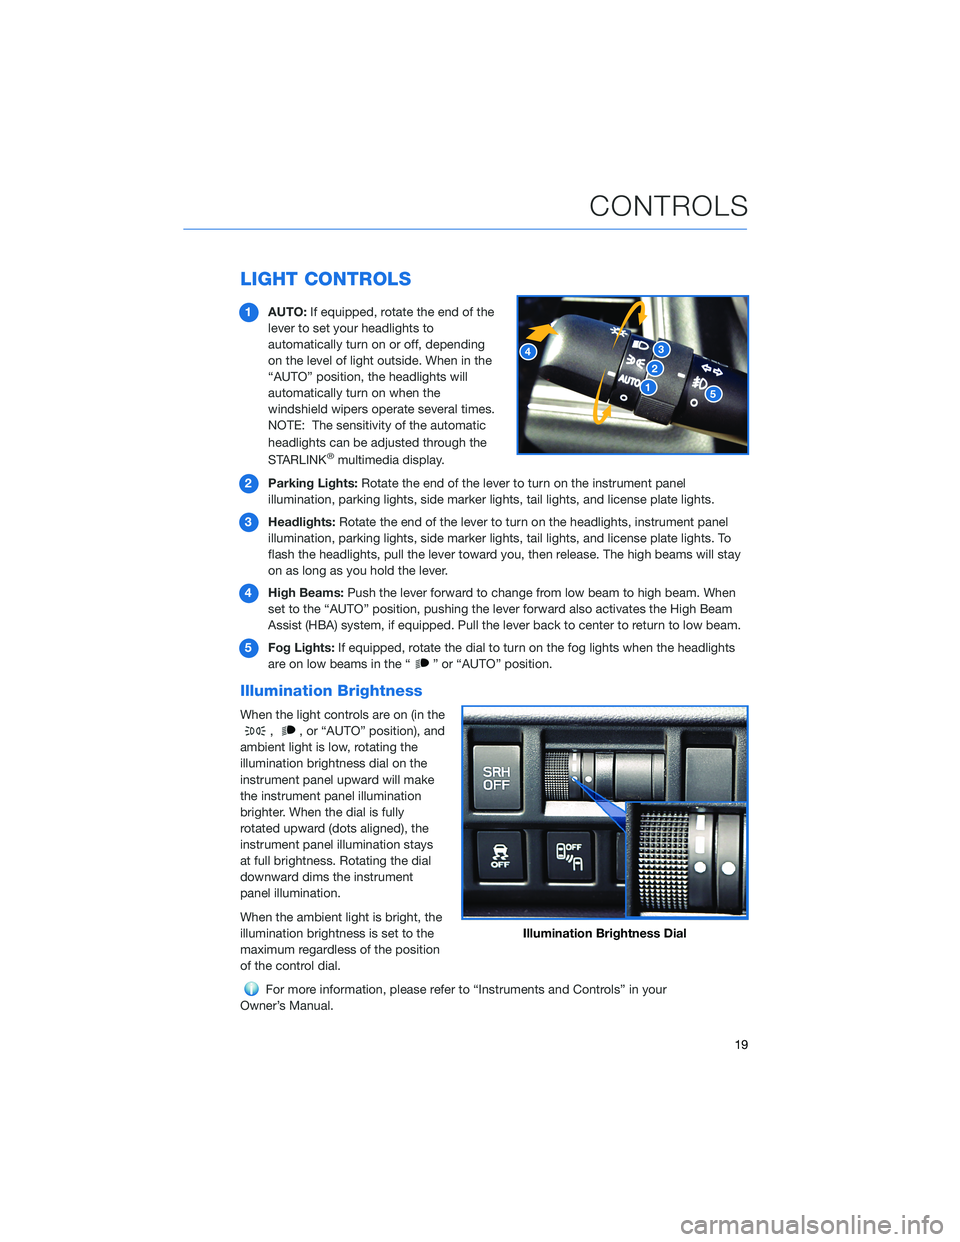
1AUTO: If equipped, rotate the end of the
lever to set your headlights to
automatically turn on or off, depending
on the level of light outside. When in the
“AUTO” position, the headlights will
automatically turn on when the
windshield wipers operate several times.
NOTE: The sensitivity of the automatic
headlights can be adjusted through the
STARLINK
®multimedia display.
2 Parking Lights: Rotate the end of the lever to turn on the instrument panel
illumination, parking lights, side marker lights, tail lights, and license plate lights.
3 Headlights: Rotate the end of the lever to turn on the headlights, instrument panel
illumination, parking lights, side marker lights, tail lights, and license plate lights. To
flash the headlights, pull the lever toward you, then release. The high beams will stay
on as long as you hold the lever.
4 High Beams: Push the lever forward to change from low beam to high beam. When
set to the “AUTO” position, pushing the lever forward also activates the High Beam
Assist (HBA) system, if equipped. Pull the lever back to center to return to low beam.
5 Fog Lights: If equipped, rotate the dial to turn on the fog lights when the headlights
are on low beams in the “
” or “AUTO” position.
Illumination Brightness
When the light controls are on (in the
,, or “AUTO” position), and
ambient light is low, rotating the
illumination brightness dial on the
instrument panel upward will make
the instrument panel illumination
brighter. When the dial is fully
rotated upward (dots aligned), the
instrument panel illumination stays
at full brightness. Rotating the dial
downward dims the instrument
panel illumination.
When the ambient light is bright, the
illumination brightness is set to the
maximum regardless of the position
of the control dial.
For more information, please refer to “Instruments and Controls” in your
Owner’s Manual.
Illumination Brightness Dial
CONTROLS
19
Page 23 of 124
REAR WINDOW WIPER (Hatchback Models)
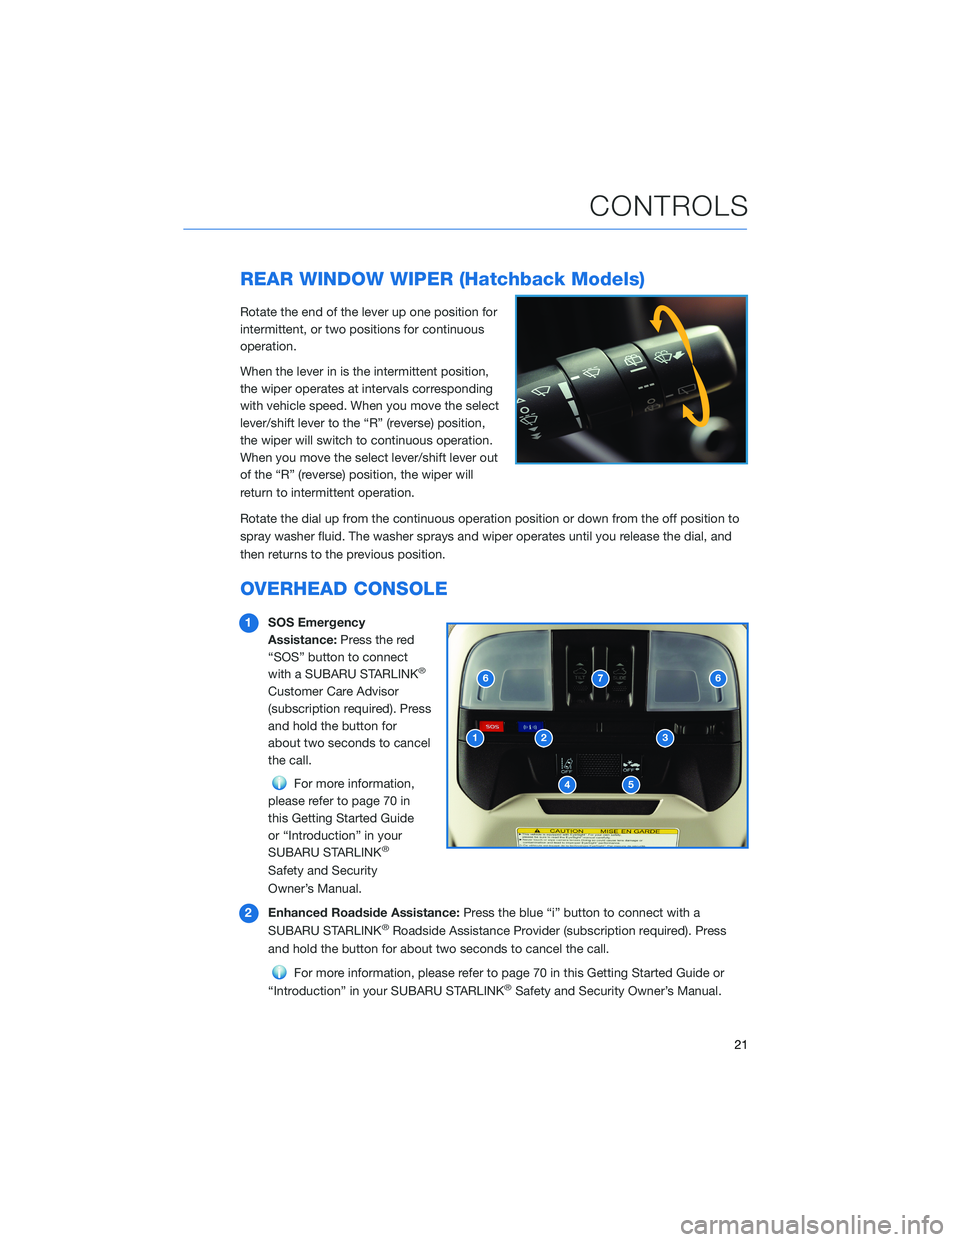
Rotate the end of the lever up one position for
intermittent, or two positions for continuous
operation.
When the lever in is the intermittent position,
the wiper operates at intervals corresponding
with vehicle speed. When you move the select
lever/shift lever to the “R” (reverse) position,
the wiper will switch to continuous operation.
When you move the select lever/shift lever out
of the “R” (reverse) position, the wiper will
return to intermittent operation.
Rotate the dial up from the continuous operation position or down from the off position to
spray washer fluid. The washer sprays and wiper operates until you release the dial, and
then returns to the previous position.
OVERHEAD CONSOLE
1SOS Emergency
Assistance: Press the red
“SOS” button to connect
with a SUBARU STARLINK
®
Customer Care Advisor
(subscription required). Press
and hold the button for
about two seconds to cancel
the call.
For more information,
please refer to page 70 in
this Getting Started Guide
or “Introduction” in your
SUBARU STARLINK
®
Safety and Security
Owner’s Manual.
2 Enhanced Roadside Assistance: Press the blue “i” button to connect with a
SUBARU STARLINK
®Roadside Assistance Provider (subscription required). Press
and hold the button for about two seconds to cancel the call.
For more information, please refer to page 70 in this Getting Started Guide or
“Introduction” in your SUBARU STARLINK®Safety and Security Owner’s Manual.
CONTROLS
21
Page 24 of 124
3Automatic Illumination: When the switch is in the “DOOR” position, the map lights
illuminate when any door is opened, the doors are unlocked using the remote keyless
entry system or keyless access function, or the ignition is turned from “ON” or “ACC”
to “LOCK”/“OFF”.
4 Lane Departure Warning OFF Switch: Press and hold this switch for two seconds to
turn off Lane Departure Warning and Lane Sway Warning. Press and hold the switch
again for two seconds to turn the systems back on.
For more information, please refer to page 86 in this Getting Started Guide or
“Lane Departure Warning” in your EyeSight®Owner’s Manual.
5 Pre-Collision Braking System OFF Switch: Press and hold this switch for two
seconds to turn off the Pre-Collision Braking System (including Pre-Collision Brake
Assist) and Pre-Collision Throttle Management. Press and hold the switch again for
two seconds to turn the systems back on.
For more information, please refer to page 86 in this Getting Started Guide or
“Pre-Collision Braking System” in your EyeSight®Owner’s Manual.
6 Map Lights: Press a map light to turn it on or off.
7 Power Moonroof Switch: Operate these switches to tilt and slide the moonroof.
For more information, please refer to page 28 in this Getting Started Guide or
“Keys and Doors” in your Owner’s Manual.
CONTROLS
22
Page 25 of 124
SEATING
Manual Seats
1Forward/Backward: Pull
the lever below the seat up
and slide the seat forward or
backward. Release the lever
and make sure the seat is
locked into place.
2 Seat Height (Driver’s Seat):
Pulling up or pushing down
on the lever will raise or
lower the seat cushion.
3 Recline Seatback: Pull the
lever up to adjust the
seatback. Release the lever
and make sure the seatback
is locked into place.
Power Driver’s Seat (if equipped)
1Seat Position: Moving the
switch forward or backward
will adjust the seat in that
direction. Pulling up or
pushing down on the back
of the switch will adjust the
seat height up or down.
2 Recline Seatback: Moving
the top of the switch forward
or backward will adjust the
angle of the seatback.
Manual Seat Levers
Power Seat Controls
GETTING COMFORTABLE
23