tow SUBARU IMPREZA 2022 Getting Started Guide
[x] Cancel search | Manufacturer: SUBARU, Model Year: 2022, Model line: IMPREZA, Model: SUBARU IMPREZA 2022Pages: 124, PDF Size: 33.04 MB
Page 3 of 124
PURPOSE OF THIS GUIDE
WELCOME................. 4
IMPORTANT SAFETY
INFORMATION .............. 4
OWNER’S RESOURCES ....... 4
IN CASE OF EMERGENCY ..... 5
TOWING YOUR ALL-WHEEL
DRIVE SUBARU ............. 6
ENTRY AND EXIT
KEYLESS ENTRY ............ 7
KEYLESS ACCESS WITH PUSH
BUTTON START ............. 9
INSTRUMENT PANEL ........12
GAUGES AND WARNING
LIGHTS
COMBINATION METER .......14
WARNING AND INDICATOR
LIGHTS ....................15
CONTROLS
INSTRUMENT PANEL SWITCHES
(LOWER LEFT) ..............16
AUDIO CONTROLS ...........16
CRUISE CONTROL ...........17
ADAPTIVE CRUISE CONTROL . 17
i/SET SWITCH ...............18
INFO SWITCH ...............18
LIGHT CONTROLS ...........19 TURN SIGNALS
.............20
WINDSHIELD WIPERS ........20
REAR WINDOW WIPER
(Hatchback Models) ..........21
OVERHEAD CONSOLE ........21
GETTING COMFORTABLE
SEATING...................23
TILT AND TELESCOPIC
STEERING COLUMN .........25
POWER EXTERIOR MIRRORS . . 25
REAR VIEW MIRROR .........26
POWER WINDOWS ..........27
POWER MOONROOF ........28
CLIMATE CONTROL ..........29
ACCESSORY CONNECTIONS . . 34
OPERATING THE VEHICLE
IGNITION SWITCH ...........35
PUSH-BUTTON IGNITION
SWITCH ...................35
STARTING THE VEHICLE ......35
DRIVING THE VEHICLE .......36
TURNING OFF THE VEHICLE ...38
REFUELING
FUEL FILLER LID............39
FUEL SPECIFICATIONS AND
CAPACITY ..................39
TABLE OF CONTENTS
Page 4 of 124
PASSENGER/CARGO AREAS
FOLDING THE REAR SEATS...40
CHILD SAFETY LOCKS .......40
LATCH/ANCHOR ............41
REAR SEAT REMINDER .......42
TRUNK LID OPENER
(Sedan Models) ..............42
INTERNAL SAFETY TRUNK
RELEASE WITH SELF-
ILLUMINATING HANDLE
(Sedan Models) ..............43
CARGO COVER .............43
SPARE TIRE AND JACK .......44
ENGINE COMPARTMENT
HOOD PROP................45
2.0L ENGINE ................46
ADDITIONAL SPECIFICATIONS
NEW VEHICLE BREAK-IN ......47
ENGINE OIL ................47
ENGINE OIL CAPACITY .......47
ROOF RAIL CAPACITY .......48
TRAILER TOWING CAPACITY . . 48
TIRE PRESSURE MONITORING
SYSTEM (TPMS) .............48
STARLINK OVERVIEW
OVERVIEW OF YOUR
MULTIMEDIA SYSTEM ........50
BUTTONS ..................50
TOUCHSCREEN .............52
STEERING WHEEL
CONTROLS .................53
VOICE RECOGNITION ........54
STARLINK HOME
HOME SCREEN ICONS .......56
REARRANGING ICONS .......56
ADDING SHORTCUTS ........57
DRIVER PROFILE
CREATING A DRIVER
PROFILE...................58
MULTIMEDIA
RADIO.....................60
MEDIA .....................61
PHONE
PAIRING A PHONE ...........62
MAKING A CALL .............62
RECEIVING A CALL ..........63
TEXT MESSAGES ............64
APPS
SUBARU STARLINK®
IN-VEHICLE APPS ...........65
SUBARU STARLINK®
MOBILE APP ................67
MYSUBARU ................68
MAPS (if equipped)
MAPS OVERVIEW ............69
CREATING HOME AND WORK
PROFILES ..................69
STARLINK SAFETY AND
SECURITY
SAFETY AND SECURITY
OVERVIEW .................70
ENROLLMENT ..............71
MYSUBARU INTEGRATION ....72
SUBARU STARLINK
®
WI-FI HOTSPOT .............72
SETTINGS AND UPDATES
SETTINGS AND UPDATES
OVERVIEW.................73
SOUND ....................74
PHONE ....................74
MAPS/NAVIGATION ..........75
CLOCK ....................76
EYESIGHT
EYESIGHT®OVERVIEW .......79
OPERATION ................79
FUNCTIONS ................80
STEERING WHEEL
CONTROLS .................85
LANE DEPARTURE WARNING
AND PRE-COLLISION BRAKING
SYSTEM OFF SWITCHES ......86
TABLE OF CONTENTS
2
Page 7 of 124
IN CASE OF EMERGENCY
SUBARU STARLINK®Safety and Security(subscription required)
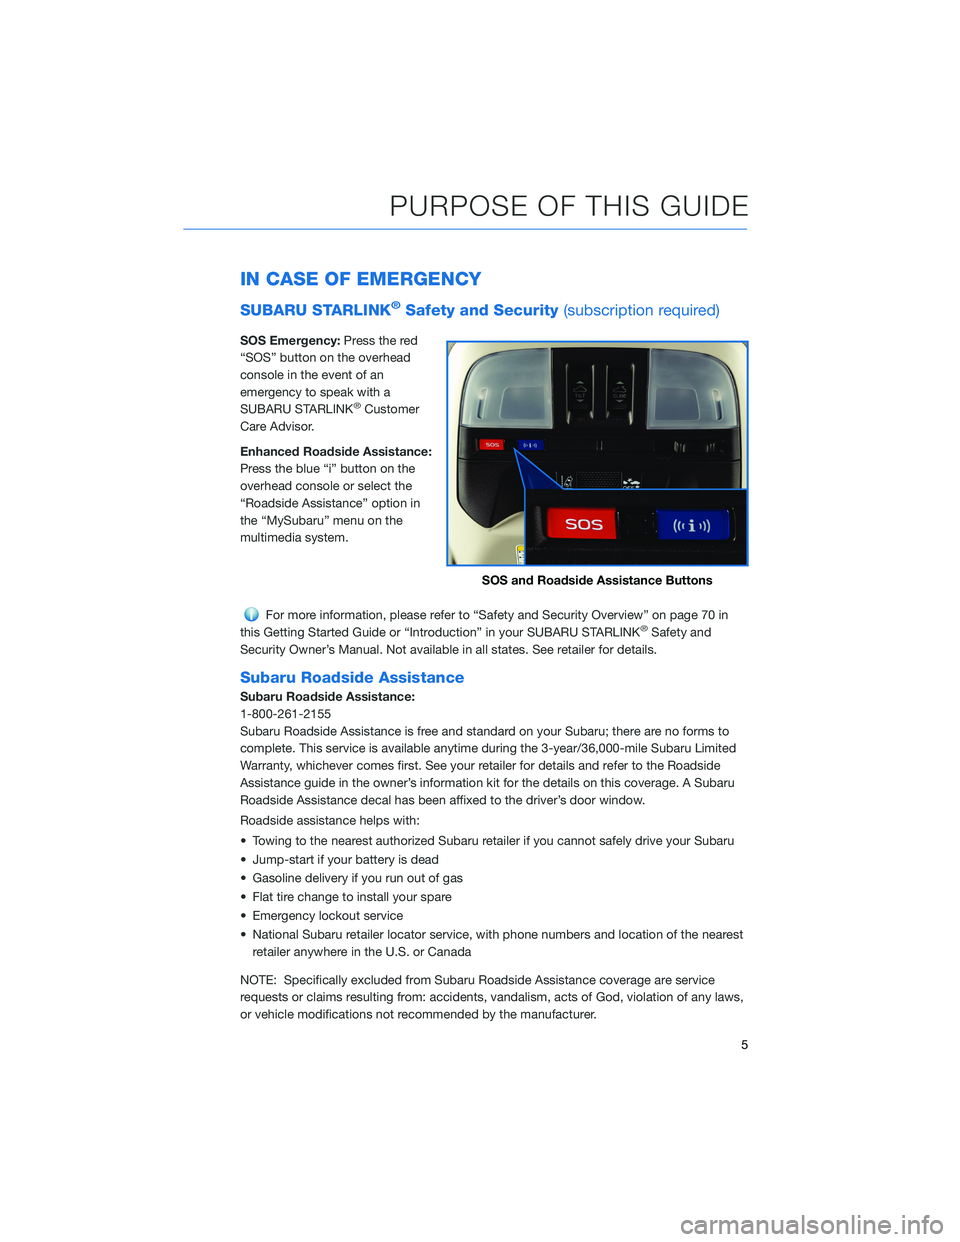
SOS Emergency:Press the red
“SOS” button on the overhead
console in the event of an
emergency to speak with a
SUBARU STARLINK
®Customer
Care Advisor.
Enhanced Roadside Assistance:
Press the blue “i” button on the
overhead console or select the
“Roadside Assistance” option in
the “MySubaru” menu on the
multimedia system.
For more information, please refer to “Safety and Security Overview” on page 70 in
this Getting Started Guide or “Introduction” in your SUBARU STARLINK®Safety and
Security Owner’s Manual. Not available in all states. See retailer for details.
Subaru Roadside Assistance
Subaru Roadside Assistance:
1-800-261-2155
Subaru Roadside Assistance is free and standard on your Subaru; there are no forms to
complete. This service is available anytime during the 3-year/36,000-mile Subaru Limited
Warranty, whichever comes first. See your retailer for details and refer to the Roadside
Assistance guide in the owner’s information kit for the details on this coverage. A Subaru
Roadside Assistance decal has been affixed to the driver’s door window.
Roadside assistance helps with:
• Towing to the nearest authorized Subaru retailer if you cannot safely drive your Subaru
• Jump-start if your battery is dead
• Gasoline delivery if you run out of gas
• Flat tire change to install your spare
• Emergency lockout service
• National Subaru retailer locator service, with phone numbers and location of the nearest retailer anywhere in the U.S. or Canada
NOTE: Specifically excluded from Subaru Roadside Assistance coverage are service
requests or claims resulting from: accidents, vandalism, acts of God, violation of any laws,
or vehicle modifications not recommended by the manufacturer.
SOS and Roadside Assistance Buttons
PURPOSE OF THIS GUIDE
5
Page 8 of 124
TOWING YOUR ALL-WHEEL DRIVE SUBARU
Since Subaru Symmetrical All-Wheel Drive distributes power to all four wheels, improper
towing may damage your AWD system. The best way to tow your Impreza is with a flatbed
truck by your Subaru retailer or a commercial towing service.
For more information, please refer to “In Case of Emergency” in your Owner’s Manual.
PURPOSE OF THIS GUIDE
6
Page 21 of 124
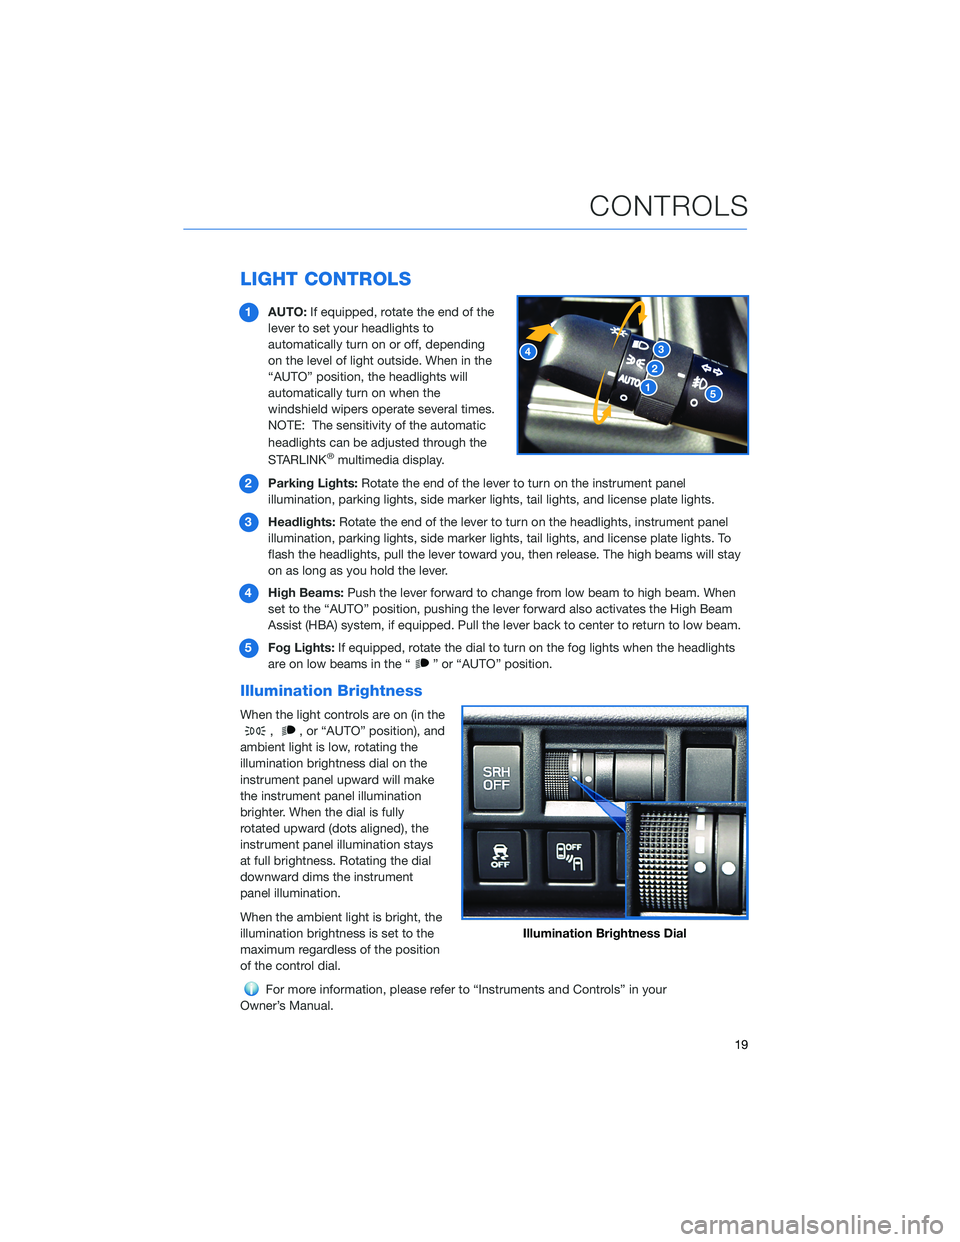
LIGHT CONTROLS
1AUTO: If equipped, rotate the end of the
lever to set your headlights to
automatically turn on or off, depending
on the level of light outside. When in the
“AUTO” position, the headlights will
automatically turn on when the
windshield wipers operate several times.
NOTE: The sensitivity of the automatic
headlights can be adjusted through the
STARLINK
®multimedia display.
2 Parking Lights: Rotate the end of the lever to turn on the instrument panel
illumination, parking lights, side marker lights, tail lights, and license plate lights.
3 Headlights: Rotate the end of the lever to turn on the headlights, instrument panel
illumination, parking lights, side marker lights, tail lights, and license plate lights. To
flash the headlights, pull the lever toward you, then release. The high beams will stay
on as long as you hold the lever.
4 High Beams: Push the lever forward to change from low beam to high beam. When
set to the “AUTO” position, pushing the lever forward also activates the High Beam
Assist (HBA) system, if equipped. Pull the lever back to center to return to low beam.
5 Fog Lights: If equipped, rotate the dial to turn on the fog lights when the headlights
are on low beams in the “
” or “AUTO” position.
Illumination Brightness
When the light controls are on (in the
,, or “AUTO” position), and
ambient light is low, rotating the
illumination brightness dial on the
instrument panel upward will make
the instrument panel illumination
brighter. When the dial is fully
rotated upward (dots aligned), the
instrument panel illumination stays
at full brightness. Rotating the dial
downward dims the instrument
panel illumination.
When the ambient light is bright, the
illumination brightness is set to the
maximum regardless of the position
of the control dial.
For more information, please refer to “Instruments and Controls” in your
Owner’s Manual.
Illumination Brightness Dial
CONTROLS
19
Page 22 of 124
Daytime Running Lights
The daytime running lights automatically turn on when the engine is running, the parking
brake is fully released, the select lever is out of the “P” position (CVT models), and the light
switch is set to Off, “AUTO” (if equipped), or “
”. Always turn on the headlights when
it’s dark outside by rotating the dial to the “
” or “AUTO” position.
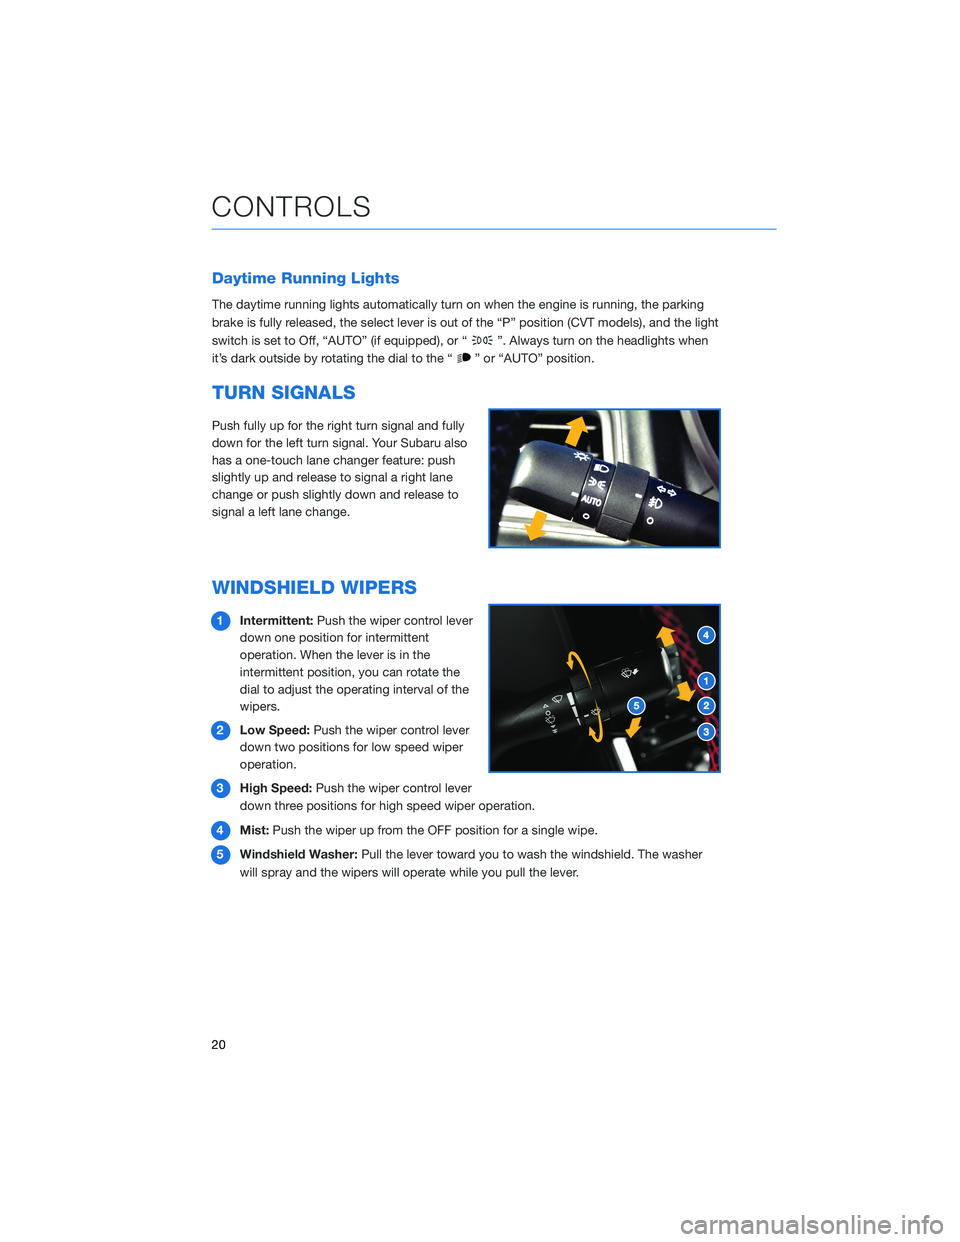
TURN SIGNALS
Push fully up for the right turn signal and fully
down for the left turn signal. Your Subaru also
has a one-touch lane changer feature: push
slightly up and release to signal a right lane
change or push slightly down and release to
signal a left lane change.
WINDSHIELD WIPERS
1 Intermittent: Push the wiper control lever
down one position for intermittent
operation. When the lever is in the
intermittent position, you can rotate the
dial to adjust the operating interval of the
wipers.
2 Low Speed: Push the wiper control lever
down two positions for low speed wiper
operation.
3 High Speed: Push the wiper control lever
down three positions for high speed wiper operation.
4 Mist: Push the wiper up from the OFF position for a single wipe.
5 Windshield Washer: Pull the lever toward you to wash the windshield. The washer
will spray and the wipers will operate while you pull the lever.
CONTROLS
20
Page 39 of 124
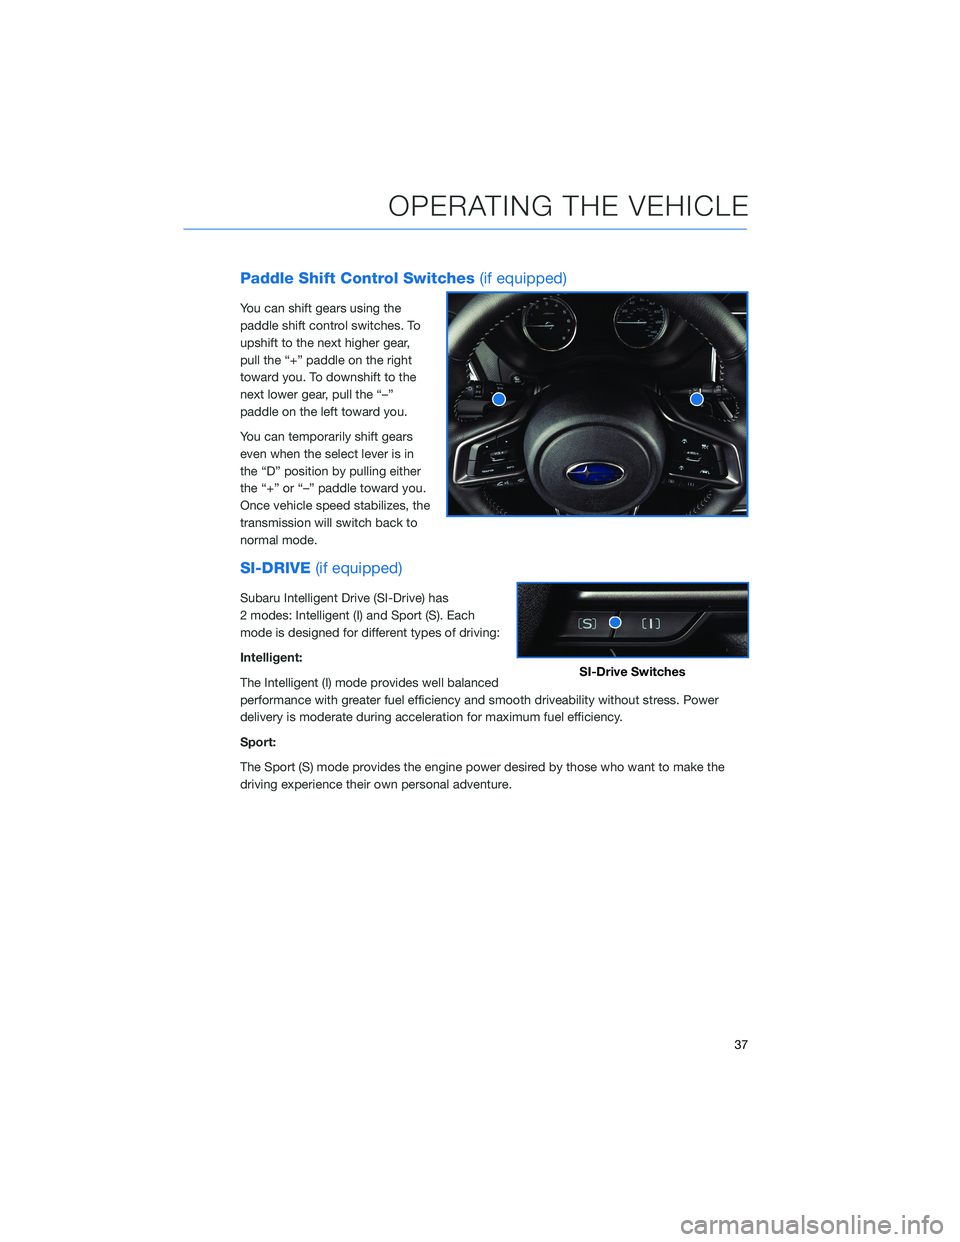
Paddle Shift Control Switches(if equipped)
You can shift gears using the
paddle shift control switches. To
upshift to the next higher gear,
pull the “+” paddle on the right
toward you. To downshift to the
next lower gear, pull the “–”
paddle on the left toward you.
You can temporarily shift gears
even when the select lever is in
the “D” position by pulling either
the “+” or “–” paddle toward you.
Once vehicle speed stabilizes, the
transmission will switch back to
normal mode.
SI-DRIVE(if equipped)
Subaru Intelligent Drive (SI-Drive) has
2 modes: Intelligent (I) and Sport (S). Each
mode is designed for different types of driving:
Intelligent:
The Intelligent (I) mode provides well balanced
performance with greater fuel efficiency and smooth driveability without stress. Power
delivery is moderate during acceleration for maximum fuel efficiency.
Sport:
The Sport (S) mode provides the engine power desired by those who want to make the
driving experience their own personal adventure.
SI-Drive Switches
OPERATING THE VEHICLE
37
Page 41 of 124
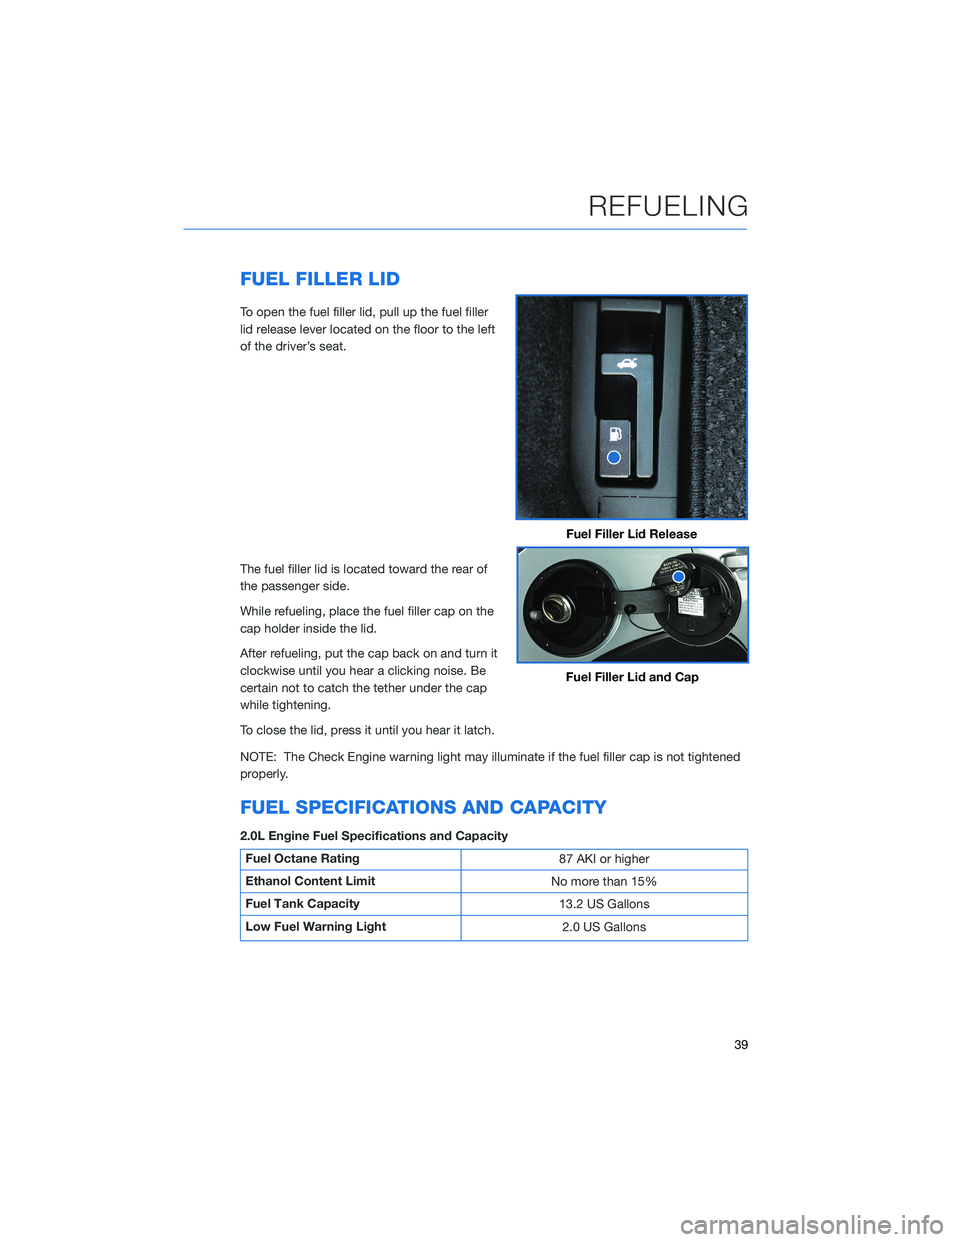
FUEL FILLER LID
To open the fuel filler lid, pull up the fuel filler
lid release lever located on the floor to the left
of the driver’s seat.
The fuel filler lid is located toward the rear of
the passenger side.
While refueling, place the fuel filler cap on the
cap holder inside the lid.
After refueling, put the cap back on and turn it
clockwise until you hear a clicking noise. Be
certain not to catch the tether under the cap
while tightening.
To close the lid, press it until you hear it latch.
NOTE: The Check Engine warning light may illuminate if the fuel filler cap is not tightened
properly.
FUEL SPECIFICATIONS AND CAPACITY
2.0L Engine Fuel Specifications and Capacity
Fuel Octane Rating87 AKI or higher
Ethanol Content Limit No more than 15%
Fuel Tank Capacity 13.2 US Gallons
Low Fuel Warning Light 2.0 US Gallons
Fuel Filler Lid Release
Fuel Filler Lid and Cap
REFUELING
39
Page 45 of 124
INTERNAL SAFETY TRUNK RELEASE WITH
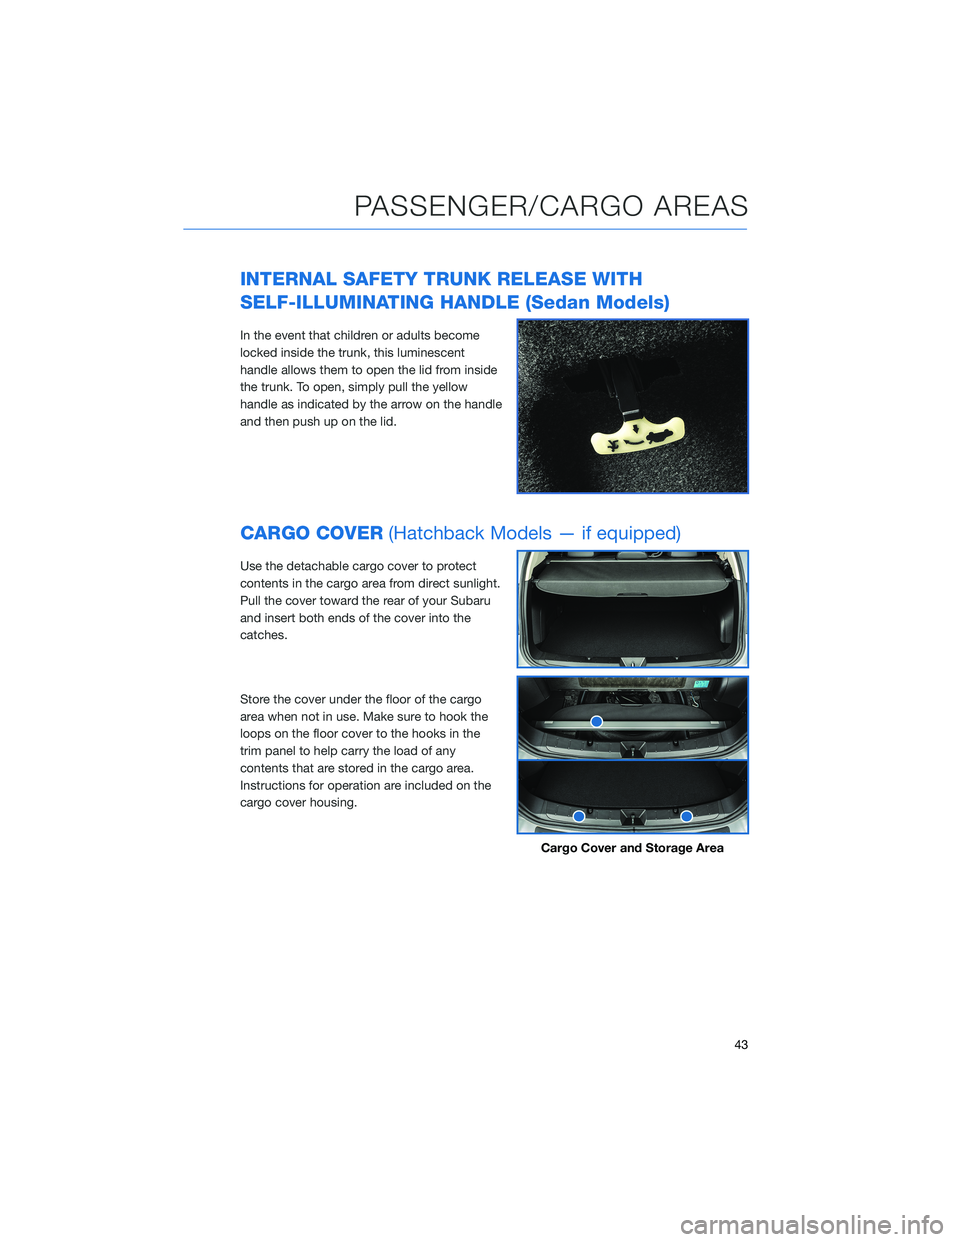
SELF-ILLUMINATING HANDLE (Sedan Models)
In the event that children or adults become
locked inside the trunk, this luminescent
handle allows them to open the lid from inside
the trunk. To open, simply pull the yellow
handle as indicated by the arrow on the handle
and then push up on the lid.
CARGO COVER(Hatchback Models — if equipped)
Use the detachable cargo cover to protect
contents in the cargo area from direct sunlight.
Pull the cover toward the rear of your Subaru
and insert both ends of the cover into the
catches.
Store the cover under the floor of the cargo
area when not in use. Make sure to hook the
loops on the floor cover to the hooks in the
trim panel to help carry the load of any
contents that are stored in the cargo area.
Instructions for operation are included on the
cargo cover housing.
Cargo Cover and Storage Area
PASSENGER/CARGO AREAS
43
Page 46 of 124
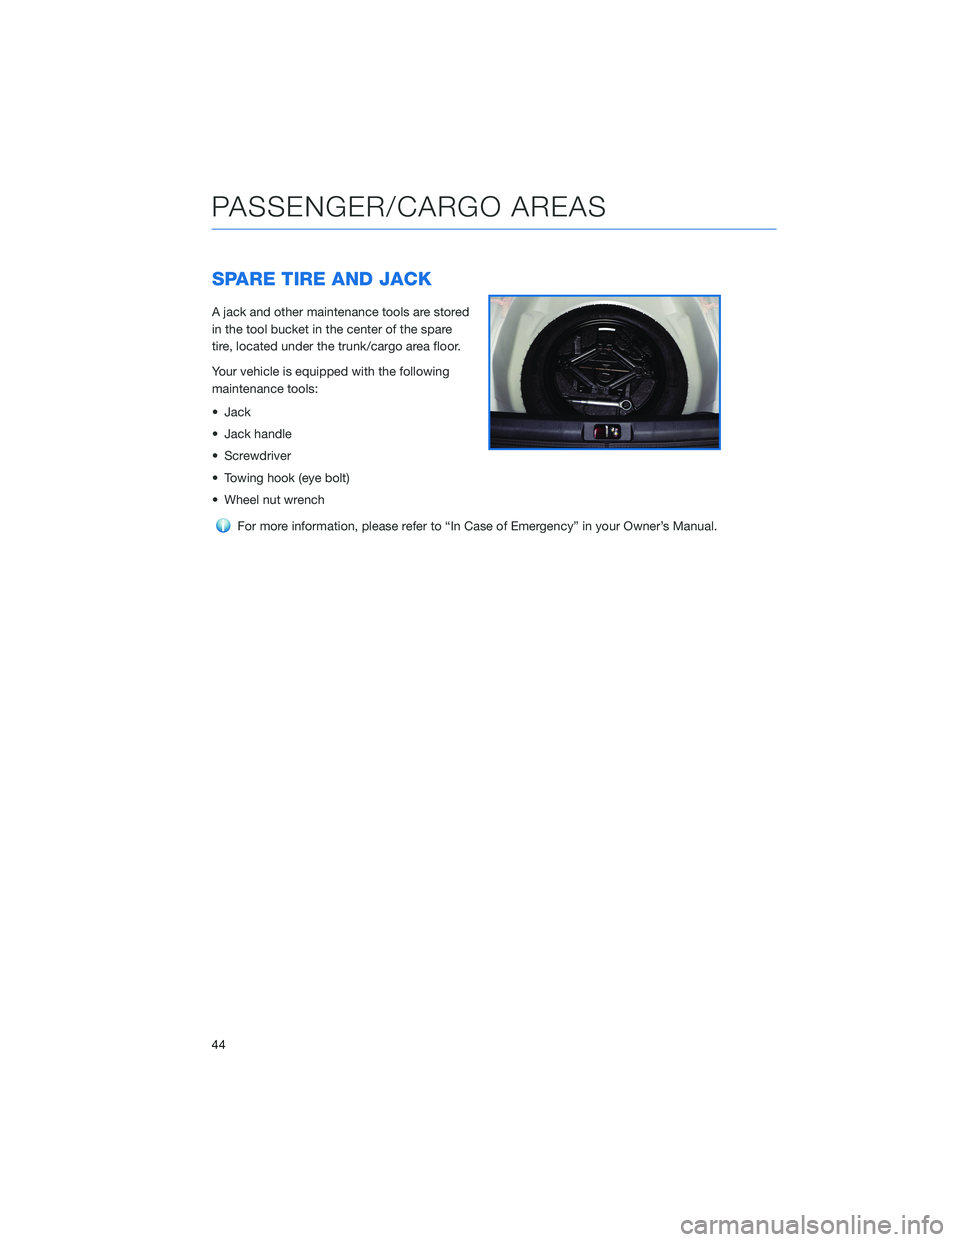
SPARE TIRE AND JACK
A jack and other maintenance tools are stored
in the tool bucket in the center of the spare
tire, located under the trunk/cargo area floor.
Your vehicle is equipped with the following
maintenance tools:
• Jack
• Jack handle
• Screwdriver
• Towing hook (eye bolt)
• Wheel nut wrench
For more information, please refer to “In Case of Emergency” in your Owner’s Manual.
PASSENGER/CARGO AREAS
44