warning light SUBARU IMPREZA 2022 Getting Started Guide
[x] Cancel search | Manufacturer: SUBARU, Model Year: 2022, Model line: IMPREZA, Model: SUBARU IMPREZA 2022Pages: 124, PDF Size: 33.04 MB
Page 3 of 124
PURPOSE OF THIS GUIDE
WELCOME................. 4
IMPORTANT SAFETY
INFORMATION .............. 4
OWNER’S RESOURCES ....... 4
IN CASE OF EMERGENCY ..... 5
TOWING YOUR ALL-WHEEL
DRIVE SUBARU ............. 6
ENTRY AND EXIT
KEYLESS ENTRY ............ 7
KEYLESS ACCESS WITH PUSH
BUTTON START ............. 9
INSTRUMENT PANEL ........12
GAUGES AND WARNING
LIGHTS
COMBINATION METER .......14
WARNING AND INDICATOR
LIGHTS ....................15
CONTROLS
INSTRUMENT PANEL SWITCHES
(LOWER LEFT) ..............16
AUDIO CONTROLS ...........16
CRUISE CONTROL ...........17
ADAPTIVE CRUISE CONTROL . 17
i/SET SWITCH ...............18
INFO SWITCH ...............18
LIGHT CONTROLS ...........19 TURN SIGNALS
.............20
WINDSHIELD WIPERS ........20
REAR WINDOW WIPER
(Hatchback Models) ..........21
OVERHEAD CONSOLE ........21
GETTING COMFORTABLE
SEATING...................23
TILT AND TELESCOPIC
STEERING COLUMN .........25
POWER EXTERIOR MIRRORS . . 25
REAR VIEW MIRROR .........26
POWER WINDOWS ..........27
POWER MOONROOF ........28
CLIMATE CONTROL ..........29
ACCESSORY CONNECTIONS . . 34
OPERATING THE VEHICLE
IGNITION SWITCH ...........35
PUSH-BUTTON IGNITION
SWITCH ...................35
STARTING THE VEHICLE ......35
DRIVING THE VEHICLE .......36
TURNING OFF THE VEHICLE ...38
REFUELING
FUEL FILLER LID............39
FUEL SPECIFICATIONS AND
CAPACITY ..................39
TABLE OF CONTENTS
Page 9 of 124
KEYLESS ENTRY
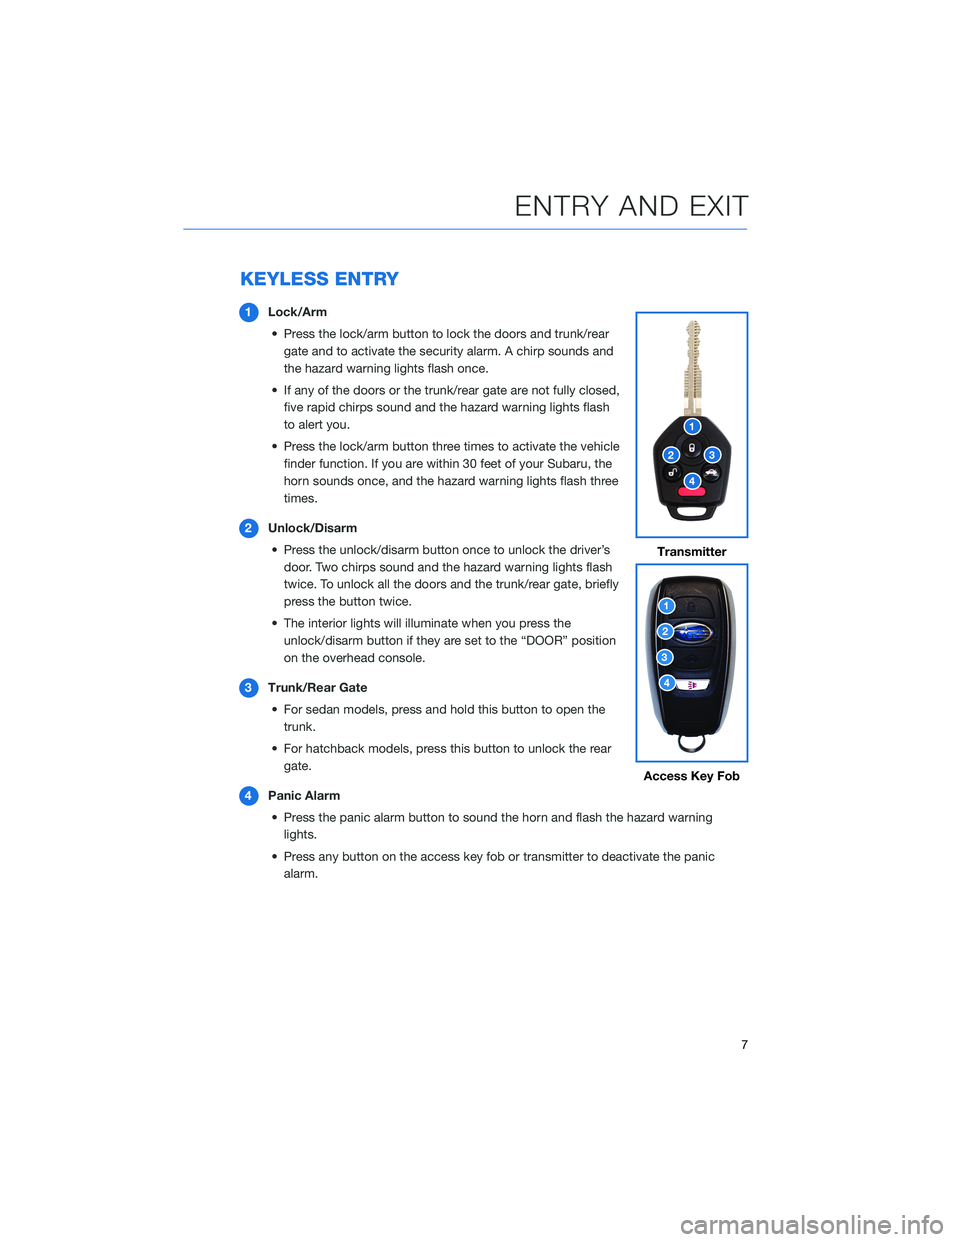
1Lock/Arm
• Press the lock/arm button to lock the doors and trunk/rear gate and to activate the security alarm. A chirp sounds and
the hazard warning lights flash once.
• If any of the doors or the trunk/rear gate are not fully closed, five rapid chirps sound and the hazard warning lights flash
to alert you.
• Press the lock/arm button three times to activate the vehicle finder function. If you are within 30 feet of your Subaru, the
horn sounds once, and the hazard warning lights flash three
times.
2 Unlock/Disarm
• Press the unlock/disarm button once to unlock the driver’s door. Two chirps sound and the hazard warning lights flash
twice. To unlock all the doors and the trunk/rear gate, briefly
press the button twice.
• The interior lights will illuminate when you press the unlock/disarm button if they are set to the “DOOR” position
on the overhead console.
3 Trunk/Rear Gate
• For sedan models, press and hold this button to open the trunk.
• For hatchback models, press this button to unlock the rear gate.
4 Panic Alarm
• Press the panic alarm button to sound the horn and flash the hazard warning lights.
• Press any button on the access key fob or transmitter to deactivate the panic alarm.
Transmitter
Access Key Fob
ENTRY AND EXIT
7
Page 11 of 124
KEYLESS ACCESS WITH PUSH BUTTON START
(if equipped)
The Keyless Access with Push-Button Start system features the following touch-activated
door locking or unlocking functions without the key ever leaving your pocket or purse;
simply carry the access key fob with you. You can customize the touch-activated door
locking or unlocking settings using the Combination Meter Display or through the
STARLINK
®Touchscreen by selecting “Settings” then “Vehicle”.
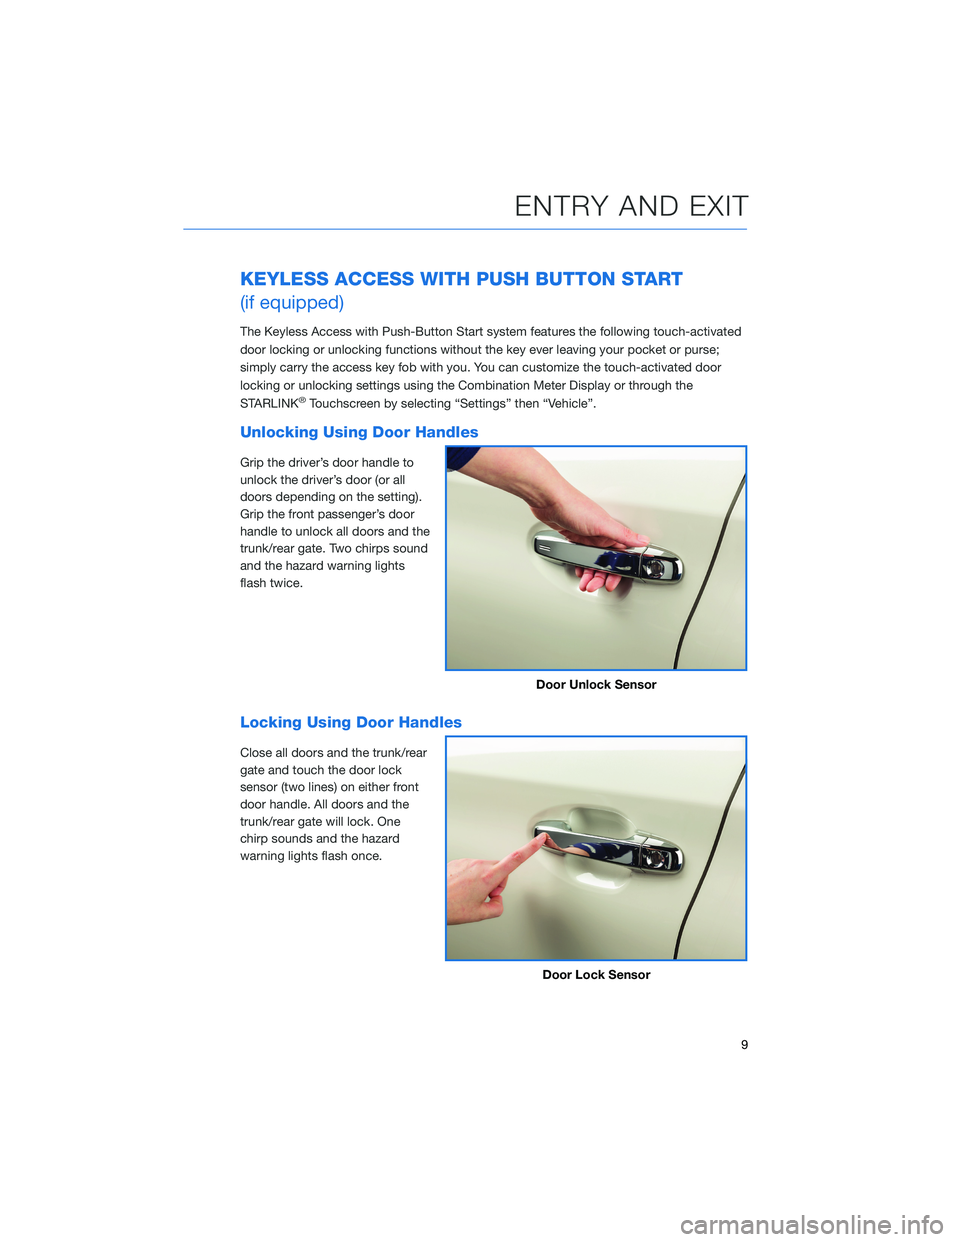
Unlocking Using Door Handles
Grip the driver’s door handle to
unlock the driver’s door (or all
doors depending on the setting).
Grip the front passenger’s door
handle to unlock all doors and the
trunk/rear gate. Two chirps sound
and the hazard warning lights
flash twice.
Locking Using Door Handles
Close all doors and the trunk/rear
gate and touch the door lock
sensor (two lines) on either front
door handle. All doors and the
trunk/rear gate will lock. One
chirp sounds and the hazard
warning lights flash once.
Door Unlock Sensor
Door Lock Sensor
ENTRY AND EXIT
9
Page 12 of 124
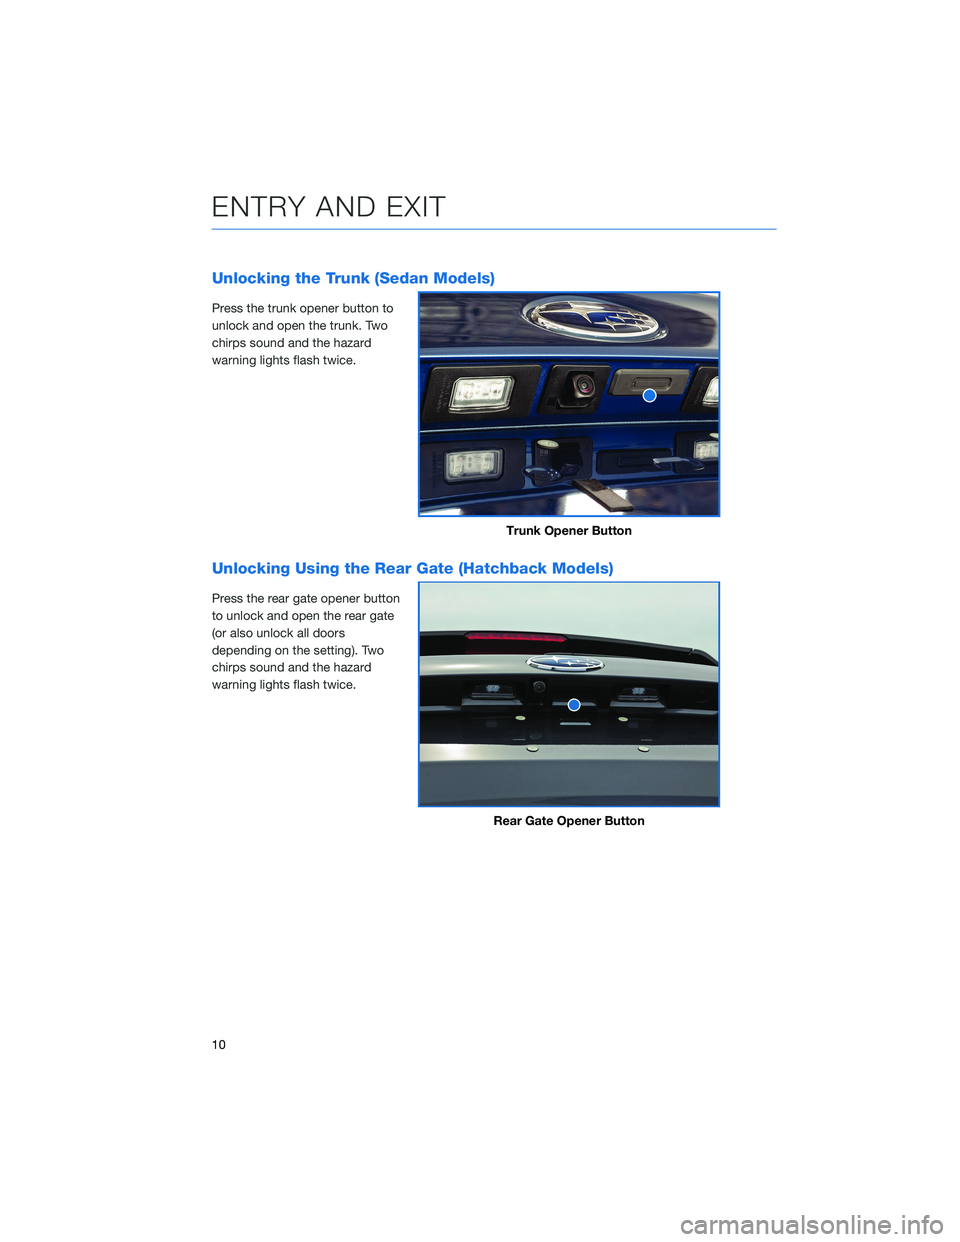
Unlocking the Trunk (Sedan Models)
Press the trunk opener button to
unlock and open the trunk. Two
chirps sound and the hazard
warning lights flash twice.
Unlocking Using the Rear Gate (Hatchback Models)
Press the rear gate opener button
to unlock and open the rear gate
(or also unlock all doors
depending on the setting). Two
chirps sound and the hazard
warning lights flash twice.
Trunk Opener Button
Rear Gate Opener Button
ENTRY AND EXIT
10
Page 13 of 124
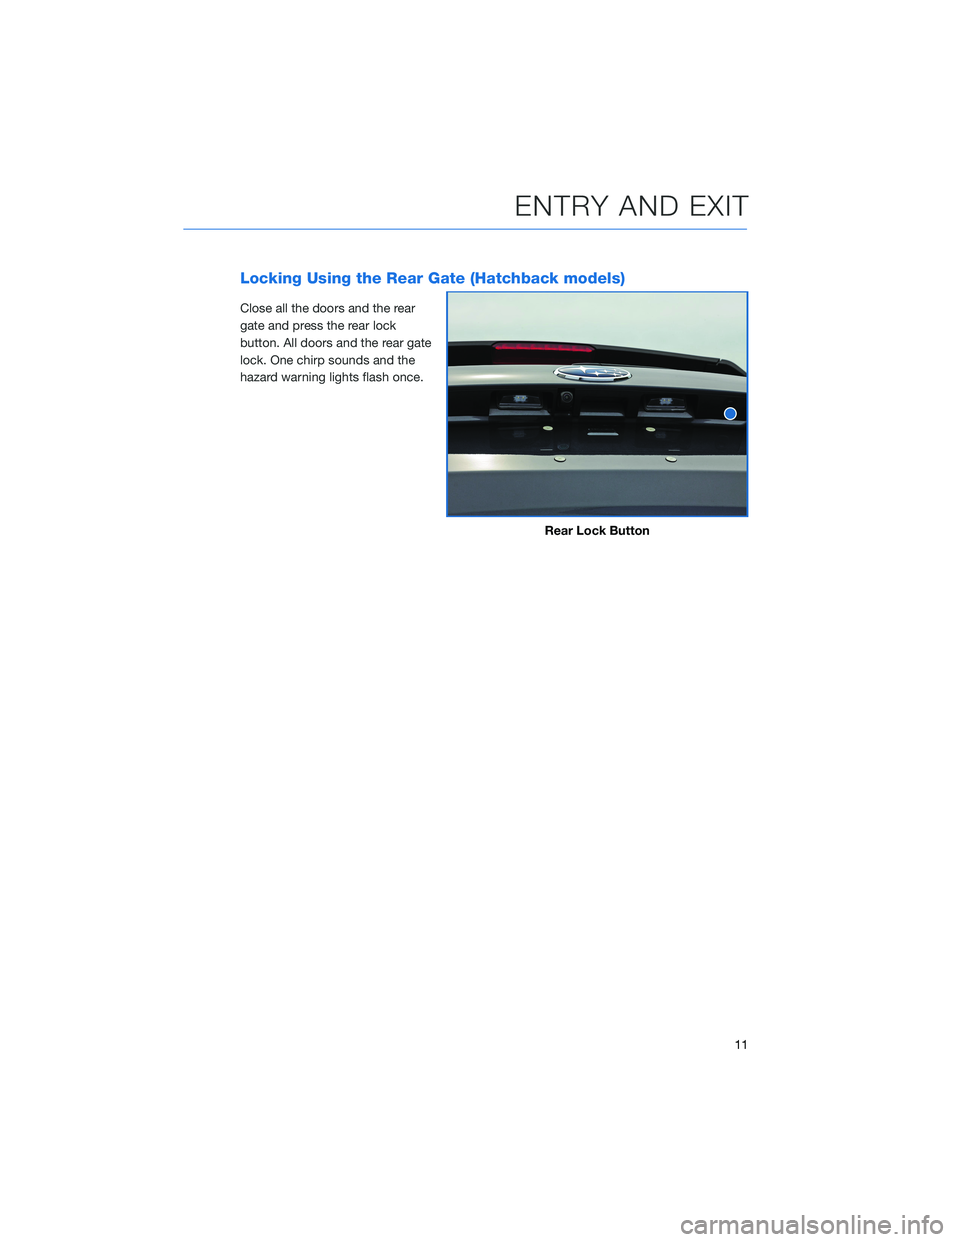
Locking Using the Rear Gate (Hatchback models)
Close all the doors and the rear
gate and press the rear lock
button. All doors and the rear gate
lock. One chirp sounds and the
hazard warning lights flash once.
Rear Lock Button
ENTRY AND EXIT
11
Page 16 of 124
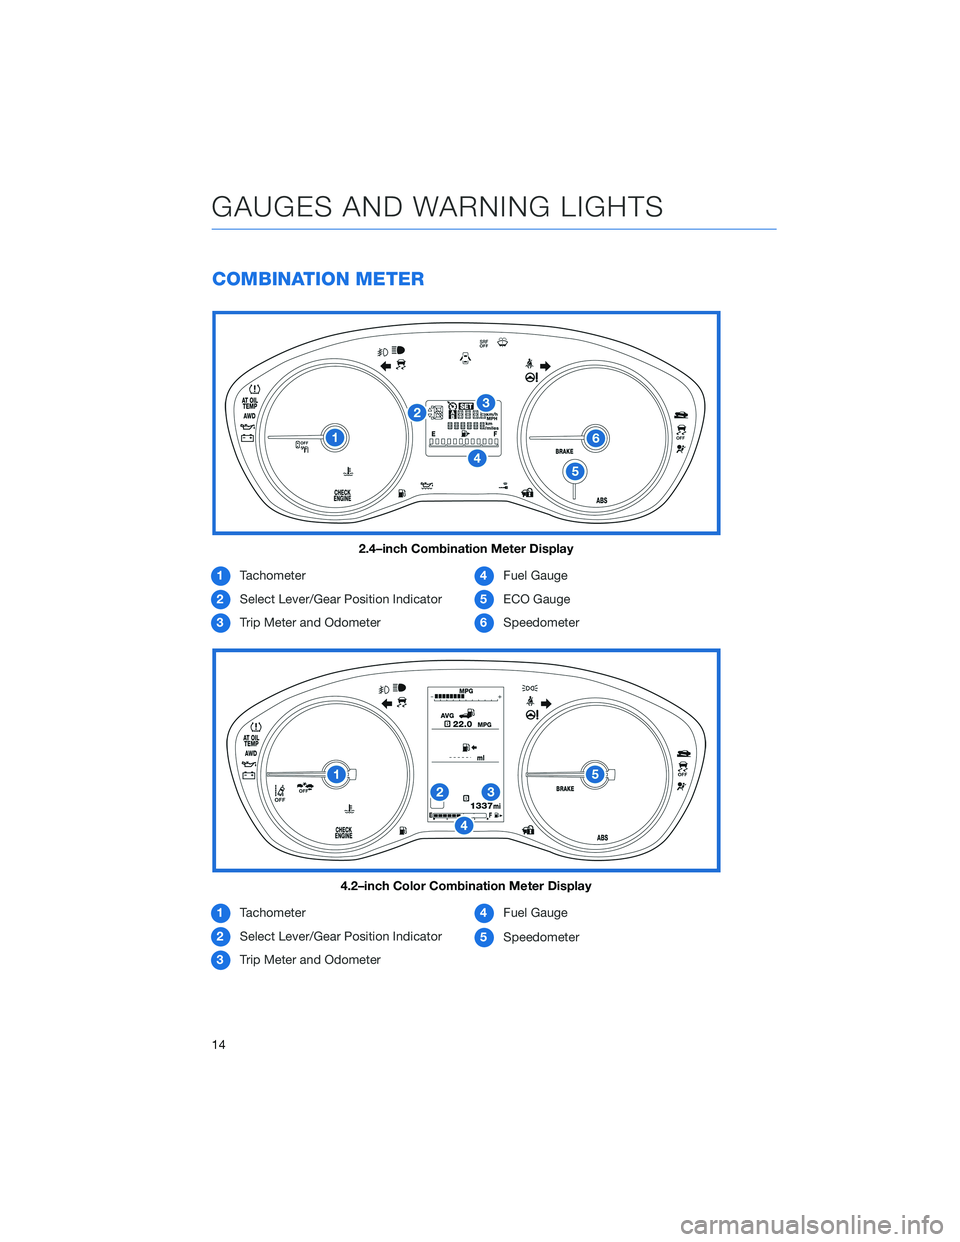
COMBINATION METER
1Tachometer
2 Select Lever/Gear Position Indicator
3 Trip Meter and Odometer 4
Fuel Gauge
5 ECO Gauge
6 Speedometer
1 Tachometer
2 Select Lever/Gear Position Indicator
3 Trip Meter and Odometer 4
Fuel Gauge
5 Speedometer
2.4–inch Combination Meter Display
4.2–inch Color Combination Meter Display
GAUGES AND WARNING LIGHTS
14
Page 17 of 124
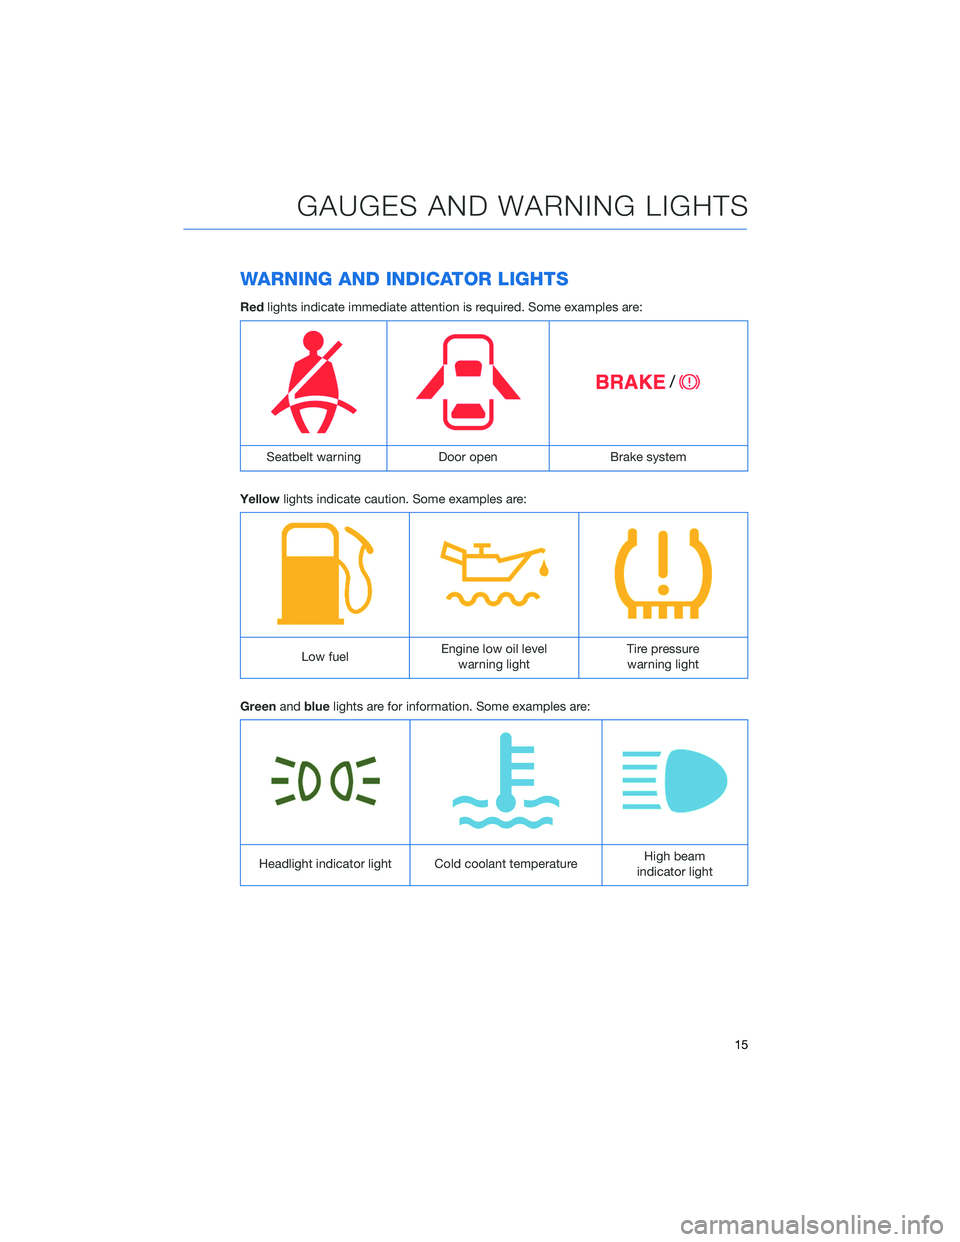
WARNING AND INDICATOR LIGHTS
Redlights indicate immediate attention is required. Some examples are:
Seatbelt warning Door openBrake system
Yellow lights indicate caution. Some examples are:
Low fuel Engine low oil level
warning light Tire pressure
warning light
Green andblue lights are for information. Some examples are:
Headlight indicator light Cold coolant temperature High beam
indicator light
GAUGES AND WARNING LIGHTS
15
Page 24 of 124
3Automatic Illumination: When the switch is in the “DOOR” position, the map lights
illuminate when any door is opened, the doors are unlocked using the remote keyless
entry system or keyless access function, or the ignition is turned from “ON” or “ACC”
to “LOCK”/“OFF”.
4 Lane Departure Warning OFF Switch: Press and hold this switch for two seconds to
turn off Lane Departure Warning and Lane Sway Warning. Press and hold the switch
again for two seconds to turn the systems back on.
For more information, please refer to page 86 in this Getting Started Guide or
“Lane Departure Warning” in your EyeSight®Owner’s Manual.
5 Pre-Collision Braking System OFF Switch: Press and hold this switch for two
seconds to turn off the Pre-Collision Braking System (including Pre-Collision Brake
Assist) and Pre-Collision Throttle Management. Press and hold the switch again for
two seconds to turn the systems back on.
For more information, please refer to page 86 in this Getting Started Guide or
“Pre-Collision Braking System” in your EyeSight®Owner’s Manual.
6 Map Lights: Press a map light to turn it on or off.
7 Power Moonroof Switch: Operate these switches to tilt and slide the moonroof.
For more information, please refer to page 28 in this Getting Started Guide or
“Keys and Doors” in your Owner’s Manual.
CONTROLS
22
Page 41 of 124
FUEL FILLER LID
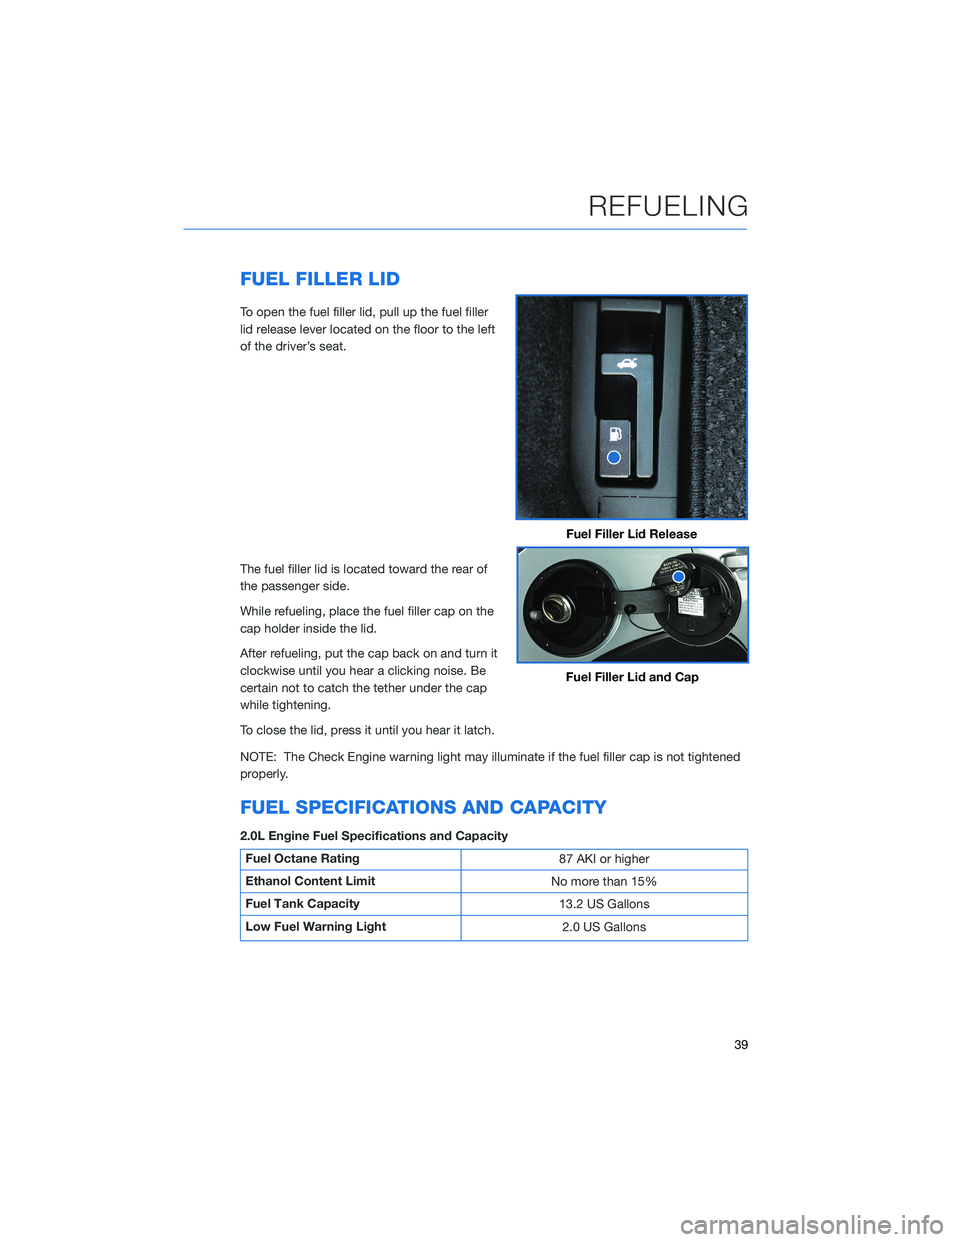
To open the fuel filler lid, pull up the fuel filler
lid release lever located on the floor to the left
of the driver’s seat.
The fuel filler lid is located toward the rear of
the passenger side.
While refueling, place the fuel filler cap on the
cap holder inside the lid.
After refueling, put the cap back on and turn it
clockwise until you hear a clicking noise. Be
certain not to catch the tether under the cap
while tightening.
To close the lid, press it until you hear it latch.
NOTE: The Check Engine warning light may illuminate if the fuel filler cap is not tightened
properly.
FUEL SPECIFICATIONS AND CAPACITY
2.0L Engine Fuel Specifications and Capacity
Fuel Octane Rating87 AKI or higher
Ethanol Content Limit No more than 15%
Fuel Tank Capacity 13.2 US Gallons
Low Fuel Warning Light 2.0 US Gallons
Fuel Filler Lid Release
Fuel Filler Lid and Cap
REFUELING
39
Page 86 of 124
Conventional Cruise Control
Conventional Cruise Control maintains a
constant traveling speed you set, but it does
not adapt to the other vehicles in front of you.
To activate Conventional Cruise Control, press
the Adaptive Cruise Control On/Off button to
set Adaptive Cruise Control into standby
status. Then, with Adaptive Cruise Control in
standby status, press and hold the “Increase
Distance” or “Decrease Distance” button on
the steering wheel for approximately two
seconds.
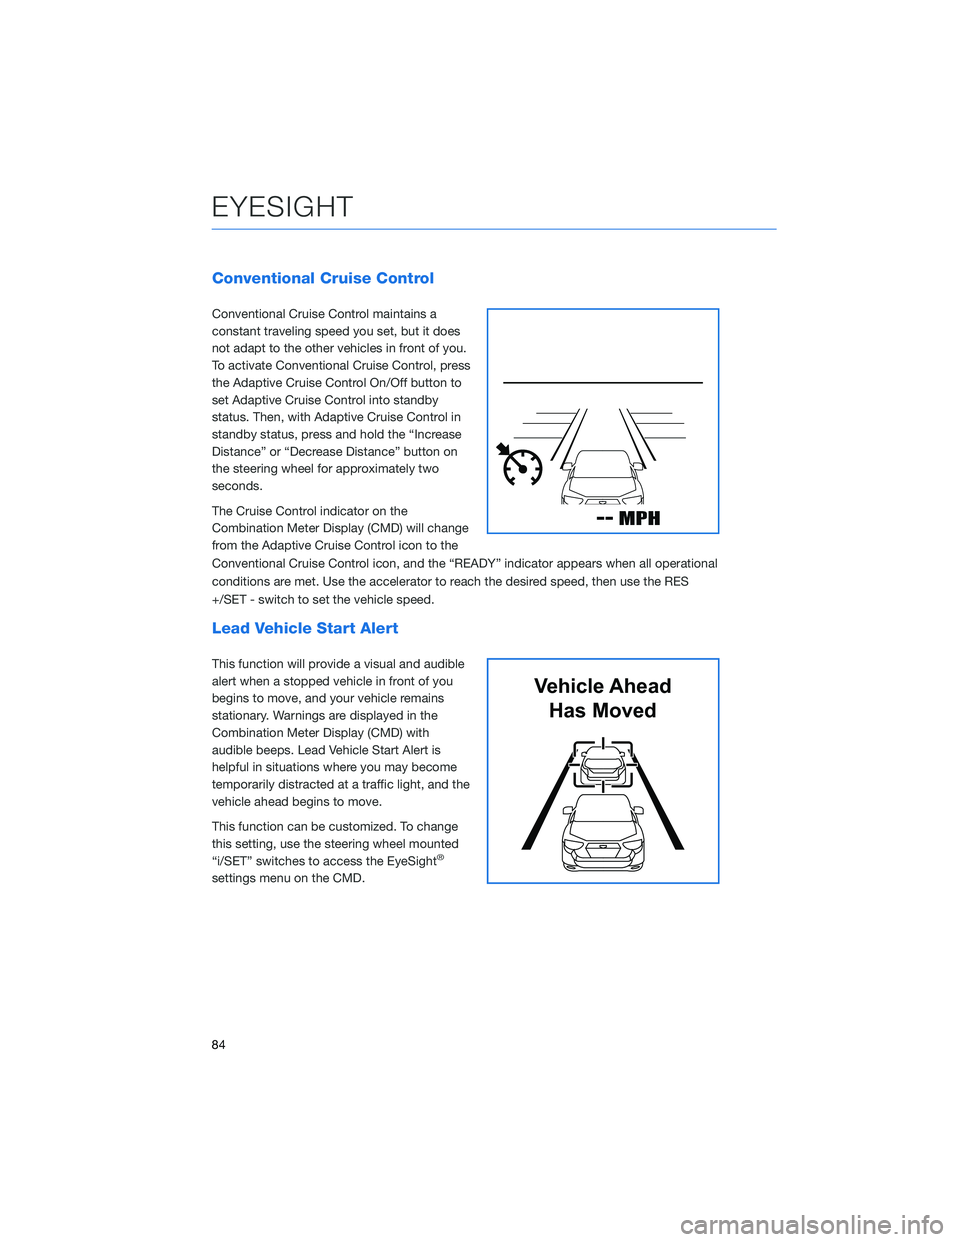
The Cruise Control indicator on the
Combination Meter Display (CMD) will change
from the Adaptive Cruise Control icon to the
Conventional Cruise Control icon, and the “READY” indicator appears when all operational
conditions are met. Use the accelerator to reach the desired speed, then use the RES
+/SET - switch to set the vehicle speed.
Lead Vehicle Start Alert
This function will provide a visual and audible
alert when a stopped vehicle in front of you
begins to move, and your vehicle remains
stationary. Warnings are displayed in the
Combination Meter Display (CMD) with
audible beeps. Lead Vehicle Start Alert is
helpful in situations where you may become
temporarily distracted at a traffic light, and the
vehicle ahead begins to move.
This function can be customized. To change
this setting, use the steering wheel mounted
“i/SET” switches to access the EyeSight
®
settings menu on the CMD.
Vehicle AheadHas Moved
EYESIGHT
84