coolant level SUBARU IMPREZA WRX 2004 2.G Owners Manual
[x] Cancel search | Manufacturer: SUBARU, Model Year: 2004, Model line: IMPREZA WRX, Model: SUBARU IMPREZA WRX 2004 2.GPages: 491, PDF Size: 5.93 MB
Page 147 of 491
3-10
Instruments and controls
contains fuel.
The gauge may move slightly during braking, turning
or acceleration due to fuel level movement in the tank.
NOTE
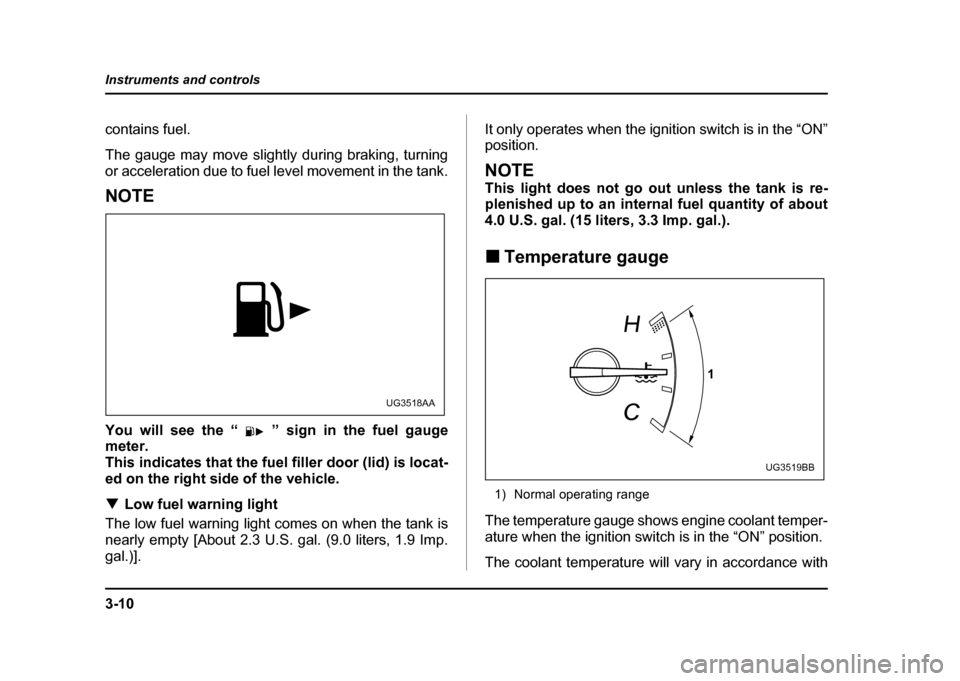
You will see the “ ” sign in the fuel gauge
meter.
This indicates that the fuel filler door (lid) is locat-
ed on the right side of the vehicle. !
Low fuel warning light
The low fuel warning light comes on when the tank is
nearly empty [About 2.3 U.S. gal. (9.0 liters, 1.9 Imp.
gal.)]. It only operates when the ignition switch is in the “ON” position.
NOTE
This light does not go out unless the tank is re-
plenished up to an internal fuel quantity of about
4.0 U.S. gal. (15 liters, 3.3 Imp. gal.). !
Temperature gauge
1) Normal operating range
The temperature gauge shows engine coolant temper-
ature when the ignition switch is in the “ON” position.
The coolant temperature will vary in accordance with
UG3518AA
1
UG3519BB
Page 154 of 491
3-17
Instruments and controls
– CONTINUED –
The gauge may move slightly during braking, turning
or acceleration due to fuel level movement in the tank.
NOTE
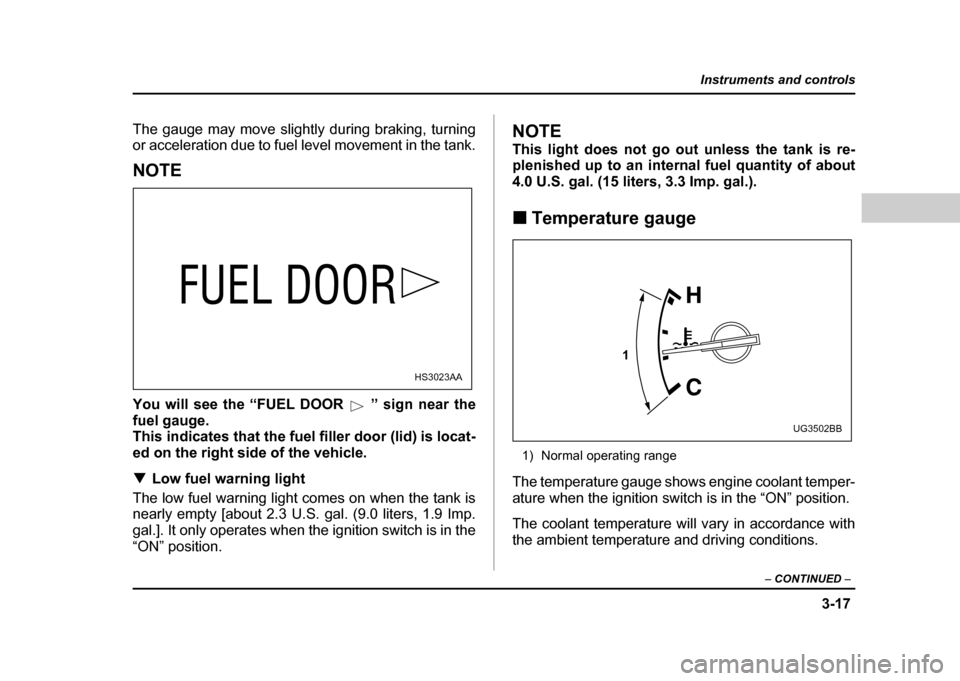
You will see the “FUEL DOOR ” sign near the
fuel gauge.
This indicates that the fuel filler door (lid) is locat-
ed on the right side of the vehicle. !Low fuel warning light
The low fuel warning light comes on when the tank is
nearly empty [about 2.3 U.S. gal. (9.0 liters, 1.9 Imp.
gal.]. It only operates when the ignition switch is in the
“ON” position.
NOTE
This light does not go out unless the tank is re-
plenished up to an internal fuel quantity of about
4.0 U.S. gal. (15 liters, 3.3 Imp. gal.). ! Temperature gauge
1) Normal operating range
The temperature gauge shows engine coolant temper-
ature when the ignition switch is in the “ON” position.
The coolant temperature will vary in accordance with
the ambient temperature and driving conditions.
HS3023AA
1
UG3502BB
Page 278 of 491
7-9
Starting and operating
– CONTINUED –
Preparing to drive
You should perform the following checks and adjust-
ments every day before you start driving.
1. Check that all windows, mirrors, and lights are
clean and unobstructed.
2. Check the appearance and condition of the tires.
Also check tires for proper inflation.
3. Look under the vehicle for any sign of leaks.
4. Check that the hood, trunk and rear gate are fully
closed.
5. Check the adjustment of the seat.
6. Check the adjustment of the inside and outside mir-
rors.
7. Fasten your seatbelt. Check that your passengers
have fastened their seatbelts.
8. Check the operation of the warning and indicator
lights when the ignition switch is turned to the “ON” po-sition.
9. Check the gauges, indicator and warning lights af-
ter starting the engine.
NOTE
Engine oil, engine coolant, brake fluid, washer flu-
id and other fluid levels should be checked daily,
weekly or at fuel stops.
Starting the engine
Do not operate the starter motor continuously
for more than ten seconds. If the engine fails to
start after operating the starter for five to ten
seconds, wait for ten seconds or more before
trying again.
! Manual transmission vehicle
1. Apply the parking brake.
2. Turn off unnecessary lights and accessories.
3. Press the clutch pedal to the floor and shift the shift
lever into neutral. Hold the clutch pedal to the floor
while starting the engine.
The starter motor will only operate when the clutch
pedal is pressed fully to the floor.
4. Turn the ignition switch to the “ON” position and
check the operation of the warning and indicator lights.
Refer to the “Warning and indicator lights” section (chapter 3).
5. Turn the ignition switch to the “START” position
without depressing the accelerator pedal. Release
the key immediately after the engine has started.
Page 368 of 491
9-17
In case of emergency
– CONTINUED –
Confirm that the cooling fan is turning. If the fan is not
turning, immediately turn the engine off and contact
your authorized dealer for repair.
3. After the engine coolant temperature has dropped, turn off the engine.
If the temperature gauge stays at the overheated
zone, turn the engine off.
4. After the engine has fully cooled down, check the
coolant level in the reserve tank.
If the coolant level is below the “LOW” mark, add cool-
ant up to the “FULL” mark.
5. If there is no coolant in the reserve tank, add cool-
ant to the reserve tank. Then remove the radiator cap
and fill the radiator with coolant.
If you remove the radiator cap from a hot radiator, first
wrap a thick cloth around the radiator cap, then turn
the cap counterclockwise slowly without pressing
down until it stops. Release the pressure from the ra-
diator. After the pressure has been fully released, re-
move the cap by pressing down and turning it.Towing
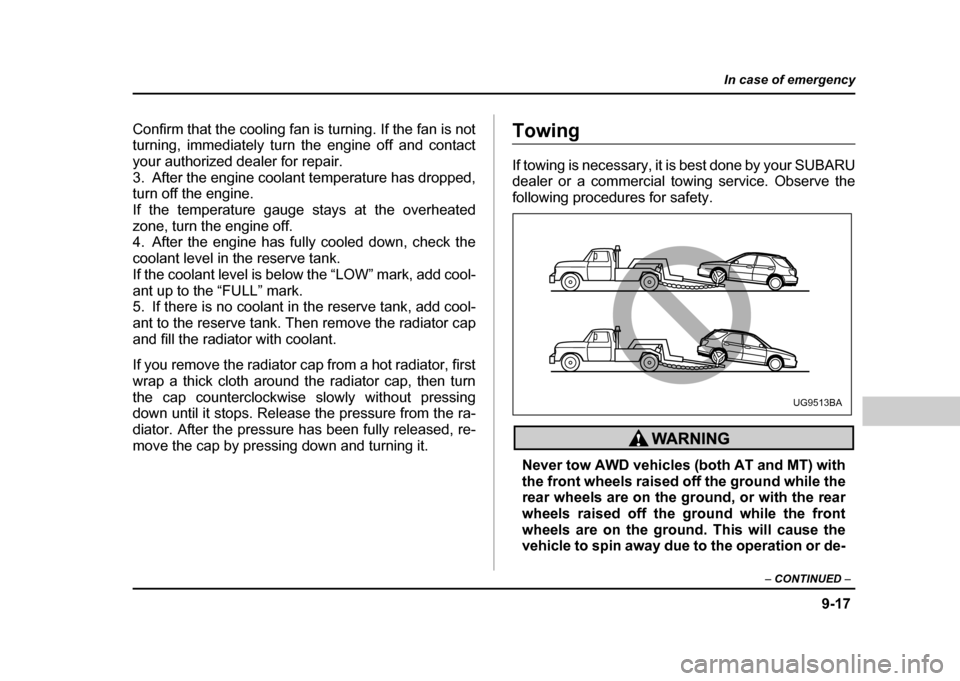
If towing is necessary, it is best done by your SUBARU
dealer or a commercial towing service. Observe the
following procedures for safety.
Never tow AWD vehicles (both AT and MT) with
the front wheels raised off the ground while the
rear wheels are on the ground, or with the rear
wheels raised off the ground while the front
wheels are on the ground. This will cause the
vehicle to spin away due to the operation or de-
UG9513BA
Page 386 of 491

11 - 1
11
Maintenance and service
Maintenance schedule ................................. 11-3
Maintenance precautions ............................ 11-3 Before checking or servicing in the engine compartment .................................................. 11-4
When you do checking or servicing in the engine compartment while the engine is
running ............................................................ 11-5
Engine hood .................................................. 11-5
Engine compartment overview ................... 11-8 2.5 liter model .................................................... 11-8
2.0 liter (Turbo) model ...................................... 11-9
2.5 liter (Turbo) model ...................................... 11-10
Engine oil ...................................................... 11-11 Checking the oil level ....................................... 11-11
Changing the oil and oil filter .......................... 11-12
Recommended grade and viscosity ................ 11-16
Recommended grade and viscosity under severe driving conditions .............................. 11-18
Synthetic oil ....................................................... 11-18
Cooling system ............................................. 11-18 Cooling fan, hose and connections ................ 11-19
Engine coolant .................................................. 11-19
Air cleaner element ...................................... 11-23 Replacing the air cleaner element ................... 11-23
Spark plugs ................................................... 11-26 Recommended spark plugs ............................. 11-27
Drive belts ..................................................... 11-27
Manual transmission oil ............................... 11-28 Checking the oil level ....................................... 11-28
Recommended grade and viscosity ................ 11-30 Automatic transmission fluid ...................... 11-31
Checking the fluid level .................................... 11-31
Recommended fluid ......................................... 11-32
Front differential gear oil (AT vehicles) ...... 11-33 Checking the oil level ....................................... 11-33
Recommended grade and viscosity ............... 11-33
Rear differential gear oil ............................... 11-34 Checking the gear oil level .............................. 11-34
Recommended grade and viscosity ............... 11-35
Power steering fluid ...................................... 11-36 Checking the fluid level .................................... 11-36
Recommended fluid ......................................... 11-37
Brake fluid ..................................................... 11-37 Checking the fluid level .................................... 11-37
Recommended brake fluid ............................... 11-38
Clutch fluid (MT vehicles) ............................ 11-38 Checking the fluid level .................................... 11-38
Recommended clutch fluid .............................. 11-39
Brake booster ................................................ 11-40
Brake pedal .................................................... 11-40 Checking the brake pedal free play ................ 11-40
Checking the brake pedal reserve distance ... 11-41
Clutch pedal (MT vehicles) ........................... 11-41 Checking the clutch function .......................... 11-41
Checking the clutch pedal free play ............... 11-42
Replacement of brake pad and lining ......... 11-42 Breaking-in of new brake pads and linings .... 11-43
Parking brake stroke .................................... 11-44
Tires and wheels ........................................... 11-44
Page 393 of 491
11 - 8
Maintenance and service
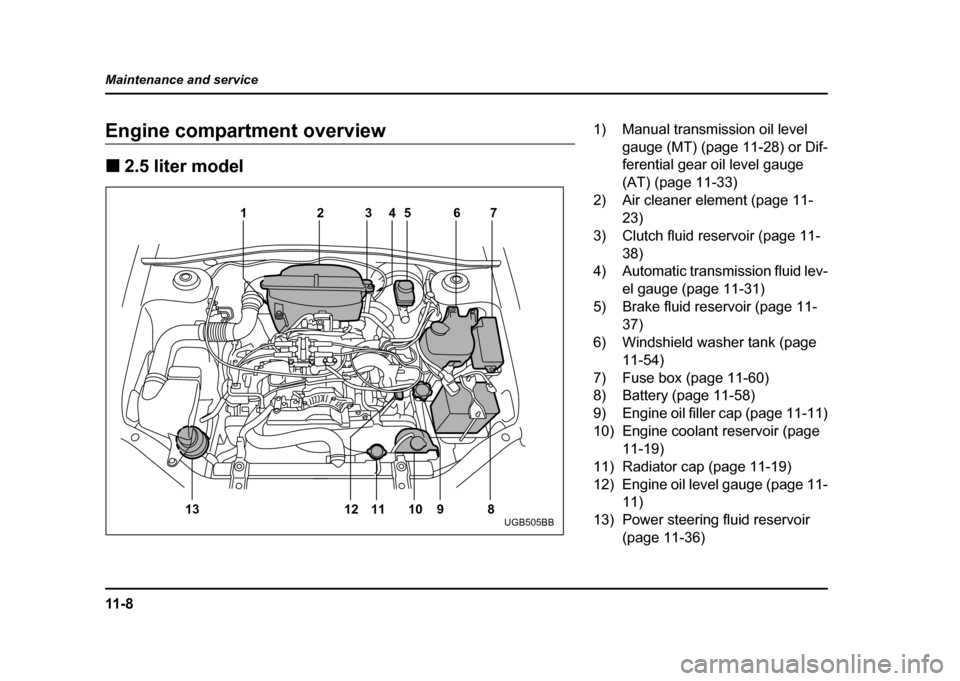
Engine compartment overview !
2.5 liter model
12 345 67
8
9
10
11
12
13
UGB505BB
1) Manual transmission oil level
gauge (MT) (page 11-28) or Dif-
ferential gear oil level gauge
(AT) (page 11-33)
2) Air cleaner element (page 11- 23)
3) Clutch fluid reservoir (page 11- 38)
4) Automatic transmission fluid lev-
el gauge (page 11-31)
5) Brake fluid reservoir (page 11-
37)
6) Windshield washer tank (page 11-54)
7) Fuse box (page 11-60)
8) Battery (page 11-58)
9) Engine oil filler cap (page 11-11)
10) Engine coolant reservoir (page 11-19)
11) Radiator cap (page 11-19)
12) Engine oil level gauge (page 11- 11)
13) Power steering fluid reservoir
(page 11-36)
Page 394 of 491
11 - 9
Maintenance and service
– CONTINUED –
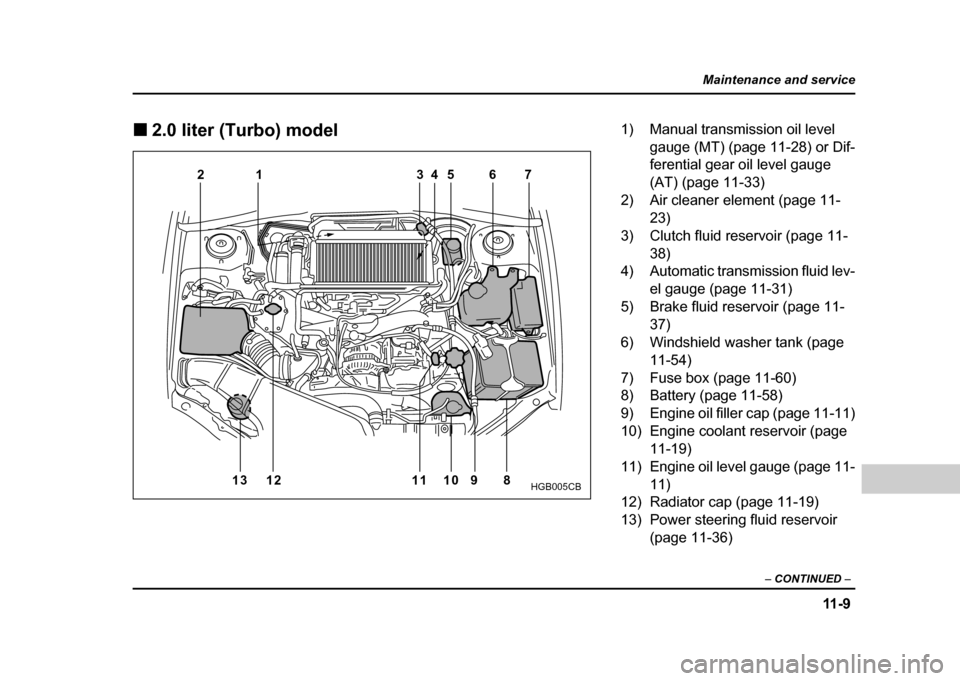
!2.0 liter (Turbo) model
34 5 6 7
1
2
13 12 11 10 9 8
HGB005CB
1) Manual transmission oil level gauge (MT) (page 11-28) or Dif-
ferential gear oil level gauge
(AT) (page 11-33)
2) Air cleaner element (page 11- 23)
3) Clutch fluid reservoir (page 11- 38)
4) Automatic transmission fluid lev-
el gauge (page 11-31)
5) Brake fluid reservoir (page 11-
37)
6) Windshield washer tank (page 11-54)
7) Fuse box (page 11-60)
8) Battery (page 11-58)
9) Engine oil filler cap (page 11-11)
10) Engine coolant reservoir (page 11-19)
11) Engine oil level gauge (page 11-
11)
12) Radiator cap (page 11-19)
13) Power steering fluid reservoir
(page 11-36)
Page 395 of 491
11 - 1 0
Maintenance and service !
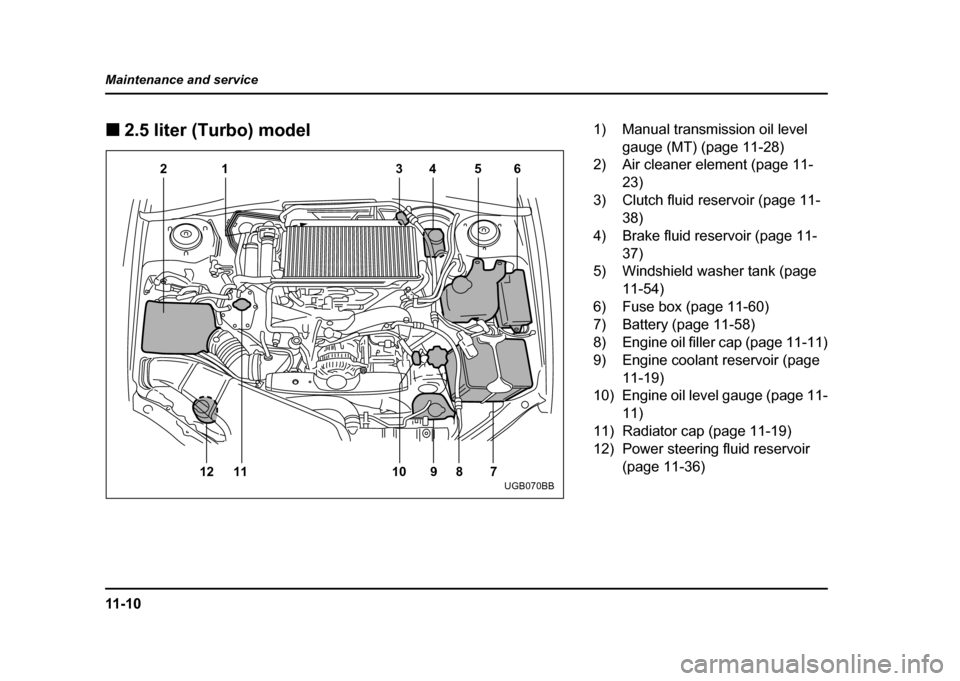
2.5 liter (Turbo) model
34 5 6
7
1
2
12 11 10 9 8
UGB070BB
1) Manual transmission oil level gauge (MT) (page 11-28)
2) Air cleaner element (page 11-
23)
3) Clutch fluid reservoir (page 11- 38)
4) Brake fluid reservoir (page 11- 37)
5) Windshield washer tank (page
11-54)
6) Fuse box (page 11-60)
7) Battery (page 11-58)
8) Engine oil filler cap (page 11-11)
9) Engine coolant reservoir (page
11-19)
10) Engine oil level gauge (page 11- 11)
11) Radiator cap (page 11-19)
12) Power steering fluid reservoir (page 11-36)
Page 404 of 491
11 -1 9
Maintenance and service
– CONTINUED –
ed parts. The alcohol contained in the enginecoolant may damage the paint surface.
! Cooling fan, hose and connections
Your vehicle employs an electric cooling fan which is
thermostatically controlled to operate when the engine
coolant reaches a specific temperature.
If the radiator cooling fan does not operate even when
the engine coolant temperature gauge exceeds the
normal operating range, the cooling fan circuit may be
defective. Check the fuse and replace it if necessary.
If the fuse is not blown, have the cooling system
checked by your SUBARU dealer.
If frequent addition of coolant is necessary, there may
be a leak in the engine cooling system. It is recom-
mended that the cooling system and connections be
checked for leaks, damage, or looseness. !
Engine coolant
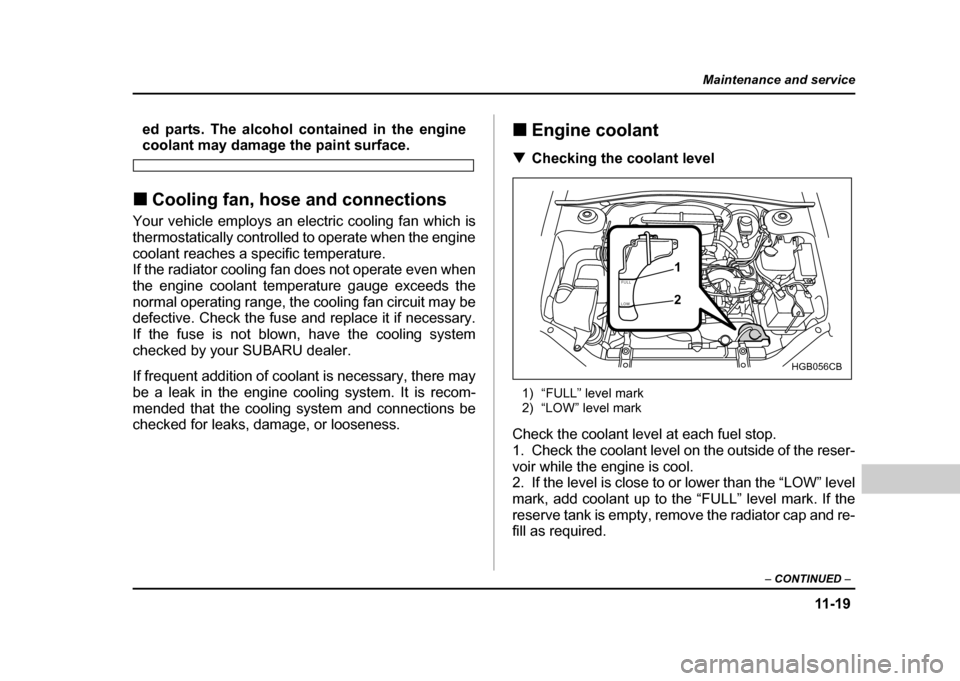
! Checking the coolant level
1) “FULL” level mark
2) “LOW” level mark
Check the coolant level at each fuel stop.
1. Check the coolant level on the outside of the reser-
voir while the engine is cool.
2. If the level is close to or lower than the “LOW” level
mark, add coolant up to the “FULL” level mark. If the
reserve tank is empty, remove the radiator cap and re-
fill as required.
FULL
LOW
HGB056CB
1 2
Page 406 of 491
11 -2 1
Maintenance and service
– CONTINUED –
Never attempt to remove the radiator cap until
the engine has been shut off and has cooled
down completely. Since the coolant is under
pressure, you may suffer serious burns from a
spray of boiling hot coolant when the cap is re-
moved.
4. Install the under cover.
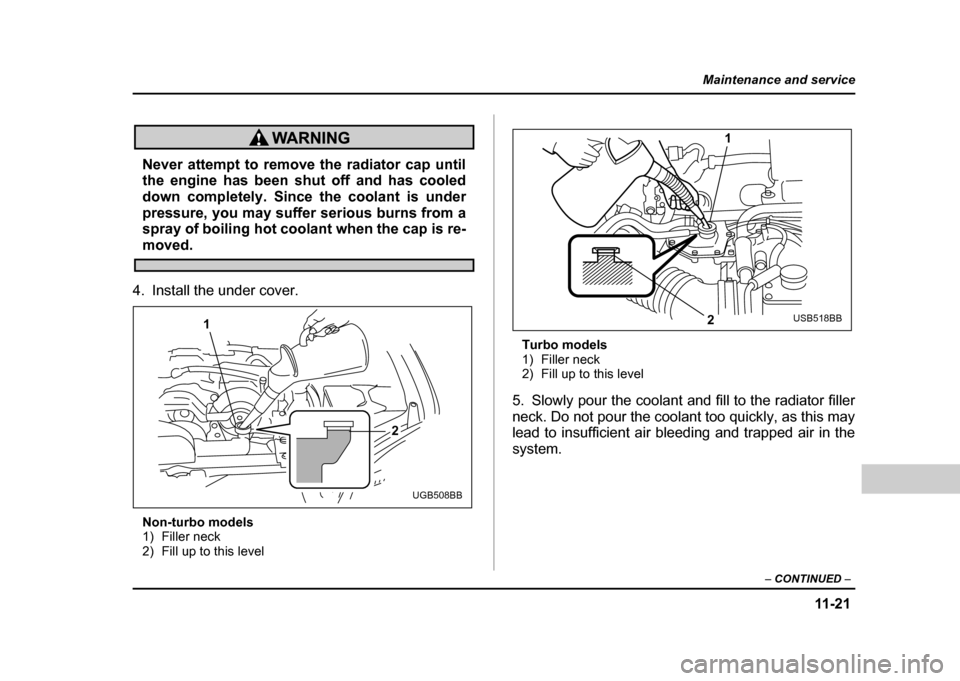
Non-turbo models
1) Filler neck
2) Fill up to this level Turbo models
1) Filler neck
2) Fill up to this level
5. Slowly pour the coolant and fill to the radiator filler
neck. Do not pour the coolant too quickly, as this may
lead to insufficient air bleeding and trapped air in the system.
1
2
UGB508BB
1
2
USB518BB