roof SUBARU IMPREZA WRX 2005 2.G Owner's Manual
[x] Cancel search | Manufacturer: SUBARU, Model Year: 2005, Model line: IMPREZA WRX, Model: SUBARU IMPREZA WRX 2005 2.GPages: 507, PDF Size: 5.96 MB
Page 330 of 507
8-23
Driving tips
– CONTINUED –
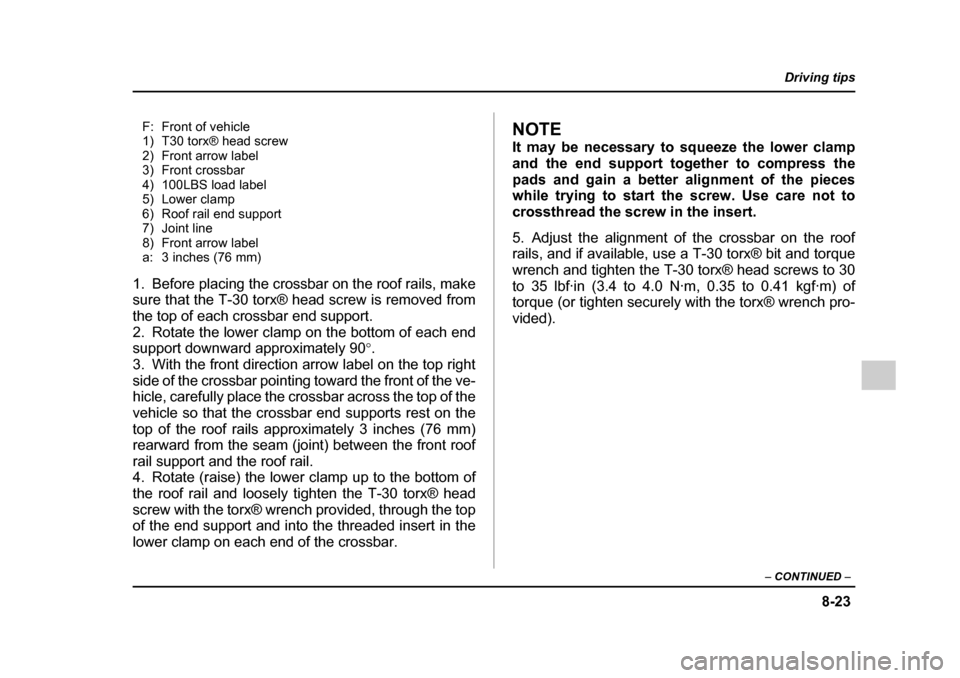
F: Front of vehicle
1) T30 torx® head screw
2) Front arrow label
3) Front crossbar
4) 100LBS load label
5) Lower clamp
6) Roof rail end support
7) Joint line
8) Front arrow label
a: 3 inches (76 mm)
1. Before placing the crossbar on the roof rails, make
sure that the T-30 torx® head screw is removed from
the top of each crossbar end support.
2. Rotate the lower clamp on the bottom of each end
support downward approximately 90 °.
3. With the front direction arrow label on the top right
side of the crossbar pointing toward the front of the ve-
hicle, carefully place the crossbar across the top of the
vehicle so that the crossbar end supports rest on the
top of the roof rails approximately 3 inches (76 mm)
rearward from the seam (joint) between the front roof
rail support and the roof rail.
4. Rotate (raise) the lower clamp up to the bottom of
the roof rail and loosely tighten the T-30 torx® head
screw with the torx® wrench provided, through the top
of the end support and into the threaded insert in the
lower clamp on each end of the crossbar.NOTE
It may be necessary to squeeze the lower clamp
and the end support together to compress the
pads and gain a better alignment of the pieces
while trying to start the screw. Use care not to
crossthread the screw in the insert.
5. Adjust the alignment of the crossbar on the roof
rails, and if available, use a T-30 torx® bit and torque
wrench and tighten the T-30 torx® head screws to 30
to 35 lbf·in (3.4 to 4.0 N·m, 0.35 to 0.41 kgf·m) of
torque (or tighten securely with the torx® wrench pro-
vided).
Page 331 of 507
8-24
Driving tips
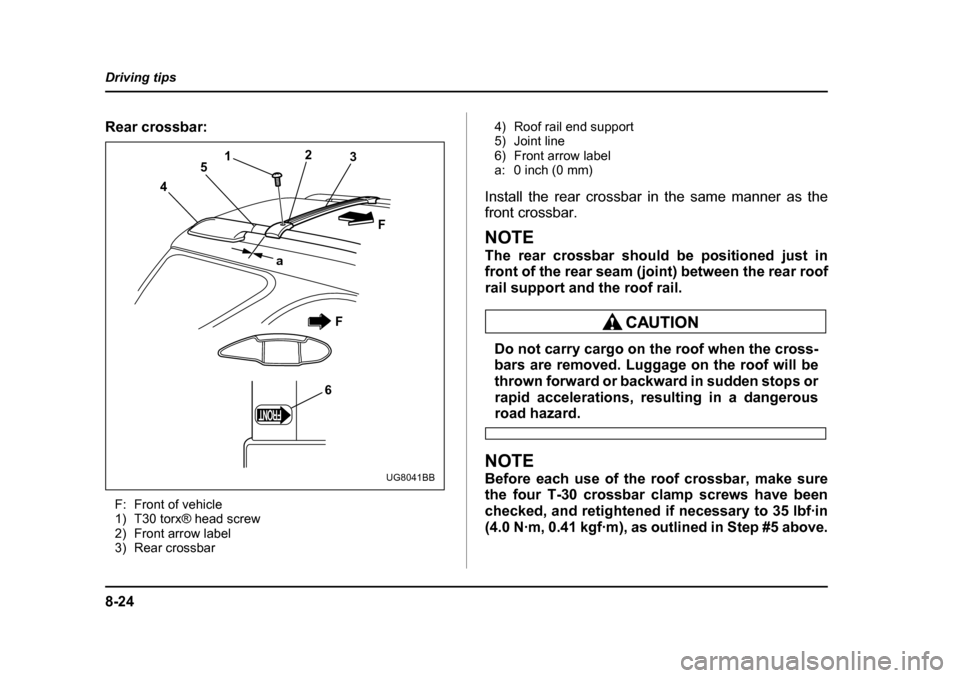
Rear crossbar:
F: Front of vehicle
1) T30 torx® head screw
2) Front arrow label
3) Rear crossbar 4) Roof rail end support
5) Joint line
6) Front arrow label
a: 0 inch (0 mm)
Install the rear crossbar in the same manner as the front crossbar.
NOTE
The rear crossbar should be positioned just in
front of the rear seam (joint) between the rear roof
rail support and the roof rail.
Do not carry cargo on the roof when the cross-
bars are removed. Luggage on the roof will be
thrown forward or backward in sudden stops or
rapid accelerations, resulting in a dangerous
road hazard.
NOTE
Before each use of the roof crossbar, make sure
the four T-30 crossbar clamp screws have been
checked, and retightened if necessary to 35 lbf·in
(4.0 N·m, 0.41 kgf·m), as outlined in Step #5 above.
FR ONTONT6 3
F
2
1
5
a
4
F
UG8041BB
Page 348 of 507

9-1
9
In case of emergency
If you park your vehicle in case of an emergency ................................................. 9-2
Temporary spare tire .................................... 9-3
Flat tires ......................................................... 9-5 Changing a flat tire ........................................... 9-5
Jump starting ................................................ 9-13 How to jump start ............................................. 9-14
Engine overheating ....................................... 9-16 If steam is coming from the engine compartment .................................................. 9-16
If no steam is coming from the engine
compartment .................................................. 9-16
Towing ........................................................... 9-17 Towing and tie-down hooks ............................ 9-18
Using a flat-bed truck ....................................... 9-20
Towing with all wheels on the ground ............ 9-21
Rear gate – if the rear gate cannot be unlocked ..................................................... 9-22
Moonroof – if the moonroof cannot be closed ......................................................... 9-23
Maintenance tools ......................................... 9-24 Jack and jack handle ........................................ 9-24
Page 354 of 507
9-7
In case of emergency
– CONTINUED –
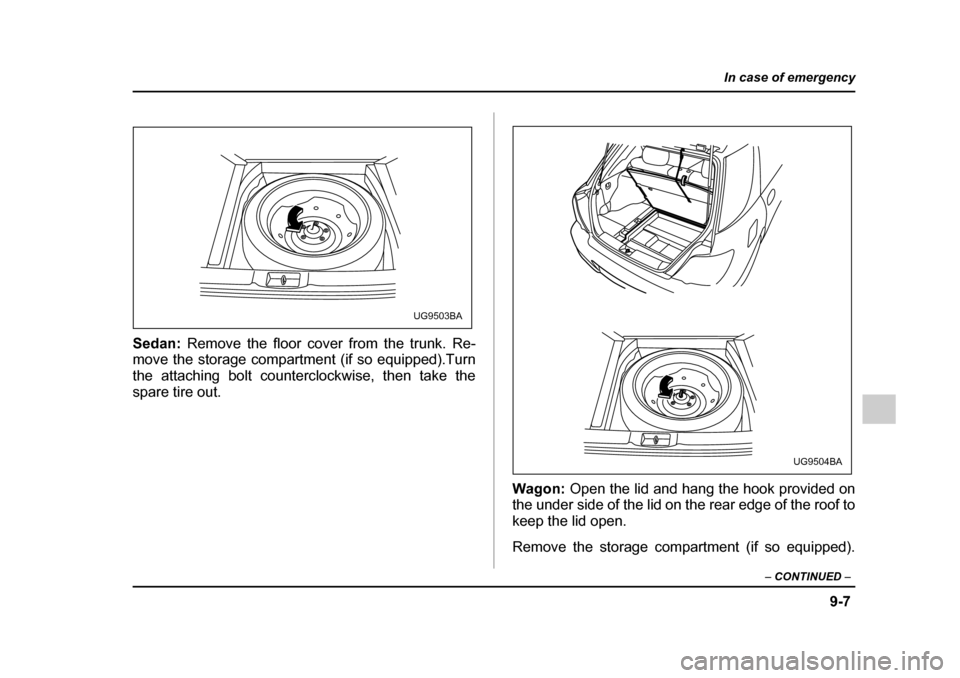
Sedan: Remove the floor cover from the trunk. Re-
move the storage compartment (if so equipped).Turn
the attaching bolt counterclockwise, then take the
spare tire out.
Wagon: Open the lid and hang the hook provided on
the under side of the lid on the rear edge of the roof to
keep the lid open.
Remove the storage compartment (if so equipped).
UG9503BA
UG9504BA
Page 370 of 507
9-23
In case of emergency
– CONTINUED –
Moonroof – if the moonroof cannot be
closed
If the moonroof cannot be closed with the moonroof
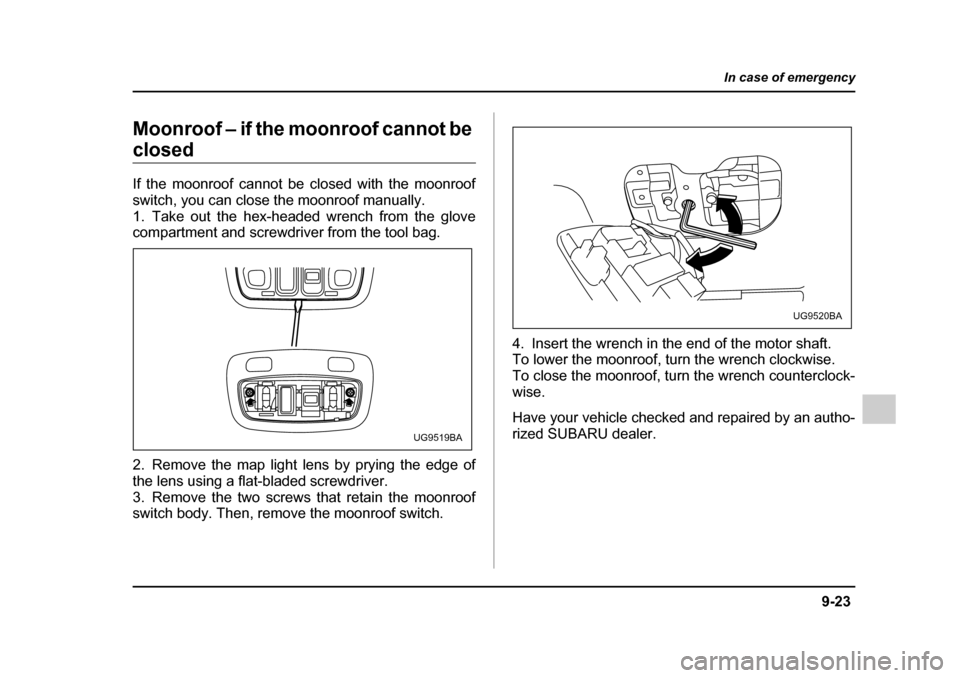
switch, you can close the moonroof manually.
1. Take out the hex-headed wrench from the glove
compartment and screwdriver from the tool bag.
2. Remove the map light lens by prying the edge of
the lens using a flat-bladed screwdriver.
3. Remove the two screws that retain the moonroof
switch body. Then, remove the moonroof switch. 4. Insert the wrench in the end of the motor shaft.
To lower the moonroof, turn the wrench clockwise.
To close the moonroof, turn the wrench counterclock-wise.
Have your vehicle checked and repaired by an autho-
rized SUBARU dealer.
UG9519BA
UG9520BA
Page 371 of 507
9-24
In case of emergency
Maintenance tools
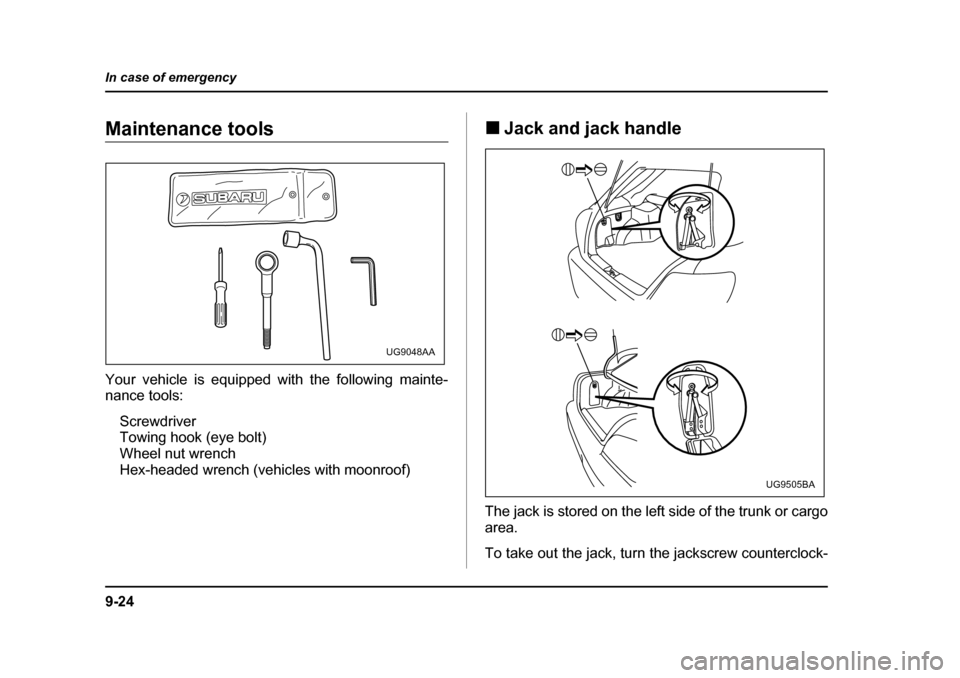
Your vehicle is equipped with the following mainte-
nance tools:
Screwdriver
Towing hook (eye bolt)
Wheel nut wrench
Hex-headed wrench (vehicles with moonroof) �„
Jack and jack handle
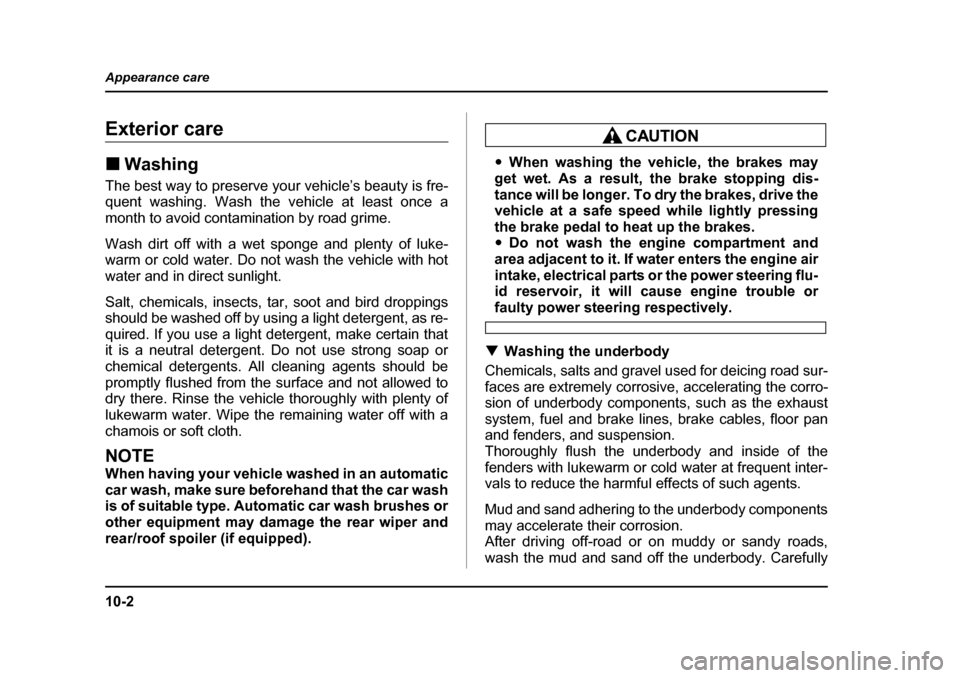
The jack is stored on the left side of the trunk or cargo
area.
To take out the jack, turn the jackscrew counterclock-
UG9048AA
UG9505BA
Page 375 of 507
10-2
Appearance care
Appearance careExterior care �„
Washing
The best way to preserve your vehicle’s beauty is fre-
quent washing. Wash the vehicle at least once a
month to avoid contamination by road grime.
Wash dirt off with a wet sponge and plenty of luke-
warm or cold water. Do not wash the vehicle with hot
water and in direct sunlight.
Salt, chemicals, insects, tar, soot and bird droppings
should be washed off by using a light detergent, as re-
quired. If you use a light detergent, make certain that
it is a neutral detergent. Do not use strong soap or
chemical detergents. All cleaning agents should be
promptly flushed from the surface and not allowed to
dry there. Rinse the vehicle thoroughly with plenty of
lukewarm water. Wipe the remaining water off with a
chamois or soft cloth.
NOTE
When having your vehicle washed in an automatic
car wash, make sure beforehand that the car wash
is of suitable type. Automatic car wash brushes or
other equipment may damage the rear wiper and
rear/roof spoiler (if equipped).
�y When washing the vehicle, the brakes may
get wet. As a result, the brake stopping dis-
tance will be longer. To dry the brakes, drive the
vehicle at a safe speed while lightly pressing
the brake pedal to heat up the brakes. �y Do not wash the engine compartment and
area adjacent to it. If water enters the engine air
intake, electrical parts or the power steering flu-
id reservoir, it will cause engine trouble or
faulty power steering respectively.
�T Washing the underbody
Chemicals, salts and gravel used for deicing road sur-
faces are extremely corrosive, accelerating the corro-
sion of underbody components, such as the exhaust
system, fuel and brake lines, brake cables, floor pan
and fenders, and suspension.
Thoroughly flush the underbody and inside of the
fenders with lukewarm or cold water at frequent inter-
vals to reduce the harmful effects of such agents.
Mud and sand adhering to the underbody components may accelerate their corrosion.
After driving off-road or on muddy or sandy roads,
wash the mud and sand off the underbody. Carefully
Page 467 of 507
12-2
Specifications
SpecificationsSpecifications
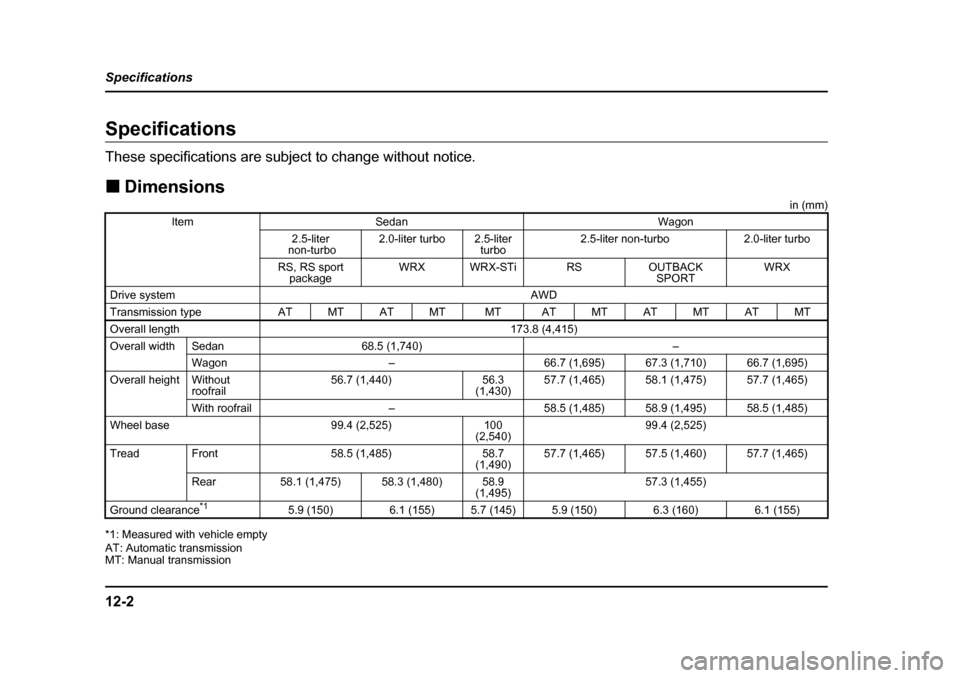
These specifications are subject to change without notice. �„
Dimensions
in (mm)
*1: Measured with vehicle empty
AT: Automatic transmission
MT: Manual transmission
ItemSedanWagon
2.5-liter
non-turbo2.0-liter turbo2.5-liter turbo2.5-liter non-turbo2.0-liter turbo
RS, RS sport packageWRXWRX-STiRSOUTBACK SPORTWRX
Drive systemAWD
Transmission typeATMTATMTMTATMTATMTATMT
Overall length173.8 (4,415)
Overall widthSedan68.5 (1,740)–
Wagon–66.7 (1,695)67.3 (1,710)66.7 (1,695)
Overall heightWithout
roofrail56.7 (1,440)56.3
(1,430)57.7 (1,465)58.1 (1,475)57.7 (1,465)
With roofrail–58.5 (1,485)58.9 (1,495)58.5 (1,485)
Wheel base99.4 (2,525)100
(2,540)99.4 (2,525)
TreadFront58.5 (1,485)58.7
(1,490)57.7 (1,465)57.5 (1,460)57.7 (1,465)
Rear58.1 (1,475)58.3 (1,480)58.9
(1,495)57.3 (1,455)
Ground clearance *15.9 (150)6.1 (155)5.7 (145)5.9 (150)6.3 (160)6.1 (155)
Page 486 of 507
13-9
Consumer information and Reporting safety defects
– CONTINUED –
left hand side of the vehicle. (Each tire must be
kept on its original side of the vehicle.) Replace
any damaged or unevenly worn tire at the time of
rotation. After tire rotation, adjust the tire pres-
sures and make sure the wheel nuts are correct-
ly tightened. A tightening torque specification
and a tightening sequence specification for the
wheel nuts can be found “Flat tires” in Chapter 9. �„Vehicle load limit – how to determine
The load capacity of your vehicle is determined
by weight, not by available cargo space. The
load limit of your vehicle is shown on the vehicle
placard attached to the driver’s side B-pillar. Lo-
cate the statement “The combined weight of oc-
cupants and cargo should never exceed XXX kg
or XXX lbs” on your vehicle’s placard.
The vehicle placard also shows seating capacity
of your vehicle.
The total load capacity includes the total weight
of driver and all passengers and their belong-
ings, any cargo, any optional equipment such as
a trailer hitch, roof rack or bike carrier, etc., and
the tongue load of a trailer. Therefore cargo ca- pacity can be calculated by the following method.
Cargo capacity = Load limit – (total weight of oc-
cupants + total weight of optional equipment +
tongue load of a trailer (if applicable))
For towing capacity information and weight lim-
its, refer to “Trailer towing” in Chapter 8. �T
Calculating total and load capacities vary-
ing seating configurations
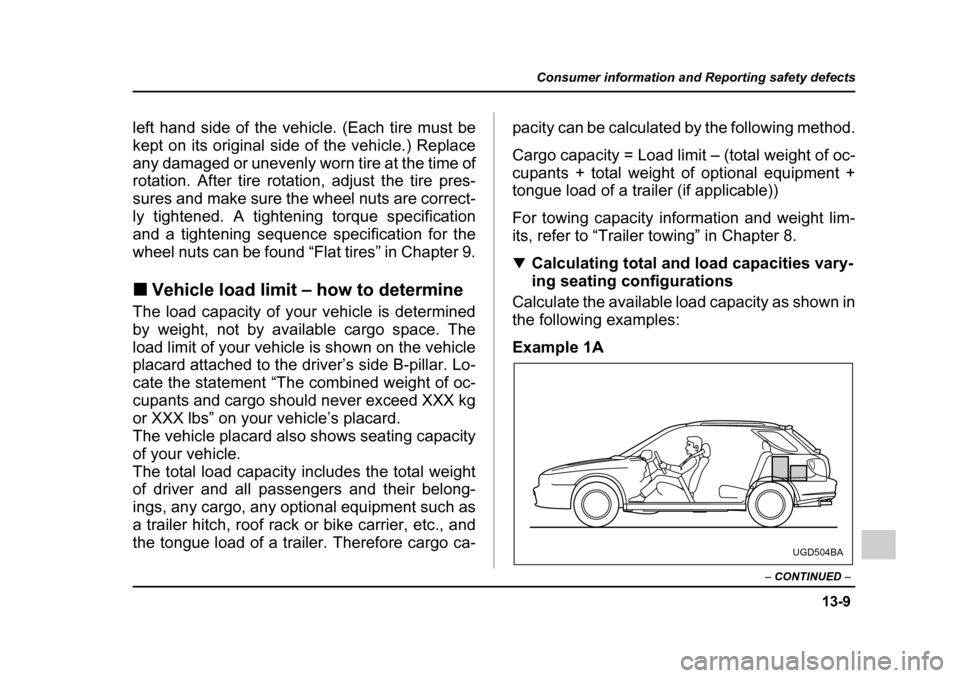
Calculate the available load capacity as shown in
the following examples:
Example 1A
UGD504BA
Page 501 of 507

14-6
Index
Number ........................................................... 2-3
Reminder chime ............................................. 3-5
Keys .................................................................... 2-2 L
Leather seat materials ....................................... 10-6
Light Cargo area .......................................... 6-2, 11-81
Dome ................................................... 6-2, 11-81
Map ..................................................... 6-3, 11-81
Light control switch ............................................ 3-30
Limited slip differential (LSD) ............................ 7-28
Loading your vehicle ......................................... 8-17
LSD (Limited slip differential) ............................ 7-28 M
Main fuse ......................................................... 11-68
Maintenance Precautions .................................................. 11-3
Schedule ...................................................... 11-3
Seatbelt ........................................................ 1-27
Tools ............................................................. 9-24
Malfunction indicator lamp (Check Engine
light) ............................................................... 3-21
Manual climate control system ............................ 4-4
Manual transmission 5 speeds ....................................................... 7-15 6 speeds ....................................................... 7-12
Map light ................................................... 6-3, 11-81
Maximum load limits .......................................... 8-29
Meters and gauges .................................... 3-7, 3-15
Mirrors ............................................................... 3-45
Moonroof .................................................. 2-33, 9-23 N
New vehicle break-in driving – the first 1,000
miles (1,600 km) .............................................. 8-2
O
Odometer/Trip meter .................................. 3-8, 3-15
Off road driving .................................................... 8-8
Oil filter ............................................................ 11-12
Oil level Engine ........................................................ 11-11
Front differential (AT vehicles) ................... 11-35
Manual transmission .................................. 11-30
Rear differential .......................................... 11-36
Oil pressure warning light .................................. 3-22
Outside mirrors .................................................. 3-48
Outside temperature indicator .................. 3-12, 3-19
Overheating engine ........................................... 9-16