seats SUBARU IMPREZA WRX 2006 2.G User Guide
[x] Cancel search | Manufacturer: SUBARU, Model Year: 2006, Model line: IMPREZA WRX, Model: SUBARU IMPREZA WRX 2006 2.GPages: 365, PDF Size: 7.09 MB
Page 69 of 365
1-42 Seat, seatbelt and SRS airbags
Do not apply any strong impact to the
front passenger s seat such as by kicking.
Do not spill liquid on the front passen-
ger s seat. If liquid is spilled, wipe it off im-
mediately.
Do not disassemble the front passen-
ger s seat.
Do not install any accessory (such as
an audio amplifier) other than a genuine
SUBARU accessory under the front pas-
senger s seat.
Do not place anything (shoes, umbrella,
etc.) under the front passenger s seat.
The front passenger s seat must not be
used with the head restraint removed.
Do not leave any article including a child
restraint system on the front passenger s
seat or the seatbelt tongue and buckle en-
gaged when you leave your vehicle.
Do not place a magnet near the seatbelt
buckle and the seatbelt retractor.
Do not use front seats with their back-
ward-forward position and seatback not
being locked into place securely. If any of
them are not locked securely, adjust them
again. For adjusting procedure, refer to
the Front seats section in this chapter.
If you use an optional seatbelt extender,
remove it after each use. (Refer to the Seatbelt extender section in this chap-
ter.)
If the seatbelt buckle switch and/or front passenger
s occupant detection system
have failed, the SRS airbag system warn-
ing light will illuminate. Have the system
inspected by your SUBARU dealer imme-
diately if the SRS airbag system warning
light comes on.
If your vehicle has sustained impact, this
may affect the proper function of the
Subaru advanced frontal airbag system.
Have your vehicle inspected at your
SUBARU dealer.
NOTE
The front passenger s SRS side airbag
and seatbelt pretensioner are not con-
trolled by the Subaru advanced frontal
airbag system.
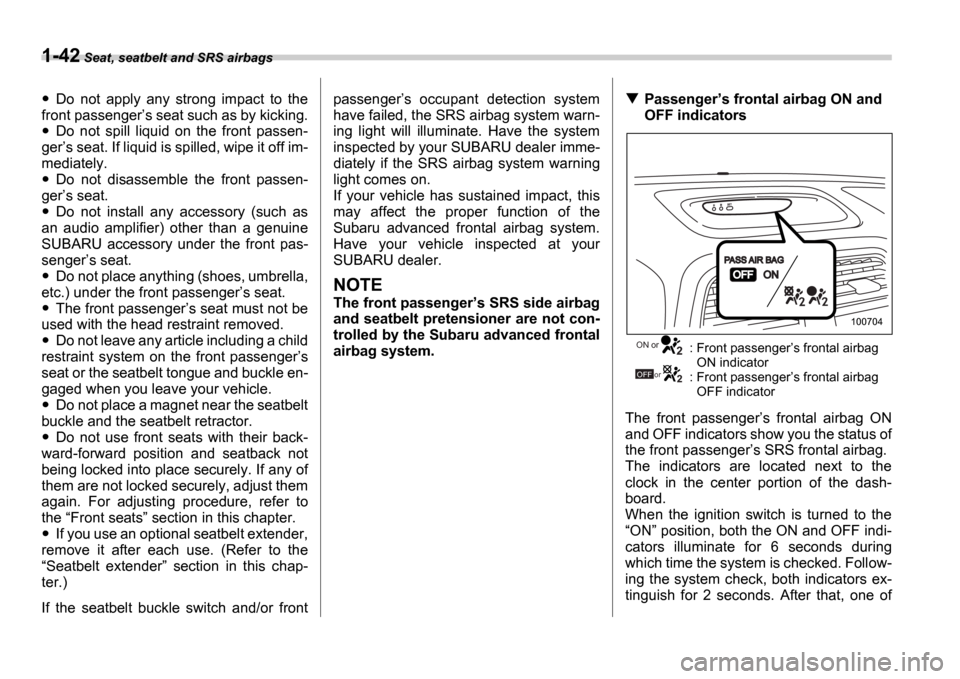
Passenger s frontal airbag ON and
OFF indicators
: Front passenger s frontal airbag
ON indicator
: Front passenger s frontal airbag
OFF indicator
The front passenger s frontal airbag ON
and OFF indicators show you the status of
the front passenger s SRS frontal airbag.
The indicators are located next to the
clock in the center portion of the dash-
board.
When the ignition switch is turned to the ON position, both the ON and OFF indi-
cators illuminate for 6 seconds during
which time the system is checked. Follow-
ing the system check, both indicators ex-
tinguish for 2 seconds. After that, one of
100704
ON or
OFF or
Page 70 of 365
Seat, seatbelt and SRS airbags 1-43
CONTINUED
the indicators illuminates depending on
the status of the front passenger
s SRS
frontal airbag determined by the Subaru
advanced frontal airbag system monitor-
ing.
If the front passenger s SRS frontal airbag
is activated, the passenger s frontal airbag
ON indicator will illuminate while the OFF
indicator will remain extinguished.
If the front passenger s SRS frontal airbag
is deactivated, the passenger s frontal air-
bag ON indicator will remain extinguished
while the OFF indicator will illuminate.
With the ignition switch turned to the ON
position, if both the ON and OFF indica-
tors remain lit or extinguished simulta-
neously even after the system check peri-
od, the system is faulty. Contact your
SUBARU dealer immediately for an in-
spection.
Conditions in which front passen-
ger s SRS frontal airbag is not acti-
vated
The front passenger s SRS frontal airbag
will not be activated when any of the fol-
lowing conditions are met regarding the
front passenger s seat:
The seat is empty.
The seat is equipped with a rearward
facing child restraint system and an infant
is restrained with it. (See WARNING that follows.)
The seat is equipped with a forward fac-
ing child restraint system and a small child
is restrained with it. (See WARNING that
follows.)
The seat is equipped with a booster
seat and a small child is in the booster
seat. (See WARNING that follows.)
The seat is relieved of the occupant
load for a time exceeding the predeter-
mined monitoring time period.
The seat is occupied by a child who has
outgrown a child restraint system (See
WARNING that follows.) or by a small
adult.
The front passenger s occupant detec-
tion system is faulty.
When the front passenger s seat is occu-
pied by a child, observe the following pre-
cautions. Failure to do so may increase
the load on the front passenger s seat, ac-
tivating the front passenger s SRS frontal
airbag even though that seat is occupied
by a child.
Do not place any article on the seat oth-
er than the child occupant and a child re-
straint system.
NEVER INSTALL A REARWARD
FACING CHILD SEAT IN THE FRONT
PASSENGER S SEAT EVEN IF THE
FRONT PASSENGER S SRS FRON-
TAL AIRBAG IS DEACTIVATED. Be
sure to install it in the REAR seat in
a correct manner. Also, it is strongly
recommended that any forward fac-
ing child seat or booster seat be in-
stalled in the REAR seat, and that
even children who have outgrown a
child restraint system be also seat-
ed in the REAR seat. This is because
children sitting in the front passen-
ger s seat may be killed or severely
injured should the front passenger s
SRS frontal airbag deploy. REAR
seats are the safest place for chil-
dren.
Page 72 of 365
Seat, seatbelt and SRS airbags 1-45
CONTINUED
When a heavy article is placed on the
seat.
When the front passenger s seat is occu-
pied by an adult, observe the following
precautions. Failure to do so may lessen
the load on the front passenger s seat, de-
activating the front passenger s SRS fron-
tal airbag despite the fact that the seat is
occupied by an adult.
Do not allow the rear seat occupant to
lift the front passenger s seat cushion us-
ing his/her feet.
Do not place any article under the front
passenger s seat, or squeeze any article
from behind and under the seat. This may
lift the seat cushion.
Do not squeeze any article between the
front passenger s seat and side trim/pillar,
door or center console box. This may lift
the seat cushion.
If the passenger s frontal airbag
OFF indicator illuminates and the
ON indicator extinguishes even
when the front passenger s seat is
occupied by an adult
This can be caused by the adult incorrect-
ly sitting in the front passenger s seat.
Turn the ignition switch to the OFF posi-
tion. Ask the front passenger to set the
seatback to the upright position, sit up
straight in the center of the seat cushion, correctly fasten the seatbelt, position his/
her legs out forward, and adjust the seat
to the rearmost position. Turn the ignition
switch to the
ON position. If the OFF in-
dicator remains illuminated while the ON
indicator remains extinguished, take the
following actions.
Turn the ignition switch to the OFF po-
sition.
Ensure that there is no article, book,
shoe, or other object trapped under the
seat, at the rear of the seat, or on the side
of the seat.
Ensure that the backward-forward posi-
tion and seatback of front passenger s
seat are locked into place securely by
moving the seat back and forth.
Next, turn the ignition switch to the ON
position and wait 6 seconds to allow the
system to complete self-checking. Follow-
ing the system check, both indicators ex-
tinguish for 2 seconds. Now, the ON indi-
cator should illuminate while the OFF indi-
cator remains extinguished.
If the OFF indicator still illuminates while
the ON indicator remains extinguished,
ask the occupant to move to the rear seat
and immediately contact your SUBARU
dealer for an inspection.
Effect vehicle modifications made
for persons with disabilities may
have on Subaru advanced frontal
airbag system operation (U.S. only)
Changing or moving any parts of the front
seats, seat belts, front bumper, front side
frame, instrument panel, combination
meter, steering wheel, steering column,
tire, suspension or floor panel can affect
the operation of the Subaru advanced air-
bag system. If you have any questions,
you may contact the following Subaru dis-
tributors:
Subaru of America, Inc.
Customer Dealer Services Department
P.O. Box 6000
Cherry Hill, NJ 08034-6000
1-800-SUBARU3 (1-800-782-2783)
Schuman Carriage Motors, Inc.
1234 South Beretania Street, Honolulu, HI
96814
808-592-4497
Triple J Enterprises, Inc.
P.O. Box 6066, Tamuning, Guam 96931
671-646-9126
Page 85 of 365
1-58 Seat, seatbelt and SRS airbags
In the event that the SRS airbag is de-
ployed, replacement of the system
should be performed only by an autho-
rized SUBARU dealer. When the com-
ponents of the SRS airbag system are
replaced, use only genuine SUBARU
parts.
To ensure their long-term reliability, the
SRS airbags must be inspected by a
SUBARU dealer ten years after the date
of manufacture, which is shown on the
certification plate attached to the driver s door jamb.
NOTE
In the following cases, contact your
SUBARU dealer as soon as possible.
The front part of the vehicle was in-
volved in an accident in which only the
driver s SRS frontal airbag or both driv-
er s and front passenger s SRS frontal
airbags did not deploy.
The pad section of the steering
wheel or front passenger s frontal air-
bag cover is scratched, cracked, or
otherwise damaged.
In addition, if your vehicle is equipped
with SRS side airbags, contact your
SUBARU dealer as soon as possible in
the following cases.
Either center pillar or a nearby area
of the vehicle was involved in an acci-
dent in which the SRS side airbag did
not deploy.
The fabric or leather of either front
seatback is cut, frayed, or otherwise
damaged.
Precautions against vehicle
modification
If you need service or repair in areas
listed in the following, have an au-
thorized SUBARU dealer perform
the work. The SRS airbag control
module, impact sensors and airbag
modules are stored in these areas.
Under the center console
Inside each front fender
Steering wheel and column and
nearby areas
Top of the dashboard on front
passenger s side and nearby ar-
eas
Each front seat and nearby area
Inside each center pillar
To avoid accidental activation of
the system or rendering the sys-
tem inoperative, which may result
in serious injury, no modifications
should be made to any compo-
nents or wiring of the SRS airbag
system.
This includes following modifica-
tions:
Installation of custom steering
wheels
Attachment of additional trim
materials to the dashboard
Installation of custom seats
Replacement of seat fabric or
leather
Installation of additional fabric
or leather on the front seat
Page 148 of 365
Instruments and controls 3-35
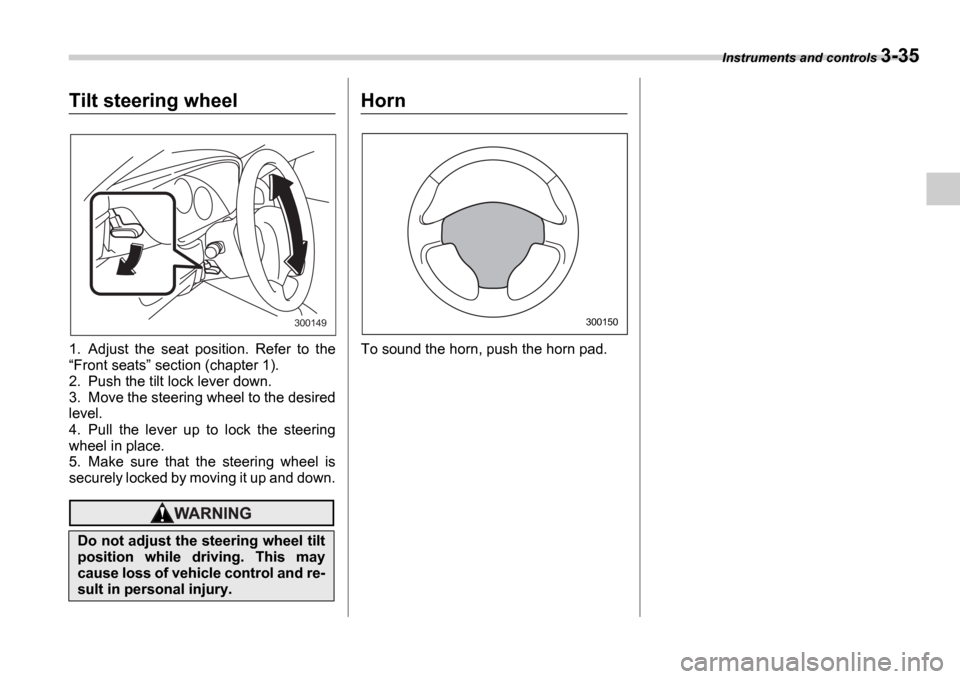
Tilt steering wheel
1. Adjust the seat position. Refer to the Front seats section (chapter 1).
2. Push the tilt lock lever down.
3. Move the steering wheel to the desired
level.
4. Pull the lever up to lock the steering
wheel in place.
5. Make sure that the steering wheel is
securely locked by moving it up and down.
Horn
To sound the horn, push the horn pad.
Do not adjust the steering wheel tilt
position while driving. This may
cause loss of vehicle control and re-
sult in personal injury.
300149300150
Page 278 of 365
Appearance care 10-5
CONTINUED
soon as you find them.
Check the interior of the vehicle for water
and dirt accumulation under the floor mats
because that could cause corrosion. Oc-
casionally check under the mats to make
sure the area is dry.
Keep your garage dry. Do not park your
vehicle in a damp, poorly ventilated ga-
rage. In such a garage, corrosion can be
caused by dampness. If you wash the ve-
hicle in the garage or put the vehicle into
the garage when wet or covered with
snow, that can cause dampness.
If your vehicle is operated in cold weather
and/or in areas where road salts and other
corrosive materials are used, the door
hinges and locks, trunk lid lock, and hood
latch should be inspected and lubricated
periodically.
Cleaning the interior
Use a soft, damp cloth to clean the climate
control panel, audio equipment, instru-
ment panel, center console, combination
meter panel, and switches. (Do not use or-
ganic solvents.)
Seat fabric
Remove loose dirt, dust or debris with a
vacuum cleaner. If the dirt is caked on the
fabric or hard to remove with a vacuum
cleaner, use a soft blush then vacuum it.
Wipe the fabric surface with a tightly
wrung cloth and dry the seat fabric thor-
oughly. If the fabric is still dirty, wipe using
a solution of mild soap and lukewarm wa-
ter then dry thoroughly.
If the stain does not come out, try a com-
mercially-available fabric cleaner. Use the
cleaner on a hidden place and make sure
it does not affect the fabric adversely. Use
the cleaner according to its instructions.
NOTE
When cleaning the seat, do not use
benzine, paint thinner, or any similar
materials.
Leather seat materials
The leather used by SUBARU is a high
quality natural product which will retain its
distinctive appearance and feel for many
years with proper care.
Allowing dust or road dirt to build up on the
surface can cause the material to become
brittle and to wear prematurely. Regular
cleaning with a soft, moist, natural fiber
cloth should be performed monthly, taking
care not to soak the leather or allow water
to penetrate the stitched seams.
A mild detergent suitable for cleaning
woolen fabrics may be used to remove dif-
ficult dirt spots, rubbing with a soft, dry
cloth afterwards to restore the luster. If
your SUBARU is to be parked for a long
time in bright sunlight, it is recommended
that the seats and headrests be covered,
or the windows shaded, to prevent fading
or shrinkage.
Minor surface blemishes or bald patches
may be treated with a commercial leather
spray lacquer. You will discover that each
leather seat section will develop soft folds
or wrinkles, which is characteristic of gen-
uine leather.
Synthetic leather upholstery
The synthetic leather material used on the
SUBARU may be cleaned using mild soap
or detergent and water, after first vacuum-
ing or brushing away loose dirt. Allow the
soap to soak in for a few minutes and wipe
Page 348 of 365
Consumer information and Reporting safety defects 13-7
CONTINUED
asymmetrical tire that has a particu-
lar side that must always face out-
ward when mounting on a vehicle.
Accessory weight
The combined weight (in excess of
those standard items which may be
replaced) of floor mats, leather seats
and cross bars to the extent that these
items are available as factory-in-
stalled equipment (whether installed
or not).
Curb weight
The weight of a motor vehicle with
standard equipment including the
maximum capacity of fuel, oil, and
coolant and air conditioning.
Maximum loaded vehicle weight
The sum of curb weight, accessory
weight, vehicle capacity weight and
production options weight.
Normal occupant weight
150 lbs (68 kg) times the number of
occupants (3 occupants).
Occupant distribution
Distribution of occupants in a vehicle,
2 in front, 1 in rear seat.
Production options weight
The combined weight of those in-
stalled regular production options weighing over 5.1 lbs (2.3 kg) in ex-
cess of those standards items which
they replace, not previously consid-
ered in curb weight or accessory
weight.
Vehicle capacity weight
The total weight of cargo, luggage
and occupants that can be added to
the vehicle.
Vehicle maximum load on a tire
Load on an individual tire that is deter-
mined by distributing to each axle its
share of the maximum loaded vehicle
weight and dividing by two.
Vehicle normal load on a tire
Load on an individual tire that is deter-
mined by distributing to each axle its
share of the curb weight, accessory
weight, and normal occupant weight
and dividing by two.
Tire care maintenance and
safety practices
Check on a daily basis that the tires
are free from serious damage, nails,
and stones. At the same time, check
the tires for abnormal wear.
Inspect the tire tread regularly and
replace the tires before their tread wear indicators become visible. When
a tire
s tread wear indicator becomes
visible, the tire is worn beyond the ac-
ceptable limit and must be replaced
immediately. With a tire in this condi-
tion, driving at even low speeds in wet
weather can cause the vehicle to hy-
droplane. Possible resulting loss of
vehicle control can lead to an acci-
dent.
To maximize the life of each tire and
ensure that the tires wear uniformly, it
is best to rotate the tires every 7,500
miles (12,500 km). Rotating the tires
involves switching the front and rear
tires on the right-hand side of the ve-
hicle and similarly switching the front
and rear tires on the left-hand side of
the vehicle. (Each tire must be kept on
its original side of the vehicle.) Re-
place any damaged or unevenly worn
tire at the time of rotation. After tire ro-
tation, adjust the tire pressures and
make sure the wheel nuts are correct-
ly tightened. A tightening torque spec-
ification and a tightening sequence
specification for the wheel nuts can be
found Flat tires section in chapter 9.
Page 359 of 365
14-4 Index
Tired or sleepy .................................... ............................... 7
E
EBD (Electronic brake force distribution) system ........ ..... 7-24
Electrical system ..................................... ......................... 12-3
Electronic Brake Force Distribution (EBD) system ......... .. 7-24
Emergency Locking Retractor (ELR) .................... ............ 1-11
Engine Compartment overview ................................ ................ 11-6
Coolant ........................................... ........................... 11-12
Exhaust gas (Carbon monoxide) ....................... ........ 6, 8-2
Hood .............................................. .............................. 11-4
Oil ............................................... ................................. 11-8
Overheating ........................................ ......................... 9-11
Starting .......................................... ................................ 7-7
Stopping .......................................... .............................. 7-8
Exterior care ....................................... .............................. 10-2
F
Flat tires ......................................... .................................... 9-4
Floor mat ......................................... ................................... 6-9
Fluid level
Automatic transmission ............................... .............. 11-20
Brake .............................................. ........................... 11-25
Clutch ............................................. ........................... 11-26
Power steering ..................................... ...................... 11-24
Folding down the rear seat ......................... ........................ 1-8
Front
Differential gear oil ............................. ........................ 11-21
Fog light ......................................... ............................ 11-48
Fog light button .................................. .......................... 3-26Seatbelt pretensioners ..............................
................... 1-20
Seats .............................................. ................................ 1-2
Turn signal light .................................. ....................... 11-48
Fuel .............................................. ....................................... 7-2
Economy hints ........................................ ....................... 8-2
Filler lid and cap ................................. ............................ 7-4
Gauge ............................................. ...................... 3-8, 3-12
Requirements ...................................... .......................... 7-2
Fuses .............................................. ................................ 11-41
Fuses and circuits ..................................... ........................ 12-6
G
GAWR (Gross Axle Weight Rating) ..................... ............. 8-14
Glove box ........................................... ................................ 6-4
GVWR (Gross Vehicle Weight Rating) ................... .......... 8-14
H
Hazard warning flasher ............................. .......................... 3-6
Head restraint adjustment (Front) ................... .................... 1-4
Head restraint adjustment (Wagon) .................. .................. 1-7
Headlight beam leveler ............................ ......................... 3-25
Headlight flasher .................................. ............................. 3-23
Headlight indicator light .......................... .......................... 3-21
Headlights ......................................... ..................... 3-22, 11-45
Heater operation .................................. ............................... 4-5
High beam indicator light .......................... ........................ 3-20
High mount stop light .............................. ........................ 11-51
Horn .............................................. .................................... 3-35
Hose and connections .................................. .................. 11-12
Page 361 of 365
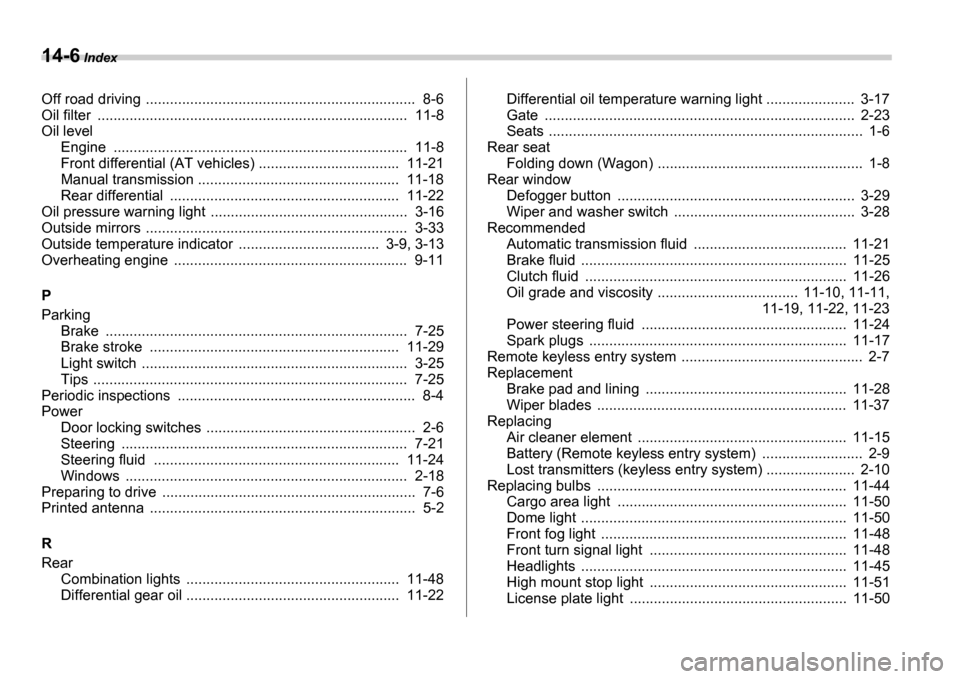
14-6 Index
Off road driving ................................... ................................ 8-6
Oil filter ........................................ ..................................... 11-8
Oil level Engine ............................................ ............................. 11-8
Front differential (AT vehicles) ..................... .............. 11-21
Manual transmission ................................. ................. 11-18
Rear differential ................................. ........................ 11-22
Oil pressure warning light .......................... ....................... 3-16
Outside mirrors ..................................... ............................ 3-33
Outside temperature indicator ....................... ............ 3-9, 3-13
Overheating engine ................................. ......................... 9-11
P
Parking Brake .............................................. ............................. 7-25
Brake stroke ......................................... ..................... 11-29
Light switch ........................................ .......................... 3-25
Tips ............................................... ............................... 7-25
Periodic inspections .................................. ......................... 8-4
Power Door locking switches ................................. ................... 2-6
Steering .......................................... ............................. 7-21
Steering fluid .................................... ......................... 11-24
Windows ........................................... ........................... 2-18
Preparing to drive ................................. .............................. 7-6
Printed antenna ................................... ............................... 5-2
R
Rear Combination lights ................................. .................... 11-48
Differential gear oil ............................. ........................ 11-22Differential oil temperature warning light ........
.............. 3-17
Gate .............................................. ............................... 2-23
Seats .............................................. ................................ 1-6
Rear seat Folding down (Wagon) .............................. ..................... 1-8
Rear window Defogger button ................................... ........................ 3-29
Wiper and washer switch ............................. ................ 3-28
Recommended Automatic transmission fluid .......................... ............ 11-21
Brake fluid ........................................ .......................... 11-25
Clutch fluid ....................................... .......................... 11-26
Oil grade and viscosity .............................. ..... 11-10, 11-11,
11-19, 11-22, 11-23
Power steering fluid ............................... .................... 11-24
Spark plugs ......................................... ....................... 11-17
Remote keyless entry system .............................. ............... 2-7
Replacement Brake pad and lining ............................... ................... 11-28
Wiper blades ....................................... ....................... 11-37
Replacing Air cleaner element ................................ .................... 11-15
Battery (Remote keyless entry system) ..................... .... 2-9
Lost transmitters (keyless entry system) ................. ..... 2-10
Replacing bulbs ..................................... ......................... 11-44
Cargo area light .................................. ....................... 11-50
Dome light ........................................ .......................... 11-50
Front fog light ................................... .......................... 11-48
Front turn signal light ............................ ..................... 11-48
Headlights ......................................... ......................... 11-45
High mount stop light .............................. ................... 11-51
License plate light ................................. ..................... 11-50