roof SUBARU IMPREZA WRX 2006 2.G Owners Manual
[x] Cancel search | Manufacturer: SUBARU, Model Year: 2006, Model line: IMPREZA WRX, Model: SUBARU IMPREZA WRX 2006 2.GPages: 365, PDF Size: 7.09 MB
Page 13 of 365
10
Illustrated index
Exterior
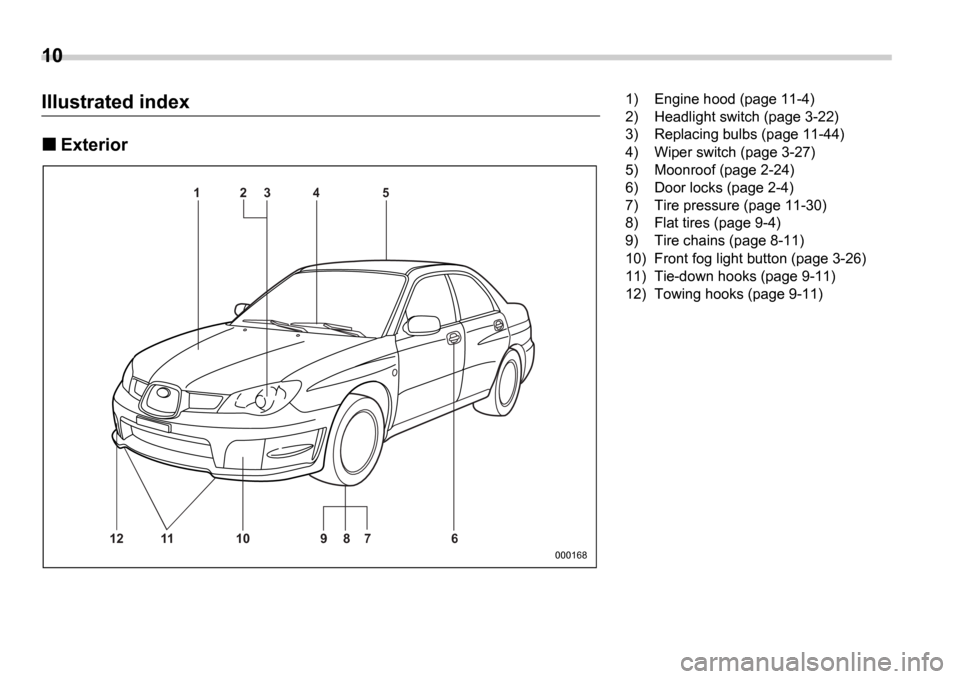
1 2 34 5
12 11 10 9 87 6
000168
1) Engine hood (page 11-4)
2) Headlight switch (page 3-22)
3) Replacing bulbs (page 11-44)
4) Wiper switch (page 3-27)
5) Moonroof (page 2-24)
6) Door locks (page 2-4)
7) Tire pressure (page 11-30)
8) Flat tires (page 9-4)
9) Tire chains (page 8-11)
10) Front fog light button (page 3-26)
11) Tie-down hooks (page 9-11)
12) Towing hooks (page 9-11)
Page 14 of 365
11
CONTINUED
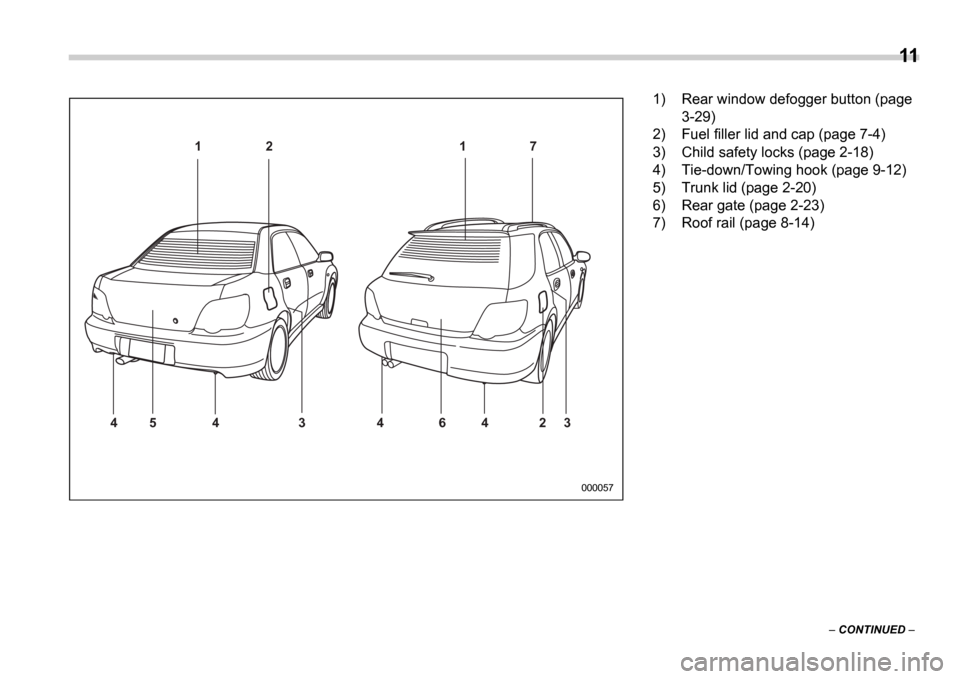
1 2
3 4 4 6 2 3
4
4 5 1 7
000057
1) Rear window defogger button (page
3-29)
2) Fuel filler lid and cap (page 7-4)
3) Child safety locks (page 2-18)
4) Tie-down/Towing hook (page 9-12)
5) Trunk lid (page 2-20)
6) Rear gate (page 2-23)
7) Roof rail (page 8-14)
Page 15 of 365
12
Interior
Passenger compartment area
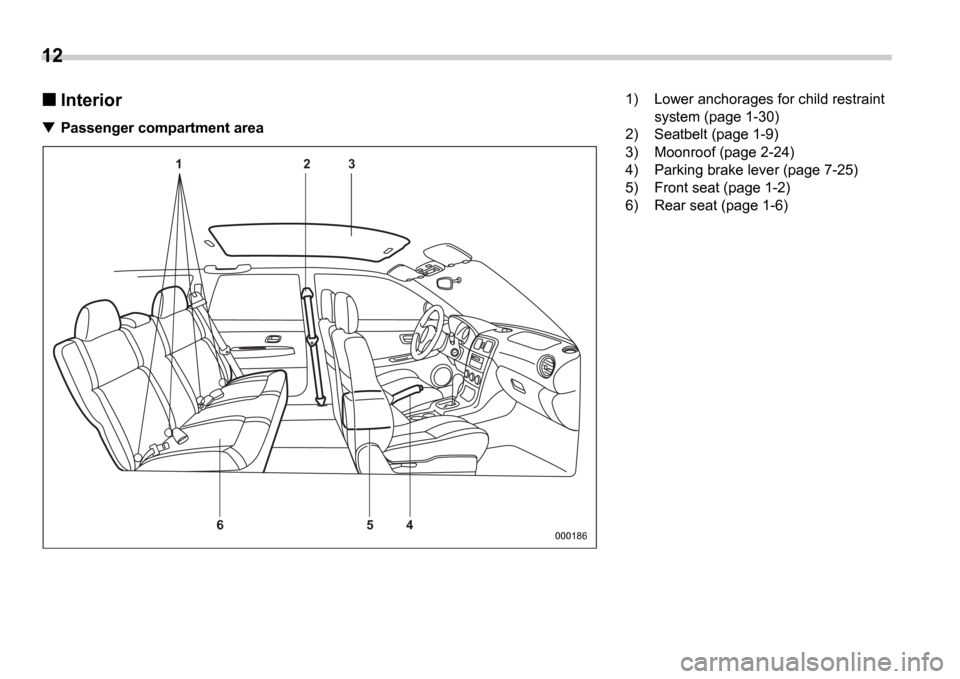
1 2 34
5
6
000186
1) Lower anchorages for child restraint
system (page 1-30)
2) Seatbelt (page 1-9)
3) Moonroof (page 2-24)
4) Parking brake lever (page 7-25)
5) Front seat (page 1-2)
6) Rear seat (page 1-6)
Page 61 of 365
1-34 Seat, seatbelt and SRS airbags
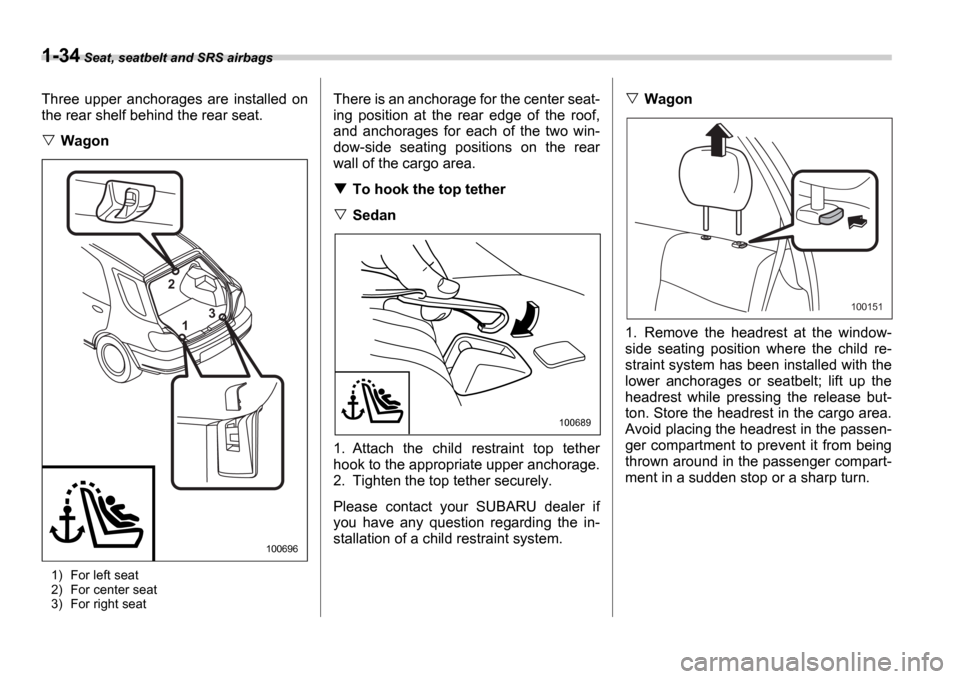
Three upper anchorages are installed on
the rear shelf behind the rear seat.
Wagon
1) For left seat
2) For center seat
3) For right seat
There is an anchorage for the center seat-
ing position at the rear edge of the roof,
and anchorages for each of the two win-
dow-side seating positions on the rear
wall of the cargo area.
To hook the top tether
Sedan
1. Attach the child restraint top tether
hook to the appropriate upper anchorage.
2. Tighten the top tether securely.
Please contact your SUBARU dealer if
you have any question regarding the in-
stallation of a child restraint system.
Wagon
1. Remove the headrest at the window-
side seating position where the child re-
straint system has been installed with the
lower anchorages or seatbelt; lift up the
headrest while pressing the release but-
ton. Store the headrest in the cargo area.
Avoid placing the headrest in the passen-
ger compartment to prevent it from being
thrown around in the passenger compart-
ment in a sudden stop or a sharp turn.
2 1 3
100696
100689
100151
Page 77 of 365
1-50 Seat, seatbelt and SRS airbags
might not necessarily require deployment
of driver s/driver s and front passenger s
SRS frontal airbag(s). If the vehicle strikes
an object, such as a telephone pole or
sign pole, or if it slides under a truck s load
bed, or if it sustains an oblique offset fron-
tal impact, the driver s/driver s and front
passenger s SRS frontal airbag(s) may
not deploy depending on the level of acci-
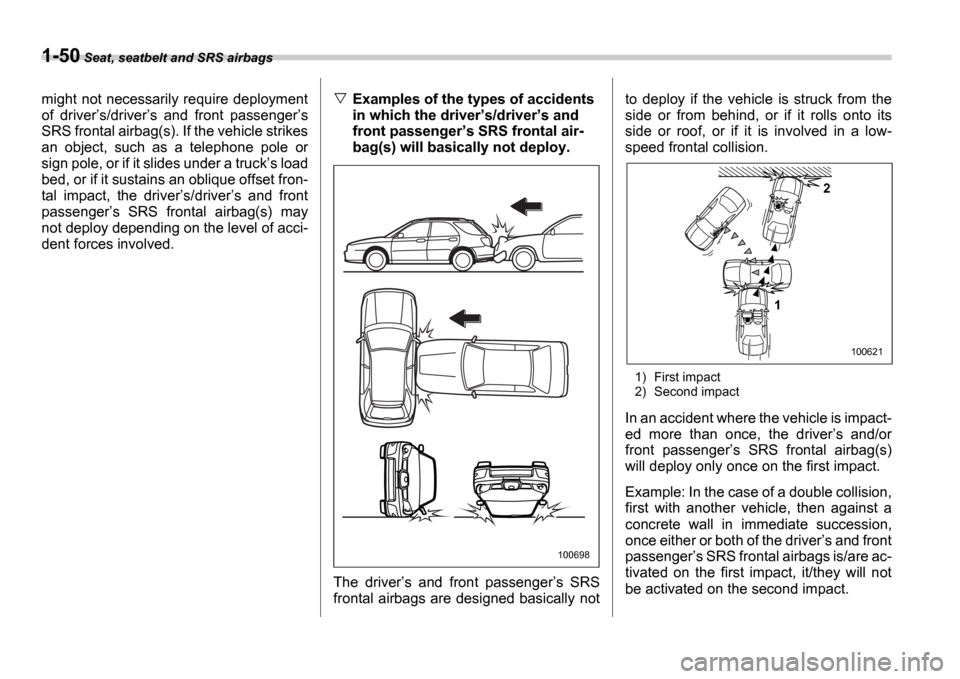
dent forces involved.Examples of the types of accidents
in which the driver s/driver s and
front passenger s SRS frontal air-
bag(s) will basically not deploy.
The driver s and front passenger s SRS
frontal airbags are designed basically not to deploy if the vehicle is struck from the
side or from behind, or if it rolls onto its
side or roof, or if it is involved in a low-
speed frontal collision.
1) First impact
2) Second impact
In an accident where the vehicle is impact-
ed more than once, the driver
s and/or
front passenger s SRS frontal airbag(s)
will deploy only once on the first impact.
Example: In the case of a double collision,
first with another vehicle, then against a
concrete wall in immediate succession,
once either or both of the driver s and front
passenger s SRS frontal airbags is/are ac-
tivated on the first impact, it/they will not
be activated on the second impact.
100698
2
1
100621
Page 82 of 365
Seat, seatbelt and SRS airbags 1-55
CONTINUED
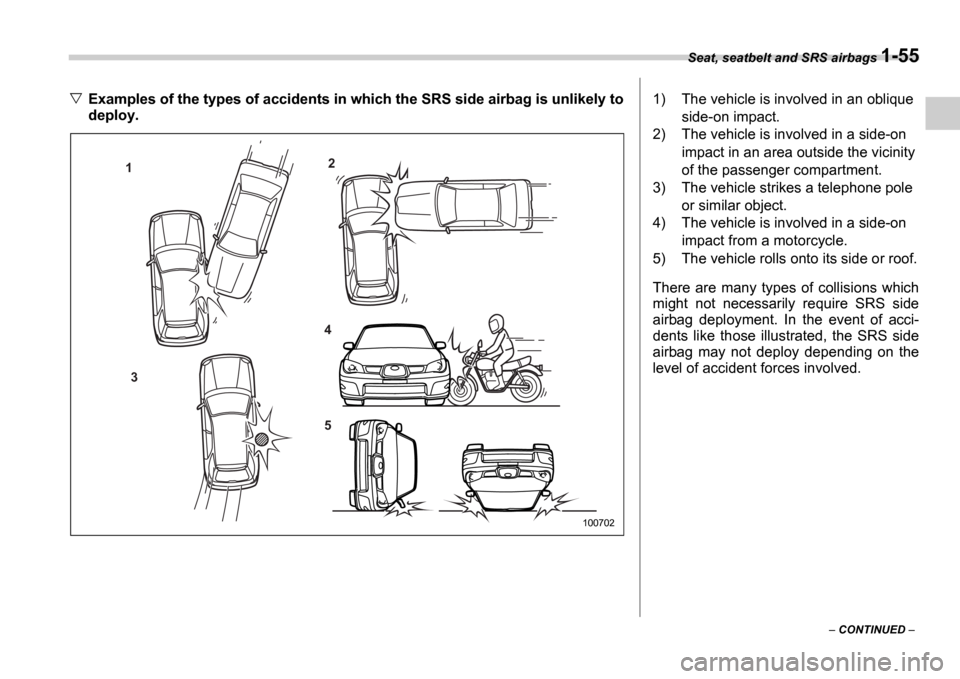
Examples of the types of accidents in which the SRS side airbag is unlikely to
deploy.
1 2
3 4 5
100702
1) The vehicle is involved in an oblique
side-on impact.
2) The vehicle is involved in a side-on
impact in an area outside the vicinity
of the passenger compartment.
3) The vehicle strikes a telephone pole or similar object.
4) The vehicle is involved in a side-on impact from a motorcycle.
5) The vehicle rolls onto its side or roof.
There are many types of collisions which
might not necessarily require SRS side
airbag deployment. In the event of acci-
dents like those illustrated, the SRS side
airbag may not deploy depending on the
level of accident forces involved.
Page 88 of 365

2
Keys and doors
Keys ..................................................................... 2-2
Key number ........................................ ..................... 2-2
Immobilizer (Turbo models) ......................... ..... 2-3
Security ID plate ................................. .................... 2-3
Security indicator light .......................... ................. 2-3
Key replacement ................................... .................. 2-4
Door locks ........................................ ................... 2-4
Locking and unlocking from the outside ............ . 2-4
Locking and unlocking from the inside ............. ... 2-5
Key lock-in prevention function ................... ......... 2-5
Power door locking switches ....................... ..... 2-6
Remote keyless entry system ....................... .... 2-7
Locking the doors ................................. ................. 2-7
Unlocking the doors ............................... ................ 2-8
Illuminated entry ................................. .................... 2-8
Vehicle finder function ........................... ................ 2-8
Sounding a panic alarm ............................ ............. 2-8
Selecting audible signal operation ................ ....... 2-8
Replacing the battery ............................. ................ 2-9
Replacing lost transmitters ....................... ............ 2-10
Alarm system ...................................... ................ 2-13
System alarm operation ............................ ............. 2-13
Activating and deactivating the alarm system ..... 2 -13
If you have accidentally triggered the alarm
system ............................................ ....................... 2-14
Arming the system ................................. ................ 2-14
Disarming the system .............................. .............. 2-15
Valet mode ........................................ ...................... 2-16
Passive arming .................................... ................... 2-16Tripped sensor identification .....................
........... 2-17
Shock sensors (dealer option) ..................... ......... 2-17
Child safety locks ................................ ............... 2-18
Windows ........................................... ................... 2-18
Power windows ..................................... .................. 2-18
Trunk lid (Sedan) ................................. ............... 2-20
To open and close the trunk lid from outside ...... 2-20
To open the trunk lid from inside ................. ......... 2-21
To cancel the trunk lid release ................... ........... 2-21
Internal trunk lid release handle ................. ........... 2-21
Rear gate (Wagon) ................................. ............. 2-23
Moonroof (if equipped) ............................ .......... 2-24
Tilt function ..................................... ........................ 2-24
Sliding function .................................. ..................... 2-24
Sun shades ........................................ ...................... 2-25
Page 101 of 365
2-14 Keys and doors
cating that the system is now deactivated.
If the system was previously deactivated:
The odometer/trip meter screen displays AL on and the horn sounds once, indi-
cating that the system is now activated.
NOTE
You may have the above setting
change done by your SUBARU dealer.
If you have accidentally trig-
gered the alarm system
To stop the alarm
Do any of the following operations:
Press any button on the remote trans-
mitter.
Cycle the ignition switch from the
LOCK to ON position three times within
5 seconds.
Arming the system
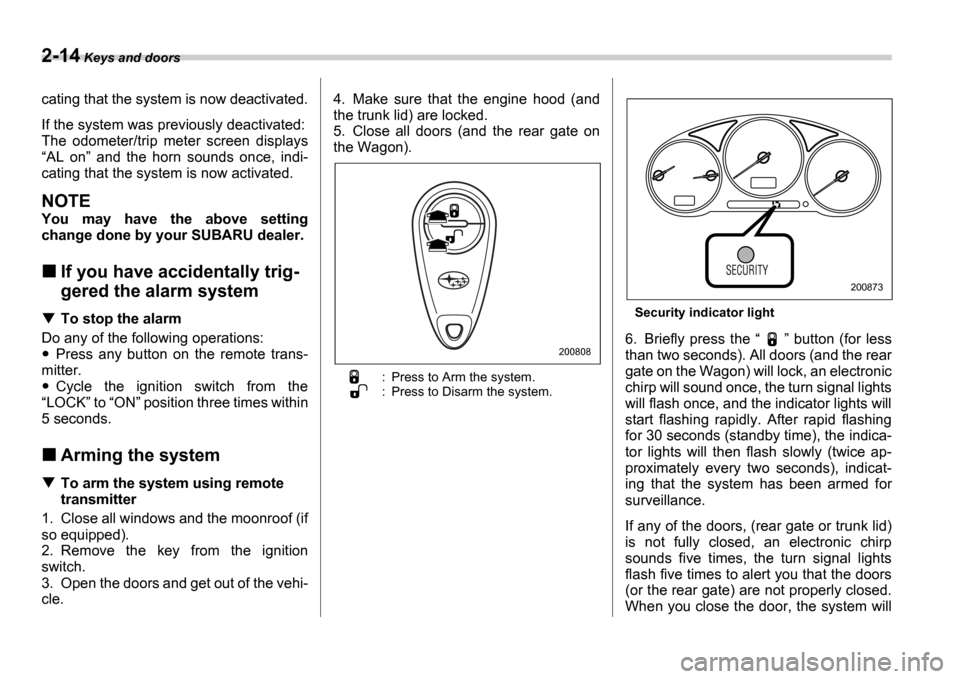
To arm the system using remote
transmitter
1. Close all windows and the moonroof (if
so equipped).
2. Remove the key from the ignition
switch.
3. Open the doors and get out of the vehi-
cle. 4. Make sure that the engine hood (and
the trunk lid) are locked.
5. Close all doors (and the rear gate on
the Wagon).
: Press to Arm the system.
: Press to Disarm the system.
Security indicator light
6. Briefly press the
button (for less
than two seconds). All doors (and the rear
gate on the Wagon) will lock, an electronic
chirp will sound once, the turn signal lights
will flash once, and the indicator lights will
start flashing rapidly. After rapid flashing
for 30 seconds (standby time), the indica-
tor lights will then flash slowly (twice ap-
proximately every two seconds), indicat-
ing that the system has been armed for
surveillance.
If any of the doors, (rear gate or trunk lid)
is not fully closed, an electronic chirp
sounds five times, the turn signal lights
flash five times to alert you that the doors
(or the rear gate) are not properly closed.
When you close the door, the system will200808
200873
Page 102 of 365
Keys and doors 2-15
CONTINUED
automatically arm and doors will automat-
ically lock.
To arm the system using power
door locking switches
1. Close all windows.
2. Remove the key from the ignition
switch.
3. Open the doors and get out of the vehi-
cle.
4. Make sure that the engine hood is
locked.
5. Close the doors (and the rear gate on
the Wagon) but leave only the driver s
door or the front passenger s door open.
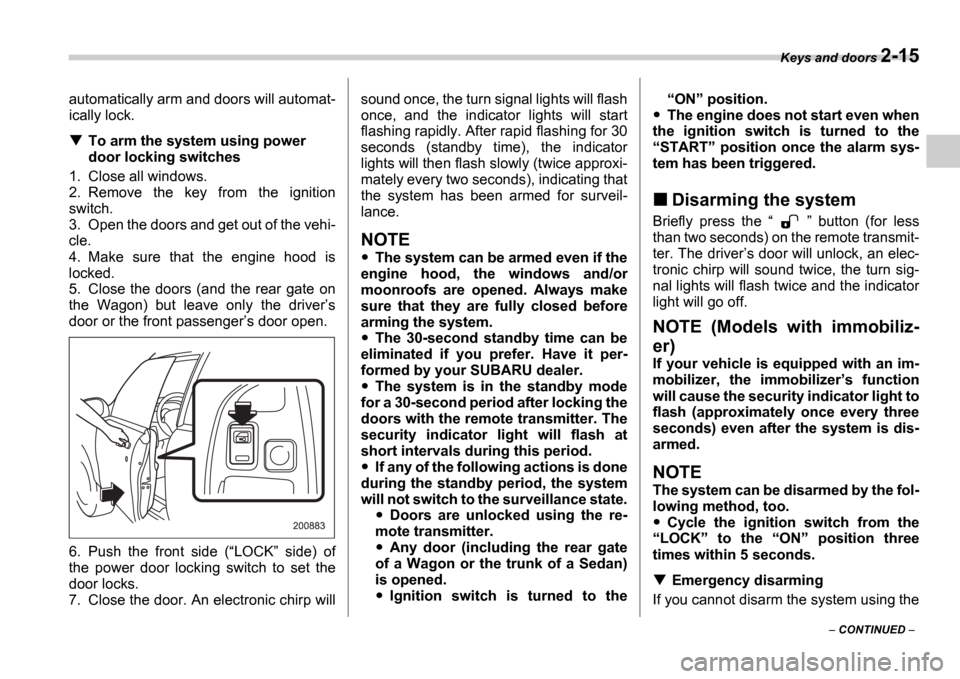
6. Push the front side ( LOCK side) of
the power door locking switch to set the
door locks.
7. Close the door. An electronic chirp will sound once, the turn signal lights will flash
once, and the indicator lights will start
flashing rapidly. After rapid flashing for 30
seconds (standby time), the indicator
lights will then flash slowly (twice approxi-
mately every two seconds), indicating that
the system has been armed for surveil-
lance.
NOTE
The system can be armed even if the
engine hood, the windows and/or
moonroofs are opened. Always make
sure that they are fully closed before
arming the system.
The 30-second standby time can be
eliminated if you prefer. Have it per-
formed by your SUBARU dealer.
The system is in the standby mode
for a 30-second period after locking the
doors with the remote transmitter. The
security indicator light will flash at
short intervals during this period.
If any of the following actions is done
during the standby period, the system
will not switch to the surveillance state.
Doors are unlocked using the re-
mote transmitter.
Any door (including the rear gate
of a Wagon or the trunk of a Sedan)
is opened.
Ignition switch is turned to the
ON position.
The engine does not start even when
the ignition switch is turned to the START position once the alarm sys-
tem has been triggered.
Disarming the system
Briefly press the button (for less
than two seconds) on the remote transmit-
ter. The driver s door will unlock, an elec-
tronic chirp will sound twice, the turn sig-
nal lights will flash twice and the indicator
light will go off.
NOTE (Models with immobiliz-
er)
If your vehicle is equipped with an im-
mobilizer, the immobilizer s function
will cause the security indicator light to
flash (approximately once every three
seconds) even after the system is dis-
armed.
NOTE
The system can be disarmed by the fol-
lowing method, too.
Cycle the ignition switch from the
LOCK to the ON position three
times within 5 seconds.
Emergency disarming
If you cannot disarm the system using the
Page 111 of 365
2-24 Keys and doors
NOTE
If the rear gate cannot be unlocked due
to a discharged battery, a fault in the
door locking/unlocking system or oth-
er causes, you can unlock it by manu-
ally operating the rear gate lock release
lever.
For the procedure, refer to Rear gate
if the rear gate cannot be unlocked in
chapter 9 In case of emergency .
Moonroof (if equipped)
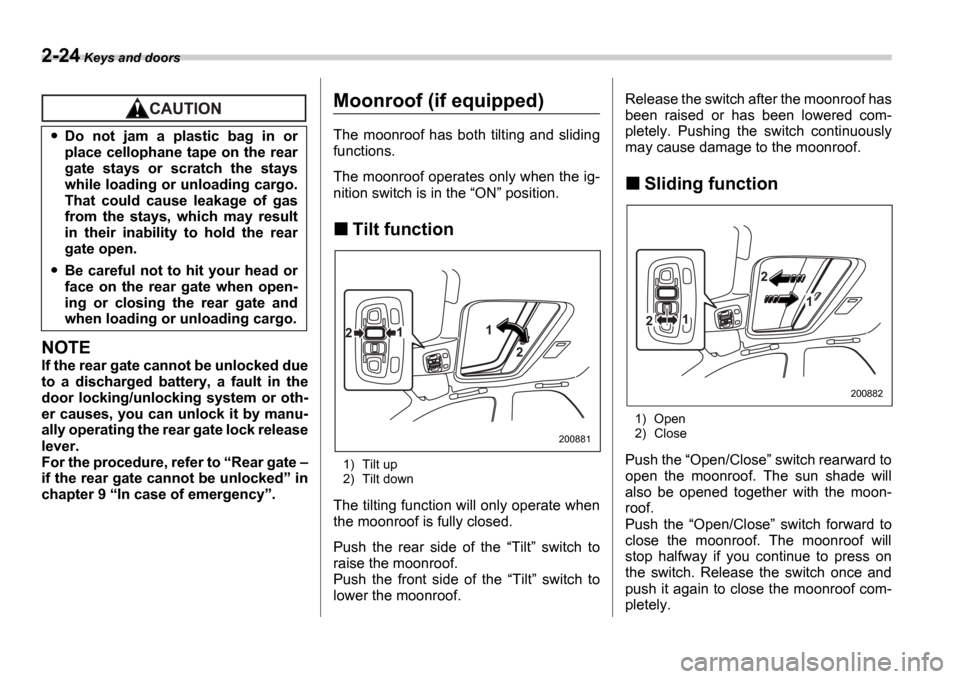
The moonroof has both tilting and sliding
functions.
The moonroof operates only when the ig-
nition switch is in the ON position.
Tilt function
1) Tilt up
2) Tilt down
The tilting function will only operate when
the moonroof is fully closed.
Push the rear side of the Tilt switch to
raise the moonroof.
Push the front side of the Tilt switch to
lower the moonroof. Release the switch after the moonroof has
been raised or has been lowered com-
pletely. Pushing the switch continuously
may cause damage to the moonroof.
Sliding function
1) Open
2) Close
Push the Open/Close switch rearward to
open the moonroof. The sun shade will
also be opened together with the moon-
roof.
Push the Open/Close switch forward to
close the moonroof. The moonroof will
stop halfway if you continue to press on
the switch. Release the switch once and
push it again to close the moonroof com-
pletely.
Do not jam a plastic bag in or
place cellophane tape on the rear
gate stays or scratch the stays
while loading or unloading cargo.
That could cause leakage of gas
from the stays, which may result
in their inability to hold the rear
gate open.
Be careful not to hit your head or
face on the rear gate when open-
ing or closing the rear gate and
when loading or unloading cargo.
1
21
2
200881
2
1
12
200882