trunk SUBARU IMPREZA WRX 2014 4.G Owner's Manual
[x] Cancel search | Manufacturer: SUBARU, Model Year: 2014, Model line: IMPREZA WRX, Model: SUBARU IMPREZA WRX 2014 4.GPages: 414, PDF Size: 14.22 MB
Page 251 of 414
7-8Starting and operating/Preparing to drive
.A vehiclefails the OBDII inspection if
the “CHECK ENGINE ”warning light is not
properly operating (light is illuminated or is
not working due to a burned out bulb) or
there is one or more diagnostic trouble
codes stored in the vehicle ’s computer.
. A state emission inspection may reject
(not pass or fail) a vehicle if the number of
OBDII system readiness monitors “NOT
READY ”is greater than one. If the
vehicle ’s battery has been recently re-
placed or disconnected, the OBDII system
inspection may indicate that the vehicle is
not ready for the emission test. Under this
condition, the vehicle driver should be
instructed to drive his/her vehicle for a few
days to reset the readiness monitors and
return for an emission re-inspection. . Owners of rejected or failing vehicles
should contact their SUBARU Dealer for service.
Some states still use dynamometers in
their emission inspection program. A
dynamometer is a treadmill or roller-like
testing device that allows your vehicle ’s
wheels to turn while the vehicle remains in
one place. Prior to your vehicle being put
on a dynamometer, tell your emission
inspector
not to place your SUBARU
AWD vehicle on a two-wheel dynam-
ometer. Otherwise, serious transmis-
sion damage will result. The U.S. Environmental Protection
Agency (EPA) and states using two-wheel
dynamometers in their emission testing
program have EXEMPTED SUBARU
AWD vehicles from the portion of the
testing program that involves a two-wheel
dynamometer. There are some states that
use four-wheel dynamometers in their
testing program. When properly used, this
equipment should not damage a SUBARU
AWD vehicle.
Under no circumstances should the rear
wheels be jacked off the ground, nor
should the driveshaft be disconnected for
state emission testing.
Preparing to drive
You should perform the following checks
and adjustments every day before you
start driving.
1. Check that all windows, mirrors, and
lights are clean and unobstructed.
2. Check the appearance and condition
of the tires. Also check tires for properinflation.
3. Look under the vehicle for any sign of leaks.
4. Check that the hood, trunk (4-door)
and rear gate (5-door) are fully closed.
5. Check the adjustment of the seat.
6. Check the adjustment of the inside
and outside mirrors.
7. Fasten your seatbelt. Check that your
passengers have fastened their seatbelts.
8. Check the operation of the warning
and indicator lights when the ignition
switch is turned to the
“ON ”position.
9. Check the gauges, indicator and warn-
ing lights after starting the engine.
NOTE
Engine oil, engine coolant, brake fluid,
washer fluid and other fluid levels
should be checked daily, weekly or at
fuel stops.
Page 276 of 414

low pressure threshold, the low tire
pressure warning light should turn
off a few minutes later.
If this light still illuminates while
driving after adjusting the tire pres-
sure, a tire may have significant
damage and a fast leak that causes
the tire to lose air rapidly. If you have
a flat tire, replace it with a spare tire
as soon as possible.
When a spare tire is mounted or a
wheel rim is replaced without the
original pressure sensor/transmitter
being transferred, the low tire pres-
sure warning light will illuminate
steadily after blinking for approxi-
mately one minute. This indicates
the TPMS is unable to monitor all
four road wheels. Contact your
SUBARU dealer as soon as possible
for tire and sensor replacement and/
or system resetting.
Do not inject any tire liquid or
aerosol tire sealant into the tires,
as this may cause a malfunction of
the tire pressure sensors. If the light
illuminates steadily after blinking for
approximately one minute, promptly
contact a SUBARU dealer to have
the system inspected.CAUTION
. Do not place metal film or any
metal parts in the cargo area/
trunk. This may cause poor re-
ception of the signals from the
tire pressure sensors, and the
tire pressure monitoring system
will not function properly.
. FCC WARNING
Changes or modifications not
expressly approved by the party
responsible for compliance
could void the user ’s authority
to operate the equipment.
NOTE
This device complies with Part 15 of
the FCC Rules and RSS-Gen of IC
Rules. Operation is subject to the
following two conditions: (1) this de-
vice may not cause harmful interfer-
ence, and (2) this device must accept
any interference received, including
interference that may cause undesiredoperation. Parking your vehicle &
Parking brake
To set the parking brake, depress the
brake pedal firmly and hold it down until
the parking brake lever is fully pulled up.
To release the parking brake, pull the lever
up slightly, press the release button, then
lower the lever while keeping the button pressed.
When the parking brake is set while the
engine is running, the parking brake
warning light illuminates. After starting
the vehicle, be sure that the warning light
has turned off before the vehicle is driven.
Refer to “Parking brake warning ”F 3-19.
Starting and operating/Parking your vehicle7-33
– CONTINUED –
Page 286 of 414

exhaust fumes are entering the
vehicle, have the problem
checked and corrected as soon
as possible. If you must drive
under these conditions, drive
only with all windows fully open.
. Keep the trunk lid (4-door) or rear
gate (5-door) closed while driving
to prevent exhaust gas from
entering the vehicle.
NOTE
Due to the expansion and contraction
of the metals used in the manufacture
of the exhaust system, you may hear a
crackling sound coming from the ex-
haust system for a short time after the
engine has been shut off. This sound isnormal. Catalytic converter
The catalytic converter is installed in the
exhaust system. It serves as a catalyst to
reduce HC, CO and NOx in exhaust
gases, thus providing cleaner exhaust.
To avoid damage to the catalytic conver- ter: .
Use only unleaded fuel. Even a small
amount of leaded fuel will damage the
catalytic converter. . Never start the engine by pushing or
pulling the vehicle.. Avoid racing the engine.
. Never turn off the ignition switch while
the vehicle is moving.. Keep your engine tuned-up. If you feel
the engine running rough (misfiring, back- firing or incomplete combustion), have
your vehicle checked and repaired by an
authorized SUBARU dealer. .
Do not apply undercoating or rust
prevention treatment to the heat shield of
catalytic converter and the exhaust sys-tem. . Do not drive with an extremely low fuel
level.
WARNING
. Avoid fire hazards. Do not drive
or park the vehicle anywhere
near flammable materials (e.g.,
grass, paper, rags or leaves),
because the catalytic converter
operates at very high tempera-tures.
. Keep everyone and flammable
materials away from the exhaust
pipe while the engine is running.
The exhaust gas is very hot.
Driving tips/Catalytic converter8-3
Page 293 of 414

8-10Driving tips/Loading your vehicle
Loading your vehicle
WARNING
. Never allow passengers to ride
on a folded rear seatback, in the
trunk or in the cargo area. Doing
so may result in serious injury.
. Never stack luggage or other
cargo higher than the top of the
seatback because it could tumble
forward and injure passengers in
the event of a sudden stop or
accident. Keep luggage or cargo
low, as close to the floor aspossible.
WARNING
. When you carry something inside
the vehicle, secure it whenever
you can to prevent it from being
thrown around inside the vehicle
during sudden stops, sharp turns
or in an accident.
. Do not pile heavy loads on the
roof. These loads raise the vehi-cle ’s center of gravity and make it
more prone to tip over.
. Secure lengthy items properly to
prevent them from shooting for-
ward and causing serious injury
during a sudden stop.
. Never exceed the maximum load
limit. If you do, some parts on
your vehicle can break, or it can
change the way your vehicle
handles. This could result in loss
of control and cause personal
injury. Also, overloading can
shorten the life of your vehicle.
. Do not place anything on the rear
shelf behind the rear seatback
(for 4-door) or the extended car-
go area cover (for 5-door). Such
items could tumble forward in the
event of a sudden stop or a
collision. This could cause ser- ious injury.
CAUTION
Do not carry spray cans, containers
with flammable or corrosive liquids
or any other dangerous items inside
the vehicle.
NOTE
For better fuel economy, do not carry
unneeded cargo. & Vehicle capacity weight
Page 302 of 414

1) Wheel nut wrench
2) Screwdriver
3) Jack
4) Towing hook (eye bolt)
The jack handle is stored under the floor of
the trunk (4-door) or the cargo area (5-
door). The jack and towing hook are
stored in the tool bucket that is located in
the recess of the spare tire wheel.
Also, the tools in the tool bag can be
stored in the tool bucket as illustrated.
For how to use the jack, refer to “Flat tires ”
F 9-5. Flat tires
If you have a flat tire while driving, never
brake suddenly; keep driving straight
ahead while gradually reducing speed.
Then slowly pull off the road to a safeplace. &
Changing a flat tire
WARNING
. Do not jack up the vehicle on an
incline or a loose road surface.
The jack can come out of the
jacking point or sink into the
ground and this can result in a
severe accident.
. Use only the jack provided with
your vehicle. The jack supplied
with the vehicle is designed only
for changing a tire. Never get
under the vehicle while support-
ing the vehicle with this jack. .
Always turn off the engine before
raising the flat tire off the ground
using the jack. Never swing or
push the vehicle supported with
the jack. The jack can come out
of the jacking point due to a jolt
and this can result in a severeaccident.
1. Park on a hard, level surface, when-
ever possible, then stop the engine.
2. Set the parking brake securely and
shift the shift lever in reverse.
3. Turn on the hazard warning flasher
and have everyone get out of the vehicle.
4. Put wheel blocks at the front and rear
of the tire diagonally opposite the flat tire.
5. Take out the jack, jack handle and
wheel nut wrench.
In case of emergency/Flat tires9-5
– CONTINUED –
Page 303 of 414
9-6In case of emergency/Flat tires
The tools and the spare tire are stored
under the floor of the trunk (4-door) or the
cargo area (5-door). Refer to“Mainte-
nance tools ”F 9-3.
NOTE
Make sure that the jack is well lubri-
cated before using it.
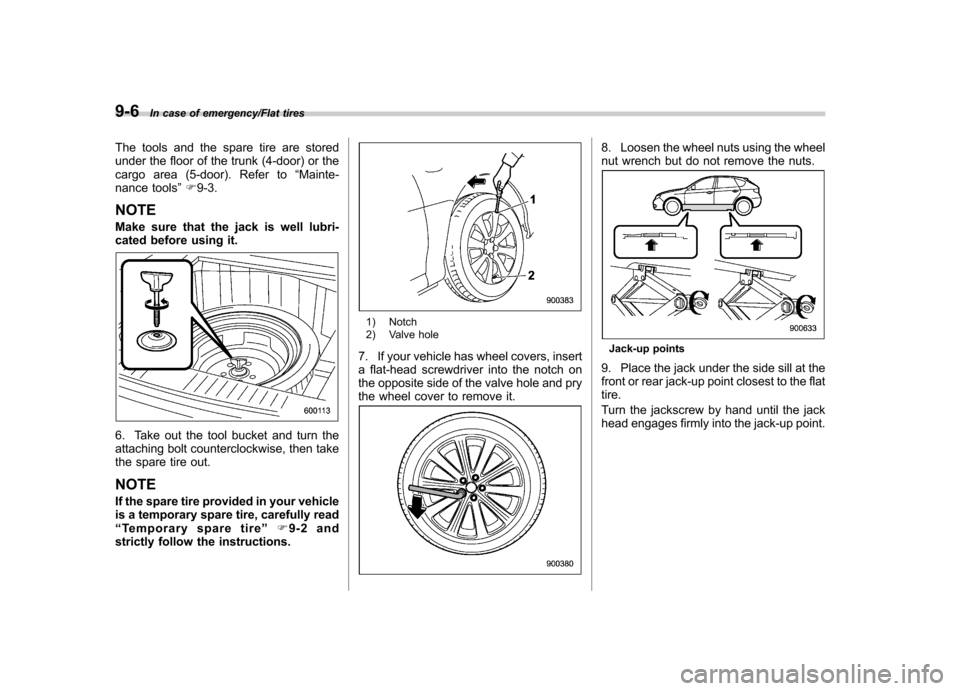
6. Take out the tool bucket and turn the
attaching bolt counterclockwise, then take
the spare tire out. NOTE
If the spare tire provided in your vehicle
is a temporary spare tire, carefully read“ Temporary spare tire ”F9-2 and
strictly follow the instructions.
1) Notch
2) Valve hole
7. If your vehicle has wheel covers, insert
a flat-head screwdriver into the notch on
the opposite side of the valve hole and pry
the wheel cover to remove it.
8. Loosen the wheel nuts using the wheel
nut wrench but do not remove the nuts.
Jack-up points
9. Place the jack under the side sill at the
front or rear jack-up point closest to the flat tire.
Turn the jackscrew by hand until the jack
head engages firmly into the jack-up point.
Page 311 of 414

9-14In case of emergency/Towing
Rear towing hook:
1. Take the towing hook out of the tool
bucket and take the screwdriver out of the
tool bag. Take the jack handle out of the
trunk (4-door) or cargo area (5-door).
2. Pry off the cover on the rear bumper
using a screwdriver, and you will find a
threaded hole for attaching the towinghook.
3. Screw the towing hook into the thread
hole until its thread can no longer be seen.
4. Tighten the towing hook securely
using the jack handle.
After towing, remove the towing hook fromthe vehicle and stow it in the tool bucket.
Fit the towing hook cover on the bumper.
WARNING
Do not use the towing hook except
when towing your vehicle.
Front tie-down hooks:
The front tie-down hooks are located
between each of the front tires and the
front bumper.
Page 317 of 414

10-4Appearance care/Corrosion protection
Corrosion protection
Your SUBARU has been designed and
built to resist corrosion. Special materials
and protective finishes have been used on
most parts of the vehicle to help maintain
fine appearance, strength, and reliableoperation. &Most common causes of corrosion
The most common causes of corrosion are:
1. The accumulation of moisture retain-
ing dirt and debris in body panel sections,
cavities, and other areas.
2. Damage to paint and other protective
coatings caused by gravel and stone
chips or minor accidents.
Corrosion is accelerated on the vehicle when:
1. It is exposed to road salt or dust
control chemicals, or used in coastal
areas where there is more salt in the air,
or in areas where there is considerable
industrial pollution.
2. It is driven in areas of high humidity,
especially when temperatures range just
above freezing.
3. Dampness in certain parts of the vehicle remains for a long time, even
though other parts of the vehicle may be
dry.
4. High temperatures will cause corro-
sion to parts of the vehicle which cannot
dry quickly due to lack of proper ventila-tion.
& To help prevent corrosion
Wash the vehicle regularly to prevent
corrosion of the body and suspension
components. Also, wash the vehicle
promptly after driving on any of the
following surfaces. . roads that have been salted to prevent
them from freezing in winter. mud, sand, or gravel
. coastal roads
After the winter has ended, it is recom-
mended that the underbody be given a
very thorough washing.
Before the beginning of winter, check the
condition of underbody components, such
as the exhaust system, fuel and brake
lines, brake cables, suspension, steering
system, floor pan, and fenders. If any of
them are found to be rusted, they should
be given an appropriate rust prevention
treatment or should be replaced. Contact
your SUBARU dealer to perform this kind of maintenance and treatment if you needassistance.
Repair chips and scratches in the paint as
soon as you find them.
Check the interior of the vehicle for water
and dirt accumulation under the floor mats
because that could cause corrosion.
Occasionally check under the mats to
make sure the area is dry.
Keep your garage dry. Do not park your
vehicle in a damp, poorly ventilated
garage. In such a garage, corrosion can
be caused by dampness. If you wash the
vehicle in the garage or put the vehicle
into the garage when wet or covered with
snow, that can cause dampness.
If your vehicle is operated in cold weather
and/or in areas where road salts and other
corrosive materials are used, the door
hinges and locks, trunk lid lock, and hood
latch should be inspected and lubricated
periodically.
Page 321 of 414
Maintenance and serviceTire replacement .............................................. 11-29
Wheel replacement ........................................... 11-30
Aluminum wheels ............................................. 11-31
Windshield washer fluid .................................. 11-31
Replacement of wiper blades .......................... 11-32
Windshield wiper blade assembly ..................... 11-33
Windshield wiper blade rubber (type A and type B) .................................................................. 11-34
Rear window wiper blade assembly (5-door models). ......................................................... 11-35
Rear window wiper blade rubber (5-door models). ......................................................... 11-35
Battery. .............................................................. 11-37
Fuses ................................................................ 11-38 Installation of accessories
.............................. 11-39
Replacing bulbs ............................................... 11-39
Headlights (models with HID headlights) ........... 11-39
Headlights (models without HID headlights) ...... 11-40
Front turn signal light ...................................... 11-42
Front fog light (if equipped) .............................. 11-42
Rear combination lights ................................... 11-43
Backup light (5-door) ....................................... 11-45
License plate light ........................................... 11-46
Map light ......................................................... 11-46
Dome light and cargo area light ....................... 11-47
Trunk light ....................................................... 11-47
High-mounted stop light (4-door) ... ................... 11-48
Other bulbs ..................................................... 11-48
Page 362 of 414
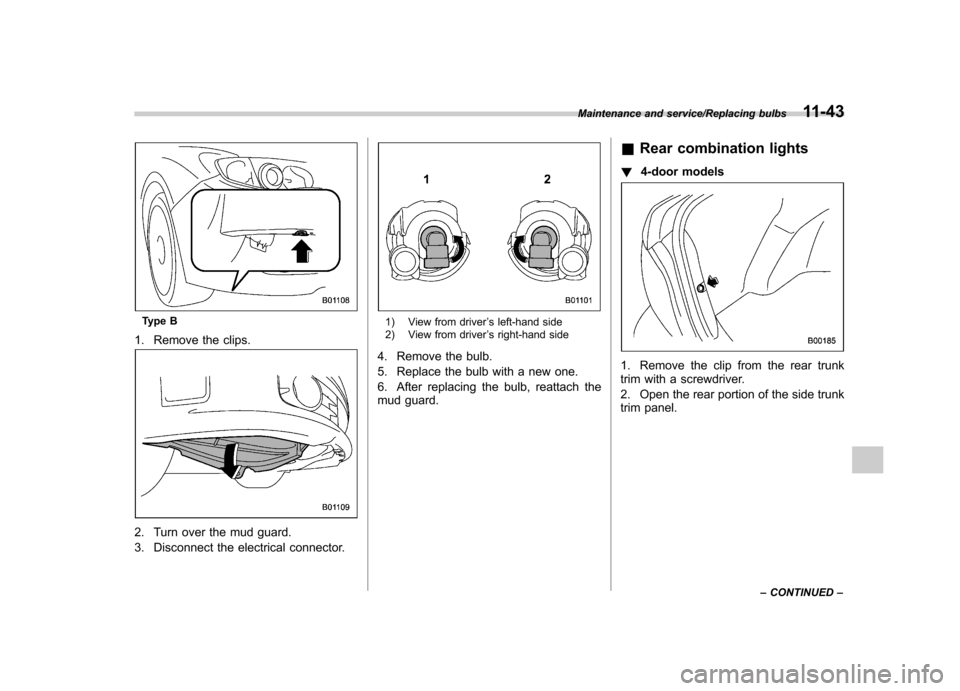
Type B
1. Remove the clips.
2. Turn over the mud guard.
3. Disconnect the electrical connector.
1) View from driver ’s left-hand side
2) View from driver ’s right-hand side
4. Remove the bulb.
5. Replace the bulb with a new one.
6. After replacing the bulb, reattach the
mud guard. &
Rear combination lights
! 4-door models
1. Remove the clip from the rear trunk
trim with a screwdriver.
2. Open the rear portion of the side trunk
trim panel.
Maintenance and service/Replacing bulbs11-43
– CONTINUED –