SUBARU IMPREZA WRX STI 2011 Owners Manual
Manufacturer: SUBARU, Model Year: 2011, Model line: IMPREZA WRX STI, Model: SUBARU IMPREZA WRX STI 2011Pages: 459, PDF Size: 6.66 MB
Page 341 of 459
Black plate (345,1)
北米Model "A1110BE-C" EDITED: 2010/ 12/ 17
Engine overheating
WARNING
Never attempt to remove the radia-
tor cap until the engine has been
shut off and has fully cooled down.
When the engine is hot, the coolant
is under pressure. Removing the
cap while the engine is still hot
could release a spray of boiling hot
coolant, which could burn you very
seriously.
If the engine overheats, safely pull off the
road and stop the vehicle in a safe place.& If steam is coming from the
engine compartmentTurn off the engine and get everyone
away from the vehicle until it cools down.&If no steam is coming from
the engine compartment
NOTEFor details about how to check the
coolant level or how to add coolant,
refer to “Engine coolant ”F 11-14.
1. Keep the engine running at idling
speed. 2. Open the hood to ventilate the engine
compartment. Refer to
“Engine hood ”
F 11-5.
Confirm that the cooling fan is turning. If
the fan is not turning, immediately turn off
the engine and contact your authorized
dealer for repair.
3. After the engine coolant temperature
has dropped, turn off the engine.
If any of the following conditions occur,
turn off the engine. .The temperature gauge stays in the
overheated zone (turbo models). Refer
to “Temperature gauge (turbo models) ”
F 3-11.
. The coolant temperature high warn-
ing light remains illuminated (non-
turbo models). Refer to “Coolant tem-
perature low indicator light (non-turbo
models)/Coolant temperature high
warning light (non-turbo models) ”F 3-
17.
4. After the engine has fully cooled down,
check the coolant level in the reserve
tank.
If the coolant level is below the “LOW”
mark, add coolant up to the “FULL”mark.
5. If there is no coolant in the reserve
tank, add coolant to the reserve tank.
Then remove the radiator cap and fill the
radiator with coolant. If you remove the radiator cap from a hot
radiator, first wrap a thick cloth around the
radiator cap, then turn the cap counter-
clockwise slowly without pressing down
until it stops. Release the pressure from
the radiator. After the pressure has been
fully released, remove the cap by pressing
down and turning it.
In case of emergency
9-13
9
Page 342 of 459
Black plate (346,1)
北米Model "A1110BE-C" EDITED: 2010/ 12/ 17
9-14
In case of emergency
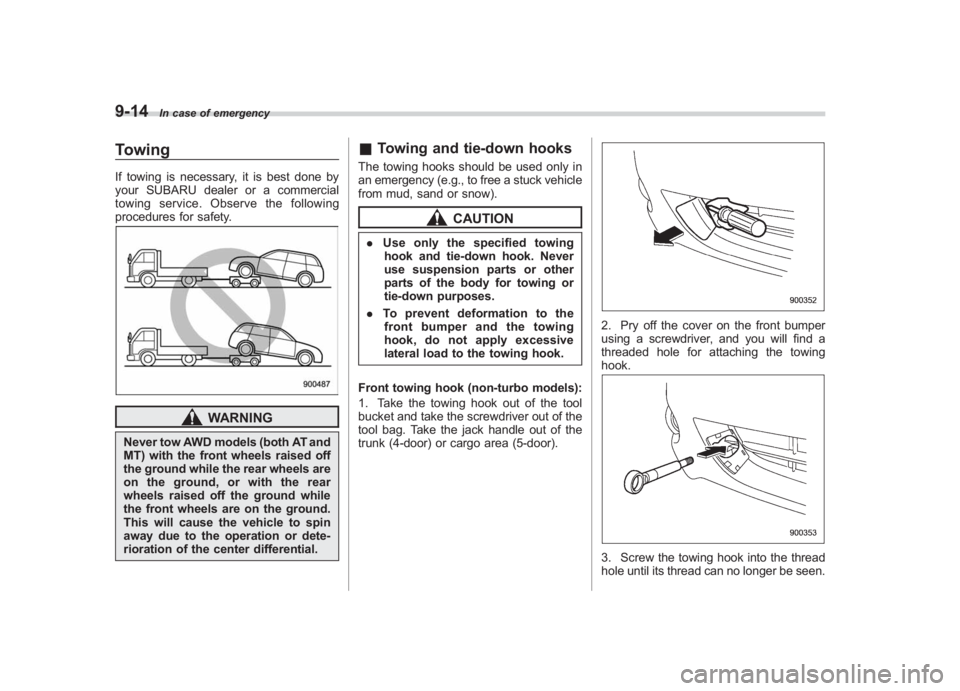
TowingIf towing is necessary, it is best done by
your SUBARU dealer or a commercial
towing service. Observe the following
procedures for safety.
WARNING
Never tow AWD models (both AT and
MT) with the front wheels raised off
the ground while the rear wheels are
on the ground, or with the rear
wheels raised off the ground while
the front wheels are on the ground.
This will cause the vehicle to spin
away due to the operation or dete-
rioration of the center differential.
& Towing and tie-down hooksThe towing hooks should be used only in
an emergency (e.g., to free a stuck vehicle
from mud, sand or snow).
CAUTION
. Use only the specified towing
hook and tie-down hook. Never
use suspension parts or other
parts of the body for towing or
tie-down purposes.
. To prevent deformation to the
front bumper and the towing
hook, do not apply excessive
lateral load to the towing hook.
Front towing hook (non-turbo models):
1. Take the towing hook out of the tool
bucket and take the screwdriver out of the
tool bag. Take the jack handle out of the
trunk (4-door) or cargo area (5-door).
2. Pry off the cover on the front bumper
using a screwdriver, and you will find a
threaded hole for attaching the towing
hook.3. Screw the towing hook into the thread
hole until its thread can no longer be seen.
Page 343 of 459
Black plate (347,1)
北米Model "A1110BE-C" EDITED: 2010/ 12/ 17
4. Tighten the towing hook securely
using the jack handle.
Front towing hook (turbo models):
1. Take the towing hook out of the tool
bucket and take the screwdriver out of the
tool bag. Take the jack handle out of the
cargo area.
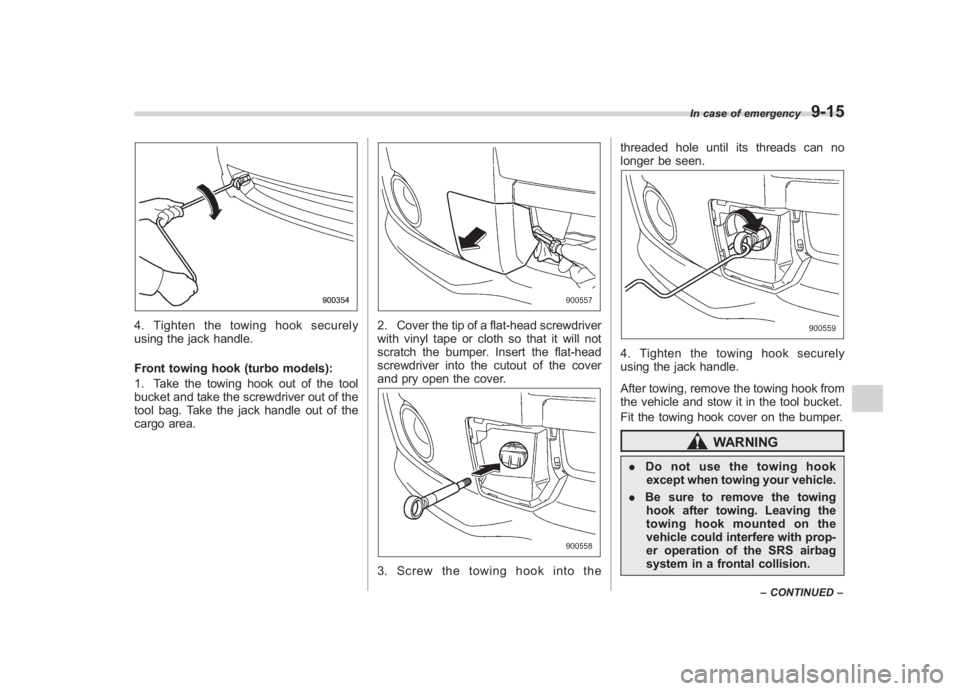
2. Cover the tip of a flat-head screwdriver
with vinyl tape or cloth so that it will not
scratch the bumper. Insert the flat-head
screwdriver into the cutout of the cover
and pry open the cover.3. Screw the towing hook into the threaded hole until its threads can no
longer be seen.
4. Tighten the towing hook securely
using the jack handle.
After towing, remove the towing hook from
the vehicle and stow it in the tool bucket.
Fit the towing hook cover on the bumper.
WARNING
.
Do not use the towing hook
except when towing your vehicle.
. Be sure to remove the towing
hook after towing. Leaving the
towing hook mounted on the
vehicle could interfere with prop-
er operation of the SRS airbag
system in a frontal collision.
In case of emergency
9-15
– CONTINUED –
9
Page 344 of 459
Black plate (348,1)
北米Model "A1110BE-C" EDITED: 2010/ 12/ 17
9-16
In case of emergency
Rear towing hook:
1. Take the towing hook out of the tool
bucket and take the screwdriver out of the
tool bag. Take the jack handle out of the
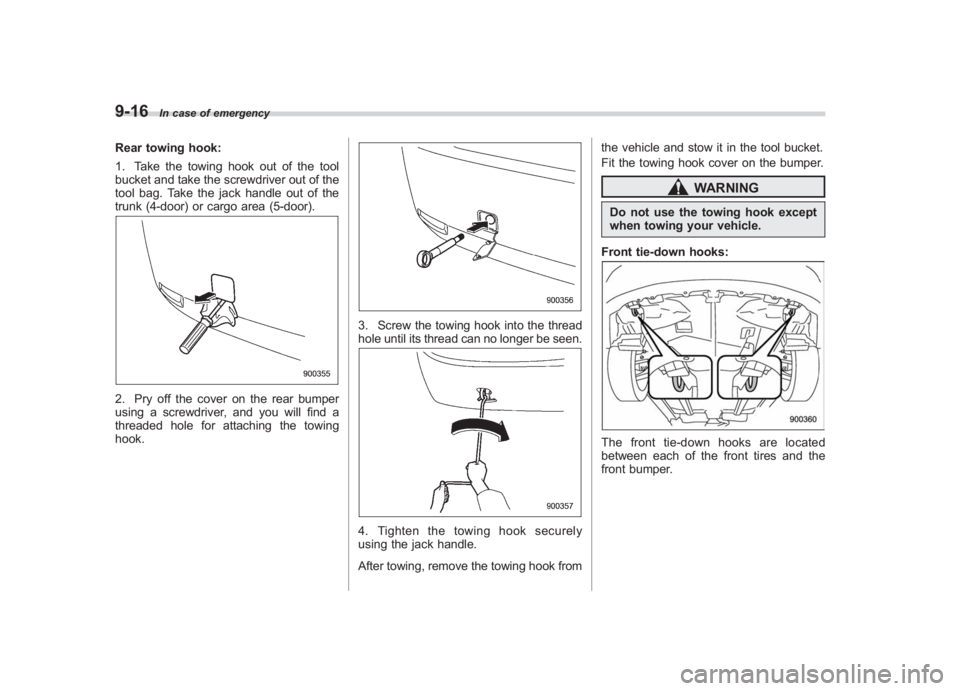
trunk (4-door) or cargo area (5-door).2. Pry off the cover on the rear bumper
using a screwdriver, and you will find a
threaded hole for attaching the towing
hook.
3. Screw the towing hook into the thread
hole until its thread can no longer be seen.4. Tighten the towing hook securely
using the jack handle.
After towing, remove the towing hook from the vehicle and stow it in the tool bucket.
Fit the towing hook cover on the bumper.
WARNING
Do not use the towing hook except
when towing your vehicle.
Front tie-down hooks:The front tie-down hooks are located
between each of the front tires and the
front bumper.
Page 345 of 459
Black plate (349,1)
北米Model "A1110BE-C" EDITED: 2010/ 12/ 17
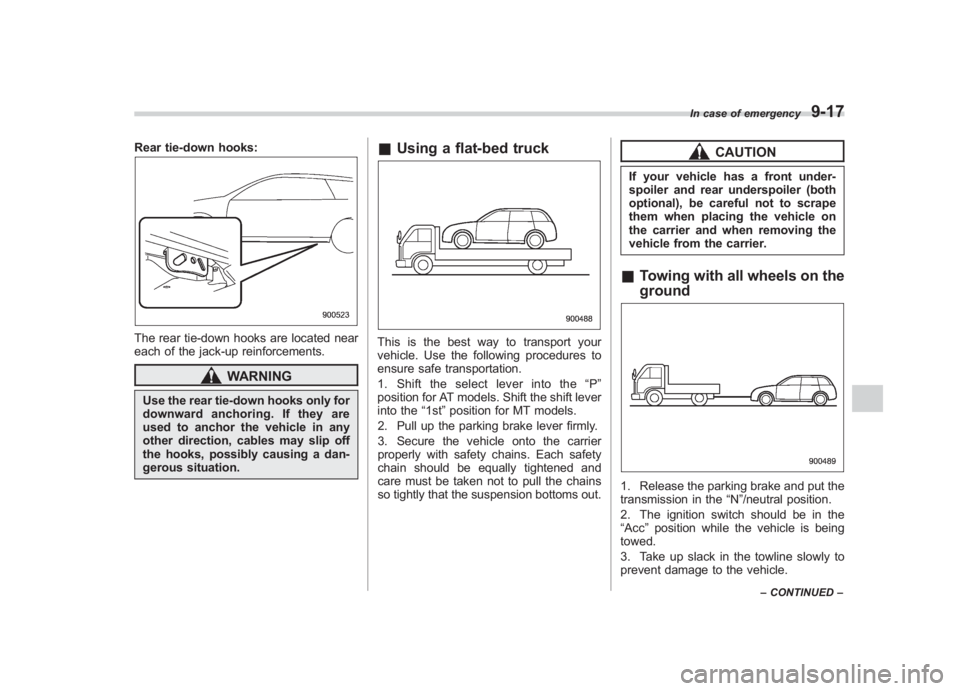
Rear tie-down hooks:The rear tie-down hooks are located near
each of the jack-up reinforcements.
WARNING
Use the rear tie-down hooks only for
downward anchoring. If they are
used to anchor the vehicle in any
other direction, cables may slip off
the hooks, possibly causing a dan-
gerous situation.
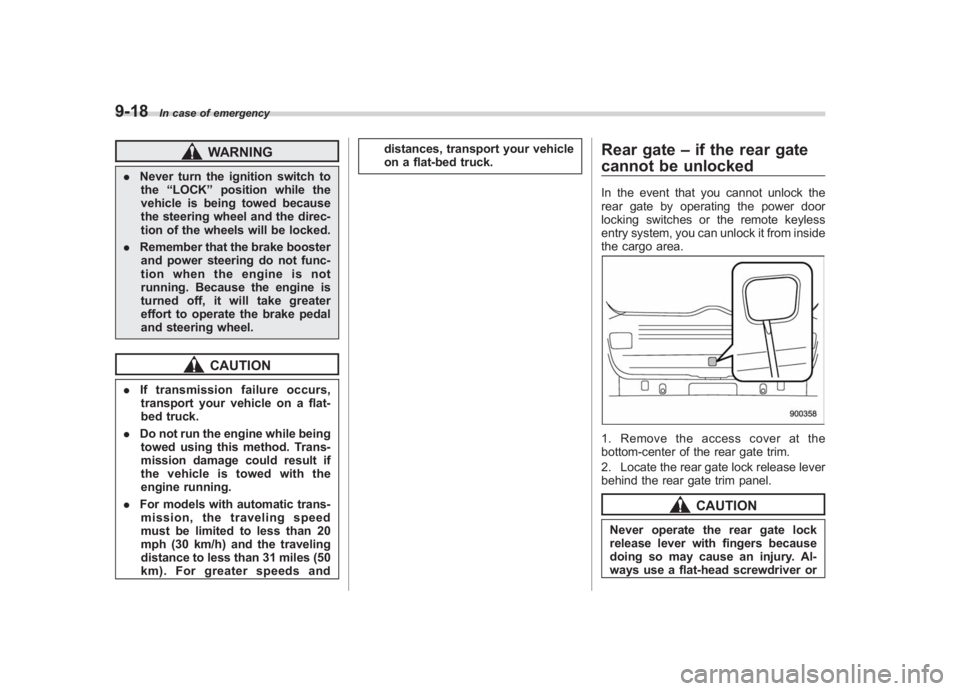
& Using a flat-bed truckThis is the best way to transport your
vehicle. Use the following procedures to
ensure safe transportation.
1. Shift the select lever into the “P ”
position for AT models. Shift the shift lever
into the “1st”position for MT models.
2. Pull up the parking brake lever firmly.
3. Secure the vehicle onto the carrier
properly with safety chains. Each safety
chain should be equally tightened and
care must be taken not to pull the chains
so tightly that the suspension bottoms out.
CAUTION
If your vehicle has a front under-
spoiler and rear underspoiler (both
optional), be careful not to scrape
them when placing the vehicle on
the carrier and when removing the
vehicle from the carrier.& Towing with all wheels on the
ground1. Release the parking brake and put the
transmission in the “N”/neutral position.
2. The ignition switch should be in the
“Acc ”position while the vehicle is being
towed.
3. Take up slack in the towline slowly to
prevent damage to the vehicle.
In case of emergency
9-17
– CONTINUED –
9
Page 346 of 459
Black plate (350,1)
北米Model "A1110BE-C" EDITED: 2010/ 12/ 17
9-18
In case of emergency
WARNING
. Never turn the ignition switch to
the “LOCK ”position while the
vehicle is being towed because
the steering wheel and the direc-
tion of the wheels will be locked.
. Remember that the brake booster
and power steering do not func-
tion when the engine is not
running. Because the engine is
turned off, it will take greater
effort to operate the brake pedal
and steering wheel.
CAUTION
. If transmission failure occurs,
transport your vehicle on a flat-
bed truck.
. Do not run the engine while being
towed using this method. Trans-
mission damage could result if
the vehicle is towed with the
engine running.
. For models with automatic trans-
mission, the traveling speed
must be limited to less than 20
mph (30 km/h) and the traveling
distance to less than 31 miles (50
km). For greater speeds and distances, transport your vehicle
on a flat-bed truck.
Rear gate
–if the rear gate
cannot be unlockedIn the event that you cannot unlock the
rear gate by operating the power door
locking switches or the remote keyless
entry system, you can unlock it from inside
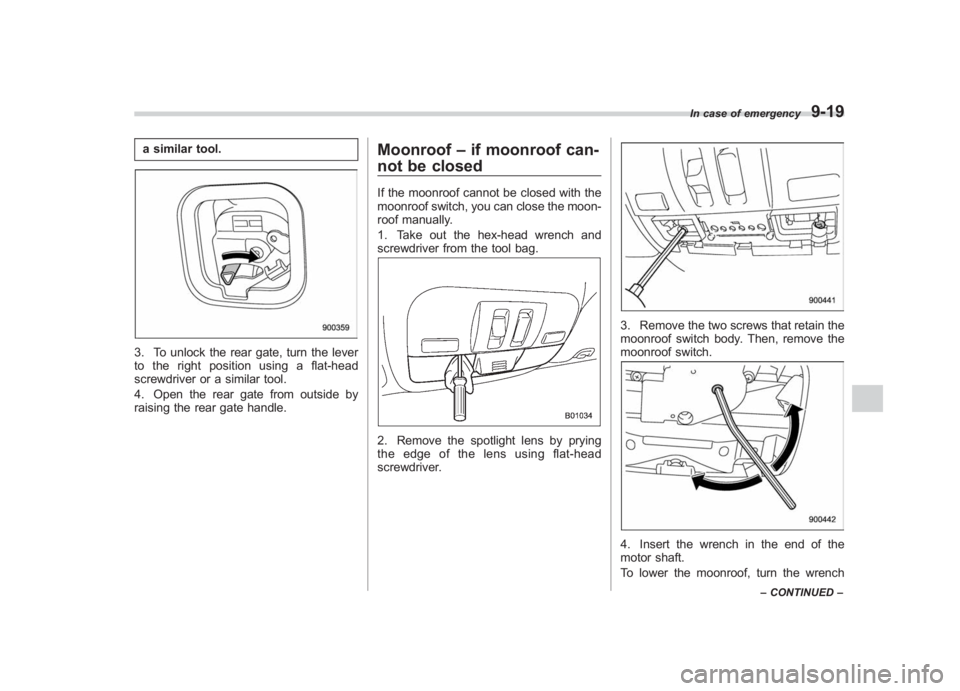
the cargo area.1. Remove the access cover at the
bottom-center of the rear gate trim.
2. Locate the rear gate lock release lever
behind the rear gate trim panel.
CAUTION
Never operate the rear gate lock
release lever with fingers because
doing so may cause an injury. Al-
ways use a flat-head screwdriver or
Page 347 of 459
Black plate (351,1)
北米Model "A1110BE-C" EDITED: 2010/ 12/ 17
a similar tool.3. To unlock the rear gate, turn the lever
to the right position using a flat-head
screwdriver or a similar tool.
4. Open the rear gate from outside by
raising the rear gate handle.
Moonroof –if moonroof can-
not be closedIf the moonroof cannot be closed with the
moonroof switch, you can close the moon-
roof manually.
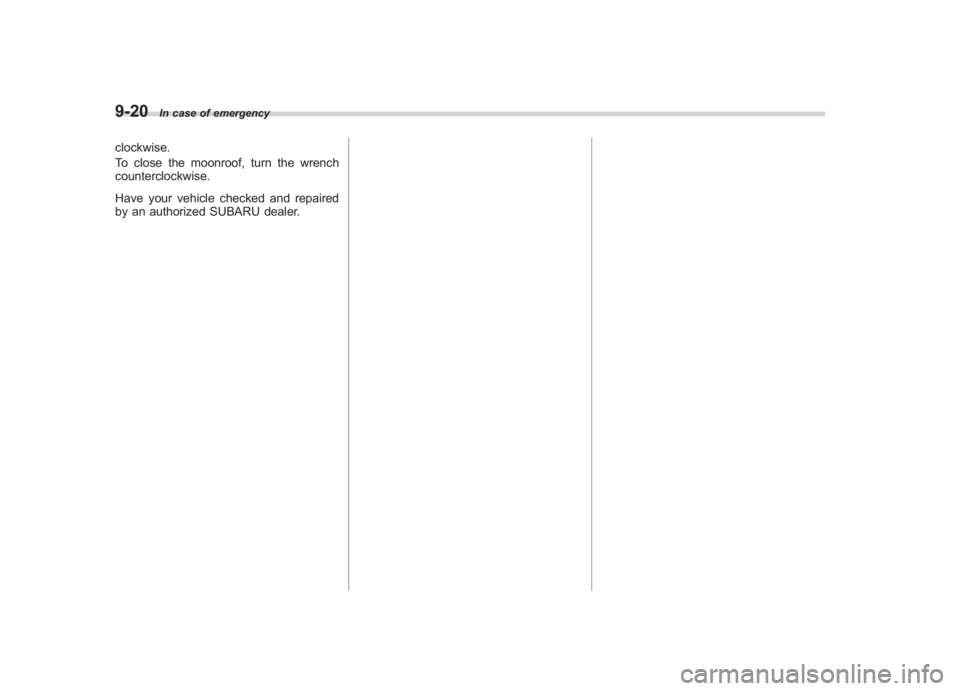
1. Take out the hex-head wrench and
screwdriver from the tool bag.2. Remove the spotlight lens by prying
the edge of the lens using flat-head
screwdriver.
3. Remove the two screws that retain the
moonroof switch body. Then, remove the
moonroof switch.4. Insert the wrench in the end of the
motor shaft.
To lower the moonroof, turn the wrench
In case of emergency
9-19
– CONTINUED –
9
Page 348 of 459
Black plate (352,1)
北米Model "A1110BE-C" EDITED: 2010/ 12/ 17
9-20
In case of emergency
clockwise.
To close the moonroof, turn the wrench
counterclockwise.
Have your vehicle checked and repaired
by an authorized SUBARU dealer.
Page 349 of 459
Black plate (19,1)
北米Model "A1110BE-C" EDITED: 2010/ 11/ 17
Exterior care ....................................................... 10-2
Washing............................................................. 10-2
Waxing and polishing ......................................... 10-3
Cleaning aluminum wheels ................................. 10-3
Corrosion protection.......................................... 10-4
Most common causes of corrosion ..................... 10-4
To help prevent corrosion ................................... 10-4
Cleaning the interior.......................................... 10-5
Seat fabric......................................................... 10-5
Leather seat materials ........................................ 10-5
Synthetic leather upholstery ............................... 10-5
Climate control panel, audio panel, instrument panel, console panel, and switches .................. 10-5
Navigation monitor (if equipped) ........................ 10-6
Appearance care
10
Page 350 of 459
Black plate (356,1)
北米Model "A1110BE-C" EDITED: 2010/ 12/ 17
10-2
Appearance care
Exterior care& Washing
CAUTION
. When washing the vehicle, the
brakes may get wet. As a result,
the brake stopping distance will
be longer. To dry the brakes,
drive the vehicle at a safe speed
while lightly depressing the
brake pedal to heat up the
brakes.
. Do not wash the engine compart-
ment and area adjacent to it. If
water enters the engine air in-
take, electrical parts or the power
steering fluid reservoir, it will
cause engine trouble or a mal-
function of power steering.
. Do not use any organic solvents
when washing the surface of the
bulb assembly cover. However, if
a detergent with organic solvents
is used to wash the cover sur-
face, completely rinse off the
detergent with water. Otherwise,
the cover surface may be da-
maged.
. For 5-door models, since your
vehicle is equipped with a rear wiper, automatic car-wash
brushes could become tangled
around it, damaging the wiper
arm and other components. Ask
the automatic car-wash operator
not to let the brushes touch the
wiper arm or to fix the wiper arm
on the rear window glass with
adhesive tape before operating
the machine.
NOTEWhen having your vehicle washed in
an automatic car wash, make sure
beforehand that the car wash is of
suitable type.
The best way to preserve your vehicle’
s
beauty is frequent washing. Wash the
vehicle at least once a month to avoid
contamination by road grime.
Wash dirt off with a wet sponge and plenty
of lukewarm or cold water. Do not wash
the vehicle with hot water and in direct
sunlight.
Salt, chemicals, insects, tar, soot, tree
sap, and bird droppings should be washed
off by using a light detergent, as required.
If you use a light detergent, make certain
that it is a neutral detergent. Do not use
strong soap or chemical detergents. All cleaning agents should be promptly
flushed from the surface and not allowed
to dry there. Rinse the vehicle thoroughly
with plenty of lukewarm water. Wipe the
remaining water off with a chamois or soft
cloth.
!
Washing the underbody
Chemicals, salts and gravel used for
deicing road surfaces are extremely cor-
rosive, accelerating the corrosion of un-
derbody components, such as the exhaust
system, fuel and brake lines, brake
cables, floor pan and fenders, and sus-
pension.
Thoroughly flush the underbody and in-
side of the fenders with lukewarm or cold
water at frequent intervals to reduce the
harmful effects of such agents.
Mud and sand adhering to the underbody
components may accelerate their corro-
sion.
After driving off-road or on muddy or
sandy roads, wash the mud and sand off
the underbody. Carefully flush the suspen-
sion and axle parts, as they are particu-
larly prone to mud and sand buildup. Do
not use a sharp-edged tool to remove
caked mud.