lights SUBARU IMPREZA WRX STI 2012 Owner's Guide
[x] Cancel search | Manufacturer: SUBARU, Model Year: 2012, Model line: IMPREZA WRX STI, Model: SUBARU IMPREZA WRX STI 2012Pages: 463, PDF Size: 7.69 MB
Page 197 of 463
Black plate (151,1)
北米Model "A1130BE-A" EDITED: 2011/ 6/ 7
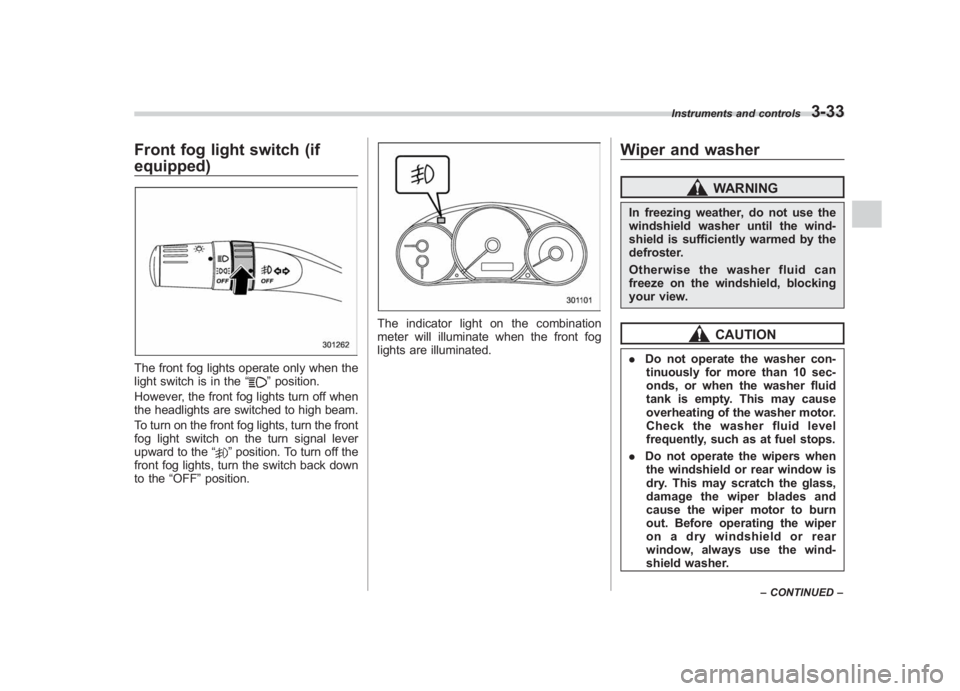
Front fog light switch (if
equipped)The front fog lights operate only when the
light switch is in the “
”position.
However, the front fog lights turn off when
the headlights are switched to high beam.
To turn on the front fog lights, turn the front
fog light switch on the turn signal lever
upward to the “
”position. To turn off the
front fog lights, turn the switch back down
to the “OFF”position.
The indicator light on the combination
meter will illuminate when the front fog
lights are illuminated.
Wiper and washer
WARNING
In freezing weather, do not use the
windshield washer until the wind-
shield is sufficiently warmed by the
defroster.
Otherwise the washer fluid can
freeze on the windshield, blocking
your view.
CAUTION
. Do not operate the washer con-
tinuously for more than 10 sec-
onds, or when the washer fluid
tank is empty. This may cause
overheating of the washer motor.
Check the washer fluid level
frequently, such as at fuel stops.
. Do not operate the wipers when
the windshield or rear window is
dry. This may scratch the glass,
damage the wiper blades and
cause the wiper motor to burn
out. Before operating the wiper
on a dry windshield or rear
window, always use the wind-
shield washer.
Instruments and controls
3-33
– CONTINUED –
3
Page 201 of 463
Black plate (155,1)
北米Model "A1130BE-A" EDITED: 2011/ 6/ 7
MirrorsAlways check that the inside and outside
mirrors are properly adjusted before you
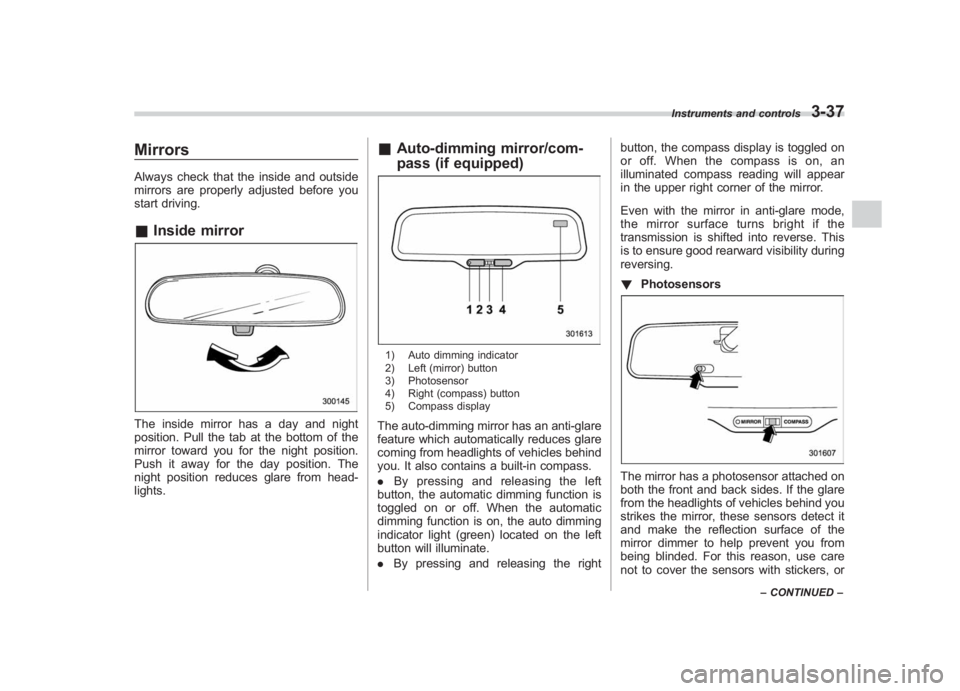
start driving.& Inside mirrorThe inside mirror has a day and night
position. Pull the tab at the bottom of the
mirror toward you for the night position.
Push it away for the day position. The
night position reduces glare from head-
lights.
&Auto-dimming mirror/com-
pass (if equipped)1) Auto dimming indicator
2) Left (mirror) button
3) Photosensor
4) Right (compass) button
5) Compass displayThe auto-dimming mirror has an anti-glare
feature which automatically reduces glare
coming from headlights of vehicles behind
you. It also contains a built-in compass.
. By pressing and releasing the left
button, the automatic dimming function is
toggled on or off. When the automatic
dimming function is on, the auto dimming
indicator light (green) located on the left
button will illuminate.
. By pressing and releasing the right button, the compass display is toggled on
or off. When the compass is on, an
illuminated compass reading will appear
in the upper right corner of the mirror.
Even with the mirror in anti-glare mode,
the mirror surface turns bright if the
transmission is shifted into reverse. This
is to ensure good rearward visibility during
reversing.
!
Photosensors
The mirror has a photosensor attached on
both the front and back sides. If the glare
from the headlights of vehicles behind you
strikes the mirror, these sensors detect it
and make the reflection surface of the
mirror dimmer to help prevent you from
being blinded. For this reason, use care
not to cover the sensors with stickers, or
Instruments and controls
3-37
–CONTINUED –
3
Page 202 of 463
Black plate (156,1)
北米Model "A1130BE-A" EDITED: 2011/ 6/ 7
3-38
Instruments and controls
other similar items. Periodically wipe the
sensors clean using a piece of dry soft
cotton cloth or an applicator.
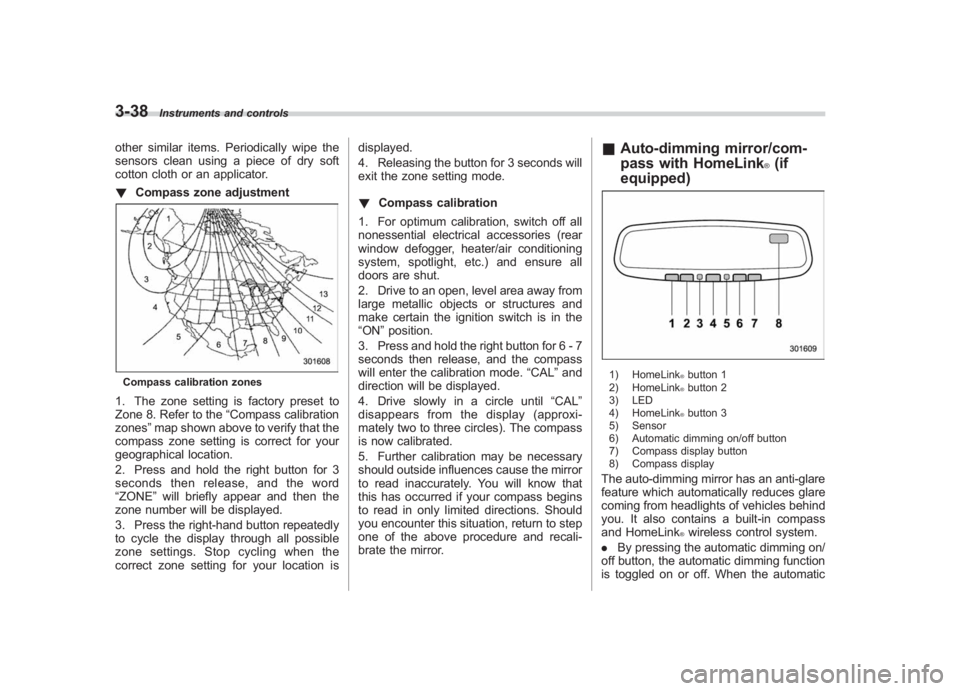
! Compass zone adjustmentCompass calibration zones1. The zone setting is factory preset to
Zone 8. Refer to the “Compass calibration
zones” map shown above to verify that the
compass zone setting is correct for your
geographical location.
2. Press and hold the right button for 3
seconds then release, and the word
“ZONE ”will briefly appear and then the
zone number will be displayed.
3. Press the right-hand button repeatedly
to cycle the display through all possible
zone settings. Stop cycling when the
correct zone setting for your location is displayed.
4. Releasing the button for 3 seconds will
exit the zone setting mode.
!
Compass calibration
1. For optimum calibration, switch off all
nonessential electrical accessories (rear
window defogger, heater/air conditioning
system, spotlight, etc.) and ensure all
doors are shut.
2. Drive to an open, level area away from
large metallic objects or structures and
make certain the ignition switch is in the
“ON ”position.
3. Press and hold the right button for 6 - 7
seconds then release, and the compass
will enter the calibration mode. “CAL”and
direction will be displayed.
4. Drive slowly in a circle until “CAL”
disappears from the display (approxi-
mately two to three circles). The compass
is now calibrated.
5. Further calibration may be necessary
should outside influences cause the mirror
to read inaccurately. You will know that
this has occurred if your compass begins
to read in only limited directions. Should
you encounter this situation, return to step
one of the above procedure and recali-
brate the mirror.
& Auto-dimming mirror/com-
pass with HomeLink
®(if
equipped)
1) HomeLink
®button 1
2) HomeLink®button 2
3) LED
4) HomeLink®button 3
5) Sensor
6) Automatic dimming on/off button
7) Compass display button
8) Compass display
The auto-dimming mirror has an anti-glare
feature which automatically reduces glare
coming from headlights of vehicles behind
you. It also contains a built-in compass
and HomeLink
®wireless control system.
. By pressing the automatic dimming on/
off button, the automatic dimming function
is toggled on or off. When the automatic
Page 203 of 463
Black plate (157,1)
北米Model "A1130BE-A" EDITED: 2011/ 6/ 7
dimming function is on, the LED indicator
will illuminate.
Even with the mirror in the automatic
dimming mode, the mirror surface turns
bright if the transmission is shifted into
reverse. This is to ensure good rearward
visibility during reversing.
. By pressing the compass display but-
ton, the compass display is toggled on or
off. When the compass is on, an illumi-
nated compass reading will appear in the
upper right corner of the mirror.
When cleaning the mirror, use a paper
towel or similar material dampened with
glass cleaner. Do not spray glass cleaner
directly on the mirror as that may cause
theliquidcleanertoenterthemirror
housing and damage the mirror. !
Photosensors
The mirror has a photosensor attached on
both the front and back sides. During
nighttime driving, these sensors detect
distracting glare from vehicle headlights
behind you and automatically dim the
mirror to eliminate glare and preserve
your vision. For this reason, use care not
to cover the sensors with stickers, or other
similar items. Periodically wipe the sen-
sors clean using a piece of dry soft cotton
cloth or an applicator. !
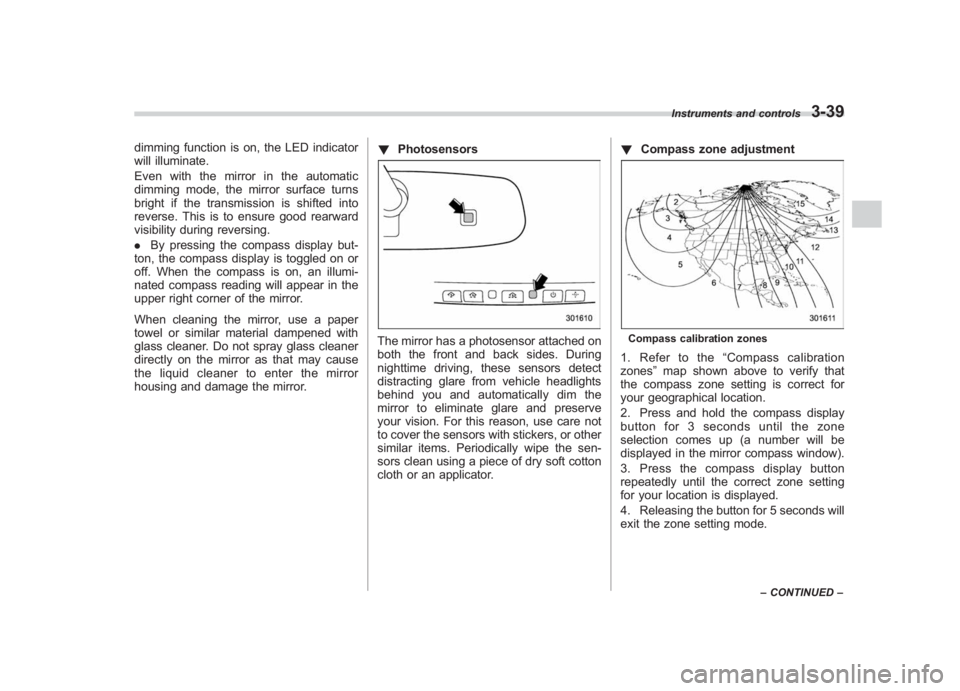
Compass zone adjustment
Compass calibration zones1. Refer to the “Compass calibration
zones” map shown above to verify that
the compass zone setting is correct for
your geographical location.
2. Press and hold the compass display
button for 3 seconds until the zone
selection comes up (a number will be
displayed in the mirror compass window).
3. Press the compass display button
repeatedly until the correct zone setting
for your location is displayed.
4. Releasing the button for 5 seconds will
exit the zone setting mode.
Instruments and controls
3-39
– CONTINUED –
3
Page 245 of 463
Black plate (201,1)
北米Model "A1130BE-A" EDITED: 2011/ 6/ 7
& Play file
NOTE. Copyright protected MP3/WMA/AAC
files will not be played by the system.
The player will automatically skip to the
next file (track).
. WMA9 Lossless, WMA9 Profes-
sional and WMA9 voice cannot be
played.
MP3:
. Based on MPEG1, 2 and 2.5 Layer3
. Sampling rate (kHz): 48, 44.1, 32, 24,
22.05, 16, 12, 11.025, 8
. Bit rate (kbps): 8 to 320
. Supports variable bit rates
WMA:
. Based on Windows Media Audio 9
. Bit rate (kbps): 32 to 192
AAC (type B audio):
. Based on MPEG4 AAC (ISO/IEC
14496-12: 2003+iTune Meta-data Specifi-
cation)
. Sampling rate (kHz): 48, 44.1, 32, 24,
22.05, 16, 12, 11.025, 8
. Bit rate (kbps): 8 to 320
. Number of channels: 1 to 2ch
&How to insert a CD(s) (type A)1. Briefly press the
button. If the
magazine in the player has a spare slot
where you can insert a disc, the disc
number indicator associated with the
spare slot will blink.
If no indicator blinks, it means that there
are no spare slots in the magazine.
2. When the “LOAD ”indicator illumi-
nates, insert the disc. Once you have
inserted the disc, the “LOAD”indicator will
turn off. The disc will then be automatically
drawn in, and the player will begin to play
back the first track of the disc.
. To insert more discs in succession,
repeat steps 1 and 2. The magazine will
be loaded with discs in the ascending
order of slot number.
If you do not insert any disc within 15
seconds after you have pressed the
button, the player will begin to play back
the first track of the last disc you have
inserted.
. The disc indicator lights up continu-
ously if a disc is already inserted in the
corresponding position of the magazine.
. While the player is in the loading mode,
if you press
or
button, the
player will enter the standby mode. Press
the
button to start playback. !
Inserting a disc in a desired posi-
tion
1. Briefly press the
button. If the
magazine in the player has a spare slot
where you can insert a disc, the disc
number indicator associated with the
spare slot will blink.
The slots in the magazine the indicator of
which steadily lights up are already loaded
with discs.
2. Press the disc select button (from
to
) at the slot where you want
to insert a disc.
3. When the “LOAD ”indicator illumi-
nates, insert the disc. Once you have
inserted the disc, the “LOAD”indicator will
turn off. The disc will then be automatically
drawn in, and the player will begin to play
the first track on the disc.
. If you wish to insert another disc,
repeat the procedure beginning with step
1.
If you do not insert any disc within 15
seconds after you have pressed the
button, the player will begin to play back
the first track of the last disc you have
inserted.
. While the player is in the loading mode,
if you press
or
button, the
player will enter the standby mode. Press
the
button to start playback.
Audio
5-17
– CONTINUED –
5
Page 277 of 463
Black plate (11,1)
北米Model "A1130BE-A" EDITED: 2011/ 6/ 2
Interior lights ....................................................... 6-2
Dome light.......................................................... 6-2
Cargo area light (5-door models) ......................... 6-2
Map lights ........................................................... 6-3
Sun visors ........................................................... 6-4
Vanity mirror ....................................................... 6-4
Storage compartment ......................................... 6-4
Glove box........................................................... 6-5
Center console .................................................... 6-5
Cup holders......................................................... 6-5
Front passenger ’s cup holder .............................. 6-5
Rear passenger ’s cup holder (if equipped) ........... 6-7
Bottle holders...................................................... 6-7 Accessory power outlets
.................................... 6-8
Use with a cigarette lighter (if equipped) ............... 6-9
Ashtray (if equipped)......................................... 6-10
Floor mat ............................................................ 6-10
Shopping bag hook (5-door) ............................. 6-11
Cargo area cover (5-door) ................................. 6-12
Using the cover................................................. 6-12
To remove the cover .......................................... 6-12
To install the cover housing ............................... 6-13
Cargo tie-down hooks (5-door) ......................... 6-13
Under-floor storage compartment (if equipped) ........................................................ 6-14
Interior equipment
6
Page 278 of 463
Black plate (236,1)
北米Model "A1130BE-A" EDITED: 2011/ 6/ 7
6-2
Interior equipment
Interior lightsWhen leaving your vehicle, make sure the
lights are turned off to avoid battery
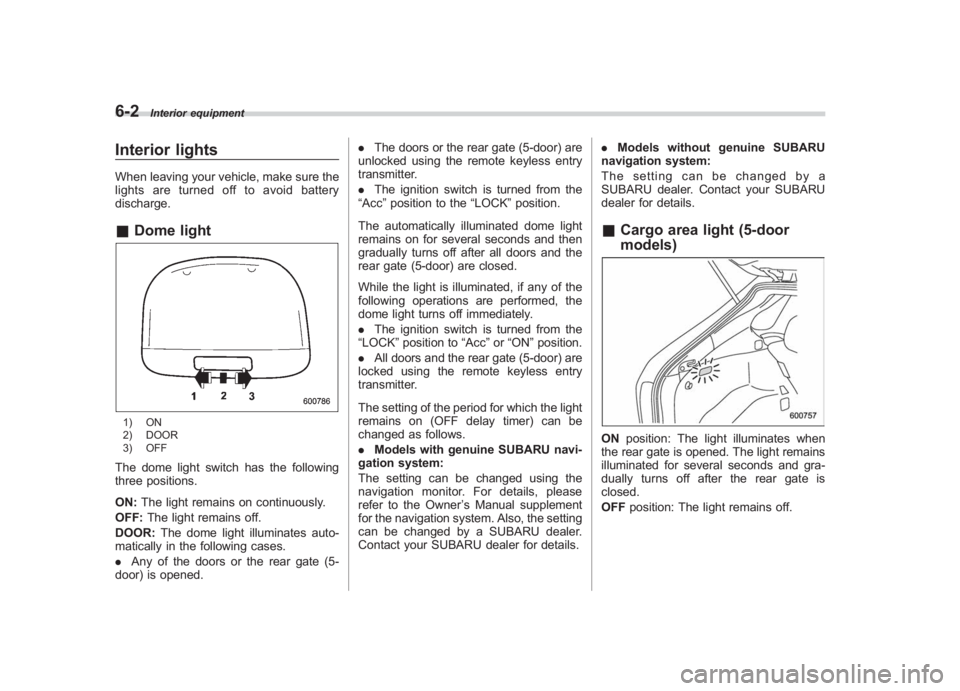
discharge.& Dome light1) ON
2) DOOR
3) OFFThe dome light switch has the following
three positions.
ON: The light remains on continuously.
OFF: The light remains off.
DOOR: The dome light illuminates auto-
matically in the following cases.
. Any of the doors or the rear gate (5-
door) is opened. .
The doors or the rear gate (5-door) are
unlocked using the remote keyless entry
transmitter.
. The ignition switch is turned from the
“Acc ”position to the “LOCK”position.
The automatically illuminated dome light
remains on for several seconds and then
gradually turns off after all doors and the
rear gate (5-door) are closed.
While the light is illuminated, if any of the
following operations are performed, the
dome light turns off immediately.
. The ignition switch is turned from the
“LOCK” position to “Acc”or “ON ”position.
. All doors and the rear gate (5-door) are
locked using the remote keyless entry
transmitter.
The setting of the period for which the light
remains on (OFF delay timer) can be
changed as follows.
. Models with genuine SUBARU navi-
gation system:
The setting can be changed using the
navigation monitor. For details, please
refer to the Owner ’s Manual supplement
for the navigation system. Also, the setting
can be changed by a SUBARU dealer.
Contact your SUBARU dealer for details. .
Models without genuine SUBARU
navigation system:
The setting can be changed by a
SUBARU dealer. Contact your SUBARU
dealer for details.
& Cargo area light (5-door
models)ON position: The light illuminates when
the rear gate is opened. The light remains
illuminated for several seconds and gra-
dually turns off after the rear gate is
closed.
OFF position: The light remains off.
Page 279 of 463
Black plate (237,1)
北米Model "A1130BE-A" EDITED: 2011/ 6/ 7
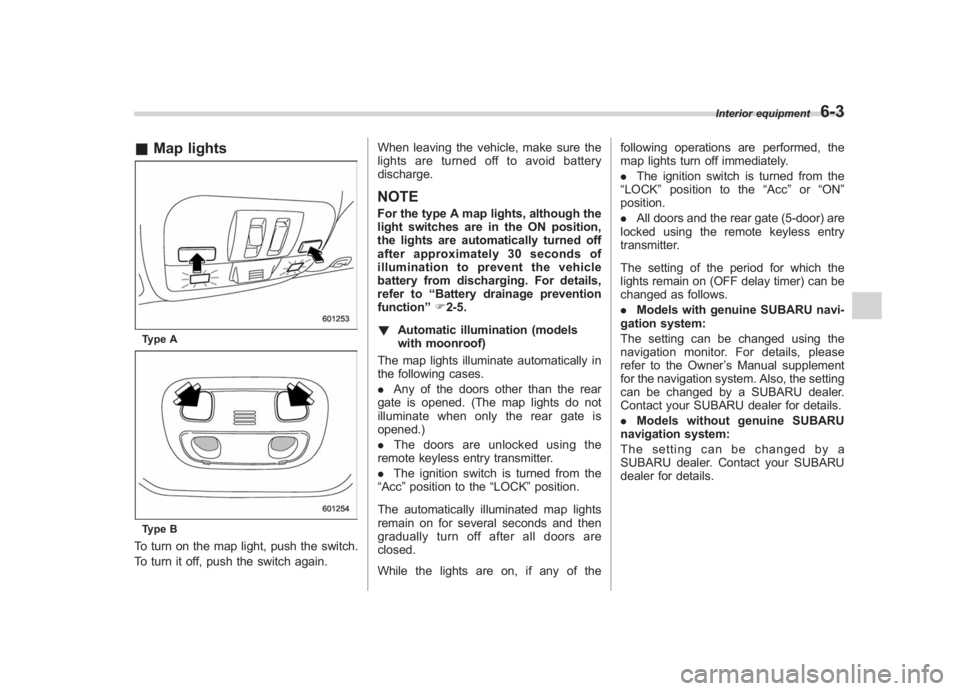
& Map lightsType AType BTo turn on the map light, push the switch.
To turn it off, push the switch again. When leaving the vehicle, make sure the
lights are turned off to avoid battery
discharge.
NOTEFor the type A map lights, although the
light switches are in the ON position,
the lights are automatically turned off
after approximately 30 seconds of
illumination to prevent the vehicle
battery from discharging. For details,
refer to
“Battery drainage prevention
function” F2-5.
! Automatic illumination (models
with moonroof)
The map lights illuminate automatically in
the following cases.
. Any of the doors other than the rear
gate is opened. (The map lights do not
illuminate when only the rear gate is
opened.)
. The doors are unlocked using the
remote keyless entry transmitter.
. The ignition switch is turned from the
“Acc ”position to the “LOCK”position.
The automatically illuminated map lights
remain on for several seconds and then
gradually turn off after all doors are
closed.
While the lights are on, if any of the following operations are performed, the
map lights turn off immediately.
.
The ignition switch is turned from the
“ LOCK ”position to the “Acc ”or “ON ”
position.
. All doors and the rear gate (5-door) are
locked using the remote keyless entry
transmitter.
The setting of the period for which the
lights remain on (OFF delay timer) can be
changed as follows.
. Models with genuine SUBARU navi-
gation system:
The setting can be changed using the
navigation monitor. For details, please
refer to the Owner ’s Manual supplement
for the navigation system. Also, the setting
can be changed by a SUBARU dealer.
Contact your SUBARU dealer for details.
. Models without genuine SUBARU
navigation system:
The setting can be changed by a
SUBARU dealer. Contact your SUBARU
dealer for details.
Interior equipment
6-3
6
Page 298 of 463
Black plate (258,1)
北米Model "A1130BE-A" EDITED: 2011/ 6/ 7
7-8
Starting and operating
. A vehicle
fails the OBDII inspection if
the “CHECK ENGINE ”warning light is not
properly operating (light is illuminated or is
not working due to a burned out bulb) or
there is one or more diagnostic trouble
codes stored in the vehicle’ s computer.
. A state emission inspection may reject
(not pass or fail) a vehicle if the number of
OBDII system readiness monitors “NOT
READY ”is greater than one. If the
vehicle’ s battery has been recently re-
placed or disconnected, the OBDII system
inspection may indicate that the vehicle is
not ready for the emission test. Under this
condition, the vehicle driver should be
instructed to drive his/her vehicle for a few
days to reset the readiness monitors and
return for an emission re-inspection.
. Owners of rejected or failing vehicles
should contact their SUBARU Dealer for
service.
Some states still use dynamometers in
their emission inspection program. A
dynamometer is a treadmill or roller-like
testing device that allows your vehicle ’s
wheels to turn while the vehicle remains in
one place. Prior to your vehicle being put
on a dynamometer, tell your emission
inspector
not to place your SUBARU
AWD vehicle on a two-wheel dynam-
ometer. Otherwise, serious transmis-
sion damage will result. The U.S. Environmental Protection
Agency (EPA) and states using two-wheel
dynamometers in their emission testing
program have EXEMPTED SUBARU
AWD vehicles from the portion of the
testing program that involves a two-wheel
dynamometer. There are some states that
use four-wheel dynamometers in their
testing program. When properly used, this
equipment should not damage a SUBARU
AWD vehicle.
Under no circumstances should the rear
wheels be jacked off the ground, nor
should the driveshaft be disconnected for
state emission testing.
Preparing to driveYou should perform the following checks
and adjustments every day before you
start driving.
1. Check that all windows, mirrors, and
lights are clean and unobstructed.
2. Check the appearance and condition
of the tires. Also check tires for proper
inflation.
3. Look under the vehicle for any sign of
leaks.
4. Check that the hood, trunk (4-door)
and rear gate (5-door) are fully closed.
5. Check the adjustment of the seat.
6. Check the adjustment of the inside
and outside mirrors.
7. Fasten your seatbelt. Check that your
passengers have fastened their seatbelts.
8. Check the operation of the warning
and indicator lights when the ignition
switch is turned to the
“ON”position.
9. Check the gauges, indicator and warn-
ing lights after starting the engine.NOTEEngine oil, engine coolant, brake fluid,
washer fluid and other fluid levels
should be checked daily, weekly or at
fuel stops.
Page 299 of 463
Black plate (259,1)
北米Model "A1130BE-A" EDITED: 2011/ 6/ 7
Starting the engine
CAUTION
Do not operate the starter motor
continuously for more than 10 sec-
onds. If the engine fails to start after
operating the starter for 5 to 10
seconds, wait for 10 seconds or
more before trying again.NOTEIt may be difficult to start the engine
when the battery has been discon-
nected and reconnected (for mainte-
nance or other purposes). This diffi-
culty is caused by the electronically
controlled throttle ’s self-diagnosis
function. To overcome it, keep the
ignition switch in the “ON ”position
for approximately 10 seconds before
starting the engine.
1. Apply the parking brake.
2. Turn off unnecessary lights and ac-
cessories.
3. Depress the clutch pedal to the floor
and shift the shift lever into neutral. Hold
the clutch pedal to the floor while starting
the engine.
The starter motor will only operate when the clutch pedal is depressed fully to the
floor.
4. Turn the ignition switch to the
“ON”
position and check the operation of the
warning and indicator lights. Refer to
“Warning and indicator lights ”F 3-12.
5. Turn the ignition switch to the “START”
position without depressing the accelera-
tor pedal. Release the key immediately
after the engine has started.
If the engine does not start, try the
following.
(1) Turn the ignition switch to the
“OFF ”position and wait for at least
10 seconds. After checking that the
parking brake is firmly set, turn the
ignition switch to the “START”position
while depressing the accelerator pedal
slightly (approximately a quarter of the
full stroke). Release the accelerator
pedal as soon as the engine starts.
(2) If this fails to start the engine, turn
the ignition switch back to the “OFF”
position and wait for at least 10
seconds. Then fully depress the accel-
erator pedal and turn the ignition
switch to the “START”position. If the
engine starts, quickly release the
accelerator pedal.
(3) If this fails to start the engine, turn
the ignition switch again to the “OFF”
position. After waiting for 10 seconds or longer, turn the ignition switch to the
“START
”position without depressing
the accelerator pedal.
(4) If the engine still refuses to start,
contact your nearest SUBARU dealer
for assistance.
6. Confirm that all warning and indicator
lights have turned off after the engine has
started. The fuel injection system auto-
matically lowers the idle speed as the
engine warms up.
Starting and operating
7-9
7