coolant SUBARU LEGACY 1999 Service Repair Manual
[x] Cancel search | Manufacturer: SUBARU, Model Year: 1999, Model line: LEGACY, Model: SUBARU LEGACY 1999Pages: 1456, PDF Size: 59.93 MB
Page 42 of 1456
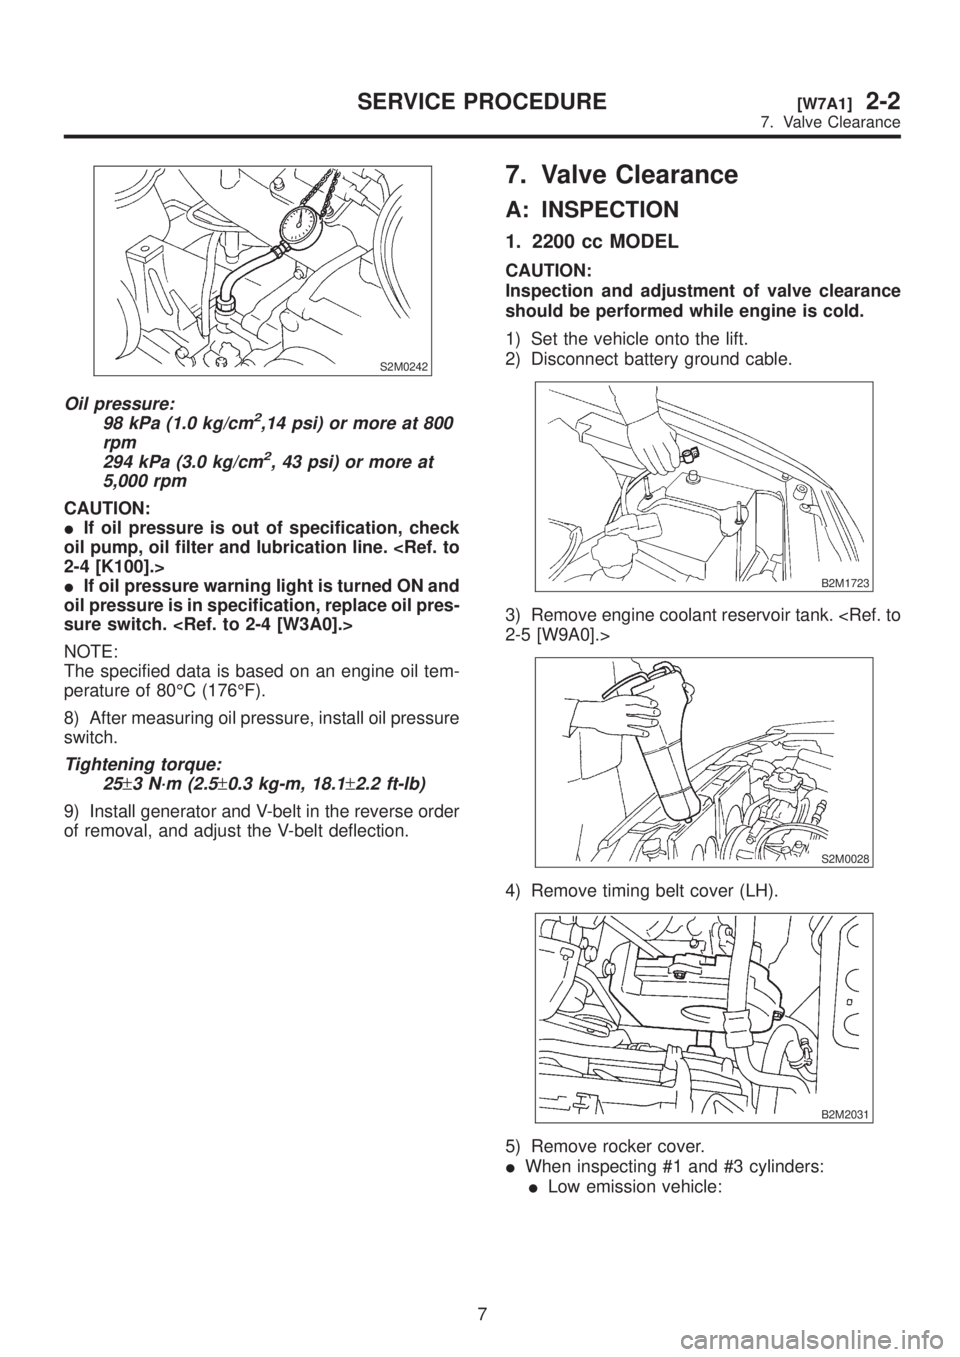
S2M0242
Oil pressure:
98 kPa (1.0 kg/cm2,14 psi) or more at 800
rpm
294 kPa (3.0 kg/cm
2, 43 psi) or more at
5,000 rpm
CAUTION:
IIf oil pressure is out of specification, check
oil pump, oil filter and lubrication line.
IIf oil pressure warning light is turned ON and
oil pressure is in specification, replace oil pres-
sure switch.
NOTE:
The specified data is based on an engine oil tem-
perature of 80ÉC (176ÉF).
8) After measuring oil pressure, install oil pressure
switch.
Tightening torque:
25
±3 N´m (2.5±0.3 kg-m, 18.1±2.2 ft-lb)
9) Install generator and V-belt in the reverse order
of removal, and adjust the V-belt deflection.
7. Valve Clearance
A: INSPECTION
1. 2200 cc MODEL
CAUTION:
Inspection and adjustment of valve clearance
should be performed while engine is cold.
1) Set the vehicle onto the lift.
2) Disconnect battery ground cable.
B2M1723
3) Remove engine coolant reservoir tank.
S2M0028
4) Remove timing belt cover (LH).
B2M2031
5) Remove rocker cover.
IWhen inspecting #1 and #3 cylinders:
ILow emission vehicle:
7
[W7A1]2-2SERVICE PROCEDURE
7. Valve Clearance
Page 43 of 1456
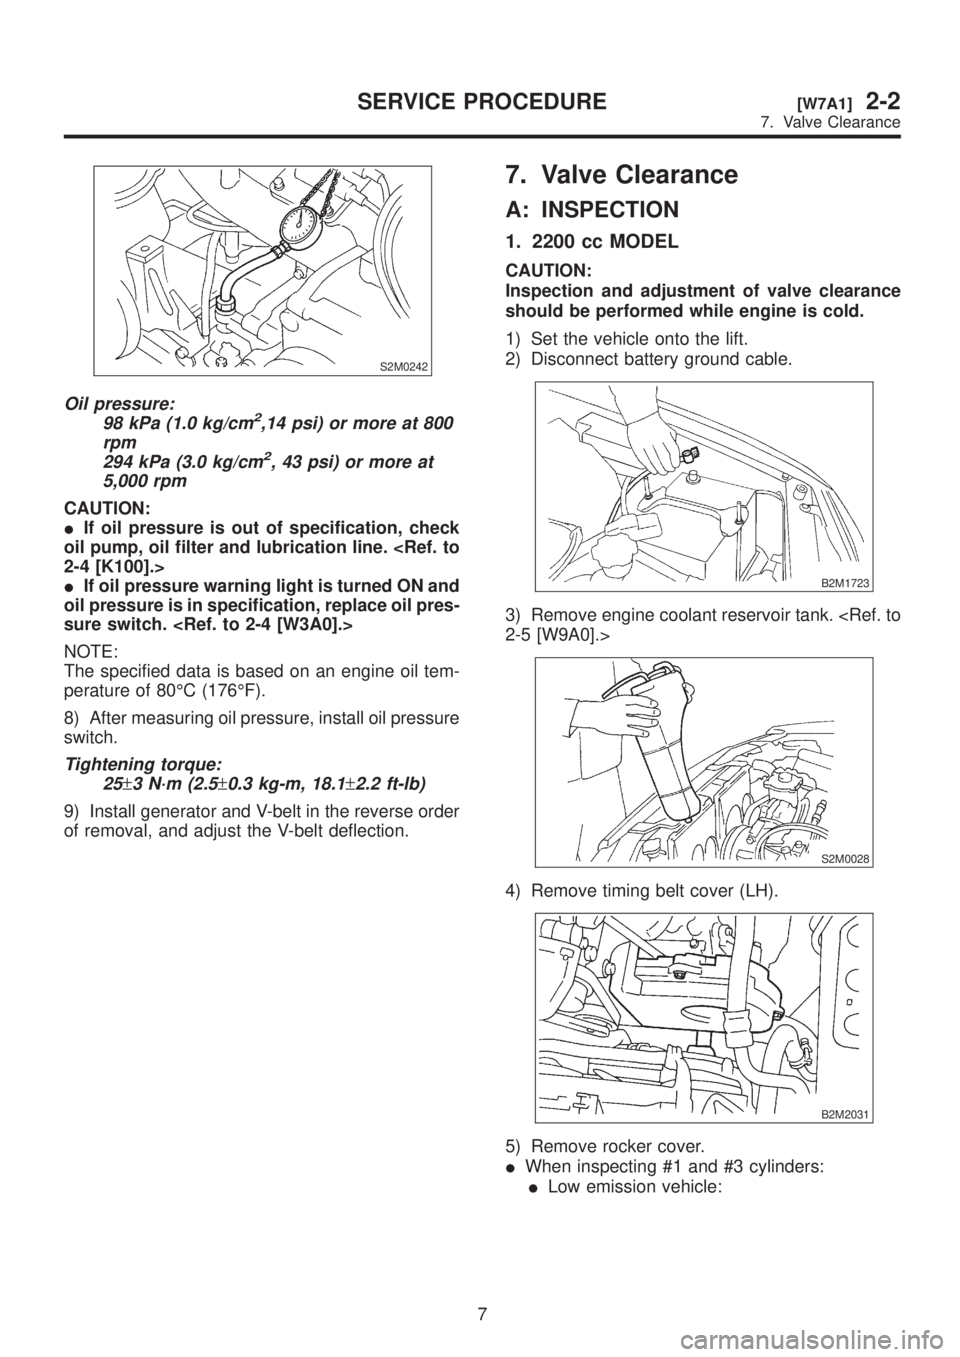
S2M0242
Oil pressure:
98 kPa (1.0 kg/cm2,14 psi) or more at 800
rpm
294 kPa (3.0 kg/cm
2, 43 psi) or more at
5,000 rpm
CAUTION:
IIf oil pressure is out of specification, check
oil pump, oil filter and lubrication line.
IIf oil pressure warning light is turned ON and
oil pressure is in specification, replace oil pres-
sure switch.
NOTE:
The specified data is based on an engine oil tem-
perature of 80ÉC (176ÉF).
8) After measuring oil pressure, install oil pressure
switch.
Tightening torque:
25
±3 N´m (2.5±0.3 kg-m, 18.1±2.2 ft-lb)
9) Install generator and V-belt in the reverse order
of removal, and adjust the V-belt deflection.
7. Valve Clearance
A: INSPECTION
1. 2200 cc MODEL
CAUTION:
Inspection and adjustment of valve clearance
should be performed while engine is cold.
1) Set the vehicle onto the lift.
2) Disconnect battery ground cable.
B2M1723
3) Remove engine coolant reservoir tank.
S2M0028
4) Remove timing belt cover (LH).
B2M2031
5) Remove rocker cover.
IWhen inspecting #1 and #3 cylinders:
ILow emission vehicle:
7
[W7A1]2-2SERVICE PROCEDURE
7. Valve Clearance
Page 65 of 1456
1. General Precautions
A: GENERAL PRECAUTIONS
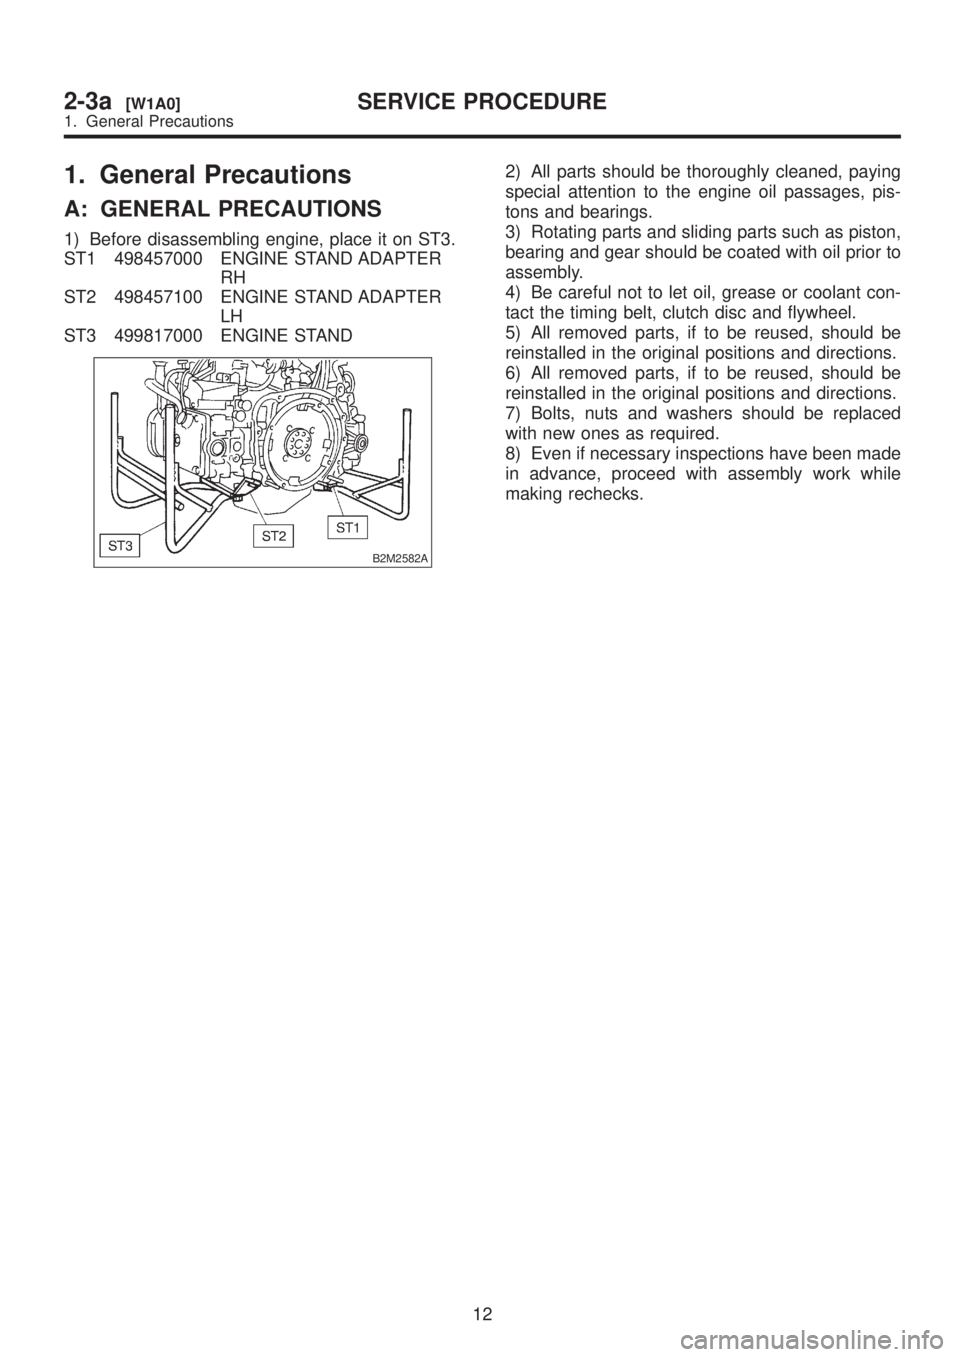
1) Before disassembling engine, place it on ST3.
ST1 498457000 ENGINE STAND ADAPTER
RH
ST2 498457100 ENGINE STAND ADAPTER
LH
ST3 499817000 ENGINE STAND
B2M2582A
2) All parts should be thoroughly cleaned, paying
special attention to the engine oil passages, pis-
tons and bearings.
3) Rotating parts and sliding parts such as piston,
bearing and gear should be coated with oil prior to
assembly.
4) Be careful not to let oil, grease or coolant con-
tact the timing belt, clutch disc and flywheel.
5) All removed parts, if to be reused, should be
reinstalled in the original positions and directions.
6) All removed parts, if to be reused, should be
reinstalled in the original positions and directions.
7) Bolts, nuts and washers should be replaced
with new ones as required.
8) Even if necessary inspections have been made
in advance, proceed with assembly work while
making rechecks.
12
2-3a[W1A0]SERVICE PROCEDURE
1. General Precautions
Page 71 of 1456
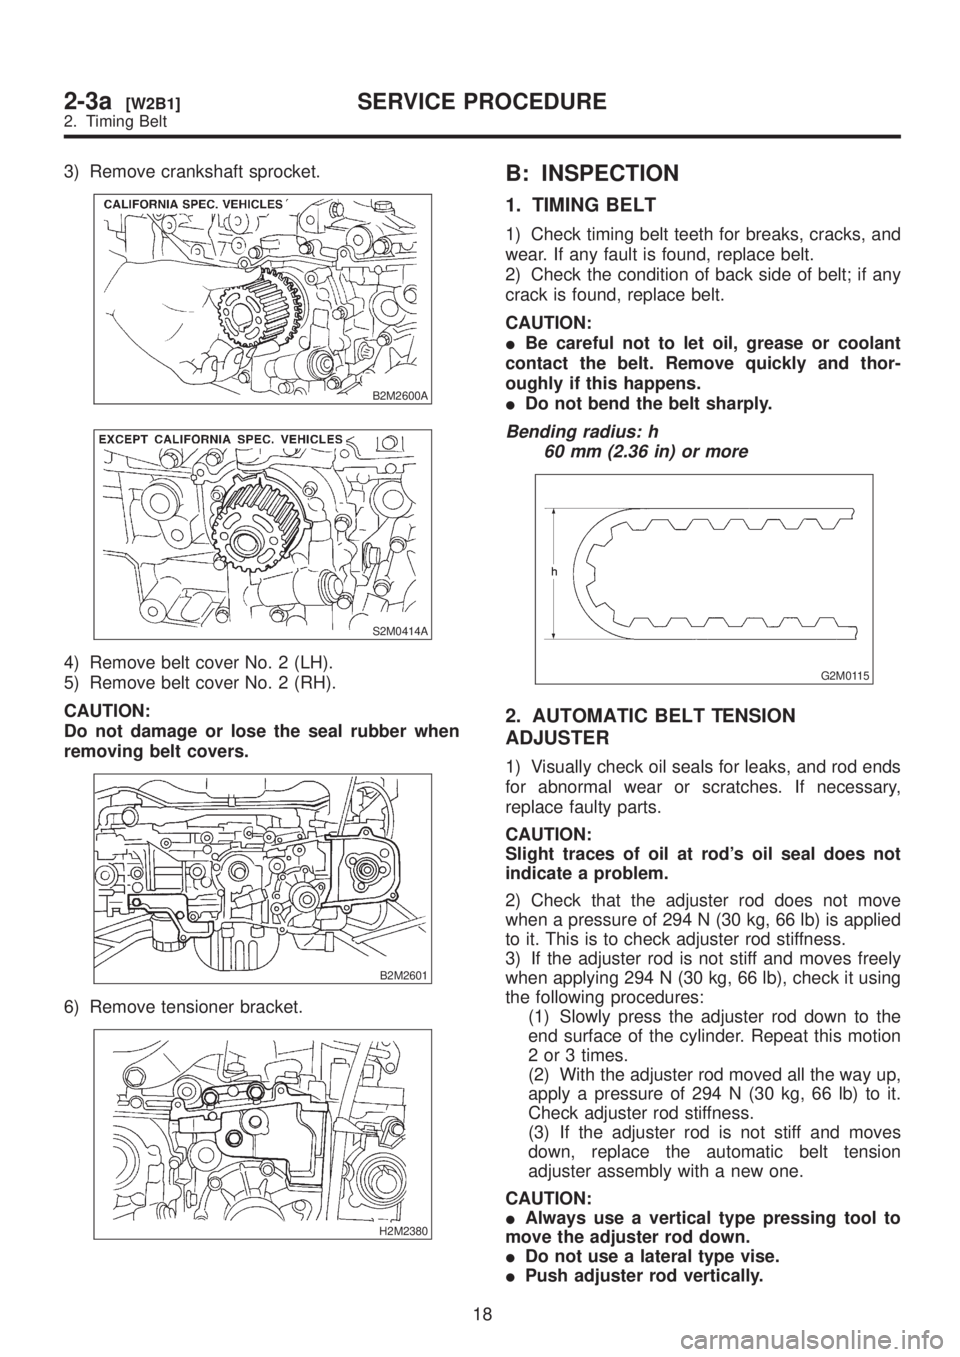
3) Remove crankshaft sprocket.
B2M2600A
S2M0414A
4) Remove belt cover No. 2 (LH).
5) Remove belt cover No. 2 (RH).
CAUTION:
Do not damage or lose the seal rubber when
removing belt covers.
B2M2601
6) Remove tensioner bracket.
H2M2380
B: INSPECTION
1. TIMING BELT
1) Check timing belt teeth for breaks, cracks, and
wear. If any fault is found, replace belt.
2) Check the condition of back side of belt; if any
crack is found, replace belt.
CAUTION:
IBe careful not to let oil, grease or coolant
contact the belt. Remove quickly and thor-
oughly if this happens.
IDo not bend the belt sharply.
Bending radius: h
60 mm (2.36 in) or more
G2M0115
2. AUTOMATIC BELT TENSION
ADJUSTER
1) Visually check oil seals for leaks, and rod ends
for abnormal wear or scratches. If necessary,
replace faulty parts.
CAUTION:
Slight traces of oil at rod's oil seal does not
indicate a problem.
2) Check that the adjuster rod does not move
when a pressure of 294 N (30 kg, 66 lb) is applied
to it. This is to check adjuster rod stiffness.
3) If the adjuster rod is not stiff and moves freely
when applying 294 N (30 kg, 66 lb), check it using
the following procedures:
(1) Slowly press the adjuster rod down to the
end surface of the cylinder. Repeat this motion
2 or 3 times.
(2) With the adjuster rod moved all the way up,
apply a pressure of 294 N (30 kg, 66 lb) to it.
Check adjuster rod stiffness.
(3) If the adjuster rod is not stiff and moves
down, replace the automatic belt tension
adjuster assembly with a new one.
CAUTION:
IAlways use a vertical type pressing tool to
move the adjuster rod down.
IDo not use a lateral type vise.
IPush adjuster rod vertically.
18
2-3a[W2B1]SERVICE PROCEDURE
2. Timing Belt
Page 94 of 1456
![SUBARU LEGACY 1999 Service Repair Manual 5. Cylinder Head
A: REMOVAL
1. RELATED PARTS
1) Release fuel pressure. <Ref. to 2-8 [W1B0].>
2) Drain engine coolant. <Ref. to 2-5 [W1A0].>
3) Remove V-belt(s).
4) Remove generator and bracket.
5) Rem SUBARU LEGACY 1999 Service Repair Manual 5. Cylinder Head
A: REMOVAL
1. RELATED PARTS
1) Release fuel pressure. <Ref. to 2-8 [W1B0].>
2) Drain engine coolant. <Ref. to 2-5 [W1A0].>
3) Remove V-belt(s).
4) Remove generator and bracket.
5) Rem](/img/17/57435/w960_57435-93.png)
5. Cylinder Head
A: REMOVAL
1. RELATED PARTS
1) Release fuel pressure.
2) Drain engine coolant.
3) Remove V-belt(s).
4) Remove generator and bracket.
5) Remove A/C compressor and bracket. (With
A/C model)6) Disconnect spark plug cords.
7) Remove connector bracket attaching bolt.
8) Remove camshaft position sensor and cam-
shaft position sensor support.
9) Disconnect oil pressure switch connector.
10) Disconnect blow-by hose.
11) Remove intake manifold.
2. CYLINDER HEAD
B2M2627A
(1) Rocker cover
(2) Cylinder head bolt(3) Cylinder head
(4) Cylinder head gasket
1) Remove timing belt, camshaft sprocket and
related parts.
2) Remove oil level gauge guide attaching bolt
(left hand only) and oil level gauge guide.
3) Remove rocker cover.
40
2-3a[W5A1]SERVICE PROCEDURE
5. Cylinder Head
Page 104 of 1456
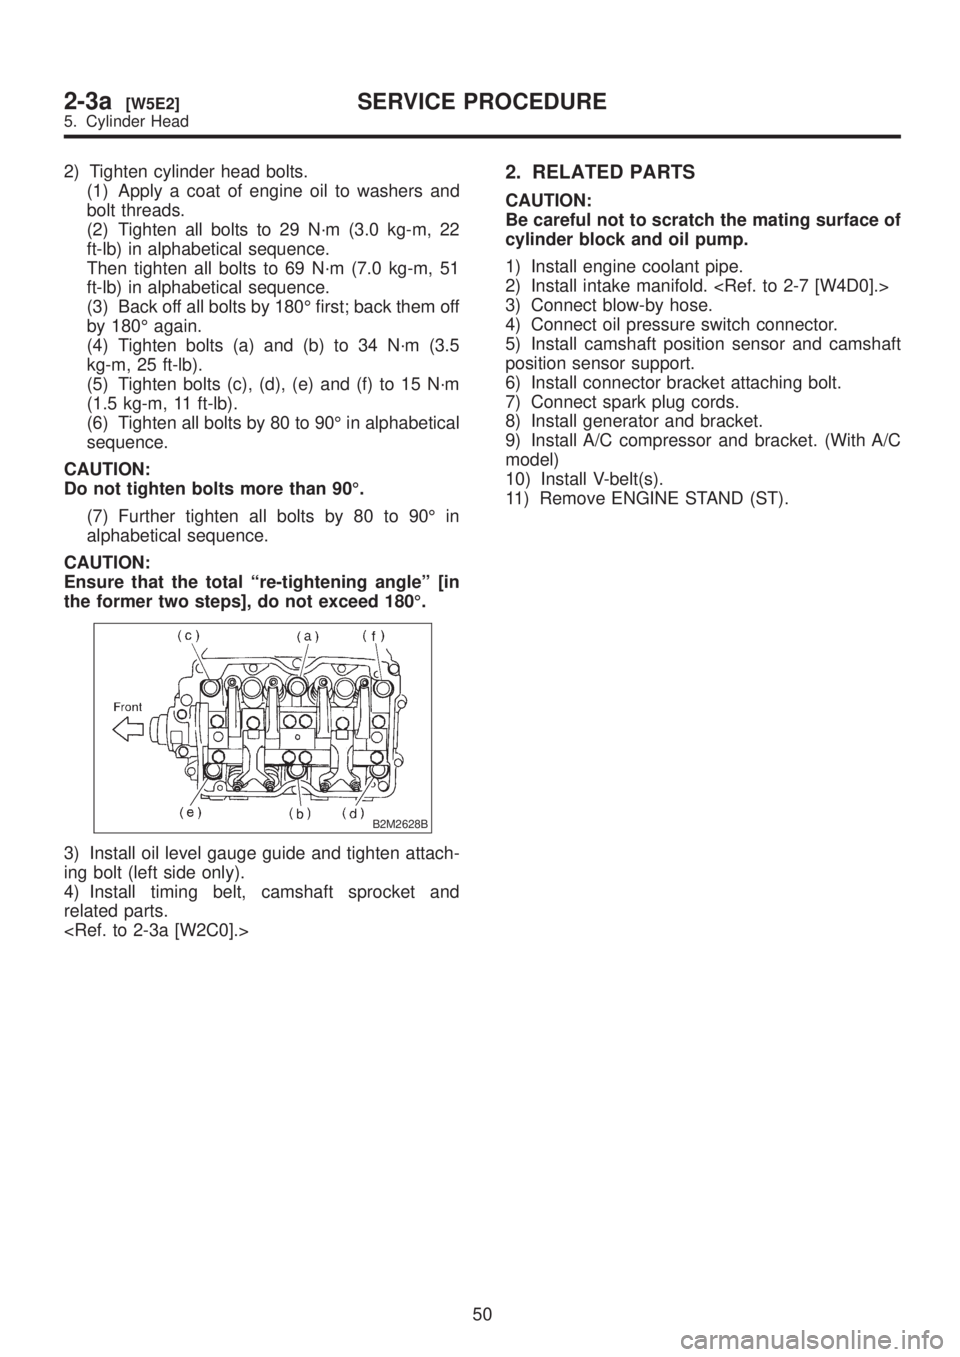
2) Tighten cylinder head bolts.
(1) Apply a coat of engine oil to washers and
bolt threads.
(2) Tighten all bolts to 29 N´m (3.0 kg-m, 22
ft-lb) in alphabetical sequence.
Then tighten all bolts to 69 N´m (7.0 kg-m, 51
ft-lb) in alphabetical sequence.
(3) Back off all bolts by 180É first; back them off
by 180É again.
(4) Tighten bolts (a) and (b) to 34 N´m (3.5
kg-m, 25 ft-lb).
(5) Tighten bolts (c), (d), (e) and (f) to 15 N´m
(1.5 kg-m, 11 ft-lb).
(6) Tighten all bolts by 80 to 90É in alphabetical
sequence.
CAUTION:
Do not tighten bolts more than 90É.
(7) Further tighten all bolts by 80 to 90É in
alphabetical sequence.
CAUTION:
Ensure that the total ªre-tightening angleº [in
the former two steps], do not exceed 180É.
B2M2628B
3) Install oil level gauge guide and tighten attach-
ing bolt (left side only).
4) Install timing belt, camshaft sprocket and
related parts.
2. RELATED PARTS
CAUTION:
Be careful not to scratch the mating surface of
cylinder block and oil pump.
1) Install engine coolant pipe.
2) Install intake manifold.
3) Connect blow-by hose.
4) Connect oil pressure switch connector.
5) Install camshaft position sensor and camshaft
position sensor support.
6) Install connector bracket attaching bolt.
7) Connect spark plug cords.
8) Install generator and bracket.
9) Install A/C compressor and bracket. (With A/C
model)
10) Install V-belt(s).
11) Remove ENGINE STAND (ST).
50
2-3a[W5E2]SERVICE PROCEDURE
5. Cylinder Head
Page 132 of 1456
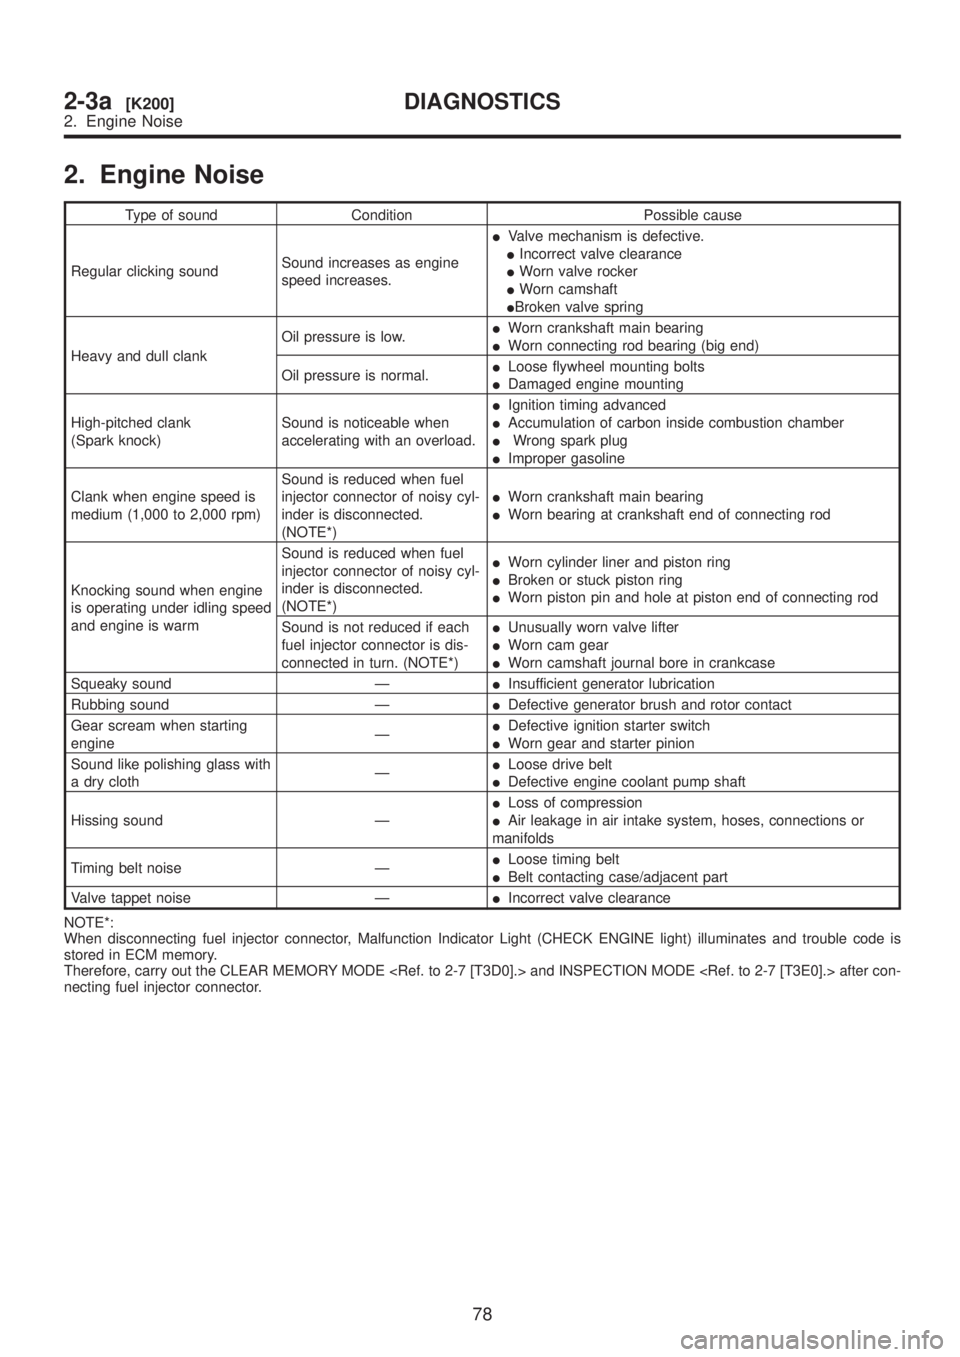
2. Engine Noise
Type of sound Condition Possible cause
Regular clicking soundSound increases as engine
speed increases.IValve mechanism is defective.
IIncorrect valve clearance
IWorn valve rocker
IWorn camshaft
IBroken valve spring
Heavy and dull clankOil pressure is low.IWorn crankshaft main bearing
IWorn connecting rod bearing (big end)
Oil pressure is normal.ILoose flywheel mounting bolts
IDamaged engine mounting
High-pitched clank
(Spark knock)Sound is noticeable when
accelerating with an overload.IIgnition timing advanced
IAccumulation of carbon inside combustion chamber
IWrong spark plug
IImproper gasoline
Clank when engine speed is
medium (1,000 to 2,000 rpm)Sound is reduced when fuel
injector connector of noisy cyl-
inder is disconnected.
(NOTE*)IWorn crankshaft main bearing
IWorn bearing at crankshaft end of connecting rod
Knocking sound when engine
is operating under idling speed
and engine is warmSound is reduced when fuel
injector connector of noisy cyl-
inder is disconnected.
(NOTE*)IWorn cylinder liner and piston ring
IBroken or stuck piston ring
IWorn piston pin and hole at piston end of connecting rod
Sound is not reduced if each
fuel injector connector is dis-
connected in turn. (NOTE*)IUnusually worn valve lifter
IWorn cam gear
IWorn camshaft journal bore in crankcase
Squeaky sound ÐIInsufficient generator lubrication
Rubbing sound ÐIDefective generator brush and rotor contact
Gear scream when starting
engineÐIDefective ignition starter switch
IWorn gear and starter pinion
Sound like polishing glass with
a dry clothÐILoose drive belt
IDefective engine coolant pump shaft
Hissing sound ÐILoss of compression
IAir leakage in air intake system, hoses, connections or
manifolds
Timing belt noise ÐILoose timing belt
IBelt contacting case/adjacent part
Valve tappet noise ÐIIncorrect valve clearance
NOTE*:
When disconnecting fuel injector connector, Malfunction Indicator Light (CHECK ENGINE light) illuminates and trouble code is
stored in ECM memory.
Therefore, carry out the CLEAR MEMORY MODE
necting fuel injector connector.
78
2-3a[K200]DIAGNOSTICS
2. Engine Noise
Page 144 of 1456
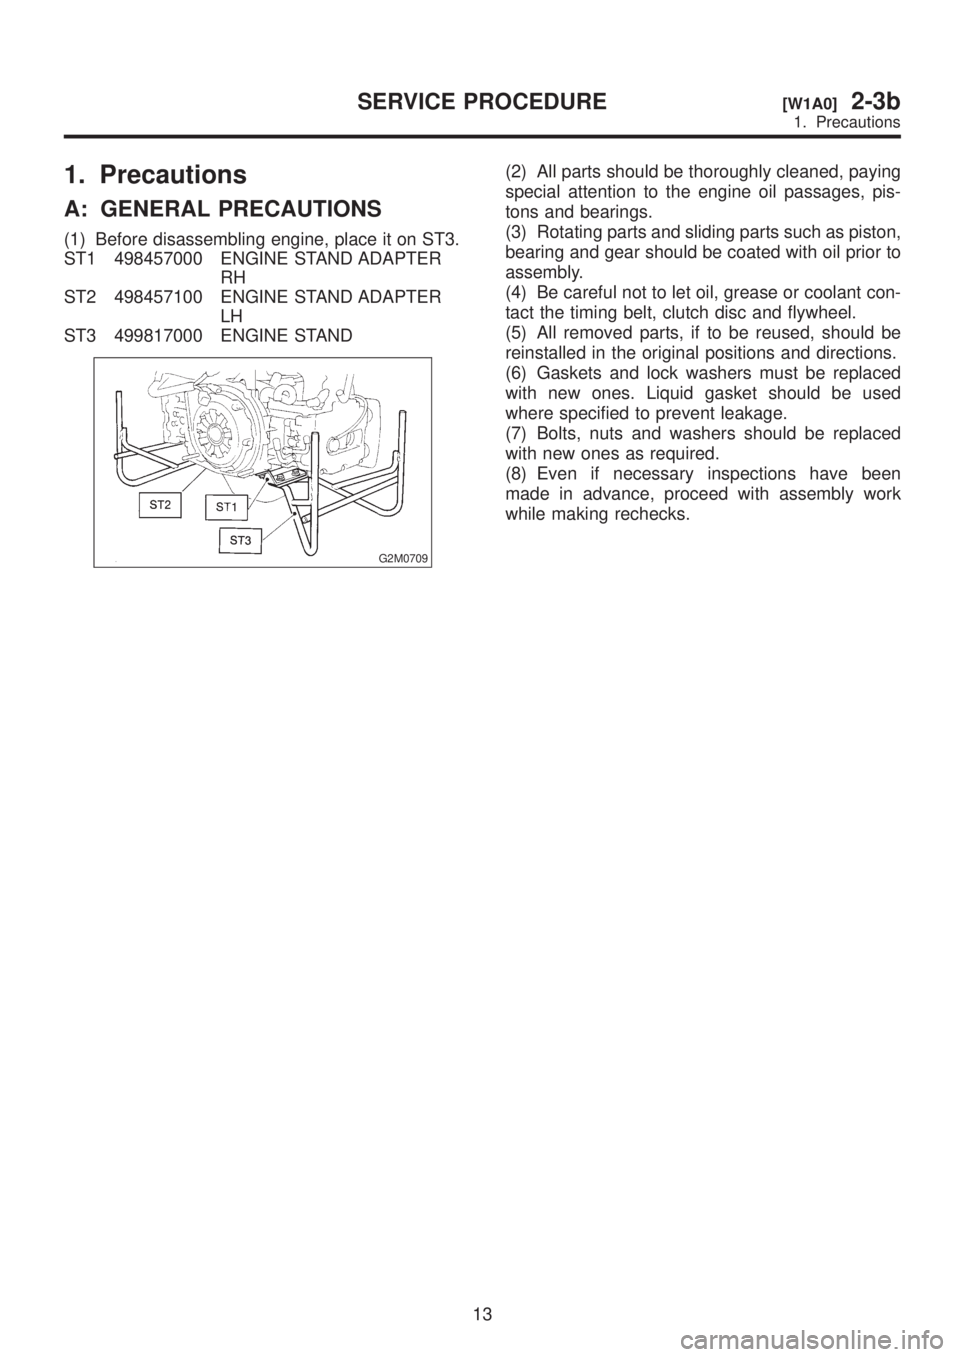
1. Precautions
A: GENERAL PRECAUTIONS
(1) Before disassembling engine, place it on ST3.
ST1 498457000 ENGINE STAND ADAPTER
RH
ST2 498457100 ENGINE STAND ADAPTER
LH
ST3 499817000 ENGINE STAND
G2M0709
(2) All parts should be thoroughly cleaned, paying
special attention to the engine oil passages, pis-
tons and bearings.
(3) Rotating parts and sliding parts such as piston,
bearing and gear should be coated with oil prior to
assembly.
(4) Be careful not to let oil, grease or coolant con-
tact the timing belt, clutch disc and flywheel.
(5) All removed parts, if to be reused, should be
reinstalled in the original positions and directions.
(6) Gaskets and lock washers must be replaced
with new ones. Liquid gasket should be used
where specified to prevent leakage.
(7) Bolts, nuts and washers should be replaced
with new ones as required.
(8) Even if necessary inspections have been
made in advance, proceed with assembly work
while making rechecks.
13
[W1A0]2-3bSERVICE PROCEDURE
1. Precautions
Page 150 of 1456

1) Remove left-hand intake camshaft sprocket.
2) Remove left-hand exhaust camshaft sprocket.
3) Remove right-hand intake camshaft sprocket.
4) Remove right-hand exhaust camshaft sprocket.
ST 499207300 CAMSHAFT SPROCKET
WRENCH
S2M0413A
5) Remove crankshaft sprocket.
S2M0414
6) Remove tensioner bracket.
H2M2407
7) Remove left-hand belt cover No. 2.
S2M0415
8) Remove right-hand belt cover No. 2.
B2M0738
B: INSPECTION
1. TIMING BELT
1) Check timing belt teeth for breaks, cracks and
wear. If any fault is found, replace belt.
2) Check the condition of back side of belt; if any
crack is found, replace belt.
CAUTION:
IBe careful not to let oil, grease or coolant
contact the belt. Remove quickly and thor-
oughly if this happens.
IDo not bend the belt sharply.
Bending radius: h
60 mm (2.36 in) or more
G2M0115
2. AUTOMATIC BELT TENSION
ADJUSTER
1) Visually check oil seals for leaks, and rod ends
for abnormal wear or scratches. If necessary,
replace automatic belt tension adjuster assembly.
CAUTION:
Slight traces of oil at rod's oil seal does not
indicate a problem.
2) Check that the adjuster rod does not move
when a pressure of 294 N (30 kg, 66 lb) is applied
to it. This is to check adjuster rod stiffness.
3) If the adjuster rod is not stiff and moves freely
when applying 294 N (30 kg, 66 lb), check it using
the following procedures:
19
[W2B2]2-3bSERVICE PROCEDURE
2. Timing Belt
Page 207 of 1456
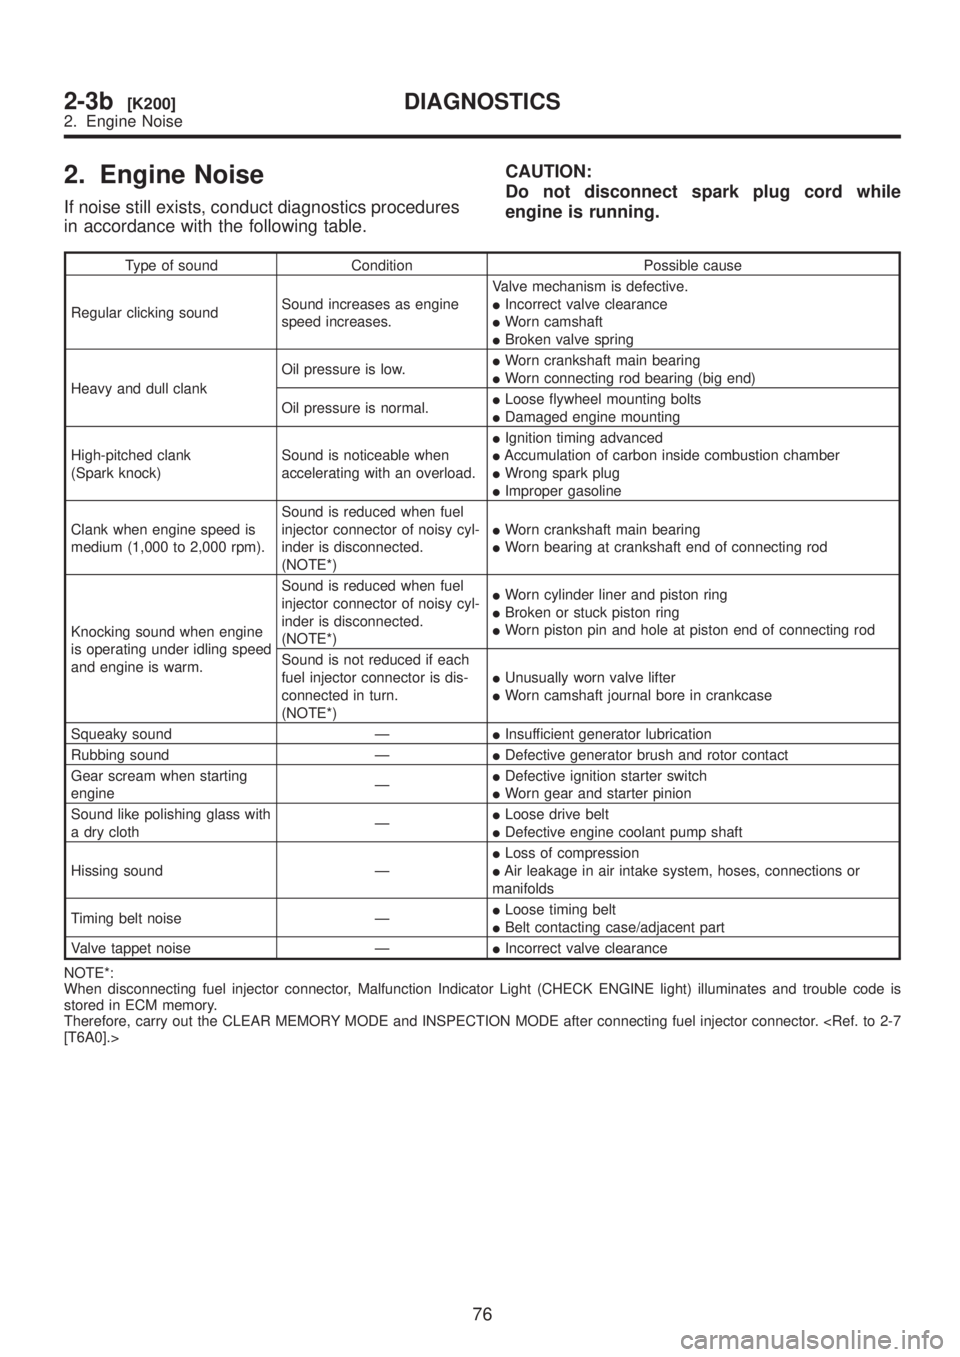
2. Engine Noise
If noise still exists, conduct diagnostics procedures
in accordance with the following table.CAUTION:
Do not disconnect spark plug cord while
engine is running.
Type of sound Condition Possible cause
Regular clicking soundSound increases as engine
speed increases.Valve mechanism is defective.
IIncorrect valve clearance
IWorn camshaft
IBroken valve spring
Heavy and dull clankOil pressure is low.IWorn crankshaft main bearing
IWorn connecting rod bearing (big end)
Oil pressure is normal.ILoose flywheel mounting bolts
IDamaged engine mounting
High-pitched clank
(Spark knock)Sound is noticeable when
accelerating with an overload.IIgnition timing advanced
IAccumulation of carbon inside combustion chamber
IWrong spark plug
IImproper gasoline
Clank when engine speed is
medium (1,000 to 2,000 rpm).Sound is reduced when fuel
injector connector of noisy cyl-
inder is disconnected.
(NOTE*)IWorn crankshaft main bearing
IWorn bearing at crankshaft end of connecting rod
Knocking sound when engine
is operating under idling speed
and engine is warm.Sound is reduced when fuel
injector connector of noisy cyl-
inder is disconnected.
(NOTE*)IWorn cylinder liner and piston ring
IBroken or stuck piston ring
IWorn piston pin and hole at piston end of connecting rod
Sound is not reduced if each
fuel injector connector is dis-
connected in turn.
(NOTE*)IUnusually worn valve lifter
IWorn camshaft journal bore in crankcase
Squeaky sound ÐIInsufficient generator lubrication
Rubbing sound ÐIDefective generator brush and rotor contact
Gear scream when starting
engineÐIDefective ignition starter switch
IWorn gear and starter pinion
Sound like polishing glass with
a dry clothÐILoose drive belt
IDefective engine coolant pump shaft
Hissing sound ÐILoss of compression
IAir leakage in air intake system, hoses, connections or
manifolds
Timing belt noise ÐILoose timing belt
IBelt contacting case/adjacent part
Valve tappet noise ÐIIncorrect valve clearance
NOTE*:
When disconnecting fuel injector connector, Malfunction Indicator Light (CHECK ENGINE light) illuminates and trouble code is
stored in ECM memory.
Therefore, carry out the CLEAR MEMORY MODE and INSPECTION MODE after connecting fuel injector connector.
76
2-3b[K200]DIAGNOSTICS
2. Engine Noise