tow SUBARU LEGACY 1999 Service Repair Manual
[x] Cancel search | Manufacturer: SUBARU, Model Year: 1999, Model line: LEGACY, Model: SUBARU LEGACY 1999Pages: 1456, PDF Size: 59.93 MB
Page 118 of 1456
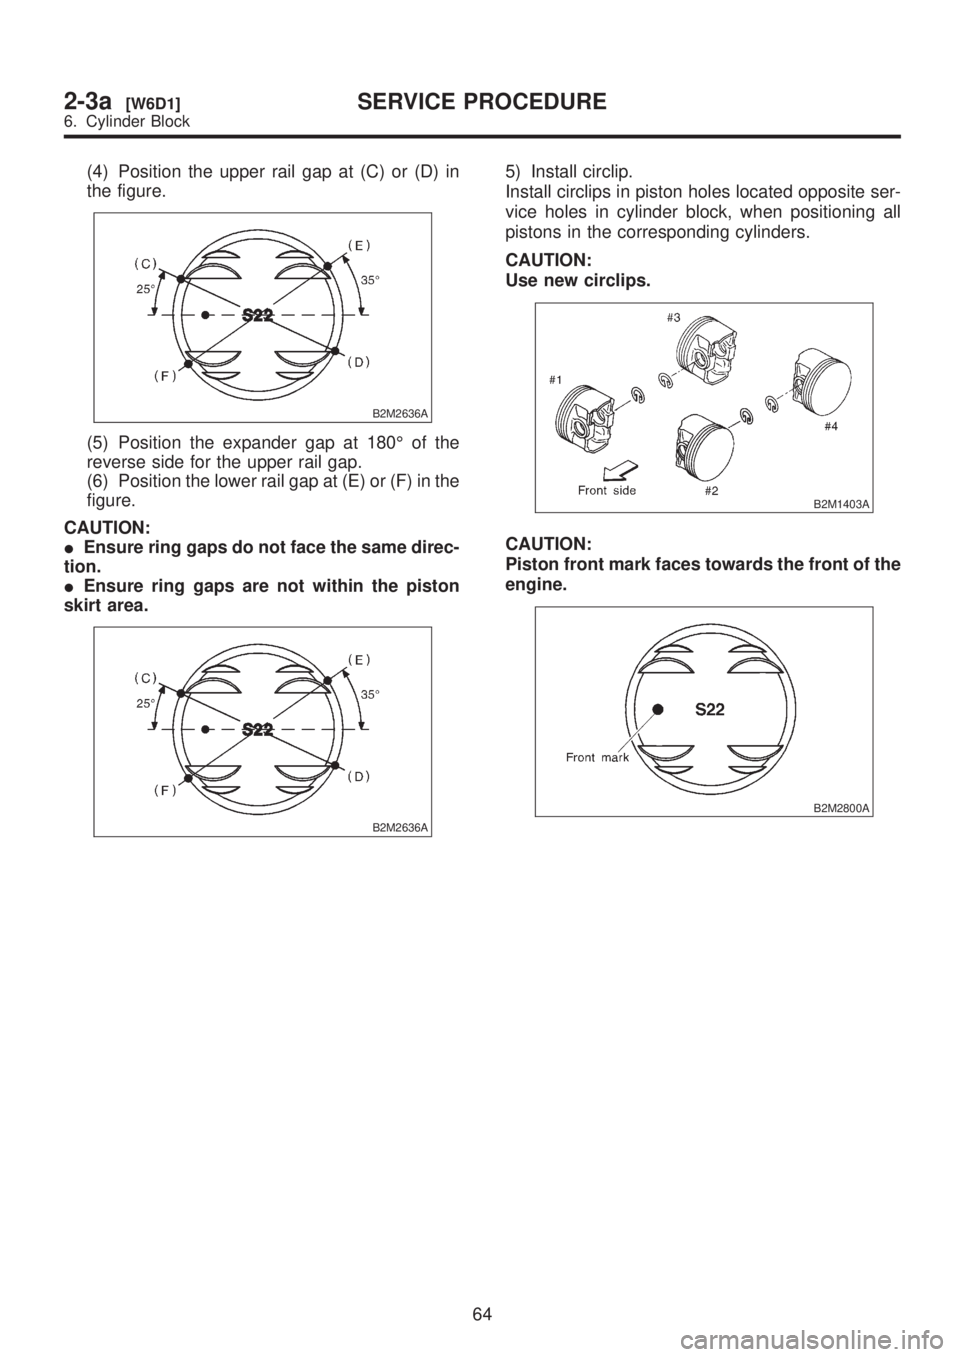
(4) Position the upper rail gap at (C) or (D) in
the figure.
B2M2636A
(5) Position the expander gap at 180É of the
reverse side for the upper rail gap.
(6) Position the lower rail gap at (E) or (F) in the
figure.
CAUTION:
IEnsure ring gaps do not face the same direc-
tion.
IEnsure ring gaps are not within the piston
skirt area.
B2M2636A
5) Install circlip.
Install circlips in piston holes located opposite ser-
vice holes in cylinder block, when positioning all
pistons in the corresponding cylinders.
CAUTION:
Use new circlips.
B2M1403A
CAUTION:
Piston front mark faces towards the front of the
engine.
B2M2800A
64
2-3a[W6D1]SERVICE PROCEDURE
6. Cylinder Block
Page 165 of 1456
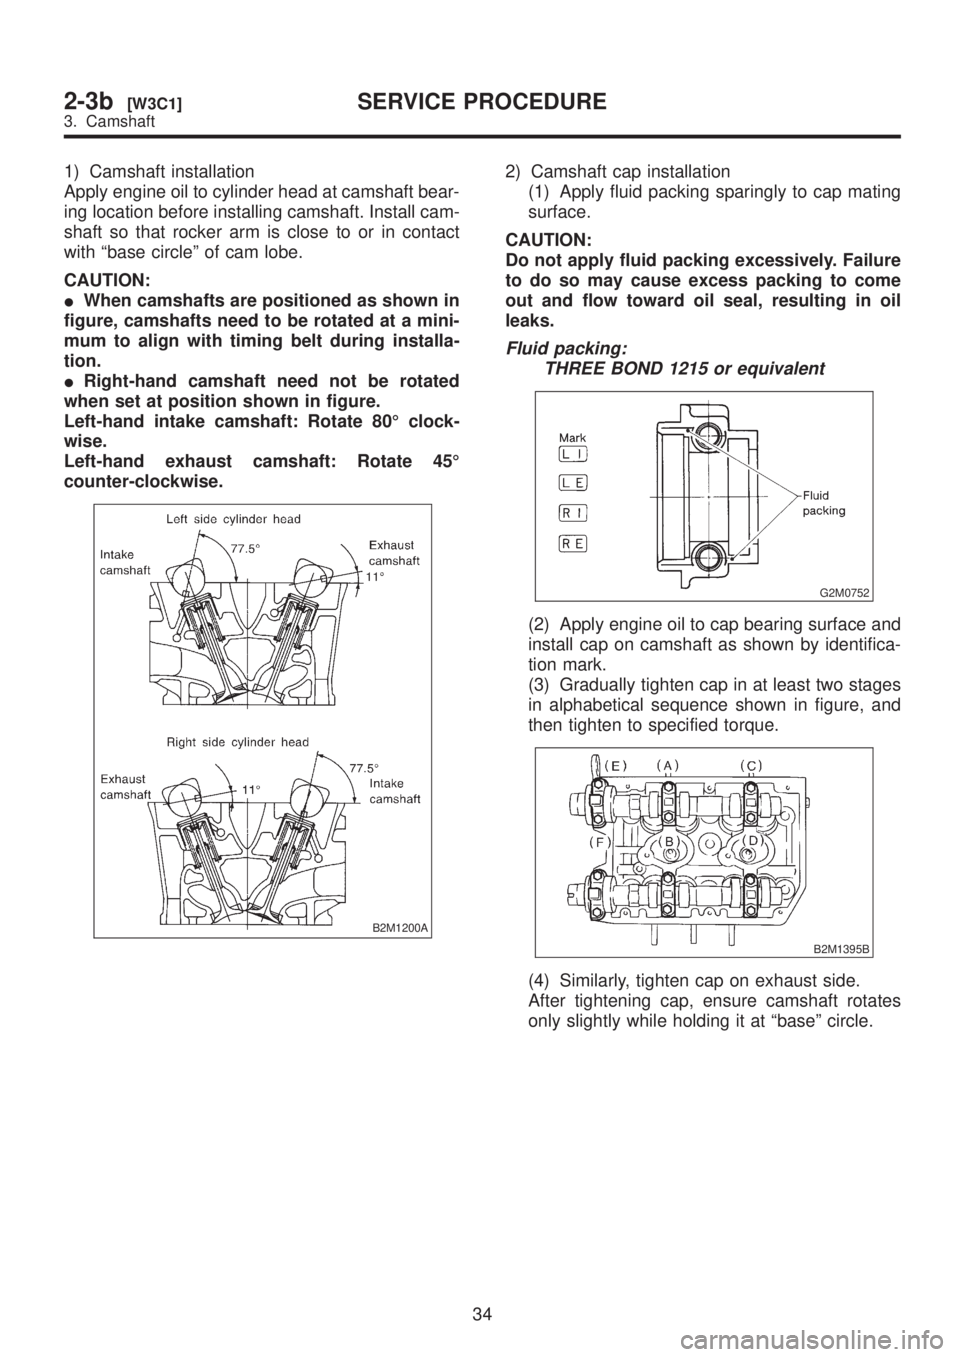
1) Camshaft installation
Apply engine oil to cylinder head at camshaft bear-
ing location before installing camshaft. Install cam-
shaft so that rocker arm is close to or in contact
with ªbase circleº of cam lobe.
CAUTION:
IWhen camshafts are positioned as shown in
figure, camshafts need to be rotated at a mini-
mum to align with timing belt during installa-
tion.
IRight-hand camshaft need not be rotated
when set at position shown in figure.
Left-hand intake camshaft: Rotate 80É clock-
wise.
Left-hand exhaust camshaft: Rotate 45É
counter-clockwise.
B2M1200A
2) Camshaft cap installation
(1) Apply fluid packing sparingly to cap mating
surface.
CAUTION:
Do not apply fluid packing excessively. Failure
to do so may cause excess packing to come
out and flow toward oil seal, resulting in oil
leaks.
Fluid packing:
THREE BOND 1215 or equivalent
G2M0752
(2) Apply engine oil to cap bearing surface and
install cap on camshaft as shown by identifica-
tion mark.
(3) Gradually tighten cap in at least two stages
in alphabetical sequence shown in figure, and
then tighten to specified torque.
B2M1395B
(4) Similarly, tighten cap on exhaust side.
After tightening cap, ensure camshaft rotates
only slightly while holding it at ªbaseº circle.
34
2-3b[W3C1]SERVICE PROCEDURE
3. Camshaft
Page 458 of 1456
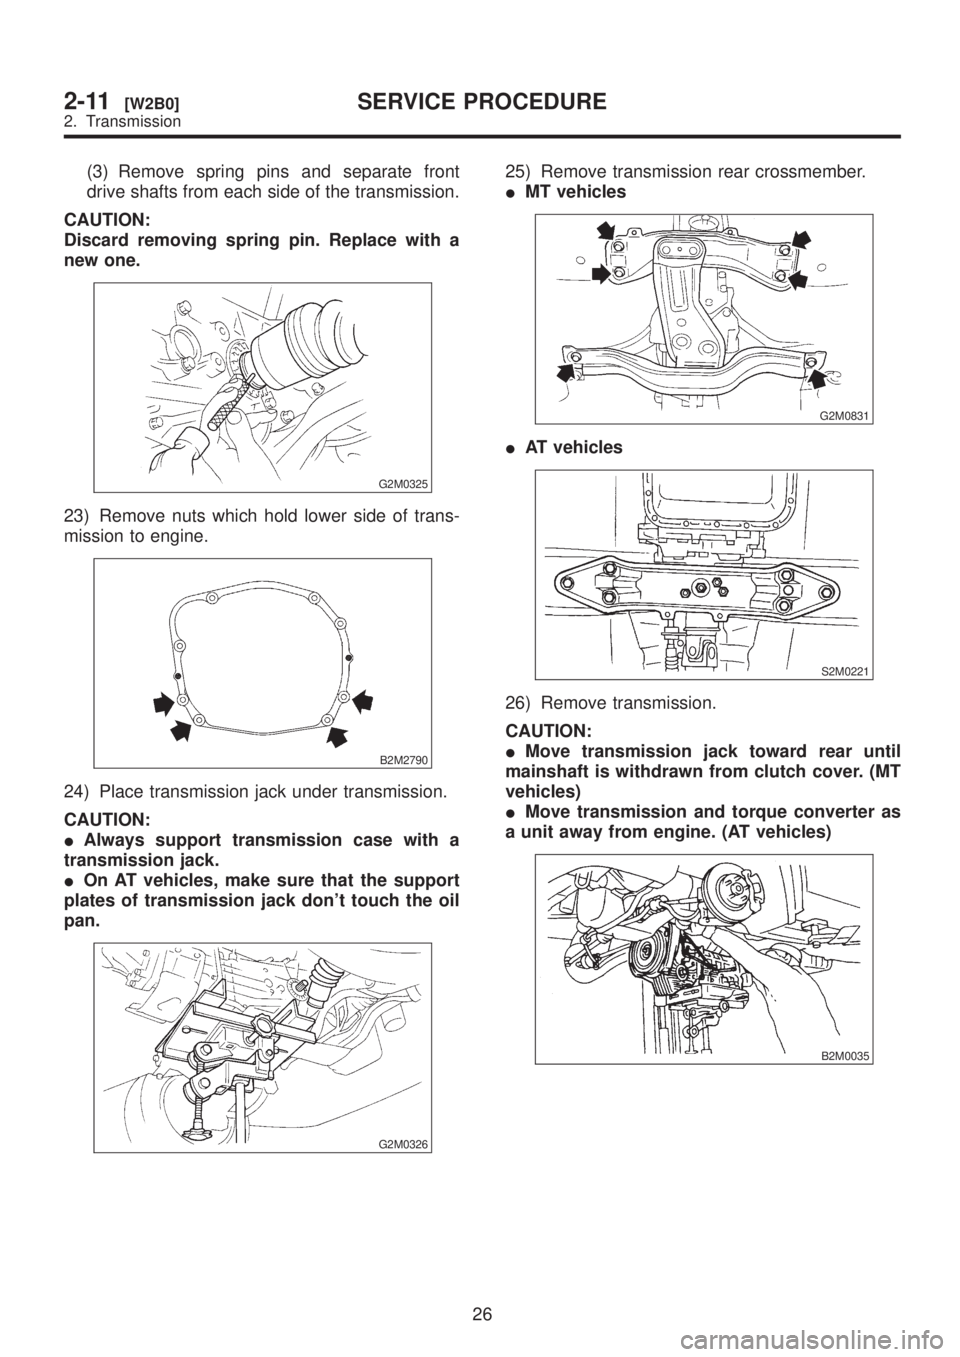
(3) Remove spring pins and separate front
drive shafts from each side of the transmission.
CAUTION:
Discard removing spring pin. Replace with a
new one.
G2M0325
23) Remove nuts which hold lower side of trans-
mission to engine.
B2M2790
24) Place transmission jack under transmission.
CAUTION:
IAlways support transmission case with a
transmission jack.
IOn AT vehicles, make sure that the support
plates of transmission jack don't touch the oil
pan.
G2M0326
25) Remove transmission rear crossmember.
IMT vehicles
G2M0831
IAT vehicles
S2M0221
26) Remove transmission.
CAUTION:
IMove transmission jack toward rear until
mainshaft is withdrawn from clutch cover. (MT
vehicles)
IMove transmission and torque converter as
a unit away from engine. (AT vehicles)
B2M0035
26
2-11[W2B0]SERVICE PROCEDURE
2. Transmission
Page 486 of 1456
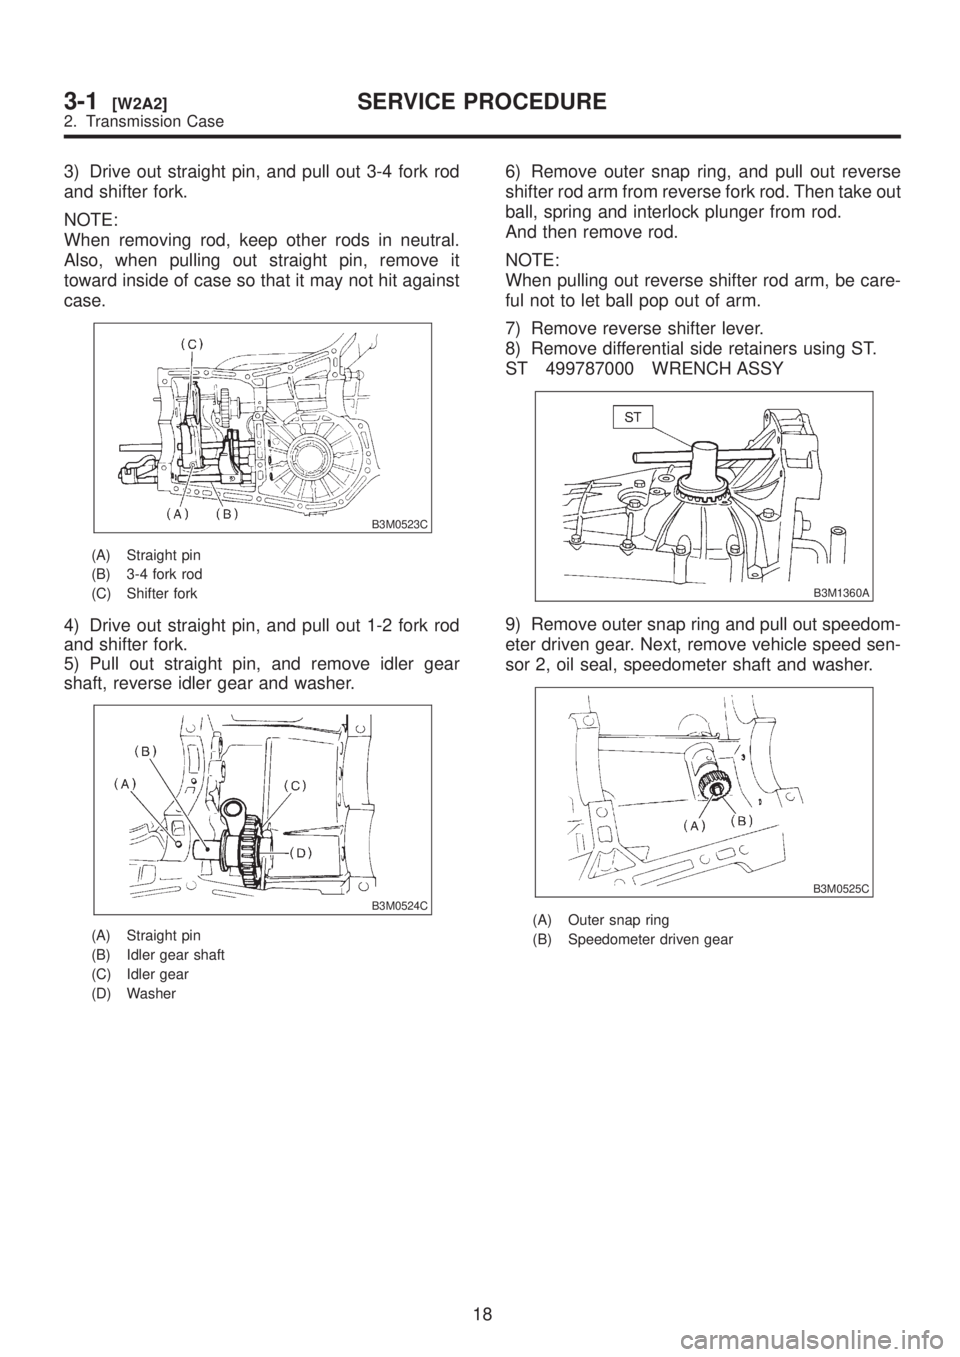
3) Drive out straight pin, and pull out 3-4 fork rod
and shifter fork.
NOTE:
When removing rod, keep other rods in neutral.
Also, when pulling out straight pin, remove it
toward inside of case so that it may not hit against
case.
B3M0523C
(A) Straight pin
(B) 3-4 fork rod
(C) Shifter fork
4) Drive out straight pin, and pull out 1-2 fork rod
and shifter fork.
5) Pull out straight pin, and remove idler gear
shaft, reverse idler gear and washer.
B3M0524C
(A) Straight pin
(B) Idler gear shaft
(C) Idler gear
(D) Washer
6) Remove outer snap ring, and pull out reverse
shifter rod arm from reverse fork rod. Then take out
ball, spring and interlock plunger from rod.
And then remove rod.
NOTE:
When pulling out reverse shifter rod arm, be care-
ful not to let ball pop out of arm.
7) Remove reverse shifter lever.
8) Remove differential side retainers using ST.
ST 499787000 WRENCH ASSY
B3M1360A
9) Remove outer snap ring and pull out speedom-
eter driven gear. Next, remove vehicle speed sen-
sor 2, oil seal, speedometer shaft and washer.
B3M0525C
(A) Outer snap ring
(B) Speedometer driven gear
18
3-1[W2A2]SERVICE PROCEDURE
2. Transmission Case
Page 488 of 1456
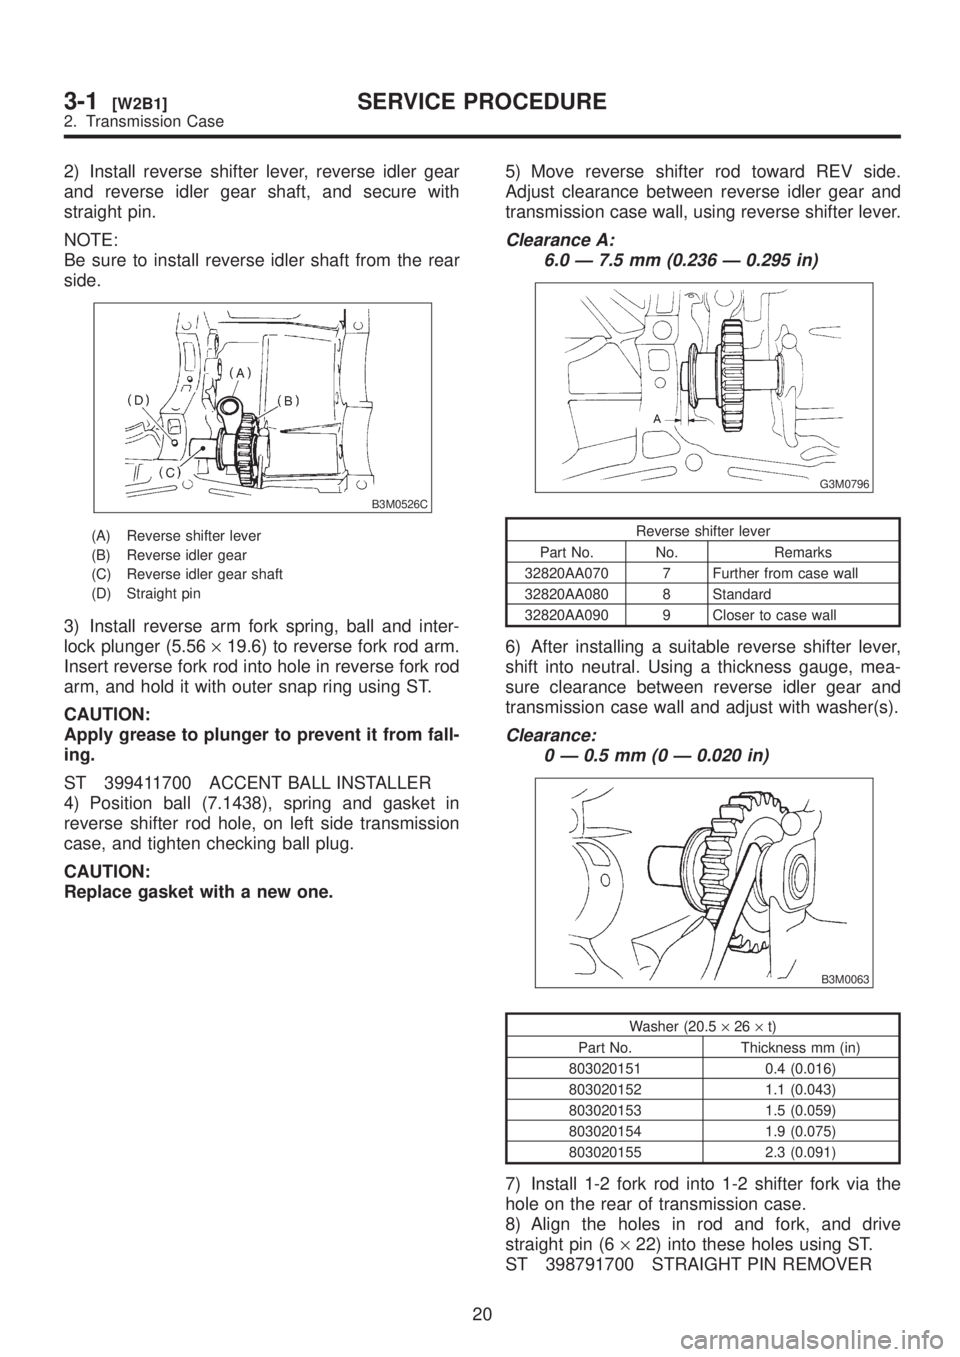
2) Install reverse shifter lever, reverse idler gear
and reverse idler gear shaft, and secure with
straight pin.
NOTE:
Be sure to install reverse idler shaft from the rear
side.
B3M0526C
(A) Reverse shifter lever
(B) Reverse idler gear
(C) Reverse idler gear shaft
(D) Straight pin
3) Install reverse arm fork spring, ball and inter-
lock plunger (5.56´19.6) to reverse fork rod arm.
Insert reverse fork rod into hole in reverse fork rod
arm, and hold it with outer snap ring using ST.
CAUTION:
Apply grease to plunger to prevent it from fall-
ing.
ST 399411700 ACCENT BALL INSTALLER
4) Position ball (7.1438), spring and gasket in
reverse shifter rod hole, on left side transmission
case, and tighten checking ball plug.
CAUTION:
Replace gasket with a new one.5) Move reverse shifter rod toward REV side.
Adjust clearance between reverse idler gear and
transmission case wall, using reverse shifter lever.
Clearance A:
6.0 Ð 7.5 mm (0.236 Ð 0.295 in)
G3M0796
Reverse shifter lever
Part No. No. Remarks
32820AA070 7 Further from case wall
32820AA080 8 Standard
32820AA090 9 Closer to case wall
6) After installing a suitable reverse shifter lever,
shift into neutral. Using a thickness gauge, mea-
sure clearance between reverse idler gear and
transmission case wall and adjust with washer(s).
Clearance:
0 Ð 0.5 mm (0 Ð 0.020 in)
B3M0063
Washer (20.5´26´t)
Part No. Thickness mm (in)
803020151 0.4 (0.016)
803020152 1.1 (0.043)
803020153 1.5 (0.059)
803020154 1.9 (0.075)
803020155 2.3 (0.091)
7) Install 1-2 fork rod into 1-2 shifter fork via the
hole on the rear of transmission case.
8) Align the holes in rod and fork, and drive
straight pin (6´22) into these holes using ST.
ST 398791700 STRAIGHT PIN REMOVER
20
3-1[W2B1]SERVICE PROCEDURE
2. Transmission Case
Page 516 of 1456
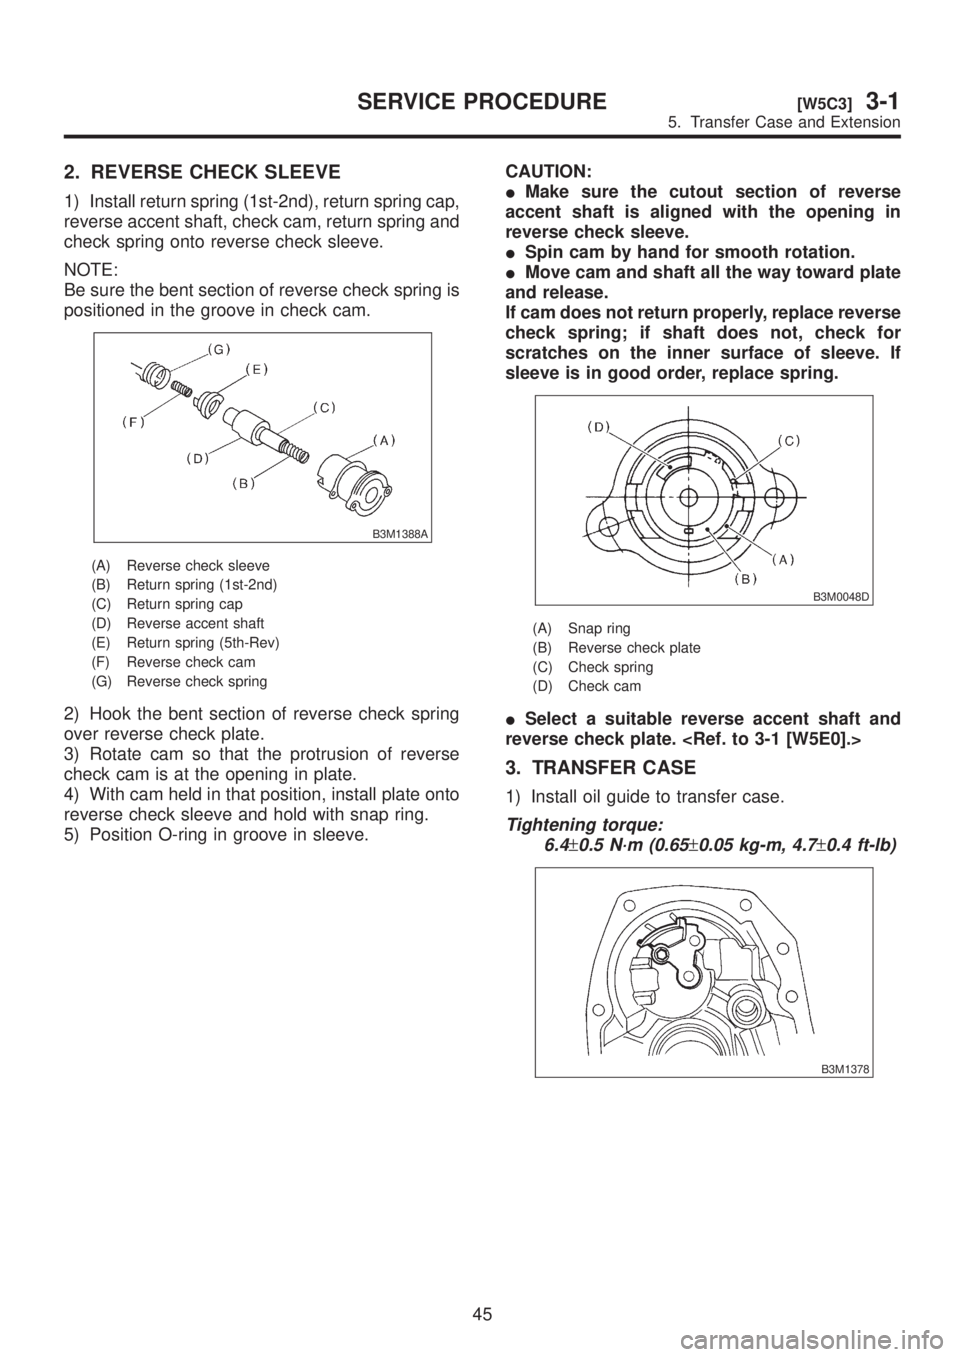
2. REVERSE CHECK SLEEVE
1) Install return spring (1st-2nd), return spring cap,
reverse accent shaft, check cam, return spring and
check spring onto reverse check sleeve.
NOTE:
Be sure the bent section of reverse check spring is
positioned in the groove in check cam.
B3M1388A
(A) Reverse check sleeve
(B) Return spring (1st-2nd)
(C) Return spring cap
(D) Reverse accent shaft
(E) Return spring (5th-Rev)
(F) Reverse check cam
(G) Reverse check spring
2) Hook the bent section of reverse check spring
over reverse check plate.
3) Rotate cam so that the protrusion of reverse
check cam is at the opening in plate.
4) With cam held in that position, install plate onto
reverse check sleeve and hold with snap ring.
5) Position O-ring in groove in sleeve.CAUTION:
IMake sure the cutout section of reverse
accent shaft is aligned with the opening in
reverse check sleeve.
ISpin cam by hand for smooth rotation.
IMove cam and shaft all the way toward plate
and release.
If cam does not return properly, replace reverse
check spring; if shaft does not, check for
scratches on the inner surface of sleeve. If
sleeve is in good order, replace spring.
B3M0048D
(A) Snap ring
(B) Reverse check plate
(C) Check spring
(D) Check cam
ISelect a suitable reverse accent shaft and
reverse check plate.
3. TRANSFER CASE
1) Install oil guide to transfer case.
Tightening torque:
6.4
±0.5 N´m (0.65±0.05 kg-m, 4.7±0.4 ft-lb)
B3M1378
45
[W5C3]3-1SERVICE PROCEDURE
5. Transfer Case and Extension
Page 519 of 1456
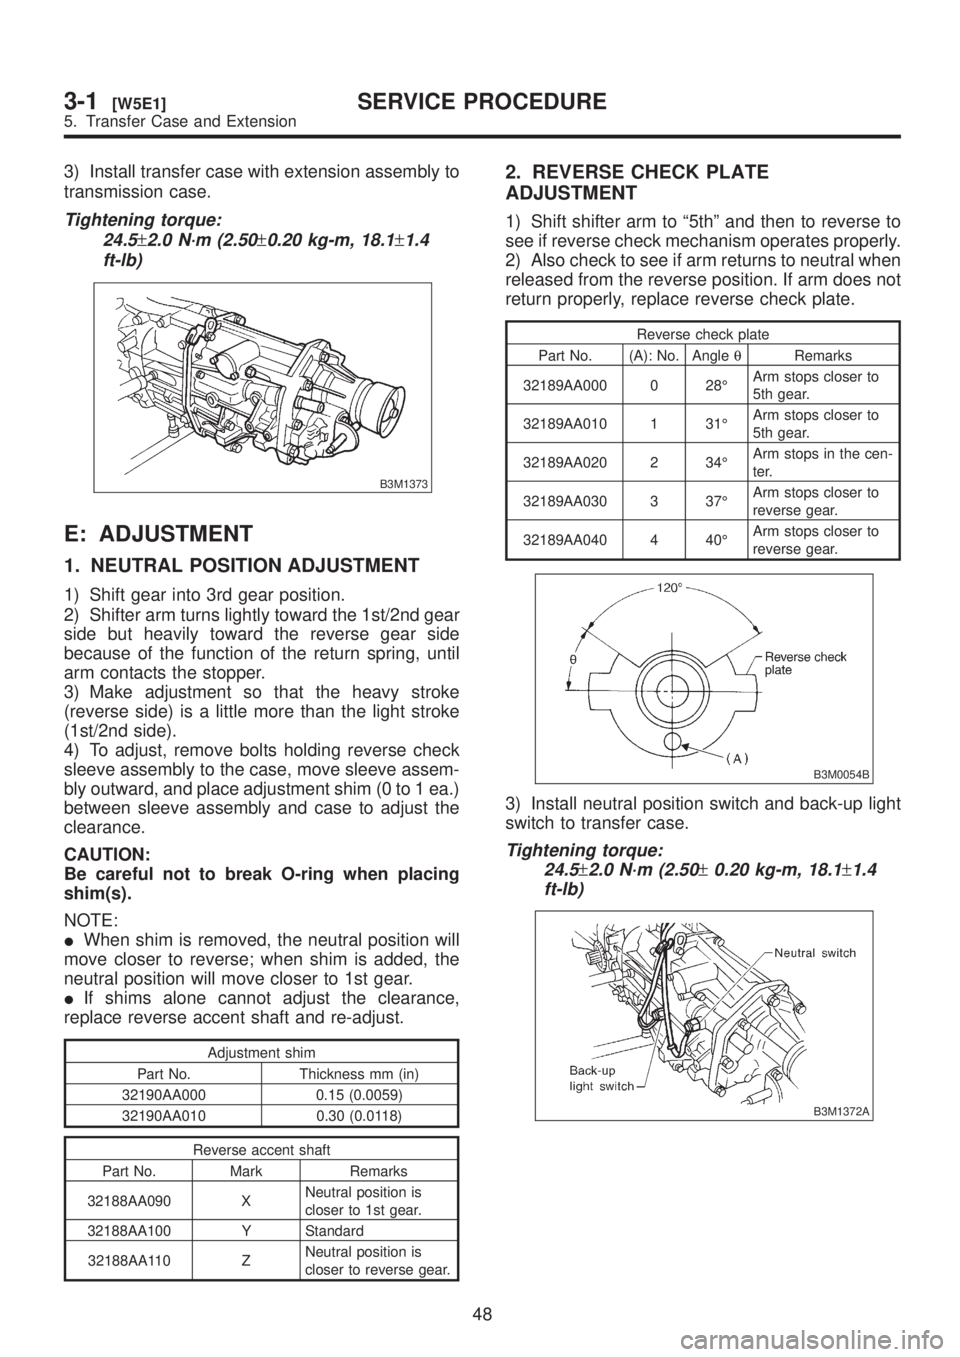
3) Install transfer case with extension assembly to
transmission case.
Tightening torque:
24.5
±2.0 N´m (2.50±0.20 kg-m, 18.1±1.4
ft-lb)
B3M1373
E: ADJUSTMENT
1. NEUTRAL POSITION ADJUSTMENT
1) Shift gear into 3rd gear position.
2) Shifter arm turns lightly toward the 1st/2nd gear
side but heavily toward the reverse gear side
because of the function of the return spring, until
arm contacts the stopper.
3) Make adjustment so that the heavy stroke
(reverse side) is a little more than the light stroke
(1st/2nd side).
4) To adjust, remove bolts holding reverse check
sleeve assembly to the case, move sleeve assem-
bly outward, and place adjustment shim (0 to 1 ea.)
between sleeve assembly and case to adjust the
clearance.
CAUTION:
Be careful not to break O-ring when placing
shim(s).
NOTE:
IWhen shim is removed, the neutral position will
move closer to reverse; when shim is added, the
neutral position will move closer to 1st gear.
IIf shims alone cannot adjust the clearance,
replace reverse accent shaft and re-adjust.
Adjustment shim
Part No. Thickness mm (in)
32190AA000 0.15 (0.0059)
32190AA010 0.30 (0.0118)
Reverse accent shaft
Part No. Mark Remarks
32188AA090 XNeutral position is
closer to 1st gear.
32188AA100 Y Standard
32188AA110 ZNeutral position is
closer to reverse gear.
2. REVERSE CHECK PLATE
ADJUSTMENT
1) Shift shifter arm to ª5thº and then to reverse to
see if reverse check mechanism operates properly.
2) Also check to see if arm returns to neutral when
released from the reverse position. If arm does not
return properly, replace reverse check plate.
Reverse check plate
Part No. (A): No. AngleqRemarks
32189AA000 0 28ÉArm stops closer to
5th gear.
32189AA010 1 31ÉArm stops closer to
5th gear.
32189AA020 2 34ÉArm stops in the cen-
ter.
32189AA030 3 37ÉArm stops closer to
reverse gear.
32189AA040 4 40ÉArm stops closer to
reverse gear.
B3M0054B
3) Install neutral position switch and back-up light
switch to transfer case.
Tightening torque:
24.5
±2.0 N´m (2.50±0.20 kg-m, 18.1±1.4
ft-lb)
B3M1372A
48
3-1[W5E1]SERVICE PROCEDURE
5. Transfer Case and Extension
Page 520 of 1456
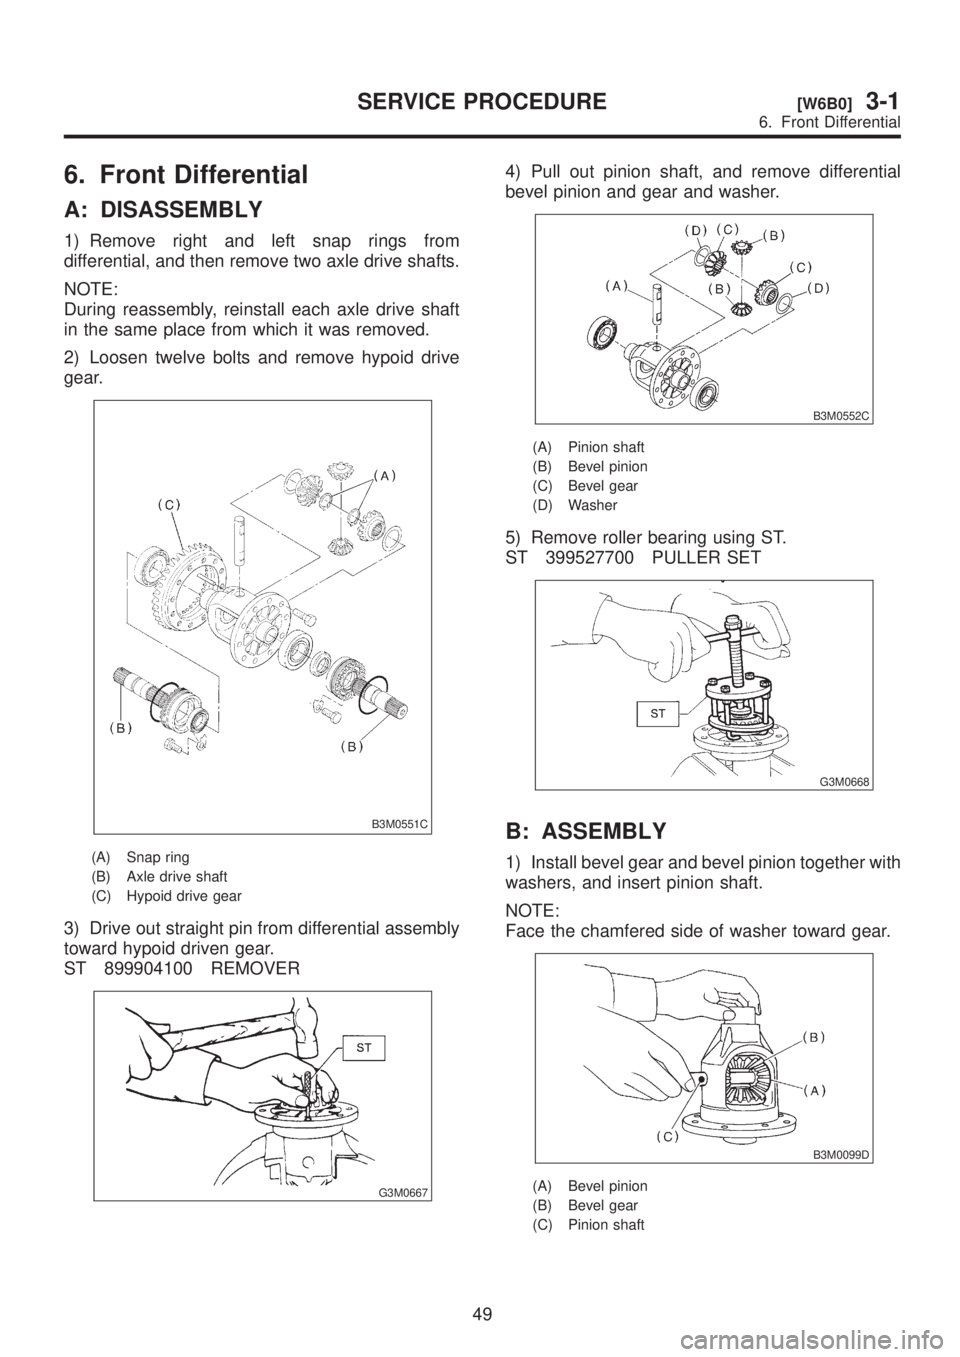
6. Front Differential
A: DISASSEMBLY
1) Remove right and left snap rings from
differential, and then remove two axle drive shafts.
NOTE:
During reassembly, reinstall each axle drive shaft
in the same place from which it was removed.
2) Loosen twelve bolts and remove hypoid drive
gear.
B3M0551C
(A) Snap ring
(B) Axle drive shaft
(C) Hypoid drive gear
3) Drive out straight pin from differential assembly
toward hypoid driven gear.
ST 899904100 REMOVER
G3M0667
4) Pull out pinion shaft, and remove differential
bevel pinion and gear and washer.
B3M0552C
(A) Pinion shaft
(B) Bevel pinion
(C) Bevel gear
(D) Washer
5) Remove roller bearing using ST.
ST 399527700 PULLER SET
G3M0668
B: ASSEMBLY
1) Install bevel gear and bevel pinion together with
washers, and insert pinion shaft.
NOTE:
Face the chamfered side of washer toward gear.
B3M0099D
(A) Bevel pinion
(B) Bevel gear
(C) Pinion shaft
49
[W6B0]3-1SERVICE PROCEDURE
6. Front Differential
Page 587 of 1456
![SUBARU LEGACY 1999 Service Repair Manual Checking item Contact pattern Corrective action
Tooth contact
Tooth contact pattern is slightly shifted
toward to under no-load rotation.
[When loaded, contact pattern moves
toward heel.]
B3M0317A
Ð
SUBARU LEGACY 1999 Service Repair Manual Checking item Contact pattern Corrective action
Tooth contact
Tooth contact pattern is slightly shifted
toward to under no-load rotation.
[When loaded, contact pattern moves
toward heel.]
B3M0317A
Ð](/img/17/57435/w960_57435-586.png)
Checking item Contact pattern Corrective action
Tooth contact
Tooth contact pattern is slightly shifted
toward to under no-load rotation.
[When loaded, contact pattern moves
toward heel.]
B3M0317A
Ð
Face contact
Backlash is too large.This may cause noise and chipping at
tooth ends.
B3M0319
Increase thickness of drive pinion height
adjusting shim in order to bring drive pin-
ion close to crown gear.
B3M0323
Flank contact Backlash is too small. This may cause noise and stepped wear
on surfaces.
B3M0320
Reduce thickness of drive pinion height
adjusting shim in order to move drive
pinion away from crown gear.
B3M0324
Toe contact
(Inside end contact)
Contact areas is small.This may cause chipping at toe.
B3M0321
Adjust as for flank contact.
B3M0324
Heel contact (Outside end contact)
Contact area is small.This may cause chipping at heel ends.
B3M0322
Adjust as for face contact.
B3M0323
: Adjusting direction of drive pinion: Adjusting direction of crown gear
58
3-2[W11C1]SERVICE PROCEDURE
11. Overall Transmission
Page 688 of 1456
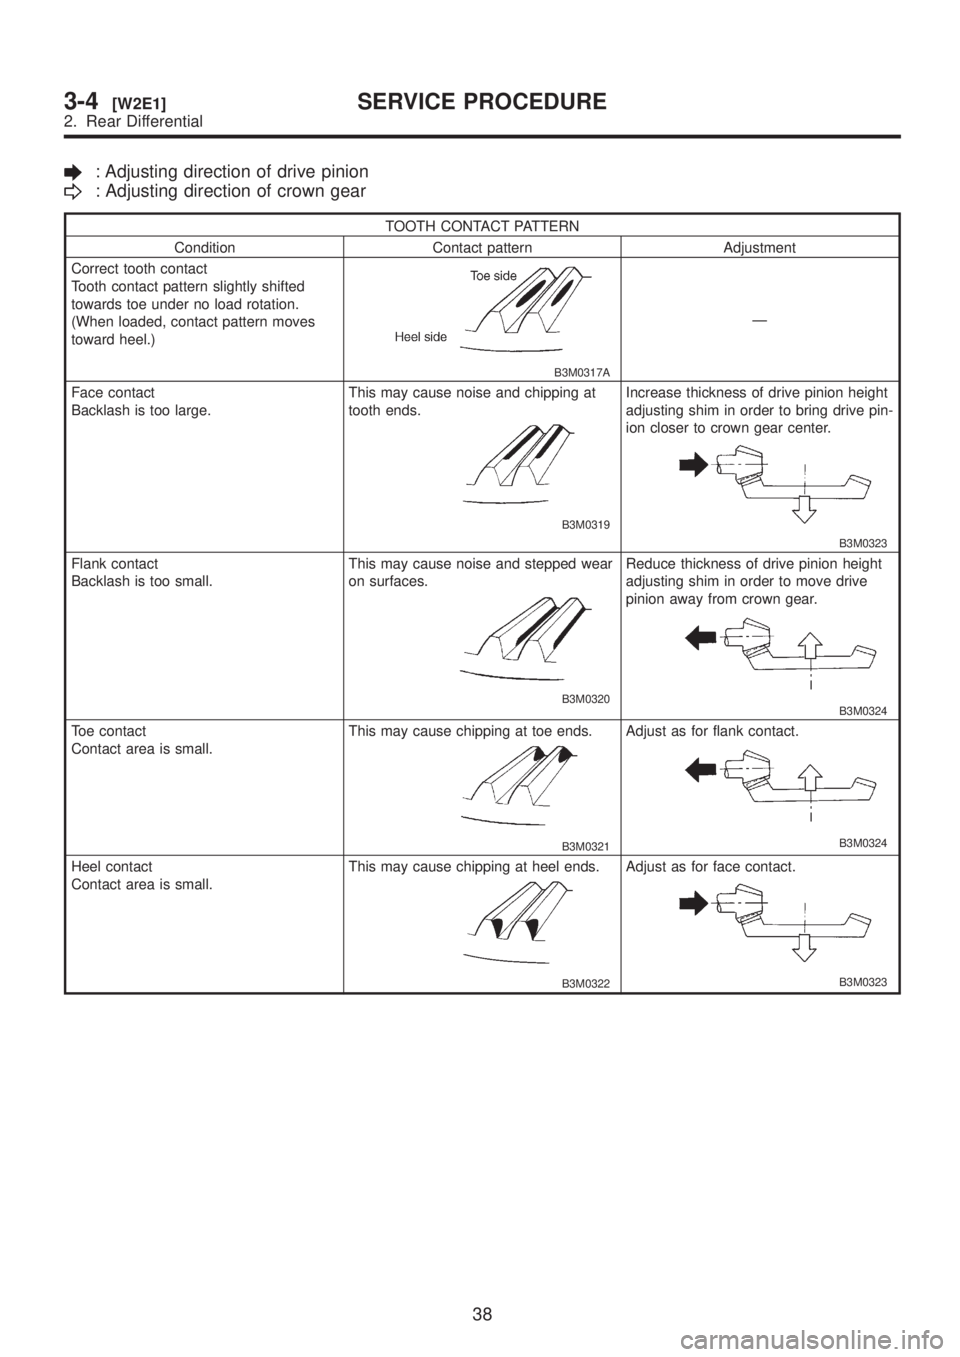
: Adjusting direction of drive pinion
: Adjusting direction of crown gear
TOOTH CONTACT PATTERN
Condition Contact pattern Adjustment
Correct tooth contact
Tooth contact pattern slightly shifted
towards toe under no load rotation.
(When loaded, contact pattern moves
toward heel.)
B3M0317A
Ð
Face contact
Backlash is too large.This may cause noise and chipping at
tooth ends.
B3M0319
Increase thickness of drive pinion height
adjusting shim in order to bring drive pin-
ion closer to crown gear center.
B3M0323
Flank contact
Backlash is too small.This may cause noise and stepped wear
on surfaces.
B3M0320
Reduce thickness of drive pinion height
adjusting shim in order to move drive
pinion away from crown gear.
B3M0324
Toe contact
Contact area is small.This may cause chipping at toe ends.
B3M0321
Adjust as for flank contact.
B3M0324
Heel contact
Contact area is small.This may cause chipping at heel ends.
B3M0322
Adjust as for face contact.
B3M0323
38
3-4[W2E1]SERVICE PROCEDURE
2. Rear Differential