Engine SUBARU LEGACY 2005 4.G Service Manual
[x] Cancel search | Manufacturer: SUBARU, Model Year: 2005, Model line: LEGACY, Model: SUBARU LEGACY 2005 4.GPages: 627, PDF Size: 6.42 MB
Page 332 of 627
6-15
Interior equipment
– CONTINUED –
accessory power outlet. "Do not place any foreign objects, especially
metal ones such as coins or aluminum foil, into
the accessory power outlet. That could cause a
short circuit. Always put the cap on the acces-
sory power outlet when it is not in use. " Use only electrical appliances which are de-
signed for 12V DC and which consume less
than 120W. Overloading the accessory power
outlet can cause a short circuit. Do not use dou-
ble adapters or more than one electrical appli-
ance. " If the plug on your electric appliance is either
too loose or too tight for the accessory power
outlet, this can result in a poor contact or cause
the plug to get stuck. Only use plugs that fit
properly." Use of an electric appliance in the accessory
power outlet for a long period of time while the
engine is not running can cause battery dis-
charge. " Before driving your vehicle, make sure that
the plug and the cord on your electrical appli- ance will not interfere with your shifting gears
and operating the accelerator and brake pedals.
If they do, do not use the electrical appliancewhile driving.
NOTE
When the lid of the center console is closed, a gap
remains between the center console and the lid to
allow the power outlet in the center console to be
used. Pass the electrical appliance’s cord through
this gap.
UB6216BA
Page 335 of 627
6-18
Interior equipment
To use the cigarette lighter, push in the knob and wait
a few moments. It will automatically spring up when
ready for use.
To avoid being burned, never grasp the lighter
by the end with the heating element. Doing so
could result in injury and could also damage
the heating element.
Do not hold the lighter pushed in, because it
will overheat.
! Using as an accessory power outlet
Electrical power (12V DC) from the battery is available
at the socket when the ignition switch is either in the
“ACC” or “ON” position.
If you use the socket as an accessory power outlet,
take the following precautions.
When the socket is not in use, always put the cap on
the socket to prevent any foreign object from enteringit.
" Use only in-car use electrical appliances
which are designed for 12V DC and which con-
sume less than 120W. Overloading the socket
can cause a short circuit. Do not use double
adapters or more than one electrical appliance. " If the plug on your electric appliance is either
too loose or too tight for the socket, this can re-
sult in a poor contact or cause the plug to get
stuck. Only use plugs that fit properly. " Use of an electric appliance in the socket for
a long period of time while the engine is not
running can cause battery discharge. " Before driving your vehicle, make sure that
the plug and the cord on your electrical appli-
ance will not interfere with your shifting gears
and operating the accelerator and brake pedals.
If they do, do not use the electrical appliance
while driving.
If the socket has been used for electrical appliances,
damage may have been done to the internal mecha-
nism that causes a cigarette lighter to “pop out” after
its element has been heated. For that reason, a ciga-
rette lighter, even if it is a genuine part, should not be
Page 356 of 627

7-1
7
Starting and operating
Fuel ................................................................ 7-2 Fuel requirements ............................................. 7-2
Fuel filler lid and cap ........................................ 7-4
State emission testing (U.S. only) ............... 7-8
Preparing to drive ......................................... 7-10
Starting the engine ....................................... 7-10 Manual transmission vehicle ........................... 7-10
Automatic transmission vehicle ...................... 7-11
Stopping the engine ..................................... 7-12
Manual transmission .................................... 7-13 Shifting speeds ................................................. 7-14
Driving tips ........................................................ 7-15
Automatic transmission – 4 speed ............. 7-16 Selector lever .................................................... 7-17
Selector lever reverse inhibiting function ...... 7-19
Selection of manual mode ............................... 7-20
Maximum speeds .............................................. 7-21
Driving tips ........................................................ 7-23
SPORT mode ..................................................... 7-23
Shift lock release .............................................. 7-24
Automatic transmission – 5 speed ............. 7-25 Selector lever .................................................... 7-26
Selector lever reverse inhibiting function ...... 7-28
Selection of manual mode ............................... 7-30
Maximum speeds .............................................. 7-32
Driving tips ........................................................ 7-33
SPORT mode ..................................................... 7-34
Shift lock release .............................................. 7-35
Rear viscous limited slip differential (LSD) (if equipped) .............................................. 7-36 Power steering .............................................. 7-36
Braking ........................................................... 7-37
Braking tips ....................................................... 7-37
Brake system .................................................... 7-37
Disc brake pad wear warning indicators ........ 7-38
ABS (Anti-lock Brake System) ..................... 7-38 ABS system self-check .................................... 7-39
ABS warning light ............................................. 7-39
Electronic Brake Force Distribution (EBD) system ........................................................ 7-41Steps to take if EBD system fails .................... 7-41
Vehicle Dynamics Control system (if equipped) ............................................... 7-43Vehicle Dynamics Control system monitor .... 7-45
Vehicle Dynamics Control OFF switch ........... 7-48
Tire pressure monitoring system (TPMS) (if equipped) ............................................... 7-49
Parking your vehicle ..................................... 7-51
Cruise control ................................................ 7-53 To set cruise control ........................................ 7-53
To temporarily cancel the cruise control ....... 7-55
To turn off the cruise control ........................... 7-56
To change the cruising speed ......................... 7-56
Cruise control indicator light ........................... 7-57
Cruise control set indicator light .................... 7-58
Page 357 of 627
7-2
Starting and operating
Starting and operatingFuel
Use of a fuel which is low in quality or use of an
inappropriate fuel additive may cause engine
damage.
! Fuel requirements
! 2.5-liter non-turbo models
The 2.5-liter non-turbo engine is designed to operate
using unleaded gasoline with an octane rating of 87
AKI or higher. ! 2.5-liter turbo models and 3.0-liter models
The 2.5-liter turbo engine and 3.0-liter engine are de-
signed to operate using premium unleaded gasoline
with an octane rating of 91 AKI or higher. If premium
unleaded gasoline is not available, regular unleaded
gasoline with an octane rating of 87 AKI or higher may
be temporarily used.
For optimum engine performance and driveability, it is
required (for 2.5-liter turbo models), and recommend-
ed (for 3.0-liter models) that you use premium grade
unleaded gasoline.
NOTE
Be sure to use premium unleaded gasoline of 91
AKI or higher for a 2.5-liter turbo engine model. If
other gasoline (lower than 91 AKI) is used, knock-
ing, reduced output and poor accelerator re-
sponse will result. ! Fuel octane rating
This octane rating is the average of the Research Oc-
tane and Motor Octane numbers and is commonly re-
ferred to as the Anti Knock Index (AKI).
Using a gasoline with a lower octane rating can cause
persistent and heavy knocking, which can damage the
engine. Do not be concerned if your vehicle some-
times knocks lightly when you drive up a hill or when
you accelerate. See your dealer or a qualified service
technician if you use a fuel with the specified octane
rating and your vehicle knocks heavily or persistently. ! Unleaded gasoline
The neck of the fuel filler pipe is designed to accept
only an unleaded gasoline filler nozzle. Under no cir-
cumstances should leaded gasoline be used because
it will damage the emission control system and may
impair driveability and fuel economy. ! California fuel
If your vehicle was certified to California Emission
Page 358 of 627
7-3
Starting and operating
– CONTINUED –
Standards as indicated on the underhood tune-up la-
bel. It is designed to optimize engine and emission
control system performance with gasoline that meets
the clean burning low-sulfur California gasoline speci-
fications. If you live in any other state than California,
your vehicle will operate on gasoline meeting Federal
specifications. Gasoline sold outside California is per-
mitted to have higher sulfur levels, which may affect
the performance of your vehicle’s catalytic converter
and may produce a sulfur exhaust odor or smell. SUB-
ARU recommends that you try a different brand of un-
leaded gasoline having lower sulfur to determine if the
problem is fuel related before returning your vehicle to
an authorized dealer for service. The CHECK EN-
GINE warning light/Malfunction indicator lamp may
also turn on. If this occurs, return to your authorized
SUBARU dealer for diagnosis. If it is determined that
the condition is caused by the type of fuel used, re-
pairs may not be covered by your warranty. !MMT
Some gasoline contains an octane-enhancing additive
called MMT (Methylcyclopentadienyl Manganese Tri-
carbonyl). If you use such fuels, your emission control
system performance may deteriorate and the CHECK
ENGINE warning light/Malfunction indicator lamp may
turn on. If this happens, return to your authorized
SUBARU Dealer for service. If it is determined that the condition is caused by the type of fuel used, repairs
may not be covered by your warranty. !
Gasoline for cleaner air
Do not let fuel spill on the exterior surfaces of
the vehicle. Fuels containing alcohol may
cause paint damage, which is not covered un-
der the SUBARU Limited Warranty.
Your use of gasoline with detergent additives will help
prevent deposits from forming in your engine and fuel
system. This helps keep your engine in tune and your
emission control system working properly, and is a
way of doing your part for cleaner air. If you continu-
ously use a high quality fuel with the proper detergent
and other additives, you should never need to add any
fuel system cleaning agents to your fuel tank.
Many gasolines are now blended with materials called
oxygenates. Use of these fuels can also help keep the
air cleaner. Oxygenated blend fuels, such as MTBE
(Methyl Tertiary Butyl ether) or ethanol (ethyl or grain
alcohol) may be used in your vehicle, but should con-
tain no more than 15% MTBE or 10% ethanol for the
proper operation of your SUBARU.
Page 361 of 627
7-6
Starting and operating
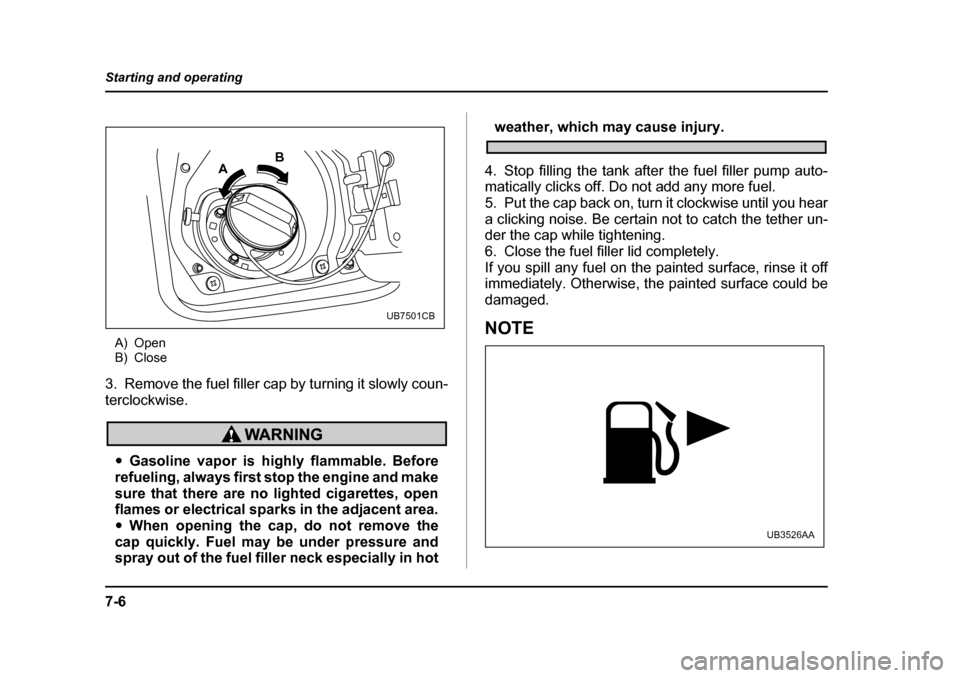
A) Open
B) Close
3. Remove the fuel filler cap by turning it slowly coun-
terclockwise.
" Gasoline vapor is highly flammable. Before
refueling, always first stop the engine and make
sure that there are no lighted cigarettes, open
flames or electrical sparks in the adjacent area. " When opening the cap, do not remove the
cap quickly. Fuel may be under pressure and
spray out of the fuel filler neck especially in hot
weather, which may cause injury.
4. Stop filling the tank after the fuel filler pump auto-
matically clicks off. Do not add any more fuel.
5. Put the cap back on, turn it clockwise until you hear
a clicking noise. Be certain not to catch the tether un-
der the cap while tightening.
6. Close the fuel filler lid completely.
If you spill any fuel on the painted surface, rinse it off
immediately. Otherwise, the painted surface could be
damaged.
NOTE
A B
UB7501CB
UB3526AA
Page 362 of 627
7-7
Starting and operating
– CONTINUED –
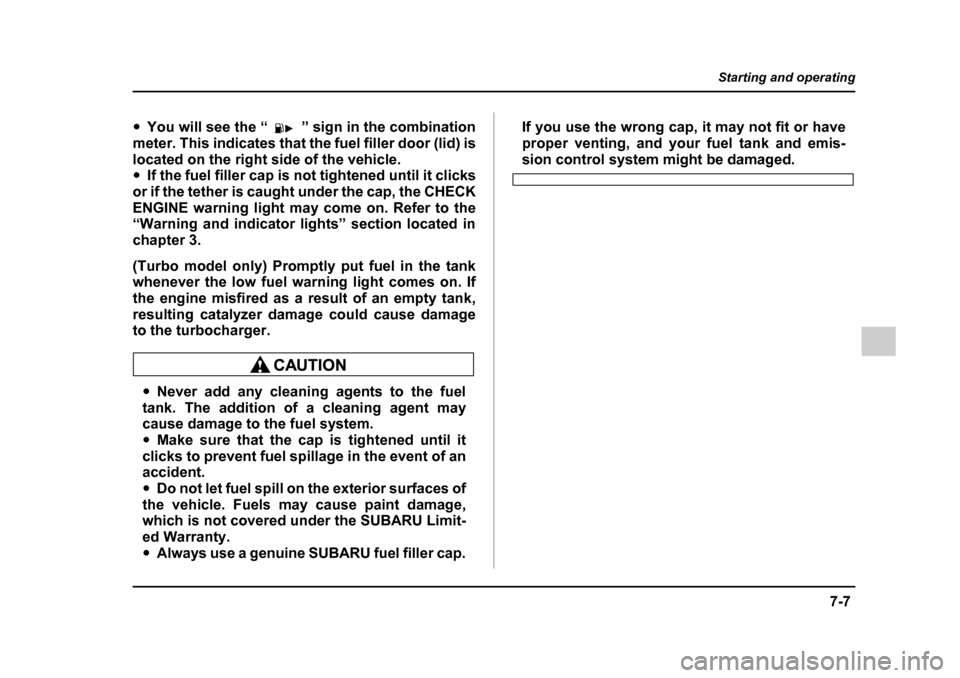
"You will see the “ ” sign in the combination
meter. This indicates that the fuel filler door (lid) is
located on the right side of the vehicle. " If the fuel filler cap is not tightened until it clicks
or if the tether is caught under the cap, the CHECK
ENGINE warning light may come on. Refer to the
“Warning and indicator lights” section located in
chapter 3.
(Turbo model only) Promptly put fuel in the tank
whenever the low fuel warning light comes on. If
the engine misfired as a result of an empty tank,
resulting catalyzer damage could cause damage
to the turbocharger.
" Never add any cleaning agents to the fuel
tank. The addition of a cleaning agent may
cause damage to the fuel system. " Make sure that the cap is tightened until it
clicks to prevent fuel spillage in the event of an
accident. " Do not let fuel spill on the exterior surfaces of
the vehicle. Fuels may cause paint damage,
which is not covered under the SUBARU Limit-
ed Warranty." Always use a genuine SUBARU fuel filler cap. If you use the wrong cap, it may not fit or have
proper venting, and your fuel tank and emis-
sion control system might be damaged.
Page 364 of 627

7-9
Starting and operating
– CONTINUED –
jacked off the ground, nor should the driveshaft be dis-
connected for state emission testing.
The EPA has issued regulations for inspecting the On-
Board Diagnostic (OBD) system as part of the state
emissions inspection. The OBD system is designed to
detect engine and transmission problems that might
cause vehicle emissions to exceed allowable limits.
These inspections apply to all 1996 model year and
newer passenger cars and light trucks. About 30
states plus the District of Columbia have implemented
the OBD system inspection. "The inspection of the OBD system consists of a vi-
sual operational check of the “ CHECK ENGINE” warn-
ing light/malfunction indicator lamp (MIL) and an ex-
amination of the OBD system with an electronic scan
tool while the engine is running. " A vehicle passes
the OBD system inspection if
proper the “ CHECK ENGINE ” warning light/MIL illumi-
nation is observed, there is no stored diagnostic trou-
ble codes, and the OBD system readiness monitors
are complete. " A vehicle fails
the OBD inspection if the “ CHECK
ENGINE ” warning light/MIL is not properly operating
or there is one or more diagnostic trouble codes stored
in vehicle’s computer with the “ CHECK ENGINE”
warning light/MIL illuminated. "
A state emission inspection may reject (not pass or
fail) a vehicle if the number of OBD system readiness monitors “ Not Ready ” is greater than three. Under this
condition, the vehicle operator should be instructed to
drive his/her vehicle for a few days to set the monitors
and return for an emission re-inspection. " Owners of rejected or failing vehicles should contact
their SUBARU Dealer for service.
Page 365 of 627
7-10
Starting and operating
Preparing to drive
You should perform the following checks and adjust-
ments every day before you start driving.
1. Check that all windows, mirrors, and lights are
clean and unobstructed.
2. Check the appearance and condition of the tires.
Also check tires for proper inflation.
3. Look under the vehicle for any sign of leaks.
4. Check that the hood, trunk and rear gate are fullyclosed.
5. Check the adjustment of the seat.
6. Check the adjustment of the inside and outside mir-rors.
7. Fasten your seatbelt. Check that your passengers
have fastened their seatbelts.
8. Check the operation of the warning and indicator
lights when the ignition switch is turned to the “ON” po- sition.
9. Check the gauges, indicator and warning lights af-
ter starting the engine.
NOTE
Engine oil, engine coolant, brake fluid, washer flu-
id and other fluid levels should be checked daily,
weekly or at fuel stops.
Starting the engine
Do not operate the starter motor continuously
for more than ten seconds. If the engine fails to
start after operating the starter for five to ten
seconds, wait for ten seconds or more before
trying again.
! Manual transmission vehicle
1. Apply the parking brake.
2. Turn off unnecessary lights and accessories.
3. Press the clutch pedal to the floor and shift the shift
lever into neutral.
Hold the clutch pedal to the floor while starting the en-
gine. The starter motor will only operate when the
clutch pedal is pressed fully to the floor.
4. Turn the ignition switch to the “ON” position and
check the operation of the warning and indicator lights.
Refer to the “Warning and indicator lights” section
(chapter 3).
5. Turn the ignition switch to the “START” position
without depressing the accelerator pedal. Release
the key immediately after the engine has started.
Page 366 of 627
7-11
Starting and operating
– CONTINUED –
If the engine does not start, try the following:
1) Turn the ignition switch to the “OFF” position and
wait for at least 10 seconds. After checking that the
parking brake is firmly set, turn the ignition switch to
the “START” position while depressing the acceler-
ator pedal slightly (about a quarter of the full stroke).
Release the accelerator pedal as soon as the en-
gine starts.
2) If this fails to start the engine, turn the ignition
switch back to the “OFF” position and wait for at
least 10 seconds. Then fully depress the accelerator
pedal and turn the ignition switch to the “START”
position. If the engine starts, quickly release the ac-
celerator pedal.
3) If this fails to start the engine, turn the ignition
switch again to the “OFF” position. After waiting for
10 seconds or longer, turn the ignition switch to the
“START” position without depressing the accelera-
tor pedal.
4) If the engine still refuses to start, contact your
nearest SUBARU dealer for assistance.
6. Confirm that all warning and indicator lights have
gone off after the engine has started. The fuel injection
system automatically lowers the idle speed as the en-
gine warms up. !
Automatic transmission vehicle
If you restart the engine while the vehicle is
moving, shift the selector lever into the “N” po-
sition. Do not attempt to place the selector lever
of a moving vehicle into the “P” position.
1. Apply the parking brake.
2. Turn off unnecessary lights and accessories.
3. Shift the selector lever to the “P” or “N” position
(preferably “P” position). The starter will only operate
when the select lever is at the “P” or “N” position.
4. Turn the ignition switch to the “ON” position and
check the operation of the warning and indicator lights.
Refer to the “Warning and indicator lights” section (chapter 3).
5. Turn the ignition switch to the “START” position
without depressing the accelerator pedal. Release
the key immediately after the engine has started.
If the engine does not start, try the following: 1) Turn the ignition switch to the “OFF” position and
wait for at least 10 seconds. After checking that the
parking brake is firmly set, turn the ignition switch to
the “START” position while depressing the acceler-
ator pedal slightly (about a quarter of the full stroke).