transmission oil SUBARU LEGACY 2005 4.G Owners Manual
[x] Cancel search | Manufacturer: SUBARU, Model Year: 2005, Model line: LEGACY, Model: SUBARU LEGACY 2005 4.GPages: 627, PDF Size: 6.42 MB
Page 198 of 627
3-27
Instruments and controls
– CONTINUED –
lubricating system is not working properly.
If the light comes on while driving or does not go out
after the engine starts, stop the engine at the first safe
opportunity and check the engine oil level. If the oil lev-
el is low, add oil immediately. If the engine oil is at the
proper level but the light remains on, contact your
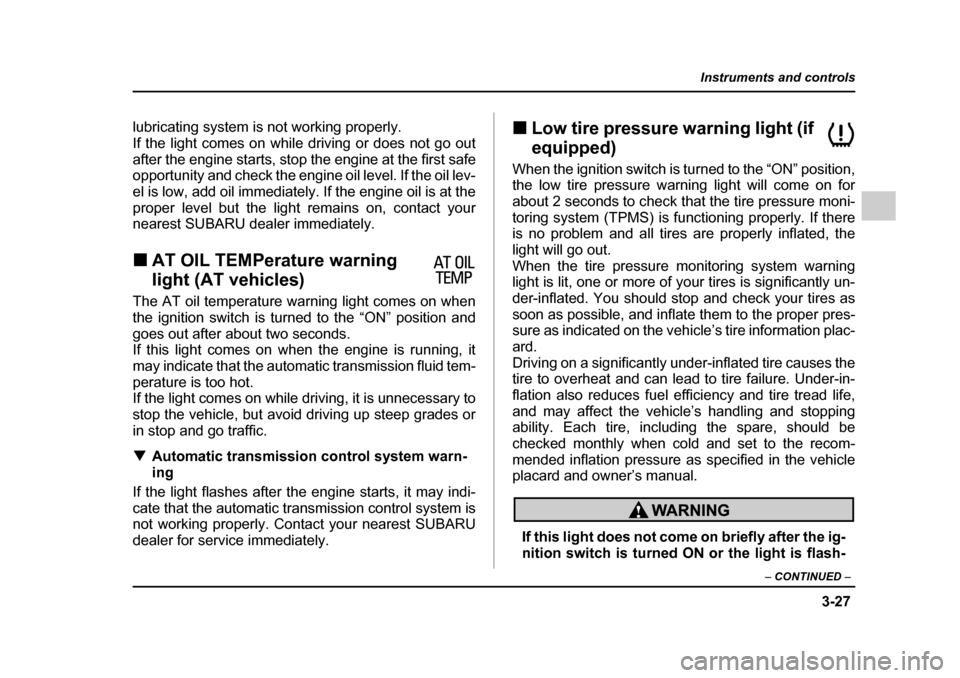
nearest SUBARU dealer immediately. !AT OIL TEMPerature warning
light (AT vehicles)
The AT oil temperature warning light comes on when
the ignition switch is turned to the “ON” position and
goes out after about two seconds.
If this light comes on when the engine is running, it
may indicate that the automatic transmission fluid tem-
perature is too hot.
If the light comes on while driving, it is unnecessary to
stop the vehicle, but avoid driving up steep grades or
in stop and go traffic. ! Automatic transmission control system warn- ing
If the light flashes after the engine starts, it may indi-cate that the automatic transmission control system is
not working properly. Contact your nearest SUBARU
dealer for service immediately. !
Low tire pressure warning light (if
equipped)
When the ignition switch is turned to the “ON” position,
the low tire pressure warning light will come on for
about 2 seconds to check that the tire pressure moni-
toring system (TPMS) is functioning properly. If there
is no problem and all tires are properly inflated, the
light will go out.
When the tire pressure monitoring system warning
light is lit, one or more of your tires is significantly un-
der-inflated. You should stop and check your tires as
soon as possible, and inflate them to the proper pres-
sure as indicated on the vehicle’s tire information plac- ard.
Driving on a significantly under-inflated tire causes the
tire to overheat and can lead to tire failure. Under-in-
flation also reduces fuel efficiency and tire tread life,
and may affect the vehicle’s handling and stopping
ability. Each tire, including the spare, should be
checked monthly when cold and set to the recom-
mended inflation pressure as specified in the vehicle
placard and owner’s manual.
If this light does not come on briefly after the ig-
nition switch is turned ON or the light is flash-
Page 365 of 627
7-10
Starting and operating
Preparing to drive
You should perform the following checks and adjust-
ments every day before you start driving.
1. Check that all windows, mirrors, and lights are
clean and unobstructed.
2. Check the appearance and condition of the tires.
Also check tires for proper inflation.
3. Look under the vehicle for any sign of leaks.
4. Check that the hood, trunk and rear gate are fullyclosed.
5. Check the adjustment of the seat.
6. Check the adjustment of the inside and outside mir-rors.
7. Fasten your seatbelt. Check that your passengers
have fastened their seatbelts.
8. Check the operation of the warning and indicator
lights when the ignition switch is turned to the “ON” po- sition.
9. Check the gauges, indicator and warning lights af-
ter starting the engine.
NOTE
Engine oil, engine coolant, brake fluid, washer flu-
id and other fluid levels should be checked daily,
weekly or at fuel stops.
Starting the engine
Do not operate the starter motor continuously
for more than ten seconds. If the engine fails to
start after operating the starter for five to ten
seconds, wait for ten seconds or more before
trying again.
! Manual transmission vehicle
1. Apply the parking brake.
2. Turn off unnecessary lights and accessories.
3. Press the clutch pedal to the floor and shift the shift
lever into neutral.
Hold the clutch pedal to the floor while starting the en-
gine. The starter motor will only operate when the
clutch pedal is pressed fully to the floor.
4. Turn the ignition switch to the “ON” position and
check the operation of the warning and indicator lights.
Refer to the “Warning and indicator lights” section
(chapter 3).
5. Turn the ignition switch to the “START” position
without depressing the accelerator pedal. Release
the key immediately after the engine has started.
Page 376 of 627
7-21
Starting and operating
– CONTINUED –
goes off.
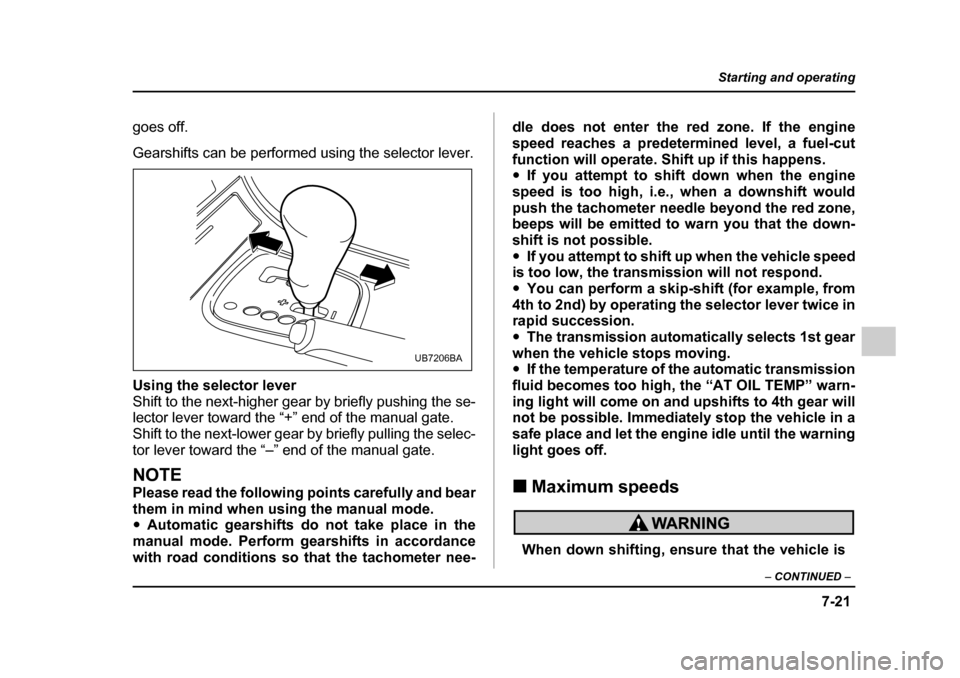
Gearshifts can be performed using the selector lever.
Using the selector lever
Shift to the next-higher gear by briefly pushing the se-
lector lever toward the “+” end of the manual gate.
Shift to the next-lower gear by briefly pulling the selec-
tor lever toward the “–” end of the manual gate.
NOTE
Please read the following points carefully and bear
them in mind when using the manual mode. "Automatic gearshifts do not take place in the
manual mode. Perform gearshifts in accordance
with road conditions so that the tachometer nee- dle does not enter the red zone. If the engine
speed reaches a predetermined level, a fuel-cut
function will operate. Shift up if this happens. "
If you attempt to shift down when the engine
speed is too high, i.e., when a downshift would
push the tachometer needle beyond the red zone,
beeps will be emitted to warn you that the down-
shift is not possible." If you attempt to shift up when the vehicle speed
is too low, the transmission will not respond." You can perform a skip-shift (for example, from
4th to 2nd) by operating the selector lever twice in
rapid succession. " The transmission automatically selects 1st gear
when the vehicle stops moving. " If the temperature of the automatic transmission
fluid becomes too high, the “AT OIL TEMP” warn-
ing light will come on and upshifts to 4th gear will
not be possible. Immediately stop the vehicle in a
safe place and let the engine idle until the warning
light goes off. ! Maximum speeds
When down shifting, ensure that the vehicle is
UB7206BA
Page 387 of 627
7-32
Starting and operating
If you subsequently ease off the accelerator pedal and
then accelerate again, the transmission will automati-
cally switch back from manual mode to normal mode.
NOTE
Please read the following points carefully and bear
them in mind when using the manual mode. "
When the temperature of the automatic trans-
mission fluid is higher than normal, warning
beeps are emitted and the shift position indicator
shows “–”. If these warnings are issued, deselect
the manual mode to protect the automatic trans-
mission from damage. " When the temperature of the engine oil is higher
than normal, warning beeps are emitted and the
shift position indicator shows “–”. If these warn-
ings are issued, deselect the manual mode to pro-
tect the engine from damage. (3.0-liter models
only) " Automatic gearshifts do not take place in the
manual mode. Perform gearshifts in accordance
with road conditions so that the tachometer nee-
dle does not enter the red zone. If the engine
speed reaches a predetermined level, a fuel-cut
function will operate. Shift up if this happens. " If you attempt to shift down when the engine
speed is too high, i.e., when a downshift would
push the tachometer needle beyond the red zone, beeps will be emitted to warn you that the down-
shift is not possible."
If you attempt to shift up when the vehicle speed
is too low, the transmission will not respond." You can perform a skip-shift (for example, from
4th to 2nd) by operating the selector lever or a
steering-wheel switch twice in rapid succession. " The transmission automatically selects 1st gear
when the vehicle stops moving. " If the temperature of the automatic transmission
fluid becomes too high, the “AT OIL TEMP” warn-
ing light will come on and upshifts to 5th gear will
not be possible. Immediately stop the vehicle in a
safe place and let the engine idle until the warning
light goes off. ! Maximum speeds
When down shifting, ensure that the vehicle is
not travelling at a speed exceeding the Maxi-
mum Allowable Speed for the gear which is
about to be selected. Failure to observe this
precaution can lead to engine over-revving and
this in turn can result in engine damage.
In addition, sudden application of engine brak-
Page 424 of 627

8-11
Driving tips
– CONTINUED –
"Always check your brakes for effectiveness immedi-
ately after driving in sand, mud or water. Do this by
driving slowly and stepping on the brake pedal. Re-
peat that process several times to dry out the brake
discs and brake pads." Do not drive or park over or near flammable materi-
als such as dry grass or fallen leaves, as they may
burn easily. The exhaust system is very hot while the
engine is running and right after engine stops. This
could create a fire hazard. " After driving through tall grass, mud, rocks, sand,
rivers, etc., check that there is no grass, bush, paper,
rags, stones, sand, etc. adhering to or trapped on the
underbody. Clear off any such matter from the under-
body. If the vehicle is used with these materials
trapped or adhering to the underbody, a mechanical
breakdown or fire could occur." Secure all cargo carried inside the vehicle and make
certain that it is not piled higher than the seatbacks.
During sudden stops or jolts, unsecured cargo could
be thrown around in the vehicle and cause injury. Do
not pile heavy loads on the roof. Those loads raise the
vehicle’s center of gravity and make it more prone to
tip over. " If you must rock the vehicle to free it from sand or
mud, depress the accelerator pedal slightly and move
the selector lever back and forth between “D” and “R” repeatedly. Do not race the engine. For the best pos-
sible traction, avoid spinning the wheels when trying to
free the vehicle. "
When the road surface is extremely slippery, you
can obtain better traction by starting the vehicle with
the transmission in 2nd than 1st (both for MT and AT). " Never equip your vehicle with tires larger than those
specified in this manual. " Wash the vehicle’s underbody after off-road driving.
Suspension components are particularly prone to dirt
buildup, so they need to be washed thoroughly." Frequent driving of an AWD vehicle under hard-driv-
ing conditions such as rough roads or off roads will ne-
cessitate more frequent replacement of engine oil,
brake fluid and transmission oil than that specified in
the maintenance schedule described in the “Warranty
and Maintenance Booklet”.
Remember that damage done to your SUBARU while
operating it off-road and not using common sense pre-
cautions such as those listed above is not eligible forwarranty coverage.
Page 455 of 627

8-42
Driving tips
!
Driving on grades
" Before going down a steep hill, slow down and shift
into lower gear (if necessary, use 1st gear) in order to
utilize the engine braking effect and prevent overheat-
ing of your vehicle’s brakes. Do not make sudden
downshifts." When driving uphill in hot weather, the air condition-
er may turn off automatically to protect the engine from
overheating." When driving uphill in hot weather, pay attention to
the water temperature gauge pointer (for all vehicles)
and AT OIL TEMP warning light (for AT vehicles) since
the engine and transmission are relatively prone to
overheating under these conditions. If the water tem-
perature gauge pointer approaches the OVERHEAT
zone or the AT OIL TEMP warning light illuminates,
immediately switch off the air conditioner and stop the
vehicle at the nearest safe place. Refer to the “Engine
overheating” section in chapter 9, and “Warning and
indicator lights” section in chapter 3.
NOTE
With AT vehicles, the temperature of engine cool-
ant is less likely to rise to the OVERHEAT zone in
the “D” position than in the manual mode position. " If your vehicle has an automatic transmission, avoid
using the accelerator pedal to stay stationary on an uphill slope instead of using the parking brake or foot
brake. That may cause the transmission fluid to over-
heat. !
Parking on a grade
Always block the wheels under both vehicle and trailer
when parking. Apply the parking brake firmly. You
should not park on a hill or slope. But if parking on a
hill or slope cannot be avoided, you should take the
following steps:
1. Apply the brakes and hold the pedal down.
2. Have someone place wheel blocks under both the
vehicle and trailer wheels.
3. When the wheel blocks are in place, release the
regular brakes slowly until the blocks absorb the load.
4. Apply the regular brakes and then apply the park-
ing brake; slowly release the regular brakes.
5. Shift into 1st or reverse gear (manual transmission)
or “P” (automatic transmission) and shut off the en-
gine.
Page 483 of 627
9-28
In case of emergency
!
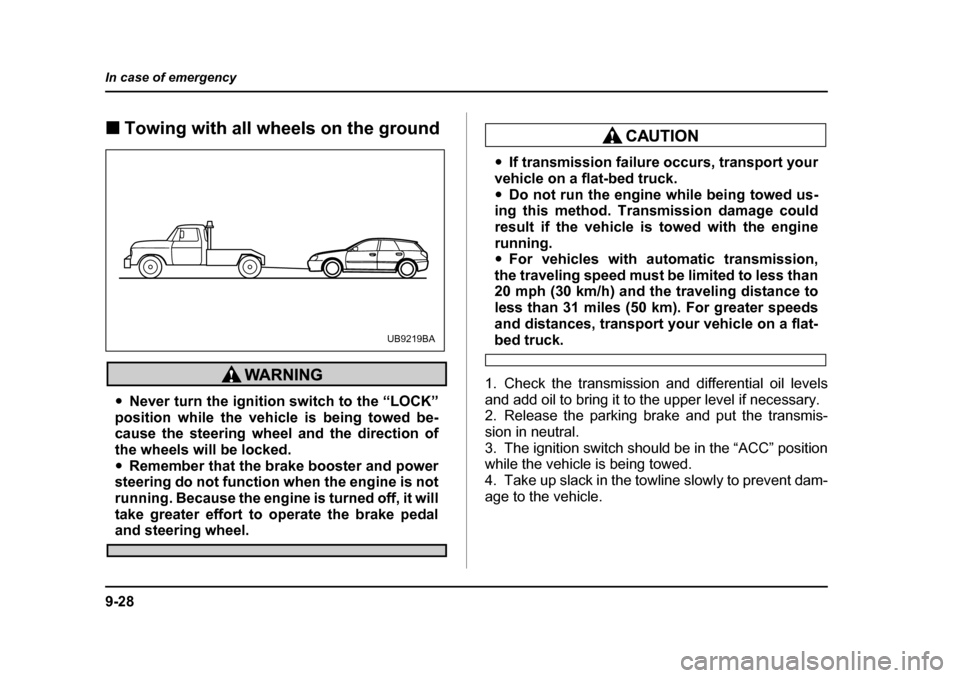
Towing with all wheels on the ground
"Never turn the ignition switch to the “LOCK”
position while the vehicle is being towed be-
cause the steering wheel and the direction of
the wheels will be locked." Remember that the brake booster and power
steering do not function when the engine is not
running. Because the engine is turned off, it will
take greater effort to operate the brake pedal
and steering wheel.
" If transmission failure occurs, transport your
vehicle on a flat-bed truck. " Do not run the engine while being towed us-
ing this method. Transmission damage could
result if the vehicle is towed with the engine
running. " For vehicles with automatic transmission,
the traveling speed must be limited to less than
20 mph (30 km/h) and the traveling distance to
less than 31 miles (50 km). For greater speeds
and distances, transport your vehicle on a flat-
bed truck.
1. Check the transmission and differential oil levels
and add oil to bring it to the upper level if necessary.
2. Release the parking brake and put the transmis-
sion in neutral.
3. The ignition switch should be in the “ACC” position
while the vehicle is being towed.
4. Take up slack in the towline slowly to prevent dam-
age to the vehicle.UB9219BA
Page 500 of 627

11 - 1
11
Maintenance and service
Maintenance schedule ................................. 11-3
Maintenance precautions ............................ 11-3 Before checking or servicing in the engine compartment .................................................. 11-4
When you do checking or servicing in the engine compartment while the engine is
running ............................................................ 11-5
Engine hood .................................................. 11-5
Engine compartment overview ................... 11-8 2.5-liter non-turbo models ................................ 11-8
2.5-liter non-turbo California-spec. models .... 11-9
2.5-liter turbo models ....................................... 11-10
3.0-liter models .................................................. 11-11
Engine oil ...................................................... 11-12 Checking the oil level ....................................... 11-12
Changing the oil and oil filter .......................... 11-13
Recommended grade and viscosity ................ 11-16
Recommended grade and viscosity under severe driving conditions .............................. 11-17
Cooling system ............................................. 11-18 Hose and connections ...................................... 11-19
Engine coolant .................................................. 11-19
Air cleaner element ...................................... 11-24 Replacing the air cleaner element ................... 11-24
Spark plugs ................................................... 11-29 Recommended spark plugs ............................. 11-29
Drive belts ..................................................... 11-30 2.5-liter models .................................................. 11-30
3.0-liter models .................................................. 11-30
Manual transmission oil ............................... 11-31 Checking the oil level ....................................... 11-31
Recommended grade and viscosity ............... 11-32
Automatic transmission fluid ...................... 11-33 Checking the fluid level .................................... 11-33
Recommended fluid ......................................... 11-35
Front differential gear oil (AT vehicles) ...... 11-35 Checking the oil level ....................................... 11-35
Recommended grade and viscosity ............... 11-36
Rear differential gear oil ............................... 11-37 Checking the gear oil level .............................. 11-37
Recommended grade and viscosity ............... 11-40
Power steering fluid ...................................... 11-41 Checking the fluid level .................................... 11-41
Recommended fluid ......................................... 11-42
Brake fluid ..................................................... 11-42 Checking the fluid level .................................... 11-42
Recommended brake fluid ............................... 11-43
Clutch fluid (MT vehicles) ............................ 11-43 Checking the fluid level .................................... 11-43
Recommended clutch fluid .............................. 11-44
Brake booster ................................................ 11-44
Brake pedal .................................................... 11-45 Checking the brake pedal free play ................ 11-45
Checking the brake pedal reserve distance ... 11-45
Clutch pedal (Manual transmission vehicles) ..................................................... 11-46Checking the clutch function .......................... 11-46
Checking the clutch pedal free play ............... 11-46
Replacement of brake pad and lining ......... 11-47
Page 507 of 627
11 - 8
Maintenance and service
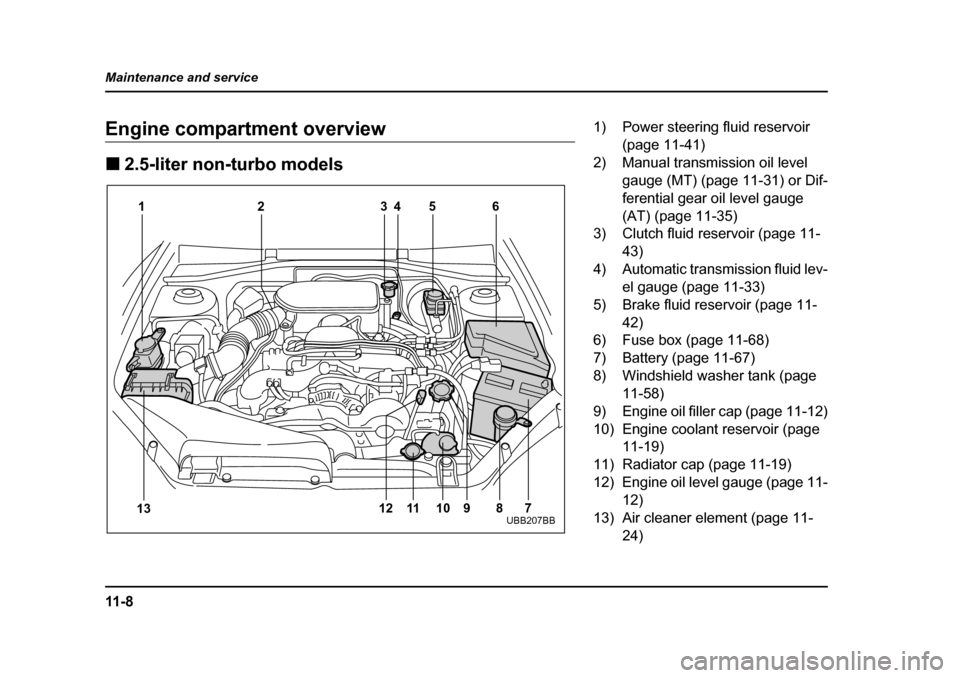
Engine compartment overview !
2.5-liter non-turbo models
12 3 45 6
7
8
9
10
11
13 12
UBB207BB
1) Power steering fluid reservoir
(page 11-41)
2) Manual transmission oil level gauge (MT) (page 11-31) or Dif-
ferential gear oil level gauge
(AT) (page 11-35)
3) Clutch fluid reservoir (page 11-
43)
4) Automatic transmission fluid lev- el gauge (page 11-33)
5) Brake fluid reservoir (page 11- 42)
6) Fuse box (page 11-68)
7) Battery (page 11-67)
8) Windshield washer tank (page 11-58)
9) Engine oil filler cap (page 11-12)
10) Engine coolant reservoir (page 11-19)
11) Radiator cap (page 11-19)
12) Engine oil level gauge (page 11- 12)
13) Air cleaner element (page 11- 24)
Page 508 of 627
11 - 9
Maintenance and service
– CONTINUED –
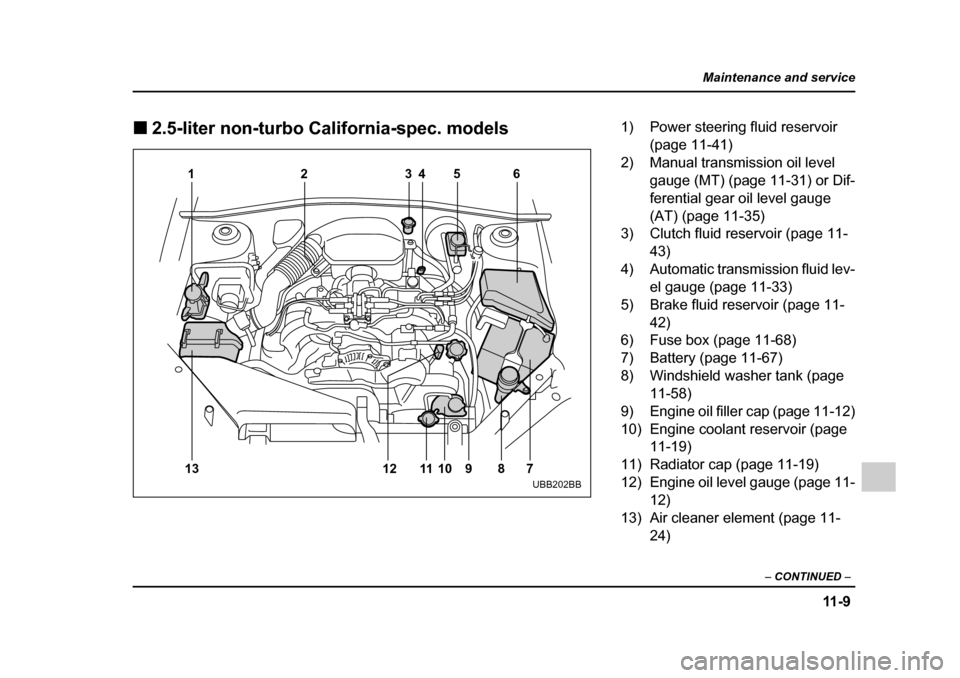
!2.5-liter non-turbo California-spec. models
123 45 6
7
8
9
10
11
13 12
UBB202BB
1) Power steering fluid reservoir
(page 11-41)
2) Manual transmission oil level gauge (MT) (page 11-31) or Dif-
ferential gear oil level gauge
(AT) (page 11-35)
3) Clutch fluid reservoir (page 11-
43)
4) Automatic transmission fluid lev- el gauge (page 11-33)
5) Brake fluid reservoir (page 11- 42)
6) Fuse box (page 11-68)
7) Battery (page 11-67)
8) Windshield washer tank (page 11-58)
9) Engine oil filler cap (page 11-12)
10) Engine coolant reservoir (page 11-19)
11) Radiator cap (page 11-19)
12) Engine oil level gauge (page 11- 12)
13) Air cleaner element (page 11- 24)