oil SUBARU LEGACY 2009 5.G Owner's Manual
[x] Cancel search | Manufacturer: SUBARU, Model Year: 2009, Model line: LEGACY, Model: SUBARU LEGACY 2009 5.GPages: 447, PDF Size: 14.26 MB
Page 342 of 447
vehicles.
2. Pull up the parking brake lever firmly.
3. Secure the vehicle onto the carrier
properly with safety chains. Each safety
chain should be equally tightened and
care must be taken not to pull the chains
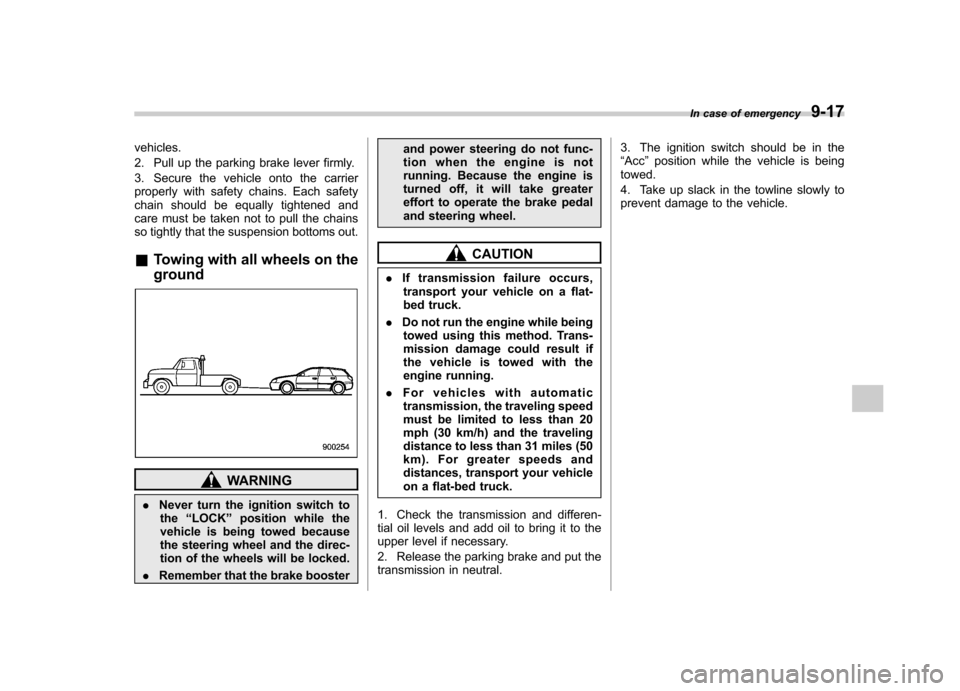
so tightly that the suspension bottoms out. &Towing with all wheels on the ground
WARNING
. Never turn the ignition switch to
the “LOCK ”position while the
vehicle is being towed because
the steering wheel and the direc-
tion of the wheels will be locked.
. Remember that the brake booster and power steering do not func-
tion when the engine is not
running. Because the engine is
turned off, it will take greater
effort to operate the brake pedal
and steering wheel.
CAUTION
. If transmission failure occurs,
transport your vehicle on a flat-
bed truck.
. Do not run the engine while being
towed using this method. Trans-
mission damage could result if
the vehicle is towed with the
engine running.
. For vehicles with automatic
transmission, the traveling speed
must be limited to less than 20
mph (30 km/h) and the traveling
distance to less than 31 miles (50
km). For greater speeds and
distances, transport your vehicle
on a flat-bed truck.
1. Check the transmission and differen-
tial oil levels and add oil to bring it to the
upper level if necessary.
2. Release the parking brake and put the
transmission in neutral. 3. The ignition switch should be in the“
Acc ”position while the vehicle is being
towed.
4. Take up slack in the towline slowly to
prevent damage to the vehicle. In case of emergency
9-17
Page 351 of 447
Maintenance schedule....................................... 11-3
Maintenance precautions ................................... 11-3
Before checking or servicing in the engine compartment .................................................... 11-4
When you do checking or servicing in the engine compartment while the engine is running .......... 11-4
Engine hood ....................................................... 11-4
Engine compartment overview .......................... 11-6
2.5 L non-turbo models ...................................... 11-6
2.5 L turbo models ............................................. 11-7
3.0 L models ...................................................... 11-8
Engine oil ............................................................ 11-9
Checking the oil level ......................................... 11-9
Changing the oil and oil filter ............................ 11-10
Recommended grade and viscosity .................. 11-12
Recommended grade and viscosity under severe driving conditions .......................................... 11-13
Cooling system ................................................ 11-14
Cooling fan, hose and connections ................... 11-14
Engine coolant ................................................. 11-14
Air cleaner element .......................................... 11-17
Replacing the air cleaner element ..................... 11-18
Spark plugs ...................................................... 11-20
Recommended spark plugs .............................. 11-20
Drive belts ........................................................ 11-20
2.5 L models .................................................... 11-20
3.0 L models .................................................... 11-21
Manual transmission oil .................................. 11-21
Checking the oil level ....................................... 11-21
Recommended grade and viscosity .................. 11-22Automatic transmission fluid
.......................... 11-22
Checking the fluid level .................................... 11-22
Recommended fluid ......................................... 11-23
Front differential gear oil (AT models) ........... 11-24
Checking the oil level ...................................... 11-24
Recommended grade and viscosity .................. 11-25
Rear differential gear oil .................................. 11-25
Checking the gear oil level ............................... 11-25
Recommended grade and viscosity .................. 11-27
Power steering fluid ........................................ 11-27
Checking the fluid level .................................... 11-27
Recommended fluid ......................................... 11-28
Brake fluid ........................................................ 11-28
Checking the fluid level .................................... 11-28
Recommended brake fluid ............................... 11-29
Clutch fluid (MT models) ................................. 11-29
Checking the fluid level .................................... 11-29
Recommended clutch fluid ............................... 11-30
Brake booster .................................................. 11-30
Brake pedal ...................................................... 11-31
Checking the brake pedal free play .................. 11-31
Checking the brake pedal reserve distance....... 11-31
Clutch pedal (MT models) ............................... 11-31
Checking the clutch function ............................ 11-31
Checking the clutch pedal free play .................. 11-32
Replacement of brake pad and lining ............ 11-32
Breaking-in of new brake pads and linings ....... 11-32
Parking brake stroke ....................................... 11-33
Tires and wheels .............................................. 11-33
Types of tires ................................................... 11-33
Maintenance and service
11
Page 354 of 447
11-4Maintenance and service
guard against getting oil or fluids
in your eyes. If something does
get in your eyes, thoroughly
wash them out with clean water.
. Do not tamper with the wiring of
the SRS airbag system or seat-
belt pretensioner system, or at-
tempt to take its connectors
apart, as that may activate the
system or it can render it inop-
erative. NEVER use a circuit
tester for these wiring. If your
SRS airbag or seatbelt preten-
sioner needs service, consult
your nearest SUBARU dealer.
& Before checking or servicing
in the engine compartment
WARNING
. Always stop the engine and set
the parking brake firmly to pre-
vent the vehicle from moving.
. Always let the engine cool down.
Engine parts become very hot
when the engine is running and
remain hot for some time after
the engine is stopped.
. Do not spill engine oil, engine
coolant, brake fluid or any other fluid on hot engine components.
This may cause a fire.
. Always remove the key from the
ignition switch. When the ignition
switch is in the “ON ”position,
thecoolingfanmayoperate
suddenly even when the engine
is stopped.
& When you do checking or
servicing in the engine com-
partment while the engine is running
WARNING
A running engine can be dangerous.
Keep your fingers, hands, clothing,
hair and tools away from the cooling
fan, belts and any other moving
engine parts. Removing rings,
watches and ties is advisable. Engine hood
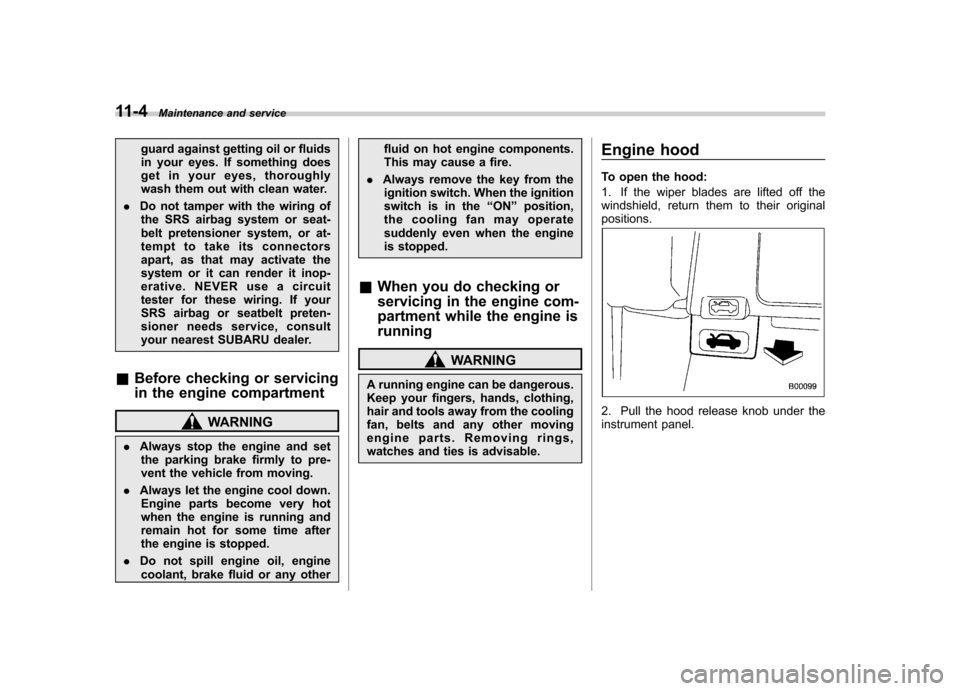
To open the hood:
1. If the wiper blades are lifted off the
windshield, return them to their originalpositions.
2. Pull the hood release knob under the
instrument panel.
Page 356 of 447
11-6Maintenance and service
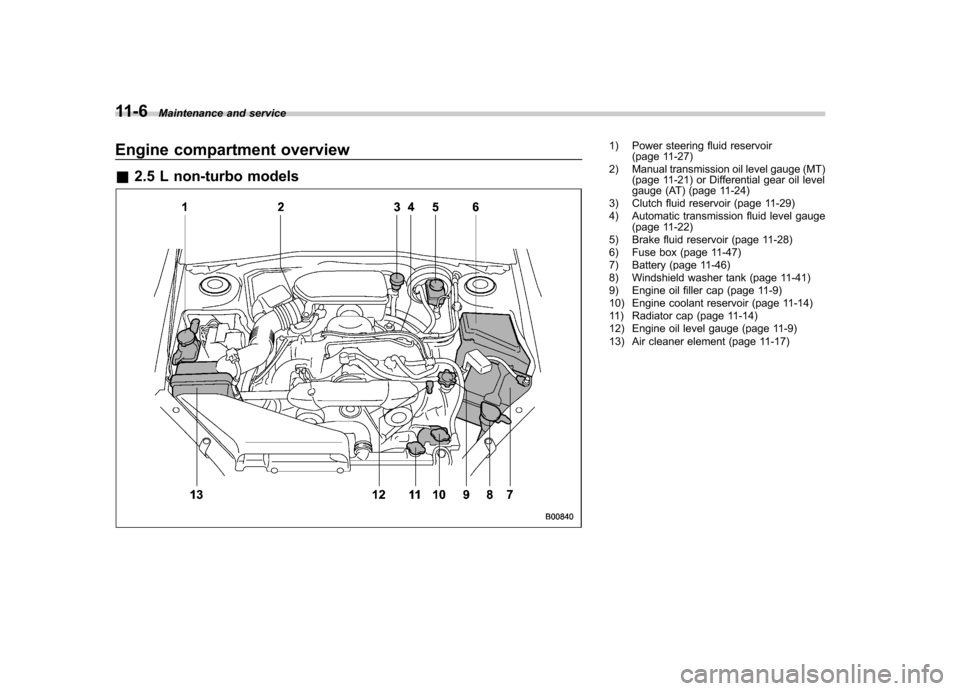
Engine compartment overview &2.5 L non-turbo models1) Power steering fluid reservoir
(page 11-27)
2) Manual transmission oil level gauge (MT) (page 11-21) or Differential gear oil level
gauge (AT) (page 11-24)
3) Clutch fluid reservoir (page 11-29)
4) Automatic transmission fluid level gauge (page 11-22)
5) Brake fluid reservoir (page 11-28)
6) Fuse box (page 11-47)
7) Battery (page 11-46)
8) Windshield washer tank (page 11-41)
9) Engine oil filler cap (page 11-9)
10) Engine coolant reservoir (page 11-14)
11) Radiator cap (page 11-14)
12) Engine oil level gauge (page 11-9)
13) Air cleaner element (page 11-17)
Page 357 of 447
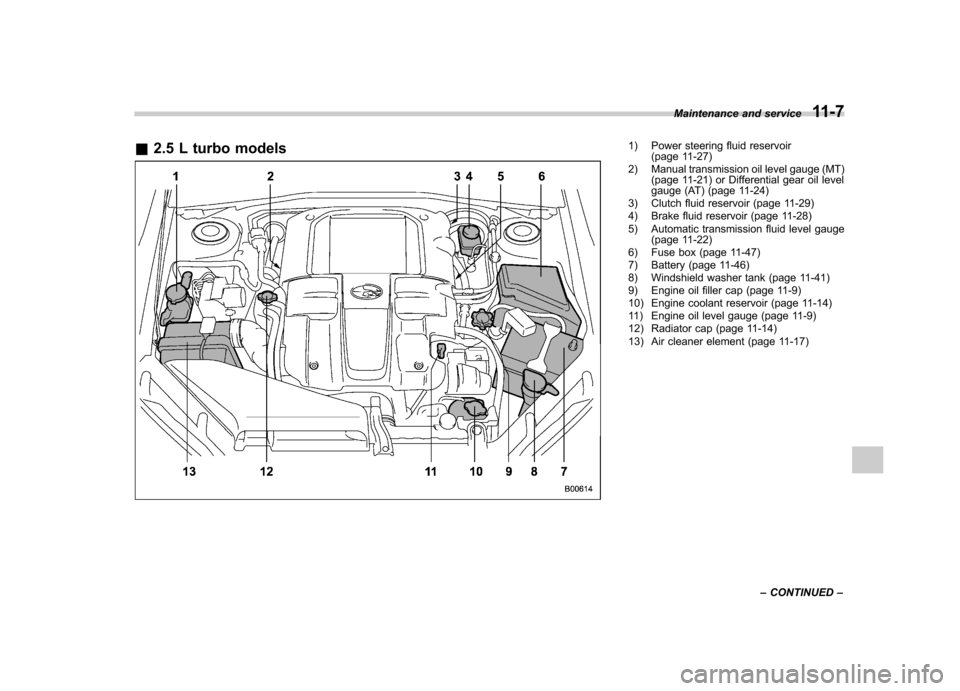
&2.5 L turbo models1) Power steering fluid reservoir
(page 11-27)
2) Manual transmission oil level gauge (MT) (page 11-21) or Differential gear oil level
gauge (AT) (page 11-24)
3) Clutch fluid reservoir (page 11-29)
4) Brake fluid reservoir (page 11-28)
5) Automatic transmission fluid level gauge (page 11-22)
6) Fuse box (page 11-47)
7) Battery (page 11-46)
8) Windshield washer tank (page 11-41)
9) Engine oil filler cap (page 11-9)
10) Engine coolant reservoir (page 11-14)
11) Engine oil level gauge (page 11-9)
12) Radiator cap (page 11-14)
13) Air cleaner element (page 11-17) Maintenance and service
11-7
– CONTINUED –
Page 358 of 447
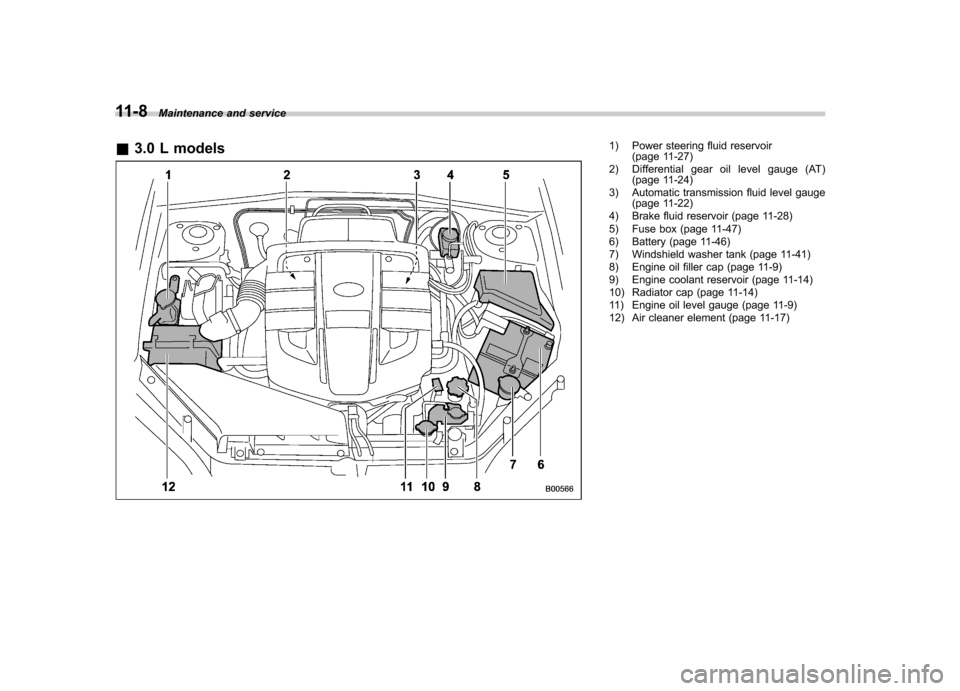
11-8Maintenance and service
& 3.0 L models
1) Power steering fluid reservoir
(page 11-27)
2) Differential gear oil level gauge (AT) (page 11-24)
3) Automatic transmission fluid level gauge (page 11-22)
4) Brake fluid reservoir (page 11-28)
5) Fuse box (page 11-47)
6) Battery (page 11-46)
7) Windshield washer tank (page 11-41)
8) Engine oil filler cap (page 11-9)
9) Engine coolant reservoir (page 11-14)
10) Radiator cap (page 11-14)
11) Engine oil level gauge (page 11-9)
12) Air cleaner element (page 11-17)
Page 359 of 447
Engine oil NOTE .The engine oil consumption rate is
not stabilized, and therefore cannot be
determined until the vehicle has tra-
veled at least several thousand miles
(kilometers). Even after break-in, when
the vehicle is used under severe driv-
ing conditions such as those men-
tionedintheWarrantyandMainte-
nance Booklet, engine oil is consumed
or deteriorated more quickly than un-
der normal driving conditions. If you
drive your vehicle under these severe
conditions, you should check the oil
level at least at every second fuel fill-up
time, and change the oil more fre-
quently. Please refer to the Warranty
and Maintenance Booklet for more de-tails.. If the oil consumption rate seems
abnormally high after the break-in
period, for example more than 1 quart
per 1,200 miles or 1 liter per 2,000
kilometers, we recommend that you
contact your SUBARU dealer. &
Checking the oil level
Check the engine oil level at each fuelstop.
1. Park the vehicle on a level surface and
stop the engine. If you check the oil level
just after stopping the engine, wait a few
minutes for the oil to drain back into the oil
pan before checking the level.
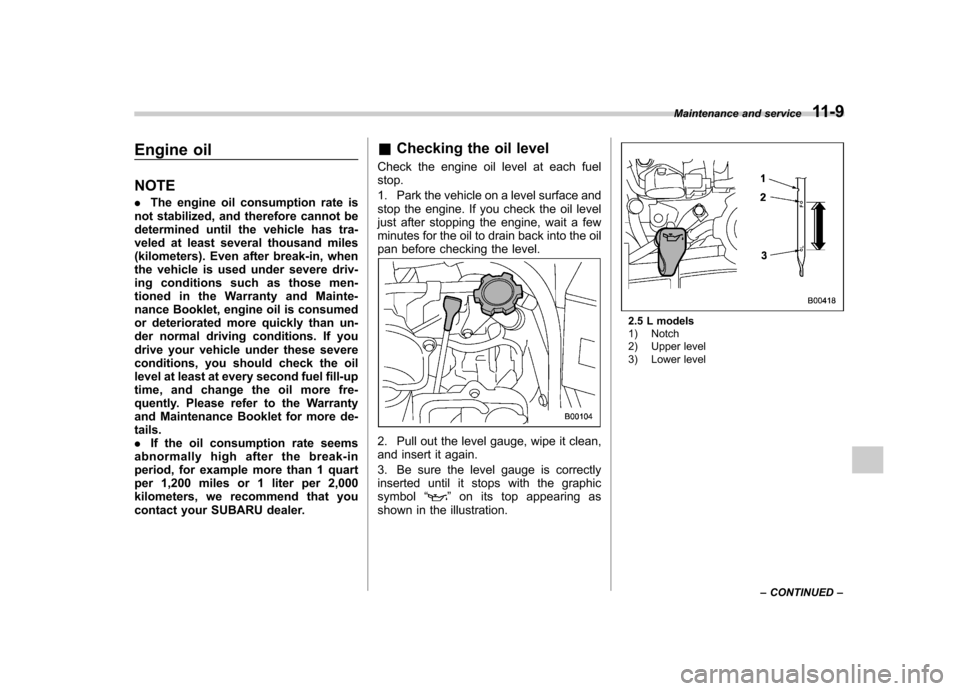
2. Pull out the level gauge, wipe it clean,
and insert it again.
3. Be sure the level gauge is correctly
inserted until it stops with the graphic
symbol “
”on its top appearing as
shown in the illustration.
2.5 L models
1) Notch
2) Upper level
3) Lower level Maintenance and service
11-9
– CONTINUED –
Page 360 of 447
11-10Maintenance and service
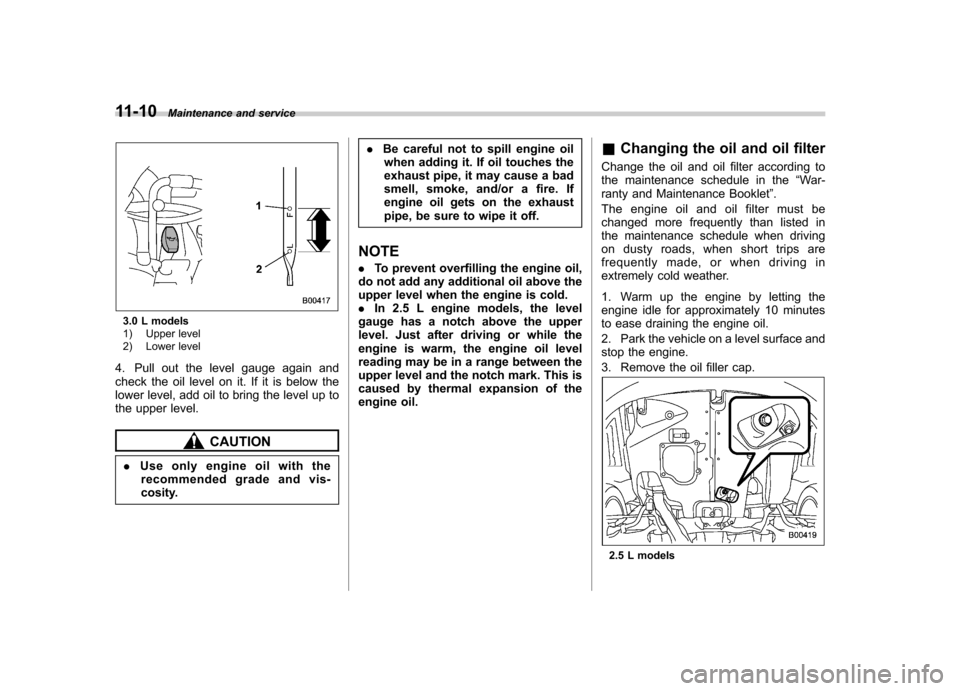
3.0 L models
1) Upper level
2) Lower level
4. Pull out the level gauge again and
check the oil level on it. If it is below the
lower level, add oil to bring the level up to
the upper level.
CAUTION
. Use only engine oil with the
recommended grade and vis-
cosity. .
Be careful not to spill engine oil
when adding it. If oil touches the
exhaust pipe, it may cause a bad
smell, smoke, and/or a fire. If
engine oil gets on the exhaust
pipe, be sure to wipe it off.
NOTE . To prevent overfilling the engine oil,
do not add any additional oil above the
upper level when the engine is cold.. In 2.5 L engine models, the level
gauge has a notch above the upper
level. Just after driving or while the
engine is warm, the engine oil level
reading may be in a range between the
upper level and the notch mark. This is
caused by thermal expansion of the
engine oil. &
Changing the oil and oil filter
Change the oil and oil filter according to
the maintenance schedule in the “War-
ranty and Maintenance Booklet ”.
The engine oil and oil filter must be
changed more frequently than listed in
the maintenance schedule when driving
on dusty roads, when short trips are
frequently made, or when driving in
extremely cold weather.
1. Warm up the engine by letting the
engine idle for approximately 10 minutes
to ease draining the engine oil.
2. Park the vehicle on a level surface and
stop the engine.
3. Remove the oil filler cap.
2.5 L models
Page 361 of 447
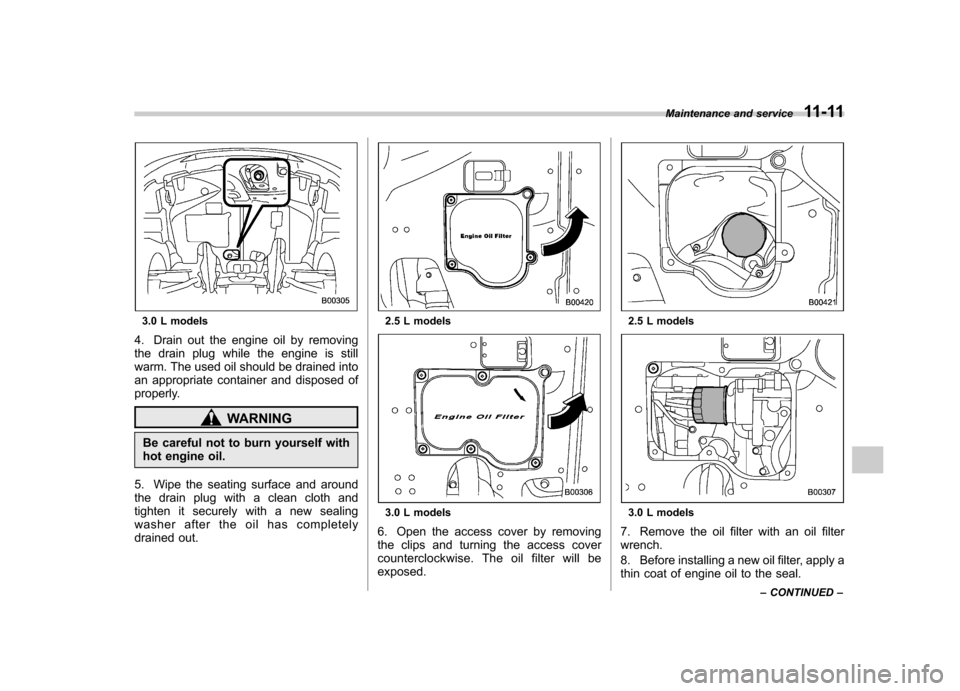
3.0 L models
4. Drain out the engine oil by removing
the drain plug while the engine is still
warm. The used oil should be drained into
an appropriate container and disposed of
properly.
WARNING
Be careful not to burn yourself with
hot engine oil.
5. Wipe the seating surface and around
the drain plug with a clean cloth and
tighten it securely with a new sealing
washer after the oil has completely
drained out.
2.5 L models
3.0 L models
6. Open the access cover by removing
the clips and turning the access cover
counterclockwise. The oil filter will beexposed.
2.5 L models
3.0 L models
7. Remove the oil filter with an oil filter wrench.
8. Before installing a new oil filter, apply a
thin coat of engine oil to the seal. Maintenance and service
11-11
– CONTINUED –
Page 362 of 447
11-12Maintenance and service
9. Clean the rubber seal seating area of
the bottom of engine and install the oil
filter by hand turning. Be careful not to
twist or damage the seal.
10. Tighten the oil filter by the amount
indicated in the following table after the
seal makes contact with the bottom ofengine.
Model Oil filter
color Part
number Amount of
rotation
2.5 L models Black 15208AA100 1 rotation
Blue 15208AA12A 7/8
rotation
3.0 L models Black 15208AA031 3/4
rotationCAUTION
. Never over tighten the oil filter
because that can result in an oil leak.
. Thoroughly wipe off any engine
oil that has spilled over the
exhaust pipe and/or under-cover.
If left unremoved, the oil could
catch fire.
11. Reinstall the cover under the oil filter.
12. Pour engine oil through the filler neck. Oil capacity (guideline): 2.5 L models: 4.2 US qt (4.0 liters, 3.5 Imp qt)
3.0 L models: 5.8 US qt (5.5 liters, 4.8 Imp qt)
The oil quantity indicated above is only a
guideline. The necessary quantity of oil
depends on the quantity of oil that has
been drained. The quantity of drained oil
differs slightly depending on the tempera-
ture of the oil and the time the oil is left
flowing out. After refilling the engine with
oil, therefore, you must use the level
gauge to confirm that the level is correct.
13. Start the engine and make sure that no
oil leaks appear around the filter ’s rubber seal and drain plug.
14. Keep the engine idling until the engine
reaches the normal operating temperature
range, as indicated by the temperature
gauge on the combination meter. After
that, check the engine oil level again. For
further details about the check procedure,
refer to
“Checking the oil level ”in this
section. & Recommended grade and viscosity
CAUTION
Use only engine oil with the recom-
mended grade and viscosity.
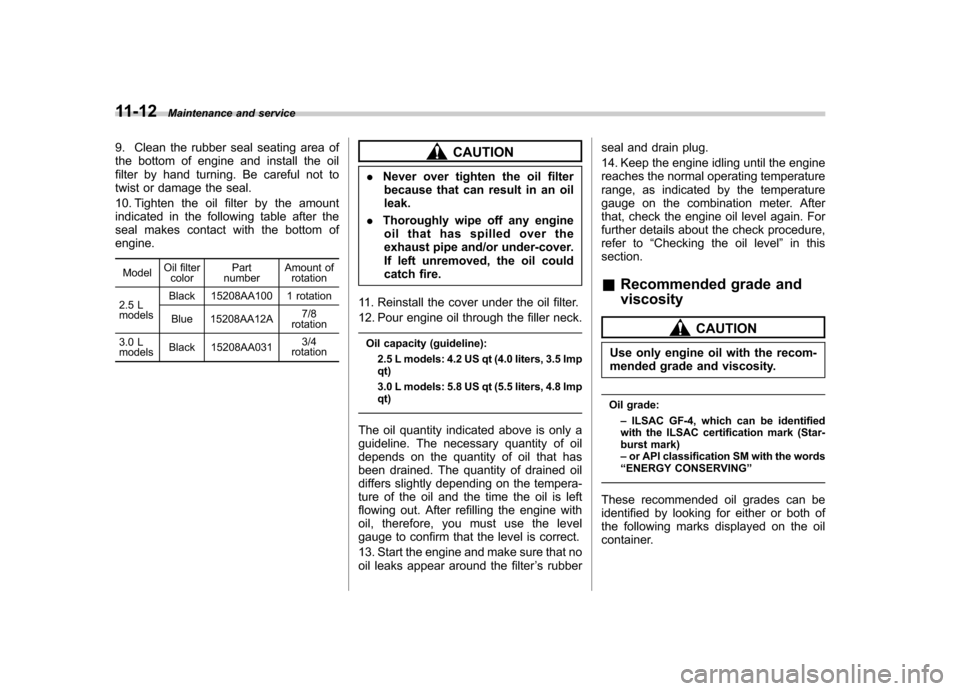
Oil grade: –ILSAC GF-4, which can be identified
with the ILSAC certification mark (Star-
burst mark) – or API classification SM with the words
“ ENERGY CONSERVING ”
These recommended oil grades can be
identified by looking for either or both of
the following marks displayed on the oil
container.