trunk release SUBARU LEGACY 2010 5.G Owners Manual
[x] Cancel search | Manufacturer: SUBARU, Model Year: 2010, Model line: LEGACY, Model: SUBARU LEGACY 2010 5.GPages: 448, PDF Size: 7.36 MB
Page 17 of 448

&Instrument panel1) Door locks (page 2-5)
2) Electronic parking brake switch
(page 7-34)
3) Hill Holder switch (page 7-35)
4) Trunk lid opener switch (page 2-24)
5) Vehicle Dynamics Control OFF switch (page 7-31)
6) Remote control mirror switch (page 3-38)
7) Illumination brightness control (page 3-30)
8) Light control switch (page 3-27)
9) Audio control buttons (page 5-30)
10) Combination meter (page 3-5)
11) Cruise control (page 7-38)
12) Paddle shift (page 7-21)
13) Wiper control lever (page 3-31)
14) Horn (page 3-39)
15) SRS airbag (page 1-38)
16) Fuse box (page 11-48)
17) Hood lock release knob (page 11-7)
18) Power windows (page 2-21) 15
– CONTINUED –
Page 30 of 448
1-8Seat, seatbelt and SRS airbags
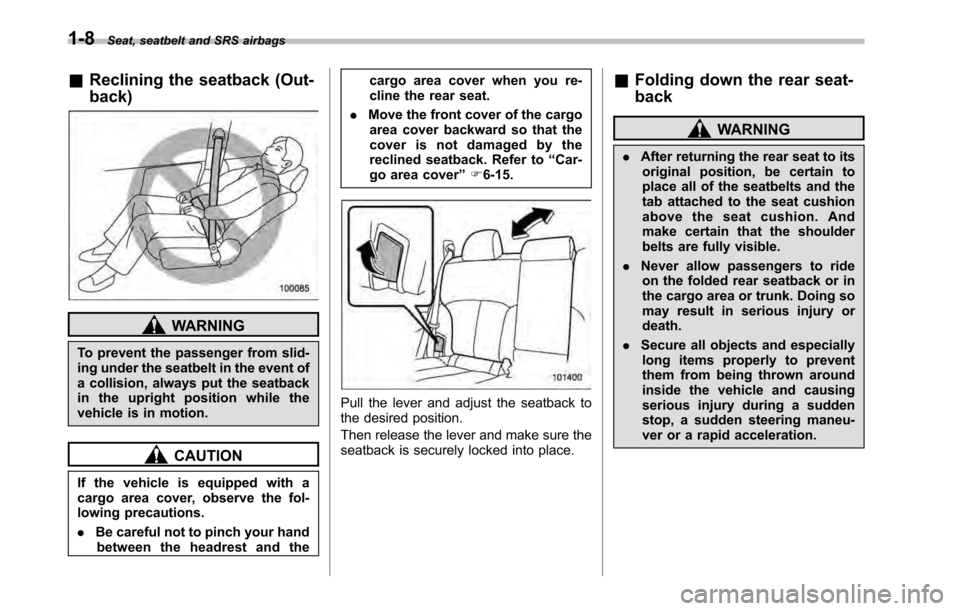
&Reclining the seatback (Out- back)
WARNING
To prevent the passenger from slid-
ing under the seatbelt in the event of
a collision, always put the seatback
in the upright position while the
vehicle is in motion.
CAUTION
If the vehicle is equipped with a
cargo area cover, observe the fol-
lowing precautions. . Be careful not to pinch your hand
between the headrest and the cargo area cover when you re-
cline the rear seat.
. Move the front cover of the cargo
area cover backward so that the
cover is not damaged by the
reclined seatback. Refer to “Car-
go area cover ”F 6-15.
Pull the lever and adjust the seatback to
the desired position.
Then release the lever and make sure the
seatback is securely locked into place. &
Folding down the rear seat- back
WARNING
. After returning the rear seat to its
original position, be certain to
place all of the seatbelts and the
tab attached to the seat cushion
above the seat cushion. And
make certain that the shoulder
belts are fully visible.
. Never allow passengers to ride
on the folded rear seatback or in
the cargo area or trunk. Doing so
may result in serious injury ordeath.
. Secure all objects and especially
long items properly to prevent
them from being thrown around
inside the vehicle and causing
serious injury during a sudden
stop, a sudden steering maneu-
ver or a rapid acceleration.
Page 31 of 448
CAUTION
The rear seatback may fold down
quickly due to the internal spring.
Hold the seatback while pulling the
release lever to slow it down.
! Legacy
CAUTION
Before folding down the rear seats,
make sure that no one is sitting and
nothing is placed on the rear seats.
Otherwise, the seatback may fold
down suddenly and an unexpected
accident may occur.
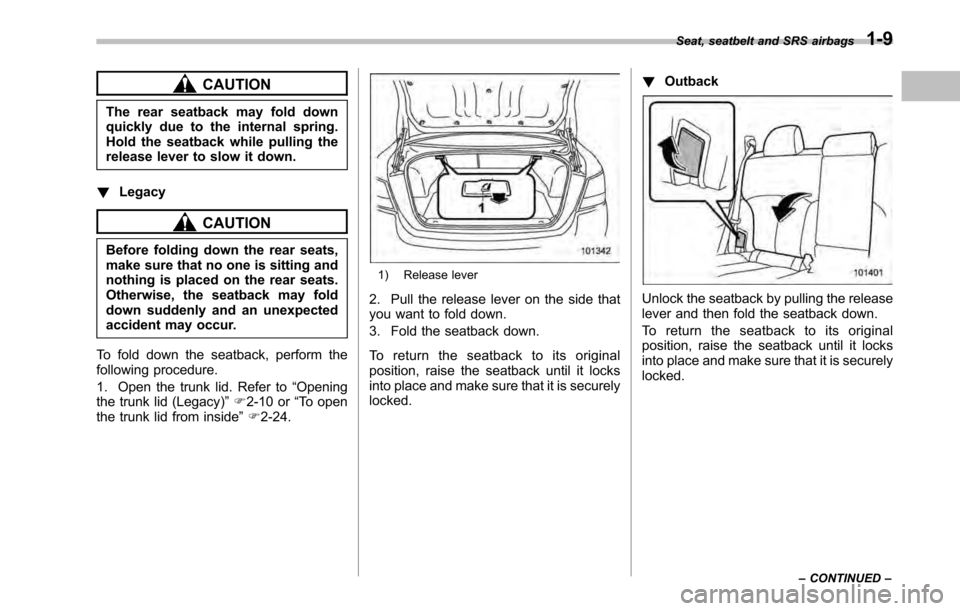
To fold down the seatback, perform the
following procedure.
1. Open the trunk lid. Refer to “Opening
the trunk lid (Legacy) ”F 2-10 or “To open
the trunk lid from inside ”F 2-24.
1) Release lever
2. Pull the release lever on the side that
you want to fold down.
3. Fold the seatback down.
To return the seatback to its original
position, raise the seatback until it locks
into place and make sure that it is securelylocked. !
Outback
Unlock the seatback by pulling the release
lever and then fold the seatback down.
To return the seatback to its original
position, raise the seatback until it locks
into place and make sure that it is securelylocked. Seat, seatbelt and SRS airbags
1-9
– CONTINUED –
Page 59 of 448
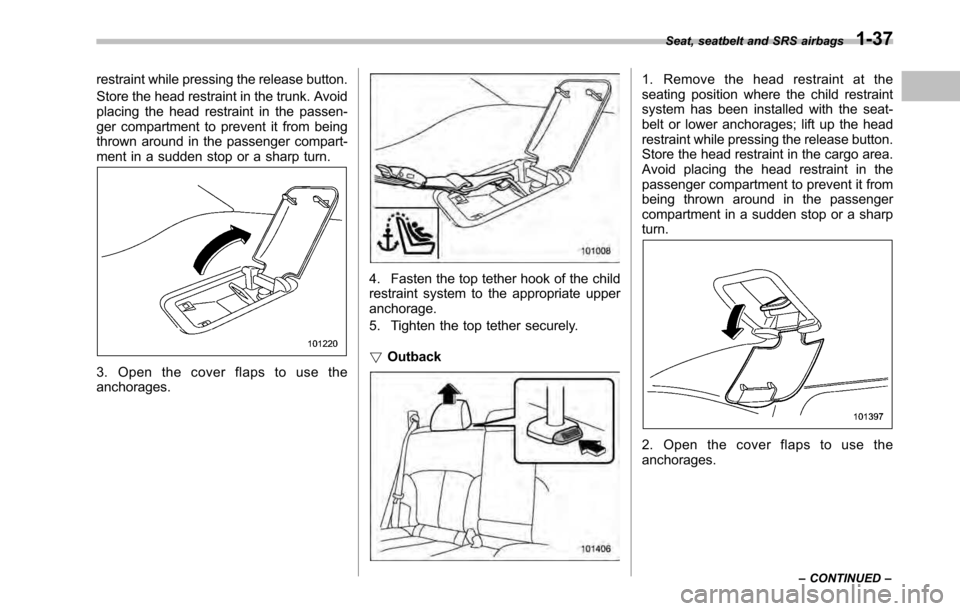
restraint while pressing the release button.
Store the head restraint in the trunk. Avoid
placing the head restraint in the passen-
ger compartment to prevent it from being
thrown around in the passenger compart-
ment in a sudden stop or a sharp turn.
3. Open the cover flaps to use the anchorages.
4. Fasten the top tether hook of the child
restraint system to the appropriate upperanchorage.
5. Tighten the top tether securely. !Outback
1. Remove the head restraint at the
seating position where the child restraint
system has been installed with the seat-
belt or lower anchorages; lift up the head
restraint while pressing the release button.
Store the head restraint in the cargo area.
Avoid placing the head restraint in the
passenger compartment to prevent it from
being thrown around in the passenger
compartment in a sudden stop or a sharpturn.
2. Open the cover flaps to use the anchorages. Seat, seatbelt and SRS airbags
1-37
– CONTINUED –
Page 89 of 448

Keys..................................................................... 2-2
Key number ........................................................ 2-2
Immobilizer .......................................................... 2-3
Security ID plate .................................................. 2-3
Security indicator light ........................................ 2-4
Key replacement ................................................. 2-4
Door locks ........................................................... 2-5
Locking and unlocking from the outside .. ............ 2-5
Locking and unlocking from the inside ................ 2-6
Battery drainage prevention function ................... 2-6
Power door locking switches ............................. 2-7
Key lock-in prevention function ........................... 2-7
Remote keyless entry system ............................ 2-8
Locking the doors ............................................... 2-9
Unlocking the doors ............................................ 2-9
Opening the trunk lid (Legacy) ............................ 2-10
Unlocking the rear gate (Outback) ....................... 2-10
Vehicle finder function ........................................ 2-10
Sounding a panic alarm ...................................... 2-10
Selecting audible signal operation ...................... 2-11
Replacing the battery ......................................... 2-11
Replacing lost transmitters ................................. 2-12
Alarm system ..................................................... 2-16
System alarm operation ...................................... 2-16 Activating and deactivating the alarm system
..... 2-16
If you have accidentally triggered the alarm system ............................................................ 2-16
Arming the system ............................................ 2-17
Disarming the system ........................................ 2-18
Valet mode ........................................................ 2-18
Passive arming .................................................. 2-18
Tripped sensor identification .............................. 2-19
Shock sensors (dealer option).. .......................... 2-19
Child safety locks .............................................. 2-20
Windows ............................................................. 2-21
Power window operation by driver ..................... 2-21
Power window operation by passengers ............. 2-23
Initialization of power window .. .......................... 2-24
Trunk lid (Legacy) .............................................. 2-24
To open and close the trunk lid from outside . ..... 2-24
To open the trunk lid from inside. ....................... 2-24
Internal trunk lid release handle ......................... 2-25
Rear gate (Outback) ........................................... 2-27
Moonroof (if equipped) ...................................... 2-28
Moonroof switches ............................................ 2-29
Sun shade ......................................................... 2-30 Keys and doors
2
Page 113 of 448
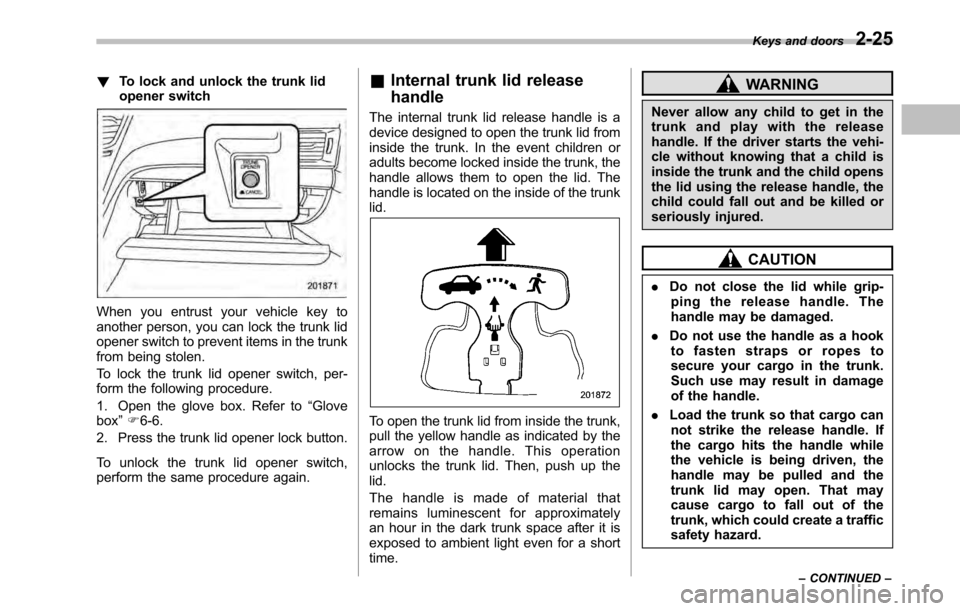
!To lock and unlock the trunk lid
opener switch
When you entrust your vehicle key to
another person, you can lock the trunk lid
opener switch to prevent items in the trunk
from being stolen.
To lock the trunk lid opener switch, per-
form the following procedure.
1. Open the glove box. Refer to “Glove
box ”F 6-6.
2. Press the trunk lid opener lock button.
To unlock the trunk lid opener switch,
perform the same procedure again. &
Internal trunk lid release handle
The internal trunk lid release handle is a
device designed to open the trunk lid from
inside the trunk. In the event children or
adults become locked inside the trunk, the
handle allows them to open the lid. The
handle is located on the inside of the trunklid.
To open the trunk lid from inside the trunk,
pull the yellow handle as indicated by the
arrow on the handle. This operation
unlocks the trunk lid. Then, push up thelid.
The handle is made of material that
remains luminescent for approximately
an hour in the dark trunk space after it is
exposed to ambient light even for a shorttime.
WARNING
Never allow any child to get in the
trunk and play with the release
handle. If the driver starts the vehi-
cle without knowing that a child is
inside the trunk and the child opens
the lid using the release handle, the
child could fall out and be killed or
seriously injured.
CAUTION
. Do not close the lid while grip-
ping the release handle. The
handle may be damaged.
. Do not use the handle as a hook
to fasten straps or ropes to
secure your cargo in the trunk.
Such use may result in damage
of the handle.
. Load the trunk so that cargo can
not strike the release handle. If
the cargo hits the handle while
the vehicle is being driven, the
handle may be pulled and the
trunk lid may open. That may
cause cargo to fall out of the
trunk, which could create a traffic
safety hazard. Keys and doors
2-25
– CONTINUED –
Page 114 of 448
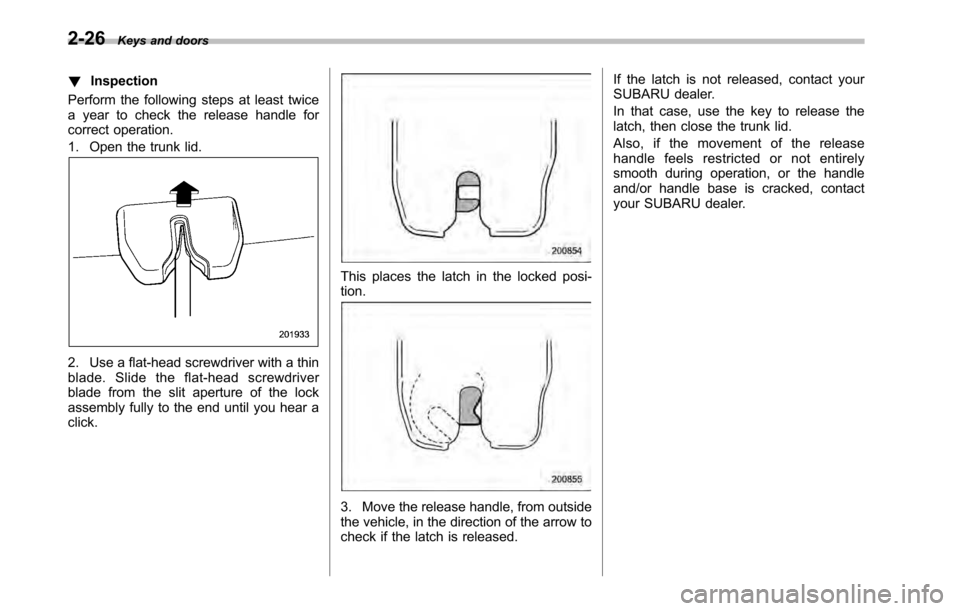
2-26Keys and doors
! Inspection
Perform the following steps at least twice
a year to check the release handle for
correct operation.
1. Open the trunk lid.
2. Use a flat-head screwdriver with a thin
blade. Slide the flat-head screwdriver
blade from the slit aperture of the lock
assembly fully to the end until you hear a click.
This places the latch in the locked posi- tion.
3. Move the release handle, from outside
the vehicle, in the direction of the arrow to
check if the latch is released. If the latch is not released, contact your
SUBARU dealer.
In that case, use the key to release the
latch, then close the trunk lid.
Also, if the movement of the release
handle feels restricted or not entirely
smooth during operation, or the handle
and/or handle base is cracked, contact
your SUBARU dealer.
Page 256 of 448

7-14Starting and operating
&Service mode
In service mode, the remote engine start
function is temporarily disabled to prevent
the system from unexpectedly starting the
engine while being serviced.
To engage or disengage service mode:
1. Enter the vehicle and close all vehicle
doors and the trunk/rear gate.
2. Verify that the select lever is in the “P ”
position (AT and CVT models)
3. Depress and hold the brake pedal
4. Turn the ignition switch to the “ON ”
position
5. Press and release the remote engine
start transmitter “
”button three times.
The system will honk the vehicle ’s horn
each time the button is pressed.
6. The system will pause for 1 second
then honk the vehicle ’s horn three times to
indicate that the service mode has been
engaged or honk one time to indicate that
the service mode has been disengaged.
NOTE
When taking your vehicle in for service,
it is recommended that you inform the
service personnel that your vehicle is
equipped with a remote engine startsystem. &
Remote transmitter program
New transmitters can be programmed to
the remote engine start system in the
event that a transmitter is lost, stolen,
damaged or additional transmitters are
desired (the system will accept up to eight
transmitters). New remote engine start
transmitters can be programmed accord-
ing to the following procedure.
1. Open the driver ’s door (the driver ’s
door must remain opened throughout the
entire process).
2. Depress and hold the brake pedal.
3. Turn the ignition switch to “ON ”then
“ LOCK ”, back to “ON ”then “LOCK ”, then
back to “ON ”again and leave the ignition
“ ON ”throughout the programming pro-
cess.
4. The system will flash the side marker
lights, tail lights and front position lights
and honk the horn three times, indicating
that the system has entered the transmit-
ter learn mode.
5. Press and release the “
”button on
the transmitter that you want to program.
6. The system will flash the side marker
lights, tail lights and front position lights
and honk the horn one time, indicating that
the system has learned the transmitter.
Upon successful programming, the re-
mote start confirmation transmitter button will flash one time.
7. Repeat step 5 for any additional
transmitters (the system will accept up to
eight transmitters).
8. The system will exit the transmitter
learn mode if the key is turned to the“
LOCK ”position, the door is closed or
after 2 minutes.
& System maintenance
NOTE
In the event that the vehicle ’s battery is
replaced, discharged or disconnected,
it will be necessary to start the vehicle
a minimum of one time using the key
prior to activating the remote engine
start system. This is required to allow
the vehicle electronic systems to re-synchronize. ! Changing the batteries
CAUTION
. Do not let dust, oil or water get on
or in the remote engine start
transmitter when replacing the
battery.
. Be careful not to damage the
printed circuit board in the re-
mote engine start transmitter
when replacing the battery.
Page 277 of 448

without depressing the brake pedal or
the clutch pedal, the parking brake is
not released..When the parking brake is being
applied or released, noise may be
noticed. However, this is not a malfunc-tion.. When the electronic parking brake
system has a malfunction or the elec-
tronic parking brake operation is pro-
hibited temporarily, if the parking brake
switch is operated, a chirp sound is
heard and the brake system warning
light flashes.. When you cannot release the park-
ing brake due to, for example, a system
malfunction, you can release it by
using the parking brake release tool.
Refer to “Electronic parking brake –if
the electronic parking brake cannot bereleased ”F 9-16.
! Automatic release function by gaspedal
The electronic parking brake system has
an automatic release function. The park-
ing brake will be automatically released by
depressing the accelerator pedal. How-
ever, the automatic release function does
not operate under the following conditions. . Any door (other than the trunk lid or
rear gate) is open. .
The driver ’s seatbelt is not fastened.
If the parking brake is automatically
released, the brake system warning light
and the indicator on the parking brake
switch turn off.
NOTE
Even if you have applied the parking
brake by pressing the parking brake
switch, the parking brake will be auto-
matically released when the accelera-
tor pedal is depressed. ! Hill Holder function
The electronic parking brake system has a
Hill Holder function. If the Hill Holder
function is activated, the parking brake
will be automatically applied when stop-
ping on an uphill slope with the brake
pedal depressed. In this case, the brake
system warning light and the indicator light
on the parking brake switch illuminate. NOTE . The Hill Holder function may not
activate on a gentle uphill slope. In this
case, manually apply the electronic
parking brake.. If you do not depress the brake
pedal sufficiently, the Hill Holder func-
tion may not operate properly. How-
ever, this is not a malfunction. When stopping on an uphill slope, depress
the brake pedal firmly and release it
after the brake system warning lightilluminates..
Depending on the condition of the
road surface and braking force, the
brakes operate temporarily and feel
different than usual.. When the electronic parking brake
system has a malfunction while the Hill
Holder function is activated, a chirp
sound is heard, the Hill Holder indica-
tor light turns off and the brake system
warning light flashes.. The Hill Holder function does not
reactivate when parking with the elec-
tronic parking brake released after the
Hill Holder function is activated. If
necessary, manually apply the electro-
nic parking brake.. If the seatbelt is not fastened when
the Hill Holder function is activated, the
vehicle may not start moving smoothly
from a stop, or a noise may be heard
from the brake components. ! Hill Holder switch
WARNING
When stopping on an uphill slope
with the Hill Holder function acti-
vated, release the brake pedal after Starting and operating
7-35
– CONTINUED –
Page 311 of 448

If you park your vehicle in an emergency......... 9-2
Temporary spare tire ........................................... 9-2
Maintenance tools ............................................... 9-3
Legacy ................................................................ 9-4
Outback .............................................................. 9-5
Flat tires ............................................................... 9-6
Changing a flat tire .............................................. 9-6
Tire pressure monitoring system (TPMS) (if equipped) ...................................................... 9-9
Jump starting ..................................................... 9-10
How to jump start ............................................... 9-10
Engine overheating ............................................ 9-12
If steam is coming from the engine compartment .................................................... 9-12 If no steam is coming from the engine
compartment ................................................... 9-12
Towing ................................................................ 9-12
Towing and tie-down hooks. ............................... 9-13
Using a flat-bed truck. ........................................ 9-15
Towing with all wheels on the ground ................. 9-15
Electronic parking brake –if the electronic
parking brake cannot be released ................. 9-16
Trunk lid (Legacy) –if the trunk lid cannot
be opened ....................................................... 9-19
Rear gate (Outback) –if the rear gate
cannot be unlocked ........................................ 9-19
Moonroof –if moonroof cannot be closed ...... 9-20
In case of emergency
9