clock SUBARU LEGACY 2016 6.G User Guide
[x] Cancel search | Manufacturer: SUBARU, Model Year: 2016, Model line: LEGACY, Model: SUBARU LEGACY 2016 6.GPages: 572
Page 474 of 572
Maintenance and service/Maintenance tips
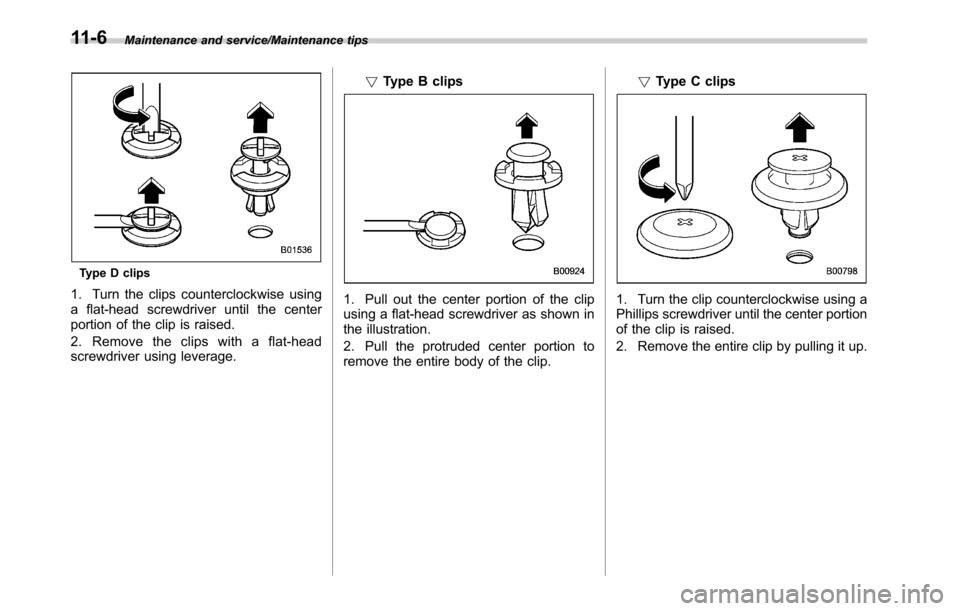
Type D clips
1. Turn the clips counterclockwise using
a flat-head screwdriver until the center
portion of the clip is raised.
2. Removetheclipswithaflat-head
screwdriver using leverage.!Type B clips1. Pull out the center portion of the clip
using a flat-head screwdriver as shown in
the illustration.
2. Pull the protruded center portion to
remove the entire body of the clip.!Type C clips1. Turn the clip counterclockwise using a
Phillips screwdriver until the center portion
of the clip is raised.
2. Remove the entire clip by pulling it up.
11-6
Page 503 of 572

grooves in the rubber and slide the blade
rubber assembly into the support until it
locks.
1) Claw
2) Stopper
4. Be sure to position the claws at the
end of the support between the stoppers
on the rubber as shown. If the rubber is
not retained properly, the wiper blade may
scratch the windshield.
&Rear window wiper blade
assembly (Outback)
1. Raise the wiper arm off the rear
window.
2. Turn the wiper blade assembly coun-
terclockwise.
3. Pull the wiper blade assembly toward
you to remove it from the wiper arm.
Maintenance and service/Replacement of wiper blades
–CONTINUED–11-35
Page 509 of 572
NOTE
.If headlight aiming is required, con-
sult your SUBARU dealer for proper
adjustment of the headlight aim.
.It may be difficult to replace the
bulbs. Have the bulbs replaced by your
SUBARU dealer if necessary.
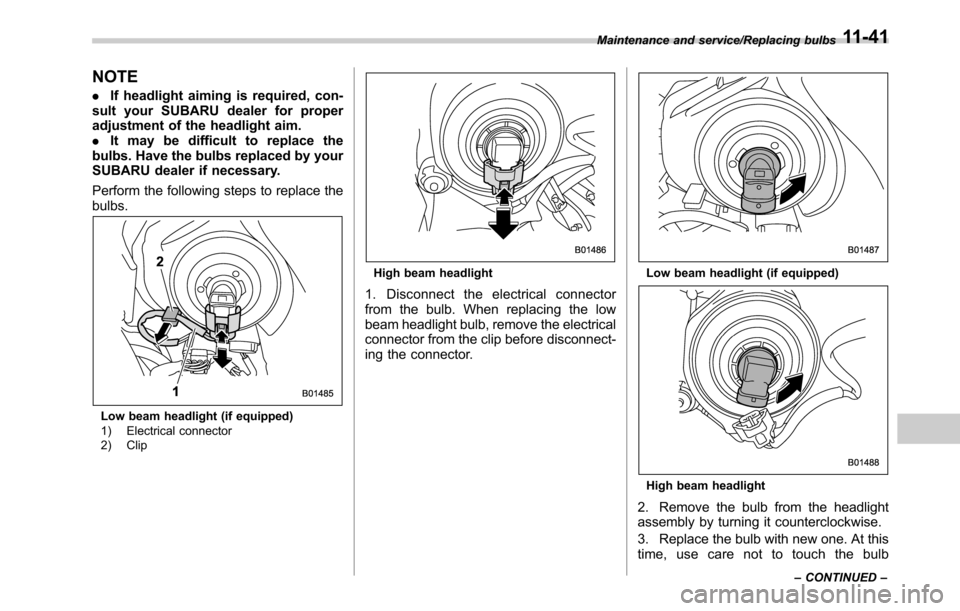
Perform the following steps to replace the
bulbs.
Low beam headlight (if equipped)
1) Electrical connector
2) Clip
High beam headlight
1. Disconnect the electrical connector
from the bulb. When replacing the low
beam headlight bulb, remove the electrical
connector from the clip before disconnect-
ing the connector.
Low beam headlight (if equipped)
High beam headlight
2. Remove the bulb from the headlight
assembly by turning it counterclockwise.
3. Replace the bulb with new one. At this
time, use care not to touch the bulb
Maintenance and service/Replacing bulbs
–CONTINUED–11-41
Page 510 of 572
Maintenance and service/Replacing bulbs
surface.
4. To install the bulb to the headlight
assembly, turn it clockwise until it clicks.
5. Reconnect the electrical connector.
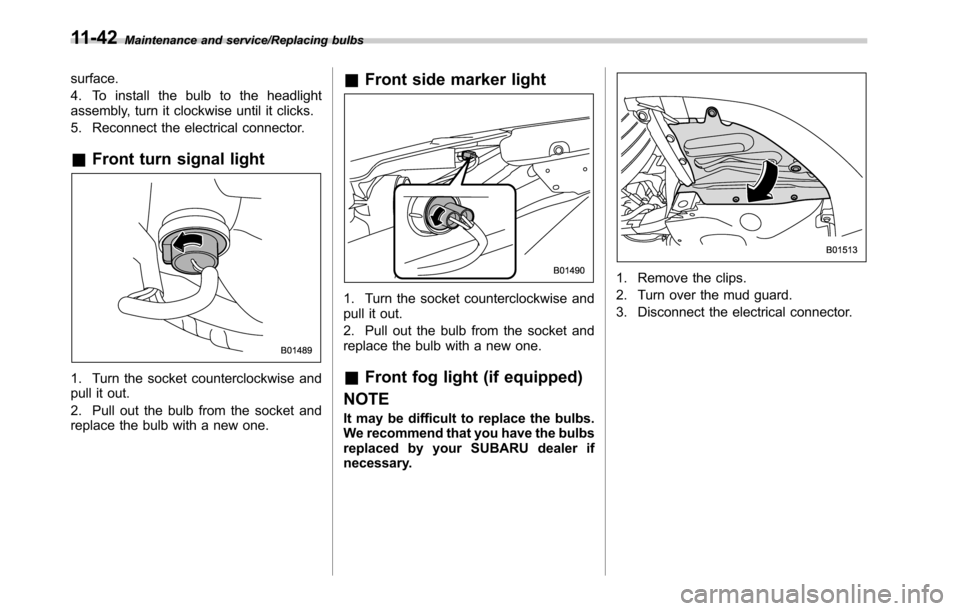
&Front turn signal light
1. Turn the socket counterclockwise and
pull it out.
2. Pull out the bulb from the socket and
replace the bulb with a new one.
&Front side marker light
1. Turn the socket counterclockwise and
pull it out.
2. Pull out the bulb from the socket and
replace the bulb with a new one.
&Front fog light (if equipped)
NOTE
It may be difficult to replace the bulbs.
We recommend that you have the bulbs
replaced by your SUBARU dealer if
necessary.
1. Remove the clips.
2. Turn over the mud guard.
3. Disconnect the electrical connector.
11-42
Page 511 of 572
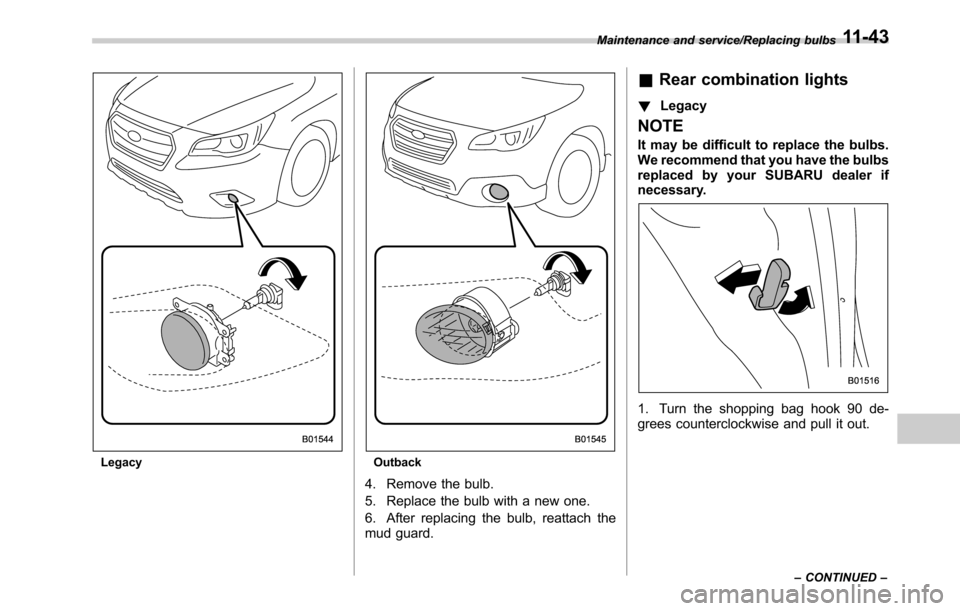
LegacyOutback
4. Remove the bulb.
5. Replace the bulb with a new one.
6. After replacing the bulb, reattach the
mud guard.
&Rear combination lights
!Legacy
NOTE
It may be difficult to replace the bulbs.
We recommend that you have the bulbs
replaced by your SUBARU dealer if
necessary.
1. Turn the shopping bag hook 90 de-
grees counterclockwise and pull it out.
Maintenance and service/Replacing bulbs
–CONTINUED–11-43
Page 512 of 572
Maintenance and service/Replacing bulbs
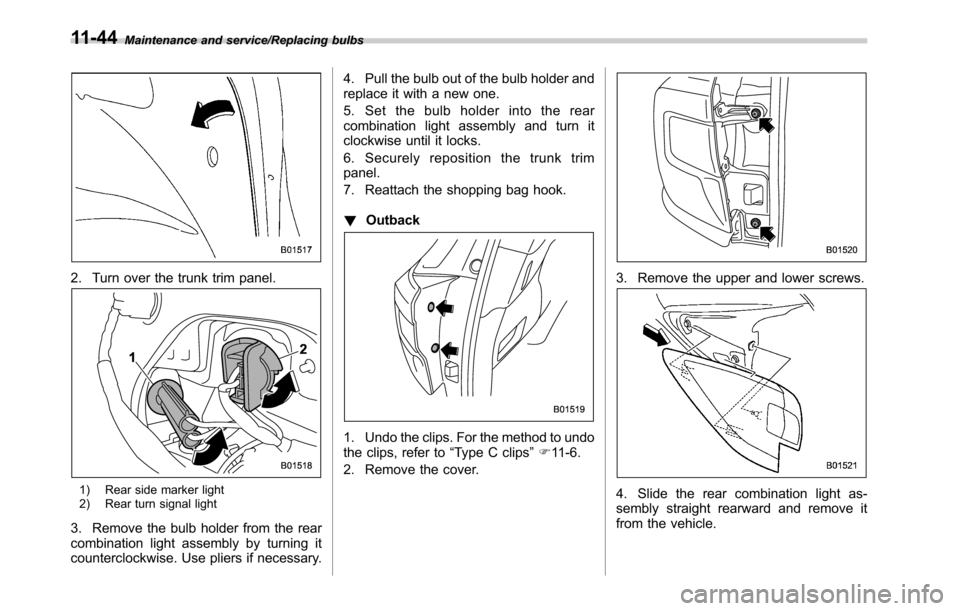
2. Turn over the trunk trim panel.
1) Rear side marker light
2) Rear turn signal light
3. Remove the bulb holder from the rear
combination light assembly by turning it
counterclockwise. Use pliers if necessary.4. Pull the bulb out of the bulb holder and
replace it with a new one.
5. Set the bulb holder into the rear
combination light assembly and turn it
clockwise until it locks.
6. Securely reposition the trunk trim
panel.
7. Reattach the shopping bag hook.
!Outback
1. Undo the clips. For the method to undo
the clips, refer to“Type C clips”F11-6.
2. Remove the cover.
3. Remove the upper and lower screws.
4. Slide the rear combination light as-
sembly straight rearward and remove it
from the vehicle.
11-44
Page 513 of 572
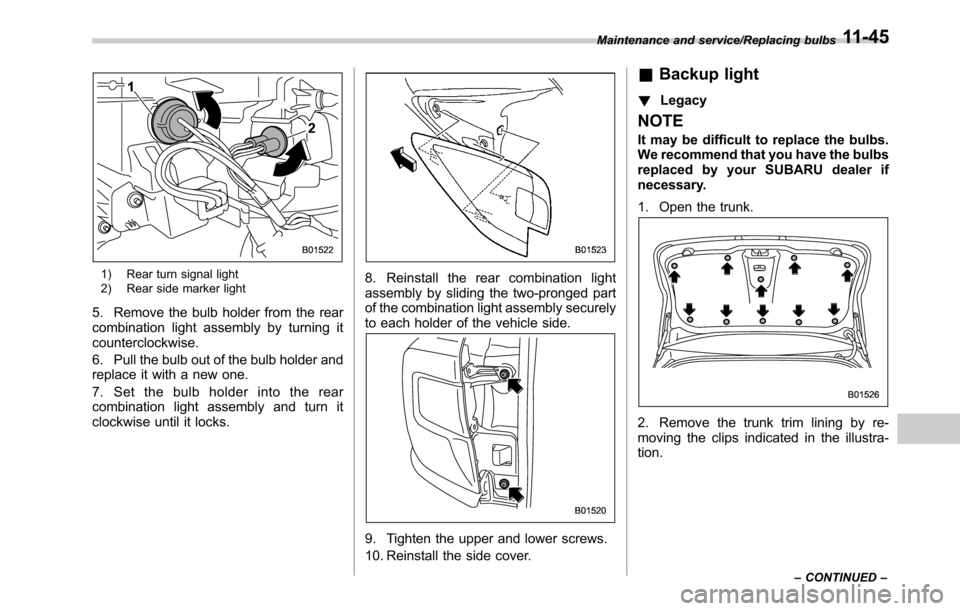
1) Rear turn signal light
2) Rear side marker light
5. Remove the bulb holder from the rear
combination light assembly by turning it
counterclockwise.
6. Pull the bulb out of the bulb holder and
replace it with a new one.
7. Set the bulb holder into the rear
combination light assembly and turn it
clockwise until it locks.
8. Reinstall the rear combination light
assembly by sliding the two-pronged part
of the combination light assembly securely
to each holder of the vehicle side.
9. Tighten the upper and lower screws.
10. Reinstall the side cover.
&Backup light
!Legacy
NOTE
It may be difficult to replace the bulbs.
We recommend that you have the bulbs
replaced by your SUBARU dealer if
necessary.
1. Open the trunk.
2. Remove the trunk trim lining by re-
moving the clips indicated in the illustra-
tion.
Maintenance and service/Replacing bulbs
–CONTINUED–11-45
Page 514 of 572
Maintenance and service/Replacing bulbs
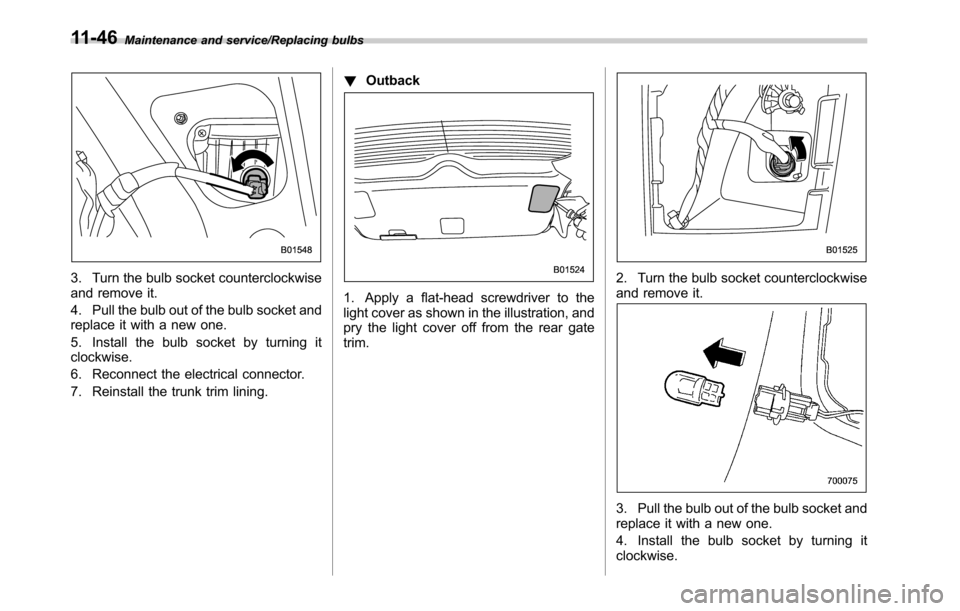
3. Turn the bulb socket counterclockwise
and remove it.
4. Pull the bulb out of the bulb socket and
replace it with a new one.
5. Install the bulb socket by turning it
clockwise.
6. Reconnect the electrical connector.
7. Reinstall the trunk trim lining.!Outback
1. Apply a flat-head screwdriver to the
light cover as shown in the illustration, and
pry the light cover off from the rear gate
trim.
2. Turn the bulb socket counterclockwise
and remove it.
3. Pull the bulb out of the bulb socket and
replace it with a new one.
4. Install the bulb socket by turning it
clockwise.
11-46
Page 515 of 572
5. Install the light cover on the rear gate.
&License plate light
!Legacy
NOTE
It may be difficult to replace the bulbs.
We recommend that you have the bulbs
replaced by your SUBARU dealer if
necessary.
1. Open the trunk.
2. Remove the trunk trim lining by re-
moving the clips indicated in the illustra-
tion.
3. Turn the bulb socket counterclockwise
and remove it.
4. Pull the bulb out of the bulb socket and
replace it with a new one.
5. Install the bulb socket by turning it
clockwise.
6. Reconnect the electrical connector.
7. Reinstall the trunk trim lining.!Outback
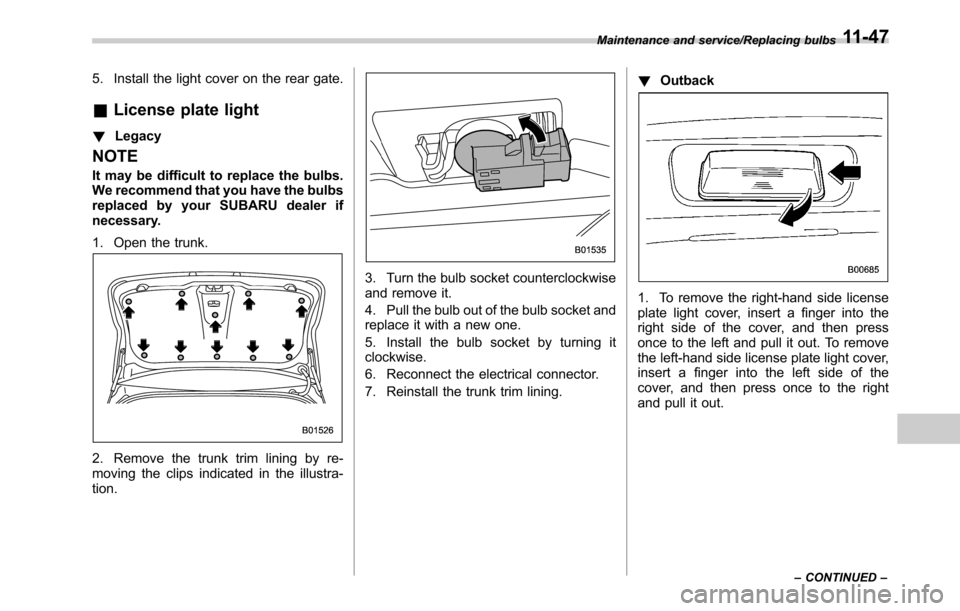
1. To remove the right-hand side license
plate light cover, insert a finger into the
right side of the cover, and then press
once to the left and pull it out. To remove
the left-hand side license plate light cover,
insert a finger into the left side of the
cover, and then press once to the right
and pull it out.
Maintenance and service/Replacing bulbs
–CONTINUED–11-47
Page 516 of 572
Maintenance and service/Replacing bulbs
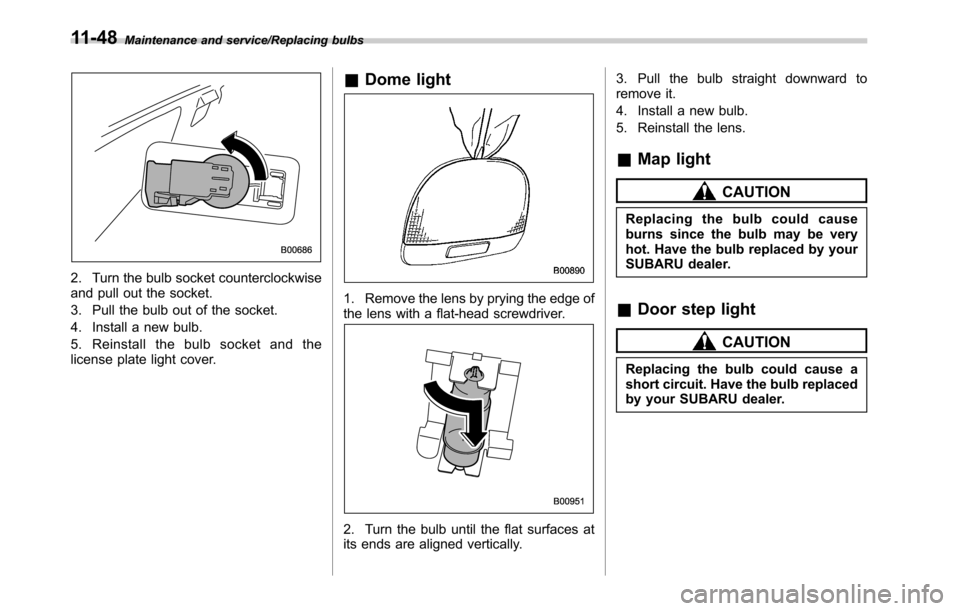
2. Turn the bulb socket counterclockwise
and pull out the socket.
3. Pull the bulb out of the socket.
4. Install a new bulb.
5. Reinstall the bulb socket and the
license plate light cover.
&Dome light
1. Remove the lens by prying the edge of
the lens with a flat-head screwdriver.
2. Turn the bulb until the flat surfaces at
its ends are aligned vertically.3. Pull the bulb straight downward to
remove it.
4. Install a new bulb.
5. Reinstall the lens.
&Map light
CAUTION
Replacing the bulb could cause
burns since the bulb may be very
hot. Have the bulb replaced by your
SUBARU dealer.
&Door step light
CAUTION
Replacing the bulb could cause a
short circuit. Have the bulb replaced
by your SUBARU dealer.
11-48