mirror SUBARU LEGACY 2016 6.G User Guide
[x] Cancel search | Manufacturer: SUBARU, Model Year: 2016, Model line: LEGACY, Model: SUBARU LEGACY 2016 6.GPages: 572
Page 211 of 572

.It is recommended that you insert a
new battery in the hand-held transmit-
ter of a device to ensure correct
programming.
!Garage door opener program-
ming in the U.S.A.
NOTE
When programming the HomeLink®Wireless Control System for a garage
door opener, it is suggested that you
park the vehicle outside the garage.
1. Unplug the motor of the garage door
opener from the outlet.
NOTE
If any of the HomeLink®buttons are
already programmed for other devices,
skip step 2 because it clears the
memory of all three buttons.
1) HomeLink®button 1
2) HomeLink®button 2
3) HomeLink®button 3
2. Press and hold the two outer
HomeLink®buttons (button 1 and button
3) until the indicator light begins to flash
(after approximately 10 seconds). Then
release both buttons.
3. Hold the end of the garage door
opener’s hand-held transmitter between
1 and 3 inches (25 and 76 mm) away from
the HomeLink
®button you wish to pro-
gram.
4. Simultaneously press and hold both
the hand-held transmitter button and the
desired HomeLink
®button. DO NOT re-
lease the buttons until step 5 has been
completed.
NOTE
Some gate operators and garage door
openers may require you to replace
this programming step 4 with proce-
dures in“Programming for entrance
gates and garage door openers in
Canada”F3-60.
5. Hold down both buttons until the
HomeLink
®indicator light flashes, first
slowly then rapidly. When the indicator
light flashes rapidly, both buttons may be
released. (The rapidly flashing light indi-
cates successful programming of the new
frequency signal.)
6. Press and hold the programmed but-
ton and check the HomeLink
®indicator
light. If the indicator light stays on con-
tinuously, your garage door should acti-
vate and the programming is completed.
If the indicator light flashes rapidly for 2
seconds and then stays on continuously,
your garage door opener may be pro-
tected by a rolling code feature. In this
case you need to perform the additional
steps that are described in“Programming
rolling-code-protected garage door open-
ers in the U.S.A.”F3-60.
Instruments and controls/Mirrors
–CONTINUED–3-59
Page 212 of 572
Instruments and controls/Mirrors
!Programming rolling-code-pro-
tected garage door openers in
the U.S.A.
If your garage door opener has a rolling
code feature, program the HomeLink
®Wireless Control System for it by following
steps 1 through 5 in“Garage door opener
programming in the U.S.A.”F3-59. Then
continue with the following steps.
NOTE
The assistance of a second person
may make the programming quicker
and easier.
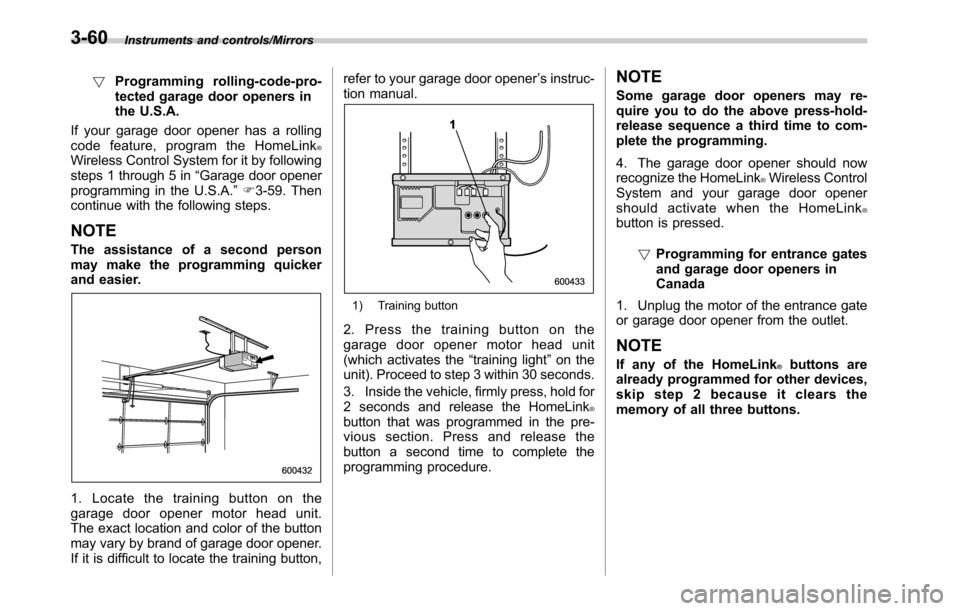
1. Locate the training button on the
garage door opener motor head unit.
The exact location and color of the button
may vary by brand of garage door opener.
If it is difficult to locate the training button,refer to your garage door opener’s instruc-
tion manual.
1) Training button
2. Press the training button on the
garage door opener motor head unit
(which activates the“training light”on the
unit). Proceed to step 3 within 30 seconds.
3. Inside the vehicle, firmly press, hold for
2 seconds and release the HomeLink
®button that was programmed in the pre-
vious section. Press and release the
button a second time to complete the
programming procedure.
NOTE
Some garage door openers may re-
quire you to do the above press-hold-
release sequence a third time to com-
plete the programming.
4. The garage door opener should now
recognize the HomeLink
®Wireless Control
System and your garage door opener
should activate when the HomeLink
®button is pressed.
!Programming for entrance gates
and garage door openers in
Canada
1. Unplug the motor of the entrance gate
or garage door opener from the outlet.
NOTE
If any of the HomeLink®buttons are
already programmed for other devices,
skip step 2 because it clears the
memory of all three buttons.
3-60
Page 213 of 572
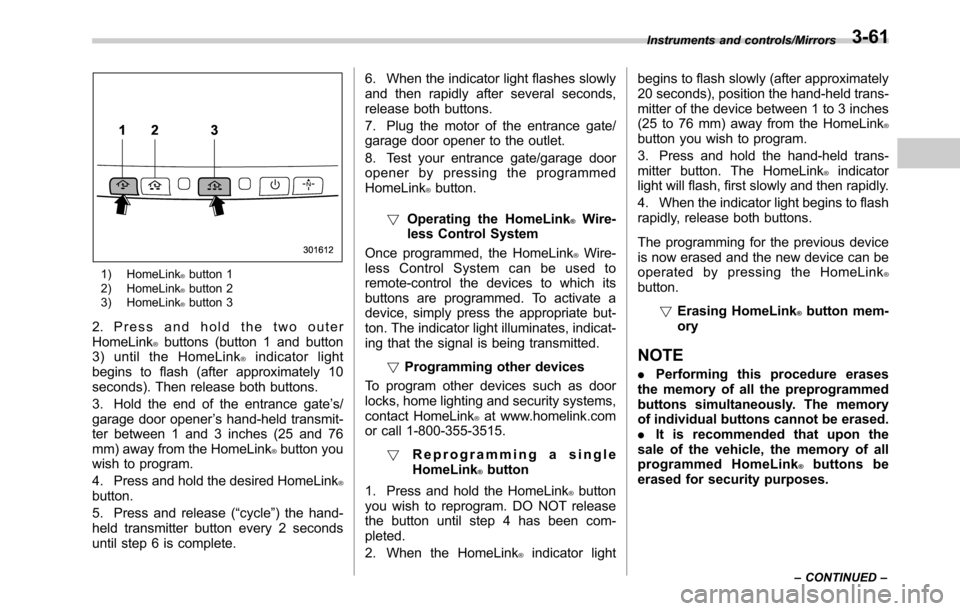
1) HomeLink®button 1
2) HomeLink®button 2
3) HomeLink®button 3
2. Press and hold the two outer
HomeLink®buttons (button 1 and button
3) until the HomeLink®indicator light
begins to flash (after approximately 10
seconds). Then release both buttons.
3. Hold the end of the entrance gate’s/
garage door opener’s hand-held transmit-
ter between 1 and 3 inches (25 and 76
mm) away from the HomeLink
®button you
wish to program.
4. Press and hold the desired HomeLink
®button.
5. Press and release (“cycle”) the hand-
held transmitter button every 2 seconds
until step 6 is complete.6. When the indicator light flashes slowly
and then rapidly after several seconds,
release both buttons.
7. Plug the motor of the entrance gate/
garage door opener to the outlet.
8. Test your entrance gate/garage door
opener by pressing the programmed
HomeLink
®button.
!Operating the HomeLink
®Wire-
less Control System
Once programmed, the HomeLink
®Wire-
less Control System can be used to
remote-control the devices to which its
buttons are programmed. To activate a
device, simply press the appropriate but-
ton. The indicator light illuminates, indicat-
ing that the signal is being transmitted.
!Programming other devices
To program other devices such as door
locks, home lighting and security systems,
contact HomeLink
®at www.homelink.com
or call 1-800-355-3515.
!Reprogramming a single
HomeLink
®button
1. Press and hold the HomeLink
®button
you wish to reprogram. DO NOT release
the button until step 4 has been com-
pleted.
2. When the HomeLink
®indicator lightbegins to flash slowly (after approximately
20 seconds), position the hand-held trans-
mitter of the device between 1 to 3 inches
(25 to 76 mm) away from the HomeLink
®button you wish to program.
3. Press and hold the hand-held trans-
mitter button. The HomeLink
®indicator
light will flash, first slowly and then rapidly.
4. When the indicator light begins to flash
rapidly, release both buttons.
The programming for the previous device
is now erased and the new device can be
operated by pressing the HomeLink
®button.
!Erasing HomeLink
®button mem-
ory
NOTE
.Performing this procedure erases
the memory of all the preprogrammed
buttons simultaneously. The memory
of individual buttons cannot be erased.
.It is recommended that upon the
sale of the vehicle, the memory of all
programmed HomeLink
®buttons be
erased for security purposes.
Instruments and controls/Mirrors
–CONTINUED–3-61
Page 214 of 572
Instruments and controls/Mirrors
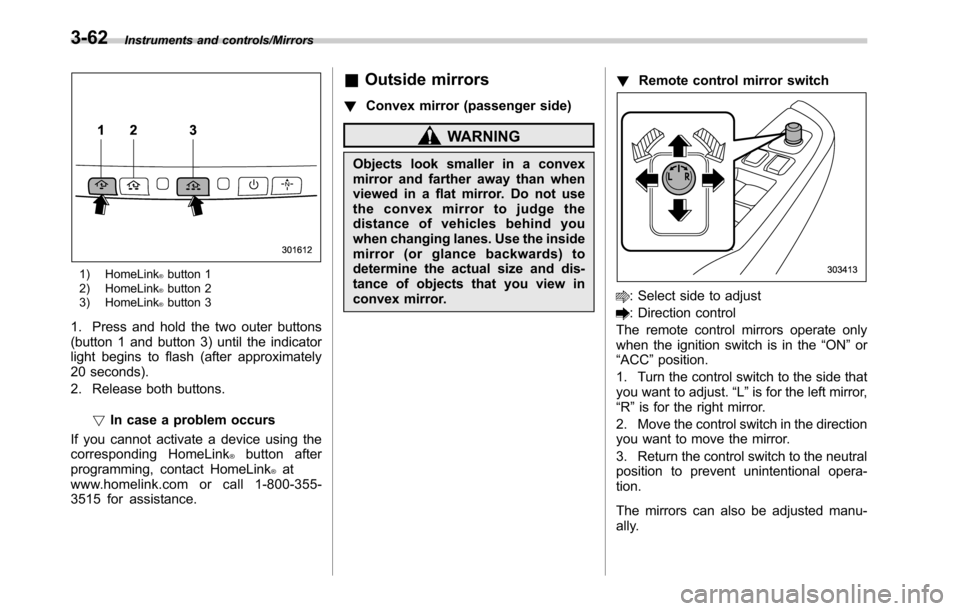
1) HomeLink®button 1
2) HomeLink®button 2
3) HomeLink®button 3
1. Press and hold the two outer buttons
(button 1 and button 3) until the indicator
light begins to flash (after approximately
20 seconds).
2. Release both buttons.
!In case a problem occurs
If you cannot activate a device using the
corresponding HomeLink
®button after
programming, contact HomeLink®at
www.homelink.com or call 1-800-355-
3515 for assistance.
&Outside mirrors
!Convex mirror (passenger side)
WARNING
Objects look smaller in a convex
mirror and farther away than when
viewed in a flat mirror. Do not use
the convex mirror to judge the
distance of vehicles behind you
when changing lanes. Use the inside
mirror (or glance backwards) to
determine the actual size and dis-
tance of objects that you view in
convex mirror.!Remote control mirror switch
: Select side to adjust
: Direction control
The remote control mirrors operate only
when the ignition switch is in the“ON”or
“ACC”position.
1. Turn the control switch to the side that
you want to adjust.“L”is for the left mirror,
“R”is for the right mirror.
2. Move the control switch in the direction
you want to move the mirror.
3. Return the control switch to the neutral
position to prevent unintentional opera-
tion.
The mirrors can also be adjusted manu-
ally.
3-62
Page 219 of 572
Climate control panel
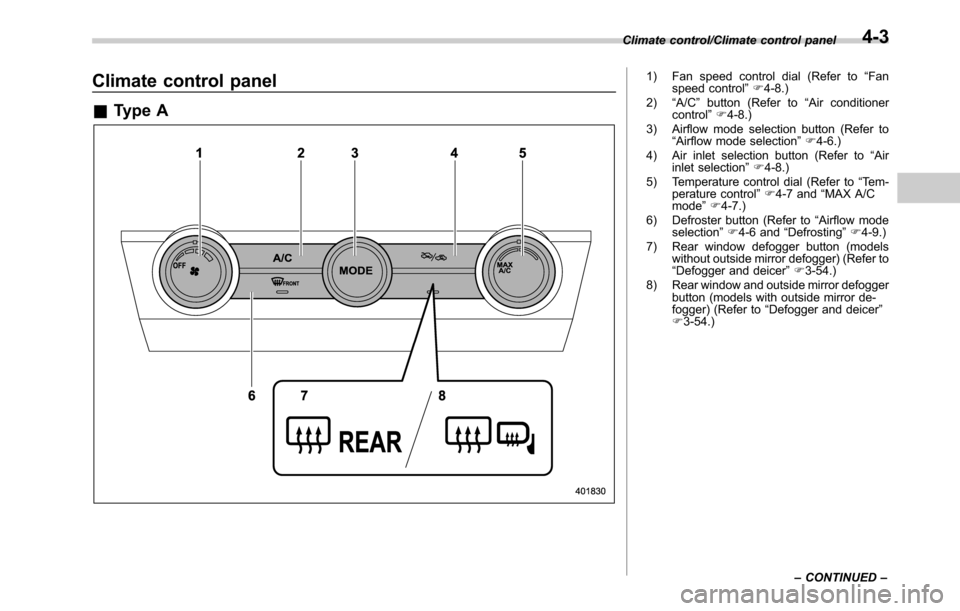
&Type A
1) Fan speed control dial (Refer to“Fan
speed control”F4-8.)
2)“A/C”button (Refer to“Air conditioner
control”F4-8.)
3) Airflow mode selection button (Refer to
“Airflow mode selection”F4-6.)
4) Air inlet selection button (Refer to“Air
inlet selection”F4-8.)
5) Temperature control dial (Refer to“Tem-
perature control”F4-7 and“MAX A/C
mode”F4-7.)
6) Defroster button (Refer to“Airflow mode
selection”F4-6 and“Defrosting”F4-9.)
7) Rear window defogger button (models
without outside mirror defogger) (Refer to
“Defogger and deicer”F3-54.)
8) Rear window and outside mirror defogger
button (models with outside mirror de-
fogger) (Refer to“Defogger and deicer”
F3-54.) Climate control/Climate control panel
–CONTINUED–
4-3
Page 220 of 572
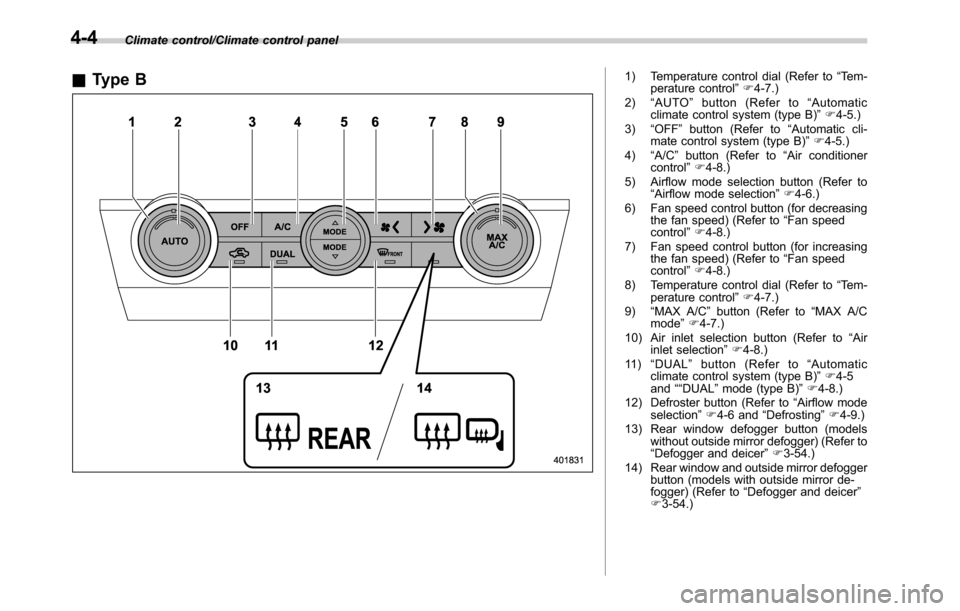
Climate control/Climate control panel
&Type B1) Temperature control dial (Refer to“Tem-
perature control”F4-7.)
2)“AUTO”button (Refer to“Automatic
climate control system (type B)”F4-5.)
3)“OFF”button (Refer to“Automatic cli-
mate control system (type B)”F4-5.)
4)“A/C”button (Refer to“Air conditioner
control”F4-8.)
5) Airflow mode selection button (Refer to
“Airflow mode selection”F4-6.)
6) Fan speed control button (for decreasing
the fan speed) (Refer to“Fan speed
control”F4-8.)
7) Fan speed control button (for increasing
the fan speed) (Refer to“Fan speed
control”F4-8.)
8) Temperature control dial (Refer to“Tem-
perature control”F4-7.)
9)“MAX A/C”button (Refer to“MAX A/C
mode”F4-7.)
10) Air inlet selection button (Refer to“Air
inlet selection”F4-8.)
11 )“DUAL”button (Refer to“Automatic
climate control system (type B)”F4-5
and““DUAL
”mode (type B)”F4-8.)
12) Defroster button (Refer to“Airflow mode
selection”F4-6 and“Defrosting”F4-9.)
13) Rear window defogger button (models
without outside mirror defogger) (Refer to
“Defogger and deicer”F3-54.)
14) Rear window and outside mirror defogger
button (models with outside mirror de-
fogger) (Refer to“Defogger and deicer”
F3-54.)
4-4
Page 323 of 572

Interior light......................................................... 6-2
Dome light.......................................................... 6-2
Map light............................................................. 6-2
Cargo area light (Outback)................................... 6-3
OFF delay timer.................................................. 6-4
Sun visors........................................................... 6-4Vanity mirror with light........................................ 6-5
Storage compartment......................................... 6-6Glove box........................................................... 6-6
Center console.................................................... 6-6
Overhead console............................................... 6-7
Pocket................................................................ 6-7
Cup holder........................................................... 6-8Front passenger’s cup holder.............................. 6-8
Rear passenger’s cup holder............................... 6-9
Bottle holders...................................................... 6-9
Accessory power outlets................................... 6-10
Ashtray (if equipped)......................................... 6-12
Coat hook........................................................... 6-13Shopping bag hook........................................... 6-14
Legacy.............................................................. 6-14
Outback............................................................ 6-14
Convenient grip (Outback)................................ 6-14
Floor mat............................................................ 6-15
Cargo area cover (Outback–if equipped)....... 6-16
Using the cover................................................. 6-16
To install the front cover.................................... 6-17
To remove the front cover.................................. 6-17
To remove the cover housing ............................. 6-17
Stowage of the cargo area cover........................ 6-18
To take out the stowed cover housing................ 6-19
To install the cover housing............................... 6-19
Convenient tie-down hooks (Outback)............. 6-19
Under-floor storage compartment.................... 6-20
Rear view camera.............................................. 6-21
How to use the rear view camera....................... 6-22
Viewing range on the screen.............................. 6-23
Help line............................................................ 6-24
Interior equipment
6
Page 327 of 572
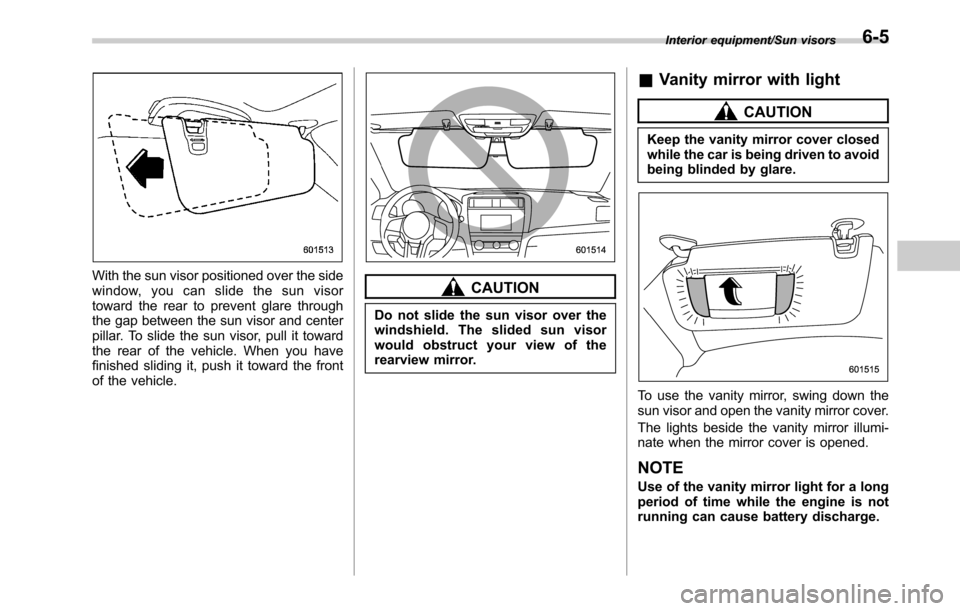
With the sun visor positioned over the side
window, you can slide the sun visor
toward the rear to prevent glare through
the gap between the sun visor and center
pillar. To slide the sun visor, pull it toward
the rear of the vehicle. When you have
finished sliding it, push it toward the front
of the vehicle.CAUTION
Do not slide the sun visor over the
windshield. The slided sun visor
would obstruct your view of the
rearview mirror.
&Vanity mirror with light
CAUTION
Keep the vanity mirror cover closed
while the car is being driven to avoid
being blinded by glare.
To use the vanity mirror, swing down the
sun visor and open the vanity mirror cover.
The lights beside the vanity mirror illumi-
nate when the mirror cover is opened.
NOTE
Use of the vanity mirror light for a long
period of time while the engine is not
running can cause battery discharge.
Interior equipment/Sun visors6-5
Page 343 of 572
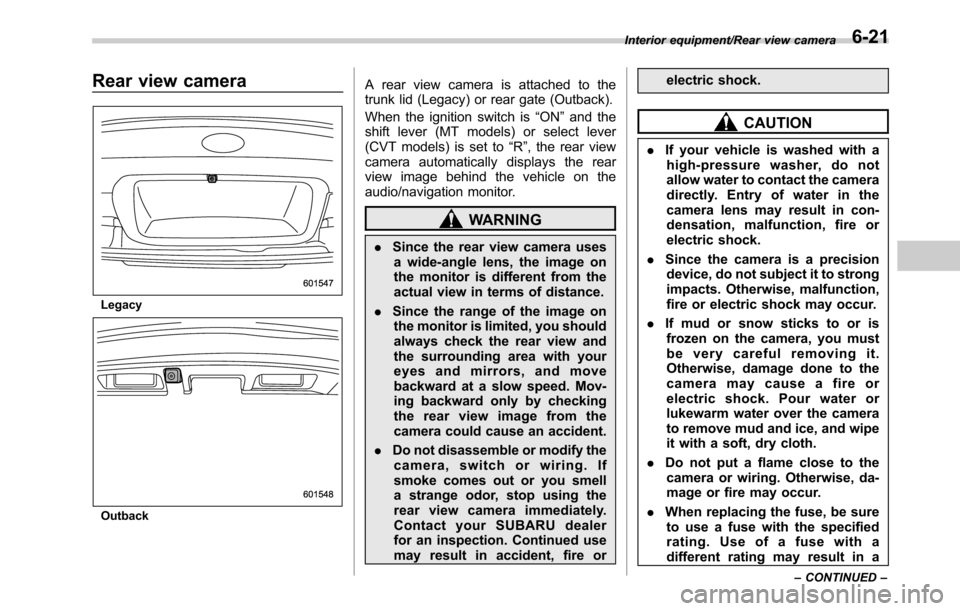
Rear view camera
Legacy
Outback
A rear view camera is attached to the
trunk lid (Legacy) or rear gate (Outback).
When the ignition switch is“ON”and the
shift lever (MT models) or select lever
(CVT models) is set to“R”, the rear view
camera automatically displays the rear
view image behind the vehicle on the
audio/navigation monitor.
WARNING
.Since the rear view camera uses
a wide-angle lens, the image on
the monitor is different from the
actual view in terms of distance.
.Since the range of the image on
the monitor is limited, you should
always check the rear view and
the surrounding area with your
eyes and mirrors, and move
backward at a slow speed. Mov-
ing backward only by checking
the rear view image from the
camera could cause an accident.
.Do not disassemble or modify the
camera, switch or wiring. If
smoke comes out or you smell
a strange odor, stop using the
rear view camera immediately.
Contact your SUBARU dealer
for an inspection. Continued use
may result in accident, fire orelectric shock.
CAUTION
.If your vehicle is washed with a
high-pressure washer, do not
allow water to contact the camera
directly. Entry of water in the
camera lens may result in con-
densation, malfunction, fire or
electric shock.
.Since the camera is a precision
device, do not subject it to strong
impacts. Otherwise, malfunction,
fire or electric shock may occur.
.If mud or snow sticks to or is
frozen on the camera, you must
be very careful removing it.
Otherwise, damage done to the
camera may cause a fire or
electric shock. Pour water or
lukewarm water over the camera
to remove mud and ice, and wipe
it with a soft, dry cloth.
.Do not put a flame close to the
camera or wiring. Otherwise, da-
mage or fire may occur.
.When replacing the fuse, be sure
to use a fuse with the specified
rating. Use of a fuse with a
different rating may result in a
Interior equipment/Rear view camera
–CONTINUED–6-21
Page 344 of 572

Interior equipment/Rear view camera
malfunction.
.If the rear view camera is used for
a long time while the engine is
not operated, the battery may
become completely discharged.
NOTE
.Do not wipe the camera with alcohol,
benzine or paint thinner. Otherwise,
discoloration may occur. To remove
contamination, wipe the camera with a
cloth moistened with a diluted neutral
detergent and then wipe it with a soft,
dry cloth.
.When waxing the vehicle, be careful
not to apply the wax to the camera. If it
comes in contact with the camera,
moisten a clean cloth with a diluted
neutral detergent to remove the wax.
.The camera lens has hard coating to
help prevent scratches. However, when
washing the vehicle or cleaning the
camera lens, be careful not to scratch
the camera lens. Do not use a washing
brush directly on the camera lens. The
monitor screen may be adversely af-
fected.
.Strong light shined on the camera
lens may develop white light stripes
around the light source. This is not a
malfunction..Under fluorescent lighting, the dis-
play may flicker. However, this is not a
malfunction.
.The image of the rear view camera
may be slightly different from the
actual color of the objects.&How to use the rear view
camera
When performing the following procedure,
the rear view camera automatically dis-
plays the rear view image from the
vehicle.
1. Set the ignition switch to“ON”.
2. Set the shift lever or select lever to“R”.
When any of the following conditions
occur, the image before setting to“R”will
be displayed.
.Several seconds have passed since
the shift lever is set to a position other than
“R”(MT models) (off delay function).
.Several seconds have passed since
the select lever is set to a position other
than“P”or“R”(CVT models) (off delay
function).
.The vehicle speed is more than 5 mph
(8 km/h).
.The select lever is set to“P”(CVT
models).
NOTE
.For models with the genuine
SUBARU navigation system, the image
of the rear view camera has priority
over other screen displays. To operate
other screens, set the shift lever (MT
models) or select lever (CVT models) to
a position other than“R”.
.The image of the rear view camera is
horizontally reversed as is the case
with the vehicle rear view mirror or the
side view mirror.
.It may be difficult to see the image of
the rear view camera in the following
cases. This is not a malfunction of the
camera.
–The vehicle is in a dark place (at
night, in a tunnel, etc.).
–The vehicle is in an extremely hot
or cold place.
–An object (such as raindrops,
snow, dirt, etc.) that disturbs the
view of the rear view camera sticks
to the lens of the camera.
–Strong light shined directly on
the camera lens (occasionally, there
are vertical lines on the screen).
6-22