sensor SUBARU LEGACY 2017 6.G User Guide
[x] Cancel search | Manufacturer: SUBARU, Model Year: 2017, Model line: LEGACY, Model: SUBARU LEGACY 2017 6.GPages: 610
Page 94 of 610
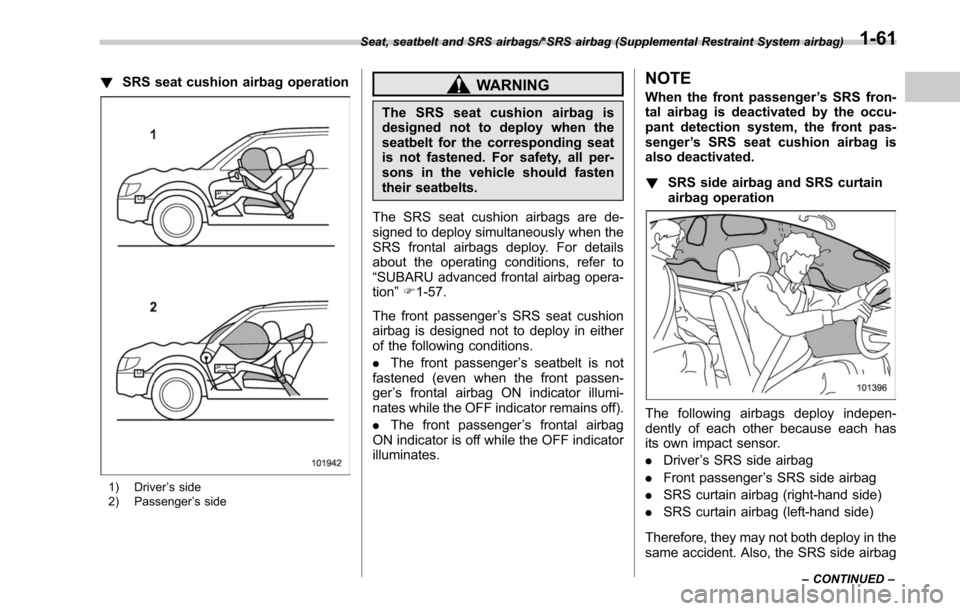
!SRS seat cushion airbag operation
1) Driver ’s side
2) Passenger ’s side
WARNING
The SRS seat cushion airbag is
designed not to deploy when the
seatbelt for the corresponding seat
is not fastened. For safety, all per-
sons in the vehicle should fasten
their seatbelts.
The SRS seat cushion airbags are de-
signed to deploy simultaneously when the
SRS frontal airbags deploy. For details
about the operating conditions, refer to
“SUBARU advanced frontal airbag opera-
tion ”F 1-57.
The front passenger ’s SRS seat cushion
airbag is designed not to deploy in either
of the following conditions.
. The front passenger ’s seatbelt is not
fastened (even when the front passen-
ger ’s frontal airbag ON indicator illumi-
nates while the OFF indicator remains off).
. The front passenger ’s frontal airbag
ON indicator is off while the OFF indicator
illuminates.
NOTE
When the front passenger ’s SRS fron-
tal airbag is deactivated by the occu-
pant detection system, the front pas-
senger ’s SRS seat cushion airbag is
also deactivated.
! SRS side airbag and SRS curtain
airbag operation
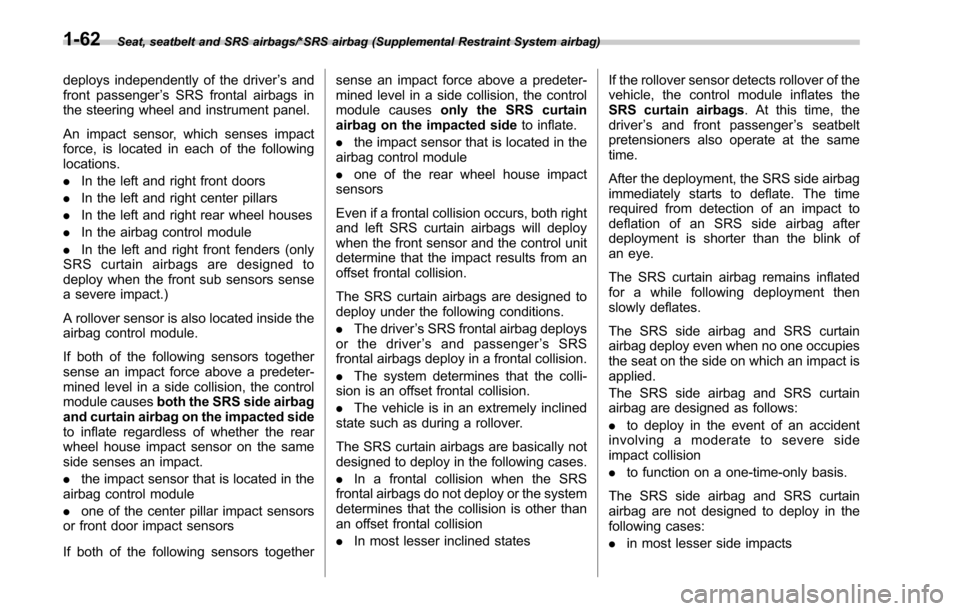
The following airbags deploy indepen-
dently of each other because each has
its own impact sensor.
.Driver ’s SRS side airbag
. Front passenger ’s SRS side airbag
. SRS curtain airbag (right-hand side)
. SRS curtain airbag (left-hand side)
Therefore, they may not both deploy in the
same accident. Also, the SRS side airbag
Seat, seatbelt and SRS airbags/*SRS airbag (Supplemental Restraint System airbag)
–CONTINUED –1-61
Page 95 of 610
Seat, seatbelt and SRS airbags/*SRS airbag (Supplemental Restraint System airbag)
deploys independently of the driver’s and
front passenger ’s SRS frontal airbags in
the steering wheel and instrument panel.
An impact sensor, which senses impact
force, is located in each of the following
locations.
. In the left and right front doors
. In the left and right center pillars
. In the left and right rear wheel houses
. In the airbag control module
. In the left and right front fenders (only
SRS curtain airbags are designed to
deploy when the front sub sensors sense
a severe impact.)
A rollover sensor is also located inside the
airbag control module.
If both of the following sensors together
sense an impact force above a predeter-
mined level in a side collision, the control
module causes both the SRS side airbag
and curtain airbag on the impacted side
to inflate regardless of whether the rear
wheel house impact sensor on the same
side senses an impact.
. the impact sensor that is located in the
airbag control module
. one of the center pillar impact sensors
or front door impact sensors
If both of the following sensors together sense an impact force above a predeter-
mined level in a side collision, the control
module causes
only the SRS curtain
airbag on the impacted side to inflate.
. the impact sensor that is located in the
airbag control module
. one of the rear wheel house impact
sensors
Even if a frontal collision occurs, both right
and left SRS curtain airbags will deploy
when the front sensor and the control unit
determine that the impact results from an
offset frontal collision.
The SRS curtain airbags are designed to
deploy under the following conditions.
. The driver ’s SRS frontal airbag deploys
or the driver ’s and passenger ’sSRS
frontal airbags deploy in a frontal collision.
. The system determines that the colli-
sion is an offset frontal collision.
. The vehicle is in an extremely inclined
state such as during a rollover.
The SRS curtain airbags are basically not
designed to deploy in the following cases.
. In a frontal collision when the SRS
frontal airbags do not deploy or the system
determines that the collision is other than
an offset frontal collision
. In most lesser inclined states If the rollover sensor detects rollover of the
vehicle, the control module inflates the
SRS curtain airbags
. At this time, the
driver ’s and front passenger ’s seatbelt
pretensioners also operate at the same
time.
After the deployment, the SRS side airbag
immediately starts to deflate. The time
required from detection of an impact to
deflation of an SRS side airbag after
deployment is shorter than the blink of
an eye.
The SRS curtain airbag remains inflated
for a while following deployment then
slowly deflates.
The SRS side airbag and SRS curtain
airbag deploy even when no one occupies
the seat on the side on which an impact is
applied.
The SRS side airbag and SRS curtain
airbag are designed as follows:
. to deploy in the event of an accident
involvingamoderatetosevereside
impact collision
. to function on a one-time-only basis.
The SRS side airbag and SRS curtain
airbag are not designed to deploy in the
following cases:
. in most lesser side impacts
1-62
Page 102 of 610
by the indicator.
.Front sub sensor
– Right-hand side
– Left-hand side
. Airbag control module (including im-
pact sensors and rollover sensors)
. Frontal airbag module
– Driver ’s side
– Front passenger ’s side
. Center pillar impact sensor
– Right-hand side
– Left-hand side
. Front door impact sensor
– Right-hand side
– Left-hand side
. Side airbag module
– Driver ’s side
– Front passenger ’s side
. Rear wheel house impact sensor
– Right-hand side
– Left-hand side
. Curtain airbag module
– Right-hand side
– Left-hand side
. Seat cushion airbag module
– Driver ’s side
– Front passenger ’s side
. Seatbelt pretensioner
– Driver ’s side
– Front passenger ’s side .
Seatbelt buckle switch
– Driver ’s side
– Front passenger ’s side
. Front passenger ’s occupant detection
system sensor and control module
. Front passenger ’s seatbelt tension
sensor
. Front passenger ’s frontal airbag ON
and OFF indicator
. All related wiring
WARNING
If the warning light exhibits any of
the following conditions, there may
be a malfunction in the seatbelt
pretensioners and/or SRS airbag
system.
.Flashing or flickering of the warn-
ing light
. No illumination of the warning
light when the ignition switch is
first turned to the “ON ”position
. Continuous illumination of the
warning light
. Illumination of the warning light
while driving
Immediatelytakeyourvehicleto
your nearest SUBARU dealer to
have the system checked. Unless
checked and properly repaired, the seatbelt pretensioners and/or SRS
airbags will operate improperly (e.g.
SRS airbags may inflate in a very
minor collision or not inflate in a
severe collision), which may in-
crease the risk of injury.
&
SRS airbag system servicing
WARNING
. When discarding an airbag mod-
ule or scrapping the entire vehi-
cle damaged by a collision, con-
sult your SUBARU dealer.
. The SRS airbag has no user-
serviceable parts. Do not use
electrical test equipment on any
circuit related to the SRS airbag
system. For required servicing of
the SRS airbag, consult your
nearest SUBARU dealer. Tamper-
ing with or disconnecting the
system ’s wiring could result in
accidental inflation of the SRS
airbag or could make the system
inoperative, which may result in
serious injury.
Seat, seatbelt and SRS airbags/*SRS airbag (Supplemental Restraint System airbag)
–CONTINUED –1-69
Page 103 of 610
Seat, seatbelt and SRS airbags/*SRS airbag (Supplemental Restraint System airbag)
CAUTION
If you need service or repair in areas
indicated in the following list, have
the work performed by an author-
ized SUBARU dealer. The SRS air-
bag control module, impact sensors
and airbag modules are stored in
these areas.
.Under the center console
. Inside each front fender
. Steering wheel and column and
nearby areas
. Top of the dashboard on front
passenger ’ssideandnearby
areas
. Each front seat and nearby area
. Inside each center pillar
. Inside each front door
. In each roof side (from the front
pillar to a point over the rear seat)
. Between the rear seat cushion
and rear wheel house on each
side
. Under the rear center seat
In the event that the SRS airbag is
deployed, replacement of the system
should be performed only by an author-
ized SUBARU dealer. When the compo- nents of the SRS airbag system are
replaced, use only genuine SUBARU
parts.
NOTE
In the following cases, contact your
SUBARU dealer as soon as possible.
.
The front part of the vehicle was
involved in an accident in which only
the driver ’s SRS frontal airbag or both
driver ’s and front passenger ’sSRS
frontal airbags did not deploy.
. The pad of the steering wheel, the
cover over the front passenger ’s SRS
frontal airbag, or either roof side (from
the front pillar to a point over the rear
seat) is scratched, cracked, or other-
wise damaged.
. The center pillar, front door, rear
wheel house or rear sub frame, or an
area near these parts, was involved in
an accident in which the SRS side
airbag and SRS curtain airbag did not
deploy.
. The fabric or leather of either front
seatback and seat cushion is cut,
frayed, or otherwise damaged.
. The rear part of the vehicle was
involved in an accident.
& Precautions against vehicle
modification
WARNING
. To avoid accidental activation of
the system or rendering the sys-
tem inoperative, which may re-
sult in serious injury, no modifi-
cations should be made to any
components or wiring of the SRS
airbag system.
This includes the following mod-
ifications.
– Installation of custom steering
wheels
– Attachment of additional trim
materials to the dashboard
– Installation of custom seats
– Replacement of seat fabric or
leather
– Installation of additional fabric
or leather on the front seat
– Attachment of a hands-free
microphone or any other ac-
cessory to a front pillar, a
center pillar, a rear pillar, the
windshield, a side window, an
assist grip, or any other cabin
surface that would be near a
1-70
Page 104 of 610
deploying SRS curtain airbag
– Installation of additional elec-
trical/electronic equipment
such as a mobile two-way
radio on or near the SRS
airbag system components
and/or wiring
– Modifications on or inside the
front door panels for the pur-
pose of a speaker replace-
ment or sound insulation
. The impact sensors, which detect
the pressure of an impact, are
located in the doors. Do not
modify any components of the
doors or door trims, such as the
addition of door speakers for
example. Any modifications to
the doors create a risk of the
airbag system becoming inop-
erative or unintended airbag de-
ployment.
CAUTION
Do not perform any of the following
modifications. Such modifications
can interfere with proper operation
of the SRS airbag system.
. Attachment of any equipment
(bush bar, bullbar, winches, snow plow, skid/sump plate, etc.) other
than genuine SUBARU acces-
sory parts.
. Modification of the suspension
system or front end structure.
. Installation of a tire of different
size and construction from the
tires specified on the vehicle
placard attached to the driver ’s
door pillar or specified for indivi-
dual vehicle models in this Own-
er ’s Manual.
. Attachment of any equipment
(side steps or side sill protectors,
etc.) other than genuine SUBARU
accessory parts to the side body.
Always consult your SUBARU dealer if
you want to install any accessory parts on
your vehicle.
Seat, seatbelt and SRS airbags/*SRS airbag (Supplemental Restraint System airbag)1-71
Page 106 of 610
Keys..................................................................... 2-3
Key number plate ................................................ 2-3
Immobilizer.......................................................... 2-4Certification for immobilizer system ..................... 2-4
Security indicator light ........................................ 2-5
Key replacement ................................................. 2-5
Door locks........................................................... 2-6Locking and unlocking from the outside . ............. 2-6
Locking and unlocking from the inside ................ 2-7
Battery drainage prevention function ................... 2-8
Power door locking switches............................. 2-9Key lock-in prevention function ........................... 2-9
Keyless access with push-button start
system (if equipped) ....................................... 2-10
Access key........................................................ 2-10
Safety precautions ............................................. 2-11
Locking and unlocking with “keyless access ”
entry function. .................................................. 2-14
Selecting audible signal operation ...................... 2-18
Selecting hazard warning flasher operation ......... 2-18
Warning chimes and warning indicator ............... 2-18
Disabling keyless access function ...................... 2-18
When access key does not operate properly ....... 2-20
Replacing battery of access key ......................... 2-20
Replacing access key ......................................... 2-20
Certification for keyless access with push-button start system ..................................................... 2-21
PIN Code Access (models with “keyless
access with push-button start system ”) ....... 2-22
Registering a PIN code ...................................... 2-22
Unlocking .......................................................... 2-23
Remote keyless entry system ........................... 2-24Operating the access key................................... 2-25
Operating the transmitter ................................... 2-26
Replacing the battery ......................................... 2-27
Replacing lost transmitters ................................ 2-27
Certification for remote keyless entry system ..... 2-27
Alarm system..................................................... 2-28System alarm operation ..................................... 2-29
Activating and deactivating the alarm system ..... 2-29
If you have accidentally triggered the alarm system ............................................................ 2-29
Arming the system ............................................ 2-30
Disarming the system ........................................ 2-32
Valet mode ........................................................ 2-33
Tripped sensor identification .............................. 2-33
Shock sensors (dealer option).. .......................... 2-33
Child safety locks.............................................. 2-34
Windows ............................................................. 2-34
Power window operation by driver ..................... 2-34
Power window operation by passengers ............. 2-37
Initialization of power window .. .......................... 2-38
Trunk lid (Legacy).............................................. 2-38
To open and close the trunk lid from outside . ..... 2-39
To open the trunk lid from inside. ....................... 2-39
Internal trunk lid release handle ......................... 2-39
Keys and doors
2
Page 120 of 610
ground, even if it is in the indicated
operating range.
.The status of the access key and the
radio wave conditions around the vehicle
(in this case, perform the procedure
described in “Locking and unlocking ”
F 9-18.
Precautions:
. When the access key is within the
operating range, it is possible for anyone,
even someone who is not carrying the
access key, to operate the keyless access
function. Please note that the keyless
access function is only available for the
following items when the access key is
detected within operating range.
–Door handle
– Door lock sensor
– Rear gate opener button (Outback)
– Trunk opener button (Legacy)
– Rear lock button (Outback)
. It is not possible to lock the doors and
rear gate using the keyless access func-
tion when the access key is inside the
vehicle. However, depending on the status
of the access key and the environmental
conditions, the access key may be locked
inside the vehicle. Before locking, make
sure that you have the access key.
. The operating ranges may be reduced,
or the keyless access function may not operate in the following cases:
–When the battery of the access key
is discharged
– When the access key is in a
location with strong radio waves or
noise (e.g., near a radio tower, power
plant, broadcast station or an area
where wireless equipment is used)
– While talking on a cell phone
In such a case, perform the procedure
described in “Locking and unlocking ”
F 9-18.
. When an access key is in the operating
range, if the door handle becomes wet
due to exposure to a significant amount of
water when the vehicle is washed or
during heavy rain, the doors may be
locked or unlocked.
! How to use keyless access func-
tions
! Keyless access function tips
. Turn off the push-button ignition switch
before locking the doors (including rear
gate) using the keyless access function. It
is not possible to lock the doors (including
the rear gate) using the keyless access
function when the push-button ignition
switch is on the “ACC”or “ON ”position.
For details about turning off the push- button ignition switch, refer to
“Switching
power status ”F 3-7.
. If the door handle is gripped with a
gloved hand, the door lock may not be
released.
. If the door lock sensor is touched three
times or more repeatedly, the system will
ignore the sensor operation.
. When performing the locking proce-
dure too quickly, locking may not have
been completed. After locking the doors, it
is recommended to pull the REAR door
handles to confirm that the doors have
been locked.
. It is possible to lock the doors even
when one of the doors is open. After
performing the locking procedure, close
the opened door or rear gate to lock it.
. Within 3 seconds after locking the
doors and the rear gate by using the
keyless access function, it is not possible
to unlock doors and/or the rear gate by
using the keyless access function.
. When locking, be sure to carry the
access key to prevent locking the access
key in the vehicle.
Keys and doors/Keyless access with push –button start system
–CONTINUED –2-15
Page 122 of 610
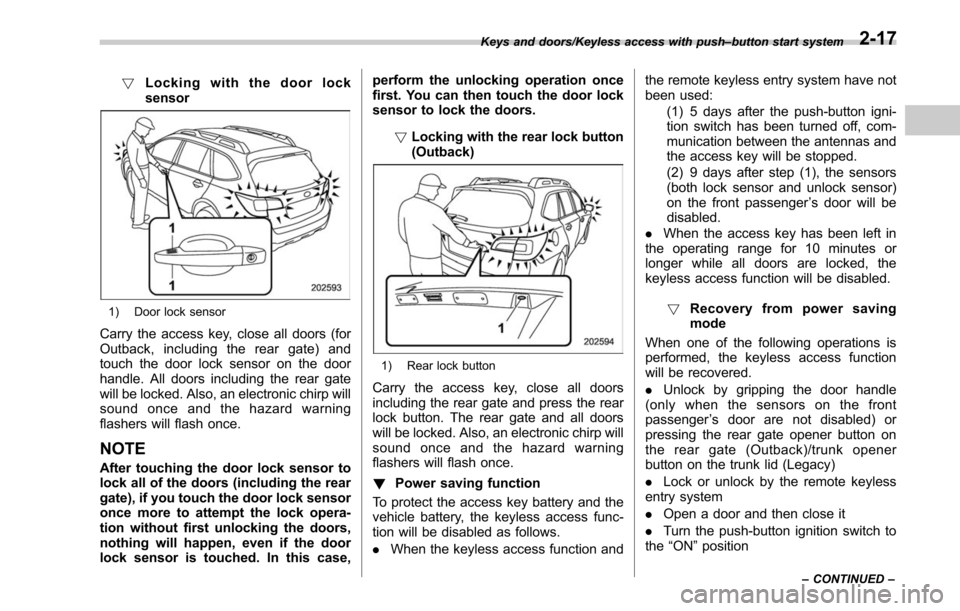
!Locking with the door lock
sensor
1) Door lock sensor
Carry the access key, close all doors (for
Outback, including the rear gate) and
touch the door lock sensor on the door
handle. All doors including the rear gate
will be locked. Also, an electronic chirp will
sound once and the hazard warning
flashers will flash once.
NOTE
After touching the door lock sensor to
lock all of the doors (including the rear
gate), if you touch the door lock sensor
once more to attempt the lock opera-
tion without first unlocking the doors,
nothing will happen, even if the door
lock sensor is touched. In this case, perform the unlocking operation once
first. You can then touch the door lock
sensor to lock the doors.
!Locking with the rear lock button
(Outback)
1) Rear lock button
Carry the access key, close all doors
including the rear gate and press the rear
lock button. The rear gate and all doors
will be locked. Also, an electronic chirp will
sound once and the hazard warning
flashers will flash once.
! Power saving function
To protect the access key battery and the
vehicle battery, the keyless access func-
tion will be disabled as follows.
. When the keyless access function and the remote keyless entry system have not
been used:
(1) 5 days after the push-button igni-
tion switch has been turned off, com-
munication between the antennas and
the access key will be stopped.
(2) 9 days after step (1), the sensors
(both lock sensor and unlock sensor)
on the front passenger ’s door will be
disabled.
. When the access key has been left in
the operating range for 10 minutes or
longer while all doors are locked, the
keyless access function will be disabled.
! Recovery from power saving
mode
When one of the following operations is
performed, the keyless access function
will be recovered.
. Unlock by gripping the door handle
(only when the sensors on the front
passenger ’s door are not disabled) or
pressing the rear gate opener button on
the rear gate (Outback)/trunk opener
button on the trunk lid (Legacy)
. Lock or unlock by the remote keyless
entry system
. Open a door and then close it
. Turn the push-button ignition switch to
the “ON ”position
Keys and doors/Keyless access with push –button start system
–CONTINUED –2-17
Page 134 of 610
&System alarm operation
The alarm system will give the following
alarms when triggered.
. The vehicle’ s horn will sound for 30
seconds.
. The hazard warning flashers will flash
for 30 seconds.
If any of the doors (or the rear gate/trunk
lid) remains open after the 30-second
period, the horn will continue to sound
for a maximum of 3 minutes. If the door (or
the rear gate/trunk lid) is closed while the
horn is sounding, the horn will stop
sounding with a delay of up to 30 seconds.
The alarm is triggered by:
. Opening any of the doors, rear gate or
the trunk lid
. Physical impact to the vehicle, such as
forced entry (only models with shock
sensors (dealer option))
NOTE
The alarm system can be set to trigger
the illumination of the following interior
lights.
. Map lights
. Dome light (illuminates only when
the dome light switch is in the “DOOR ”
position)
. Cargo area light (Outback) The notifications regarding the map
lights, dome light and cargo area light
(Outback) are deactivated as the fac-
tory setting. A SUBARU dealer can
activate the system. Contact your
SUBARU dealer for details.
&
Activating and deactivating
the alarm system
To change the setting of your vehicle’ s
alarm system for activation or deactiva-
tion, do the following.
1. Disarm the alarm system. Refer to
“Disarming the system ”F 2-32.
2. Sit in the driver ’s seat and shut all
doors (and the rear gate (Outback)).
3. Turn the ignition switch to the “ON”
position.
4. Hold down the REAR (UNLOCK) side
of the driver ’s power door locking switch,
open the driver ’s door within the following
1 second, and wait 10 seconds without
releasing the switch. The setting will then
be changed as follows:
If the system was previously activated:
The odometer screen displays “ALOF ”
and the horn sounds twice, indicating that
the system is now deactivated. If the system was previously deacti-
vated:
The odometer screen displays
“ALON”
and the horn sounds once, indicating that
the system is now activated.
NOTE
You may have the above setting
change done by your SUBARU dealer.
& If you have accidentally trig-
gered the alarm system
! To stop the alarm
Perform any of the following operations.
. Press any button on the access key/
remote transmitter.
. Turn the ignition switch to the “ON”
position (models without “keyless access
with push-button start system ”).
. Turn the push-button ignition switch to
the “ACC ”position (models with “keyless
access with push-button start system ”).
NOTE
Only registered keys will stop the
alarm. If the key is not registered, the
alarm will not stop.
Keys and doors/Alarm system
–CONTINUED –2-29
Page 137 of 610
Keys and doors/Alarm system
!To arm the system using the key-
less access function (if equipped)
1. Close all windows and the moonroof (if
equipped)
2. Turn the push-button ignition switch to
the “OFF ”position.
3. Open the doors and get out of the
vehicle.
4. Make sure that the engine hood is
locked.
5. Close all doors and the rear gate/trunk
lid.
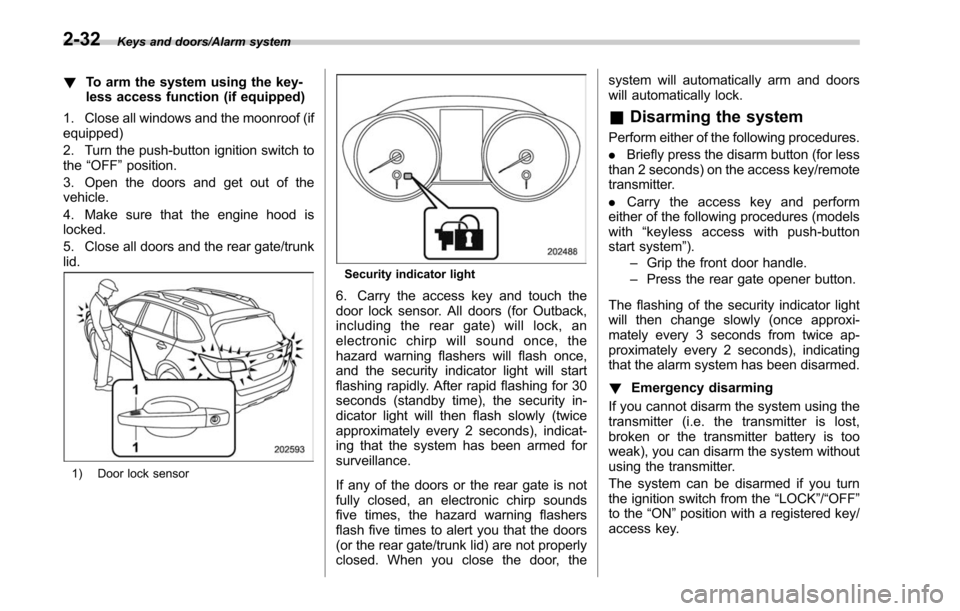
1) Door lock sensor
Security indicator light
6. Carry the access key and touch the
door lock sensor. All doors (for Outback,
including the rear gate) will lock, an
electronic chirp will sound once, the
hazard warning flashers will flash once,
and the security indicator light will start
flashing rapidly. After rapid flashing for 30
seconds (standby time), the security in-
dicator light will then flash slowly (twice
approximately every 2 seconds), indicat-
ing that the system has been armed for
surveillance.
If any of the doors or the rear gate is not
fully closed, an electronic chirp sounds
five times, the hazard warning flashers
flash five times to alert you that the doors
(or the rear gate/trunk lid) are not properly
closed. When you close the door, the system will automatically arm and doors
will automatically lock.
&
Disarming the system
Perform either of the following procedures.
. Briefly press the disarm button (for less
than 2 seconds) on the access key/remote
transmitter.
. Carry the access key and perform
either of the following procedures (models
with “keylessaccesswithpush-button
start system ”).
– Grip the front door handle.
– Press the rear gate opener button.
The flashing of the security indicator light
will then change slowly (once approxi-
mately every 3 seconds from twice ap-
proximately every 2 seconds), indicating
that the alarm system has been disarmed.
! Emergency disarming
If you cannot disarm the system using the
transmitter (i.e. the transmitter is lost,
broken or the transmitter battery is too
weak), you can disarm the system without
using the transmitter.
The system can be disarmed if you turn
the ignition switch from the “LOCK”/“OFF”
to the “ON ”position with a registered key/
access key.
2-32