lock SUBARU LEGACY 2022 Getting Started Guide
[x] Cancel search | Manufacturer: SUBARU, Model Year: 2022, Model line: LEGACY, Model: SUBARU LEGACY 2022Pages: 164, PDF Size: 51.03 MB
Page 36 of 164
OVERHEAD CONSOLE
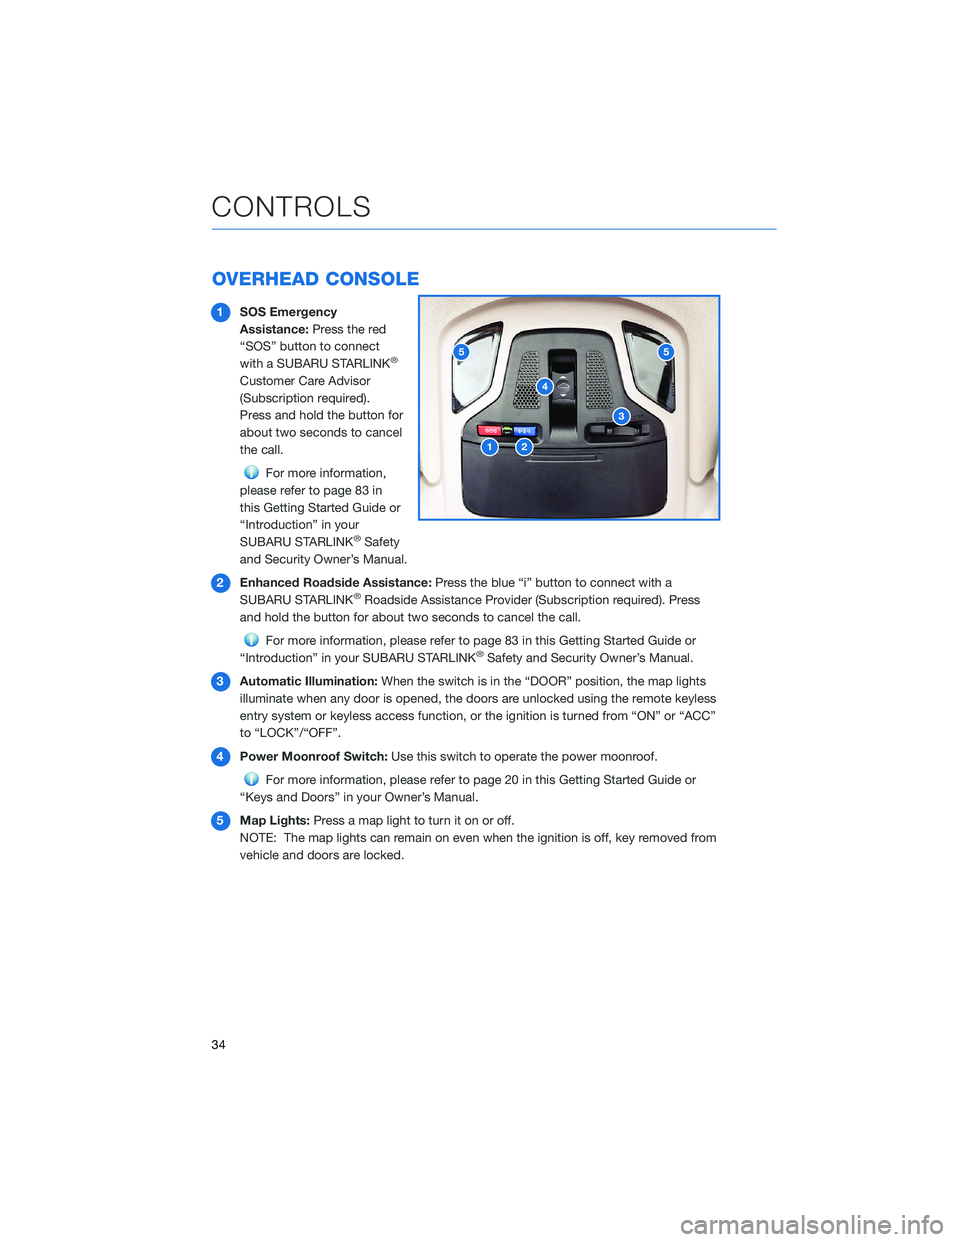
1SOS Emergency
Assistance:Press the red
“SOS” button to connect
with a SUBARU STARLINK
®
Customer Care Advisor
(Subscription required).
Press and hold the button for
about two seconds to cancel
the call.
For more information,
please refer to page 83 in
this Getting Started Guide or
“Introduction” in your
SUBARU STARLINK
®Safety
and Security Owner’s Manual.
2Enhanced Roadside Assistance:Press the blue “i” button to connect with a
SUBARU STARLINK
®Roadside Assistance Provider (Subscription required). Press
and hold the button for about two seconds to cancel the call.
For more information, please refer to page 83 in this Getting Started Guide or
“Introduction” in your SUBARU STARLINK®Safety and Security Owner’s Manual.
3Automatic Illumination:When the switch is in the “DOOR” position, the map lights
illuminate when any door is opened, the doors are unlocked using the remote keyless
entry system or keyless access function, or the ignition is turned from “ON” or “ACC”
to “LOCK”/“OFF”.
4Power Moonroof Switch:Use this switch to operate the power moonroof.
For more information, please refer to page 20 in this Getting Started Guide or
“Keys and Doors” in your Owner’s Manual.
5Map Lights:Press a map light to turn it on or off.
NOTE: The map lights can remain on even when the ignition is off, key removed from
vehicle and doors are locked.
12
3
4
55
CONTROLS
34
Page 39 of 164
IGNITION SWITCH
The ignition switch has four positions:
LOCK:You can only insert or remove the key in this position.
ACC (Accessory):Provides power to the audio system and accessory power outlets.
ON:All electrical systems are available. The key returns to this position after starting the
engine.
START:Turn the key to this position to start the engine.
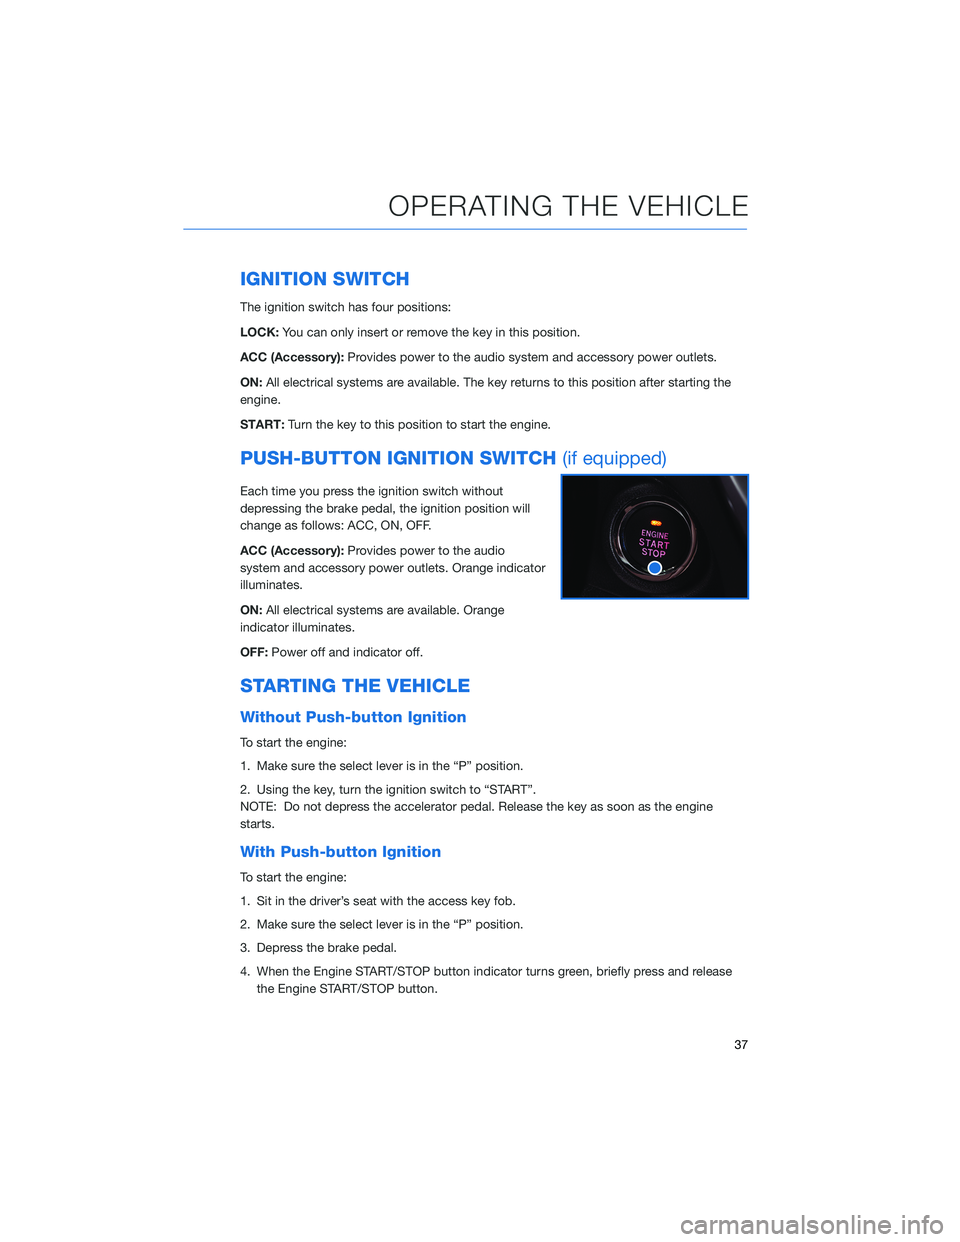
PUSH-BUTTON IGNITION SWITCH(if equipped)
Each time you press the ignition switch without
depressing the brake pedal, the ignition position will
change as follows: ACC, ON, OFF.
ACC (Accessory):Provides power to the audio
system and accessory power outlets. Orange indicator
illuminates.
ON:All electrical systems are available. Orange
indicator illuminates.
OFF:Power off and indicator off.
STARTING THE VEHICLE
Without Push-button Ignition
To start the engine:
1. Make sure the select lever is in the “P” position.
2. Using the key, turn the ignition switch to “START”.
NOTE: Do not depress the accelerator pedal. Release the key as soon as the engine
starts.
With Push-button Ignition
To start the engine:
1. Sit in the driver’s seat with the access key fob.
2. Make sure the select lever is in the “P” position.
3. Depress the brake pedal.
4. When the Engine START/STOP button indicator turns green, briefly press and release
the Engine START/STOP button.
OPERATING THE VEHICLE
37
Page 47 of 164
FUEL FILLER LID
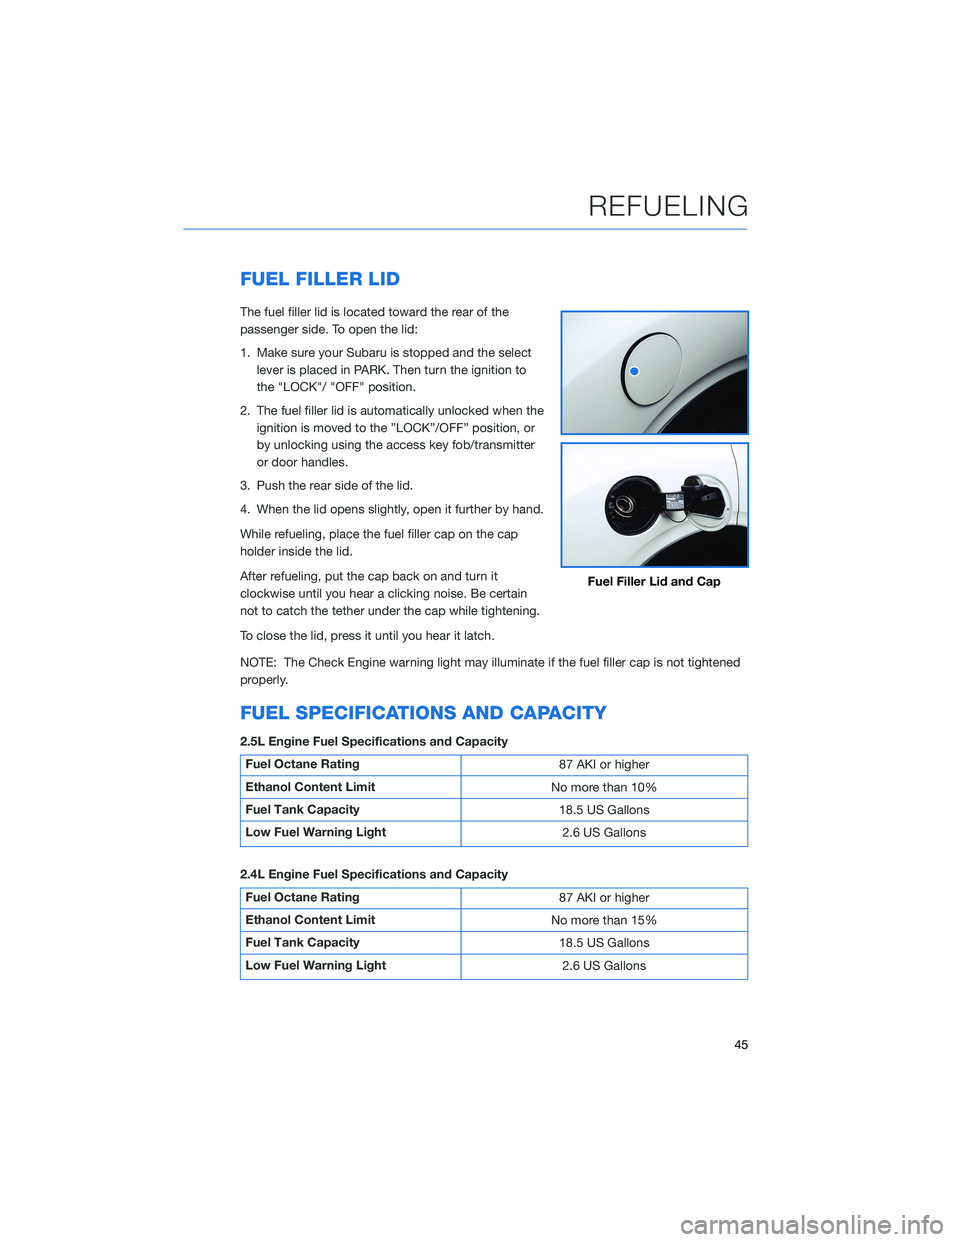
The fuel filler lid is located toward the rear of the
passenger side. To open the lid:
1. Make sure your Subaru is stopped and the select
lever is placed in PARK. Then turn the ignition to
the "LOCK"/ "OFF" position.
2. The fuel filler lid is automatically unlocked when the
ignition is moved to the ”LOCK”/OFF” position, or
by unlocking using the access key fob/transmitter
or door handles.
3. Push the rear side of the lid.
4. When the lid opens slightly, open it further by hand.
While refueling, place the fuel filler cap on the cap
holder inside the lid.
After refueling, put the cap back on and turn it
clockwise until you hear a clicking noise. Be certain
not to catch the tether under the cap while tightening.
To close the lid, press it until you hear it latch.
NOTE: The Check Engine warning light may illuminate if the fuel filler cap is not tightened
properly.
FUEL SPECIFICATIONS AND CAPACITY
2.5L Engine Fuel Specifications and Capacity
Fuel Octane Rating
87 AKI or higher
Ethanol Content Limit
No more than 10%
Fuel Tank Capacity
18.5 US Gallons
Low Fuel Warning Light
2.6 US Gallons
2.4L Engine Fuel Specifications and Capacity
Fuel Octane Rating
87 AKI or higher
Ethanol Content Limit
No more than 15%
Fuel Tank Capacity
18.5 US Gallons
Low Fuel Warning Light
2.6 US Gallons
Fuel Filler Lid and Cap
REFUELING
45
Page 48 of 164
FOLDING THE REAR SEATS
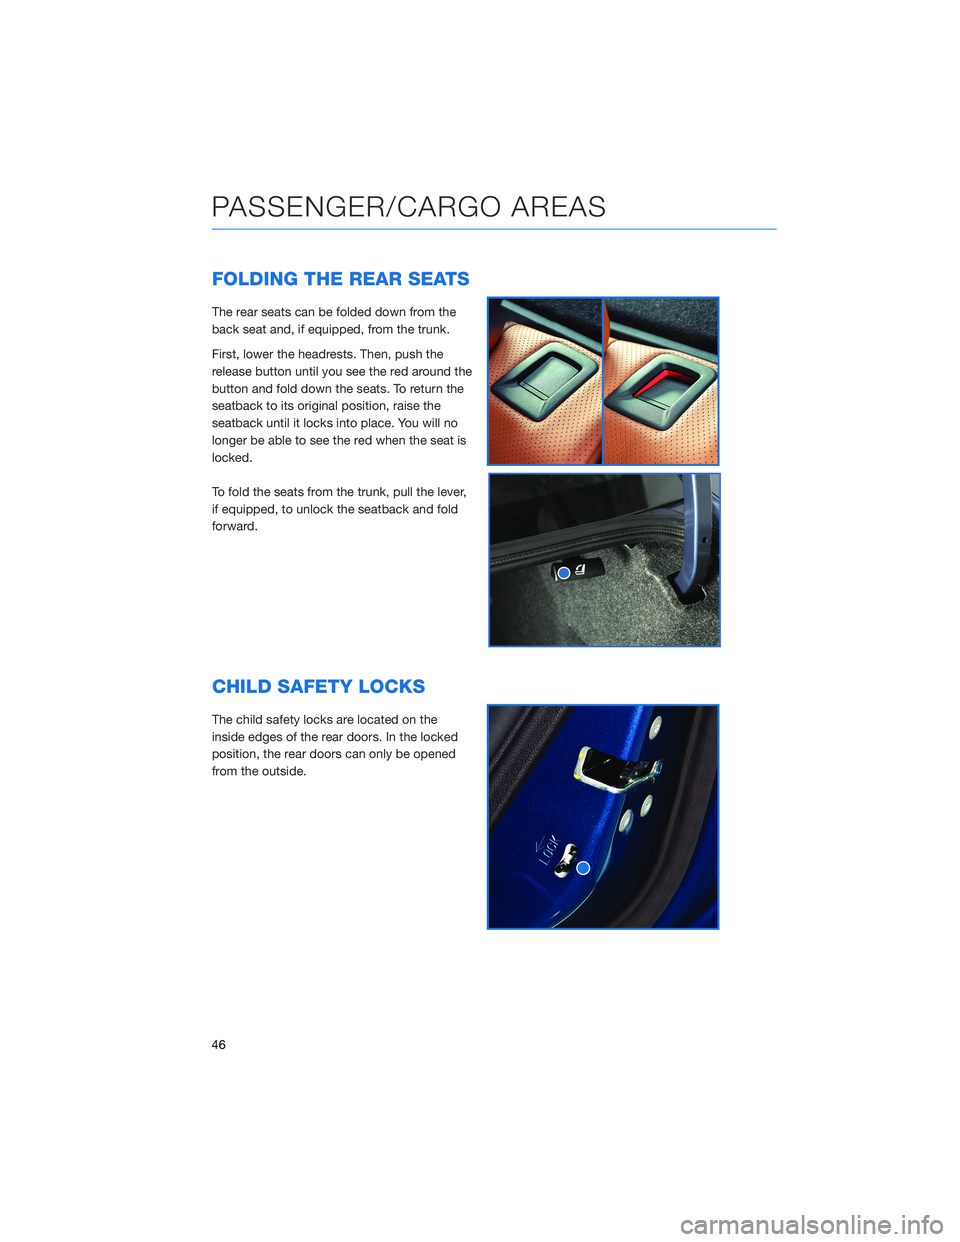
The rear seats can be folded down from the
back seat and, if equipped, from the trunk.
First, lower the headrests. Then, push the
release button until you see the red around the
button and fold down the seats. To return the
seatback to its original position, raise the
seatback until it locks into place. You will no
longer be able to see the red when the seat is
locked.
To fold the seats from the trunk, pull the lever,
if equipped, to unlock the seatback and fold
forward.
CHILD SAFETY LOCKS
The child safety locks are located on the
inside edges of the rear doors. In the locked
position, the rear doors can only be opened
from the outside.
PASSENGER/CARGO AREAS
46
Page 51 of 164
INTERNAL SAFETY TRUNK RELEASE WITH
SELF-ILLUMINATING HANDLE
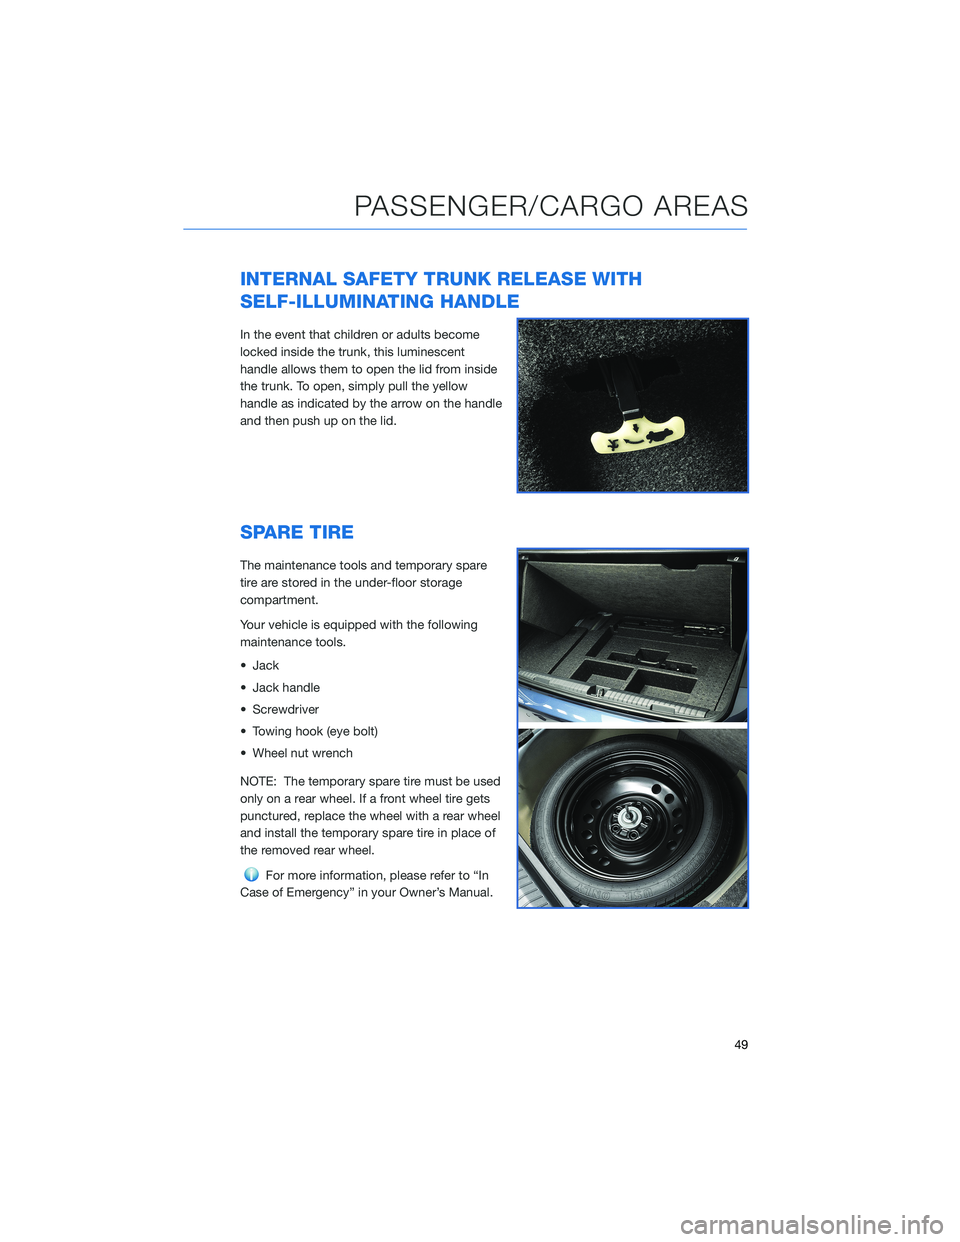
In the event that children or adults become
locked inside the trunk, this luminescent
handle allows them to open the lid from inside
the trunk. To open, simply pull the yellow
handle as indicated by the arrow on the handle
and then push up on the lid.
SPARE TIRE
The maintenance tools and temporary spare
tire are stored in the under-floor storage
compartment.
Your vehicle is equipped with the following
maintenance tools.
• Jack
• Jack handle
• Screwdriver
• Towing hook (eye bolt)
• Wheel nut wrench
NOTE: The temporary spare tire must be used
only on a rear wheel. If a front wheel tire gets
punctured, replace the wheel with a rear wheel
and install the temporary spare tire in place of
the removed rear wheel.
For more information, please refer to “In
Case of Emergency” in your Owner’s Manual.
PASSENGER/CARGO AREAS
49
Page 61 of 164
Screen Layout
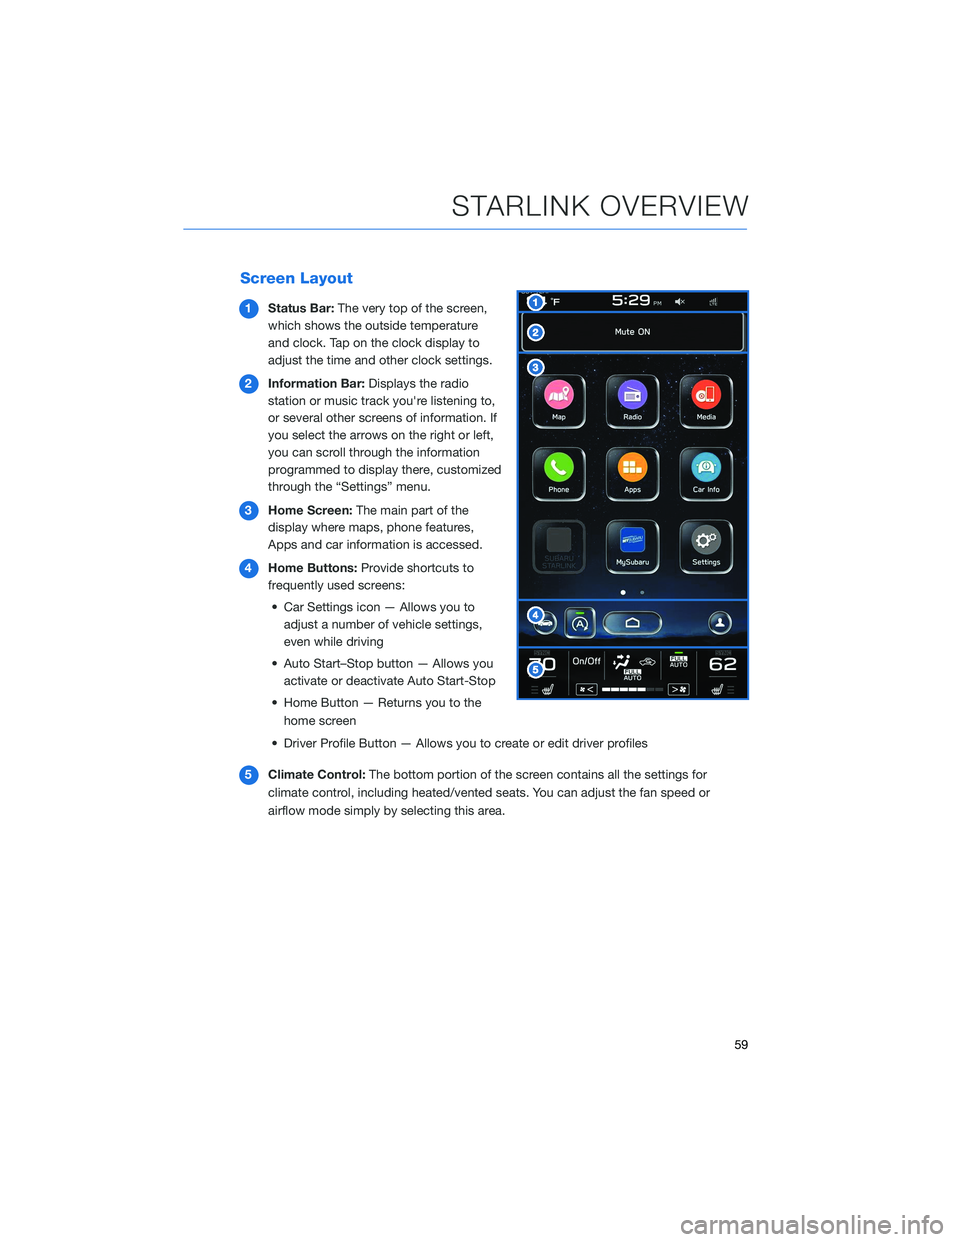
1Status Bar:The very top of the screen,
which shows the outside temperature
and clock. Tap on the clock display to
adjust the time and other clock settings.
2Information Bar:Displays the radio
station or music track you're listening to,
or several other screens of information. If
you select the arrows on the right or left,
you can scroll through the information
programmed to display there, customized
through the “Settings” menu.
3Home Screen:The main part of the
display where maps, phone features,
Apps and car information is accessed.
4Home Buttons:Provide shortcuts to
frequently used screens:
• Car Settings icon — Allows you to
adjust a number of vehicle settings,
even while driving
• Auto Start–Stop button — Allows you
activate or deactivate Auto Start-Stop
• Home Button — Returns you to the
home screen
• Driver Profile Button — Allows you to create or edit driver profiles
5Climate Control:The bottom portion of the screen contains all the settings for
climate control, including heated/vented seats. You can adjust the fan speed or
airflow mode simply by selecting this area.
STARLINK OVERVIEW
59
Page 92 of 164
CLOCK
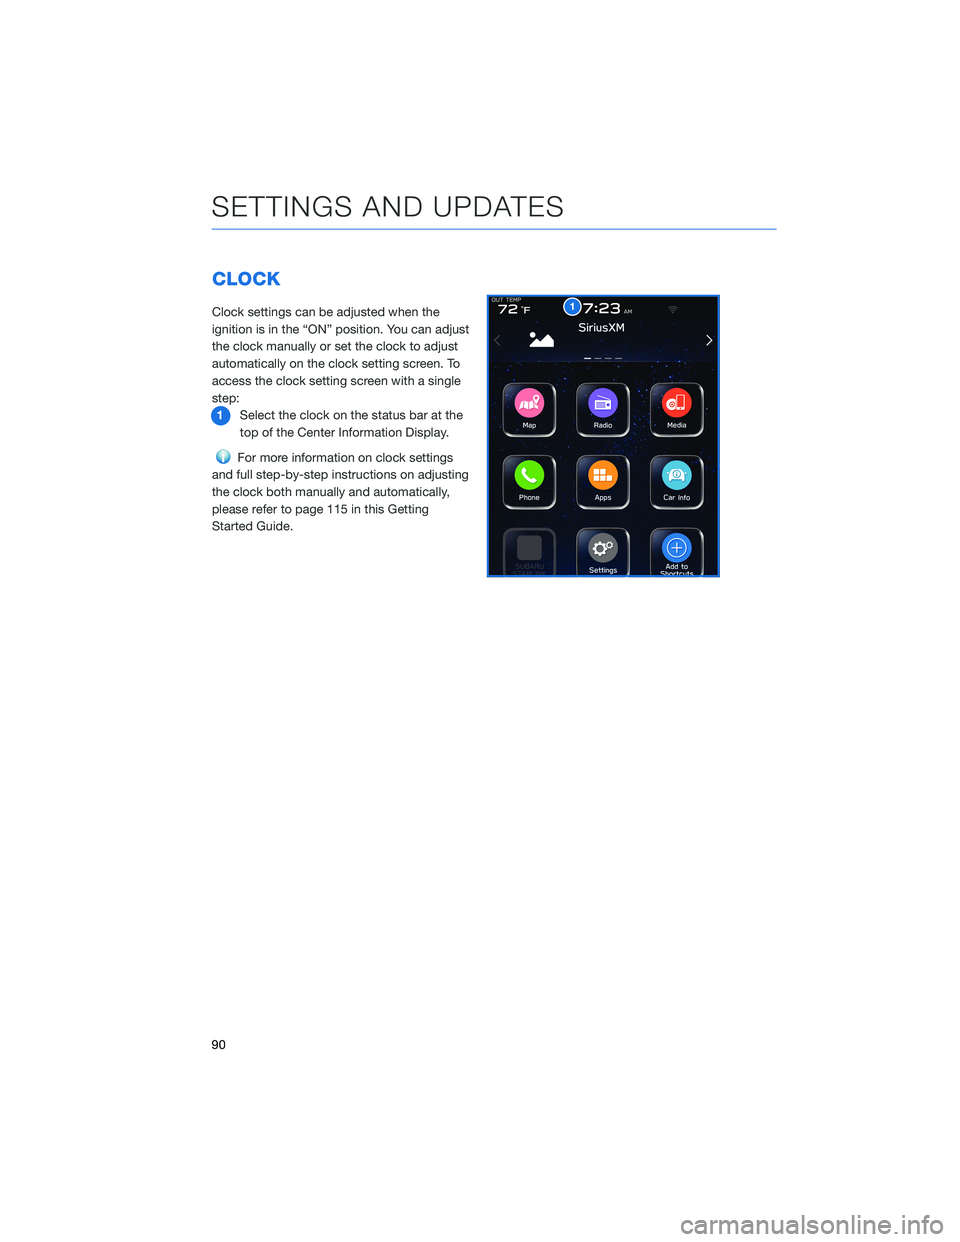
Clock settings can be adjusted when the
ignition is in the “ON” position. You can adjust
the clock manually or set the clock to adjust
automatically on the clock setting screen. To
access the clock setting screen with a single
step:
1Select the clock on the status bar at the
top of the Center Information Display.
For more information on clock settings
and full step-by-step instructions on adjusting
the clock both manually and automatically,
please refer to page 115 in this Getting
Started Guide.
1
SETTINGS AND UPDATES
90
Page 117 of 164
HOW TO OVERVIEW
This “How To” appendix provides detailed, step-by-step instructions to easily connect with
features of your Legacy.
If you need some help with these features or want to
learn more, we are here to assist you:
Your Subaru Owner’s Manuals:
Located in the glovebox
Online Subaru Owner’s Resources:
www.subaru.com/owners
Subaru Customer Support:
www.subaru.com/customer-support
1-800-782-2783 (1-800-SUBARU3 )
SETTING THE CLOCK
Clock settings can be adjusted when the ignition is in the “ON” position. You can adjust
the clock manually or set the clock to adjust automatically in the clock setting screen. To
directly access the clock setting screen, you can select the clock on the status bar at the
top of the Center Information Display. Full directions for accessing the clock settings and
adjusting the clock manually or automatically are given below.
For more information, please refer to “Quick Guide” in your STARLINK®Owner’s
Manual.
HOW TO APPENDIX
115
Page 118 of 164
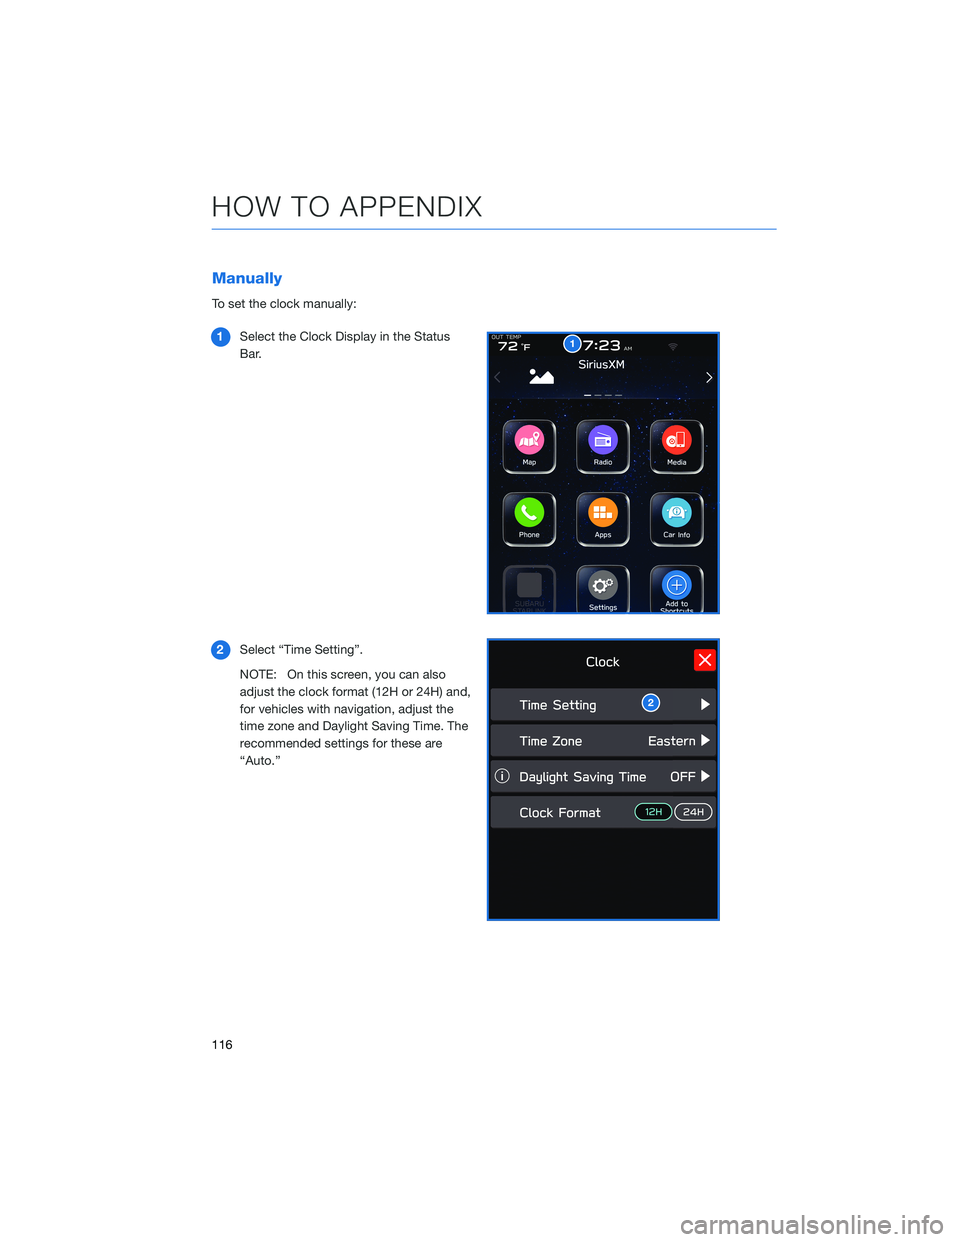
Manually
To set the clock manually:
1Select the Clock Display in the Status
Bar.
2Select “Time Setting”.
NOTE: On this screen, you can also
adjust the clock format (12H or 24H) and,
for vehicles with navigation, adjust the
time zone and Daylight Saving Time. The
recommended settings for these are
“Auto.”
1
2
HOW TO APPENDIX
116
Page 120 of 164
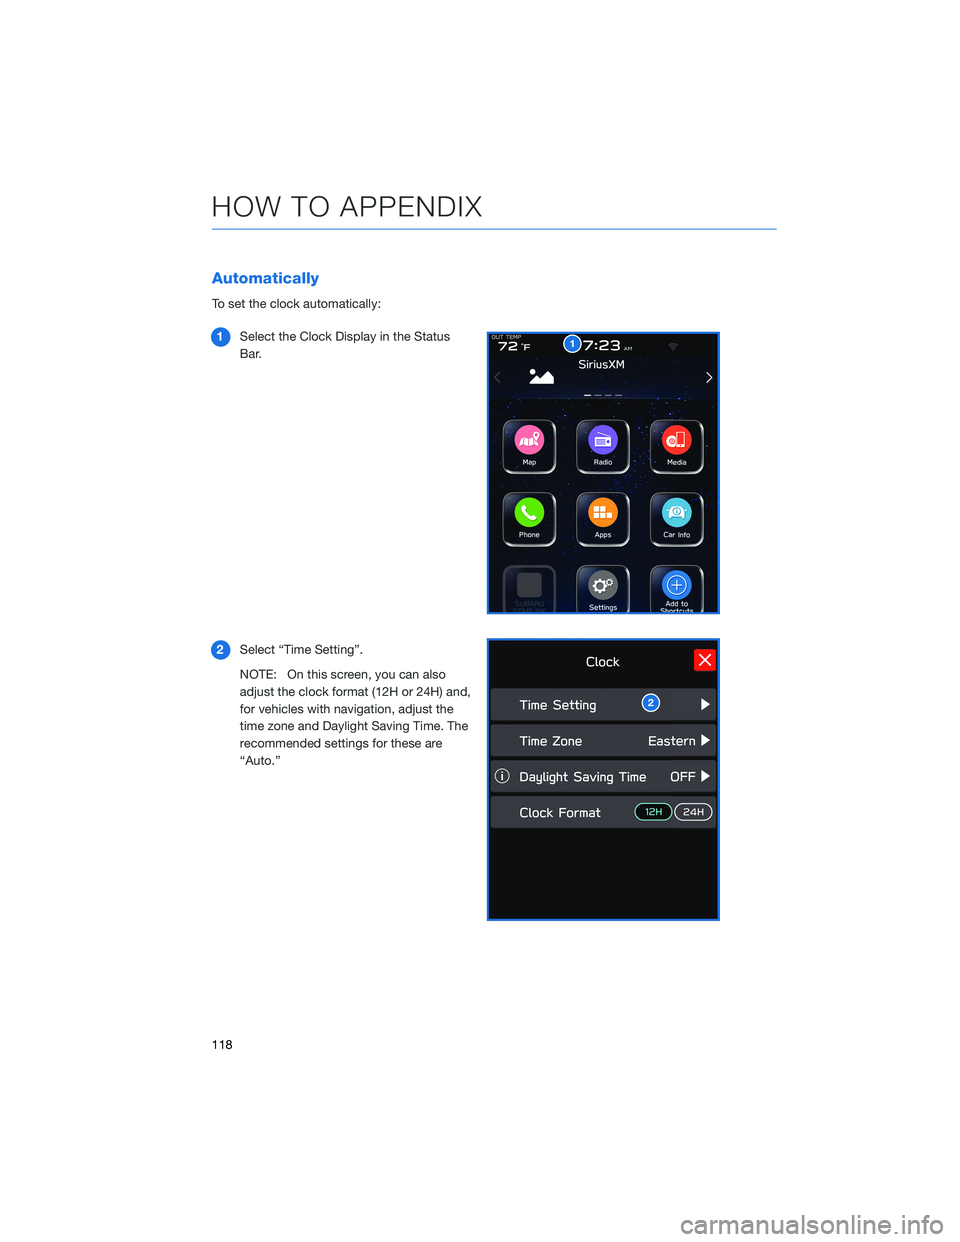
Automatically
To set the clock automatically:
1Select the Clock Display in the Status
Bar.
2Select “Time Setting”.
NOTE: On this screen, you can also
adjust the clock format (12H or 24H) and,
for vehicles with navigation, adjust the
time zone and Daylight Saving Time. The
recommended settings for these are
“Auto.”
1
2
HOW TO APPENDIX
118