light SUBARU LEGACY 2022 Getting Started Guide
[x] Cancel search | Manufacturer: SUBARU, Model Year: 2022, Model line: LEGACY, Model: SUBARU LEGACY 2022Pages: 164, PDF Size: 51.03 MB
Page 3 of 164
PURPOSE OF THIS GUIDE
WELCOME................. 4
IMPORTANT SAFETY
INFORMATION.............. 4
OWNER’S RESOURCES....... 4
IN CASE OF EMERGENCY..... 5
TOWING YOUR ALL-WHEEL
DRIVE SUBARU............. 6
ENTRY AND EXIT
KEYLESS ENTRY............ 7
KEYLESS ACCESS WITH PUSH
BUTTON START............. 8
INSTRUMENT PANEL........10
GETTING COMFORTABLE
SEATING...................12
TILT AND TELESCOPIC STEERING
COLUMN...................15
POWER EXTERIOR MIRRORS . . 16
REAR VIEW MIRROR.........18
POWER WINDOWS..........19
CENTER CONSOLE STORAGE . 19
POWER MOONROOF........20
CLIMATE CONTROL..........21
ACCESSORY CONNECTIONS . . 29
CONTROLS
INSTRUMENT PANEL SWITCHES
(LOWER LEFT)..............30
AUDIO CONTROLS...........30ADVANCED ADAPTIVE CRUISE
CONTROL..................31
I SWITCH...................31
LIGHT CONTROLS...........32
TURN SIGNALS.............33
WINDSHIELD WIPERS........33
OVERHEAD CONSOLE........34
GAUGES AND WARNING
LIGHTS
COMBINATION METER.......35
WARNING AND INDICATOR
LIGHTS....................36
OPERATING THE VEHICLE
IGNITION SWITCH...........37
PUSH-BUTTON IGNITION
SWITCH...................37
STARTING THE VEHICLE......37
DRIVING THE VEHICLE.......38
AUTO START–STOP..........39
ELECTRONIC PARKING BRAKE
(EPB).....................42
TURNING OFF THE VEHICLE...44
REFUELING
FUEL FILLER LID............45
FUEL SPECIFICATIONS AND
CAPACITY..................45
PASSENGER/CARGO AREAS
FOLDING THE REAR SEATS...46
TABLE OF CONTENTS
Page 4 of 164
CHILD SAFETY LOCKS.......46
LATCH/ANCHOR............47
REAR SEAT REMINDER.......48
INTERNAL SAFETY TRUNK
RELEASE WITH SELF-
ILLUMINATING HANDLE......49
SPARE TIRE................49
ENGINE COMPARTMENT
HOOD PROP................50
2.5L ENGINE................51
2.4L TURBO ENGINE.........52
ADDITIONAL SPECIFICATIONS
NEW VEHICLE BREAK-IN......53
ENGINE OIL................53
ENGINE OIL CAPACITY.......53
ROOF RAIL CAPACITY.......54
TRAILER TOWING CAPACITY . . 54
TIRE PRESSURE MONITORING
SYSTEM (TPMS).............55
STARLINK OVERVIEW
OVERVIEW OF YOUR MULTIMEDIA
SYSTEM...................58
BUTTONS..................60
TOUCHSCREEN.............61
STEERING WHEEL CONTROLS . 62
VOICE RECOGNITION........62
STARLINK HOME
HOME SCREEN ICONS.......64
REARRANGING ICONS.......65
ADDING SHORTCUTS........66
DRIVER PROFILE
CREATING A DRIVER PROFILE . 68
MULTIMEDIA
RADIO.....................72
MEDIA.....................74
PHONE
PAIRING A PHONE...........75
MAKING A CALL.............76
RECEIVING A CALL..........77
TEXT MESSAGES............78
APPS
SUBARU STARLINK®IN-VEHICLE
APPS......................79SUBARU STARLINK
®MOBILE
APP.......................80
MYSUBARU................81
MAPS
MAPS OVERVIEW............82
STARLINK SAFETY AND
SECURITY
SAFETY AND SECURITY
OVERVIEW.................83
ENROLLMENT..............84
MYSUBARU INTEGRATION....84
SUBARU STARLINK
®WI-FI
HOTSPOT..................85
SETTINGS AND UPDATES
SETTINGS AND UPDATES
OVERVIEW.................86
SOUND....................87
PHONE....................88
MAPS/NAVIGATION..........88
CLOCK....................90
EYESIGHT
EYESIGHT®OVERVIEW.......91
OPERATION................92
FUNCTIONS................92
STEERING WHEEL CONTROLS . 98
EYESIGHT
®ASSIST MONITOR
(EAM)....................100
LANE DEPARTURE WARNING AND
PRE-COLLISION BRAKING
SYSTEM OFF..............101
DRIVER ASSIST
TECHNOLOGIES
REAR-VISION CAMERA......102
FRONT VIEW MONITOR.....102
BLIND SPOT DETECTION (BSD) /
REAR CROSS TRAFFIC ALERT
(RCTA)...................103
HIGH BEAM ASSIST (HBA)...105
STEERING RESPONSIVE
HEADLIGHTS (SRH).........105
REVERSE AUTOMATIC BRAKING
(RAB)....................106
TABLE OF CONTENTS
2
Page 9 of 164
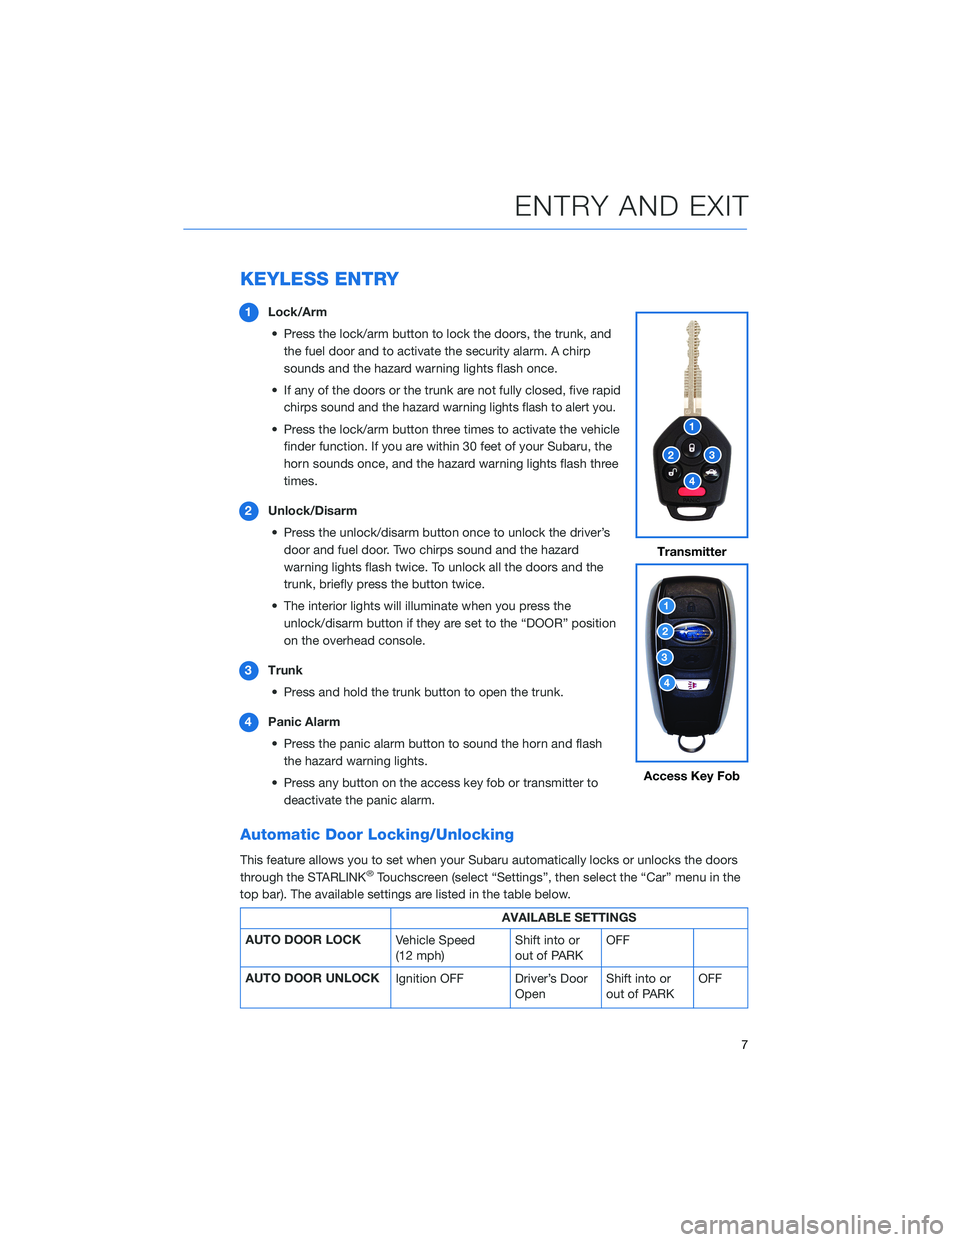
KEYLESS ENTRY
1Lock/Arm
• Press the lock/arm button to lock the doors, the trunk, and
the fuel door and to activate the security alarm. A chirp
sounds and the hazard warning lights flash once.
• If any of the doors or the trunk are not fully closed, five rapid
chirps sound and the hazard warning lights flash to alert you.
• Press the lock/arm button three times to activate the vehicle
finder function. If you are within 30 feet of your Subaru, the
horn sounds once, and the hazard warning lights flash three
times.
2Unlock/Disarm
• Press the unlock/disarm button once to unlock the driver’s
door and fuel door. Two chirps sound and the hazard
warning lights flash twice. To unlock all the doors and the
trunk, briefly press the button twice.
• The interior lights will illuminate when you press the
unlock/disarm button if they are set to the “DOOR” position
on the overhead console.
3Trunk
• Press and hold the trunk button to open the trunk.
4Panic Alarm
• Press the panic alarm button to sound the horn and flash
the hazard warning lights.
• Press any button on the access key fob or transmitter to
deactivate the panic alarm.
Automatic Door Locking/Unlocking
This feature allows you to set when your Subaru automatically locks or unlocks the doors
through the STARLINK®Touchscreen (select “Settings”, then select the “Car” menu in the
top bar). The available settings are listed in the table below.
AVAILABLE SETTINGS
AUTO DOOR LOCK
Vehicle Speed
(12 mph)Shift into or
out of PARKOFF
AUTO DOOR UNLOCK
Ignition OFF Driver’s Door
OpenShift into or
out of PARKOFF
Transmitter
Access Key Fob
ENTRY AND EXIT
7
Page 10 of 164
KEYLESS ACCESS WITH PUSH BUTTON START
(if equipped)
The Keyless Access with Push-Button Start system features the following touch-activated
door locking or unlocking functions without the key ever leaving your pocket or purse. You
can customize the touch-activated door locking or unlocking settings using the
STARLINK
®Touchscreen by selecting “Settings” then selecting the “Car” menu in the top
bar.
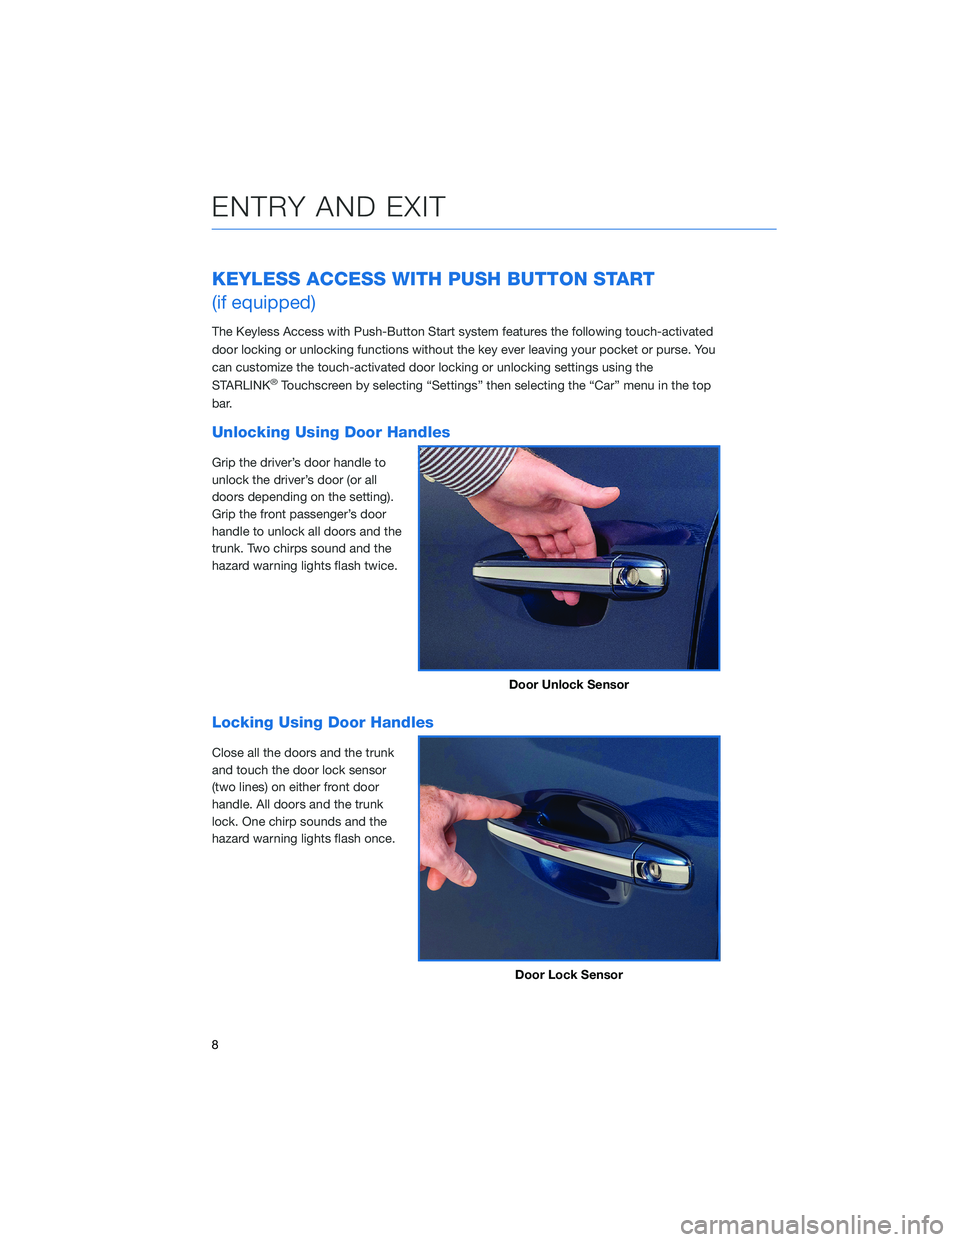
Unlocking Using Door Handles
Grip the driver’s door handle to
unlock the driver’s door (or all
doors depending on the setting).
Grip the front passenger’s door
handle to unlock all doors and the
trunk. Two chirps sound and the
hazard warning lights flash twice.
Locking Using Door Handles
Close all the doors and the trunk
and touch the door lock sensor
(two lines) on either front door
handle. All doors and the trunk
lock. One chirp sounds and the
hazard warning lights flash once.
Door Unlock Sensor
Door Lock Sensor
ENTRY AND EXIT
8
Page 11 of 164
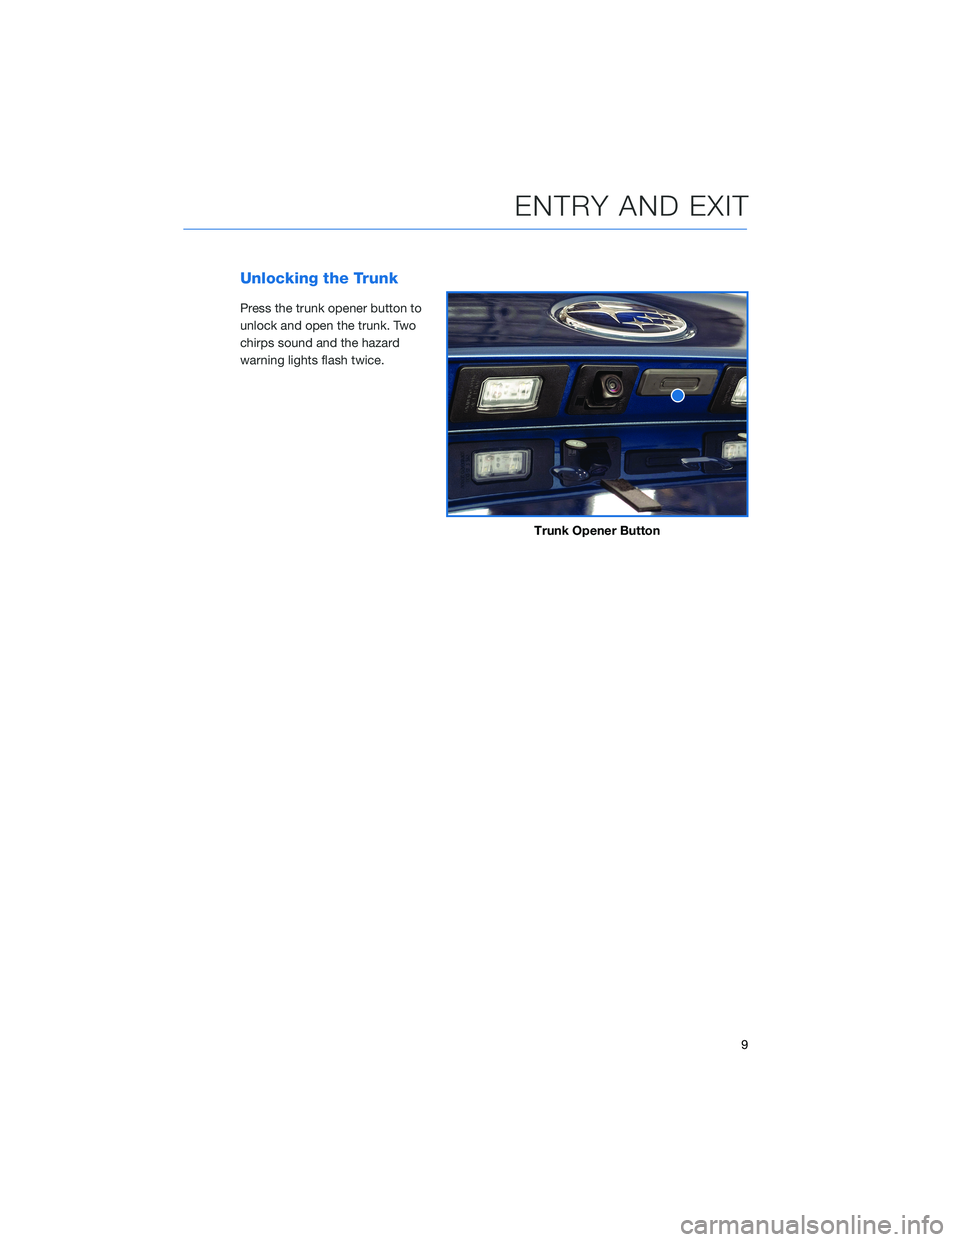
Unlocking the Trunk
Press the trunk opener button to
unlock and open the trunk. Two
chirps sound and the hazard
warning lights flash twice.
Trunk Opener Button
ENTRY AND EXIT
9
Page 12 of 164
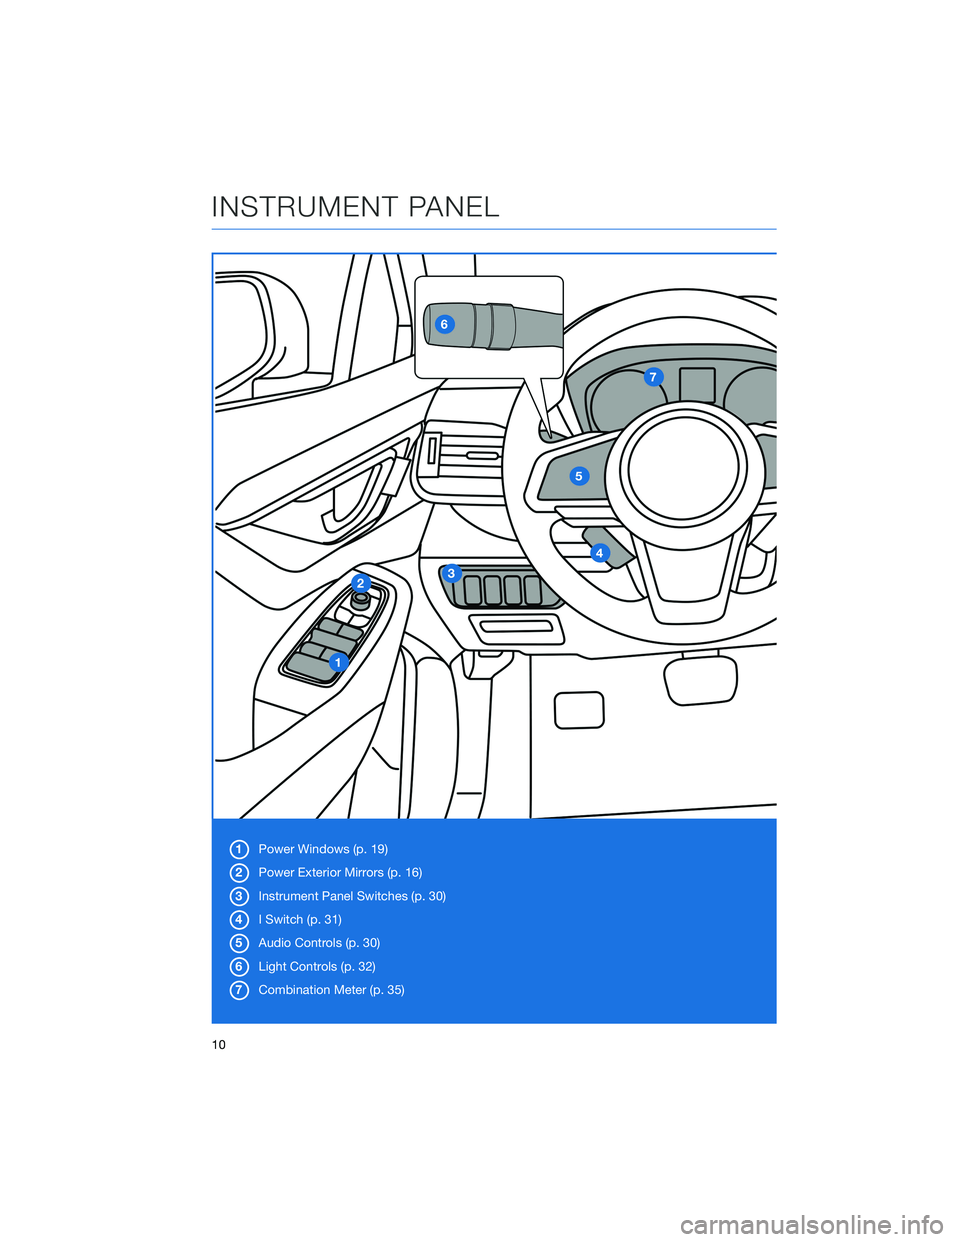
1Power Windows (p. 19)
2Power Exterior Mirrors (p. 16)
3Instrument Panel Switches (p. 30)
4I Switch (p. 31)
5Audio Controls (p. 30)
6Light Controls (p. 32)
7Combination Meter (p. 35)
INSTRUMENT PANEL
10
Page 20 of 164
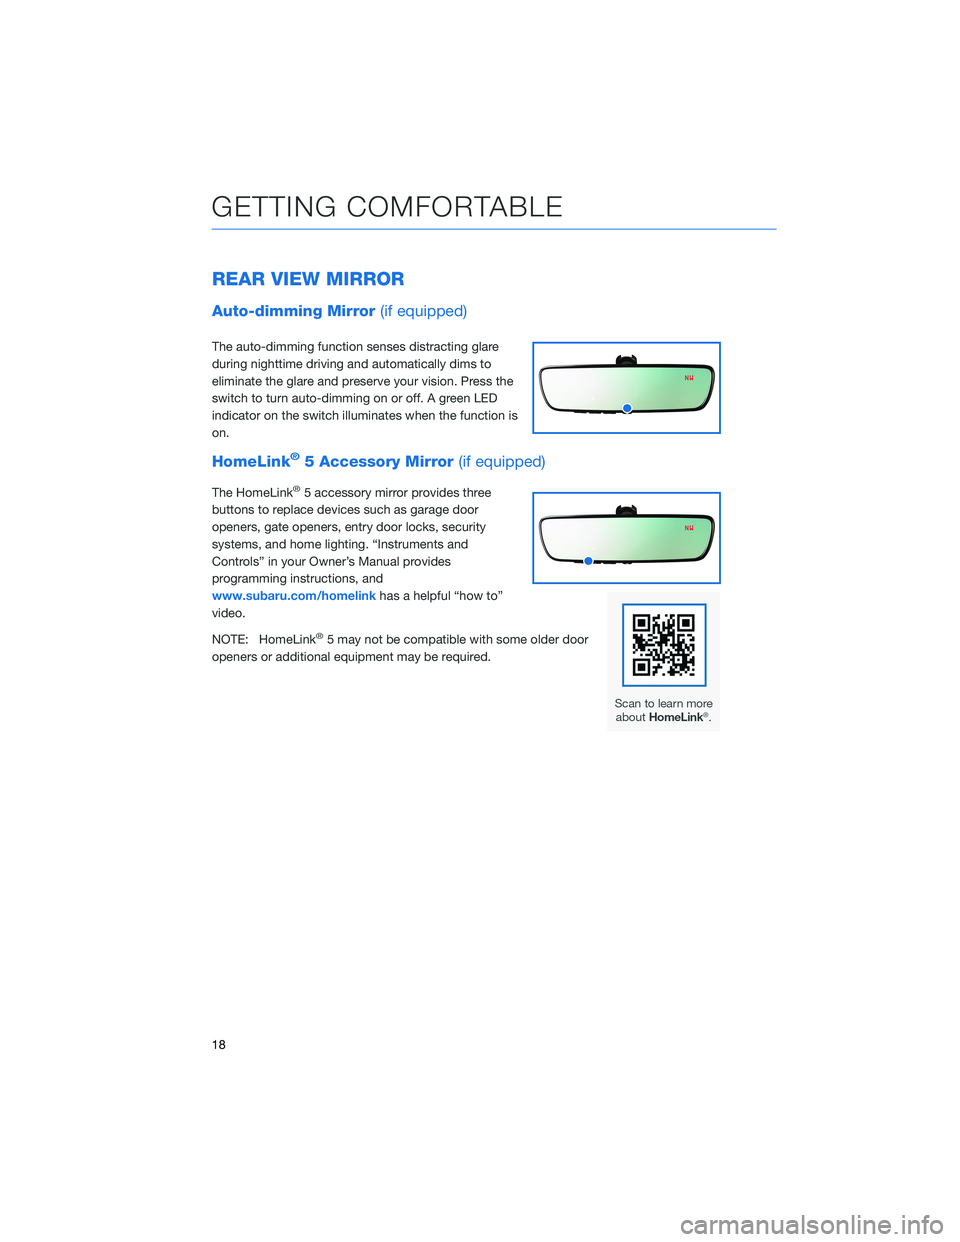
REAR VIEW MIRROR
Auto-dimming Mirror(if equipped)
The auto-dimming function senses distracting glare
during nighttime driving and automatically dims to
eliminate the glare and preserve your vision. Press the
switch to turn auto-dimming on or off. A green LED
indicator on the switch illuminates when the function is
on.
HomeLink®5 Accessory Mirror(if equipped)
The HomeLink®5 accessory mirror provides three
buttons to replace devices such as garage door
openers, gate openers, entry door locks, security
systems, and home lighting. “Instruments and
Controls” in your Owner’s Manual provides
programming instructions, and
www.subaru.com/homelinkhas a helpful “how to”
video.
NOTE: HomeLink
®5 may not be compatible with some older door
openers or additional equipment may be required.
GETTING COMFORTABLE
18
Page 22 of 164
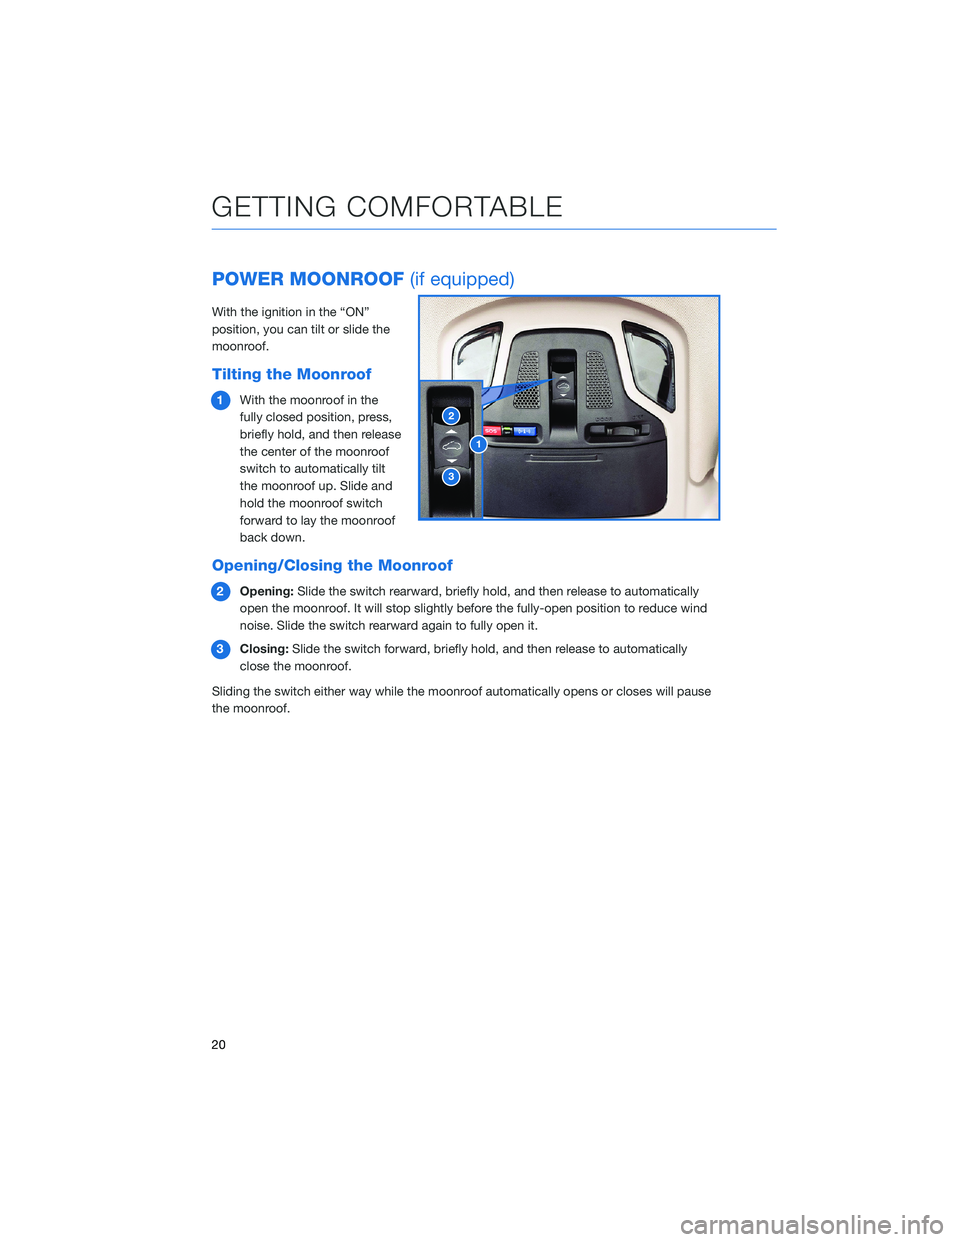
POWER MOONROOF(if equipped)
With the ignition in the “ON”
position, you can tilt or slide the
moonroof.
Tilting the Moonroof
1With the moonroof in the
fully closed position, press,
briefly hold, and then release
the center of the moonroof
switch to automatically tilt
the moonroof up. Slide and
hold the moonroof switch
forward to lay the moonroof
back down.
Opening/Closing the Moonroof
2Opening:Slide the switch rearward, briefly hold, and then release to automatically
open the moonroof. It will stop slightly before the fully-open position to reduce wind
noise. Slide the switch rearward again to fully open it.
3Closing:Slide the switch forward, briefly hold, and then release to automatically
close the moonroof.
Sliding the switch either way while the moonroof automatically opens or closes will pause
the moonroof.
1
2
3
GETTING COMFORTABLE
20
Page 28 of 164
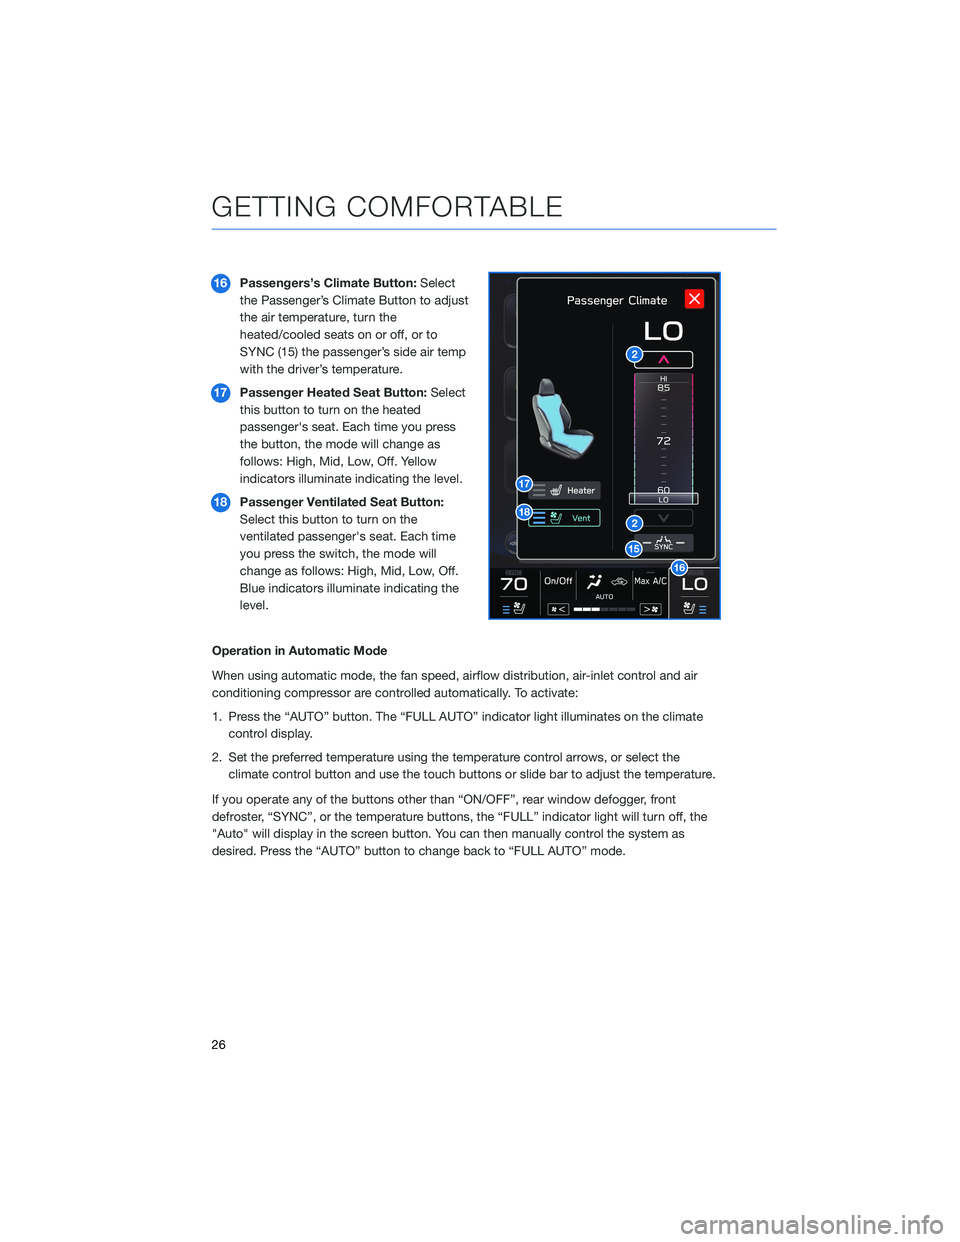
16Passengers’s Climate Button:Select
the Passenger’s Climate Button to adjust
the air temperature, turn the
heated/cooled seats on or off, or to
SYNC (15) the passenger’s side air temp
with the driver’s temperature.
17Passenger Heated Seat Button:Select
this button to turn on the heated
passenger's seat. Each time you press
the button, the mode will change as
follows: High, Mid, Low, Off. Yellow
indicators illuminate indicating the level.
18Passenger Ventilated Seat Button:
Select this button to turn on the
ventilated passenger's seat. Each time
you press the switch, the mode will
change as follows: High, Mid, Low, Off.
Blue indicators illuminate indicating the
level.
Operation in Automatic Mode
When using automatic mode, the fan speed, airflow distribution, air-inlet control and air
conditioning compressor are controlled automatically. To activate:
1. Press the “AUTO” button. The “FULL AUTO” indicator light illuminates on the climate
control display.
2. Set the preferred temperature using the temperature control arrows, or select the
climate control button and use the touch buttons or slide bar to adjust the temperature.
If you operate any of the buttons other than “ON/OFF”, rear window defogger, front
defroster, “SYNC”, or the temperature buttons, the “FULL” indicator light will turn off, the
"Auto" will display in the screen button. You can then manually control the system as
desired. Press the “AUTO” button to change back to “FULL AUTO” mode.
GETTING COMFORTABLE
26
Page 30 of 164
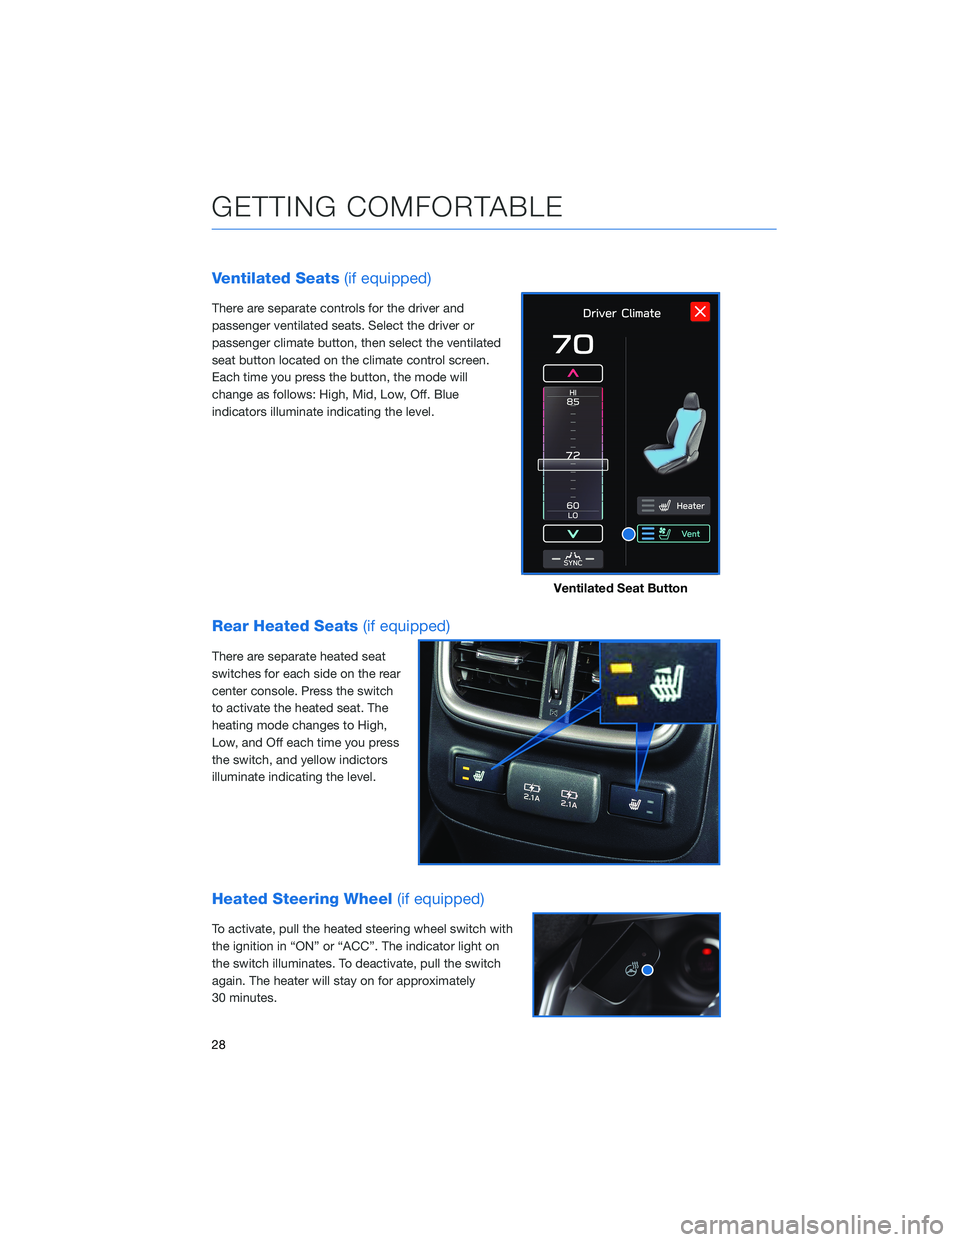
Ventilated Seats(if equipped)
There are separate controls for the driver and
passenger ventilated seats. Select the driver or
passenger climate button, then select the ventilated
seat button located on the climate control screen.
Each time you press the button, the mode will
change as follows: High, Mid, Low, Off. Blue
indicators illuminate indicating the level.
Rear Heated Seats(if equipped)
There are separate heated seat
switches for each side on the rear
center console. Press the switch
to activate the heated seat. The
heating mode changes to High,
Low, and Off each time you press
the switch, and yellow indictors
illuminate indicating the level.
Heated Steering Wheel(if equipped)
To activate, pull the heated steering wheel switch with
the ignition in “ON” or “ACC”. The indicator light on
the switch illuminates. To deactivate, pull the switch
again. The heater will stay on for approximately
30 minutes.
Ventilated Seat Button
GETTING COMFORTABLE
28