check oil SUBARU OUTBACK 2005 4.G User Guide
[x] Cancel search | Manufacturer: SUBARU, Model Year: 2005, Model line: OUTBACK, Model: SUBARU OUTBACK 2005 4.GPages: 627, PDF Size: 6.42 MB
Page 470 of 627
9-15
In case of emergency
– CONTINUED –
surface of the wheel and hub with a cloth.
12.Put on the spare tire. Replace the wheel nuts.
Tighten them by hand.
Do not use oil or grease on the wheel studs or
nuts when the spare tire is installed. This could
cause the nuts to become loose and lead to an
accident.
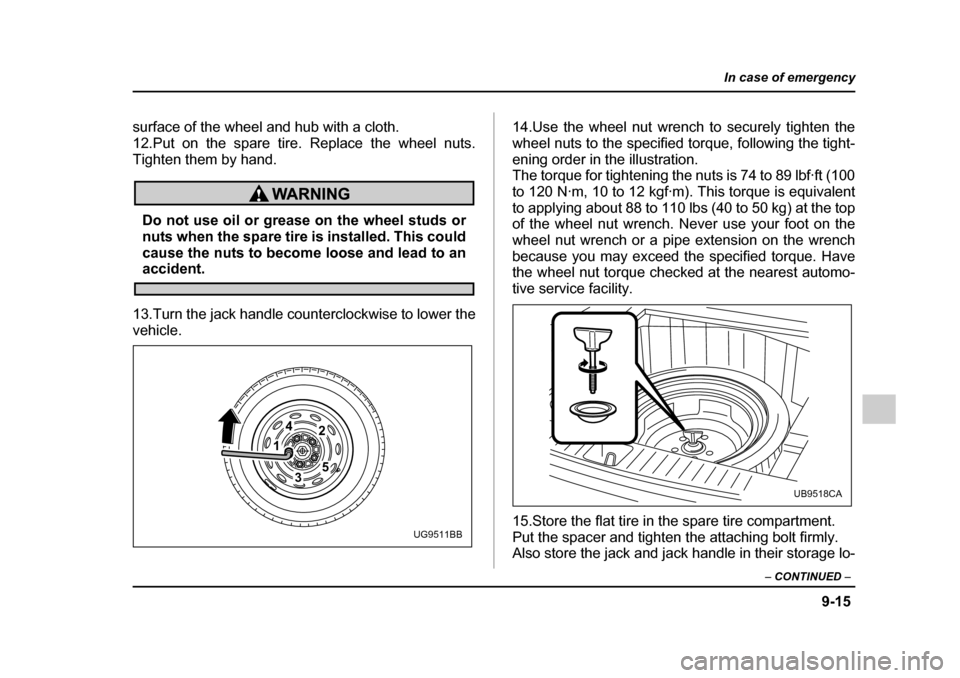
13.Turn the jack handle counterclockwise to lower the vehicle. 14.Use the wheel nut wrench to securely tighten the
wheel nuts to the specified torque, following the tight-
ening order in the illustration.
The torque for tightening the nuts is 74 to 89 lbf·ft (100
to 120 N·m, 10 to 12 kgf·m). This torque is equivalent
to applying about 88 to 110 lbs (40 to 50 kg) at the top
of the wheel nut wrench. Never use your foot on the
wheel nut wrench or a pipe extension on the wrench
because you may exceed the specified torque. Have
the wheel nut torque checked at the nearest automo-
tive service facility.
15.Store the flat tire in the spare tire compartment.
Put the spacer and tighten the attaching bolt firmly.
Also store the jack and jack handle in their storage lo-
1
42
53
UG9511BB
UB9518CA
Page 483 of 627
9-28
In case of emergency
!
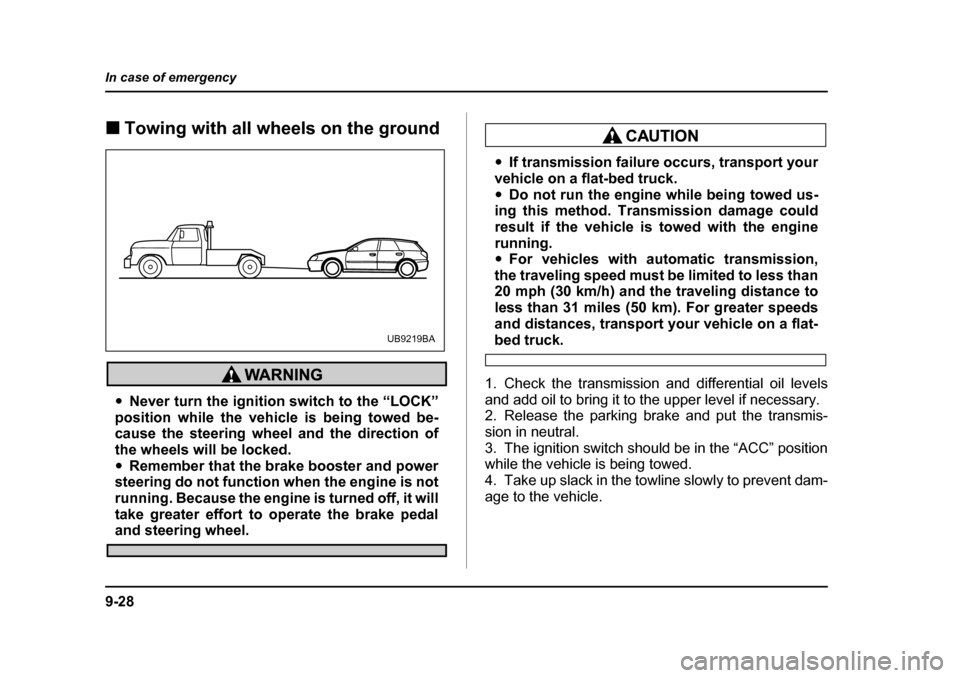
Towing with all wheels on the ground
"Never turn the ignition switch to the “LOCK”
position while the vehicle is being towed be-
cause the steering wheel and the direction of
the wheels will be locked." Remember that the brake booster and power
steering do not function when the engine is not
running. Because the engine is turned off, it will
take greater effort to operate the brake pedal
and steering wheel.
" If transmission failure occurs, transport your
vehicle on a flat-bed truck. " Do not run the engine while being towed us-
ing this method. Transmission damage could
result if the vehicle is towed with the engine
running. " For vehicles with automatic transmission,
the traveling speed must be limited to less than
20 mph (30 km/h) and the traveling distance to
less than 31 miles (50 km). For greater speeds
and distances, transport your vehicle on a flat-
bed truck.
1. Check the transmission and differential oil levels
and add oil to bring it to the upper level if necessary.
2. Release the parking brake and put the transmis-
sion in neutral.
3. The ignition switch should be in the “ACC” position
while the vehicle is being towed.
4. Take up slack in the towline slowly to prevent dam-
age to the vehicle.UB9219BA
Page 500 of 627

11 - 1
11
Maintenance and service
Maintenance schedule ................................. 11-3
Maintenance precautions ............................ 11-3 Before checking or servicing in the engine compartment .................................................. 11-4
When you do checking or servicing in the engine compartment while the engine is
running ............................................................ 11-5
Engine hood .................................................. 11-5
Engine compartment overview ................... 11-8 2.5-liter non-turbo models ................................ 11-8
2.5-liter non-turbo California-spec. models .... 11-9
2.5-liter turbo models ....................................... 11-10
3.0-liter models .................................................. 11-11
Engine oil ...................................................... 11-12 Checking the oil level ....................................... 11-12
Changing the oil and oil filter .......................... 11-13
Recommended grade and viscosity ................ 11-16
Recommended grade and viscosity under severe driving conditions .............................. 11-17
Cooling system ............................................. 11-18 Hose and connections ...................................... 11-19
Engine coolant .................................................. 11-19
Air cleaner element ...................................... 11-24 Replacing the air cleaner element ................... 11-24
Spark plugs ................................................... 11-29 Recommended spark plugs ............................. 11-29
Drive belts ..................................................... 11-30 2.5-liter models .................................................. 11-30
3.0-liter models .................................................. 11-30
Manual transmission oil ............................... 11-31 Checking the oil level ....................................... 11-31
Recommended grade and viscosity ............... 11-32
Automatic transmission fluid ...................... 11-33 Checking the fluid level .................................... 11-33
Recommended fluid ......................................... 11-35
Front differential gear oil (AT vehicles) ...... 11-35 Checking the oil level ....................................... 11-35
Recommended grade and viscosity ............... 11-36
Rear differential gear oil ............................... 11-37 Checking the gear oil level .............................. 11-37
Recommended grade and viscosity ............... 11-40
Power steering fluid ...................................... 11-41 Checking the fluid level .................................... 11-41
Recommended fluid ......................................... 11-42
Brake fluid ..................................................... 11-42 Checking the fluid level .................................... 11-42
Recommended brake fluid ............................... 11-43
Clutch fluid (MT vehicles) ............................ 11-43 Checking the fluid level .................................... 11-43
Recommended clutch fluid .............................. 11-44
Brake booster ................................................ 11-44
Brake pedal .................................................... 11-45 Checking the brake pedal free play ................ 11-45
Checking the brake pedal reserve distance ... 11-45
Clutch pedal (Manual transmission vehicles) ..................................................... 11-46Checking the clutch function .......................... 11-46
Checking the clutch pedal free play ............... 11-46
Replacement of brake pad and lining ......... 11-47
Page 503 of 627
11 - 4
Maintenance and service
the materials in the vehicle may be hazardous if
improperly used or handled, for example, bat-tery acid. "
Your vehicle should only be serviced by per-
sons fully competent to do so. Serious person-
al injury may result to persons not experienced
in servicing vehicles. " Always use the proper tools and make certain
that they are well maintained. " Never get under the vehicle supported only
by a jack. Always use a safety stands to sup-
port the vehicle. " Never keep the engine running in a poorly
ventilated area, such as a garage or other
closed areas. " Do not smoke or allow open flames around
the fuel or battery. This will cause a fire. " Because the fuel system is under pressure,
replacement of the fuel filter should be per-
formed only by your SUBARU dealer." Wear adequate eye protection to guard
against getting oil or fluids in your eyes. If
something does get in your eyes, thoroughly
wash them out with clean water. " Do not tamper with the wiring of the SRS air-
bag system or seatbelt pretensioner system, or
attempt to take its connectors apart, as that may activate the system or it can render it inop-
erative. The wiring and connectors of these
systems are yellow for easy identification. NEV-
ER use a circuit tester for these wiring.
If your SRS airbag or seatbelt pretensioner
needs service, consult your nearest SUBARU
dealer.
! Before checking or servicing in the en-
gine compartment
"Always stop the engine and set the parking
brake firmly to prevent the vehicle from mov-
ing. " Always let the engine cool down. Engine
parts become very hot when the engine is run-
ning and remain hot for some time after the en-
gine is stopped." Do not spill engine oil, engine coolant, brake
fluid or any other fluid on hot engine compo-
nents. This may cause a fire." Always remove the key from the ignition
switch. When the ignition switch is in the “ON”
position, the cooling fan may operate suddenly
Page 511 of 627
11 - 1 2
Maintenance and service
Engine oil !
Checking the oil level
Check the engine oil level at each fuel stop.
1. Park the vehicle on a level surface and stop the en-
gine.
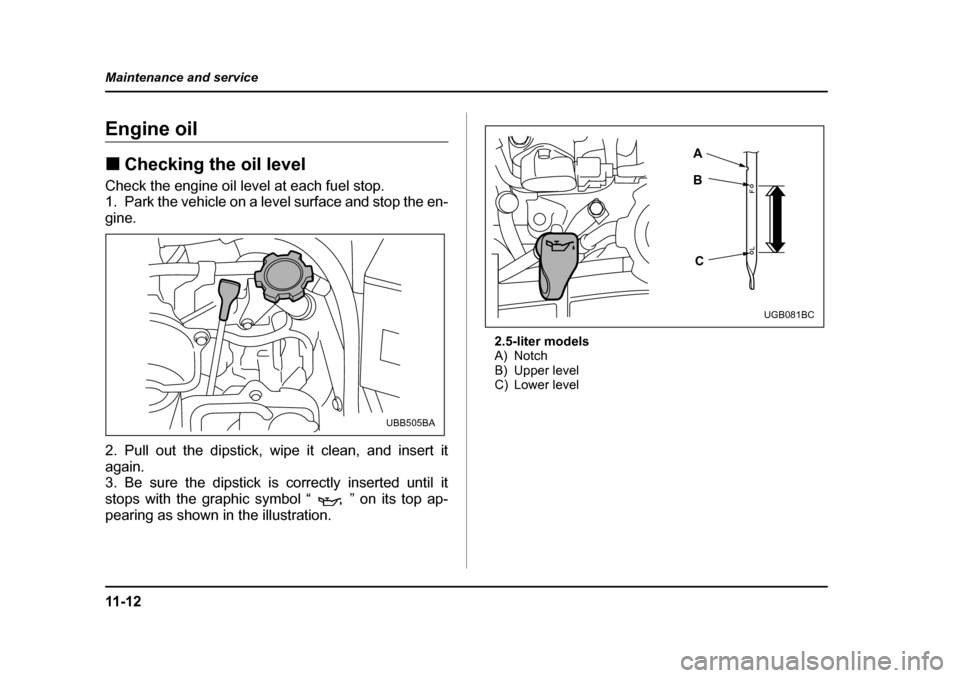
2. Pull out the dipstick, wipe it clean, and insert it
again.
3. Be sure the dipstick is correctly inserted until it
stops with the graphic symbol “ ” on its top ap-
pearing as shown in the illustration. 2.5-liter models
A) Notch
B) Upper level
C) Lower level
UBB505BA
A B
C
UGB081BC
Page 512 of 627
11 -1 3
Maintenance and service
– CONTINUED –
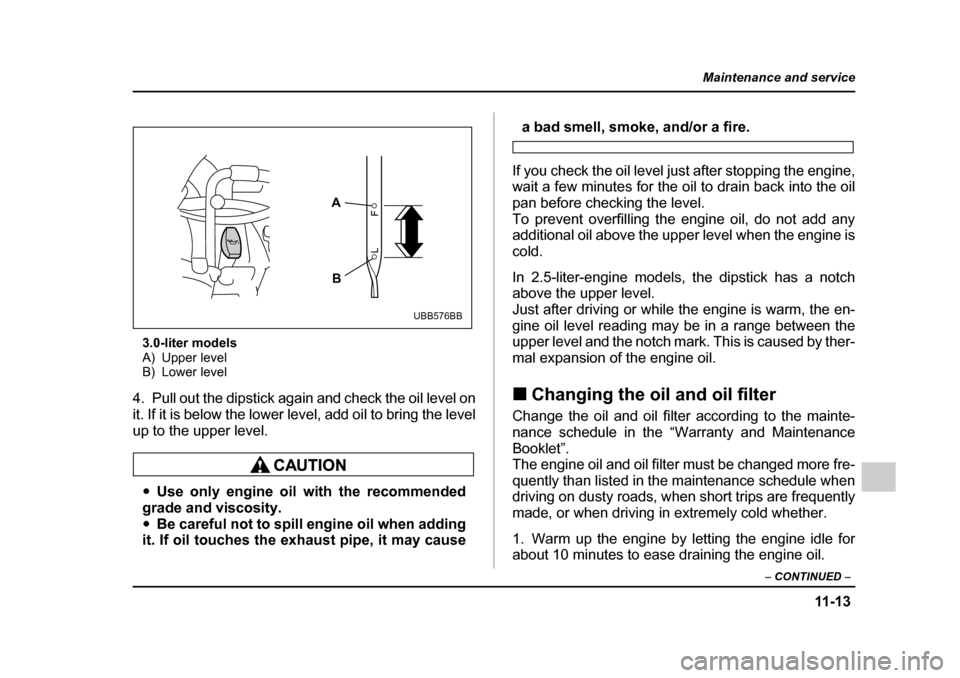
3.0-liter models
A) Upper level
B) Lower level
4. Pull out the dipstick again and check the oil level on
it. If it is below the lower level, add oil to bring the level
up to the upper level.
" Use only engine oil with the recommended
grade and viscosity. " Be careful not to spill engine oil when adding
it. If oil touches the exhaust pipe, it may cause
a bad smell, smoke, and/or a fire.
If you check the oil level just after stopping the engine,
wait a few minutes for the oil to drain back into the oil
pan before checking the level.
To prevent overfilling the engine oil, do not add any
additional oil above the upper level when the engine is cold.
In 2.5-liter-engine models, the dipstick has a notch
above the upper level.
Just after driving or while the engine is warm, the en-
gine oil level reading may be in a range between the
upper level and the notch mark. This is caused by ther-
mal expansion of the engine oil. ! Changing the oil and oil filter
Change the oil and oil filter according to the mainte-
nance schedule in the “Warranty and Maintenance
Booklet”.
The engine oil and oil filter must be changed more fre-
quently than listed in the maintenance schedule when
driving on dusty roads, when short trips are frequently
made, or when driving in extremely cold whether.
1. Warm up the engine by letting the engine idle for
about 10 minutes to ease draining the engine oil.
A
B
UBB576BB
Page 514 of 627
11 -1 5
Maintenance and service
– CONTINUED –
washer after the oil has completely drained out.
6. Remove the under cover.
7. Remove the oil filter with an oil filter wrench.
8. Before installing a new oil filter, apply a thin coat of
engine oil to the seal.
9. Clean the rubber seal seating area of the bottom of
engine and install the oil filter by hand turning. Be
careful not to twist or damage the seal.
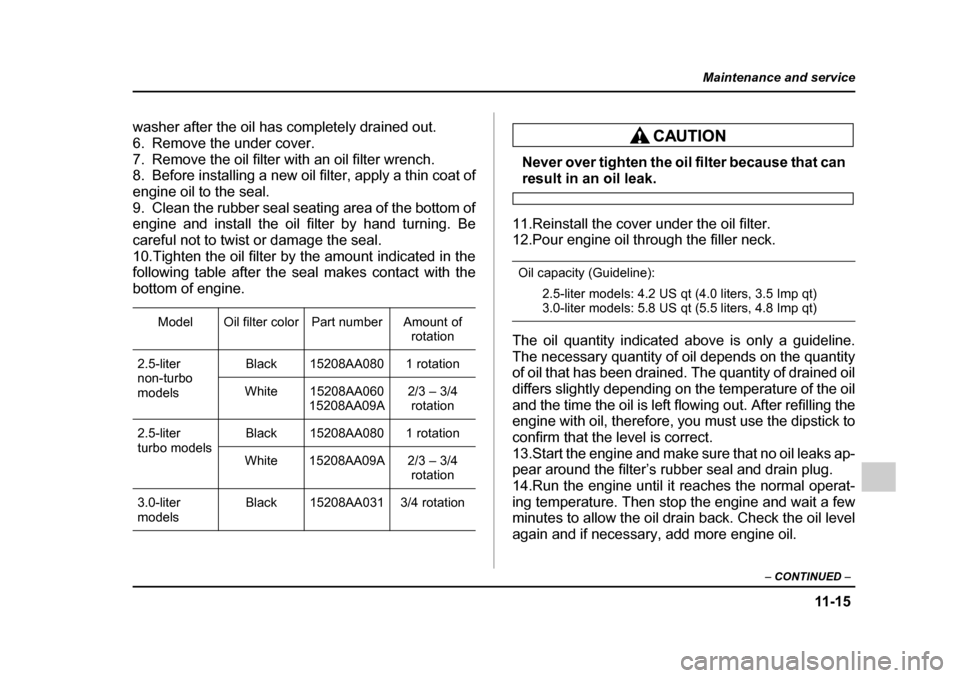
10.Tighten the oil filter by the amount indicated in the
following table after the seal makes contact with the
bottom of engine.
Never over tighten the oil filter because that can
result in an oil leak.
11.Reinstall the cover under the oil filter.
12.Pour engine oil through the filler neck.
Oil capacity (Guideline): 2.5-liter models: 4.2 US qt (4.0 liters, 3.5 Imp qt)
3.0-liter models: 5.8 US qt (5.5 liters, 4.8 Imp qt)
The oil quantity indicated above is only a guideline.
The necessary quantity of oil depends on the quantity
of oil that has been drained. The quantity of drained oil
differs slightly depending on the temperature of the oil
and the time the oil is left flowing out. After refilling the
engine with oil, therefore, you must use the dipstick to
confirm that the level is correct.
13.Start the engine and make sure that no oil leaks ap-
pear around the filter’s rubber seal and drain plug.
14.Run the engine until it reaches the normal operat-
ing temperature. Then stop the engine and wait a few
minutes to allow the oil drain back. Check the oil level
again and if necessary, add more engine oil.
Model Oil filter color Part number Amount of
rotation
2.5-liter
non-turbo
models Black 15208AA080 1 rotation
White 15208AA060 15208AA09A 2/3 – 3/4
rotation
2.5-liter
turbo models Black 15208AA080 1 rotation
White 15208AA09A 2/3 – 3/4 rotation
3.0-liter
models Black 15208AA031 3/4 rotation
Page 530 of 627
11 -3 1
Maintenance and service
– CONTINUED –
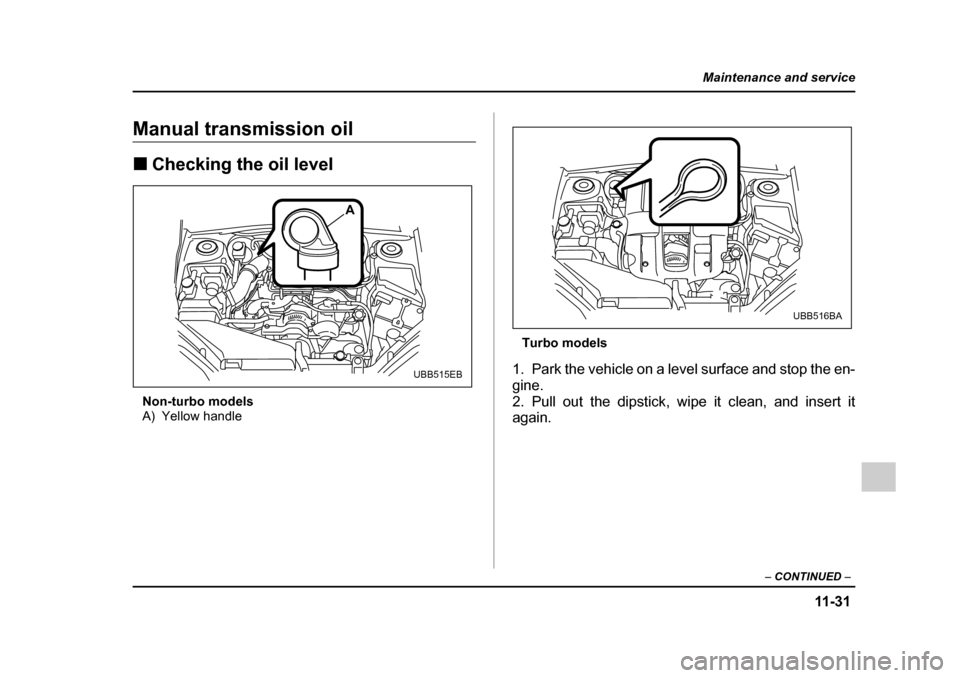
Manual transmission oil !Checking the oil level
Non-turbo models
A) Yellow handle Turbo models
1. Park the vehicle on a level surface and stop the en-
gine.
2. Pull out the dipstick, wipe it clean, and insert it
again.
A
UBB515EB
UBB516BA
Page 531 of 627
11 - 3 2
Maintenance and service
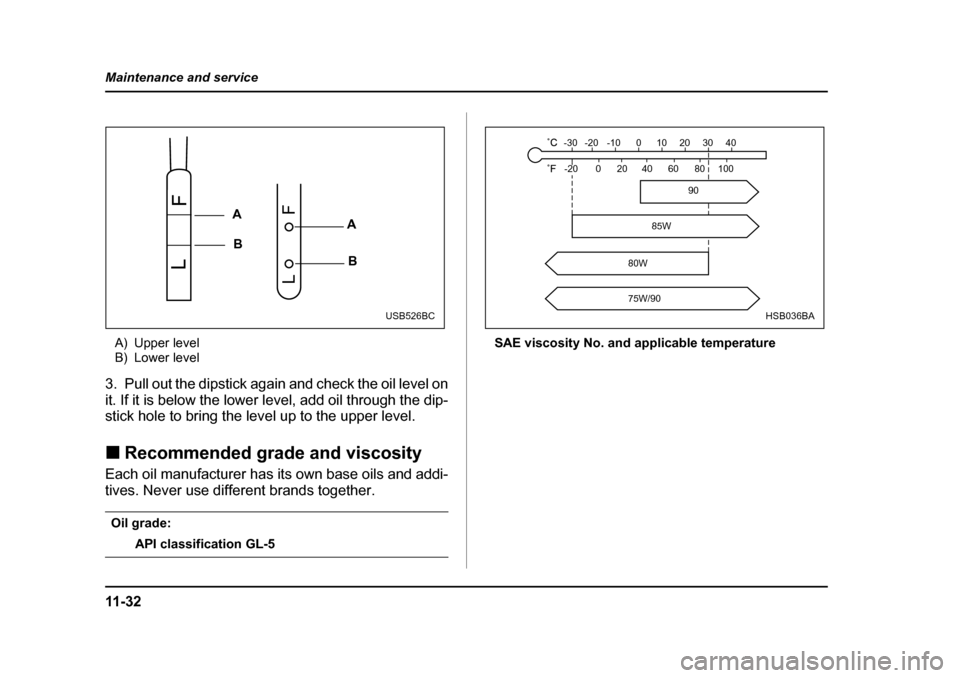
A) Upper level
B) Lower level
3. Pull out the dipstick again and check the oil level on
it. If it is below the lower level, add oil through the dip-
stick hole to bring the level up to the upper level. ! Recommended grade and viscosity
Each oil manufacturer has its own base oils and addi-
tives. Never use different brands together.
Oil grade:
API classification GL-5 SAE viscosity No. and applicable temperature
L
F
F
LA
B A
B
USB526BC
-30 -20 -10 0 10 20 30 40-20 0 60 20
80W
75W/90 80 100
40
85W 90
HSB036BA
Page 534 of 627
11 -3 5
Maintenance and service
– CONTINUED –
fluid up to the upper level. Be careful not to overfill. !Recommended fluid
Use one of the following types of automatic transmis-
sion fluid.
Genuine Subaru Automatic Transmission Fluid
IDEMITSU ATF HP
Castrol Transmax J
Pennzoil ATF-J*
* Available only in the USA (except Alaska and Ha-
waii)
NOTE "Using any non-specified type of automatic
transmission fluid could result in damage inside
the transmission. When replacing the automatic
transmission fluid, be sure to use the kind speci-
fied above." If your vehicle has a four-speed automatic trans-
mission, you can use “Dexron III” Type Automatic
Transmission Fluid in addition to the recommend-
ed fluid types listed above. Front differential gear oil (AT vehi-
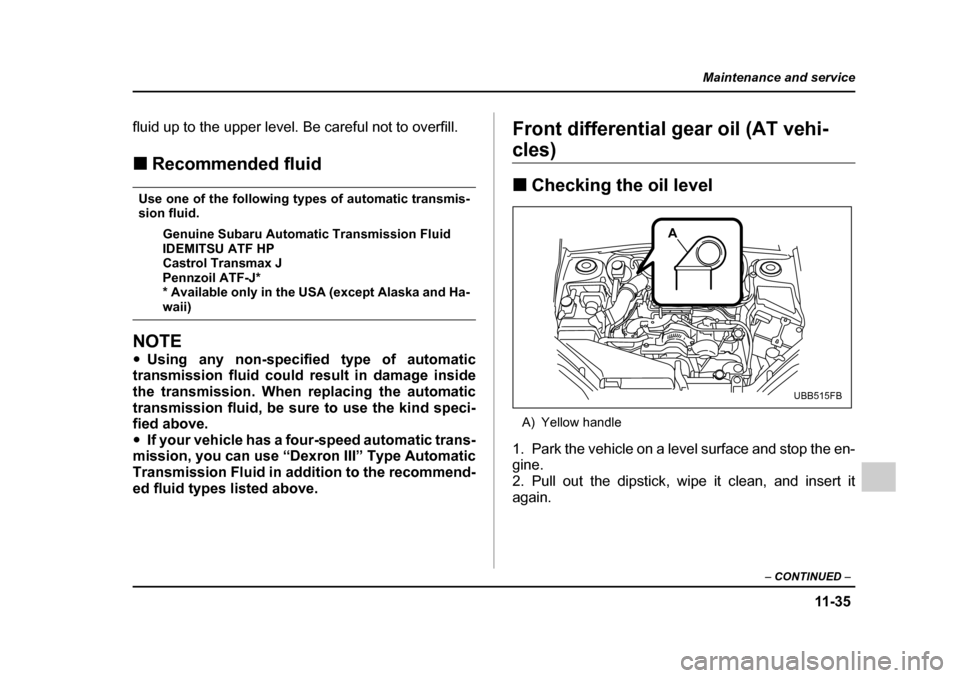
cles) !
Checking the oil level
A) Yellow handle
1. Park the vehicle on a level surface and stop the en-
gine.
2. Pull out the dipstick, wipe it clean, and insert it
again.
A
UBB515FB