service SUBARU OUTBACK 2007 4.G Owner's Manual
[x] Cancel search | Manufacturer: SUBARU, Model Year: 2007, Model line: OUTBACK, Model: SUBARU OUTBACK 2007 4.GPages: 442, PDF Size: 13.39 MB
Page 314 of 442
chain connection, refer to the instructions
for your hitch and trailer. !Side mirrors
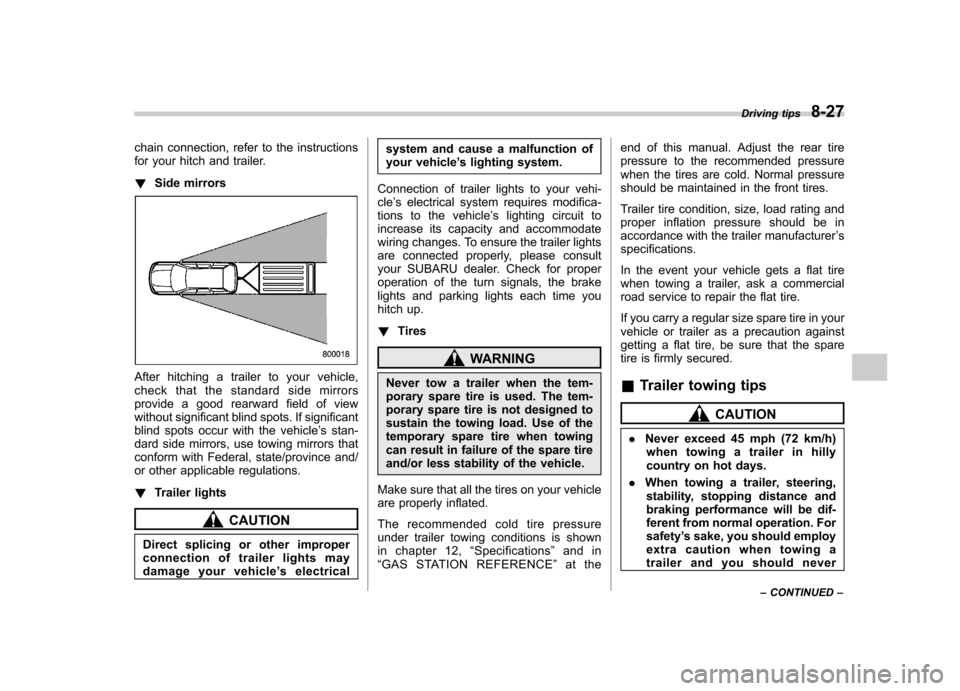
After hitching a trailer to your vehicle,
check that the standard side mirrors
provide a good rearward field of view
without significant blind spots. If significant
blind spots occur with the vehicle ’s stan-
dard side mirrors, use towing mirrors that
conform with Federal, state/province and/
or other applicable regulations. ! Trailer lights
CAUTION
Direct splicing or other improper
connection of trailer lights may
damage your vehicle ’s electrical system and cause a malfunction of
your vehicle
’s lighting system.
Connection of trailer lights to your vehi-cle ’s electrical system requires modifica-
tions to the vehicle ’s lighting circuit to
increase its capacity and accommodate
wiring changes. To ensure the trailer lights
are connected properly, please consult
your SUBARU dealer. Check for proper
operation of the turn signals, the brake
lights and parking lights each time you
hitch up. ! Tires
WARNING
Never tow a trailer when the tem-
porary spare tire is used. The tem-
porary spare tire is not designed to
sustain the towing load. Use of the
temporary spare tire when towing
can result in failure of the spare tire
and/or less stability of the vehicle.
Make sure that all the tires on your vehicle
are properly inflated.
The recommended cold tire pressure
under trailer towing conditions is shown
in chapter 12, “Specifications ”and in
“ GAS STATION REFERENCE ”at the end of this manual. Adjust the rear tire
pressure to the recommended pressure
when the tires are cold. Normal pressure
should be maintained in the front tires.
Trailer tire condition, size, load rating and
proper inflation pressure should be in
accordance with the trailer manufacturer
’s
specifications.
In the event your vehicle gets a flat tire
when towing a trailer, ask a commercial
road service to repair the flat tire.
If you carry a regular size spare tire in your
vehicle or trailer as a precaution against
getting a flat tire, be sure that the spare
tire is firmly secured.
& Trailer towing tips
CAUTION
. Never exceed 45 mph (72 km/h)
when towing a trailer in hilly
country on hot days.
. When towing a trailer, steering,
stability, stopping distance and
braking performance will be dif-
ferent from normal operation. Forsafety ’s sake, you should employ
extra caution when towing a
trailer and you should never Driving tips
8-27
– CONTINUED –
Page 325 of 442
9-8In case of emergency
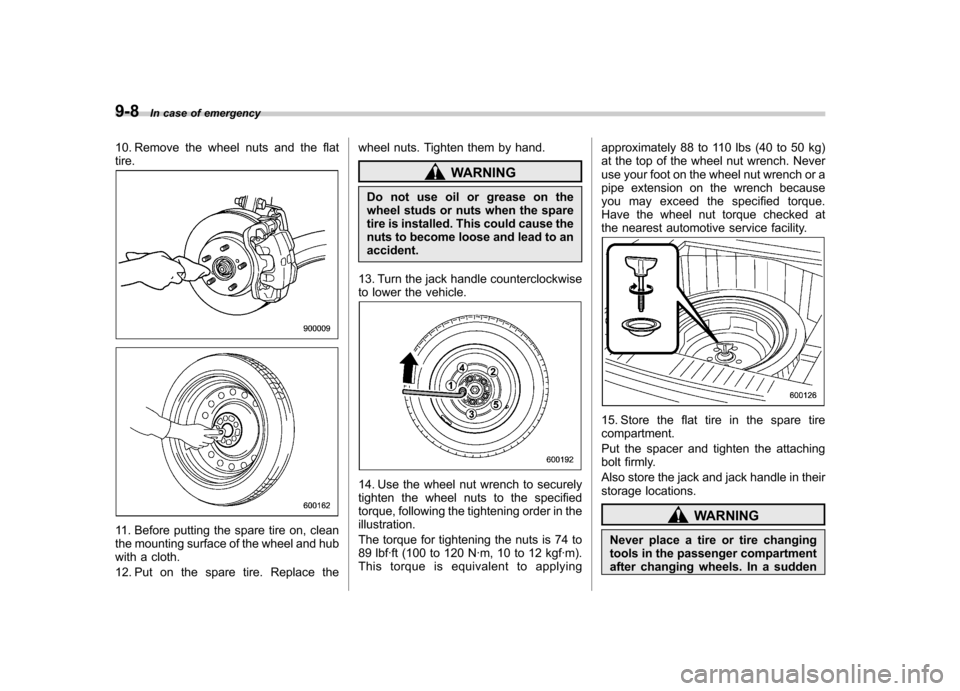
10. Remove the wheel nuts and the flat tire.
11. Before putting the spare tire on, clean
the mounting surface of the wheel and hub
with a cloth.
12. Put on the spare tire. Replace the wheel nuts. Tighten them by hand.
WARNING
Do not use oil or grease on the
wheel studs or nuts when the spare
tire is installed. This could cause the
nuts to become loose and lead to anaccident.
13. Turn the jack handle counterclockwise
to lower the vehicle.
14. Use the wheel nut wrench to securely
tighten the wheel nuts to the specified
torque, following the tightening order in the illustration.
The torque for tightening the nuts is 74 to
89 lbf·ft (100 to 120 N·m, 10 to 12 kgf·m).
This torque is equivalent to applying approximately 88 to 110 lbs (40 to 50 kg)
at the top of the wheel nut wrench. Never
use your foot on the wheel nut wrench or a
pipe extension on the wrench because
you may exceed the specified torque.
Have the wheel nut torque checked at
the nearest automotive service facility.
15. Store the flat tire in the spare tire compartment.
Put the spacer and tighten the attaching
bolt firmly.
Also store the jack and jack handle in their
storage locations.
WARNING
Never place a tire or tire changing
tools in the passenger compartment
after changing wheels. In a sudden
Page 330 of 442
Towing
WARNING
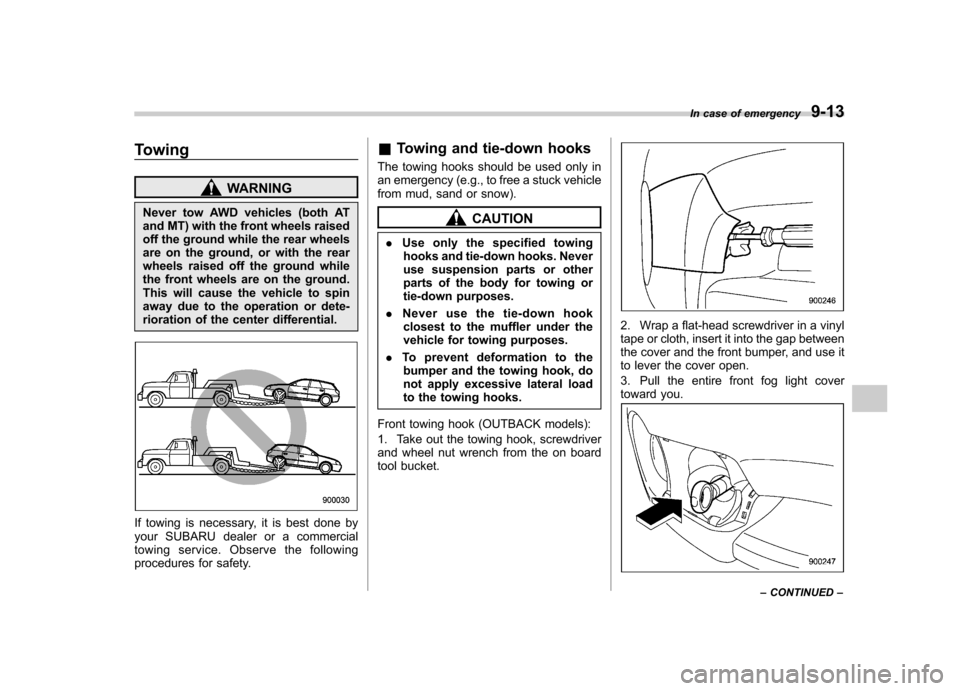
Never tow AWD vehicles (both AT
and MT) with the front wheels raised
off the ground while the rear wheels
are on the ground, or with the rear
wheels raised off the ground while
the front wheels are on the ground.
This will cause the vehicle to spin
away due to the operation or dete-
rioration of the center differential.
If towing is necessary, it is best done by
your SUBARU dealer or a commercial
towing service. Observe the following
procedures for safety. &
Towing and tie-down hooks
The towing hooks should be used only in
an emergency (e.g., to free a stuck vehicle
from mud, sand or snow).
CAUTION
. Use only the specified towing
hooks and tie-down hooks. Never
use suspension parts or other
parts of the body for towing or
tie-down purposes.
. Never use the tie-down hook
closest to the muffler under the
vehicle for towing purposes.
. To prevent deformation to the
bumper and the towing hook, do
not apply excessive lateral load
to the towing hooks.
Front towing hook (OUTBACK models):
1. Take out the towing hook, screwdriver
and wheel nut wrench from the on board
tool bucket.
2. Wrap a flat-head screwdriver in a vinyl
tape or cloth, insert it into the gap between
the cover and the front bumper, and use it
to lever the cover open.
3. Pull the entire front fog light cover
toward you.
In case of emergency 9-13
– CONTINUED –
Page 344 of 442
Maintenance schedule....................................... 11-3
Maintenance precautions ................................... 11-3
Before checking or servicing in the engine compartment .................................................... 11-4
When you do checking or servicing in the engine compartment while the engine is running .......... 11-4
Engine hood ....................................................... 11-4
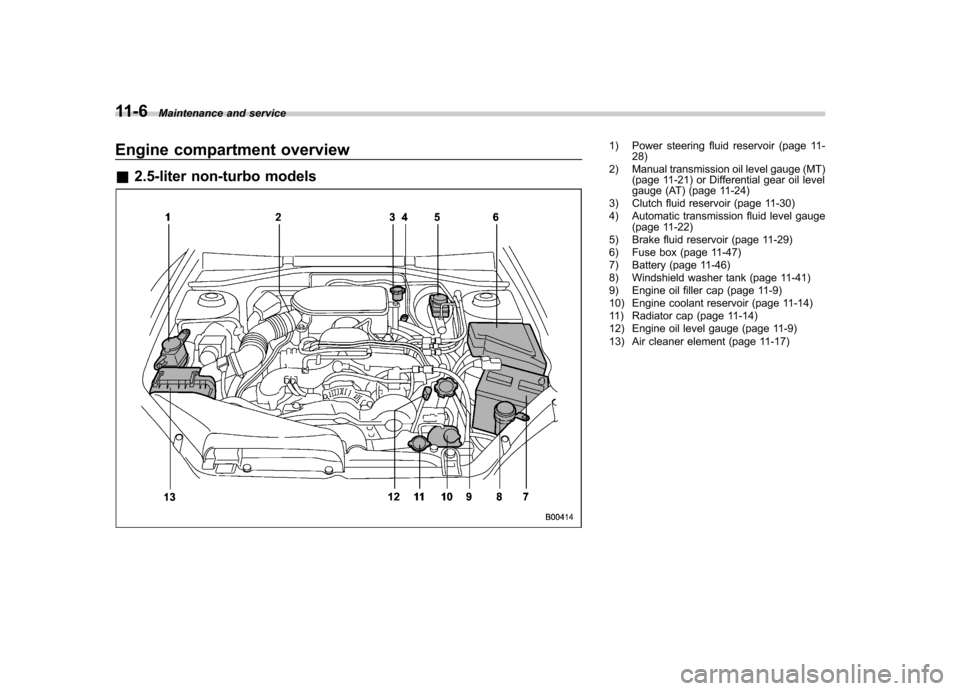
Engine compartment overview .......................... 11-6
2.5-liter non-turbo models ................................... 11-6
2.5-liter turbo models ......................................... 11-7
3.0-liter models .................................................. 11-8
Engine oil ............................................................ 11-9
Checking the oil level ......................................... 11-9
Changing the oil and oil filter ............................ 11-10
Recommended grade and viscosity .................. 11-12
Recommended grade and viscosity under severe driving conditions .......................................... 11-13
Cooling system ................................................ 11-13
Hose and connections ...................................... 11-14
Engine coolant ................................................. 11-14
Air cleaner element .......................................... 11-17
Replacing the air cleaner element ..................... 11-17
Spark plugs ...................................................... 11-20
Recommended spark plugs .............................. 11-20
Drive belts ........................................................ 11-20
2.5-liter models ................................................ 11-20
3.0-liter models ................................................ 11-21
Manual transmission oil .................................. 11-21
Checking the oil level ....................................... 11-21
Recommended grade and viscosity .................. 11-22Automatic transmission fluid
.......................... 11-22
Checking the fluid level .................................... 11-22
Recommended fluid ......................................... 11-23
Front differential gear oil (AT vehicles) .......... 11-24
Checking the oil level ...................................... 11-24
Recommended grade and viscosity .................. 11-25
Rear differential gear oil .................................. 11-25
Checking the gear oil level ............................... 11-25
Recommended grade and viscosity .................. 11-27
Power steering fluid ........................................ 11-28
Checking the fluid level .................................... 11-28
Recommended fluid ......................................... 11-28
Brake fluid ........................................................ 11-29
Checking the fluid level .................................... 11-29
Recommended brake fluid ............................... 11-29
Clutch fluid (MT vehicles) ............................... 11-30
Checking the fluid level .................................... 11-30
Recommended clutch fluid ............................... 11-30
Brake booster .................................................. 11-31
Brake pedal ...................................................... 11-31
Checking the brake pedal free play .................. 11-31
Checking the brake pedal reserve distance ........................................................ 11-31
Clutch pedal (Manual transmission vehicles) ........................................................ 11-32
Checking the clutch function ............................ 11-32
Checking the clutch pedal free play .................. 11-32
Replacement of brake pad and lining ............ 11-32
Breaking-in of new brake pads and linings ........................................................... 11-33Maintenance and service
11
Page 345 of 442
Maintenance and serviceParking brake stroke ........................................ 11-33
Tires and wheels .............................................. 11-34
Types of tires ................................................... 11-34
Tire pressure monitoring system (TPMS) (if equipped) ................................................... 11-34
Tire inspection ................................................. 11-36
Tire pressures and wear ................................... 11-36
Wheel balance .................................................. 11-38
Wear indicators ................................................ 11-38
Tire rotation direction mark .............................. 11-39
Tire rotation ..................................................... 11-39
Tire replacement .............................................. 11-40
Wheel replacement ........................................... 11-40
Aluminum wheels ............................................. 11-41
Windshield washer fluid .................................. 11-41
Replacement of wiper blades .......................... 11-42
Windshield wiper blade assembly ..................... 11-43
Windshield wiper blade rubber ......................... 11-43
Rear window wiper blade assembly .................. 11-44
Rear window wiper blade rubber ....................... 11-45Battery
.............................................................. 11-46
Fuses ................................................................ 11-47
Main fuse .......................................................... 11-49
Installation of accessories .............................. 11-49
Replacing bulbs ............................................... 11-50
Headlight ......................................................... 11-51
Parking light .................................................... 11-53
Front turn signal light ...................................... 11-53
Front fog light (if equipped) .............................. 11-53
Rear combination lights ................................... 11-54
Backup light (Station wagon) ........................... 11-55
License plate light ........................................... 11-56
Dome light ....................................................... 11-56
Map light ......................................................... 11-57
Door step light ................................................. 11-57
Cargo area light (Station wagon) ... ................... 11-58
Trunk light (Sedan) .......................................... 11-58
High mount stop light (Sedan) .......................... 11-59
Page 346 of 442
Maintenance schedule
The scheduled maintenance items re-
quired to be serviced at regular intervals
are shown in the“Warranty and Main-
tenance Booklet ”.
For details of your maintenance schedule,
read the separate “Warranty and Main-
tenance Booklet ”. Maintenance precautions
When maintenance and service are re-
quired, it is recommended that all work be
done by an authorized SUBARU dealer.
If you perform maintenance and service
by yourself, you should familiarize yourself
with the information provided in this
section on general maintenance and
service for your SUBARU.
Incorrect or incomplete service could
cause improper or unsafe vehicle opera-
tion. Any problems caused by improper
maintenance and service performed by
you are not eligible for warranty coverage.
WARNING
. Testing of an All-Wheel Drive
vehicle must NEVER be per-
formed on a single two-wheel
dynamometer or similar appara-
tus. Attempting to do so will
result in transmission damage
and in uncontrolled vehicle
movement and may cause an
accident or injuries to persons
nearby.
. Always select a safe area when
performing maintenance on yourvehicle. .
Always be very careful to avoid
injury when working on the vehi-
cle. Remember that some of the
materials in the vehicle may be
hazardous if improperly used or
handled, for example, batteryacid.
. Your vehicle should only be ser-
viced by persons fully competent
to do so. Serious personal injury
may result to persons not experi-
enced in servicing vehicles.
. Always use the proper tools and
make certain that they are wellmaintained.
. Never get under the vehicle sup-
ported only by a jack. Always use
a safety stands to support thevehicle.
. Never keep the engine running in
a poorly ventilated area, such as
a garage or other closed areas.
. Do not smoke or allow open
flames around the fuel or battery.
This will cause a fire.
. Because the fuel system is under
pressure, replacement of the fuel
filter should be performed only
by your SUBARU dealer.
. Wear adequate eye protection to Maintenance and service
11-3
– CONTINUED –
Page 347 of 442
11-4Maintenance and service
guard against getting oil or fluids
in your eyes. If something does
get in your eyes, thoroughly
wash them out with clean water.
. Do not tamper with the wiring of
the SRS airbag system or seat-
belt pretensioner system, or at-
tempt to take its connectors
apart, as that may activate the
system or it can render it inop-
erative. The wiring and connec-
tors of these systems are yellow
for easy identification. NEVER
use a circuit tester for thesewiring.
If your SRS airbag or seatbelt
pretensioner needs service, con-
sult your nearest SUBARU deal-
er.
& Before checking or servicing
in the engine compartment
WARNING
. Always stop the engine and set
the parking brake firmly to pre-
vent the vehicle from moving.
. Always let the engine cool down.
Engine parts become very hot
when the engine is running and remain hot for some time after
the engine is stopped.
. Do not spill engine oil, engine
coolant, brake fluid or any other
fluid on hot engine components.
This may cause a fire.
. Always remove the key from the
ignition switch. When the ignition
switch is in the “ON ”position,
thecoolingfanmayoperate
suddenly even when the engine
is stopped.
& When you do checking or
servicing in the engine com-
partment while the engine isrunning
WARNING
A running engine can be dangerous.
Keep your fingers, hands, clothing,
hair and tools away from the cooling
fan, belts and any other moving
engine parts. Removing rings,
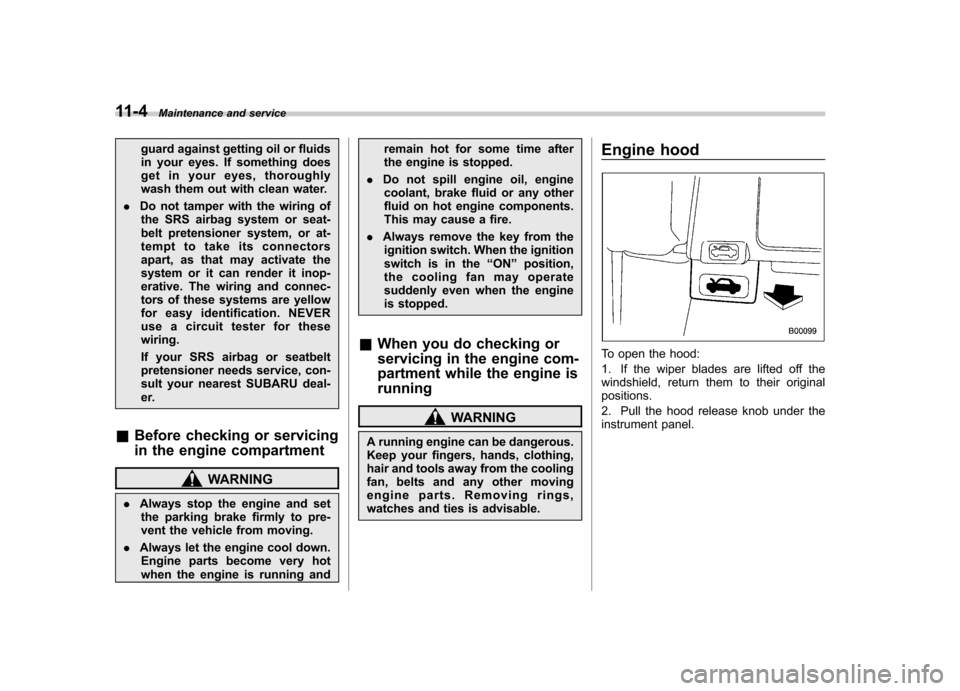
watches and ties is advisable. Engine hood
To open the hood:
1. If the wiper blades are lifted off the
windshield, return them to their originalpositions.
2. Pull the hood release knob under the
instrument panel.
Page 348 of 442
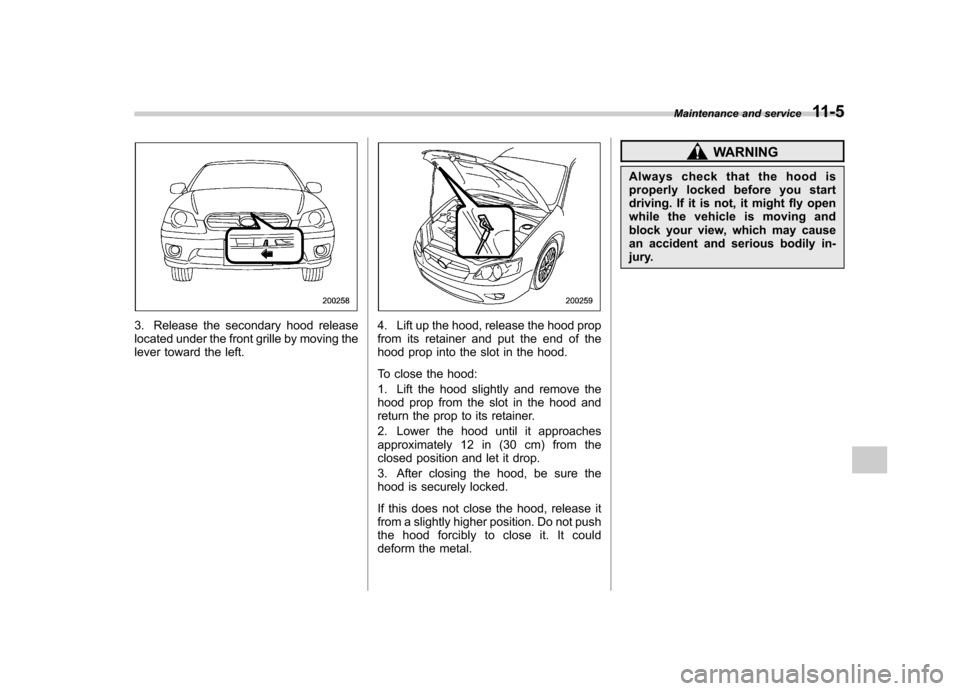
3. Release the secondary hood release
located under the front grille by moving the
lever toward the left.4. Lift up the hood, release the hood prop
from its retainer and put the end of the
hood prop into the slot in the hood.
To close the hood:
1. Lift the hood slightly and remove the
hood prop from the slot in the hood and
return the prop to its retainer.
2. Lower the hood until it approaches
approximately 12 in (30 cm) from the
closed position and let it drop.
3. After closing the hood, be sure the
hood is securely locked.
If this does not close the hood, release it
from a slightly higher position. Do not push
the hood forcibly to close it. It could
deform the metal.
WARNING
Always check that the hood is
properly locked before you start
driving. If it is not, it might fly open
while the vehicle is moving and
block your view, which may cause
an accident and serious bodily in-
jury. Maintenance and service
11-5
Page 349 of 442
11-6Maintenance and service
Engine compartment overview &2.5-liter non-turbo models1) Power steering fluid reservoir (page 11-
28)
2) Manual transmission oil level gauge (MT) (page 11-21) or Differential gear oil level
gauge (AT) (page 11-24)
3) Clutch fluid reservoir (page 11-30)
4) Automatic transmission fluid level gauge (page 11-22)
5) Brake fluid reservoir (page 11-29)
6) Fuse box (page 11-47)
7) Battery (page 11-46)
8) Windshield washer tank (page 11-41)
9) Engine oil filler cap (page 11-9)
10) Engine coolant reservoir (page 11-14)
11) Radiator cap (page 11-14)
12) Engine oil level gauge (page 11-9)
13) Air cleaner element (page 11-17)
Page 350 of 442
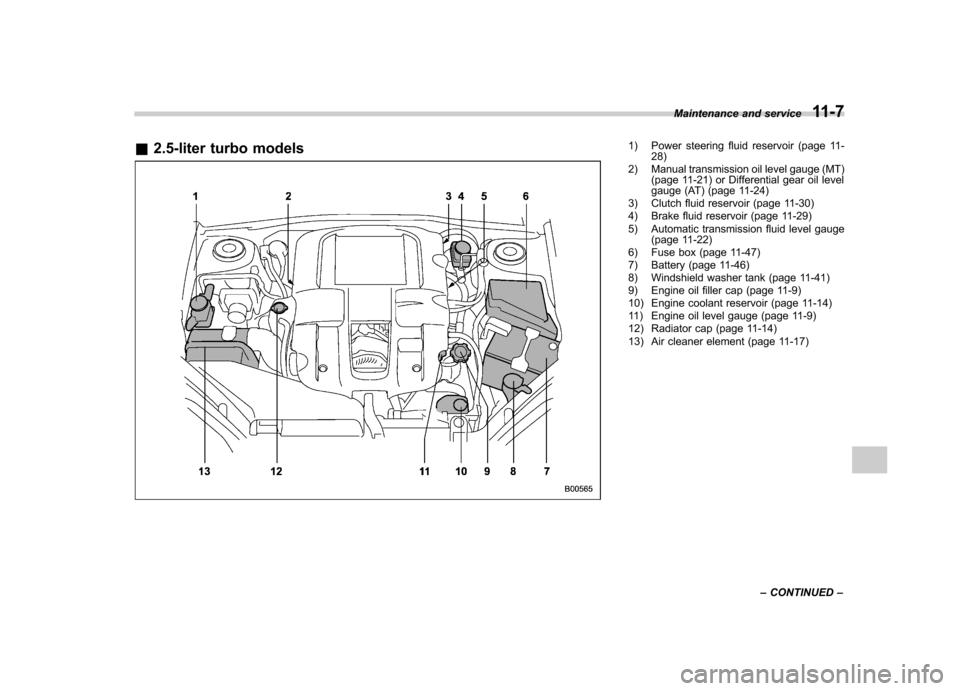
&2.5-liter turbo models1) Power steering fluid reservoir (page 11-
28)
2) Manual transmission oil level gauge (MT) (page 11-21) or Differential gear oil level
gauge (AT) (page 11-24)
3) Clutch fluid reservoir (page 11-30)
4) Brake fluid reservoir (page 11-29)
5) Automatic transmission fluid level gauge (page 11-22)
6) Fuse box (page 11-47)
7) Battery (page 11-46)
8) Windshield washer tank (page 11-41)
9) Engine oil filler cap (page 11-9)
10) Engine coolant reservoir (page 11-14)
11) Engine oil level gauge (page 11-9)
12) Radiator cap (page 11-14)
13) Air cleaner element (page 11-17) Maintenance and service
11-7
– CONTINUED –