sport mode SUBARU OUTBACK 2007 4.G Owners Manual
[x] Cancel search | Manufacturer: SUBARU, Model Year: 2007, Model line: OUTBACK, Model: SUBARU OUTBACK 2007 4.GPages: 442, PDF Size: 13.39 MB
Page 24 of 442

&Warning and indicator light
Mark Name Page
Seatbelt warning light 3-22
Front passenger ’s seat-
belt warning light 3-22
SRS airbag system warn-
ing light3-24
CHECK ENGINE warning
light/Malfunction indicator lamp3-25
Charge warning light 3-26
Oil pressure warning light 3-26
AT OIL temperature
warning light (if equipped)
3-26
orABS warning light 3-28
orBrake system warning light
3-28
orDoor open warning light 3-29 Mark Name Page
Low fuel warning light 3-29
All-Wheel Drive warning
light (if equipped)
3-30
Vehicle Dynamics Control
operation indicator light (if
equipped)3-30
Vehicle Dynamics Control
warning light/Vehicle Dy-
namics Control OFF indi-
cator light (if equipped)3-30
Security indicator light 3-31
Turn signal indicator lights 3-33
High beam indicator light 3-33
Cruise control indicator
light (if equipped)
3-33
Cruise control set indica-
tor light (if equipped)
3-33
Light indicator light 3-33
Low tire pressure warning
light (if equipped)3-26Mark Name Page
orPassenger airbag ON in-
dicator light
3-25
orPassenger airbag OFF
indicator light
3-25
SPORT mode indicator
light (if equipped)3-32
orDaytime running lights in-
dicator light3-40
Shift up indicator (MT ve-
hicles) (if equipped)
3-32
S# PREP indicator
(if equipped) 3-721
– CONTINUED –
Page 122 of 442

Ignition switch..................................................... 3-3
LOCK .................................................................. 3-3
ACC.................................................................... 3-4
ON...................................................................... 3-4
START ................................................................ 3-4
Key reminder chime ............................................ 3-5
Ignition switch light ............................................. 3-5
Hazard warning flasher ....................................... 3-5
Meters and gauges (Turbo models) ................... 3-5
Combination meter illumination ........................... 3-5
Speedometer ....................................................... 3-6
Tachometer ......................................................... 3-6
Fuel gauge .......................................................... 3-6
Temperature gauge ............................................. 3-7
ECO gauge ......................................................... 3-8
Multi-information display (Turbo models) .......... 3-8
Odometer and trip meter ..................................... 3-9
Current and average fuel consumption ............... 3-10
Outside temperature and journey time ................ 3-11
Driving range on remaining fuel .......................... 3-13
Clock (Vehicle with Navigation System) ............... 3-14
SI-DRIVE display ................................................ 3-14
Warning messages and driver ’s
information ...................................................... 3-15
Meters and gauges (Non-turbo models) ........... 3-18
Combination meter illumination .......................... 3-18
Canceling the function for meter/gauge needle movement upon turning on the ignition switch .............................................................. 3-18
Speedometer ...................................................... 3-18
Odometer ........................................................... 3-19 Double trip meter
............................................... 3-19
Tachometer ....................................................... 3-20
Fuel gauge ........................................................ 3-20
Temperature gauge ............................................ 3-21
Warning and indicator lights ............................. 3-22
Seatbelt warning light and chime ....................... 3-22
SRS airbag system warning light ........................ 3-24
Front passenger ’s frontal airbag ON and OFF
indicators ........................................................ 3-25
CHECK ENGINE warning light/Malfunction indicator lamp ................................................. 3-25
Charge warning light .......................................... 3-26
Oil pressure warning light .................................. 3-26
AT OIL TEMPerature warning light (AT vehicles) .................................................... 3-26
Low tire pressure warning light (if equipped) .................................................... 3-26
ABS warning light .............................................. 3-28
Brake system warning light ................................ 3-28
Low fuel warning light ....................................... 3-29
Door open warning light .................................... 3-29
All-Wheel Drive warning light (AT vehicles) .................................................... 3-30
Vehicle Dynamics Control operation indicator light (if equipped). ............................................ 3-30
Vehicle Dynamics Control warning light (if equipped)/Vehicle Dynamics Control OFF
indicator light (if equipped) .............................. 3-30
Security indicator light ....................................... 3-31
SPORT mode indicator light (if equipped) ........... 3-32
Shift-up indicator light (MT vehicles) (if equipped) .................................................... 3-32
Instruments and controls
3
Page 128 of 442

NOTE
You will see the“”sign in the fuel
gauge.
This indicates that the fuel filler door
(lid) is located on the right side of thevehicle. ! Low fuel warning light
The low fuel warning light comes on when
the tank is nearly empty [Approximately
2.6 US gal (10 liters, 2.2 lmp gal)].
It only operates when the ignition switch is
in the “ON ”position.
NOTE
This light does not go out unless the
tank is replenished up to an internal fuel quantity of approximately 4.0 US
gal (15 liters, 3.3 lmp gal).
CAUTION
Promptly put fuel in the tank when-
ever the low fuel warning light
comes on. Engine misfires as a
result of an empty tank could cause
damage to the engine.
& Temperature gauge
1) Normal operating range
2) S# PREP indicator light
The temperature gauge shows engine
coolant temperature when the ignition
switch is in the “ON ”position. The coolant temperature will vary in
accordance with the outside temperature
and driving conditions.
We recommend that you drive moderately
until the pointer of the temperature gauge
reaches near the middle of the range.
Engine operation is optimum with the
engine coolant at this temperature range
and high revving operation when the
engine is not warmed up enough should
be avoided.
When the engine is not warmed up
sufficiently, the S# PREP indicator light
turns on. While this indicator light is on,
the SI-DRIVE mode cannot be changed to
the Sport Sharp (S#) mode. For details
about the SI-DRIVE mode, refer to the
“SI-
DRIVE (Turbo models) ”section in chapter
7.
CAUTION
If the pointer exceeds the normal
operating range, safely stop the
vehicle as soon as possible.
See the “In case of emergency ”in
chapter 9. Instruments and controls
3-7
– CONTINUED –
Page 135 of 442

3-14Instruments and controls
Canada-spec. vehicles
If the driving range is shown as “
”,
there is only a tiny amount of fuel left in the
tank. You must refuel the vehicle immedi-
ately. NOTE
The driving range on remaining fuel is
only a guide. The indicated value may
differ from the actual driving range on
remaining fuel, so you must immedi-
ately fill the tank when the low fuel
warning light comes on. &
Clock (Vehicle with Naviga-
tion System)
NOTE
If your vehicle is a non-turbo model
equipped with a navigation system,
refer to the separate “Operating In-
structions for Monitor System ”.
For turbo models equipped with a naviga-
tion system, the clock can show the time.
The time shown by the clock receives the
time information from the navigation sys-
tem. To adjust the time shown by the
clock, refer to the separate “Operating
Instructions for Monitor System ”and
adjust the time of the navigation system.
CAUTION
To ensure safety, do not attempt to
set the time during driving, as an
accident could result.
& SI-DRIVE display
1) Sport Sharp (S#) mode*
2) Sport (S) mode
3) Intelligent (I) mode
4) Throttle angle
*: This display means that the Sport Sharp
(S#) mode is in the selected condition.
This indicates the current SI-DRIVE mode
with its throttle angle.
For details of SI-DRIVE mode, refer to the “ SI-DRIVE (Turbo models) ”section in
chapter 7.
Page 143 of 442
3-22Instruments and controls
Warning and indicator lights
Several of the warning and indicator lights
come on momentarily and then go out
when the ignition switch is initially turned
to the“ON ”position. This permits check-
ing the operation of the bulbs.
Apply the parking brake and turn the
ignition switch to the “ON ”position. The
following lights come on:
: Seatbelt warning light
(The seatbelt warning light goes out only
when the driver fastens the seatbelt.)
: Front passenger ’s seatbelt warning
light
(The seatbelt warning light goes out only
when the front seat passenger fastens theseatbelt.)
: SRS airbag system warning light
: CHECK ENGINE warning light/Mal- function indicator lamp
: Charge warning light
: Oil pressure warning light
: AT OIL temperature warning light (ATvehicles)
/: ABS warning light
: Vehicle Dynamics Control operation indicator light (if equipped)
: Vehicle Dynamics Control warning light
(if equipped)/Vehicle Dynamics Control
OFF indicator light (if equipped)
/: Brake system warning light
: AWD warning light (AT vehicles)
: Low tire pressure warning light (if equipped)
: SPORT mode indicator light (AT vehicles)
/: Front passenger ’s frontal airbag
ON indicator light
/: Front passenger ’s frontal airbag
OFF indicator light
: Low fuel warning light
/: Door open warning light
: Cruise control indicator light (if equipped)
: Cruise control set indicator light (if
equipped)
: Shift-up indicator light (MT vehicles) (ifequipped)
: S# PREP indicator light (if equipped)
If any lights fail to come on, it indicates a burned-out bulb or a malfunction of the
corresponding system.
Consult your authorized SUBARU dealer
for repair.
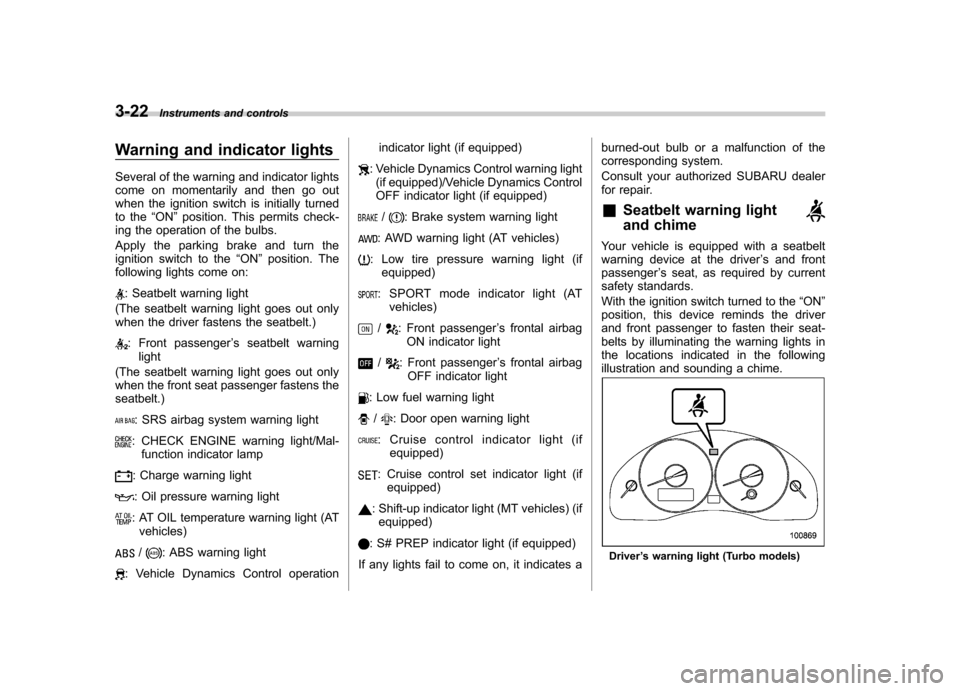
& Seatbelt warning light
and chime
Your vehicle is equipped with a seatbelt
warning device at the driver ’s and front
passenger ’s seat, as required by current
safety standards.
With the ignition switch turned to the “ON ”
position, this device reminds the driver
and front passenger to fasten their seat-
belts by illuminating the warning lights in
the locations indicated in the following
illustration and sounding a chime.
Driver ’s warning light (Turbo models)
Page 153 of 442
3-32Instruments and controls
& SPORT mode indicator
light (if equipped)
This light comes on when the ignition
switch is turned to the “ON ”position and
goes out after the engine has started.
When the selector lever is moved to the
manual gate, the SPORT mode is se-
lected and the indicator light comes on.
(Refer to the “Automatic transmission –4-
speed ”or “Automatic transmission –5-
speed ”section in chapter 7.)
& Shift-up indicator light
(MT vehicles) (if equipped)
When the ignition switch is turned to the “ON ”position, the indicator light comes on
for 3 seconds, and then turns off. While
selecting the Intelligent (I) mode of SI-
DRIVE, this indicator light comes on and
informs the upshift timing to the driver for
fuel-efficient driving. &
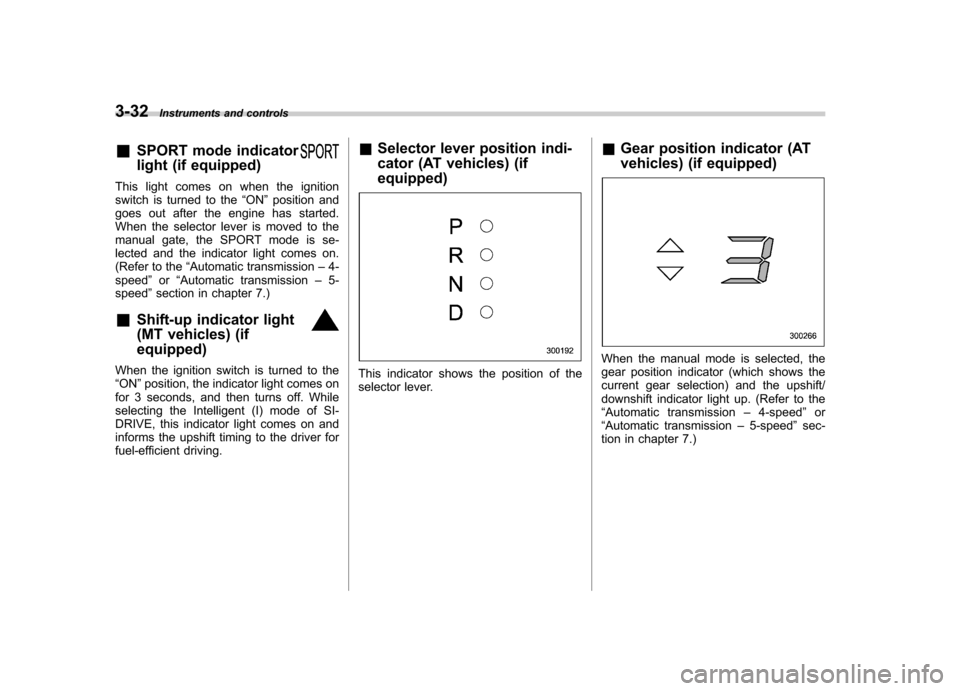
Selector lever position indi-
cator (AT vehicles) (if equipped)This indicator shows the position of the
selector lever. &
Gear position indicator (AT
vehicles) (if equipped)
When the manual mode is selected, the
gear position indicator (which shows the
current gear selection) and the upshift/
downshift indicator light up. (Refer to the“Automatic transmission –4-speed ”or
“ Automatic transmission –5-speed ”sec-
tion in chapter 7.)
Page 238 of 442
Fuel...................................................................... 7-3
Fuel requirements ............................................... 7-3
Fuel filler lid and cap ........................................... 7-5
State emission testing (U.S. only) ...................... 7-7
Preparing to drive ............................................... 7-9
Starting the engine .............................................. 7-9
Manual transmission vehicle ................................ 7-9
Automatic transmission vehicle .......................... 7-10
Stopping the engine ........................................... 7-11
Remote engine start system (dealer option) ................................................. 7-11
Starting your vehicle .......................................... 7-12
Remote start safety features ............................... 7-12
Entering the vehicle while it is running via remote start ................................................................. 7-12
Entering the vehicle following remote engine start shutdown ......................................................... 7-12
Pre-heating or pre-cooling the interior of the vehicle ............................................................. 7-13
Service mode ..................................................... 7-13
Remote transmitter programming and programmable feature option ............................ 7-13
System maintenance .......................................... 7-14
Manual transmission –5 speeds ...................... 7-15
Shifting speeds .................................................. 7-15
Driving tips ........................................................ 7-16
Manual transmission –6 speeds (2.5GT
spec.B) ............................................................. 7-17
Selecting reverse gear ........................................ 7-17
Shifting speeds .................................................. 7-17
Driving tips ........................................................ 7-18 Automatic transmission
–4-speed ................... 7-18
Selector lever .................................................... 7-19
Selector lever reverse inhibiting function ............ 7-20
Selection of manual mode .................................. 7-21
Maximum speeds ............................................... 7-22
Driving tips ........................................................ 7-23
SPORT mode ..................................................... 7-23
Shift lock release ............................................... 7-23
Automatic transmission –5-speed ................... 7-24
Selector lever .................................................... 7-25
Selector lever reverse inhibiting function ............ 7-26
Selection of manual mode .................................. 7-27
Maximum speeds ............................................... 7-29
Driving tips ........................................................ 7-29
SPORT mode (Non-turbo models) ....................... 7-30
Shift lock release ............................................... 7-30
SI-DRIVE (Turbo models) .................................. 7-31
Intelligent (I) mode ............................................. 7-31
Sport (S) mode .................................................. 7-32
Sport Sharp (S#) mode. ...................................... 7-32
SI-DRIVE selector .............................................. 7-32
Rear viscous limited slip differential (LSD) (if equipped) .................................................... 7-33
Power steering ................................................... 7-33
Braking ............................................................... 7-34
Braking tips ....................................................... 7-34
Brake system .................................................... 7-34
Disc brake pad wear warning indicators ............. 7-34
ABS (Anti-lock Brake System) .......................... 7-35
ABS system self-check ...................................... 7-35
Starting and operating
7
Page 255 of 442
7-18Starting and operating
engine over-revving and this in turn
can result in engine damage.
In addition, sudden application of
engine brakes when the vehicle is
travelling on a slippery surface can
lead to wheel locking; as a conse-
quence, control of the vehicle may
be lost and the risk of an accidentincreased.
The following tables show the maximum
speeds that are possible with each differ-
ent gear. The tachometer ’s needle will
enter the red area if these speeds areexceeded.
With the exception of cases where sudden
acceleration is required, the vehicle
should not be driven with the tachometer ’s
needle inside the red area. Failure to
observe this precaution can lead to
excessive engine wear and poor fuel
economy.
Gear mph (km/h)1st 33 (54)
2nd 51 (83)
3rd 69 (112)4th 90 (147)
5th 125 (204) 6th Top speed NOTE
Never exceed posted speed limits. &
Driving tips
Do not drive with your foot resting on the
clutch pedal and do not use the clutch to
hold your vehicle at a standstill on an
upgrade. Either of those actions may
cause clutch damage.
Do not drive with your hand resting on the
shift lever. This may cause wear on the
transmission components.
When it is necessary to reduce vehicle
speed due to slow traffic, turning corners,
or driving up steep hills, downshift to a
lower gear before the engine starts to
labor.
On steep downgrades, downshift the
transmission to 5th, 4th, 3rd or 2nd gear
as necessary; this helps to maintain a safe
speed and to extend brake pad life.
In this way, the engine provides a braking
effect. Remember, if you “ride ”(over use)
the brakes while descending a hill, they
may overheat and not work properly.
The engine may, on rare occasions, knock
when the vehicle rapidly accelerates or
rapidly pulls away from a standstill. This
phenomenon does not indicate a problem. Automatic transmission
–4-
speed
The automatic transmission is electroni-
cally controlled and provides 4 forward
speeds and 1 reverse speed. Also, it has a
manual mode and a SPORT mode.
WARNING
Do not shift from the “P ” or “N ”
position into the “D ” or “R ” position
while depressing the accelerator
pedal. This may cause the vehicle
to jump forward or backward.
CAUTION
. Shift into the “P ” or “R ” position
only after the vehicle is comple-
tely stopped. Shifting while the
vehicle is moving may cause
damage to the transmission.
. Do not race the engine for more
than five seconds in any position
except the “N ” or “P ” position
when the brake is set or when
chocks are used in the wheels.
This may cause the automatic
transmission fluid to overheat.
. Avoid shifting from one of the
Page 256 of 442

forward driving positions into the “R ” position or vice versa until
the vehicle has completely
stopped. Such shifting may
cause damage to the transmis-sion.
. When parking the vehicle, first
securely apply the parking brake
and then place the selector lever
in the “P ” position. Avoid parking
for a long time with the selector
lever in any other position as
doing so could result in a dead
battery.
NOTE . When the engine coolant tempera-
ture is still low, your vehicle ’s auto-
matic transmission will up-shift at
higher engine speeds than when the
coolant temperature is sufficiently high
in order to shorten the warm-up time
and improve driveability. The gearshift
timing will automatically shift to the
normal timing after the engine has
warmed up.. Immediately after ATF (automatic
transmission fluid) is replaced, you
may feel that the automatic transmis-
sion operation is somewhat unusual.
This results from invalidation of data which the on-board computer has
collected and stored in memory to
allow the transmission to shift at the
most appropriate times for the current
condition of your vehicle. Optimized
shifting will be restored as the vehicle
continues to be driven for a while.
& Selector lever
: Shift possible with brake pedal de-
pressed
: Shift possible with brake pedal not
depressed
The selector lever has four positions, “P ”,
“ R ”, “N ”, “D ”and also has manual gate for
using “SPORT ”mode or manual mode. !
P (Park)
This position is for parking the vehicle and
starting the engine.
In this position, the transmission is me-
chanically locked to prevent the vehicle
from rolling freely.
When you park the vehicle, first set the
parking brake fully, then shift into the “P ”
position. Do not hold the vehicle with only
the transmission.
To shift the selector lever from the “P ” to
any other position, you should depress the
brake pedal fully then move the selector
lever. This prevents the vehicle from
lurching when it is started. ! R (Reverse)
This position is for backing the vehicle.
To shift from the “N ”to “R ”position, stop
the vehicle completely then move the
lever to the “R ”position.
! N (Neutral)
This position is for restarting a stalledengine.
In this position the wheels and transmis-
sion are not locked. In this position, the
transmission is neutral; the vehicle will roll
freely, even on the slightest incline unless
the parking brake or foot brake is on. Starting and operating
7-19
– CONTINUED –
Page 257 of 442
7-20Starting and operating
Avoid coasting with the transmission neutral.
During coasting, there is no engine brak-
ing effect. NOTE
If the selector lever is in the “N ”
position when you stop the engine for
parking, you may not subsequently be
able to move it to the “R ” and “P ”
positions. If this happens, turn the
ignition switch to the “ON ”position.
Youwillthenbeabletomovethe
selector lever to the “P ” position.
WARNING
Do not drive the vehicle with the
selector lever in the “N ” (neutral)
position. Engine braking has no
effect in this condition and the risk
of an accident is consequently in-creased.
! D (Drive)
This position is for normal driving.
The transmission automatically shifts into
a suitable gear from 1st to 4th according to
the vehicle speed and the acceleration
you require.
When more acceleration is required in this position, press the accelerator pedal fully
to the floor and hold that position. The
transmission will automatically downshift
to 3rd, 2nd or 1st gear. When you release
the pedal, the transmission will return to
the original gear position.
To use the
“SPORT ”mode, move the lever
from this position into the manual gate. To
use the manual mode, move the lever
from this position into the manual gate
then move it toward the “+ ” and “� ” ends.
! While climbing a grade
When driving up a hill, undesired upshift to
4th gear is prevented from taking place
when the accelerator is released. This
minimizes the chance of subsequent
downshifting to a lower gear when accel-
erating again. This prevents repeated
upshifting and downshifting resulting in a
smoother operation of the vehicle.
NOTE
The transmission may downshift to 2nd
or 1st gear, depending on the way the
accelerator pedal is pressed to accel-
erate the vehicle again. ! While going down a hill
When you are descending a hill or any
other slope while braking with the“ SPORT ”mode selected, the transmission
may downshift to 3rd or 2nd gear depend- ing on how hard you depress the brake
pedal, causing engine braking to work.
Reacceleration for a short time will cause
the transmission to upshift normally.
NOTE . A 4th-to-3rd automatic downshift
will not occur at speeds above 50
mph (80 km/h) and a 3rd-to-2nd auto-
matic downshift will not occur at
speeds above 24 mph (38 km/h).. Automatic downshifts to 3rd or 2nd
may occur even when driving on a level
road depending on conditions, such as
how hard you depress the brake pedal. & Selector lever reverse inhi-
biting function
This function prevents accidental move-
ment of the selector lever to the “R ”
position while the vehicle is moving.
The function becomes operational when
the vehicle reaches a speed of approxi-
mately 6 mph (10 km/h). Once opera-
tional, it prevents the selector lever from
being moved from the “N ”position to the
“ R ” position. When the vehicle speed
drops below 6 mph (10 km/h), the function
is canceled. The selector lever can then
be moved to the “R ”and “P ”positions.
When the ignition switch has been turned