fog light SUBARU OUTBACK 2008 4.G Owners Manual
[x] Cancel search | Manufacturer: SUBARU, Model Year: 2008, Model line: OUTBACK, Model: SUBARU OUTBACK 2008 4.GPages: 444, PDF Size: 14.1 MB
Page 5 of 444
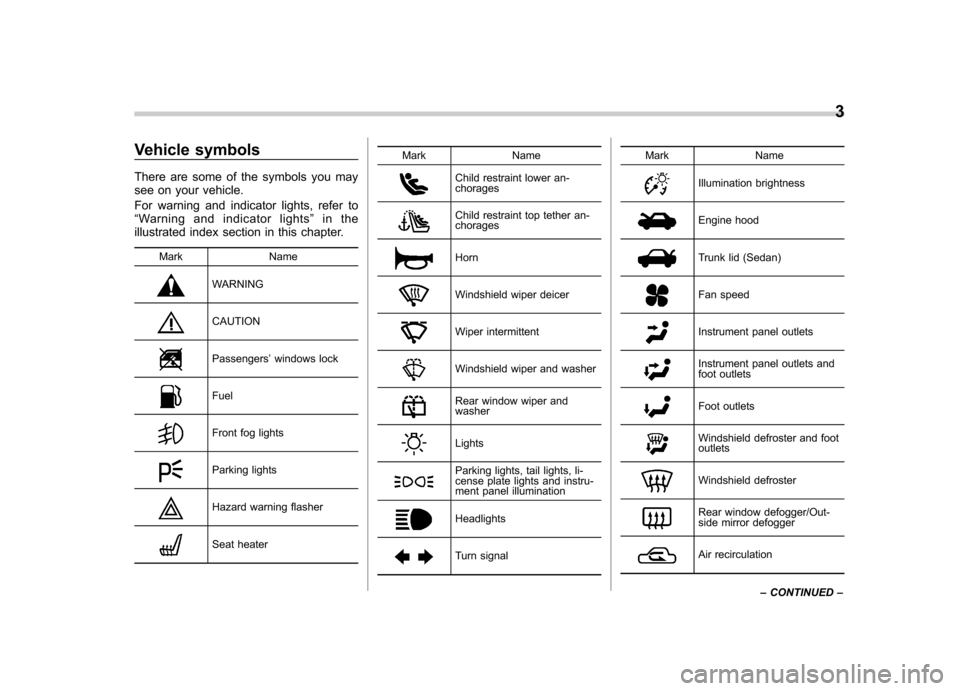
Vehicle symbols
There are some of the symbols you may
see on your vehicle.
For warning and indicator lights, refer to “Warning and indicator lights ”in the
illustrated index section in this chapter.
Mark Name
WARNING
CAUTION
Passengers ’windows lock
Fuel
Front fog lights
Parking lights
Hazard warning flasher
Seat heater Mark Name
Child restraint lower an- chorages
Child restraint top tether an- chorages
Horn
Windshield wiper deicer
Wiper intermittent
Windshield wiper and washer
Rear window wiper and washer
Lights
Parking lights, tail lights, li-
cense plate lights and instru-
ment panel illumination
Headlights
Turn signalMark Name
Illumination brightness
Engine hood
Trunk lid (Sedan)
Fan speed
Instrument panel outlets
Instrument panel outlets and
foot outlets
Foot outlets
Windshield defroster and foot outlets
Windshield defroster
Rear window defogger/Out-
side mirror defogger
Air recirculation3
– CONTINUED –
Page 12 of 444

10
Illustrated index &Exterior1) Engine hood lock release (page 11-4)
2) Headlight switch (page 3-46)
3) Bulb replacement (page 11-51)
4) Wiper switch (page 3-50)
5) Moonroof (page 2-27)
6) Roof rail (page 8-15)
7) Door locks (page 2-5)
8) Tire pressure (page 11-36)
9) Flat tires (page 9-4)
10) Tire chains (page 8-13)
11) Fog light switch (page 3-48)
12) Tie-down hooks (page 9-14)
13) Towing hook (page 9-14)
Page 18 of 444
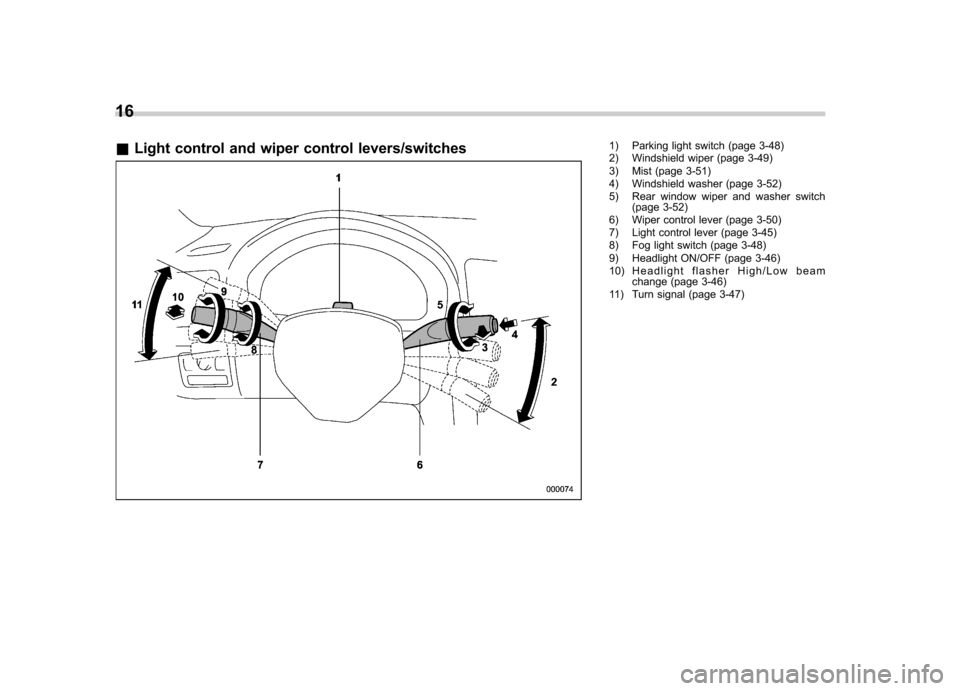
16 &Light control and wiper control levers/switches
1) Parking light switch (page 3-48)
2) Windshield wiper (page 3-49)
3) Mist (page 3-51)
4) Windshield washer (page 3-52)
5) Rear window wiper and washer switch
(page 3-52)
6) Wiper control lever (page 3-50)
7) Light control lever (page 3-45)
8) Fog light switch (page 3-48)
9) Headlight ON/OFF (page 3-46)
10) Headlight flasher High/Low beam change (page 3-46)
11) Turn signal (page 3-47)
Page 25 of 444
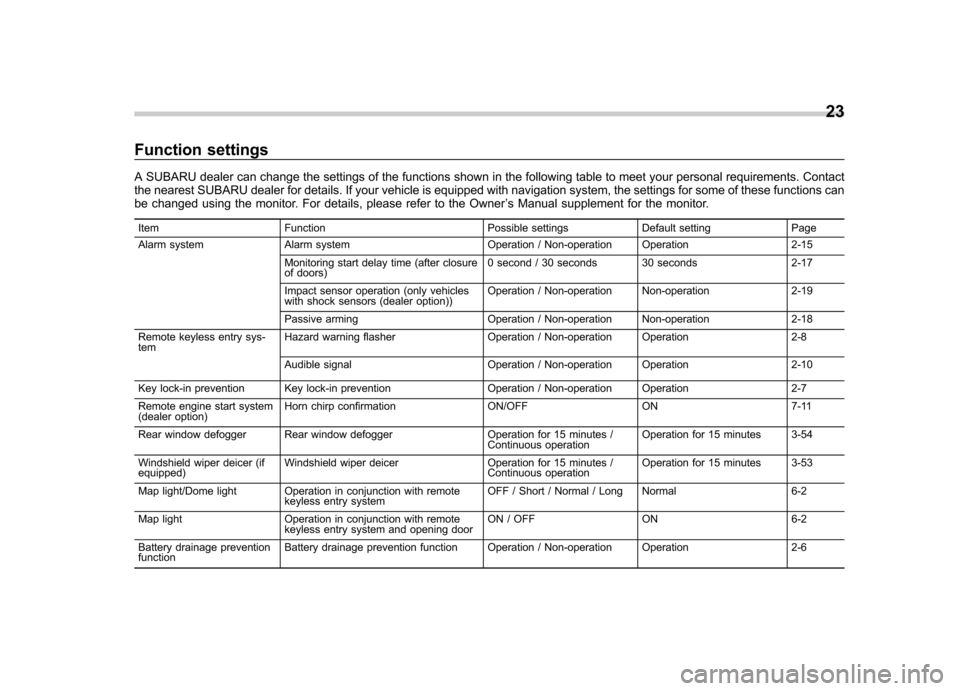
Function settings
A SUBARU dealer can change the settings of the functions shown in the following table to meet your personal requirements. Contact
the nearest SUBARU dealer for details. If your vehicle is equipped with navigation system, the settings for some of these functions can
be changed using the monitor. For details, please refer to the Owner’s Manual supplement for the monitor.
Item Function Possible settings Default setting Page
Alarm system Alarm system Operation / Non-operation Operation 2-15 Monitoring start delay time (after closure
of doors) 0 second / 30 seconds 30 seconds 2-17
Impact sensor operation (only vehicles
with shock sensors (dealer option)) Operation / Non-operation Non-operation 2-19
Passive arming Operation / Non-operation Non-operation 2-18
Remote keyless entry sys- tem Hazard warning flasher Operation / Non-operation Operation 2-8
Audible signal Operation / Non-operation Operation 2-10
Key lock-in prevention Key lock-in prevention Operation / Non-operation Operation 2-7
Remote engine start system
(dealer option) Horn chirp confirmation ON/OFF ON 7-11
Rear window defogger Rear window defogger Operation for 15 minutes / Continuous operationOperation for 15 minutes 3-54
Windshield wiper deicer (if
equipped) Windshield wiper deicer Operation for 15 minutes /
Continuous operationOperation for 15 minutes 3-53
Map light/Dome light Operation in conjunction with remote keyless entry system OFF / Short / Normal / Long Normal 6-2
Map light Operation in conjunction with remote keyless entry system and opening door ON / OFF ON 6-2
Battery drainage prevention function Battery drainage prevention function Operation / Non-operation Operation 2-6 23
Page 121 of 444
Instruments and controlsSecurity indicator light ....................................... 3-38
SPORT mode indicator light (4-speed AT models) (if equipped) ..................................................... 3-38
Shift-up indicator light (MT models) (if equipped) ..................................................... 3-38
S# PREP indicator light (if equipped) .................. 3-38
Selector lever position indicator (AT models) (if equipped) ..................................................... 3-39
Gear position indicator (AT models) (if equipped) ..................................................... 3-39
Selector lever and gear position indicator (AT models) (if equipped) ........................................ 3-39
Turn signal indicator lights ................................. 3-39
High beam indicator light ................................... 3-40
Cruise control indicator light .............................. 3-40
Cruise control set indicator light ......................... 3-40
Headlight indicator light ..................................... 3-40
Front fog light indicator light .............................. 3-40
Clock (Vehicle without Navigation System) ............................................................ 3-40
Information display (2.5-liter non-turbo model without Navigation System) ................ 3-41
Outside temperature indicator ............................ 3-41
Current fuel consumption ................................... 3-43
Average fuel consumption .................................. 3-43 Driving range on remaining fuel
......................... 3-44
Journey time ..................................................... 3-45
Light control switch ........................................... 3-45
Headlights ......................................................... 3-46
High/low beam change (dimmer) ... ..................... 3-46
Headlight flasher ............................................... 3-46
Daytime running light system ............................. 3-47
Turn signal lever ................................................ 3-47
Illumination brightness control ......................... 3-47
Parking light switch ........................................... 3-48
Front fog light switch (if equipped) .................. 3-48
Wiper and washer .............................................. 3-49
Windshield wiper and washer switches .............. 3-50
Rear window wiper and washer switch (Station wagon) ............................................................ 3-52
Windshield wiper deicer (if equipped) .............. 3-53
Rear window defogger button .......................... 3-54
Mirrors ................................................................ 3-55
Inside mirror ...................................................... 3-55
Auto-dimming mirror/compass (if equipped) ....... 3-55
Outside mirrors ................................................. 3-57
Tilt/telescopic steering wheel ........................... 3-58
Horn .................................................................... 3-59
Page 159 of 444
3-40Instruments and controls
rapidly, the turn signal bulb may be burned
out. Replace the bulb as soon as possible.
Refer to the “Replacing bulbs ”section in
chapter 11.
& High beam indicator light
This light shows that the headlights are in
the high beam mode.
This indicator light also comes on when
the headlight flasher is operated. &Cruise control indica-
tor light
The cruise control indicator light comes on
when the ignition switch is turned to the“ON ”position and goes out after approxi-
mately 3 seconds.
This light comes on when the “CRUISE ”
main switch is pressed. NOTE . If you move the cruise control lever
or press the main switch button while
turning the ignition switch “ON ”, the
cruise control function is deactivated
and the “CRUISE ”indicator light
flashes. To reactivate the cruise control
function, turn the ignition switch back
to the “Acc ”or “LOCK ”position, and
then turn it again to the “ON ”position. .
If this indicator light and the CHECK
ENGINE warning light/malfunction in-
dicator lamp flash simultaneously dur-
ing driving, have the vehicle checked
by your nearest SUBARU dealer. & Cruise control set in-
dicator light
The cruise control set indicator light
comes on when the ignition switch is
turned to the “ON ”position and goes out
after approximately 3 seconds.
This light comes on when vehicle speed
has been set.
& Headlight indicator light
This indicator light comes on when the
light switch is turned to the “”position
(to turn on the parking lights) or to the “
” position (to turn on the headlights).
& Front fog light indicator light
This indicator light is on while the front fog
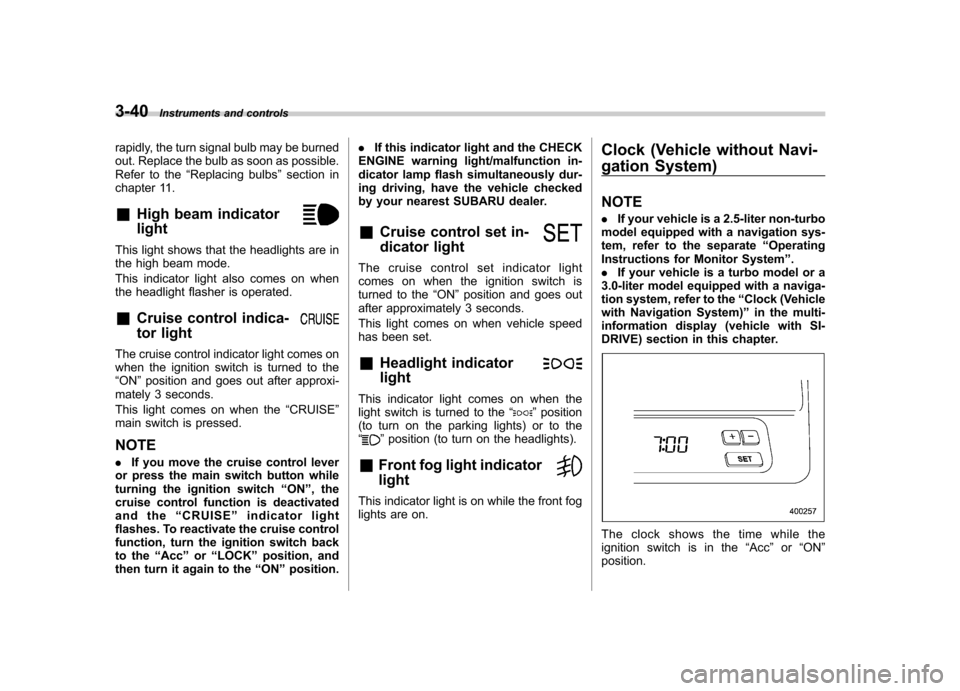
lights are on. Clock (Vehicle without Navi-
gation System) NOTE .
If your vehicle is a 2.5-liter non-turbo
model equipped with a navigation sys-
tem, refer to the separate “Operating
Instructions for Monitor System ”.
. If your vehicle is a turbo model or a
3.0-liter model equipped with a naviga-
tion system, refer to the “Clock (Vehicle
with Navigation System) ”in the multi-
information display (vehicle with SI-
DRIVE) section in this chapter.
The clock shows the time while the
ignition switch is in the “Acc ”or “ON ”
position.
Page 167 of 444
3-48Instruments and controls
NOTE
When the control dial is turned fully
upward, the illumination brightness
becomes the maximum and the auto-
matic dimming function does not work
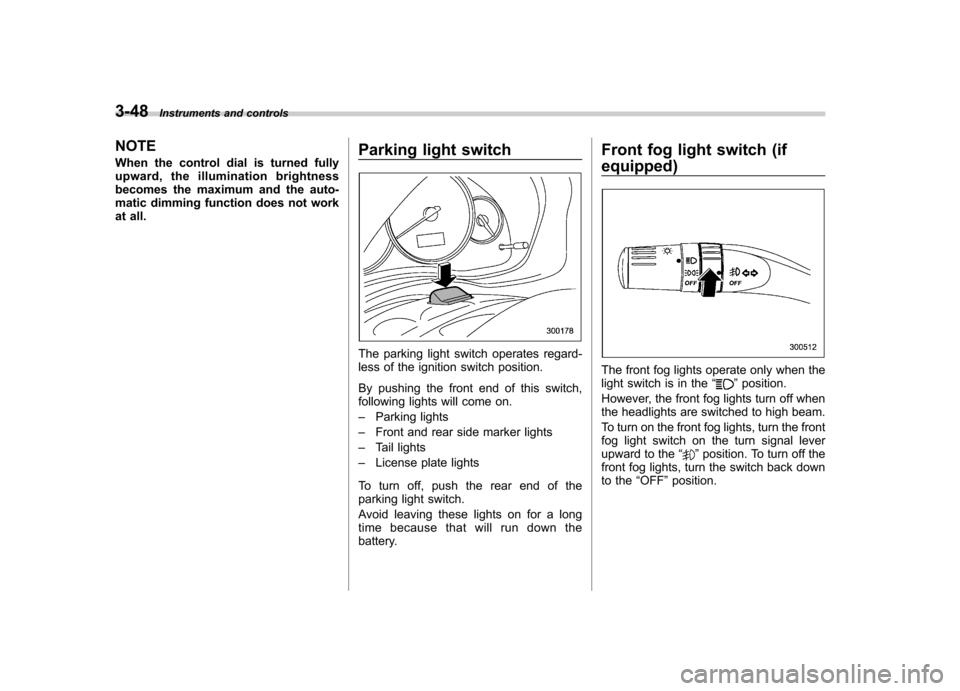
at all. Parking light switch
The parking light switch operates regard-
less of the ignition switch position.
By pushing the front end of this switch,
following lights will come on. –
Parking lights
– Front and rear side marker lights
– Tail lights
– License plate lights
To turn off, push the rear end of the
parking light switch.
Avoid leaving these lights on for a long
time because that will run down the
battery. Front fog light switch (if
equipped)
The front fog lights operate only when the
light switch is in the
“”position.
However, the front fog lights turn off when
the headlights are switched to high beam.
To turn on the front fog lights, turn the front
fog light switch on the turn signal lever
upward to the “
”position. To turn off the
front fog lights, turn the switch back down
to the “OFF ”position.
Page 168 of 444
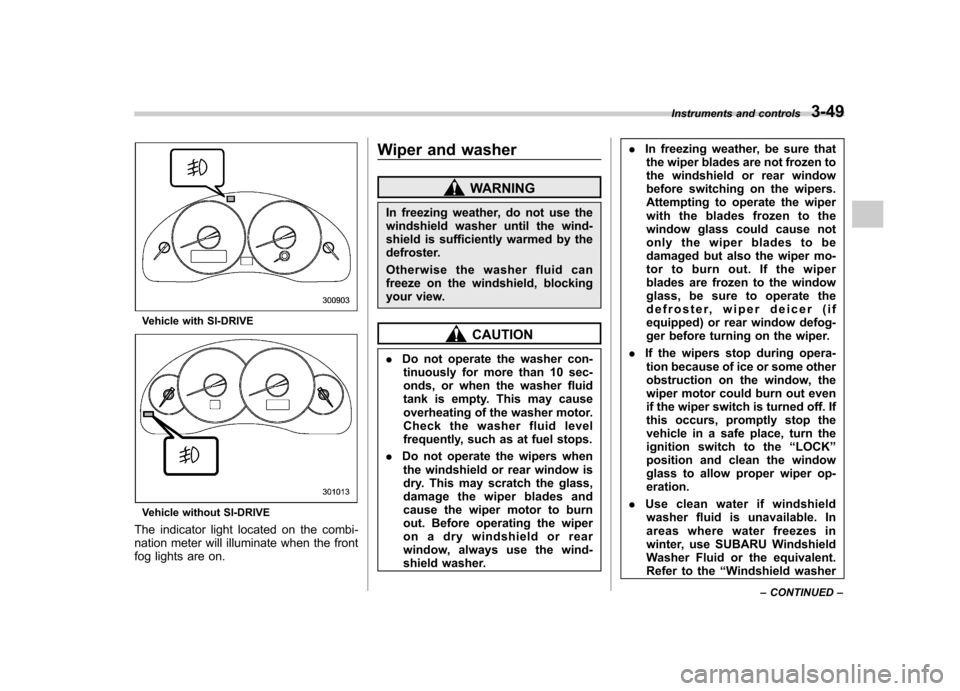
Vehicle with SI-DRIVE
Vehicle without SI-DRIVE
The indicator light located on the combi-
nation meter will illuminate when the front
fog lights are on. Wiper and washer
WARNING
In freezing weather, do not use the
windshield washer until the wind-
shield is sufficiently warmed by the
defroster.
Otherwise the washer fluid can
freeze on the windshield, blocking
your view.
CAUTION
. Do not operate the washer con-
tinuously for more than 10 sec-
onds, or when the washer fluid
tank is empty. This may cause
overheating of the washer motor.
Check the washer fluid level
frequently, such as at fuel stops.
. Do not operate the wipers when
the windshield or rear window is
dry. This may scratch the glass,
damage the wiper blades and
cause the wiper motor to burn
out. Before operating the wiper
on a dry windshield or rear
window, always use the wind-
shield washer. .
In freezing weather, be sure that
the wiper blades are not frozen to
the windshield or rear window
before switching on the wipers.
Attempting to operate the wiper
with the blades frozen to the
window glass could cause not
only the wiper blades to be
damaged but also the wiper mo-
tor to burn out. If the wiper
blades are frozen to the window
glass, be sure to operate the
defroster, wiper deicer (if
equipped) or rear window defog-
ger before turning on the wiper.
. If the wipers stop during opera-
tion because of ice or some other
obstruction on the window, the
wiper motor could burn out even
if the wiper switch is turned off. If
this occurs, promptly stop the
vehicle in a safe place, turn the
ignition switch to the “LOCK ”
position and clean the window
glass to allow proper wiper op-eration.
. Use clean water if windshield
washer fluid is unavailable. In
areas where water freezes in
winter, use SUBARU Windshield
Washer Fluid or the equivalent.
Refer to the “Windshield washer
Instruments and controls
3-49
– CONTINUED –
Page 173 of 444
3-54Instruments and controls
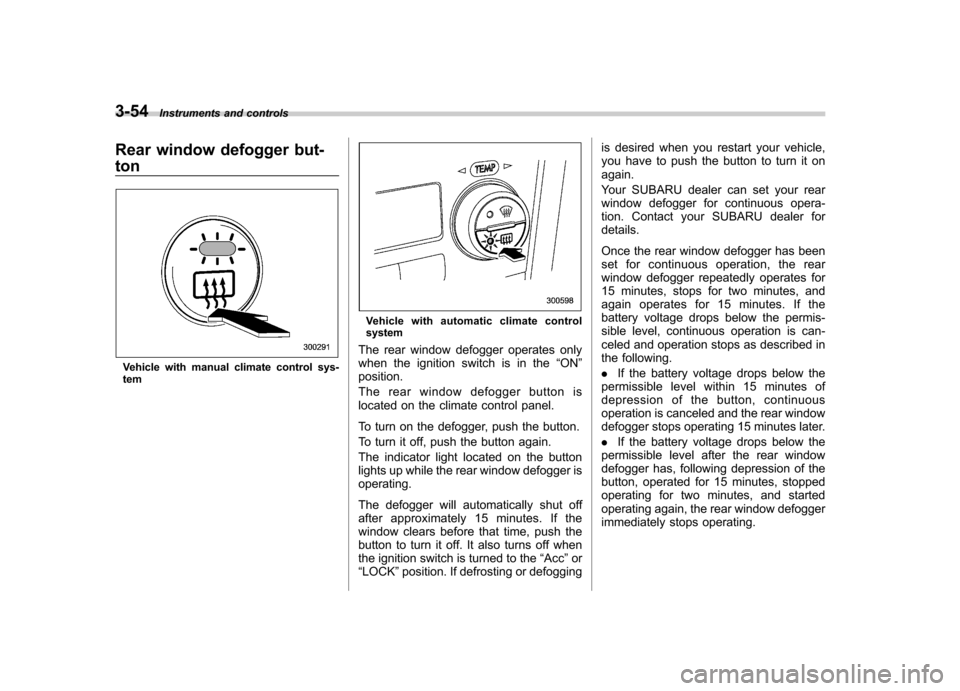
Rear window defogger but- ton
Vehicle with manual climate control sys- tem
Vehicle with automatic climate control system
The rear window defogger operates only
when the ignition switch is in the “ON ”
position.
The rear window defogger button is
located on the climate control panel.
To turn on the defogger, push the button.
To turn it off, push the button again.
The indicator light located on the button
lights up while the rear window defogger isoperating.
The defogger will automatically shut off
after approximately 15 minutes. If the
window clears before that time, push the
button to turn it off. It also turns off when
the ignition switch is turned to the “Acc ”or
“ LOCK ”position. If defrosting or defogging is desired when you restart your vehicle,
you have to push the button to turn it onagain.
Your SUBARU dealer can set your rear
window defogger for continuous opera-
tion. Contact your SUBARU dealer fordetails.
Once the rear window defogger has been
set for continuous operation, the rear
window defogger repeatedly operates for
15 minutes, stops for two minutes, and
again operates for 15 minutes. If the
battery voltage drops below the permis-
sible level, continuous operation is can-
celed and operation stops as described in
the following. .
If the battery voltage drops below the
permissible level within 15 minutes of
depression of the button, continuous
operation is canceled and the rear window
defogger stops operating 15 minutes later. . If the battery voltage drops below the
permissible level after the rear window
defogger has, following depression of the
button, operated for 15 minutes, stopped
operating for two minutes, and started
operating again, the rear window defogger
immediately stops operating.
Page 174 of 444
CAUTION
. Do not use sharp instruments or
window cleaner containing abra-
sives to clean the inner surface
of the rear window. They may
damage the conductors printed
on the window.
. To prevent the battery from being
discharged, do not operate the
defogger continuously for any
longer than necessary.
NOTE
If your vehicle is equipped with the
outside mirror defogger, the outside
mirror defogger operates while the rear
window defogger is operating. Mirrors
Always check that the inside and outside
mirrors are properly adjusted before you
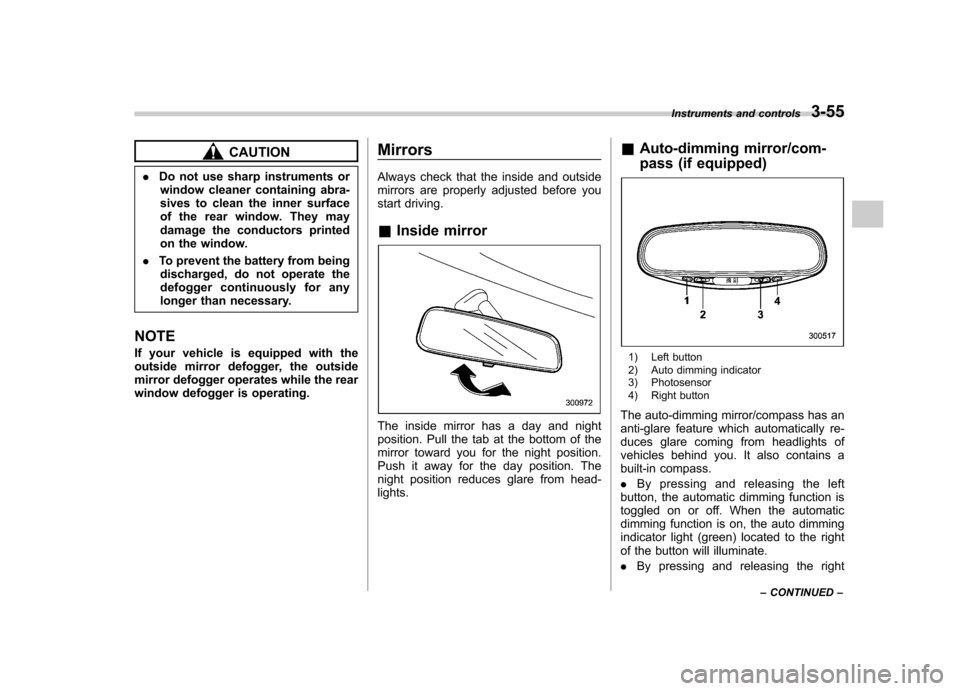
start driving. &
Inside mirror
The inside mirror has a day and night
position. Pull the tab at the bottom of the
mirror toward you for the night position.
Push it away for the day position. The
night position reduces glare from head-lights. &
Auto-dimming mirror/com-
pass (if equipped)
1) Left button
2) Auto dimming indicator
3) Photosensor
4) Right button
The auto-dimming mirror/compass has an
anti-glare feature which automatically re-
duces glare coming from headlights of
vehicles behind you. It also contains a
built-in compass. . By pressing and releasing the left
button, the automatic dimming function is
toggled on or off. When the automatic
dimming function is on, the auto dimming
indicator light (green) located to the right
of the button will illuminate. . By pressing and releasing the right Instruments and controls
3-55
– CONTINUED –