mirror SUBARU OUTBACK 2012 5.G Owners Manual
[x] Cancel search | Manufacturer: SUBARU, Model Year: 2012, Model line: OUTBACK, Model: SUBARU OUTBACK 2012 5.GPages: 474, PDF Size: 17.45 MB
Page 7 of 474
4
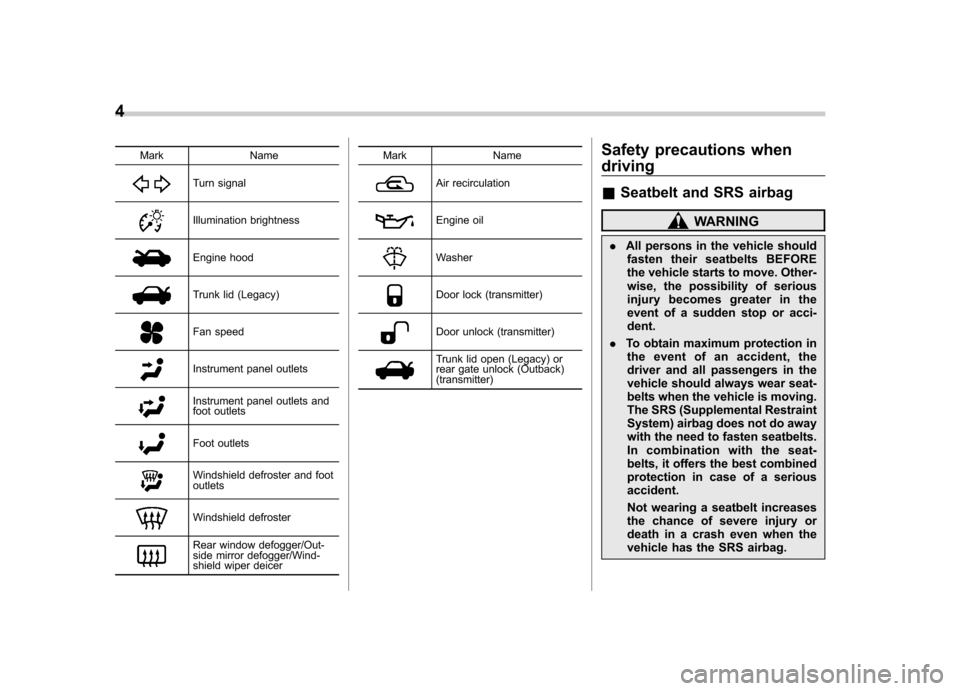
Mark Name
Turn signal
Illumination brightness
Engine hood
Trunk lid (Legacy)
Fan speed
Instrument panel outlets
Instrument panel outlets and
foot outlets
Foot outlets
Windshield defroster and foot outlets
Windshield defroster
Rear window defogger/Out-
side mirror defogger/Wind-
shield wiper deicerMark Name
Air recirculation
Engine oil
Washer
Door lock (transmitter)
Door unlock (transmitter)
Trunk lid open (Legacy) or
rear gate unlock (Outback) (transmitter)
Safety precautions when driving &
Seatbelt and SRS airbag
WARNING
. All persons in the vehicle should
fasten their seatbelts BEFORE
the vehicle starts to move. Other-
wise, the possibility of serious
injury becomes greater in the
event of a sudden stop or acci-dent.
. To obtain maximum protection in
the event of an accident, the
driver and all passengers in the
vehicle should always wear seat-
belts when the vehicle is moving.
The SRS (Supplemental Restraint
System) airbag does not do away
with the need to fasten seatbelts.
In combination with the seat-
belts, it offers the best combined
protection in case of a seriousaccident.
Not wearing a seatbelt increases
the chance of severe injury or
death in a crash even when the
vehicle has the SRS airbag.
Page 18 of 474

&Instrument panel1) Door locks (page 2-4)
2) Electronic parking brake switch
(page 7-31)
3) Hill Holder switch (page 7-32)
4) Trunk lid opener switch (page 2-24)
5) Vehicle Dynamics Control OFF switch (page 7-28)
6) Remote control mirror switch (page 3-51)
7) Illumination brightness control (page 3-29)
8) Light control switch (page 3-27)
9) Audio control buttons (page 5-41)
10) Combination meter (page 3-5)
11) Cruise control (page 7-35)
12) Paddle shift (page 7-21)
13) Wiper control lever (page 3-30)
14) Horn (page 3-52)
15) SRS airbag (page 1-36)
16) Fuse box (page 11-44)
17) Hood lock release knob (page 11-7)
18) Power windows (page 2-20) 15
– CONTINUED –
Page 23 of 474

20
Function settings
A SUBARU dealer can change the settings of the functions shown in the following table to meet your personal requirements. Contact
the nearest SUBARU dealer for details.Item Function Possible settings Default setting Page
Alarm system Alarm system Operation/Non-operation Operation 2-15 Monitoring start delay time (after closure
of doors) 0 second/30 seconds 30 seconds 2-17
Impact sensor operation (only models
with shock sensors (dealer option)) Operation/Non-operation Non-operation 2-19
Passive arming Operation/Non-operation Non-operation 2-18
Map light/Dome light/Cargo area light illumination ON/OFF OFF 2-15
Remote keyless entry sys-tem Hazard warning flasher Operation/Non-operation Operation 2-7
Audible signal Operation/Non-operation Operation 2-10
Key lock-in prevention Key lock-in prevention Operation/Non-operation Operation 2-6
Defogger and deicer system
for models with the automatic
climate control system Rear window defogger, outside mirror
defogger and windshield wiper deicer
Operation for 15 minutes/
Continuous operationOperation for 15 minutes 3-34
Map light/Dome light/Cargo
area light Operation of map light/Dome light/Cargo
area light OFF delay timer OFF/Short/Normal/Long Long 6-2
Battery drainage preventionfunction Battery drainage prevention function Operation/Non-operation Operation 2-6
Seatbelt warning Sounds a chime while driving Operation/Non-operation Operation 1-14
Auto on/off headlights Sensitivity of the operation of the auto on/ off headlights Low/Normal/High/Very high Normal 3-27
Page 61 of 474
1-38Seat, seatbelt and SRS airbags
WARNING
. Do not rest your arm on either
front door or its internal trim. You
could be injured in the event of
SRS side airbag deployment.
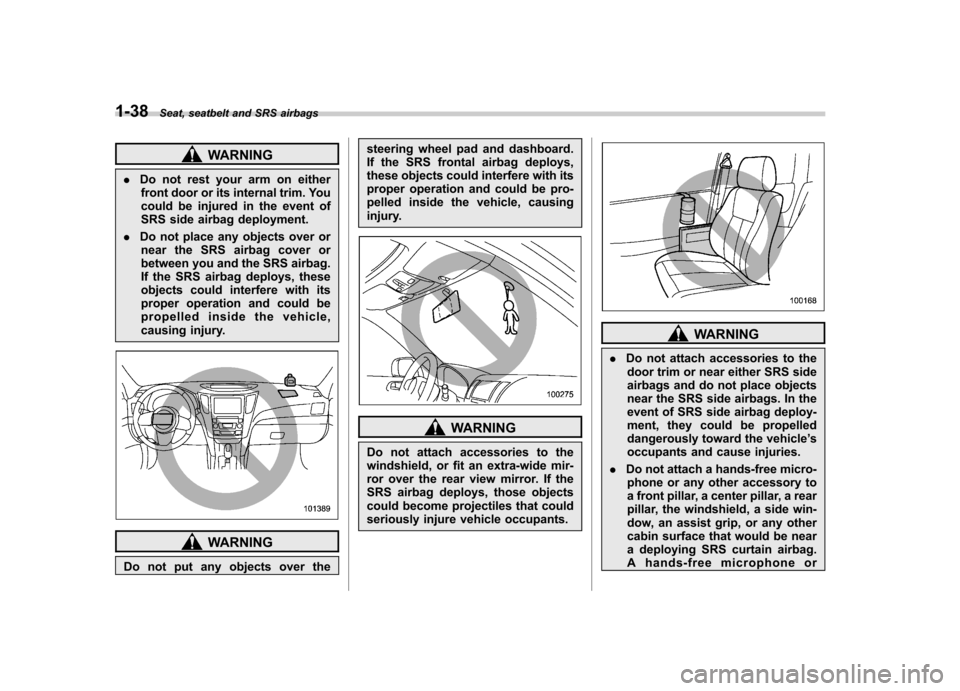
. Do not place any objects over or
near the SRS airbag cover or
between you and the SRS airbag.
If the SRS airbag deploys, these
objects could interfere with its
proper operation and could be
propelled inside the vehicle,
causing injury.
WARNING
Do not put any objects over the steering wheel pad and dashboard.
If the SRS frontal airbag deploys,
these objects could interfere with its
proper operation and could be pro-
pelled inside the vehicle, causing
injury.
WARNING
Do not attach accessories to the
windshield, or fit an extra-wide mir-
ror over the rear view mirror. If the
SRS airbag deploys, those objects
could become projectiles that could
seriously injure vehicle occupants.
WARNING
. Do not attach accessories to the
door trim or near either SRS side
airbags and do not place objects
near the SRS side airbags. In the
event of SRS side airbag deploy-
ment, they could be propelled
dangerously toward the vehicle ’s
occupants and cause injuries.
. Do not attach a hands-free micro-
phone or any other accessory to
a front pillar, a center pillar, a rear
pillar, the windshield, a side win-
dow, an assist grip, or any other
cabin surface that would be near
a deploying SRS curtain airbag.
A hands-free microphone or
Page 121 of 474

Instruments and controlsHigh/low beam change (dimmer) ......................... 3-28
Headlight flasher ................................................ 3-28
Daytime running light system ............................. 3-28
Turn signal lever ................................................ 3-29
Illumination brightness control ......................... 3-29
Front fog light switch (if equipped) .................. 3-30
Wiper and washer .............................................. 3-30
Windshield wiper and washer switches ............... 3-32
Rear window wiper and washer switch (Outback) ......................................................... 3-33 Defogger and deicer
.......................................... 3-34
Mirrors ................................................................ 3-35
Type A inside mirror (if equipped) . ..................... 3-35
Type B inside mirror (if equipped) . ..................... 3-36
Auto-dimming mirror with compass (if equipped) .................................................... 3-43
Auto-dimming mirror with compass and HomeLink
®(if equipped) ................................... 3-45
Outside mirrors ................................................. 3-50
Tilt/telescopic steering wheel ........................... 3-52
Horn .................................................................... 3-52
Page 153 of 474
3-34Instruments and controls
Defogger and deicer
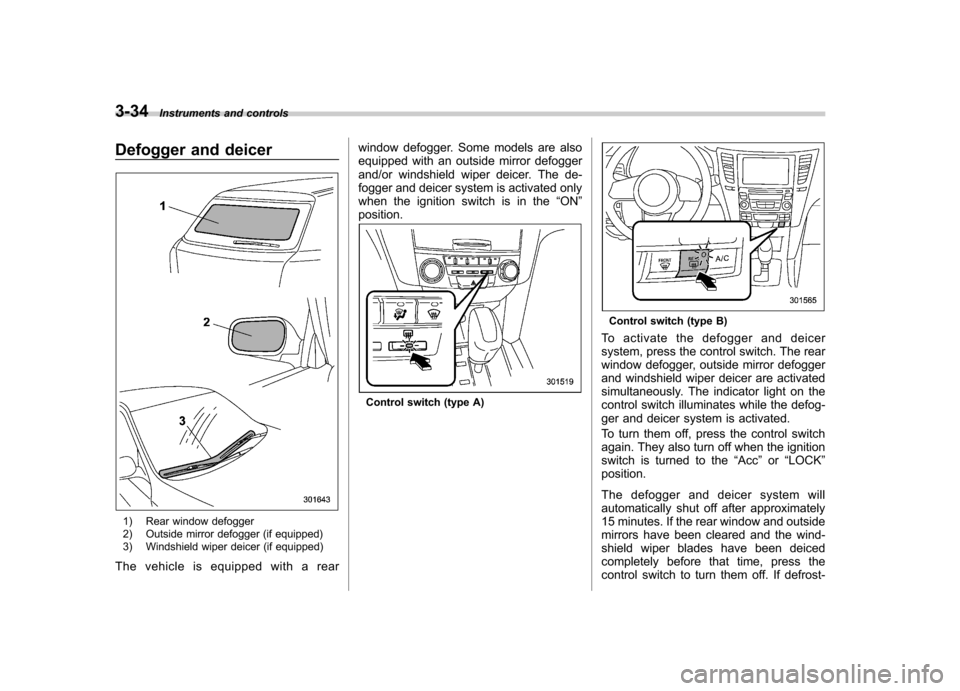
1) Rear window defogger
2) Outside mirror defogger (if equipped)
3) Windshield wiper deicer (if equipped)
The vehicle is equipped with a rear window defogger. Some models are also
equipped with an outside mirror defogger
and/or windshield wiper deicer. The de-
fogger and deicer system is activated only
when the ignition switch is in the
“ON ”
position.
Control switch (type A)
Control switch (type B)
To activate the defogger and deicer
system, press the control switch. The rear
window defogger, outside mirror defogger
and windshield wiper deicer are activated
simultaneously. The indicator light on the
control switch illuminates while the defog-
ger and deicer system is activated.
To turn them off, press the control switch
again. They also turn off when the ignition
switch is turned to the “Acc ”or “LOCK ”
position.
The defogger and deicer system will
automatically shut off after approximately
15 minutes. If the rear window and outside
mirrors have been cleared and the wind-
shield wiper blades have been deiced
completely before that time, press the
control switch to turn them off. If defrost-
Page 154 of 474
ing, defogging or deicing is not complete,
you have to press the control switch to
turn them on again.
For models with the automatic climate
control system,it is possible for a
SUBARU dealer to set the defogger and
deicer system for the continuous opera-
tion mode. Contact your SUBARU dealer
for details.
CAUTION
. To prevent the battery from being
discharged, do not operate the
defogger and deicer system con-
tinuously for any longer than
necessary.
. Do not use sharp instruments or
window cleaner containing abra-
sives to clean the inner surface
of the rear window. They may
damage the conductors printed
on the window. NOTE .
Turn on the defogger and deicer
system if the wipers are frozen to the windshield.. If the windshield is covered with
snow, remove the snow so that the
windshield wiper deicer works effec-
tively.. While the defogger and deicer sys-
tem is in the continuous operation
mode, if the vehicle speed remains at
9 mph (15 km/h) or lower for 15
minutes, the windshield wiper deicer
automatically stops operating, though
the rear window defogger and outside
mirror defogger maintain continuous
operation in this condition.. While the defogger and deicer sys-
tem is in the continuous operation
mode, if the battery voltage drops
below the permissible level, continu-
ous operation of the defogger and
deicer system is canceled and the
system stops operating. Mirrors
Always check that the inside and outside
mirrors are properly adjusted before you
start driving. &
Type A inside mirror (if equipped)
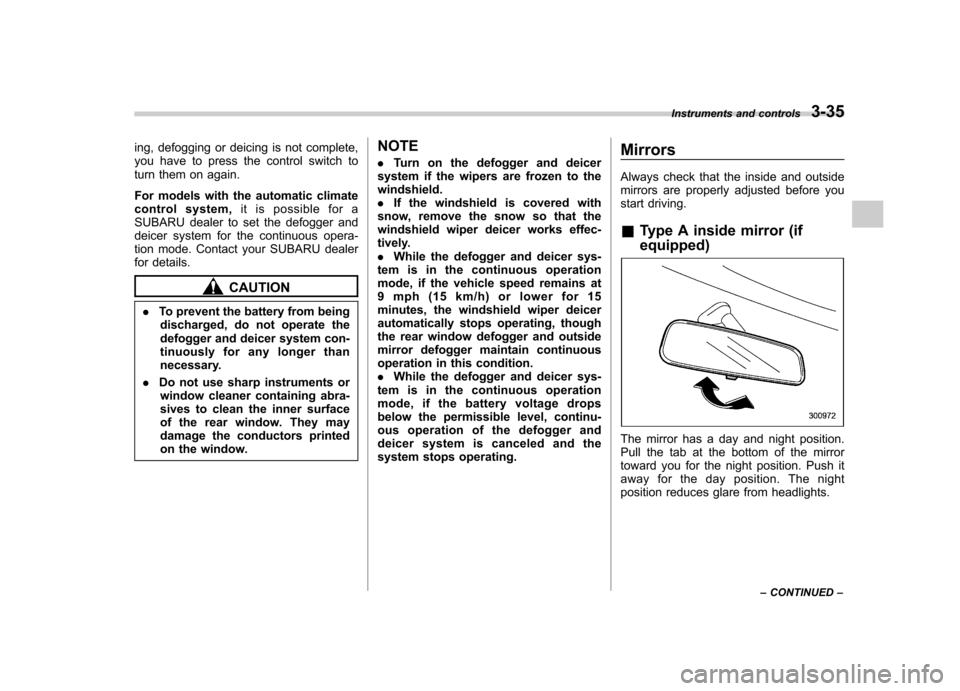
The mirror has a day and night position.
Pull the tab at the bottom of the mirror
toward you for the night position. Push it
away for the day position. The night
position reduces glare from headlights. Instruments and controls
3-35
– CONTINUED –
Page 155 of 474
3-36Instruments and controls
&Type B inside mirror (if equipped)
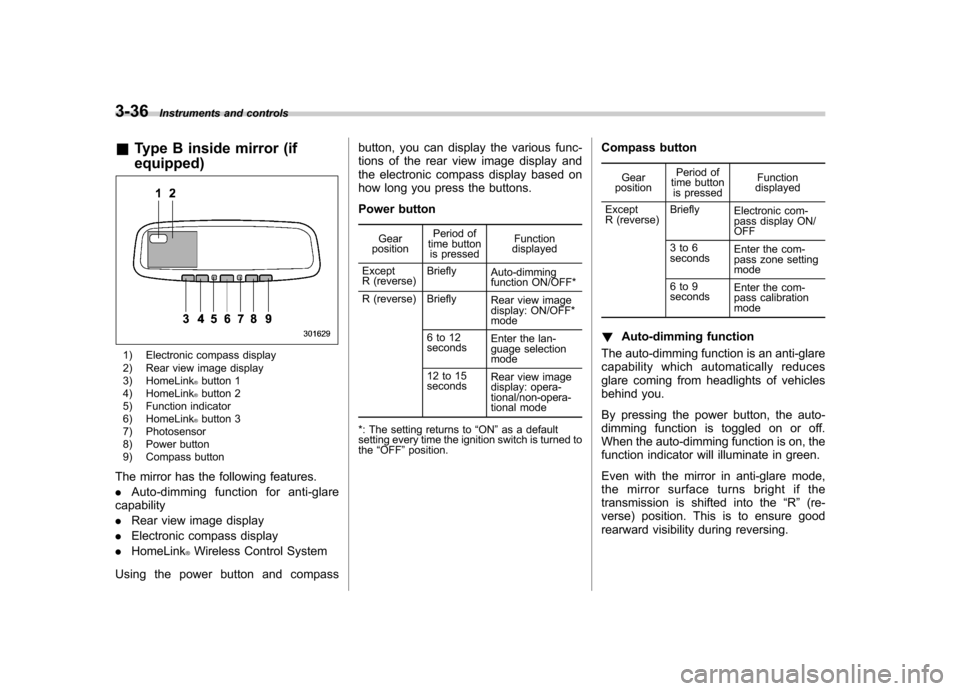
1) Electronic compass display
2) Rear view image display
3) HomeLink
®button 1
4) HomeLink®button 2
5) Function indicator
6) HomeLink
®button 3
7) Photosensor
8) Power button
9) Compass button
The mirror has the following features. . Auto-dimming function for anti-glare
capability. Rear view image display
. Electronic compass display
. HomeLink
®Wireless Control System
Using the power button and compass button, you can display the various func-
tions of the rear view image display and
the electronic compass display based on
how long you press the buttons.
Power button
Gear
position Period of
time button
is pressed Function
displayed
Except
R (reverse) Briefly
Auto-dimming
function ON/OFF*
R (reverse) Briefly Rear view image
display: ON/OFF* mode
6to12 seconds Enter the lan-
guage selection mode
12 to 15 seconds Rear view image
display: opera-
tional/non-opera-
tional mode
*: The setting returns to “ON ”as a default
setting every time the ignition switch is turned to the “OFF ”position. Compass button
Gear
position Period of
time button is pressed Function
displayed
Except
R (reverse) Briefly
Electronic com-
pass display ON/ OFF
3to6
seconds Enter the com-
pass zone setting mode
6to9
seconds Enter the com-
pass calibration mode
! Auto-dimming function
The auto-dimming function is an anti-glare
capability which automatically reduces
glare coming from headlights of vehicles
behind you.
By pressing the power button, the auto-
dimming function is toggled on or off.
When the auto-dimming function is on, the
function indicator will illuminate in green.
Even with the mirror in anti-glare mode,
the mirror surface turns bright if the
transmission is shifted into the “R ” (re-
verse) position. This is to ensure good
rearward visibility during reversing.
Page 156 of 474
The mirror has a photosensor attached on
both the front and back sides. During
nighttime driving, these sensors detect
distracting glare from vehicle headlights
behind you and automatically dim the
mirror to eliminate glare and preserve
your vision. For this reason, use care not
to cover the sensors with stickers, or other
similar items. Periodically wipe the sen-
sors clean using a piece of dry soft cotton
cloth or an applicator. NOTE
When cleaning the mirror, use a paper
towel or similar item dampened with
glass cleaner. Do not spray glass
cleaner directly on the mirror surface.
By doing so, the sprayed glass cleaner
could enter the inside of the mirrorhousing. That may cause a malfunction
in the mirror. !
Rear view image display
When the ignition switch is in the “ON ”
position and the transmission is in the “R ”
(reverse) position, the rear view camera
automatically displays the rear view image
behind the vehicle on the inside mirror.
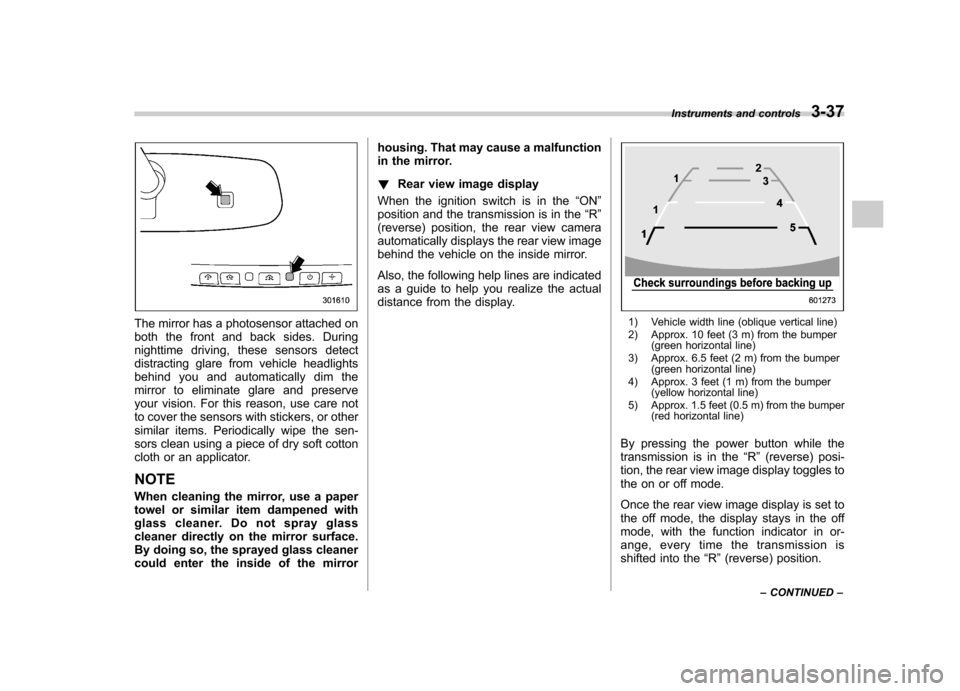
Also, the following help lines are indicated
as a guide to help you realize the actual
distance from the display.1) Vehicle width line (oblique vertical line)
2) Approx. 10 feet (3 m) from the bumper (green horizontal line)
3) Approx. 6.5 feet (2 m) from the bumper (green horizontal line)
4) Approx. 3 feet (1 m) from the bumper (yellow horizontal line)
5) Approx. 1.5 feet (0.5 m) from the bumper (red horizontal line)
By pressing the power button while the
transmission is in the “R ” (reverse) posi-
tion, the rear view image display toggles to
the on or off mode.
Once the rear view image display is set to
the off mode, the display stays in the off
mode, with the function indicator in or-
ange, every time the transmission is
shifted into the “R ”(reverse) position.
Instruments and controls
3-37
– CONTINUED –
Page 157 of 474
3-38Instruments and controls
If the ignition switch is turned to the “OFF ”
position, the display setting returns to the
on mode as a default setting the next time
the ignition switch is turned to the “ON ”
position. ! Language mode change
The language mode of the captions on the
rear view image display is selectable in
English or French in the following ways.
1. Press and hold the power button for 6
to 12 seconds while the transmission is inthe “R ” (reverse) position, and then
release it. The display will enter the
language selection mode.
2. Briefly press the power button to
toggle the captions on the display in
English or French.
3. By releasing the power button for 5
seconds, the display blinks one time to
show that the language mode is selected. ! Non-operational mode
The rear view image display can be set as
non-operational. After setting the display
to the non-operational mode, the display
does not show the rear view image even if
the ignition switch is reset (turning the
ignition switch to the “ON ”position after
turning it to the “OFF ”position).
To set the display to the non-operational mode, press and hold the power button for
12 to 15 seconds while the transmission is
in the
“R ” (reverse) position, and then
release it. The display is now in the non-
operational mode. After the display has
been set to the non-operational mode, the
function indicator will illuminate in orange
whilethetransmissionisinthe “R ”
(reverse) position.
To return the display to the operational
mode, press and hold the power button for
12 to 15 seconds again.
For precautions about the rear view
camera and the rear view image, refer to“ Rear view camera ”F 6-19.
! Electronic compass display
By briefly pressing the compass button,
the compass display is toggled on or off.
When the compass display is on, an
illuminated compass reading will appear
on the mirror.
Using the electronic compass properly,
the following compass zone adjustment
and compass calibration will be neces-
sary. !
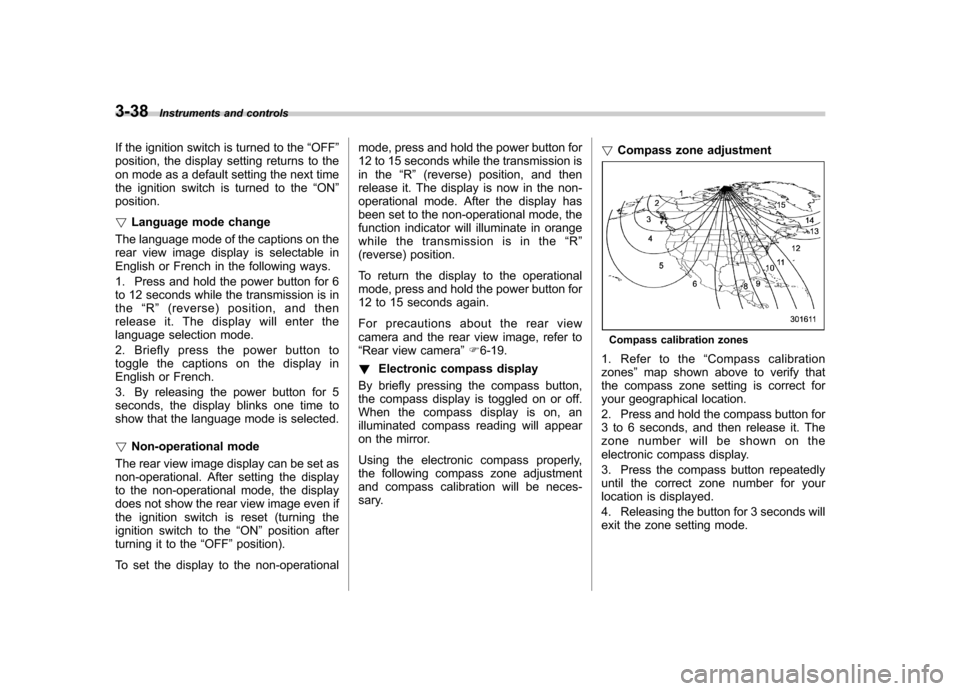
Compass zone adjustment
Compass calibration zones
1. Refer to the “Compass calibration
zones ”map shown above to verify that
the compass zone setting is correct for
your geographical location.
2. Press and hold the compass button for
3 to 6 seconds, and then release it. The
zone number will be shown on the
electronic compass display.
3. Press the compass button repeatedly
until the correct zone number for your
location is displayed.
4. Releasing the button for 3 seconds will
exit the zone setting mode.