Multi function display set up SUBARU OUTBACK 2017 6.G User Guide
[x] Cancel search | Manufacturer: SUBARU, Model Year: 2017, Model line: OUTBACK, Model: SUBARU OUTBACK 2017 6.GPages: 610, PDF Size: 10.28 MB
Page 200 of 610
!BSD/RCTA (if equipped)
After entering the “BSD/RCTA ”menu,
select the “Warning Volume ”menu. You
can set the volume of the warning buzzer
for RCTA (Rear Cross Traffic Alert). You
can select “Max”,“Mid ”or “Min ”.
! RAB (if equipped)
After entering the “RAB”menu, select one
of the following menus.
NOTE
For models with RAB (Reverse Auto-
matic Braking) system, refer to “Re-
verse Automatic Braking System ”F 7-
63.
!Warning Volume
The volume of the warning buzzer that
sounds when the RAB (Reverse Auto-
matic Braking) system is in operation can
be set in 3 stages (“Max ”,“Mid ”and “Min ”).
! Sonar Audible Alarm
When the RAB (Reverse Automatic Brak-
ing) system is in operation, the buzzer that
sounds if an obstacle is detected in the
rear or if detection is not possible can be
activated or deactivated. Select “On”to
activate the buzzer. Select “Off”to deac-
tivate the buzzer. !
Vehicle Setting
After entering the “Vehicle Setting”menu,
select one of the following menus.
!Keyless Entry System
After entering the “Keyless Entry System ”
menu, select one of the following menus.
. Audible Signal (models with “key-
less access with push-button start
system ”):
The audible signal can be activated or
deactivated. Select “On”to activate. Se-
lect “Off”to deactivate.
. Hazard Warning Flasher (all mod-
els):
The hazard warning flasher operation can
be activated or deactivated. Select “On”to
activate. Select “Off ”to deactivate.
. Driver Door Unlock (models with
“ keyless access with push-button start
system ”):
The door unlock selection function is
available for the “keyless access”entry
function. For details, refer to “Door
unlock
selection function ”F 2-18. On this setting
menu, the door unlock selection function
for the driver ’s door can be customized.
Select “Driver Door Only ”to set as
“Operational ”. Select “All”to set as “Non-
operational ”. .
Rear Gate Unlock (Outback with
“ keyless access with push-button start
system ”):
The door unlock selection function is
available for the “keyless access”entry
function. For details, refer to “Door unlock
selection function ”F 2-18. On this setting
menu, the door unlock selection function
for the rear gate can be customized.
Select “Rear Gate Only ”to set as “Opera-
tional ”. Select “All”to set as “Non-opera-
tional ”.
! Defogger
The defogger and deicer system can be
set for the continuous operation mode or
automatic shut-off mode. Select “Contin-
uous” to select the continuous operation
mode. Select “15 minutes”to select the
automatic shut-off mode.
!Interior Light
The setting for the period of time in which
the interior lights remain on (OFF delay
timer) after closing the doors and/or the
rear gate can be set or customized. Select
the preferred seconds to customize the
operation period. Select “Off”to deactivate
the OFF delay timer.
Instruments and controls/Multi information display
–CONTINUED –3-45
Page 202 of 610
Regardless of the position of the light
control switch, the illuminated lights are
turned off when the key is removed from
the ignition switch.
NOTE
The light control switch can be oper-
ated (except auto on/off headlights),
even under the following conditions.
.when the push-button ignition
switch is turned off (models with “key-
less access with push-button start
system ”)
. when the key is not inserted into the
ignition switch (models without “key-
less access with push-button start
system ”)
If the driver ’s door is opened while the
headlights are illuminated under such
conditions, a chirp sound will inform
the driver that the lights are illumi-
nated.
& Headlights
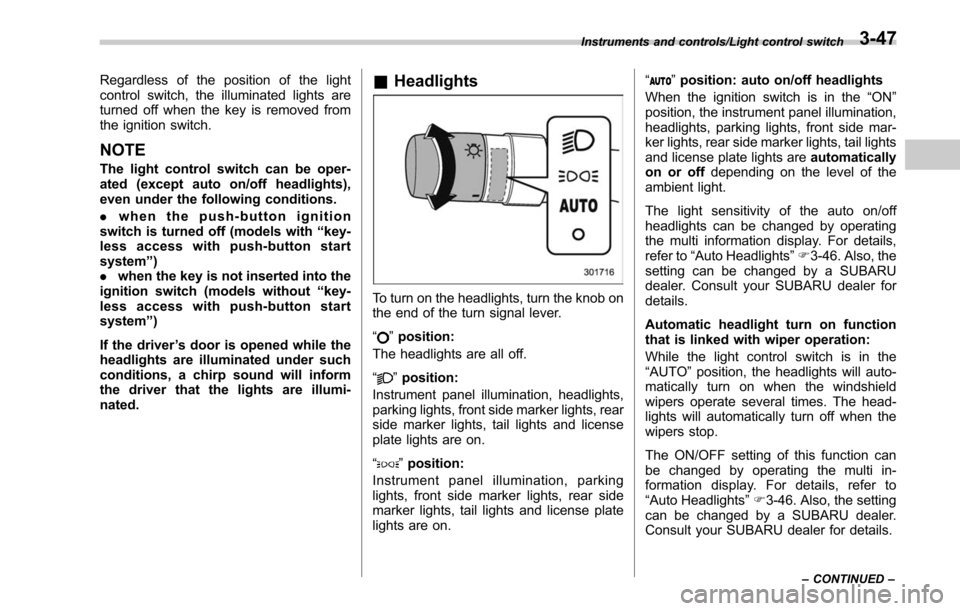
To turn on the headlights, turn the knob on
the end of the turn signal lever.
“
”position:
The headlights are all off.
“
” position:
Instrument panel illumination, headlights,
parking lights, front side marker lights, rear
side marker lights, tail lights and license
plate lights are on.
“
” position:
Instrument panel illumination, parking
lights, front side marker lights, rear side
marker lights, tail lights and license plate
lights are on. “
”
position: auto on/off headlights
When the ignition switch is in the “ON”
position, the instrument panel illumination,
headlights, parking lights, front side mar-
ker lights, rear side marker lights, tail lights
and license plate lights are automatically
on or off depending on the level of the
ambient light.
The light sensitivity of the auto on/off
headlights can be changed by operating
the multi information display. For details,
refer to “Auto Headlights ”F 3-46. Also, the
setting can be changed by a SUBARU
dealer. Consult your SUBARU dealer for
details.
Automatic headlight turn on function
that is linked with wiper operation:
While the light control switch is in the
“AUTO ”position, the headlights will auto-
matically turn on when the windshield
wipers operate several times. The head-
lights will automatically turn off when the
wipers stop.
The ON/OFF setting of this function can
be changed by operating the multi in-
formation display. For details, refer to
“Auto Headlights ”F 3-46. Also, the setting
can be changed by a SUBARU dealer.
Consult your SUBARU dealer for details.
Instruments and controls/Light control switch
–CONTINUED –3-47
Page 203 of 610
Instruments and controls/Light control switch
!Welcome lighting function
The welcome lighting function turns on the
low beam headlight for smooth approach-
ing to or exiting from the vehicle at night or
in a dark place.
The function is activated while all of the
following conditions are met.
. The light control switch is in the
“AUTO ”position
. It is dark enough to turn on the auto on/
off headlights
When approaching:
While the welcome lighting function is
activated, the low beam headlights will
automatically illuminate when unlocking
the doors (for Outback, including the rear
gate) by using the remote keyless entry
system.
The low beam headlights will remain
illuminated for 30 seconds
*1and then turn
off. However, if any of the following
operations is done, the low beam head-
lights will turn off.
. The doors are locked.
. The light control switch is turned to a
position other than “AUTO”.
. The ignition switch is turned to the “ON”
position. When exiting:
While the welcome lighting function is
activated, the low beam headlights will
remain illuminated even when either of the
following operation is done.
.
Thepush-buttonignitionswitchis
turned to the “OFF”status (models with
“ keyless access with push-button start
system ”)
. The key is pulled out from the ignition
switch (models without “keyless access
with push-button start system ”)
The low beam headlights will turn off
under any of the following conditions.
. 3 minutes have passed since the low
beam headlights were illuminated by the
welcome lighting function.
. 30 seconds have passed since the
door is opened and closed.
*1
. The light control switch is turned to a
position other than “AUTO”.
. The locking procedure is performed
twice. When performing the unlocking
procedure after performing the locking
procedure, perform the locking procedure
twice again.
*1: The setting for the period of time in which
the low beam headlights remain on by the
welcome lighting function can be changed by a
SUBARU dealer. Contact your SUBARU dealer for details. Also, you can change the setting by
operating the multi information display. For
details, refer to
“Welcome Lighting ”F3-46.
For models with the genuine SUBARU naviga-
tion system, you can change the setting by
using the navigation system. For details, refer to
the Owner ’s Manual supplement for the naviga-
tion system.
3-48
Page 262 of 610
!File information
Compatible compressed files (Audio)
Item USB DISC
Compatible
file format MP3/WMA/AAC
Folders in the
device Maximum
512 Maximum
255
Files in the
device Maximum
8000 Maximum
512
Files per
folder Maximum
255 —
Corresponding sampling frequency
(Audio)
File type Frequency (kHz)
MP3 files:
MPEG 1 LAYER 3 32/44.1/48
MP3 files:
MPEG 2 LSF LAYER 3 16/22.05/24
WMA files:
Ver. 7, 8, 9 (9.1/9.2) 32/48/64/80/96/128/
160/192
AAC files:
MPEG4/AAC-LC 48/44.1/32/24/22.05/
16/12/11.025/8
Corresponding bit rates (Audio)
File type
Bit rate (kbps)
MP3 files:
MPEG 1 LAYER 3 32 - 320
MP3 files:
MPEG 2 LSF LAYER 3 8 - 160
WMA files: Ver. 7, 8 CBR 48 - 192
WMA files:
Ver. 9 (9.1/9.2) CBR 32 - 192
AAC files:
MPEG4/AAC-LC 16 - 320
(Variable Bit Rate (VBR) compatible)
.
MP3 (MPEG Audio Layer 3), WMA
(Windows Media Audio) and AAC (Ad-
vanced Audio Coding) are audio compres-
sion standards.
. This system can play MP3/WMA/AAC
files on CD-R, CD-RW discs, USB mem-
ory, and Bluetooth device.
. This system can play disc recordings
compatible with ISO 9660 level 1 and level
2 and with the Romeo and Joliet file
system.
. When naming an MP3/WMA/AAC file,
add an appropriate file extension (.mp3/
.wma/.m4a).
. This system plays back files with .mp3/
.wma/.m4a file extensions as MP3/WMA/
AAC files respectively. To prevent noise and playback errors, use the appropriate
file extension.
.
This system can play only the first
session when using multi-session compa-
tible CDs.
. MP3 files are compatible with the ID3
Tag Ver. 1.0, Ver. 1.1, Ver. 2.2 and Ver. 2.3
formats. This system cannot display disc
title, track title and artist name in other
formats.
. WMA/AAC files can contain a WMA/
AAC tag that is used in the same way as
an ID3 tag. WMA/AAC tags carry informa-
tion such as track title and artist name.
. The emphasis function is available only
when playing MP3/WMA files recorded at
32, 44.1 and 48 kHz.
. This system can play back AAC files
encoded by iTunes.
. The sound quality of MP3/WMA files
generally improves with higher bit rates. In
order to achieve a reasonable level of
sound quality, discs recorded with a bit
rate of at least 128 kbps are recom-
mended.
. The MP3/WMA player does not play
back MP3/WMA files from discs recorded
using packet write data transfer (UDF
format). Discs should be recorded using
“pre-mastering ”software rather than pack-
etwrite software.
Audio/Audio set
–CONTINUED –5-11
Page 267 of 610
Audio/Audio set
!Touch screen operation
This system is operated mainly by the
keys on the screen.
When a screen key is touched, a beep
sounds. You can set the beep sound.
Refer to “Unit settings” F5-19.
NOTE
. If the system does not respond to
touching a screen key, move your
finger away from the screen and touch
it again.
. Grayed-out screen keys cannot be
operated.
. The displayed image may become
darkerandmovingimagesmaybe
slightly distorted when the screen is
cold.
. In extremely cold conditions, the
screen may not be displayed correctly.
Also, the screen keys may be less
responsive than usual when pressed.
. When you look at the screen
through polarized material such as
polarized sunglasses, the screen may
be dark and difficult to see. If so, look at
the screen from different angles, adjust
the screen settings or take off your
sunglasses. Refer to “Unit settings ”
F 5-19. !
Entering letters and numbers/list
screen operation
! Entering letters and numbers
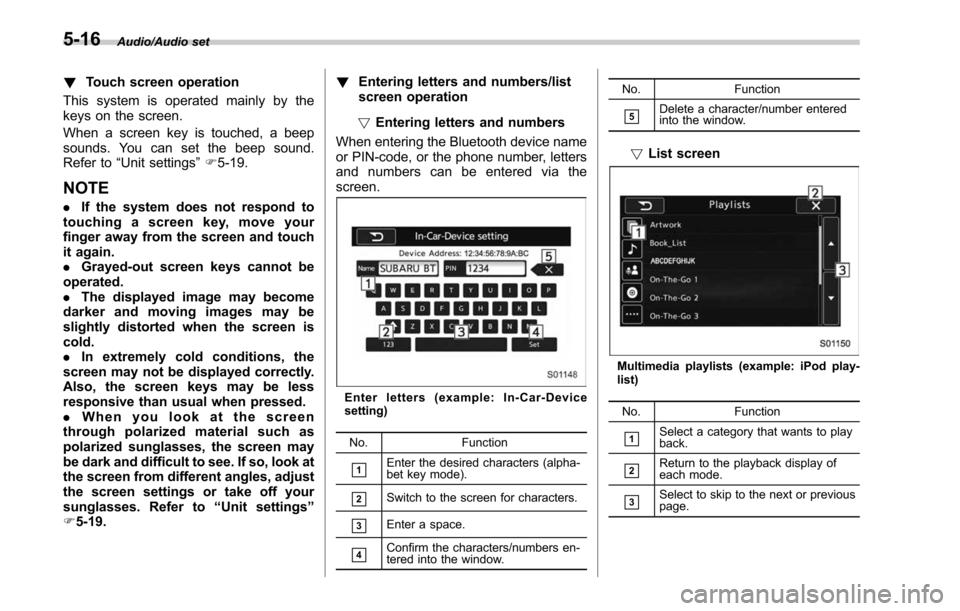
When entering the Bluetooth device name
or PIN-code, or the phone number, letters
and numbers can be entered via the
screen.
Enter letters (example: In-Car-Device
setting)
No. Function
&1Enter the desired characters (alpha-
bet key mode).
&2Switch to the screen for characters.
&3Enter a space.
&4Confirm the characters/numbers en-
tered into the window. No. Function
&5Delete a character/number entered
into the window.
!
List screen
Multimedia playlists (example: iPod play-
list)
No. Function
&1Select a category that wants to play
back.
&2Return to the playback display of
each mode.
&3Select to skip to the next or previous
page.
5-16
Page 300 of 610
necting an Android device: Refer to
“Registering/connecting Bluetooth®
device ”F 5-66.
NOTE
When iPhone/iPod touch and Android
devices are connected at the same
time, iPhone/iPod touch is prioritized.
! How to change the source
. Select the “aha”key on the source
select screen. Refer to “Basic operation ”
F 5-18.
. Select the “aha”key on the APPS
screen. Refer to “SUBARU STARLINK ”
F 5-26.
NOTE
When starting-up “aha ”,thereare
some smartphone models for which
“ aha ”application does not start up
automatically. !
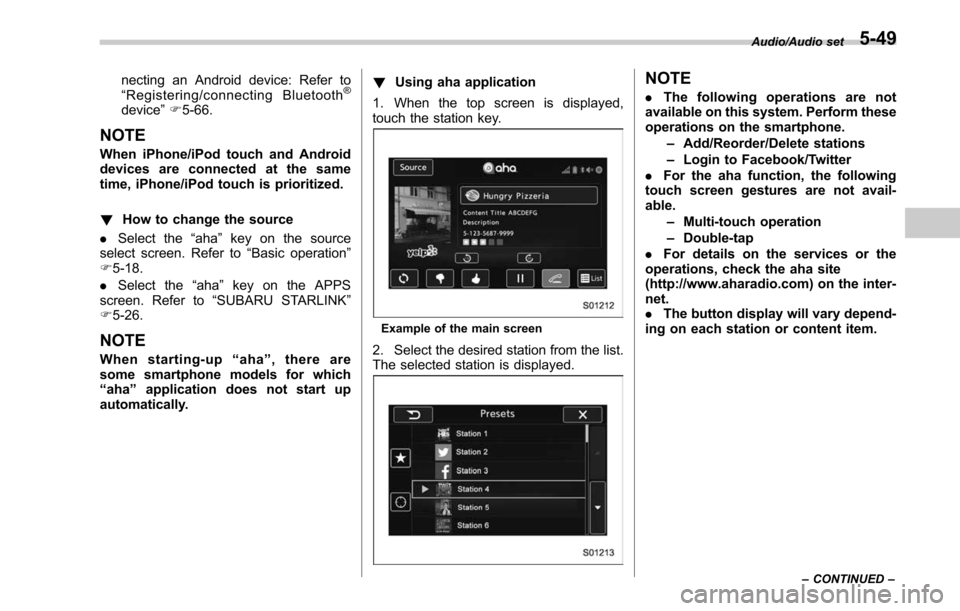
Using aha application
1. When the top screen is displayed,
touch the station key.
Example of the main screen
2. Select the desired station from the list.
The selected station is displayed.
NOTE
. The following operations are not
available on this system. Perform these
operations on the smartphone.
–Add/Reorder/Delete stations
– Login to Facebook/Twitter
. For the aha function, the following
touch screen gestures are not avail-
able.
–Multi-touch operation
– Double-tap
. For details on the services or the
operations, check the aha site
(http://www.aharadio.com) on the inter-
net.
. The button display will vary depend-
ing on each station or content item.
Audio/Audio set
–CONTINUED –5-49
Page 329 of 610
Audio/Hands–free phone system
! By off/on hook switch
When you receive a call, you can also
answer it by pressing the off hook switch
on the steering switch. To end a call, press
the on hook switch.
& Talking on the phone
The call screen opens when you perform
the following operations.
. When you accept a call on the incom-
ing call screen (by selecting the
key),
the call screen opens.
. When you are on the outgoing call
screen, the screen changes to the call
screen when the other party answers the
call.
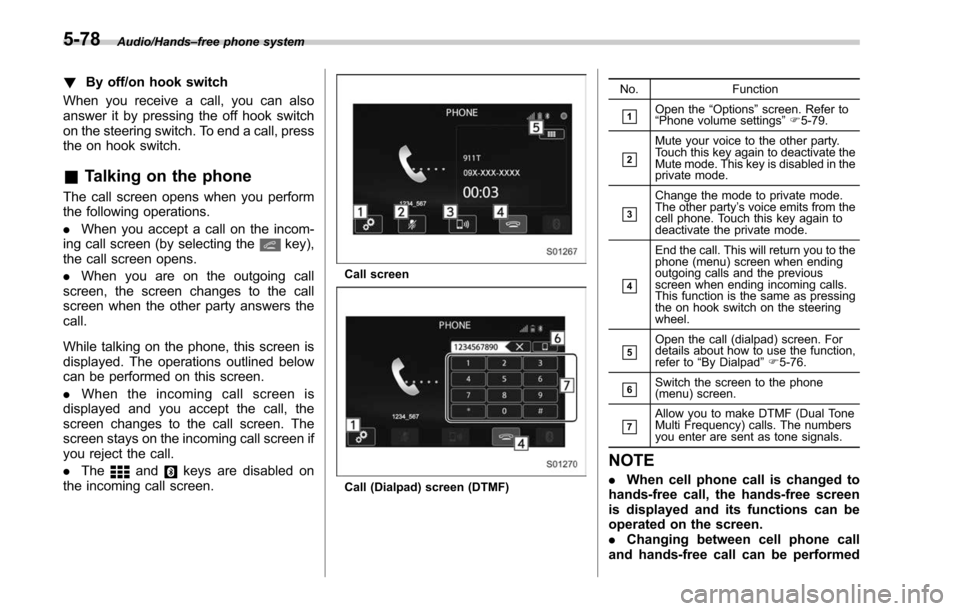
While talking on the phone, this screen is
displayed. The operations outlined below
can be performed on this screen.
. When the incoming call screen is
displayed and you accept the call, the
screen changes to the call screen. The
screen stays on the incoming call screen if
you reject the call.
. The
andkeys are disabled on
the incoming call screen.
Call screen
Call (Dialpad) screen (DTMF) No. Function
&1Open the
“Options ”screen. Refer to
“ Phone volume settings ”F 5-79.
&2
Mute your voice to the other party.
Touch this key again to deactivate the
Mute mode. This key is disabled in the
private mode.
&3
Change the mode to private mode.
The other party ’s voice emits from the
cell phone. Touch this key again to
deactivate the private mode.
&4
End the call. This will return you to the
phone (menu) screen when ending
outgoing calls and the previous
screen when ending incoming calls.
This function is the same as pressing
the on hook switch on the steering
wheel.
&5Open the call (dialpad) screen. For
details about how to use the function,
refer to “By Dialpad ”F 5-76.
&6Switch the screen to the phone
(menu) screen.
&7Allow you to make DTMF (Dual Tone
Multi Frequency) calls. The numbers
you enter are sent as tone signals.
NOTE
. When cell phone call is changed to
hands-free call, the hands-free screen
is displayed and its functions can be
operated on the screen.
. Changing between cell phone call
and hands-free call can be performed
5-78
Page 349 of 610
Interior equipment/Sun visors
&OFF delay timer
The following lights have an automatic
illumination function.
. dome light
. map light
. cargo area light (Outback)
After being illuminated automatically,
these lights remain on for several seconds
and then gradually turn off under the
following conditions.
. after the ignition switch is turned to the
“LOCK”/ “OFF”position
. after any doors or the rear gate
(Outback) is closed (dome light)
. after all doors are closed (map light)
. after the rear gate is closed (cargo area
light)
. after the doors are unlocked using the
keyless access function (if equipped)
(dome light and map light)
. after the doors are unlocked using the
remote keyless entry system (dome light
and map light)
. when approaching with the access key
(if equipped) (dome light and map light)
While the lights are illuminated, if any of
the following operations is performed, the
lights turn off immediately.
. The ignition switch is turned from the “
LOCK”/ “OFF”position to the “ACC”or
“ON ”position.
. All doors and the rear gate (Outback)
are locked using the keyless access
function (if equipped).
. All doors and the rear gate (Outback)
are locked using the remote keyless entry
system.
The setting for the period of time in which
the lights remain on (OFF delay timer) can
be changed by a SUBARU dealer. Con-
tact your SUBARU dealer for details. Also,
the setting can be changed by operating
the multi information display. For details,
refer to“Interior Light ”F 3-45.
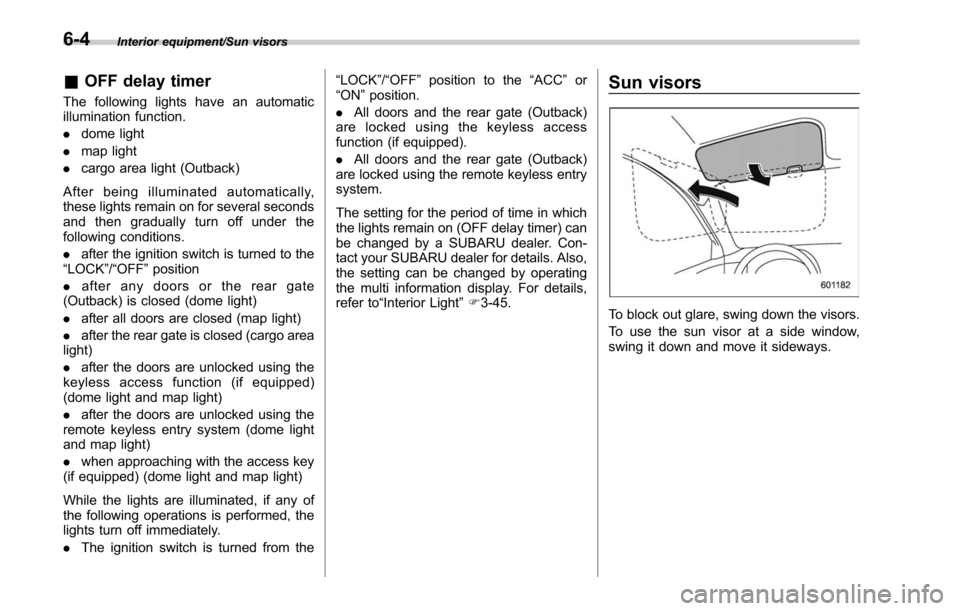
Sun visors
To block out glare, swing down the visors.
To use the sun visor at a side window,
swing it down and move it sideways.
6-4
Page 429 of 610
Starting and operating/BSD/RCTA
tected.
The indicator light will
flash to warn the
driver of dangers under the following
conditions.
. While the indicator light is illuminating,
if the turn signal lever is operated toward
the side in which this light turned on
. When reversing the vehicle while the
system detects a vehicle approaching
from either side
! BSD/RCTA approach indicator
light dimming function
When the headlights are turned on, the
brightness of the BSD/RCTA approach
indicator light will be reduced.
NOTE
. You may have difficulty seeing the
BSD/RCTA approach indicator light
under the following conditions.
–When sunlight shines directly on
it
– When the headlight beams from a
vehicle traveling behind shines di-
rectly on it
. While the illumination brightness
control dial is in the fully upward
position, even if the headlights are
turned on, the brightness of the BSD/
RCTA approach indicator light will not
be reduced. For details about the illumination brightness control dial,
refer to
“Illumination brightness con-
trol” F3-55.
! BSD/RCTA approach warning buz-
zer (only when reversing)
A warning buzzer sounds along with
flashing of the BSD/RCTA approach in-
dicator light to warn the driver of dangers.
The setting of the warning buzzer volume
can be changed by operating the multi
information display of the combination
meter. For details, refer to “BSD/RCTA”
F 3-45.
! Safety tips regarding the BSD/RCTA
approach indicator light/warning
buzzer
. In the following cases, operation of the
BSD/RCTA approach indicator light and
the warning buzzer may be delayed or the
system may fail to issue these warnings.
–Whenavehiclemovestothe
neighboring lane from a lane next to
the neighboring lane
– When driving on a steep incline or
on repeated sharp uphill and downhill
grades
– When going beyond a pass
– When both your vehicle and a
vehicle driving on a neighboring lane
are driving on the far side of each lane. –
When several narrowly-spaced ve-
hicles are approaching in a row
– In low radius bends (tight bends or
when making turns at an intersection)
– When there is a difference in height
between your lane and the neighbor-
ing lane
– Immediately after the BSD/RCTA is
activated by pressing the BSD/RCTA
OFF switch
– Immediately after the shift lever/
select lever is shifted to the “R ”
position
– When extremely heavy cargo is
loaded in the trunk or cargo area
. During reversing, operation of the BSD/
RCTA approach indicator light and the
warning buzzer may be delayed or the
system may fail to issue these warnings
under the following conditions.
–When backing out of an angled
parking space
– When a large-sized vehicle is
parked next to your vehicle (That
vehicle prevents the propagation of
radar waves.)
– When reversing on sloped roads
– When reversing at a high speed
7-58
Page 441 of 610
Starting and operating/Reverse Automatic Braking System
When the OFF setting is shown, the
corresponding setting is OFF.
Touch and hold the OFF setting key to turn
the setting ON.
When the Reverse Automatic Braking
system and/or the object detection warn-
ing beeping sounds are turned OFF, the
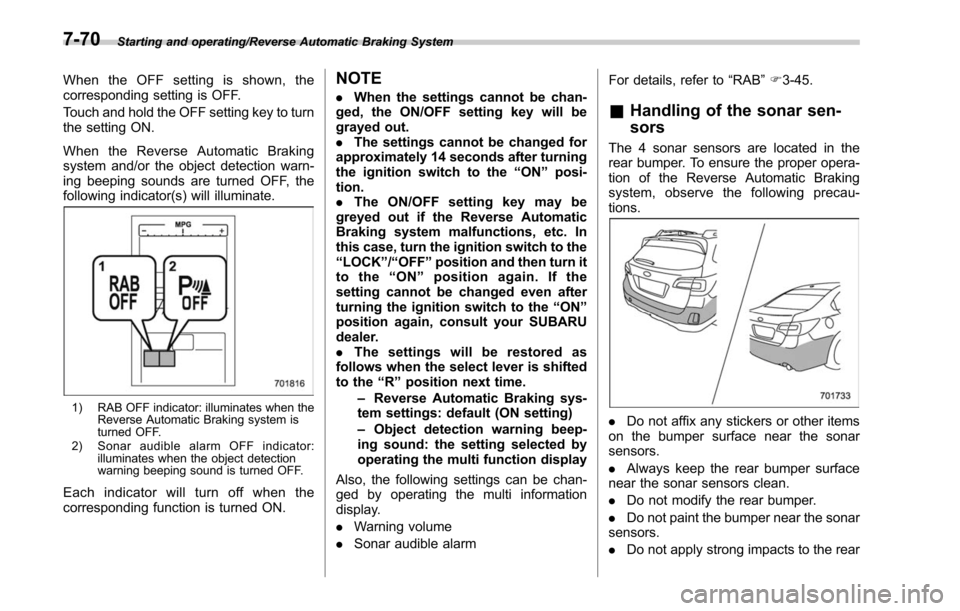
following indicator(s) will illuminate.
1) RAB OFF indicator: illuminates when theReverse Automatic Braking system is
turned OFF.
2) Sonar audible alarm OFF indicator: illuminates when the object detection
warning beeping sound is turned OFF.
Each indicator will turn off when the
corresponding function is turned ON.
NOTE
.When the settings cannot be chan-
ged, the ON/OFF setting key will be
grayed out.
. The settings cannot be changed for
approximately 14 seconds after turning
the ignition switch to the “ON ”posi-
tion.
. The ON/OFF setting key may be
greyed out if the Reverse Automatic
Braking system malfunctions, etc. In
this case, turn the ignition switch to the
“ LOCK ”/“ OFF ”position and then turn it
to the “ON ”position again. If the
setting cannot be changed even after
turning the ignition switch to the “ON ”
position again, consult your SUBARU
dealer.
. The settings will be restored as
follows when the select lever is shifted
to the “R ” position next time.
– Reverse Automatic Braking sys-
tem settings: default (ON setting)
– Object detection warning beep-
ing sound: the setting selected by
operating the multi function display
Also, the following settings can be chan-
ged by operating the multi information
display.
. Warning volume
. Sonar audible alarm For details, refer to
“RAB”F 3-45.& Handling of the sonar sen-
sors
The 4 sonar sensors are located in the
rear bumper. To ensure the proper opera-
tion of the Reverse Automatic Braking
system, observe the following precau-
tions.
. Do not affix any stickers or other items
on the bumper surface near the sonar
sensors.
. Always keep the rear bumper surface
near the sonar sensors clean.
. Do not modify the rear bumper.
. Do not paint the bumper near the sonar
sensors.
. Do not apply strong impacts to the rear
7-70