buttons SUBARU OUTBACK 2020 Getting Started Guide
[x] Cancel search | Manufacturer: SUBARU, Model Year: 2020, Model line: OUTBACK, Model: SUBARU OUTBACK 2020Pages: 132, PDF Size: 5.99 MB
Page 13 of 132
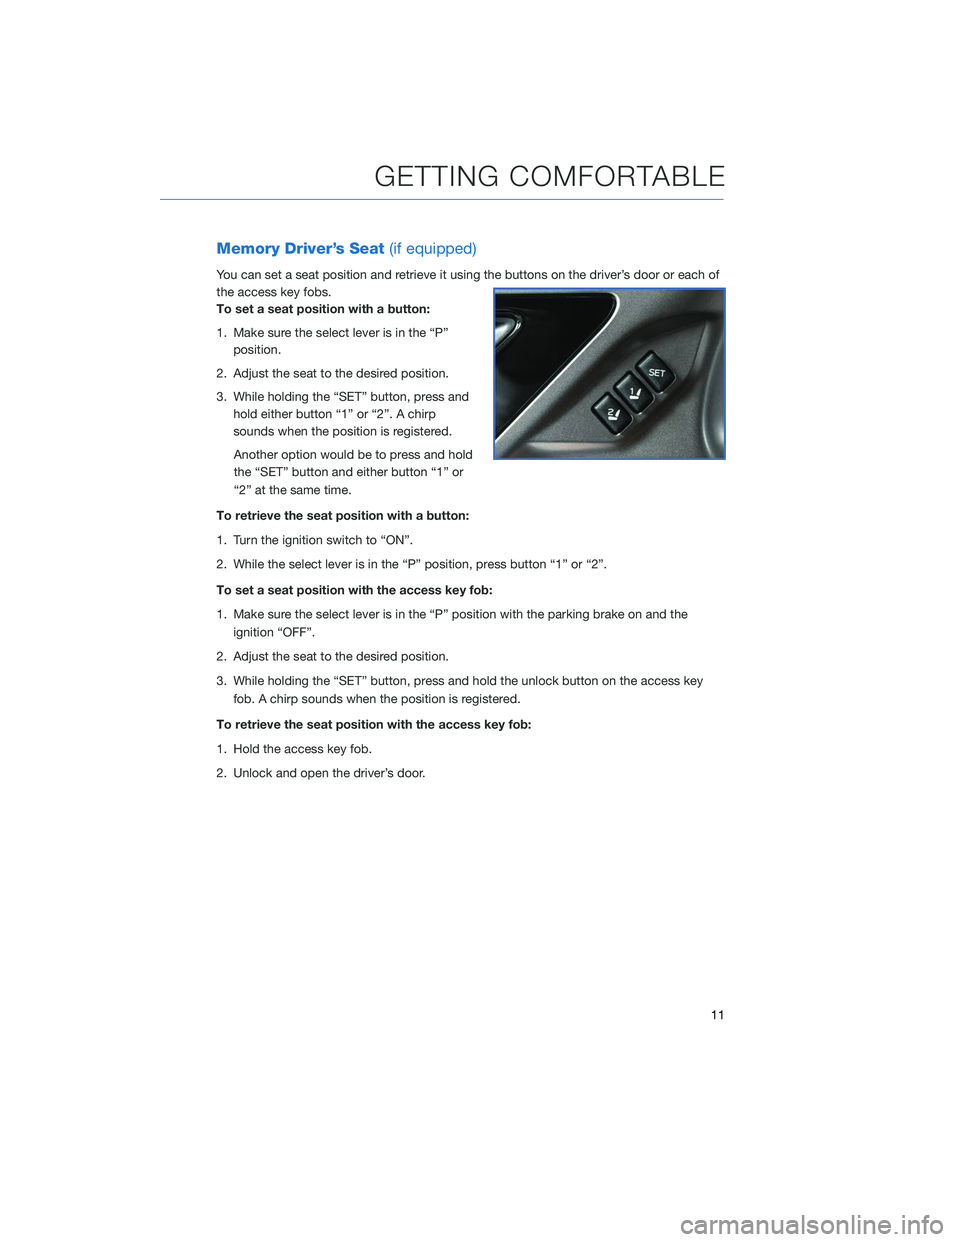
Memory Driver’s Seat(if equipped)
You can set a seat position and retrieve it using the buttons on the driver’s door or each of
the access key fobs.
To set a seat position with a button:
1. Make sure the select lever is in the “P”
position.
2. Adjust the seat to the desired position.
3. While holding the “SET” button, press and hold either button “1” or “2”. A chirp
sounds when the position is registered.
Another option would be to press and hold
the “SET” button and either button “1” or
“2” at the same time.
To retrieve the seat position with a button:
1. Turn the ignition switch to “ON”.
2. While the select lever is in the “P” position, press button “1” or “2”.
To set a seat position with the access key fob:
1. Make sure the select lever is in the “P” position with the parking brake on and the ignition “OFF”.
2. Adjust the seat to the desired position.
3. While holding the “SET” button, press and hold the unlock button on the access key fob. A chirp sounds when the position is registered.
To retrieve the seat position with the access key fob:
1. Hold the access key fob.
2. Unlock and open the driver’s door.
GETTING COMFORTABLE
11
Page 17 of 132
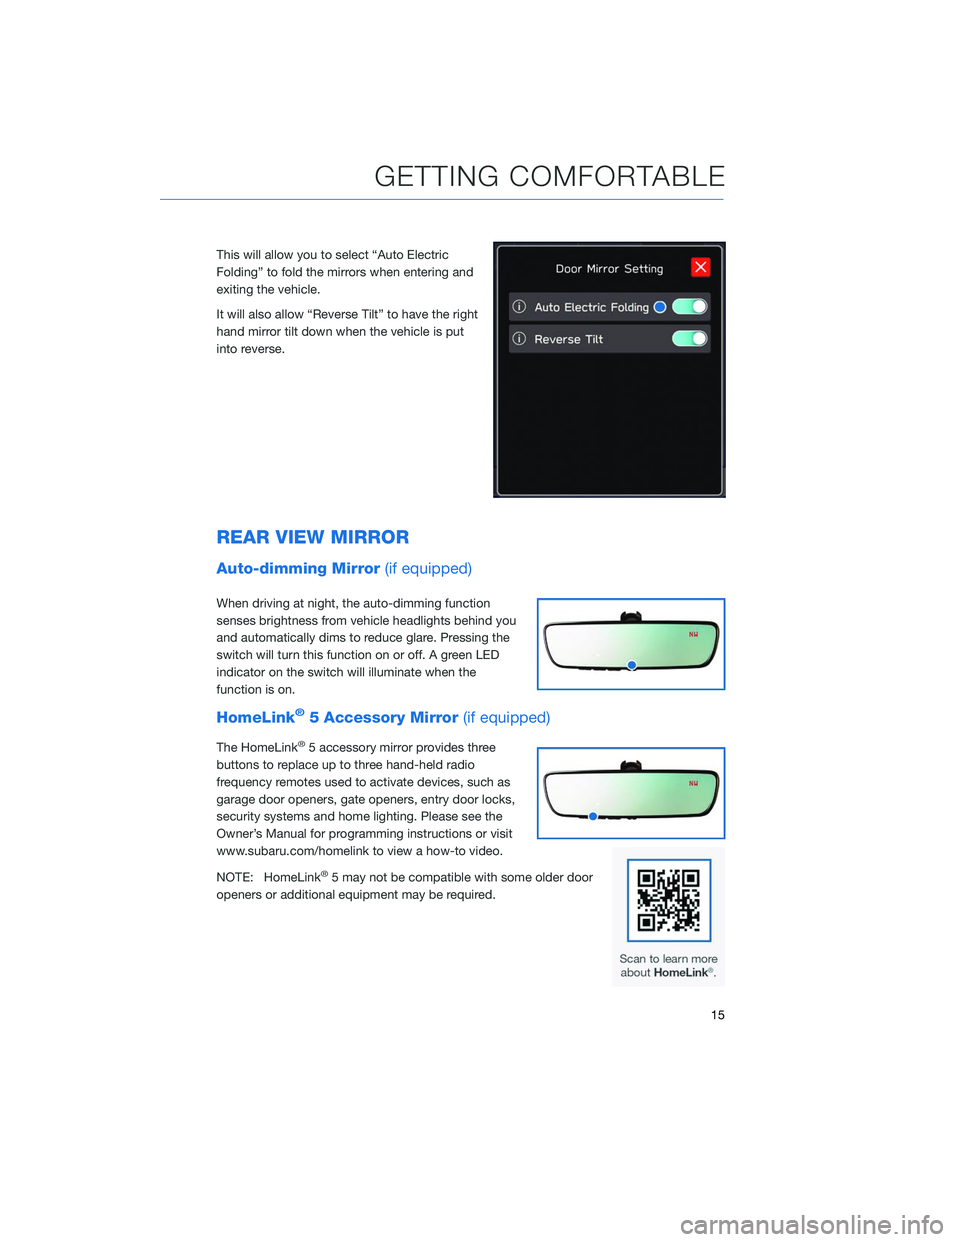
This will allow you to select “Auto Electric
Folding” to fold the mirrors when entering and
exiting the vehicle.
It will also allow “Reverse Tilt” to have the right
hand mirror tilt down when the vehicle is put
into reverse.
REAR VIEW MIRROR
Auto-dimming Mirror(if equipped)
When driving at night, the auto-dimming function
senses brightness from vehicle headlights behind you
and automatically dims to reduce glare. Pressing the
switch will turn this function on or off. A green LED
indicator on the switch will illuminate when the
function is on.
HomeLink®5 Accessory Mirror(if equipped)
The HomeLink®5 accessory mirror provides three
buttons to replace up to three hand-held radio
frequency remotes used to activate devices, such as
garage door openers, gate openers, entry door locks,
security systems and home lighting. Please see the
Owner’s Manual for programming instructions or visit
www.subaru.com/homelink to view a how-to video.
NOTE: HomeLink
®5 may not be compatible with some older door
openers or additional equipment may be required.
GETTING COMFORTABLE
15
Page 19 of 132
CLIMATE CONTROL SYSTEM
11.6–Inch Automatic Climate Control
You can set separate temperatures for the
driver and front passenger. Set your desired
temperature and let the system automatically
make the adjustments for you while you
control the fan speed or let the system have
full control in the Full Auto mode. At any time,
you can manually take control of the climate
settings.
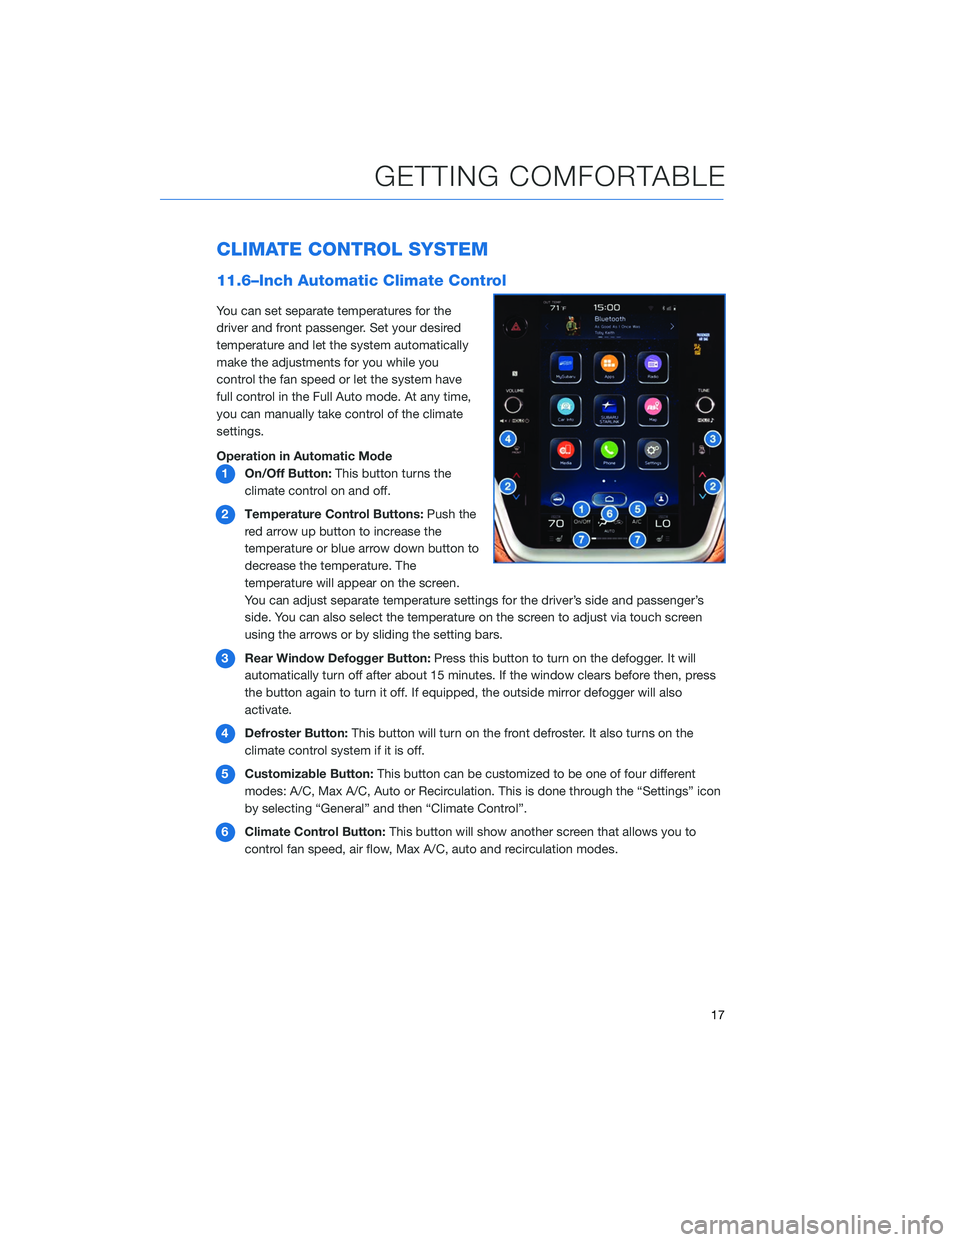
Operation in Automatic Mode1 On/Off Button: This button turns the
climate control on and off.
2 Temperature Control Buttons: Push the
red arrow up button to increase the
temperature or blue arrow down button to
decrease the temperature. The
temperature will appear on the screen.
You can adjust separate temperature settings for the driver’s side and passenger’s
side. You can also select the temperature on the screen to adjust via touch screen
using the arrows or by sliding the setting bars.
3 Rear Window Defogger Button: Press this button to turn on the defogger. It will
automatically turn off after about 15 minutes. If the window clears before then, press
the button again to turn it off. If equipped, the outside mirror defogger will also
activate.
4 Defroster Button: This button will turn on the front defroster. It also turns on the
climate control system if it is off.
5 Customizable Button: This button can be customized to be one of four different
modes: A/C, Max A/C, Auto or Recirculation. This is done through the “Settings” icon
by selecting “General” and then “Climate Control”.
6 Climate Control Button: This button will show another screen that allows you to
control fan speed, air flow, Max A/C, auto and recirculation modes.
GETTING COMFORTABLE
17
Page 20 of 132
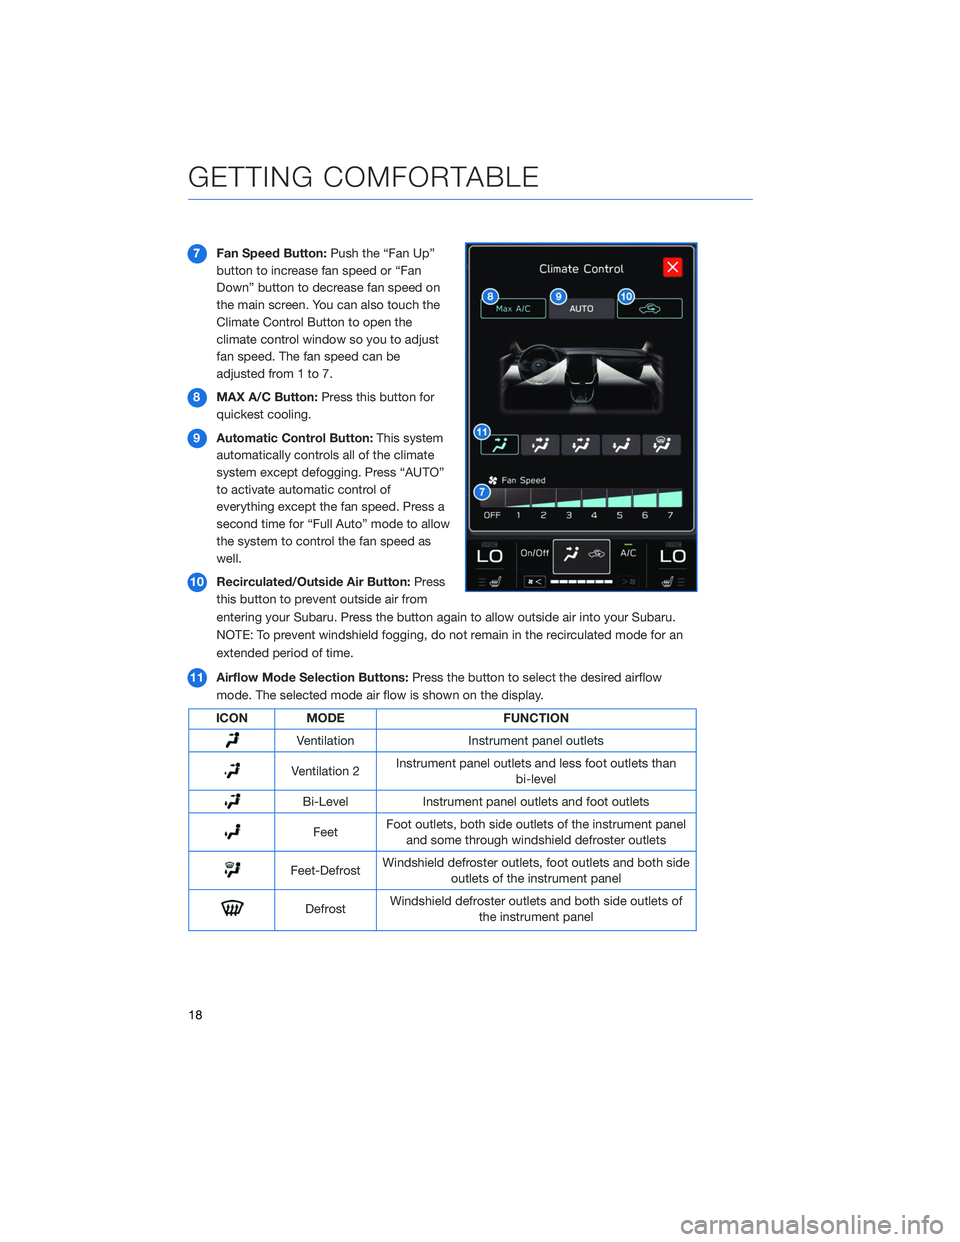
7Fan Speed Button: Push the “Fan Up”
button to increase fan speed or “Fan
Down” button to decrease fan speed on
the main screen. You can also touch the
Climate Control Button to open the
climate control window so you to adjust
fan speed. The fan speed can be
adjusted from 1 to 7.
8 MAX A/C Button: Press this button for
quickest cooling.
9 Automatic Control Button: This system
automatically controls all of the climate
system except defogging. Press “AUTO”
to activate automatic control of
everything except the fan speed. Press a
second time for “Full Auto” mode to allow
the system to control the fan speed as
well.
10 Recirculated/Outside Air Button: Press
this button to prevent outside air from
entering your Subaru. Press the button again to allow outside air into your Subaru.
NOTE: To prevent windshield fogging, do not remain in the recirculated mode for an
extended period of time.
11 Airflow Mode Selection Buttons: Press the button to select the desired airflow
mode. The selected mode air flow is shown on the display.
ICON MODE FUNCTION
VentilationInstrument panel outlets
Ventilation 2Instrument panel outlets and less foot outlets than
bi-level
Bi-Level Instrument panel outlets and foot outlets
FeetFoot outlets, both side outlets of the instrument panel
and some through windshield defroster outlets
Feet-Defrost Windshield defroster outlets, foot outlets and both side
outlets of the instrument panel
Defrost Windshield defroster outlets and both side outlets of
the instrument panel
GETTING COMFORTABLE
18
Page 22 of 132
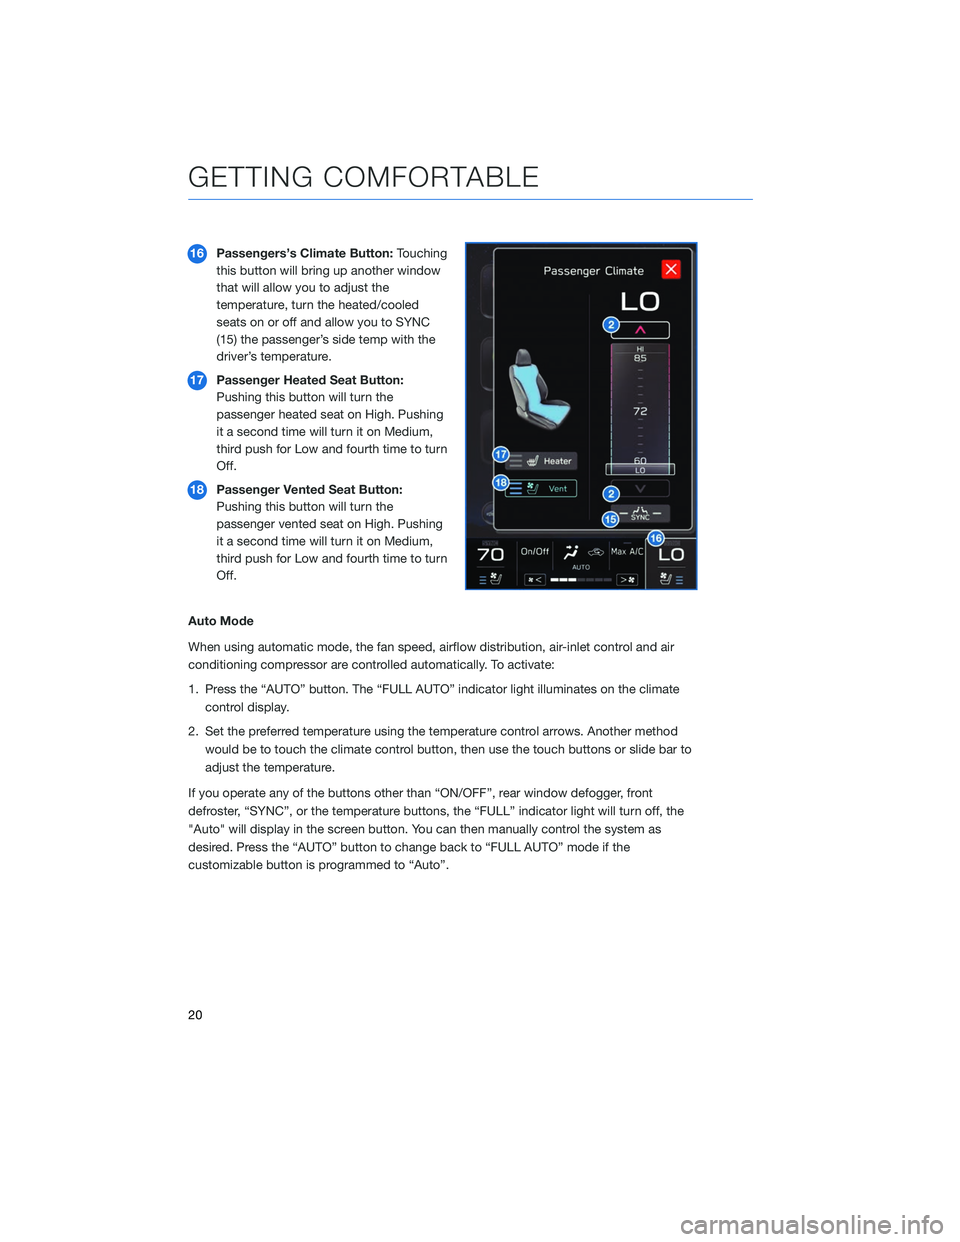
16Passengers’s Climate Button: Touching
this button will bring up another window
that will allow you to adjust the
temperature, turn the heated/cooled
seats on or off and allow you to SYNC
(15) the passenger’s side temp with the
driver’s temperature.
17 Passenger Heated Seat Button:
Pushing this button will turn the
passenger heated seat on High. Pushing
it a second time will turn it on Medium,
third push for Low and fourth time to turn
Off.
18 Passenger Vented Seat Button:
Pushing this button will turn the
passenger vented seat on High. Pushing
it a second time will turn it on Medium,
third push for Low and fourth time to turn
Off.
Auto Mode
When using automatic mode, the fan speed, airflow distribution, air-inlet control and air
conditioning compressor are controlled automatically. To activate:
1. Press the “AUTO” button. The “FULL AUTO” indicator light illuminates on the climate control display.
2. Set the preferred temperature using the temperature control arrows. Another method would be to touch the climate control button, then use the touch buttons or slide bar to
adjust the temperature.
If you operate any of the buttons other than “ON/OFF”, rear window defogger, front
defroster, “SYNC”, or the temperature buttons, the “FULL” indicator light will turn off, the
"Auto" will display in the screen button. You can then manually control the system as
desired. Press the “AUTO” button to change back to “FULL AUTO” mode if the
customizable button is programmed to “Auto”.
GETTING COMFORTABLE
20
Page 23 of 132
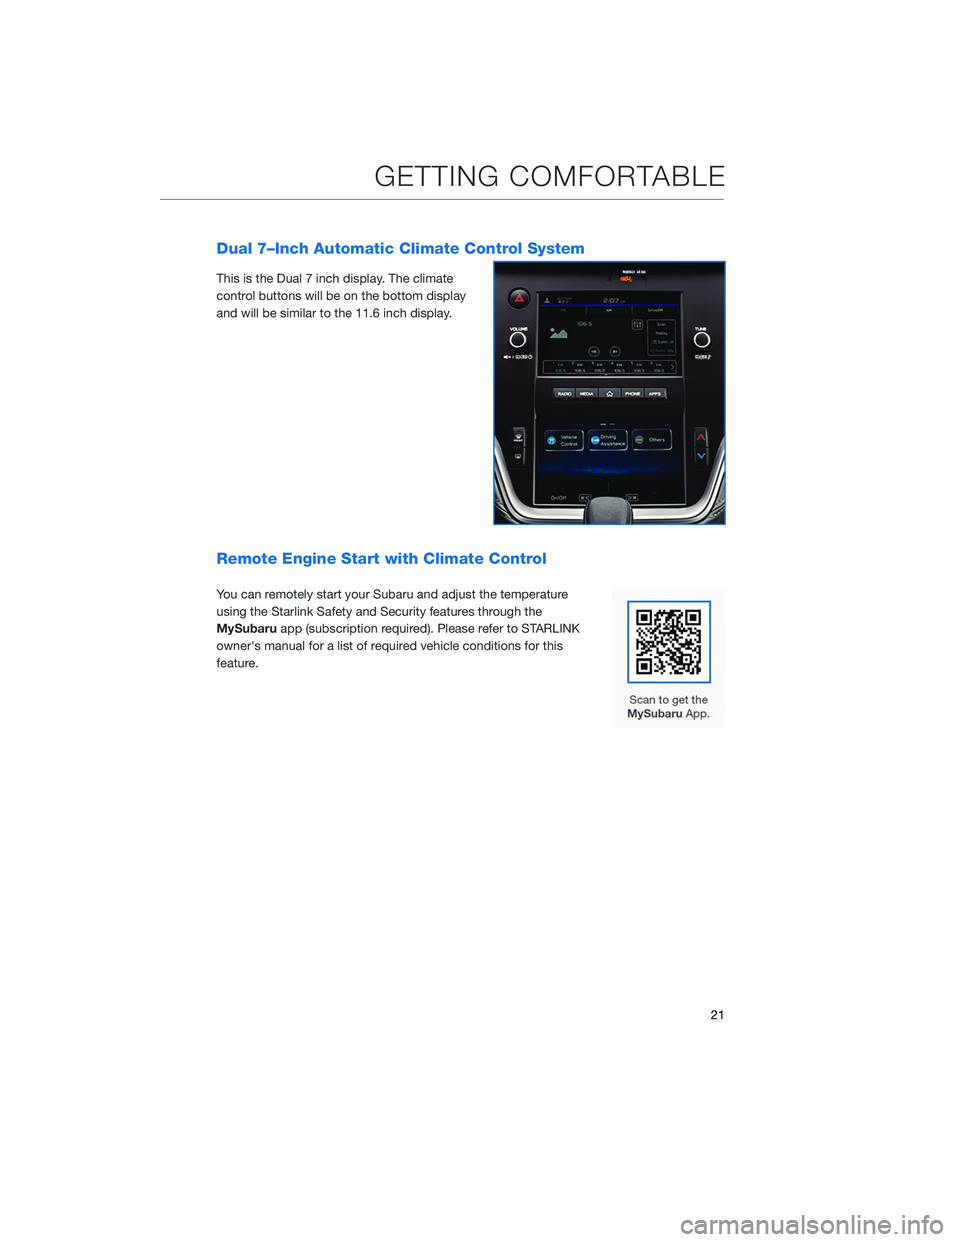
Dual 7–Inch Automatic Climate Control System
This is the Dual 7 inch display. The climate
control buttons will be on the bottom display
and will be similar to the 11.6 inch display.
Remote Engine Start with Climate Control
You can remotely start your Subaru and adjust the temperature
using the Starlink Safety and Security features through the
MySubaruapp (subscription required). Please refer to STARLINK
owner's manual for a list of required vehicle conditions for this
feature.
GETTING COMFORTABLE
21
Page 54 of 132
OVERVIEW OF YOUR MULTIMEDIA SYSTEM
SUBARU STARLINK™ Multimedia combines the radio along with the ability to connect
your phone* through Bluetooth®to the radio for making calls, sending text messages and
listening to your favorite songs that are on your phone.
* *Compatible smartphone and application required. For applications to operate, latest version of each application required. Data provided by smartphone is displayed on the Touchscreen. Some state laws
prohibit the operation of handheld electronic devices while operating a vehicle. Smartphone apps
should only be launched when vehicle is safely parked. Your wireless carrier’s rates may apply.
Various Systems
Depending on your model and trim level, there are several types of SUBARU STARLINK™
Multimedia systems. Some of the functions described in this guide will vary by system.
• Dual 7–inch Multimedia
• 11.6–inch Multimedia Plus
• 11.6–inch Multimedia Navigation
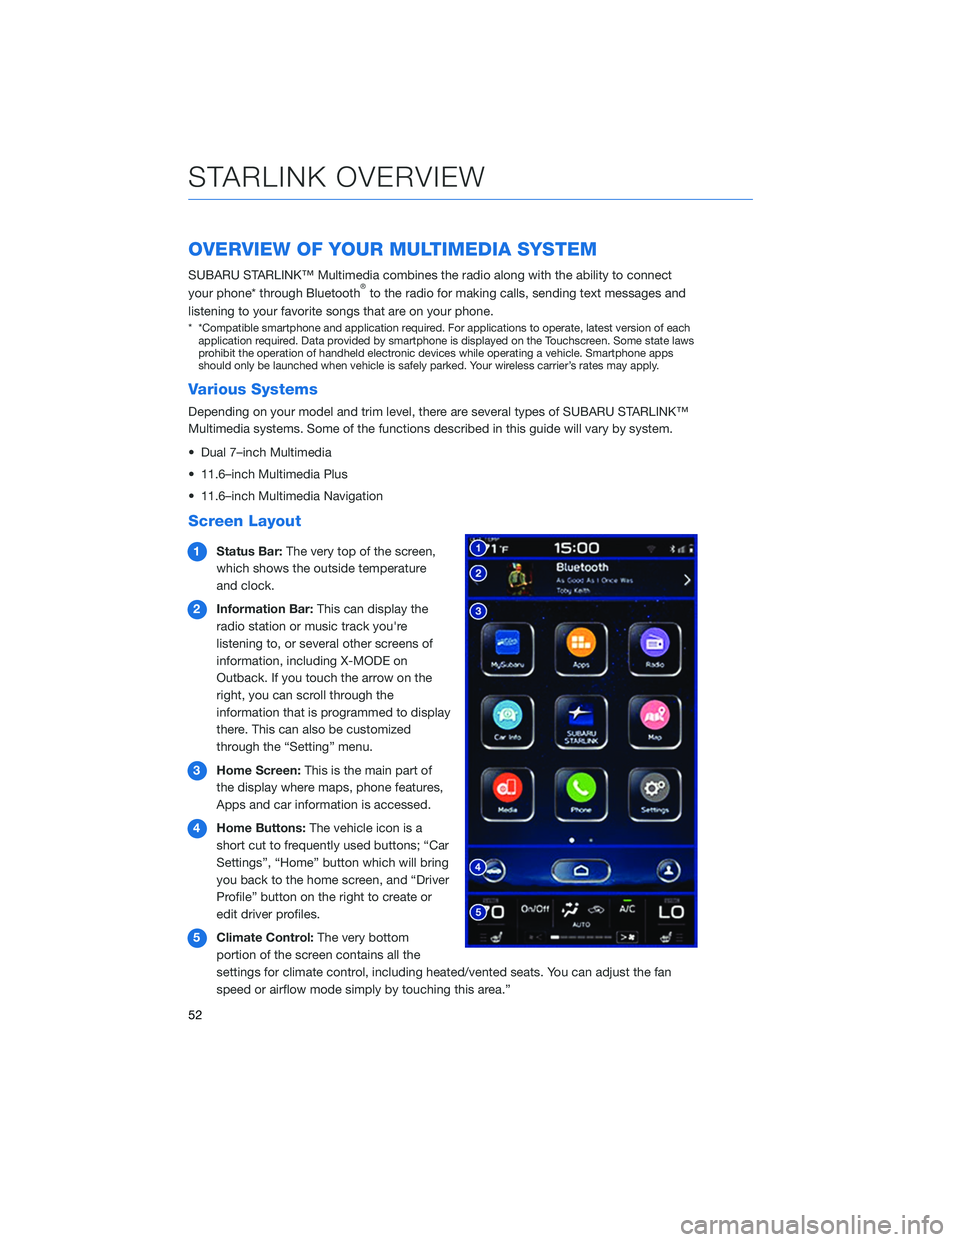
Screen Layout
1 Status Bar: The very top of the screen,
which shows the outside temperature
and clock.
2 Information Bar: This can display the
radio station or music track you're
listening to, or several other screens of
information, including X-MODE on
Outback. If you touch the arrow on the
right, you can scroll through the
information that is programmed to display
there. This can also be customized
through the “Setting” menu.
3 Home Screen: This is the main part of
the display where maps, phone features,
Apps and car information is accessed.
4 Home Buttons: The vehicle icon is a
short cut to frequently used buttons; “Car
Settings”, “Home” button which will bring
you back to the home screen, and “Driver
Profile” button on the right to create or
edit driver profiles.
5 Climate Control: The very bottom
portion of the screen contains all the
settings for climate control, including heated/vented seats. You can adjust the fan
speed or airflow mode simply by touching this area.”
STARLINK OVERVIEW
52
Page 55 of 132
BUTTONS
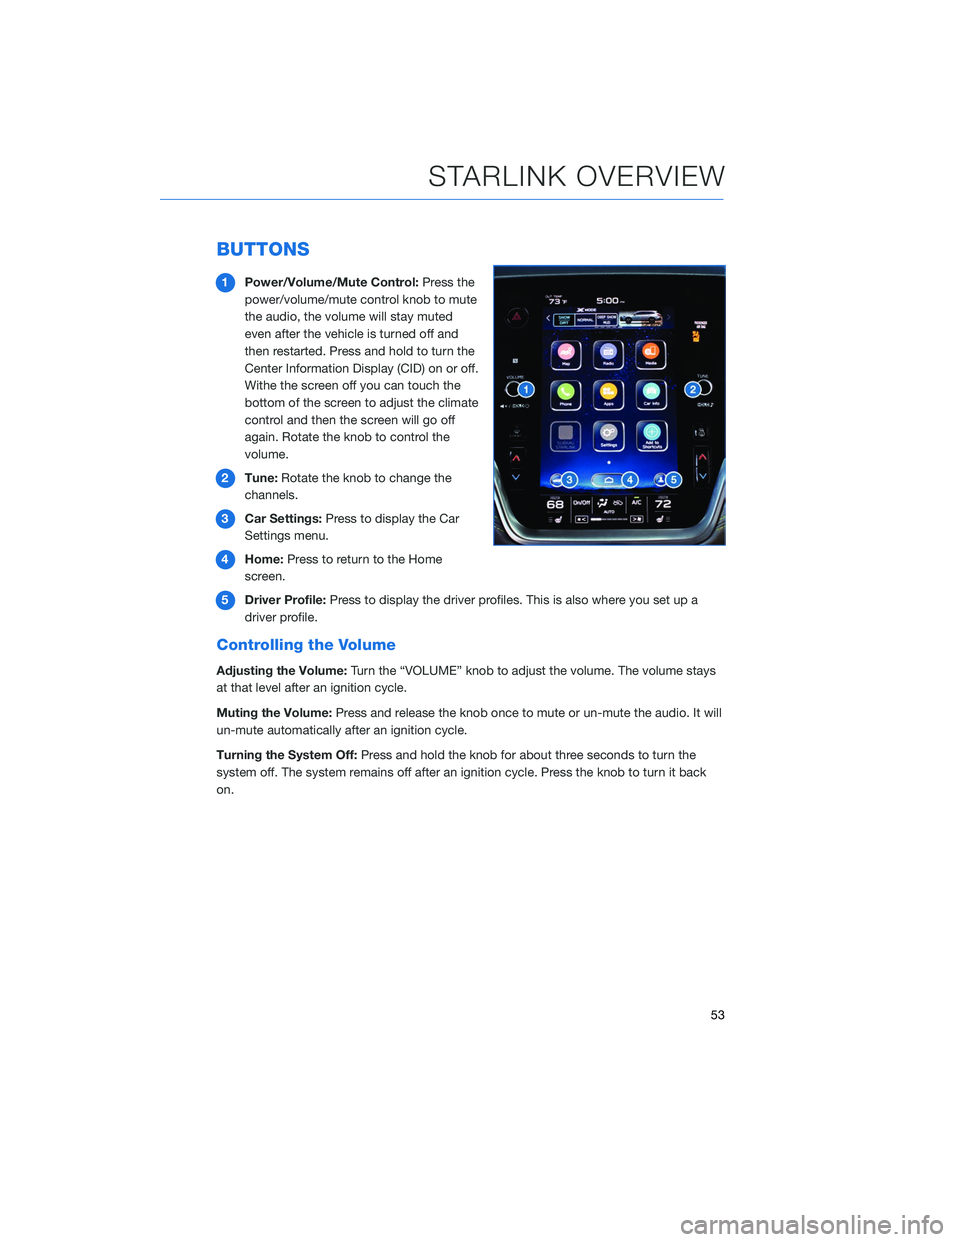
1Power/Volume/Mute Control: Press the
power/volume/mute control knob to mute
the audio, the volume will stay muted
even after the vehicle is turned off and
then restarted. Press and hold to turn the
Center Information Display (CID) on or off.
Withe the screen off you can touch the
bottom of the screen to adjust the climate
control and then the screen will go off
again. Rotate the knob to control the
volume.
2 Tune: Rotate the knob to change the
channels.
3 Car Settings: Press to display the Car
Settings menu.
4 Home: Press to return to the Home
screen.
5 Driver Profile: Press to display the driver profiles. This is also where you set up a
driver profile.
Controlling the Volume
Adjusting the Volume: Turn the “VOLUME” knob to adjust the volume. The volume stays
at that level after an ignition cycle.
Muting the Volume: Press and release the knob once to mute or un-mute the audio. It will
un-mute automatically after an ignition cycle.
Turning the System Off: Press and hold the knob for about three seconds to turn the
system off. The system remains off after an ignition cycle. Press the knob to turn it back
on.
STARLINK OVERVIEW
53
Page 69 of 132
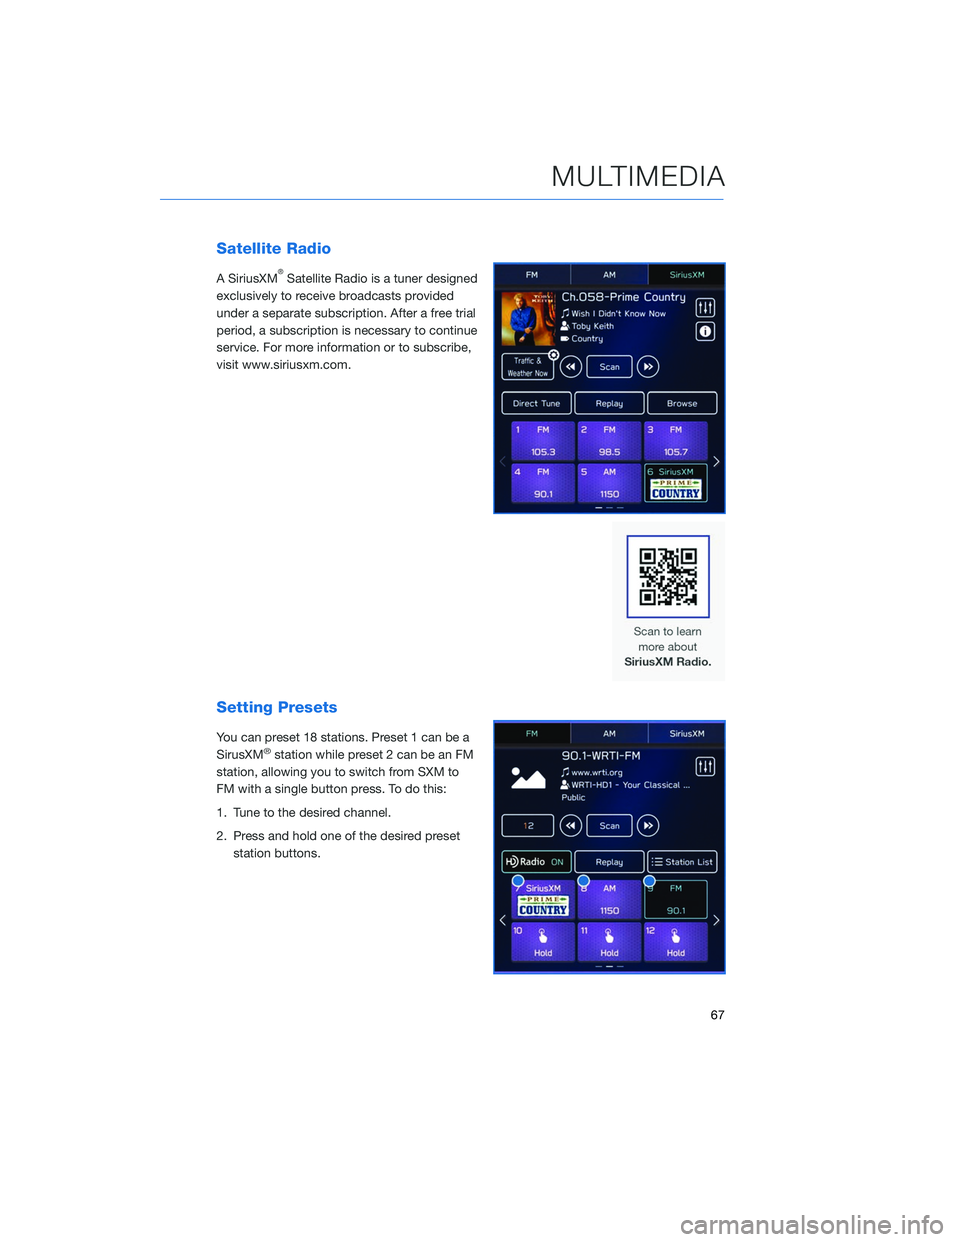
Satellite Radio
A SiriusXM®Satellite Radio is a tuner designed
exclusively to receive broadcasts provided
under a separate subscription. After a free trial
period, a subscription is necessary to continue
service. For more information or to subscribe,
visit www.siriusxm.com.
Setting Presets
You can preset 18 stations. Preset 1 can be a
SirusXM®station while preset 2 can be an FM
station, allowing you to switch from SXM to
FM with a single button press. To do this:
1. Tune to the desired channel.
2. Press and hold one of the desired preset station buttons.
MULTIMEDIA
67
Page 80 of 132
THE SUBARU STARLINK™ EXPERIENCE
STARLINK Safety and Security services* are designed to help in your time of need. These include
Advanced Automatic Collision Notification, Enhanced Roadside Assistance, Stolen Vehicle
Recovery, the added convenience of Remote Engine Start with Climate Control, and so much more.
With the SUBARU STARLINK™ system integrated into your vehicle, advanced safety and
security technology is just a button press away. The SUBARU STARLINK™ experience
includes in-vehicle call center support, maintenance and diagnostic alerts as well as
remote services that keep you connected to your Subaru vehicle.
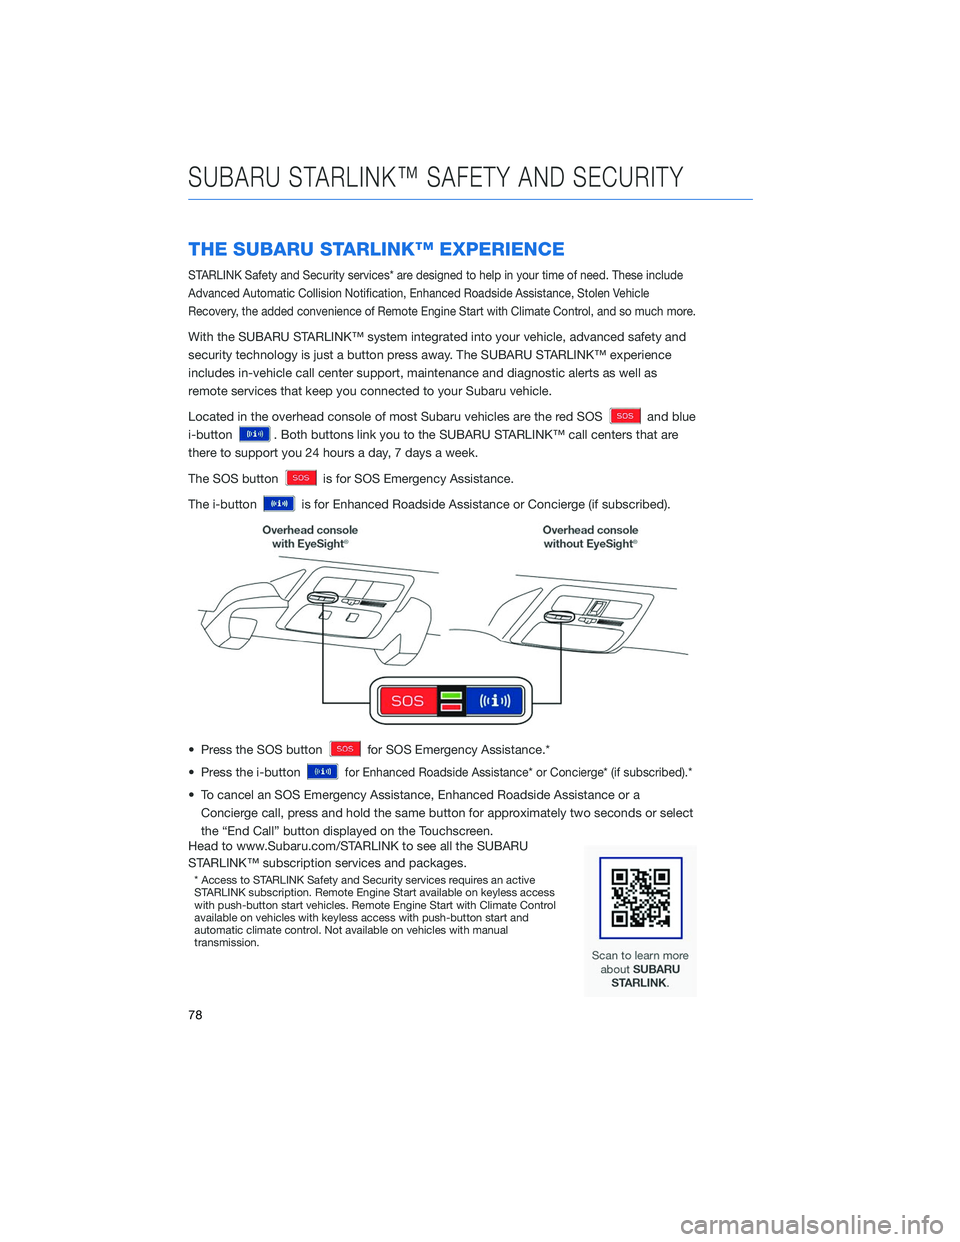
Located in the overhead console of most Subaru vehicles are the red SOS
and blue
i-button
. Both buttons link you to the SUBARU STARLINK™ call centers that are
there to support you 24 hours a day, 7 days a week.
The SOS button
is for SOS Emergency Assistance.
The i-button
is for Enhanced Roadside Assistance or Concierge (if subscribed).
• Press the SOS button
for SOS Emergency Assistance.*
• Press the i-button
for Enhanced Roadside Assistance* or Concierge* (if subscribed).*
• To cancel an SOS Emergency Assistance, Enhanced Roadside Assistance or a Concierge call, press and hold the same button for approximately two seconds or select
the “End Call” button displayed on the Touchscreen.
Head to www.Subaru.com/STARLINK to see all the SUBARU
STARLINK™ subscription services and packages.
* Access to STARLINK Safety and Security services requires an active
STARLINK subscription. Remote Engine Start available on keyless access
with push-button start vehicles. Remote Engine Start with Climate Control
available on vehicles with keyless access with push-button start and
automatic climate control. Not available on vehicles with manual
transmission.
SUBARU STARLINK™ SAFETY AND SECURITY
78